1
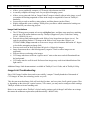
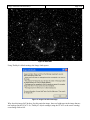
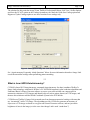
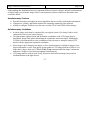
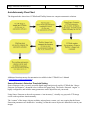
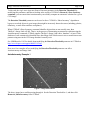
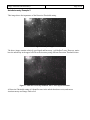
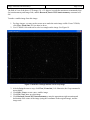
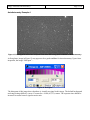
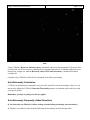
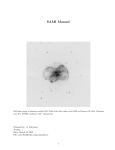
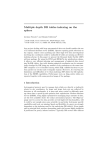
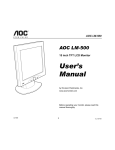
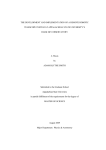
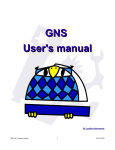
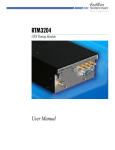
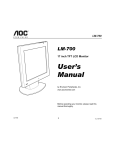
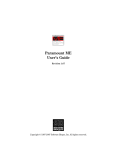
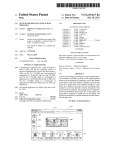
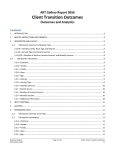
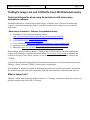
Image Link and AutoAstrometry
Page 1/18
TheSky6’s Image Link and CCDSoft’s Insert WCS/AutoAstrometry
Technical information when using these features with observatory
automation software
Automated observatory control using Software Bisque’s TheSky6 and CCDSoft as the underlying
“engine” is becoming increasingly popular, fueled by a number of new (and not so new) software
applications.
“Observatory Automation” Software (in alphabetical order):
• Automapper II (free telescope mapping software
(http://www.newastro.com/newastro/downloads/automap2/default.htm)
• Browser Astronomy (www.bisque.com/ibisque)
• CCDAutoPilot (http://www.ccdware.com)
• CCD Commander (http://www.astromatt.com/Software/CCDCommander.html)
• Orchestrate Scripting Software (http://www.bisque.com/products/Orchestrate)
• SBScripter (http://www.minorplanetobserver.com/htms/mpoconx.htm)
When configured to use Software Bisque’s TheSky6 and CCDSoft software, the above applications
employ Software Bisque’s standard automation model (www.bisque.com/scripting) to automate the
control of telescopes, filter wheels, cameras, as well as access tools and features from TheSky6 and
CCDSoft.
Two of the most powerful (and perhaps the least understood) features used by automation software are
TheSky6’s Image Link and CCDSoft’s AutoAstrometry technologies.
This document is intended to explain the underlying processes used by these two features, and address
the common issues that arise when using Image Link and AutoAstrometry with automation software.
What is Image Link?
TheSky6’s Image Link technology identifies stars in a CCD image, and then uses these stars to precisely
align the simulated star field to the CCD image.
Page 2/18
Image Link and AutoAstrometry
Figure 1: TheSky6's Virtual Sky
Figure 2: CCD image of the Horsehead
Nebula.
At the left is a screen of TheSky6’s Virtual Sky showing the “simulated” star field near
IC 434. The CCD image on the right is the Horsehead Nebula. Manually matching the
simulated star field to the CCD image can be a difficult task.
Figure 3: "Image Linked" image.
The Image Link Wizard automatically scales, rotates and mirrors (where necessary)
TheSky6’s simulated star field to match the stars in the CCD image.
Image Link Advantages
• Very powerful, works with a broad range of CCD images and image scales.
Image Link and AutoAstrometry
•
•
•
•
•
Page 3/18
Allows you to graphically compare a CCD image with a known star field.
Accurately computes the image scale for your optical/imaging system.
Allows you to point and click on “Image Linked” image to identify objects in the image, as well
as compare the limiting magnitude of stars in the image to magnitudes of stars in TheSky6’s
databases.
Locate objects such as satellites, minor planets, and faint planets (such as Pluto).
Highly configurable source catalogs. TheSky6 lets you choose which astronomical catalogs are
best suited for your observing projects.
Image Link Limitations
• The CCD image must contain at least six well-defined stars, and these stars must have matching
stars in one of the stellar databases used by TheSky6 (Hipparcos/Tycho, Guide Star Catalog,
UCAC, USNO B 1.0, etc.).
• Does not always find pattern matches with fields of view larger than one degree (or so). For
optical systems that produce CCD images with fields of view larger than 1 degree, use
CCDSoft’s Edit | Crop command to create a new image with a maximum dimension of 1 degree
or less before attempting an Image Link.
• Does not work well on small (less than 100 pixels x 100 pixels) images.
• Image format must have a black background (“negative” black on white images are not
supported).
• Does not always work using color images.
• CCD image must have sufficient “signal to noise” ratio so that stars can be differentiated from
the background.
• CCD image must be well focused. Defocused star images may result in misidentification of the
light sources.
Additional Image Link documentation is available in TheSky6 User’s Guide, and in TheSky6’s Help.
Image Link Troubleshooting
Since 1996, Image Link has been used to successfully “compare” literally hundreds of thousands of
CCD images. In short, the technology works very well.
This does not mean that Image Link will work the first time, and every time for all optical systems. That
is, depending on the telescope’s optical system, CCD camera, you may need to configure which catalogs
TheSky6 searches to locate matching stars.
Below is an example where TheSky6’s default catalog settings result in Image Link failure on an image
that meets the minimum requirements (and theoretically “should” link).
Page 4/18
Image Link and AutoAstrometry
Figure 4: NGC 6888
Using TheSky6’s default settings, the Image Link reports:
Figure 5: Image Link failed message.
Why does this image fail? In short, for this particular image, there are bright stars in the image that are
not cataloged in the UCAC2. So, TheSky6’s default settings (using the UCAC2 as the source catalog)
cause Image Link to fail.
Page 5/18
Image Link and AutoAstrometry
The solution for this particular image? From TheSky6 Professional Edition, click View | Stellar Options
and clear the UCAC2 option on the Catalogs/Astrometry tab. Mark the Guide Star Catalog option and
Hipparcos/Tycho Catalogs option to use stars from these two catalogs only.
Figure 6: Catalogs/Astrometry tab of the Stellar Options dialog box.
See “AutoAstrometry Frequently Asked Questions” below for more information about how Image Link
uses different stellar catalogs when performing pattern matching.
***
What is Insert WCS/AutoAstrometry?
CCDSoft’s Insert WCS/AutoAstrometry command (AutoAstrometry for short) combines TheSky6’s
Image Link technology with Patrick Wallace’s PC-ASTROM astrometric plate reduction algorithms and
Emmanuel Bertin’s Source Extractor software to create a powerful tool that can compute precise
astrometric solutions of CCD images and identify objects (such as minor planets) in CCD images, and
then use this solution to add the World Coordinate System to the FITS header.
CCDSoft uses TheSky6’s Image Link to match stars from known astronomical catalogs with stars that
are “inventoried” in the CCD image. The algorithms used by CCDSoft to generate an inventory of
objects on a CCD image are based on very powerful Source Extractor software, and not just on the
brightness of stars in the image (as is the case when Image Link is used “stand alone”).
Page 6/18
Image Link and AutoAstrometry
Understanding this fundamental and very important difference between Image Link and AutoAstrometry
is helpful when you encounter Image Link or AutoAstrometry failures, and need to determine what
caused the failure.
AutoAstrometry Features
• Powerful astrometry and object inventory algorithms that are used by professional astronomers.
• Ultra-precise, reliable, and flexible method for computing astrometric plate solutions.
• Ability to configure TheSky6 to use the more accurate UCAC and USNO stellar catalogs.
AutoAstrometry Limitations
• Accurate image scale must be computed for your optical system. (Use Image Link to easily
compute the scale of your optical system.)
• The approximate right ascension and declination coordinates of the CCD image must be
determined. Image Link makes determining the coordinates somewhat simple. Additionally,
CCDSoft will automatically use the coordinates of the telescope to stamp the images FITS
header with the appropriate equatorial coordinates.
• Since Image Link is limited to one degree or less, AutoAstrometry is limited to images of one
degree and smaller as well. If an optical system produces CCD images that have fields of view
larger than 1 degree, then use CCDSoft’s Edit | Crop command make the image’s maximum
dimension 1 degree or less before attempting AutoAstrometry.
• CCD image must be well focused. Poorly focused or defocused star images may result in
misidentification of the light sources.
***
Image Link and AutoAstrometry
Page 7/18
AutoAstrometry Flow Chart
The diagram below shows how CCDSoft and TheSky6 interact to compute astrometric solutions.
Additional AutoAstrometry documentation is available in the CCDSoft User’s Manual
(www.bisque.com/documentation).
Source Extractor’s Detection Threshold Setting
Source Extractor is the extremely powerful digital image analysis tool used by CCDSoft (the “Source
Extractor for Dummies” document alone is almost 100 pages long). The Source Extractor “engine” is
highly configurable, and includes many parameters can be adjusted to suit your needs.
Using Source Extractor as the tool to generate a “star inventory”, virtually any grayscale CCD image
can be used to perform AutoAstrometry.
The “content” of the image (clusters, nebulae, minor planets, comets, etc.) may require that the Source
Extraction parameters are modified or “tweaking” so that the correct objects are identified as star in your
images.
Page 8/18
Image Link and AutoAstrometry
To this end, the single most important Source Extractor parameter is the Detection Threshold. By
modifying this parameter, and then to looking at the results of CCDSoft’s Research | Show Inventory
command, you can ensure that AutoAstrometry can reliably compute an astrometric solution for a given
CCD image.
The Detection Threshold parameter can be used to force CCDSoft’s “Show Inventory” algorithm to
bypass or overlook objects in your images that might be incorrectly detected as stars (including galaxies,
nebulosity, or trails from satellites or airplanes).
When CCDSoft’s Show Inventory command identifies objects that are not actually stars, then
TheSky6’s Image Link will fail. That is, in the process of determining an astrometric solution using the
AutoAstrometry command, CCDSoft supplies TheSky6’s Image Link with a “database” of stars. If this
database of stars contains mis-identified stars, then Image Link fails because it tries to match known star
patterns using stars in the CCD image that don’t actually exist.
See: SBKB article 1192 for details about modifying the Detection Threshold parameter in CCDSoft at
http://www.bisque.com/support/sbkb2/1192.asp
Here are a few examples of how modifying the Detection Threshold parameter can affect
AutoAstrometry and Image Link.
AutoAstrometry Example 1
Figure 7: Image with satellite.
The above image has a satellite passing through it. Set the Detection Threshold to 1, and then click
Research | Show Inventory from CCDSoft.
Page 9/18
Image Link and AutoAstrometry
Figure 8: "Bad" inventory.
What’s wrong with this picture? When the Detection Threshold at set to 1, the Show Inventory
command misidentifies the streak in the image and creates a bogus inventory of “stars”. These “stars”
are then supplied to Image Link, and, Image Link fails because these “stars” do not really exist.
Figure 9: "Correct" inventory.
Change the Detection Threshold parameter from 5 to 10, and then click Research | Show Inventory
(you might have to do this twice if the Show Inventory command is marked). Notice that no stars are
detected in the “streak” and only true “stars” are identified.
Note: Even though AutoAstrometry is successful, this is a particularly poor image. It has very bad signal
to noise ratio (the dynamic range is 65 counts out of a possible 65535), and it is also “deficient” in stars
(about 6 are “inventoried”). In this case, a longer exposure is highly recommended.
Page 10/18
Image Link and AutoAstrometry
AutoAstrometry Example 2
This image shows the importance of the Detection Threshold setting.
Figure 10: Sample image.
The above image contains relatively good signal and has many “well-defined” stars. However, notice
how the nebulosity in the upper left affects the inventory using different Detection Threshold values.
Figure 11: Note the incorrectly identified "stars" in the upper left corner.
A Detection Threshold setting of 6 identifies stars in the nebula that do not exist, and causes
AutoAstrometry and Image Link to fail.
Image Link and AutoAstrometry
Page 11/18
Figure 12: Changing the detection threshold correctly identifies stars in the nebula.
A Detection Threshold setting of 30 correctly identifies the stars in the nebula; AutoAstrometry and
Image Link will now succeed (provided the correct image scale is used).
AutoAstrometry Example 3
Figure 13: Sample image of NGC7331 region (1.8 x 1.2 degrees)
Image Link and AutoAstrometry
Page 12/18
The field of view of the above CCD image (1.8 x 1.2 degrees) exceeds the maximum recommended size
for AutoAstrometry and Image Link, and the Research | Insert WCS/AutoAstrometry command will
fail.
To make a smaller image from this image:
1. For large images, you may need to zoom out to make the entire image visible. From CCDSoft,
click View | Zoom Out | 1:3 (or other) to do so.
2. Use CCDSoft’s Selection tool to select a rectangle on the image. See Figure 14.
Figure 14: Selection rectangle defines area to crop image.
3. After defining the area to crop, click View | Zoom Out | 1:1. Otherwise, the Crop command is
not available.
4. Click Edit | Crop to create a new, smaller image.
5. Click File | Save As to save this image.
6. Click Research | Insert WCS/AutoAstrometry, enter the approximate right ascension and
declination of the center of the image (using the coordinates in the original image), and the
image scale.
Page 13/18
Image Link and AutoAstrometry
AutoAstrometry Example 4
Figure 15: Poor signal-to-noise ratio and poor focus make this a very poor candidate for AutoAstrometry.
At first glance, image in Figure 15 may appear to be a good candidate for AutoAstrometry. Upon closer
inspection, the image “falls apart”…
Figure 16: Histogram
The histogram of this image shows that there is virtually no signal in this image. The default background
and range settings differ by a mere 65 counts for a 16-bit (65,353) camera. The exposure time should be
increased to ensure better a signal-to-noise ratio.
Image Link and AutoAstrometry
Page 14/18
Figure 17: Same image after adjusting the range or "white point"
After increasing the range (that is, increasing the “white point” in the image), another very important
deficiency is revealed, specifically that the image is way out of focus. Notice the donut-looking stars.
Image Link and AutoAstrometry
Page 15/18
Figure 18: Multiple light sources (indicated by two red dots) are detected for individual “out of focus”
stars.
Using CCDSoft’s Research | Show Inventory command (with a detection threshold of 10), notice that
several of the out of focus stars are identified as two separate light sources! If multiple light sources are
detected for a single star, then the Research | Insert WCS/AutoAstrometry command will almost
certainly fail.
Consider using CCDSoft’s @Focus2 for automated focus before proceeding.
AutoAstrometry Conclusion
CCDSoft’s AutoAstrometry command is very powerful, and will work on most images. However, you
may need to adjust the CCDSoft’s Detection Threshold parameter to determine what works best with
your optical system.
Remember: garbage in, garbage out always applies.
AutoAstrometry Frequently Asked Questions
Q. In what order are TheSky6’s stellar catalogs searched when performing AutoAstrometry?
A. TheSky6’s searches for stars from the following stellar catalogs, in the following order:
Page 16/18
Image Link and AutoAstrometry
Catalog Name
UCAC Star Catalog
USNO B 1.0 (subset, above 40 degrees declination)
USNO A2.0
USNO B1.0 (80 GB dataset)
Comment
Most accurate coordinates
Hubble Guide Star Catalog
Hipparcos/Tycho Catalog
Least accurate coordinates
Fewest stars
TheSky6 allows you to include or exclude any stellar catalog from this search. To do so, click View |
Stellar Options and then click the | Catalogs Astrometry tab, and then clear the desired Charting or
Astrometry databases.
Additional TheSky6 Stellar Catalog Comments
•
•
•
•
•
•
•
TheSky6 version 6.0.0.35 and later, when performing an Image Link, attempts to use brighter
stars from the GSC and fainter stars from the UCAC and USNO B1.0 (subset) catalogs (that is,
TheSky6's core databases only) in the Image Link pattern matching algorithm. This makes Image
Link more reliable.
TheSky6 does not combine brighter stars from the GSC and fainter stars from “non-core stellar
catalogs” (USNO A2.0, USNO B1.0 80 GB catalog).
The USNO A2.0 stellar catalog contains only “faint” stars. If you attempt to use this catalog
exclusively (by turning of the GSC and UCAC/USNO B1.0 catalogs), and your image contains
brighter stars that are not included in the USNO A2.0, the Image Link and AutoAstrometry will
most likely fail.
For best accuracy, astrometric calculations should use a single star catalog (and not “mix” stars
from multiple catalogs). Therefore CCDSoft's AutoAstrometry algorithms, when attempting to
match known catalogs from TheSky6, use stars from a particular catalog, such as the UCAC, or
USNO, but not both.
TheSky6 supports the latest star catalogs that give much more precise astrometric solutions.
That's the purpose of AutoAstrometry.
TheSky6 supports a wide number of star catalogs, and uses all of them, to determine the plate
solutions and perform Image Links.
If TheSky6 is configured correctly, (that is, all star catalogs are used), then the user has the best
of both worlds, flexible star catalog support, and precise astrometric calculations.
Q. What makes an image suitable for AutoAstrometry?
A. A suitable image should have at least six well-defined stars (sufficient signal, sufficient exposure
time), and have a field of view of less than one degree.
Image Link and AutoAstrometry
Page 17/18
Figure 19: A poor candidate for AutoAstrometry
The above image is a very poor candidate for AutoAstrometry. There is virtually no signal (no dynamic
range) and very few “well-defined” stars. A longer exposure will help.
Note: Even using this poor data, AutoAstrometry is successful.
Q. How can I modify the Source Extraction parameters used to generate the inventory of stars?
A. See the following support article for details about accessing the Source Extraction parameters:
http://www.bisque.com/support/sbkb2/1192.asp. The Source Extraction Setup dialog box in the
CCDSoft Help file contains additional resources and information.
Best Practices
Image Link and AutoAstrometry work very well to reliable determine accurate astrometric solutions
using a wide range of optical systems. If you’re encountering failures, then proper configuration of
TheSky6’s stellar catalogs and CCDSoft’s source extraction parameters is crucial.
For best results, you need to answer the following question: “How are you planning to use
AutoAstrometry and Image Link?”
•
•
•
•
•
•
Make sure your images are well focused before attempting an Insert WCS/AutoAstrometry.
Make sure that your image scale is accurate (binning, different optical systems, etc. will alter the
image scale.)
Make sure the images have “sufficient” dynamic range. 1000 counts for a 16 bit camera may be
insufficient. The solution is to use a longer exposure.
If it is to perform reliable telescope mapping, then turn on all stellar catalogs in TheSky6. That
is, there is absolutely no reason to try to use a particular catalog for automated telescope
mapping. The inventory of stars supplied by CCDSoft’s source extraction to TheSky6 will be
compared to stars in any/all of the following star catalogs that are available (and turned on),
including Hipparcos/Tycho, Guide Star Catalog, UCAC, USNO B1.0 (subset), UNSO A2.0.
If the goal is to compute precision astrometric solutions, then use the UCAC and USNO B1.0
star catalogs. These catalogs have more precise positions that the GSC or USNO catalogs,
resulting in more accurate astrometry.
If your optical system produces wide field images that contain hundreds (or thousands) of stars,
you may need to increase Source Extractor’s “Detection Threshold” parameter so that fewer stars
are “inventoried” in order to find a successful astrometric solution.
Image Link and AutoAstrometry
•
Page 18/18
If your optical system produces a field of view that is larger than one degree in any one
dimension, then you may need to reduce the size of the image before performing
AutoAstrometry.