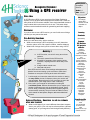
1
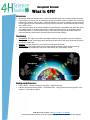
Geospatial Science:
What Is GPS?
Objectives
Main Idea
•
The Global Positioning System is a system of satellites, ground control
units and receivers. A GPS can pinpoint a user’s location to within just a
few feet.
Motivator
Global positioning systems are everywhere, whether you know it or not.
Everyone from farmers to fighter jet pilots use the technology. If you’ve
ever looked at someone’s home address on an internet map, you’ve
used it too!
Pre-Activity Questions
Before you start the activity, ask the students:
Who do you think originated the concept of a GPS? (U.S. Army)
Did you know that a pizza delivery driver inspired the first GPS for
use in cars?
When someone asks you where you live in relation to school, have
you ever answered with a time — about 20 minutes away?
Activity 1
You Measure Distance with a Clock?
Sup
s
pl i e
Activity Series:
Geospatial
Science
Grade: 3-6
Time: 60 min
Five volunteers (a “satellite”, a “signal”, two “hikers”
and a “timer”)
Stopwatch (watch, clock with a second hand, cell
phone with a timer, etc)
1. The “satellite” should close his/her eyes while one of the “hikers”
stands some distance away. The “signal” will stand by the
“satellite”.
2. When everyone is ready, the “signal” leaves the “satellite” and
walks (do not run) to the “hiker.” When the signal reaches the
“hiker,” the “signal will yell out “stop!” Have the “timer” time how
long it takes for the signal to reach the hiker from the satellite.
3. Have the “satellite” keep their eyes closed and repeat this process with the other “hiker. This time, the “hiker” should be a different distance (twice as far or half as far is good) from the
“satellite.”
4. Can the satellite tell which of the two “hikers” is further away?
How?(By noting how long it is until the signal says “stop.”)
Science Checkup - Questions to ask to evaluate what
was learned
What is the formula for speed? (Distance divided by time, i.e. miles/
hour or meters/second)
It is important for the signal to be traveling at the same speed at all
times. What would happen if the signal were to speed up or slow
down? (Errors in the distance between the satellite and the hiker.)
Learn what
global positioning systems are used
for and how
they work
Learning
Standards
(See Matrix)
Common
SET Abilities
4-H projects
address:
Predict
Hypothesize
Evaluate
State a Problem
Research Problem
Test
Problem Solve
Design Solutions
Develop Solutions
Measure
Collect Data
Draw/Design
Build/Construct
Use tools
Observe
Communicate
Organize
Infer
Question
Plan Investigation
Summarize
Invent
Interpret
Categorize
Model/Graph
Troubleshoot
Redesign
Optimize
Collaborate
Compare
Contributed By
James Hooper,
NYS
4-H Geospatial
Science Team
IRIS
Department of Crop
and Soil Science
Geospatial Science:
What Is GPS?
Activity 2
What is trilateration?
p
Sup
lies
Three pieces of rope of different lengths (Between 10 - 25 feet long)
Sidewalk chalk
Four temporary place markers (pieces of tape, cones, etc)
Six volunteers (three “satellites” and three “signals”)
Large open area where you can
Satellite 1
draw with chalk on the floor or
Setup:
ground
Do this before the students arrive:
1. Use a temporary place marker in the center
of a large open area.
2. Lay each of the three ropes on the floor,
starting from the original place marker and
radiating out in different directions.
3. At the end of each rope, put another place
marker. Then, pick up the ropes and lay
each rope in a pile, near its far end place
marker. Pick up the center place marker.
Satellite
Satellite 2
int
ypo
Wa
With the students:
1. Each of the three “satellites” should stand on
one of the three place markers and pick up
one end of the rope.
2. Each “signal” should pick up the other end of
the rope, and walk in a circle around the satellite, drawing this path on the ground with
the chalk.
3. Each of these circles represents the area
where a hiker could be.
4. After the first circle is drawn, the waypoint
could be anywhere on that circle.
5. After the second circle is drawn, the hiker
could only be in the area where the two circles intersect.
6. The point where all three circles cross is the
location of the waypoint and should be the
same as your original center place marker.
Temporary
Science Checkup- Questions to ask to evaluate what was learned
Why is it important to u se three satellites when trying to find your location? (The points where two
signals cross could be thousands of miles apart in real life. If you only had one signal, your hiker
could be anywhere along the arc.)
Would it make a difference if your GPS receiver was able to pick up signals from more than three
satellites?
Using the distance from three different points in order to determine your exact location is called
what? (Trilateration! It is how GPS receivers figure out where you are! “Tri” come from the Latin
tres word for three, while “lateral” comes from the Latin latus, meaning sides).
Find this activity and more at: http://nys4h.cce.cornell.edu
Cornell Cooperative Extension is an equal opportunity, affirmative action educator and employer.
Geospatial Science:
What Is GPS?
Extensions
•
•
Sometimes, obstacles interfere with the path of the satellite signal. Have another student represent
a skyscraper or a canyon wall, by standing in the field somewhere near the “satellite” but not directly
between the “satellite” and the “hiker.” When the signal is sent from the “satellite,” the signal should
bounce (gently!) off of the obstacle before going out to its normal arc. Would this affect the accuracy
of the GPS? How?
There are some layers of the earth’s atmosphere (specifically, the ionosphere) that affect the speed
of a satellite signal. To illustrate this, have the “signal” crab-walk a portion of the distance. What
effect does that have? In the real GPS system, accurately surveyed ground stations determine
correction factors to take this into account and provide accurate readings.
Vocabulary
•
•
•
Ionosphere: The region of the earth's atmosphere between the stratosphere and the exosphere,
consisting of several ionized layers and extending from about 50 to 250 miles (80 to 400 km) above
the surface of the earth.
Satellite: A device designed to be launched into orbit around the earth.
Trilateration: The measurement of three unique distances between points for the purpose of
establishing relative positions of the points. Illustrated by the yellow beams, below.
satellite
exosphere
ionosphere
stratosphere
Background Resources
•
•
Hinch, Steven. “Outdoor Navigation with GPS.” Wilderness Press.
Latham, Lawrence and Alex Lathem. “GPS Made Easy: Using Global Positioning Systems in the
Outdoors.” Mountaineers Books.
Find this activity and more at: http://nys4h.cce.cornell.edu
Cornell Cooperative Extension is an equal opportunity, affirmative action educator and employer.
Geospatial Science:
Geocaching
Objectives
Main Idea
•
Geocaching is a fun and exciting activity using the Global Positioning
System (GPS) to explore the great outdoors. Imagine a giant treasure
hunt with thousands of treasure boxes hidden all over the world! It’s fun
for everyone and it’s a great way to get exercise and make new friends in
the geocaching community!
Motivator
As of the writing of this Toolkit, there are more than 1 million geocaches
hidden all over the world, and more than 65,000 geocachers registered at
www.geocaching.com. Those numbers are growing every day!
Pre-Activity Questions
Before you start the activity, ask the students:
When you head out on the trail, what should you bring with you? (first
aid kit, water bottle, snacks, GPS receiver, map, compass, etc.)
What kind of clothing do you think would be appropriate for an
outing? (Long pants, long sleeves, boots and clothes that can get
dirty)
Activity 1
p
Sup
lies
Activity Series:
Geospatial
Science
Grade: 3-6
Time: 60 min.
A GPS receiver (GPSr), ideally one unit for every
two to three students
A variety of weatherproof containers of different
shapes and sizes
An outdoor natural area, ideally a blend of natural
areas including forest and field, but any outdoor
area will do.
There are many kinds of geocaches but the simplest type is known
as a “traditional” geocache.
1. Dig through your recycling bin at home to find a few different
plastic containers that have good, sturdy lids. Butter tubs,
whipped cream containers, or other similar containers make fine
temporary geocaches. (Later, if you decide to hide a permanent
geocache, you will want something much sturdier and weatherresistant.) Be sure to include a log book, or at least a strip of
paper in a plastic bag, in your geocache.
2. Make a visit to a large outdoor space such as a local park, or a
friend’s big backyard.
3. Using a GPSr, take a walk and find a good place to hide your
container. You will want to put it in a spot where it will blend in to
the environment. You might want to paint it a dark color, or cover
it with camouflage tape.
4. Once you have hidden the container, mark its location on your
GPSr. It’s a good idea to allow your GPSr to rest at the cache
To practice
more with
GPS units
by learning
about geocaching
Learning
Standards
(See Matrix)
Common
SET Abilities
4-H projects
address:
Predict
Hypothesize
Evaluate
State a Problem
Research Problem
Test
Problem Solve
Design Solutions
Develop Solutions
Measure
Collect Data
Draw/Design
Build/Construct
Use tools
Observe
Communicate
Organize
Infer
Question
Plan Investigation
Summarize
Invent
Interpret
Categorize
Model/Graph
Troubleshoot
Redesign
Optimize
Collaborate
Compare
Contributed By
James Hooper
NYS
4-H Geospatial
Science Team
IRIS
Department of Crop
and Soil Science
Geospatial Science:
Geocaching
location for a few minutes before you actually mark the location, so you can get the most
accurate coordinates possible.
4. Share the coordinates of your geocache with your friends. Next time they are in the area, they
can try to find the geocache that you have hidden! When you find a geocache, sign your
nickname in the log book to prove that you found it.
5. If you plan to leave your cache in place for more than a few days, it’s a good idea to use
something sturdier than a recycled butter tub. Lock-n-Lock containers and surplus military
ammunitions cans make good sturdy geocaches for more durable hides. Take a look at “Rules
For Hiding A Geocache” for suggestions on hiding any long-term cache.
Science Checkup - Questions to ask to evaluate what was learned
Would you consider geocaching a healthy form of exercise? Why or why not? (Yes! It’s a good
way to get outside, enjoy the fresh air, and stretch your legs.)
Do you think geocaching has an impact on the environment? If so, is it a positive or a negative
impact? Can you think of at least one positive and one negative? (Geocaching can have both
positive and negative impacts. One benefit is that it can raise our awareness for the environment,
the negative impact can come when geocachers trample vegetation creating new trails where there
were none. It is important to take care of our environment.)
Activity 2
p
Sup
lies
A GPS receiver (GPSr), ideally one unit for every two to three students
Computer with internet connection
With more than 1 million caches hidden all over the globe, the world is your playground with
geocaching! Plan a geocaching trip with some friends or family members at a local park.
1. First, you need to find the coordinates of official geocaches. There are a few different Web sites
that list geocaches, but the largest one is www.geocaching.com. You will need to create a free
user account to get started.
2. Once you have logged into the Web site, enter your zip code in the “Hide and Seek a
Geocache” box. You will see a list of geocaches near you. Browse through the list, clicking on
geocaches that sound interesting and take a look at the detailed cache description. Look for
these things:
• Difficulty and terrain ratings. Rated from one to five stars, these will give you a feel for
how difficult the cache will be to find. Start simple and work your way up to more
complex caches.
• What kind of cache is it? Traditional caches are the most common, but there are many
different variations, so you will want to know what you are looking for. Check out the
site, http://www.geocaching.com/about/cache_types.aspx, for a detailed description of
the cache types that geocaching.com recognizes.
• What size is the cache? Caches range from very small to very large.
• Read the description. Sometimes the cache hider will give hints about the cache in the
Find this activity and more at: http://nys4h.cce.cornell.edu
Cornell Cooperative Extension is an equal opportunity, affirmative action educator and employer.
Geospatial Science:
Geocaching
description.
Look at the logs posted by the last people to find the cache. If the last four or five
people to look for a cache couldn’t find it, it could be missing. You can often learn a lot
from other people’s logs.
3. Take a family trip to the local park. Park the car, and hit the trail!
4. Once you get near a geocache, you may find that your receiver is giving you mixed signals.
Check out “loose bearings” in the vocabulary section.
5. When you finally find a cache, there are a couple of basic guidelines:
• Sign the log book. Use a nickname rather than your real name.
• Take something. Some caches will have trade items. These are there for other cachers
to take. Feel free to take one.
• Leave something. If you chose to take anything from the cache, you are also expected
to leave something behind. Some folks choose to leave trade items even when they
don’t take one. The rule of thumb is to trade equal or trade up! For example, if you take
a baseball, you should leave something of similar or greater value, like a small first aid
kit.
• Re-hide the cache in exactly the same spot you found it.
• When you return home, go back to the geocaching Web site and log your find. This
helps the owner and other geocachers to know that the cache is still in good shape.
•
Science Checkup - Questions to ask to evaluate what was learned
Sometimes when you find a geocache, your GPSr can still say that you are well over 30 feet away.
How is this possible? (GPS receivers are not perfect, and every unit has a small amount of error.
The unit used by the person who hid the geocache has a small unit or error, and your unit had error
when you found it, compounding to up to 50 feet of error at times!)
After you have found a few geocaches, write down a list of the different ways that caches have
been camouflaged. How has camouflage helped these caches survive? Can you think of any animals in nature that use camouflage to survive? (Squirrels are gray to hide in the trees. Stick bugs
are designed to look like branches)
Vocabulary
CITO: An acronym standing for Cache In, Trash Out. This ethic encourages geocachers to pick up litter
and trash and leave the environment cleaner than they found it.
Geocache: A weather-resistant container hidden in a public, outdoor place, with its coordinates recorded on a GPSr and shared with others.
GZ (Ground zero): The area in which a geocache is expected to be found. Typically GZ is an area of
approximately 30 feet around the actual cache.
Loose bearings: The point at which the direction on your GPSr no longer points in the correct direction, mostly because you've slowed down to a point that it doesn't know in which direction you're moving.
Muggle: A person who isn’t familiar with the game of geocaching (as in “There were a few muggles
around, so I decided to wait for them to leave before looking for the ‘cache.’ “)
Background Information
•
•
Geocache Listing Sites: www.earthcaching.com, www.geocaching.com, www.navicache.com
Geocache Hiding Guidelines: http://www.geocaching.com/about/guidelines.aspx
Find this activity and more at: http://nys4h.cce.cornell.edu
Cornell Cooperative Extension is an equal opportunity, affirmative action educator and employer.
Geospatial Science:
Geocaching
Rules for Hiding a Geocache
1. Be Respectful of the Environment: When you hide a cache, you may soon find a new trail of footprints from other geocachers, straight to your hide. Visitors to your cache could end up doing a lot
of damage if you place your cache next to a new bird’s nest, or some species of rare plant!
2. Be Respectful of Private Property: If you are hiding a cache on land that is not your own, be sure
to place it on public land. If you place a cache on private land, be sure to get permission first!
3. Never Bury a Geocache: You don’t want people digging up 30 feet of grass and leaves to find your
cache. See #1.
4. Don’t Hide A Cache Anywhere That it Could Cause Unnecessary Harm: If non-cachers were to
see someone poking around at the cache site, would they be panicked? You wouldn’t want to hide
a cache near a railroad track or under a bridge.
Find this activity and more at: http://nys4h.cce.cornell.edu
Cornell Cooperative Extension is an equal opportunity, affirmative action educator and employer.
Geospatial Science:
Using a GPS receiver
Activity Series:
Geospatial
Science
Grade: 3-6
Time: 60 min.
Main Idea
Objectives
A GPS Receiver (GPSr) is just one piece of the Global Positioning
System, but it’s the piece that most people are familiar with. There are
many kinds of GPS receivers available, from simple handheld models to
larger models with touch-screens for use in cars. This lesson helps
students use the handheld models for geocaching and basic mapping.
Motivator
To learn to
use a GPS
receiver to find
a location or
object
If you know how to use a GPS receiver, you can find all sorts of things
and find your way around the earth!
Learning
Standards
Pre-Activity Questions
(See Matrix)
Before you start the activity, ask the students:
What are some things a GPS could help you to do? (determine
direction, plan a route, find a specific location, measure distance)
What kinds of things would you like to learn about using a GPS?
Activity 1
p
Sup
•
lies
A GPS receiver, one unit for every two to three
students
The user’s manual for the GPS receiver
A handful of temporary place markers (cones,
Frisbees®, anything that won’t blow away in the
wind)
A large outdoor natural area
Note pad and pencil
Since GPS receivers have varied settings and appearances,
spend a few minutes setting up the receivers to make them
consistent so everyone is looking at the same information.
1. Look through your instruction manual for the section on setting
the map datum, the set of reference points your receiver will
use as its data. Be sure that all of your receivers are set to the
WGS84 Datum. (See “Map datum” under vocabulary.)
2. Now, look in your manual for information on setting the
coordinate format. Different formats allow you to express your
location in different ways, such as hemisphere (North, South,
East or West), followed by latitude and/or longitude (degrees,
minutes and/or seconds). Set your format to hddd mm.mmm,
which stands for hemisphere, degree, minutes and decimal
minutes.
Science Checkup - Questions to ask to evaluate
what was learned
What would happen if you used a different datum than someone
else in your group? (Your unit may be referenced from a different
starting point, so your waypoints could be significantly different.)
Common
SET Abilities
4-H projects
address:
Predict
Hypothesize
Evaluate
State a Problem
Research Problem
Test
Problem Solve
Design Solutions
Develop Solutions
Measure
Collect Data
Draw/Design
Build/Construct
Use tools
Observe
Communicate
Organize
Infer
Question
Plan Investigation
Summarize
Invent
Interpret
Categorize
Model/Graph
Troubleshoot
Redesign
Optimize
Collaborate
Compare
Contributed By
James Hooper,
NYS
4-H Geospatial
Science Team
IRIS
Department of Crop
and Soil Science
Geospatial Science:
Using a GPS receiver
What is the difference between formats? Why are there so many? (It’s kind of like fractions or
decimals, just different ways of saying the same thing. It’s typically a regional choice.)
Activity 2:
Where am I? Where are you?
The most basic functions of the receiver are to record your current location and to mark a
different location. Do you know where you are right now? Your receiver may not… YET!
1. Turn on your receiver and let it find the satellites overhead. Make sure there is nothing above
you (like a dense tree canopy), otherwise, the receiver may not connect to the satellites.
2. In your manual, find the section about how to record a waypoint.
3. Standing outside in a clear, open space, record your current location. Name this first
waypoint, “test.” You can delete this later, but for now, you’re just practicing. While you are
marking this location, take a look at the coordinates of the waypoint displayed on your GPS
unit. This will include a direction and degrees of longitude and latitude. On your note pad,
write down your coordinates.
4. Got the hang of it? Try it again! Move 50 steps away and try marking another waypoint.
Name this one “test 2.” On your note pad, write down the coordinates of this second
waypoint. Take a look at the coordinates of “test 2.” How do they compare to “test”? Are they
the same? If not, are they similar?
5. How accurate is a GPS receiver? Try this experiment to find out. Pick out a nearby landmark
(a water fountain, a light pole, etc.) or simply place a place-marker on the ground.
6. Have each member of the group take turns marking the location of the land marker and
saving it in their receiver as “test 3.”
7. Compare your coordinates with the others in your group. How similar are they? It is likely that
they will be very similar, but not identical. Why do you think this might be? Remember that
your receiver is communicating with satellites 12,000 miles away!
8. Another way to record a waypoint is to type in the coordinates. Remember that scrap where
you wrote wrote the coordinates to your original waypoints? Use your instruction manual and
create a new waypoint by typing in those original coordinates.
Science Checkup - Questions to ask to evaluate what was learned
Do you think your receiver is accurate enough for you? Why might someone need theirs to be
more accurate? (You are using your unit for recreation. Firemen might need to find the gas shutoff valve to your house in the case of emergency. The purpose for which you are using the
GPSr will determine the level of accuracy that is needed.)
Would your receiver be good for recording the locations of telephones in your home? Why or
why not? (GPSr’s don’t work well indoors because they need an unobstructed view of the
satellites overhead.)
Activity 3:
How can I get there from here?
Once you enter a waypoint into your unit, the receiver stores the coordinates for that waypoint in its
internal memory. The first step in getting from here to there is finding that waypoint in your receiver.
(Continued on page 3)
Find this activity and more at: http://nys4h.cce.cornell.edu
Cornell Cooperative Extension is an equal opportunity, affirmative action educator and employer.
Geospatial Science:
Using a GPS receiver
1. In your manual, look up how to find a waypoint and then look on your receiver for the waypoint
called “test 2.”
2. Once you find the waypoint, check your manual for help in how to “goto” or navigate to that
waypoint.
3. Take a walk with your receiver and see how it works to help you go back to the place that you
marked as “test 2.”
Science Checkup - Questions to ask to evaluate what was learned
How is your receiver like a compass? How is it different? (It can tell direction, but most receivers
require that you are moving in order to tell direction.)
Does your receiver consider obstacles that might be between you and your final destination?
How do you know? (No, the receiver only knows the direction and the distance to the final destination. It always draws a straight line path.)
Activity 4
Putting it all together
Note: You will need two groups for this activity.
1. Give each group a place marker of some sort (a cone or a bandana).
2. Each group should take a short walk (no more than 300 feet) in different directions and put their
place marker on the ground.
3. Each member of the group should mark the location of their place marker on their GPS receiver
4. Once the waypoints are marked, gather back at the starting place.
5. Share coordinates with the other group and enter the other group’s coordinates into the
receivers.
6. As a group, see if you can find the other group’s place marker!
Science Checkup - Questions to ask to evaluate what was learned
What factors might affect the accuracy of your receiver?
Extensions
•
If people in your group have different models of GPS receivers, try Activity 4 with various receivers and see how accurate they are and how well they locate the placemarkers. Take your coordinates and enter them into Google Earth or mapquest.com to see your location from above or a
street map of your location. These programs show you two of the myriad ways you can use coordinates to find a location or find your way around.
Vocabulary
Coordinate: Any of a set of two or more numbers used to determine the position of a point, line,
curve, or plane.
Map Datum: A set of reference points on the earth's surface against which position measurements
are made.
Coordinate Format: Any of a number of methods for displaying the coordinates of a given location
on earth. Typical examples would include HDDDDDDDD, HDDD MM.MMM or HDDD MM SSS,
where H is the Hemisphere (North, East, South or West), D is degrees of latitude or longitude, M is
minutes (1 degree = 60 minutes) and S is seconds (1 minute = 60 seconds).
Waypoint: Waypoints are named coordinates representing points on the surface of the Earth.
Find this activity and more at: http://nys4h.cce.cornell.edu
Cornell Cooperative Extension is an equal opportunity, affirmative action educator and employer.
Geospatial Science:
Using a GPS receiver
Background Resources
•
•
Download a manual for your GPS receiver at:
Garmin: http://www8.garmin.com/support/userManual.jsp
Magellan: http://www.magellangps.com/support/index.asp
DeLorme: http://www.delorme.com/support/search.aspx
Lowrance: http://www.lowrance.com/en/Downloads/Manuals/
Check out geocaching.com for more information about GPS units and the sport of geocaching.
Find this activity and more at: http://nys4h.cce.cornell.edu
Cornell Cooperative Extension is an equal opportunity, affirmative action educator and employer.