1
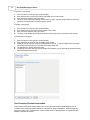
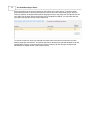
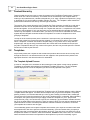
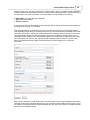
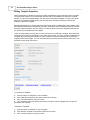
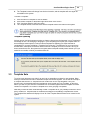
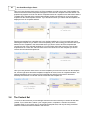
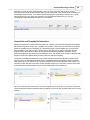
AccuDraft
DocsEngine Portal
Administrator Manual
Copyright 1992-2004 AccuDraft
I
AccuDraft DocsEngine Portal
Table of Contents
Chapter I: Administration Overview
General System
...................................................................................................................................
Overview
3
Your Role as the
...................................................................................................................................
System Administrator
3
Getting Started
................................................................................................................................... 3
System Access.......................................................................................................................................................... 3
Logon Procedure
.......................................................................................................................................................... 3
Administrative..........................................................................................................................................................
Menu Overview
3
Chapter II: User Management
Adding a New...................................................................................................................................
User
6
Viewing User ...................................................................................................................................
Details
9
Editing User ...................................................................................................................................
Personal Information
11
Editing Permissions
................................................................................................................................... 12
User Groups................................................................................................................................... 13
Chapter III: Content Management
Content Hierarchy
................................................................................................................................... 19
Templates
................................................................................................................................... 19
Template Sets
................................................................................................................................... 22
The Content ...................................................................................................................................
Set
25
Document Set
...................................................................................................................................
Workflow
27
Chapter IV: System Management
Planning User
...................................................................................................................................
Profile(s)
30
Planning Content
...................................................................................................................................
Access with User Groups
30
Reporting
................................................................................................................................... 30
AccuDraft
DocsEngine Portal
Chapter
I
Administration Overview
3
1.1
AccuDraft DocsEngine Portal
General System Overview
Welcome to the DocsEngine Portal system. DocsEngine is the industry leading online document
creation and management tool. This manual will cover all of the great features that DocsEngine has to
offer, and apply those features in a real world environment. Translation: You will not only be finding out
everything that DocsEngine has to offer, but also how it relates to your day-to-day operations.
DocsEngine gives you the flexibility to effectively create and manage documents from anywhere at
anytime, all you need is access to the internet. Because DocsEngine is a completely internet based
system there is never any software to install on your computer. This means that there is nothing for you
to maintain or update. The final document output is either a Microsoft Word (.doc) or Adobe Acrobat
(.pdf) document. Since the output of the system is the two most widely accepted document formats any
type of compatibility issues are eliminated. DocsEngine is the answer When The Words Matter.
1.2
Your Role as the System Administrator
You are the System Administrator, so what does that really mean? It means that you are the person
who is in charge of managing the content that is published on the system, managing user accounts on
the system, general system management as well as in many cases of creating and/or managing
documents. A description of "User Management", "Content Management" and "System Management"
each consume an entire chapter in this manual. A description of creating and/or managing documents
is covered in the End User Manual.
The role of the System Administrator comes with a great deal of responsibility. You are essentially the
first line of defense for your DocsEngine Portal system. Your end users will see you as the "all
knowing" being that they will turn to in the event of a problem with the system, or something happened
in the system that they do not understand. The information contained within this manual and the End
User Manual will prepare you to be able to answer most questions. In the even that you yourself come
across something that needs a little clarification, or an end user poses a question that you find yourself
unable to answer, AccuDraft Technical Support is always just a phone call away!
1.3
Getting Started
1.3.1
System Access
As previously stated the DocsEngine Portal system is completely web based. As long as you have a
computer and internet access you have the capabilities to draft and manage documents. All you have
to do is open a web browser and go to http://docsengine.accudraft.com and you will arrive at the
system login page.
1.3.2
Logon Procedure
The Logon Procedure is a universally accepted and secure logon process. Your User ID is an email
address and your password will be assigned to you by AccuDraft. After specifying your email address
and assigned password the system will verify your identity and take you directly to your Document Main
Console.
1.3.3
Administrative Menu Overview
After your login information is verified you will be taken to the Document Main Console. On the left
hand side of the screen you will see the main menu. This is the central navigation panel that you will
use to navigate your way through the DocsEngine system. Please see the End User Manual for a
description of each Main Menu option.
The Administrative Menu is contained within the My Setup area of the DocsEngine Portal system. Click
My Setup from the Main Menu to be taken to the Administrative Menu. A description of each
Administrative Menu option is as follows:
AccuDraft DocsEngine Portal
4
· Setup Home: This link will take you back to the Setup Home screen from any other location in the
Administrative Menu. The screen allows you to add Publisher Contacts/Users to the system as well
as view system messages. A detailed description of a Publisher Contact/User is in the "User
Management" section of this manual.
· Manage Content: This link will take you back to the Manage Content screen from any other location
in the Administrative Menu. This screen allows you to manage the content that your end users will
see. A detailed explanation of this screen can be found beginning with the "Content Hierarchy"
section of this manual.
· Manage Template Sets: This link will take you back to the Manage Template Sets screen from any
other location in the Administrative Menu. This screen allows you to manage the template sets that
make up your content. A detailed explanation of this screen can be found beginning with the
"Template Sets" section of this manual.
· Manage Users: This link will take you back to the Manage Users screen from any other location in
the Administrative Menu. This screen allows you to manage the user accounts that you have created
on the system. A detailed explanation of this screen can be found in the "User Management" chapter
of this manual.
· View Reports: This link will take you back to the View Reports screen from any other location in the
Administrative Menu. This screen allows you to run and view statistical reports about your
DocsEngine Portal content and content usage. A detailed explanation of this screen can be found in
the "Reporting" section of this manual.
AccuDraft
DocsEngine Portal
Chapter
II
User Management
AccuDraft DocsEngine Portal
2.1
6
Adding a New User
The most basic form of User Management is creating a new user account. This is also one of the most
important facets of User Management because it is at this point that you not only specify the user's
personal information, but also the user's security level. A user's security level is dependent on the
permissions that you assign or do not assign.
Permissions are broken down into two different groupings, Publisher Permission and End User
Permissions. The Publisher Permissions are what separates an end user from a System Administrator.
The 3 publisher permissions that specifically identify a System Administrator from an end user are
Create Template Set, Add/Edit/Delete Users and View and Change Passwords. If a user does has any
of these 3 permissions assigned to No they are not considered to be a System Administrator.
Publisher Permissions consist of the following:
·
·
·
·
·
·
Access My Setup (yes/no)
Grant Permissions (yes/no)
Create Template Set (yes/no)
Edit User Groups (yes/no)
Add/Edit/Delete Users (yes/no)
View and Change Passwords (yes/no)
Access My Setup
The moment that you assign at the very least Access My Setup to Yes for an end user you have made
them a System Administrator because they have access to the System Administrator screens. Please
keep in mind also that if you assign Access My Setup to No, you should set the remaining publisher
permissions to No because without access to My Setup the user will not be able to access any of the
other screens that the rest of the permissions "live" on.
Grant Permissions
The ability to Grant Permissions (what you are currently assigning) must be given if you would like for
this user to add new users, if they cannot grant new user permissions there is no point in allowing them
to add/edit/delete users.
Edit User Groups
The permission to Edit User Groups means that you are either allowing or not allowing this user to
group users together and to modify existing User Groups. User Groups are covered in detail in the
"Controlling Content Access" section of this manual.
Create Template Set
The permission to create a template set means that you are either allowing or not allowing this use to
create a new "place holder" for a template or group of templates. If you do not grant this user the
permission to create a template set, they in affect will have no management over any content on the
system. The will be able to upload templates to the system, and place them inside of an existing
template set, but not have the ability to create a new template set for the new template. In most cases
you will want to create a new template set when uploading a new template.
Add/Edit/Delete Users
The ability to Add/Edit/Delete Users means that you basically are giving this user permission to do what
you are doing right now, create new users as well as allowing them to remove or edit users on the
system. If this permission is assigned to No the user will not have the ability to access the Manage
Users screen and will only be able to see them self as a user in the Contacts window on the Setup
Home screen.
7
AccuDraft DocsEngine Portal
View and Change Passwords
The final permission that is identified as a publisher permission is the ability to view/change passwords.
If this user does not have this permission then anywhere in the system that a password is displayed,
they will just see asterisks (*). This will also prevent them from having the ability to change passwords
for other users. Regardless of the status of view and change passwords a user will always retain the
ability to view and change his or her own password.
The next group of permissions are the End User Permissions. This group of permissions can be
assigned to only an end user, as well as to a System Administrator. There are many times where not
only will a user be a System Administrator, but an end user too. Assigning that person both the
Publisher and End User Permission will allow that situation.
End User Permissions consist of the following:
Create Documents (yes/no)
Submit Documents (yes/no)
Redraft Documents (All Documents, Documents in my User Group, My Documents Only)
Use BETA Template Sets (yes/no)
View Documents (All Documents, Documents in my User Group, My Documents Only)
View Document Format (All Formats, PDF Only)
Email Document Format (All Formats, PDF Only)
Change Document Workflow Status (All Documents, Documents in my User Group, My Documents
Only)
· Edit Patterns (All Documents, Documents in my User Group, My Documents Only)
·
·
·
·
·
·
·
·
Create Documents
Most times when creating a user, you will assign at least some of the End User Permissions specified
above. Above and beyond all the purpose of the DocsEngine Portal system is the ability to create
documents in real time. It is always recommended to assign new users the permission to create
documents because if they have no ability create documents then you have effectively deprived them a
great deal of the system's functionality.
Submit Documents
The option of submitting documents can restrict the user from completing the document. Should you
assign Submit Documents to No, the user will be able to fill in the interview and save the answers they
have specified. It would then be up to a user who has Submit Documents assigned to Yes to review
the saved answers and once verified, to Submit them for document assembly.
Redraft Documents
The ability to redraft a document means the ability to make modifications to the interview after the
document has been completed. Generally it is recommended that you assign Redraft Documents to
My Documents Only so that the user can make changes to only a document they have created in the
case that a mistake is found. If Submit Documents is assigned to No the user will have to again notify
another user of the changes so that they can again be verified and submitted.
BETA Template Sets
The next set of End User Permissions deal not so much with the creation of the document, but how
you can see and manage the document. The ability or inability to use BETA template sets is purely at
your discretion. The idea behind a BETA template set is that you have not yet finalized the content and
it is currently in BETA testing. If you want this user to be able to see and access BETA template sets,
then assign Yes otherwise assign No. The entire concept of a template set is covered in detail in the
"Template Set" section of this manual.
AccuDraft DocsEngine Portal
8
View Documents
There is no permission in the system that will allow you to limit the users ability to not see any
documents, however; you can limit the users ability to see only the documents that they have created,
only the documents created by users in their User Group, or to see all documents that have been
created on the system. If you wish to keep some documents private it is recommended that you do not
give any user, with the exception of System Administrators such as yourself, the ability to see all
documents. If you assign Documents in my User Group, but don't add this user to a group or have no
User Groups defined, then the user will retain the ability to see all documents. User Groups are
covered in detail in the "Controlling Content Access" section of this manual.
View Document Format and Email Document Format
View Document Format goes hand-in-hand with Email Document Format. These two permissions
control the end users ability or inability to attain an edit able copy of the completed document. If you do
not want this user to ever be able to attain or send a copy of the edit able. document then you should
only allow them to view and email PDF. If you only allow the user to view PDF and Email All Formats
than you have effectively given the user the ability to email themselves an edit able copy of the
document.
Change Document Workflow Status
Change Document Workflow Status is one of the most important End User Permissions on the system.
By assigning what group of document(s) this user has the ability to change Workflow Status for you
have granted them the ability to effectively change the state of a particular document. For instance if
you user has be assigned Change Document Workflow Status for all documents they have the ability
to change the state or status of any document in the system. Unless this user is a System
Administrator similar to yourself it is recommended that the user is assigned either Documents in my
User Group or My Documents Only for this permission. Document Set Workflow is covered in detail in
the "Document Set Workflow" section of this manual.
Edit Patterns
The final End User Permission is the ability to edit patterns. Basically if Edit Patterns is assigned either
Documents in my User Group or All Documents then this user will have the ability to edit a pattern
setup by another user. A pattern file is setup for the purpose of the answers being consistently the
same and lessening the amount of user input required. It is recommended that unless this person is a
System Administrator such as yourself, Edit Patterns is assigned My Documents only so that the user
will only be able to edit patterns that they have created. This helps to improve data integrity over your
user base. Patterns are covered in detail starting in the "Advanced Document Creation" section of the
End User Manual.
New users can be added in two different locations on the DocsEngine Portal system. You can add
them either on the Setup Home screen or the Manage Users screen. On the Setup Home screen to
add a user click Add Publisher Contact and on the Manage Users screen click Add User.
You may choose to add a user from either location. Both locations ask for the same personal
information and also allow you to assign the same security level by providing you the same permission
options.
9
2.2
AccuDraft DocsEngine Portal
Viewing User Details
As with Adding New Users you may View User Details on both the Setup Home screen or the Manage
Users screen. The Details referred to are the user's personal information as well as this user's current
state for each permission. To view a particular User's Details click that person's name.
If you click the user's name on the Setup Home screen you will see the Publisher Contact Details:
AccuDraft DocsEngine Portal
10
If you click the user's name on the Manage Users screen you will see the User Details:
As you can see from the above illustrations most of the information is consistent between the two
screens. The User Details screen does allow you to add a new phone number or email address without
editing user information where on the Publisher Contact Details you are required to click Edit User to
add an additional email address or phone number to the system. You will also notice on the User
Details screen that any User Group this user is associated with is displayed, and this information is not
contained within the Publisher Contact Details. User Groups are covered in detail starting in the
"Controlling Content Access" section of this manual.
The Publisher Contact Details and the User Details both give you the opportunity to edit user
information, delete the user, inactivate the user, and edit user permissions as long as you have
permission to do so. Inactivating a user prevents access to the system without permanently deleting
the account. This feature was included in the system so that in the event you have users who need
occasional access, you can grant or remove this without having to delete and re-create the account
multiple times.
To inactivate a user:
1.
2.
3.
Click the name of a user to view his or her details.
Click Inactivate User on the bottom left hand corner of the screen.
The User's status will change from Active to Inactive, and the user will no longer have access to
the system.
To activate a user:
1.
2.
Click the name of a user to view his or her details.
Click Activate User on the bottom left hand corner of the screen.
11
AccuDraft DocsEngine Portal
3.
The User's status will change from Inactive to Active, and the user will once again have access to
the system.
To delete a user:
1.
2.
3.
2.3
Click the name of a user to view his or her details.
Click Delete User on the bottom left hand corner of the screen.
The Users Details screen will close and the user will be removed from the system.
Editing User Personal Information
To edit User Personal Information click Edit User if you are on the User Details screen or click Edit
Contact if you are on the Publisher Contact Details screen. When you click this link you will be able to
change information such as name, title, address, phone number etc.
Once you have made you desired changes click Submit and they will be applied to this user. You will
be returned to either the User Details or Publisher Contact Details screen where you can see that your
changes have been applied. In the illustration below you will notice that the (111) 111-1111 phone
number has been changed from Work to Cellular.
AccuDraft DocsEngine Portal
2.4
12
Editing Permissions
To edit User Personal Information click Edit Permissions from either the User Details or Publisher
Contact Details screen. When you click this link you will be able to change permission assignments for
this user.
13
AccuDraft DocsEngine Portal
Once you have made you desired permission assignment changes click Submit and they will be
applied to this user. You will be returned to either the User Details or Publisher Contact Details screen
where you can see that your changes have been applied. In the illustration below you will notice that
the Edit Patterns permission has been changed from All Documents to My documents only.
2.5
User Groups
When you begin placing content on the DocsEngine Portal system you will quickly realize that in many
cases you will not want all users to have access to all of the content you have placed on the system.
To control what content your users have access to you must create User Groups and then assign
specific users to those groups.
A User Group is a group of people categorized together for a specific reason. For instance, a good
example of a User Group setup would be if your organization has multiple shifts who need access to
different template sets. Template sets are covered in detail in the "Template Sets" section of this
manual. You would create a First Shift, Second Shift and Third Shift User Group and assign the users
that reside on each of those shifts to the corresponding group. Therefore the members of a specific
User Group will only be able to create documents with the Template Sets that are assigned to their
group.
User Group Creation and Management
User Group creation and management is located on the Manage Users screen. The default User
Group is called the Everyone group and is what all users are automatically assigned to when no other
User Group(s) exist.
AccuDraft DocsEngine Portal
14
To create User Group(s):
1.
2.
Click Add User Group and you will be asked to give your group a name, like First Shift.
Once the name is specified click Add User Group and you will notice that the First Shift Group is
displayed below the Everyone group. Even when a user is assigned to a the First Shift Group they
always remain a member of the Everyone Group.
To view the details of a specific User Group, click the name of the group. You will notice that the User
Group Details screen contains a lot of useful information. You have the ability to Edit, Delete or
Activate/Inactivate Custom User Groups, you do not have the ability to Edit, Delete or
Activate/Inactivate the Everyone Group.
To inactivate a user group:
1.
2.
3.
4.
Click the name of a user group to view its details.
Click Inactivate User Group on the bottom right hand corner of the screen.
Click Yes when asked to verify your action.
The User Group's status will change from Active to Inactive, and the users that are part of this
group will no longer have access to system content.
15
AccuDraft DocsEngine Portal
To activate a user group:
1.
2.
3.
4.
Click the name of a user group to view its details.
Click Activate User Group on the bottom right hand corner of the screen.
Click Yes when asked to verify your action.
The User Group's status will change from Inactive to Active, and the user(s) that are part of this
group will once again have access to system content.
To delete a user group:
1.
2.
3.
4.
Click the name of a user group to view its details.
Click Delete User Group on the bottom middle of the screen.
Click Yes when asked to verify your action.
The User Group Details screen will close and the user group will be removed from the system.
To add a user to this group:
1.
2.
3.
4.
5.
Click the name of a user group to view its details.
Click Add Users to Group on the top middle of the screen.
Select the user(s) from the list and click Add Users to Group. To select multiple users hold down
the Control Key (Ctrl) when you click the name of the listed user.
The Add Users to Group screen will close.
You will be returned to the User Group Details screen where you can see that the selected user(s)
have been added to this group.
User Group and Content Association
As previously stated, User Groups allow you to control who has access to what template sets. A
Template Set is essentially a place holder for a template or group of templates. Template Sets are
covered in detail in the "Template Sets" section of this manual. This association is controlled on the
Manage Template Set screen.
AccuDraft DocsEngine Portal
16
You begin this process by selecting a template set from the Template Set window. To select a
template set click the corresponding row in the window and you will see that it turns gray to indicate
your selection.
After making your template set selection, scroll down to the bottom of the screen and you will see that
the User Groups with Access to this Template Set window shows that only your everyone group has
access to the selected template set. As stated previously the Everyone Group is a default User Group
that all users are a member of.
Even though you have assigned users to a User Group, they are always a member of the Everyone
group. To prevent all users from having access to a template set you must assign specific User
Groups to it. Click Give Access to Additional User Groups and the User Group Access screen will
appear with all unassigned User Group(s) listed. Unassigned User Group(s) are groups that have not
been assigned to the selected template set.
17
AccuDraft DocsEngine Portal
As the instructions on the screen indicate you may select one or more groups. To select multiple
groups hold down the Control Key (Ctrl) when you click on the name of the listed groups. After you
make you selection click Add and the system will grant access to only those User Groups and you will
once again see the User Groups with Access to this Template Set window. You will notice that now
only specific groups have access to this template set.
To remove access to a group or groups place a check mark in the Remove Access box for each
desired group and click Remove. The system will remove access to the selected template set for the
checked User Group(s). In the event that you remove access to all User Groups, the system will
automatically re-assign access to the Everyone group.
AccuDraft
DocsEngine Portal
Chapter
III
Content Management
19
3.1
AccuDraft DocsEngine Portal
Content Hierarchy
Content is what the end user uses to create documents on the DocsEngine Portal system. Content is
broken down into a three tier hierarchy. This lowest level of the hierarchy is the Template which is
made up of four individual files: a HotDocs template file (.rtf or .hpd), a HotDocs component file (.cmp),
a JavaScript file (.js) and a HotDocs variable collection file (.hvc). The Template is what contains the
questions the end user will see as they work through the interview.
The next tier of the content hierarchy is the Template Set. Each document you wish for an end user to
assemble must have its own template. Many times you will want the end user to assemble multiple
documents together. This is how the concept of a Template Set was born. A Template Set can contain
from one to may templates. If only one document is to be assembled then the template set would
contain only one template, on the other hand if you wish for your end user to assemble four documents
together then the template set would contain four templates. So in short a Template Set is like a
grouping of templates.
The top tier of the content hierarch is the Content Set. At the same time your DocsEngine Portal
account was created you Content Set was also created. Your Content Set is called: <your company
name> Templates. A Content Set contains Template Set(s). It may contain one to many different
template sets, and only the set(s) contained within the Content Set will be available to the end user.
Any other Template Set that you may create on the system, but have not yet made part of the Content
Set will not be visible by the end user.
3.2
Templates
As previously stated, the Template is what contains the questions the end user will see as they work
through the interview. The answers that the end user supplies to the questions will be placed in the
appropriate location in the document when it is assembled.
The Template Upload Process
In order for a template to be accessible on the DocsEngine Portal system it must first be uploaded.
Templates are uploaded and managed on the Manage Template Sets screen. The All Templates
window displays a list of all of the templates you have currently uploaded to the system.
To begin the upload process click Upload New Template on the All Templates window, and the Upload
Template window will appear. The Name and Description that you give to this template is completely
arbitrary, however; it is recommended that you come up with a naming convention that is meaningful.
The end user will not see the name that you give to the Template when it is uploaded. When uploading
the template, the system requires that you supply at least the Template File (.rtf or .hpd) and the
Component file (.cmp). The last two files in the list, the JavaScript (.js) and HotDocs variable collection
file (.hvc) are what makes up the interview. There are cases in which you may upload a template to the
system that does not have a JavaScript and HotDocs Variable Collection file, however; most times
your template will consist of all 4 file types.
The conditionality portion of the Upload Template screen allows you to input the condition under which
this template will or will not be part of the document assembly. In the HD Variable field, you specify a
variable name that is contained within this template, and in the Type drop down you specify the type of
that particular variable. For instance, MULTIPLECHOICE, NUMBERTYPE, DATETYPE, etc. The value
field is the answer that needs to be specified for this template to be part of the assembly. A good
AccuDraft DocsEngine Portal
20
example of when you may use conditionality is if this template is part of a template set that deals with
College Students and this template will only be included in the assembly process if a student entered in
the University in the summer semester. The conditionality may look similar to the following:
· HD Variable: University_Entrance_Semester
· Type: MULTIPLECHOICE
· VALUE: SUMMER
If you do not specify any conditionality on this template it will be used in document assembly each time
a template set it is a part of is accessed.
Post Assembly Macros are a way that you can increase the functionality of your DocsEngine Portal.
Post Assembly macros allow you to change the look of your document after the assembly process has
concluded. These type of macros are most widely used for inserting a table of contents in a document
or finalizing highly complex document formatting. You do have the ability to upload macros to your
DocsEngine Portal, however; each Post Assembly Macro you upload must be approved by AccuDraft
before the system can utilize it. The approval of Post Assembly Macros is done on a case by case
basis for an additional charge. Please contact AccuDraft Technical Support if you need more
information.
After you have reviewed to make sure that all of the information is correct click Upload and the system
will begin the process of uploading the files from your computer to the DocsEngine Portal server. Once
the upload is complete the Upload Template window will close and you will see your uploaded template
listed in the All Templates window.
21
AccuDraft DocsEngine Portal
Editing Template Properties
After the template is uploaded to the system certain modifications may sometimes need to be made.
The system has a built in set of modification features that are accessible from within the Template
Details. To access the template details click the name of the desired template. You will notice at the
bottom of the Template Details window you have the option to Edit the template, inactivate the
template or delete the template.
Edit template allows you to change the Name, Description and/or conditionality of this template. Click
Edit template and the fields corresponding to Name, Description and Conditionality become edit able.
Make any required changes and click Submit. You will be taken back to the Template Details where
you will see your changes have been applied.
There are cases where you may want to remove all access to a particular Template, but know that at
some point in the future you will want to once again grant access. This is the concept of Inactivating a
Template. By Inactivating the template you save yourself the hassle of deleting and re-uploading a
template time and time again. You can inactivate which will remove access from all users until it is reactivated at some point in the future.
To inactivate a Template:
1. Click the name of a template to view its details.
2. Click Inactivate Template on the bottom middle of the screen.
3. Click Yes when asked to verify your action.
4. The Template's status will change from Active to Inactive, and the template will no longer be
accessible on the system.
To activate a Template:
1.
2.
3.
Click the name of a template to view its details.
Click Activate Template on the bottom middle of the screen.
Click Yes when asked to verify your action.
AccuDraft DocsEngine Portal
4.
22
The Template's status will change from Active to Inactive, and the template will once again be
accessible on the system.
To delete a Template:
1.
2.
3.
4.
Click the name of a template to view its details.
Click Delete Template on the bottom right hand corner of the screen.
Click Yes when asked to verify your action.
The Template Details screen will close and the template will be removed from the system.
Template Updating
As time goes on and environments continue to change, chances are the language in your Template(s)
will change as well. The changing of language in your Template(s) will require you to update them on
the DocsEngine Portal system, but how is this accomplished? Updating is a simple task that is
completed as if you were uploading a Template for the first time. The difference is you must ensure
that the Name, Description, and 4 files names match the Template you wish to override. As long as
these conditions are met, the system will recognize that this template already exists and ask you if you
would like to override, to which you would answer OK.
3.3
Template Sets
To review, each document you wish for an end user to assemble must have its own template. Many
times you will want the end user to assemble multiple documents together. This is how the concept of
a Template Set was born. A Template Set can contain from one to may templates. If only one
document is to be assembled then the template set would contain only one Template, on the other
hand if you wish for your end user to assemble four documents together then the template set would
contain four templates. So in short a Template Set is a like grouping of templates.
Now that you have the basic understanding of what a Template Set is, you probably would like to know
how to create one. Template Sets are created and managed on the Manage Template Sets screen.
The Template Sets window will display a list of all of the Template Sets that have been created on the
system.
23
AccuDraft DocsEngine Portal
To begin the Template Set creation process, click Create new template set on the Template Sets
window, and the Template Set creation window will appear. The Name that you give to this Template
Set is completely arbitrary, however; it is recommended that you come up with a naming convention
that is meaningful. Also, keep in mind that the name you specify for a Template Set will be viewed by
the end user, so it is recommended that you refrain from placing any sensitive information in this name.
When creating a new Template Set you are also prompted for a Status. The system allows three
different statuses for a Template Set: Production, BETA and Archived. A description of each status is
as follows:
· Production: A Template Set with a status of Production is a template set that contains templates
that are ready for general end user viewing and/or use. All of the templates have been thoroughly
tested and verified to contain no errors or illegal processes.
· BETA: A Template Set with a status of BETA is a template set that contains Templates that are
currently being tested, and therefore not ready for general end user viewing and/or use. The
Templates contained within the BETA Template Set may contain errors and/or illegal processes.
· Archived: A Template Set with a status of Archived is a template set that is not currently in use. The
Templates contained within an Archived Template Set may be out of date or simply not relevant to
the organization's business at this time. By archiving the Template Set, you are removing it from end
user viewing and/or use, but not removing it from the system. The archived template set can be
changed to Production at a later time so that it may once again be accessed by end users.
After you have reviewed to make sure that all of the information is correct click Create and the system
will begin the process of creating your new Template Set. Once the creation is complete the Template
Set creation window will close and you will see your newly created template set listed in the Template
Sets window.
Editing Template Set Properties
After the Template Set is created certain modifications may sometimes need to be made. The system
has a built in set of modification features that are accessible from within the Template Set Details. To
access the Template Set Details click the name of the desired Template Set. You will notice at the
bottom of the Template Set Details window you have the option to Edit template set or Delete template
set, as well as Upload additional files.
Edit template set allows you to change the Name and/or Status of this template set. Click Edit template
set and the fields corresponding to Name and Status become edit able. Make any required changes
and click Submit. You be taken back to the Template Set Details where you will see your changes have
been applied.
There may be cases in which you will need the ability to delete this particular template set from the
system all together. You must first review a few things before deleting a template set. The first is to
make sure that you have removed all Template(s) from this Template Set. The second is to ensure you
have removed this Template Set from your Content Set. The third is to ensure that you have removed
from the system any and all Document Sets that were created with this template set. Once you have
verified all of these things, click Delete template set and the system will warn you to make sure that you
want to do this. Click OK and the template set will be removed from the system.
AccuDraft DocsEngine Portal
24
For advanced Template Sets, the DocsEngine Portal system provides for uploading additional files and
components. Full details of these features are beyond the scope of this manual. For further
information, please contact AccuDraft.
Template Set and Template Interaction
Now that you are familiar with the concept of a Template and a Template Set it would probably be
helpful to understand how the two interact with one another. A Template Set is essentially a place
holder for a template or group of templates. The Template Set also allows you to organize different
templates in more than one way for more than one user or User Group. An end user will never have
access to a Template unless it is contained within a template set to which they have access.
The process of adding a template to a template set takes place on the Manage Template Sets screen.
You begin by first selecting a template set that is listed in the Template Sets window. Click the
corresponding row for the template set you wish to select and you will see that the row turns gray to
indicate your selection. After making your selection direct you attention to the All Templates window
where you will see a lit of all of the templates currently uploaded to the system. You will further notice
that next to the name of each template there is a check box. Place a check mark in the check box for
each template you wish to make a part of the selected template set.
25
AccuDraft DocsEngine Portal
Once you have placed a check mark in all of the templates you wish to be a part of this template set,
click the left arrow and these templates will appear to move into the Template in this Set window. The
template only appears to move from the All Templates window to Templates in this Set window when a
Template Set is selected which contains that template, thereby not allowing you to move the same
template into the same template set twice. If you refresh the screen you will see that all templates are
displayed in the All Templates window.
Removing a template from a template set is very similar to adding one. You once again start out by
selecting the template set you wish to remove template(s) from. After making your selection direct you
attention to the Templates in this Set window where you will see a list of all of the templates that
currently are part of the selected template set. You will further notice that next to the name of each
template there is a check box. Place a check mark in the check box for each template you wish to
remove from the selected template set.
Once you have placed a check mark in all of the templates you wish to be remove from this template
set, click the right arrow and these templates will appear to move into the All Templates window. The
selected template(s) are no longer part of this template set and will not be used for document
assembly the next time an end user selects to assemble this template set.
3.4
The Content Set
To review, at the same time your DocsEngine Portal account was created you Content Set was also
created. Your Content Set is called: <your company name> Templates. A Content Set contains
Template Set(s). It may contain one to many different template sets, and only the set(s) contained
within the Content Set will be available to the end user.
AccuDraft DocsEngine Portal
26
Now that you have the basic understanding of not only The Content Set, but the entire content
hierarchy you are ready to add template sets to your document set. Your document set is managed on
the Manage Content screen. The Content window displays your organization's Content Set. You will
notice that since you only have one content set it is automatically selected for you. You can
immediately being adding template sets to your content set.
Content Set and Template Set Interaction
Interaction between the content set and template set is similar to the interaction between the template
set and the template covered in the "Template Sets" section of this manual. A document set is a place
holder for template sets and essentially is a determining factor in what template sets your end users
have the ability to see and work with. Please keep in mind that you are able to add many different
template sets to the content set and if an user group has not been assigned to be able to view a
particular template set they still will not be allowed to see it. This allows you to add all the template sets
that all users will need without having to worry each user will see everything.
The process of adding a template set to the content set takes place on the Manage Content screen.
Once you arrive on the Manage Content screen immediately direct you attention to the All Template
Sets window where you will see a list of all of the template sets currently uploaded to the system. You
will further notice that next to the name of each template set there is a check box. Place a check mark
in the check box for each template set you wish to make a part of the content set.
Once you have placed a check mark in all of the template sets you wish to be a part of the content set,
click the left arrow and these template set(s) will appear to move into the Template Sets in this Content
window.
27
AccuDraft DocsEngine Portal
Removing a template set from a content set is very similar to adding one. Direct you attention to the
Templates Sets in this Content window where you will see a list of all of the template sets that currently
are part of the content set. You will further notice that next to the name of each template set there is a
check box. Place a check mark in the check box for each template set you wish to remove from the
content set.
Once you have placed a check mark in all of the template set(s) you wish to be remove from the
content set, click the right arrow and these template set(s) will appear to move into the All Template
Sets window. The selected template set(s) are no longer part of the content set and will not be
available to be assembled the next time the user selects the content set for document creation.
3.5
Document Set Workflow
Document Set Workflow allows the end user to set a status for a document set. This helps to track the
document set as it goes through all of the required processes to become finalized.
Document Set Workflow Setup
In order for the end user to be able to specify a Workflow status for a particular document set, at least
two things must be true. First of all, the end user must have the permission to at the very least change
Workflow status for their own documents and you as the System Administrator must have setup a
Workflow List for you content set. Setup and management of the Workflow takes place on the Manage
Content screen. The Workflow Picklist for this Content window located toward the bottom of the screen
displays the Workflow for your content. Since you are setting up Workflow for this content set for the
first time the window will display currently no Workflow exist for this product.
To begin adding Workflow for your content set click edit picklist and the Edit Workflow Picklist window
will appear. This window contains a free type text box that will allow you to enter as much or as little
Workflow as you please. Each Workflow status must have its own line in the picklist, so please
remember to press Enter after you type each one. It is also important to remember that the order you
type the statuses is the order that they will display. With this being said you will want to type the
statuses in the order that the end user will apply them. You do not want signed to display before
created.
AccuDraft DocsEngine Portal
28
Once you have specified and reviewed all of the statuses for this content set click Submit Changes and
the system will assign your statuses to your content set. The Edit Workflow Picklist window will close
and you will be returned to the Manage Content screen where you will see your statuses displayed in
the Workflow Picklist for this Content window.
Document Set Workflow Editing
Editing existing Workflow statuses is similar to the original setup process. To begin editing your
Workflow, click edit picklist which once again will open the Edit Workflow Picklist window. You will see
your pre-existing Workflow statuses displayed in this window. In order to Add a new status click at the
end of the final status, and press enter for a new line. Begin typing your new status or statuses
remembering to press enter after typing each one. To edit an existing status click in or near that status
and make the necessary change(s). You may also remove the status all together by highlighting the
particular status and pressing the backspace key once if you are removing the last status in the list and
twice if you are removing a status in the middle of the list.
Once you have specified and reviewed all of the statuses for this content set click Submit Changes and
the system will re-assign your statuses to your content set. The Edit Workflow Picklist window will close
and you will be returned to the Manage Content screen where you will see your statuses displayed in
the Workflow Picklist for this Content window.
AccuDraft
DocsEngine Portal
Chapter
IV
System Management
AccuDraft DocsEngine Portal
4.1
30
Planning User Profile(s)
It is important to plan the profile(s) of your end users before you begin adding them to the DocsEngine
Portal system. You obviously know that each person added to the system will in some way shape or
form be an end user, however; there are many different gradient levels that an end user can
encompass. An end user can be anything from a person with full administrative permissions down to a
person who has access to only one template set. A complete description of this concept is beyond the
scope of this manual. For more information please contact the AccuDraft Sales Department and we
will be happy to put you in touch with one of our trained Profile Planning Consultants.
4.2
Planning Content Access with User Groups
After you complete planning the different user profiles, you should begin planning the different user
groups that will exist for your organization. The simple example used previously in this manual is that of
shifts, first shift, second shift and third shift. While this works well for illustrating the point of User
Groups, it is most likely not the way you will implement User Groups. The graphic below illustrates a
chart that may be used to plan the user groups and their content.
4.3
Reporting
Reporting becomes very important to you as the System Administrator. Currently the reporting module
in your DocsEngine Portal allows you to search on a date range for document transactions that have
been done by your end users. You may either enter a date range or leave the date fields blank to see a
list of all the transactions that have been done on your DocsEngine Portal. The reporting capabilities of
the DocsEngine Portal system are being expanded and will soon include many of the most popular
types of Administrator/Managerial reports.
31
AccuDraft DocsEngine Portal