1
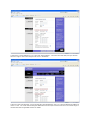
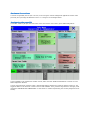
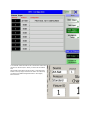
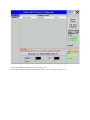
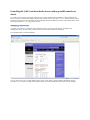
Controlling DL.3/DL.2 and Axon Media Servers with a grandMA console via Artnet • In order for the DL.3/DL.2 and Axon media servers to communicate with the grandMA console via ArtNet, the
servers must be in the same IP address range as the console, which in this case is 2.x.x.x. Because the DL.3/DL.2
and Axon servers do not have the ability to have statically assigned IP addresses a router with a DHCP server must
be used to assign the 2.x.x.x range to the servers.
Setting up the Router
• Connect your router to a computer using an Ethernet cable. Using your web browser, navigate to the
configuration screen for the router (see the router’s user manual for details on doing this).
The example below is a Linksys WRT54G.
• As you can see here, the Local IP address of the router is 192.168.1.1 and the Starting IP Address range is
192.168.1.100. In order to change the IP address range, the Local IP Address of the router must be changed.
• Change the Local IP Address to 2.0.0.1 and click “Save Settings”. The router will reset itself, and you will then
have to re-login to the router using the new 2.0.0.1 IP address.
• After the router has rebooted, you will see that the Local IP address is now 2.0.0.1 and the Starting IP Address is
now 2.0.0.100. The router will now assign IP addresses to the DL.3/DL.2 and Axon servers in the correct range to
communicate with the grandMA console via ArtNet.
Hardware Connections
• Connect the grandMA, the DL.3/DL.2 or Axon, a PC running the content management application and the router
previously set up to assign IP addresses in the 2.x.x.x range to an unmanaged switch.
Configuring the grandMA
• Press the 'Tools' key to open the Tools menu on the main screen. In this menu, press 'DMX Configuration’.
• If the grandMA is not networked to another console, make sure that "Enabled if Standalone" is turned on in the
DMX Configuration Window.
• On the right-hand side, press the button, marked 'DMX Output via Ethernet.' Select the desired universe (1-64) ,
toggle the button in the 'Protocol' column so that it reads 'ARTNET.' Then, press the large button to the right (it will
read either 'PROTOCOL NOT CONFIGURED!' or have letters or numbers representing the currently assigned sub-net
and ID).
• The Subnet and ID should be set to match the Subnet and
Universe on the DL.3/DL.2. Once you have set the Subnet
and
ID (located at the bottom of this screen), press the ‘Save’
button in the top-right, and close the menu. This will drop
you back to the DMX Configuration Menu. Once again,
save and close.
• Access the MA Network Configuration from the Tools menu
• Make certain that the console’s IP address is not within the 2.x.x.x range or set to 127.0.0.