1
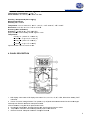
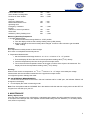
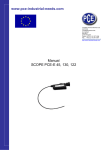
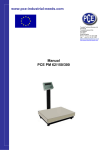
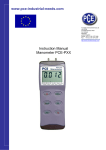
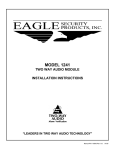
www.pce-industrial-needs.com Tursdale Technical Services Ltd Unit N12B Tursdale Business Park Co. Durham DH6 5PG United Kingdom Phone: +44 ( 0 ) 191 377 3398 Fax: +44 ( 0 ) 191 377 3357 [email protected] http://www.industrial-needs.com/ INSTRUCTION MANUAL PCE-222 [email protected] TABLET OF CONTENTS INSTRUCTION MANUAL ........................................................................................................ 1 1. INTRODUCTION ................................................................................................................. 3 2. FEATURES ......................................................................................................................... 3 3. SPECIFICATIONS ............................................................................................................... 3 4. PANEL DESCRIPTION ....................................................................................................... 4 5. OPERATING INSTRUCTION .............................................................................................. 5 6. MAINTENANCE................................................................................................................... 6 2 [email protected] 1. INTRODUCTION The 4 in 1 digital multi- Multi-Function Environment Meter has been designed to combine the functions of Sound Level Meter, Light Meter, Humidity Meter, and Temperature Meter. It is an ideal Multi-Function Environment Meter Instrument with scores of practical applications for professional and home use. The Sound Level function can be used to measure noise in factories, schools, offices, airports, home, etc., checking acoustics of studios, auditoriums and hi-fi installations. The Light function is used to measure luminance in the field. It is fully cosine corrected for the angular incidence of light. The light sensitive component used in the meter is a very stable, long life silicon diode. The Humidity / Temperature is for use a humidity / semiconductor sensor and K type thermocouple. This operations manual contains general information and specification 2. FEATURES z z z z z z z Optically isolated PC interface-optional RS-232 cable and windows® 95/98/2000 compatible software allows user to collect display, plot and save data 4 functions measure Sound level, Light, Humidity, and Temperature. 4000 count large LCD display with units of Lux, oC, %RH and dB indication. Easy to use with single function switch operating, pocket size and light weight. Sound level measures from Lo: 35dB to 100dB/ Hi: 65dB to 130dB for A weighting checking with 0.1dB resolution. Light measuring levers ranging from 0.01 lux to 40,000 lux. Humidity measurement from 25%RH to 95%RH with 0.1%RH resolution and fast time response. 3. SPECIFICATIONS Display: 4000 counts LCD display with function of Lux, oC, oF, %RH and dB indication. Polarity: Automatic, (-) negative polarity indication. Over-range: “OL” mark indication. Low battery indication: The “BAT” is displayed when the battery voltage drops below the operating level. Measurement rate: 1.5 times per second, nominal. Storage temperature: -10 oC to 60 oC (14 oF to 140 oF) at < 80 % relative humidity Power: One standard 9V, NEDA1604 or 6F22 battery. Dimensions: 121.5 (H) x 60.6 (W) x 40 (D) mm Weight: Approx.: 280g including holster. Sound Level Measurement range: Lo: 35dB -100dB; Hi: 65dB~130dB Resolution: 0.1dB Typical instrument frequency range: 30Hz-10 KHz Frequency Weighting: A –weighting Time Weighting: Fast Accuracy: +3.5 dB at 94 dB sound level, 1KHZ sine wave. Microphone: Electric condenser microphone. Light Measuring Range:40, 400, 4000, 40,000lux (40,000lux range reading x10) Overrate Display: Highest digit of “OL” is displayed. Accuracy: +5% rdg + 10 dgts (calibrated to standard incandescent lamp at colour temperature 2856 k). Repeatability: + 2%. 3 [email protected] Temperaturre Characterristic: +0.1% % / oC. Photo detec ctor: One silicon photo diode d with filte er. Humidity / Temperature T e (Auto-rang ging) Measureme ent Range: Humidity 25 5%~95%RH Temperaturre: -20.0 ºC-+ +400.0 ºC, -2 20 ºC -+750 ºC, -4.0℉-+4 400.0℉, -4℉ ℉-+1400℉ Resolution:: 0.1% RH, 0.1 0 ºC or 1 ºC C / 0.1℉or1℉ ℉. Accuracy (a after calibra ation): Humidity: + 5%RH (at 25 2 ~, 35%~95 5% RH). Response tim me of the hu umidity senso or: approx. 6 min. Temperaturre: +3% %rdg + 2~ (att -20 ºC ~+40 00.0 ºC) +3.5 5%rdg + 2~ (at ( -20 ºC ~+ +750 ºC) +3% %rdg + 2~ (att -4.0℉~+400 0.0℉) +3.5 5%rdg + 2~ (at ( -4℉~+140 00℉) Input Protecction: 60V dc or 24V ac rm ms. 4. PANEL L DESCRIP PTION 1. LCD disp play: 4000 co ount LCD display with uniits of Lux, x10 Lux, oC, oF, %RH, dB and low batttery “BAT” indicatio on. 2. Power / Function / Range R Switch h: Turn powe er on (or off) and a select measurement m t function and d ranges. 3.Microphon ne: Electric co ondenser miicrophone insside. 4.Photo Dete ector: Long life l silicon ph hoto diode inside. 5. Humidityy & Tempera ature: Humidity Sensor an nd Semiconductor Sensor inside. 6. Tempera ature Termin nal: Insert the e temperaturre probe in th his terminal. 7. RS-232 Terminal: Co omputer Inte erface Transp port Termina al 4 [email protected] ** 8. RS-232 wires: Connect the RS-232 wires to the meter’s “RS-232” interface 5. OPERATING INSTRUCTION Measuring Sound Level 1. Turn the Power/function/range Switch to “dB” position. 2. Remove the meter and face the microphone to sound source in a horizontal position. 3. The A -weighting curve is nearly uniform over the frequency range from 30 to 10,000Hz, thus giving an indication of overall Sound level. 4. The Fast response is suitable to measure shout bursts and peak values from sound source. 5. The sound level will be displayed. 6. Note: Strong wind (over 10m/sec.) striking the microphone can cause misreading for measurement in windy locations; a windscreen should be used in front of microphone. Measuring Light 1. Turn the Power/function/range Switch to select the “lux” scale and set the range to desired (“lux” or “x10 lux”) range. 2. Remove the meter and face the photo detector to light source in a horizontal position. 3. Read the illuminance nominal from the LCD display. 4. Over-range: If the instrument only display one “OL” in the M.S.D. the input signal is too strong, and a higher range should be selected. 5. When the measurement is completed. Replace the photo detector from the light source. 6. Spectral sensitivity characteristic: To the detector, the applied photo diode with filters makes the spectral sensitivity characteristic almost meet C.I.E. (International Commission on Illumination) photopia curve V ( ) as the following chart described. 100% (Relative Sensitivity) Spectral Sensitivity 80 ºC V( ) 60 ºC 40 ºC 20 ºC 0 400 500 600 700 800 Wavelength(nm) 7. Recommended Illumination: Locations *Office Conference, Reception room. Clerical work Typing drafting *Factory Packing work, Entrance passage Visual work at production line Inspection work Electronic parts assembly line *Hotel Public room, Cloakroom Reception, Cashier *Store Lux 200 700 1000 ~ 750 ~ 1,500 ~ 2,000 150 300 750 1500 ~ 300 ~ 750 ~ 1,500 ~ 3,000 100 200 ~ 200 ~ 1,000 5 [email protected] Indoors Stairs Corridor Show window, Packing table Forefront of show window *Hospital Sickroom, Warehouse Medical Examination room Operating room Emergency Treatment *School Auditorium, Indoor Gymnasium Class room Laboratory Library Drafting room 150 750 1500 ~ 200 ~ 1,500 ~ 3,000 100 300 ~ 200 ~ 750 750 ~ 1,500 100 200 500 ~ 300 ~ 750 ~ 1,500 Measuring Humidity/Temperature 1. Humidity Measurement: 1. Set the Power/function/range Switch to “%RH” position. 2. Then the display will show the humidity reading value (%RH) directly. 3. When the tested environment humidity value changed. It need to a few minutes to get the stable “%RH” reading. Warning: Don’t expose the humidity sensor to direct sunlight. Don’t touch or manipulate the humidity sensor. 2. Temperature Measurement: 1. Set the Power/function/range Switch to “0.1 oC or 1 oC and 0.1℉ or 1 ℉” position. 2. Then the display will show the environment temperature reading value (oC/℉) directly. 3. Insert the temperature probe into the K-type thermocouple socket. 4. Touch the end of the temperature sensor to the area or surface of the object to be measured. The display will show the temperature reading value (oC/℉) directly. Warning: When function switch on temperature “0.1 oC or 1 oC and 0.1℉ or 1 ℉”range, never attempt a voltage measurement with the test leads inserted into the K-type thermocouple socket. You might be injured or damage the meter. RS-232 INTERFACE MEASUREMENTS 1. Connect the RS-232 wires to the meter’s “RS-232” interface and PC “COM” port., the indicator “RS232” will be appear in the display. 2. PC will display the meter’s measuring model. Note: First of all please read the “README” file in the attached soft disk and then comply with it set the SET UP Program from soft disk up to your PC. 6. MAINTENANCE Battery Replacement If the sign “BAT” appears on the LCD display, it indicates that the battery should be replaced. Remove screws on the back cover and open the case. Replace the exhausted battery with new batteries. (1 x 9V battery NEDA 1604, 6F22 or equivalent) 6 [email protected] In this direction will find a vision of the measurement technique: http://www.industrial-needs.com/measuring-instruments.htm NOTE: "This instrument doesn’t have ATEX protection, so it should not be used in potentially explosive atmospheres (powder, flammable gases)." 7