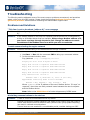
1
MatrikonOPC Modbus Driver User's Manual MatrikonOPC Modbus Driver User's Manual This manual is a product of Matrikon Inc. Matrikon Inc. Suite 1800, 10405 Jasper Avenue Edmonton, AB T5J 3N4 Canada Phone: +1.780.448.1010 Fax: +1.780.448.9191 www.matrikonopc.com H Document Revision History: Date Document Version Description Author 2006-06-01 1.0 Initial document 2006-10-18 1.1 Merge from old template and update for new release. CB 2007-06-29 2.0 Update template, general edit, update for new release (i.e., Omni functionality). CD 2007-11-12 2.1 Updated Item syntax and installed file sections. ZA 2008-07-01 2.2 Updates for 4.3.0.0. MH Version updated to 4.3.0.0. Added the following: Creating and Configuring a Redundancy Group Object 2008-07-10 3.0 Getting Data without Being Connected to a Device Appendix E OPC Security Custom Interface MH, LB Appendix F Offline Mode 3.1 Version updated to 4.3.1.0. Appendix E OPC Security Custom Interface replaced with updated Appendix E Security. LB 2008-09-09 3.2 Installed Files section updated. Modbus Address field description updated in the following Creating and Configuring sections: Modbus Ethernet PLC (TCP/IP) Device, Serial Device, MTL Serial Device, Terminal Server PLD Device, UPD Device. Troubleshooting section updated. TNM, LB 2008-09-15 3.3 Version updated to 4.3.2.0. REK 2008-09-08 MatrikonOPC Modbus Driver v4.5.1 User’s Manual 2 2008-09-22 3.4 Installation and Un-Installation sections updated to reflect new installer. Installed Files section updated. Replaced Security appendix with newest version. 2008-12-05 3.5 Updated with support information for Modbus+ SA85 or PCI85 Card. JFY 2008-12-08 3.6 Added View Tags and Security Settings descriptions to Tools menu. Replaced Configuration screen graphic with updated screenshot showing View Tags and Security Settings icons. Enter Password screen added to Installation section. LB 2009-09-10 4.0 Updates for version 4.5.0 of the Modbus driver. CHB, LB 2010-01-04 5.0 Updated product version to 4.5.1. Removed references to MTL 8000 device. SL, LB 2010-01-08 5.1 Updated Sample Item IDs (Table 20). ZB, LB 2010-01-27 5.2 Software Requirements section updated. AB, LB MatrikonOPC Modbus Driver v4.5.1 User’s Manual LB 3 SOFTWARE VERSION Version: 4.5.1 DOCUMENT VERSION Version: 5.2 COPYRIGHT INFORMATION © Copyright 1997 - 2010, Matrikon Inc. All rights reserved. No part of this document may be reproduced, stored in a retrieval system, translated, or transmitted in any form or by any means, electronic, mechanical, photocopying, recordi ng, or otherwise, without prior written permission of Matrikon Inc. CONFIDENTIAL The information contained herein is confidential and proprietary to Matrikon Inc. It may not be disclosed or transferred, directly or indirectly, to any third party without the explicit written permission of Matrikon Inc. LIMITATIONS Matrikon has made its best effort to prepare this manual. Matrikon makes no representation or warranties of any kind with regard to the completeness or accuracy of the contents herein and accepts no liability of any kind including without limitation warranties of merchantable quality, satisfactory quality, merchantability and fitness for a particular purpose on those arising by law, statute, usage of trade, course of dealing or otherwise. Matrikon shall not be liable for any losses or damages of any kind caused or alleged to be caused directly or indirectly from this manual. LICENSE AGREEMENT This document and the software described in this document are supplied under a license agreement and may only be used in accordance with the terms of that agreement. Matrikon reserves the right to make any improvements and/or changes to product specifications at any time without notice. TRADEMARK INFORMATION The following are either trademarks or registered trademarks of their respective organizations: Matrikon and MatrikonOPC are trademarks or registered trademarks of Matrikon Inc. OTHER MatrikonOPC™ is a division of Matrikon™ Inc. MatrikonOPC Modbus Driver v4.5.1 User’s Manual 4 Table of Contents 0BIntroduction ..................................................................................................................... 7 6BWho Should Use This Manual .............................................................................................. 7 7BOverview of Manual ........................................................................................................... 7 8BReferences ....................................................................................................................... 8 9BDocument Terminology ...................................................................................................... 8 1BGetting Started................................................................................................................. 9 10BSystem Requirements ........................................................................................................ 9 19BSoftware Requirements ................................................................................................... 9 20BHardware Requirements .................................................................................................. 9 1BModbus Implementation ..................................................................................................... 9 12BInstalled Files ................................................................................................................. 10 13BLicensing ........................................................................................................................ 11 14BContacting Support .......................................................................................................... 11 2BConfiguration ................................................................................................................. 13 15BDriver Configuration ........................................................................................................ 13 21BCreating Objects ........................................................................................................... 13 2BCreating and Configuring a Modbus Ethernet PLC (TCP/IP) Device ...................................... 15 23BCreating and Configuring a Modbus Serial Port Device ....................................................... 17 24BCreating and Configuring a Modbus Serial Device .............................................................. 22 25BCreating and Configuring a Modbus Serial Slave Port Device .............................................. 25 26BCreating and Configuring a Modbus+ SA85 or PCI85 Card.................................................. 27 27BCreating and Configuring a Modbus+ Device .................................................................... 28 29BCreating and Configuring a Redundancy Group Object ....................................................... 30 30BCreating and Configuring a Server Status List .................................................................. 30 31BCreating and Configuring a TCP/IP Terminal Server Device ................................................ 31 32BCreating and Configuring a Terminal Server PLC Device ..................................................... 32 3BCreating and Configuring a UDP Port Device ..................................................................... 35 34BCreating and Configuring a Modbus UDP Device ................................................................ 36 3BOPC Data Items .............................................................................................................. 39 16BModbus Items ................................................................................................................. 39 35BExamples ..................................................................................................................... 40 4BLimitations ..................................................................................................................... 42 5BTroubleshooting ............................................................................................................. 43 17BProblems and Solutions .................................................................................................... 43 18BQuestions and Answers .................................................................................................... 44 Table of Figures Figure Figure Figure Figure Figure Figure Figure Figure Figure Figure 1 - Insert New Object Window ............................................................................ 2 - Create New Modbus Ethernet PLC (TCP/IP) Window ..................................... 3 - Create New Modbus Serial Port Window – COMM Port Tab............................. 4 - Create New Modbus Serial Port Window – Advanced Options Tab .................. 5 - Create New Modbus Serial Device Window..................................................... 6 - Insert New Object .......................................................................................... 7 - Create New Modbus Serial Slave Port Window ............................................... 8 - Create New Modbus+ SA85 or PCI85 Card Window........................................ 9 - Create New Modbus+ Device Window ............................................................ 10 - Insert New Object ........................................................................................ MatrikonOPC Modbus Driver v4.5.1 User’s Manual 13 15 18 20 23 24 25 27 29 30 5 Figure Figure Figure Figure Figure Figure Figure 11 12 13 14 15 16 17 - Create New TCP/IP Terminal Server Window............................................... Create New Terminal Server PLC Window .................................................... Insert New Object ........................................................................................ Create New UDP Port Window ...................................................................... Create New Modbus UDP Device Window ..................................................... Insert New Object ........................................................................................ Configuration Example ................................................................................. 31 33 34 35 37 38 40 Table of Tables Table 1 - Terms and Definitions........................................................................................ 8 Table 2 - Supported Features ......................................................................................... 10 Table 3 - Files Installed in "Modbus" Folder (For Stand-Alone Server) .......................... 10 Table 4 - Files Installed in "Modbus" Folder (For UCS Driver Module) ............................ 11 Table 5 - MatrikonOPC Support Regional Contact Information ....................................... 12 Table 6 - After-Hours Support ........................................................................................ 12 Table 7 - Objects Available Under Insert New Object Window ....................................... 14 Table 8 - Create New Modbus Ethernet PLC (TCP/IP) Window Components .................. 16 Table 9 - Create New Modbus Serial Port Window – COMM Port Tab Components .......... 19 Table 10 - Create New Modbus Serial Port Window – Advanced Options Tab Components ....................................................................................................................................... 21 Table 11 - Create New Modbus Serial Device Window Components ................................ 24 Table 12 - Create New Modbus Serial Slave Port Window Components .......................... 26 Table 13 - Create New Modbus+ SA85 or PCI85 Card Window Components ................... 27 Table 14 - Create New Modbus+ Device Window Components ....................................... 30 Table 15 - Create New TCP/IP Terminal Server Window Components............................ 32 Table 16 - Create New Terminal Server PLC Window Components ................................. 34 Table 17 - Create New UDP Port Window Components ................................................... 36 Table 18 - Create New Modbus UDP Device Window Components .................................. 38 Table 19 - Available Item Options .................................................................................. 40 Table 20 - Sample Item IDs ........................................................................................... 41 MatrikonOPC Modbus Driver v4.5.1 User’s Manual 6 Introduction 0B This MatrikonOPC™ Modbus Driver is an OPC product that enables data interchange between OPC clients and Modbus-compliant devices. Each read/write with the device is optimized to maximize throughput. This driver can be configured with the following connection types: Modbus Serial (RS-232, RS-422, or RS-485, as available on the user’s computer) Ethernet (TCP/IP or UDP) The limit on the number of connections is determined by the user’s computer RAM and the number of physical ports available for use. There are no limits built into the OPC driver itself. This driver supports the following operations: Modbus This product is commonly used in many industries. Modbus is a standard protocol. Who Should Use This Manual 6B This manual is intended for use by all users of the MatrikonOPC Modbus Driver. This manual explains how to install and configure the software, and how to perform common tasks. In addition, technical information about OPC data items is included, along with sections on diagnostics and troubleshooting. Overview of Manual 7B This document uses icons to highlight valuable information. Remember these icons and what they mean, as they will assist you throughout the manual. This symbol denotes important information that must be acknowledged. BOLD Font displayed in this color and style indicates a hyperlink to the applicable/associated information within this document, or if applicable, any external sources. The User’s Manual has been designed so that you can click on references in the document to jump to that referenced point without having to scroll through several pages (in some cases). For example, if you were to see the sentence “Refer to Figure 1 for more information”, pressing the CTRL key and clicking your mouse on the text “Figure 1” will automatically take you to the location of Figure 1 within the document. This manual consists of several sections and is structured as follows: Introduction – this introductory chapter. Getting Started – provides information on the minimum system requirements, and how to contact MatrikonOPC’s Support team. Configuration – shows how to configure the driver, and describes each component in detail, including windows/screens, panels, tabs, and menu commands. OPC Data Items – describes the driver’s items. Troubleshooting – provides solutions for common problems that may be encountered, and answers to frequently asked questions. MatrikonOPC Modbus Driver v4.5.1 User’s Manual 7 References 8B This document references information found within the following documents/sites: www.opcfoundation.org H www.matrikonopc.com H www.opcsupport.com H www.modbus.org H H Modicon Modbus Protocol Reference Guide Modbus Application Protocol Specification Document Terminology 9B The terms screen and window, and tab and panel are used interchangeably throughout this document. Table 1 provides a list of definitions for terms used throughout this document. X X Term/Abbreviation Description ACL Access Control List. COM Component Object Model. A method for organizing software, specifying how to build components that can be dynamically interchanged. DA OPC Data Access. Provides access to real-time process data. DCOM Distributed Component Object Model. An extension of COM that allows communication between COM components over a network. DDE Dynamic Data Exchange. Allows the transfer of data between two running applications. FIFO First In, First Out. The way data stored in a queue is processed. HDA OPC Historical Data Access. Matrikon Matrikon Inc. MatrikonOPC Matrikon’s brand name for its OPC servers and clients. OPC A communication standard. Refer to www.opcfoundation.org for more information. PLC Programmable Logic Controller. H H Table 1 - Terms and Definitions MatrikonOPC Modbus Driver v4.5.1 User’s Manual 8 Getting Started 1B This chapter contains important information about configuring the driver and how to contact Matrikon’s Support team. The System Requirements section shows how to avoid future problems by ensuring that the system meets the minimum software and hardware requirements. H H Refer to the Licensing section for information on how to obtain the appropriate license. The Licensing section will refer you to the Licensing Procedures document that was installed along with the driver and this User’s Manual. The Contacting Support section provides you with contact information for the MatrikonOPC Support team, should you have any problems during the installation or licensing of the software. H H H H System Requirements 10B The software has minimum Software and Hardware system requirements. These requirements must be met for the software to function properly. H H H H Software Requirements 19B The driver requires the following software: Microsoft Windows XP SP2, or Microsoft Windows 2003, or Microsoft Windows 2000 SP4 Microsoft .NET 2.0 Framework (included with this install program) Note: It is recommended that the most current service packs are installed. Hardware Requirements 20B The driver requires the following hardware: Intel® Pentium® 4 Processor 512 MB RAM 40 GB 7200 RPM hard drive The driver requires the additional hardware listed below to make use of the following functionality: For Ethernet communication with Modbus devices: Windows-compatible Ethernet network card. For Serial communication with Modbus devices: Windows-compatible Serial Port. Modbus Implementation 1B For information about Modbus, refer to the documentation found at www.modbus.org. H H Table 2 lists and describes the supported features. X X Function Code Description Supported? 01 Read Coil Status YES 02 Read Input Status YES MatrikonOPC Modbus Driver v4.5.1 User’s Manual 9 Function Code Description Supported? 03 Read Holding Registers YES 04 Read Input Registers YES 05 Force Single Coil 06 Preset Single Register 07 Read Exception Status 11 Fetch Communications Event Counter 12 Fetch Communications Event Log 15 Force Multiple Coils YES 16 Present Multiple Registers YES 17 Report Slave ID 20 Read General Reference 21 Write General Reference 22 Mask Write 4X Register 23 Read/Write 4X Registers 24 Read FIFO Queue YES Table 2 - Supported Features Installed Files 12B The MatrikonOPC Modbus Driver may be installed as a UCS driver module or as a stand-alone OPC server. The installation program copies all necessary files to the target computer and creates shortcut icons in the Start menu. For information on non-driver-specific files that are installed on the system, please refer the MatrikonOPC Universal Connectivity Server User’s Manual or the MatrikonOPC Server User’s Manual. The driver specific files listed in Table 3 are installed by default, if the driver is installed as a standalone server, in the following location: X X C:\Program Files\Matrikon\OPC\Modbus File Name Description MatrikonOPC Modbus Driver Release Notes.pdf Release Notes for this driver. MatrikonOPC Modbus Driver User Manual.pdf User’s Manual for this driver. OPCModbus.exe Driver executable. PSTCFGModiconLib.ocx Driver ActiveX configuration panel. Videos/Modbus Ethernet.wmv Instructional video demonstrating how to set up Ethernet Modbus. Videos/Modbus Serial.wmv Instructional video demonstrating how to set up Serial Modbus. Table 3 - Files Installed in "Modbus" Folder (For Stand-Alone Server) MatrikonOPC Modbus Driver v4.5.1 User’s Manual 10 The driver-specific files listed in Table 4 are installed by default, if the driver is installed as a UCS driver module, in the following location: X X C:\Program Files\Matrikon\OPC\UCS\Drivers\Modbus File Name Description MatrikonOPC Modbus Driver Release Notes.pdf Release Notes for this driver. MatrikonOPC Modbus Driver User Manual.pdf User’s Manual for this driver. ModbusSIL.dll Driver module. PSTCFGModiconLib.ocx Driver ActiveX configuration panel. Videos/Modbus Ethernet.wmv Instructional video demonstrating how to set up Ethernet Modbus. Videos/Modbus Serial.wmv Instructional video demonstrating how to set up Serial Modbus. Table 4 - Files Installed in "Modbus" Folder (For UCS Driver Module) Licensing 13B Most MatrikonOPC products require some form of licensing criteria be met to ensure that it functions successfully The MatrikonOPC Modbus Driver supports both hardware and software licensing. IMPORTANT TO NOTE: The following licensing information is described in detail within the Licensing Procedures document which accompanies the MatrikonOPC Modbus Driver software and User’s Manual: Hardware and software key licensing information. Information about the MatrikonOPC Licensing Utility that is used to license driver software, and the variety of ways in which licenses can be obtained (e.g., Internet Connection, Web Page, Email). Licensing Q&A and Troubleshooting. Contacting Support 14B The MatrikonOPC Customer Services department (www.opcsupport.com) is available 24 hours a day, seven days a week. H H Contact MatrikonOPC Support using the information below, or send an email ([email protected]). H H For Monday to Friday daytime support requests, contact MatrikonOPC Support using the regional phone numbers provided in Table 5. X X Region North America UTC/GMT -7 hours (MST) Europe /Africa * Office Hours Contact Information 8:00 am-5:00 pm +1-877-OPC-4-ALL 9:00 am-5:00 pm +49-221-969-77-0 MatrikonOPC Modbus Driver v4.5.1 User’s Manual 11 Region Office Hours UTC/GMT +1 hours (CET) Contact Information (Request OPC Support) Middle East * 9:00 am-5:00 pm UTC/GMT +3 hours Australia/Asia * 9:00 am-5:00 pm UTC/GMT +10 hours (AEST) +973-174-65363 +61-2-4908-2198 (Request OPC Support) * Toll-free regional numbers coming soon! Table 5 - MatrikonOPC Support Regional Contact Information For after-hours support in all regions, please use either of the following numbers. There is no extra charge from MatrikonOPC for calling their after-hours support numbers. Region Contact Information +1-780-231-9480 All +1-780-264-6714 Table 6 - After-Hours Support MatrikonOPC Modbus Driver v4.5.1 User’s Manual 12 Configuration 2B The driver’s GUI allows users to view and alter configuration parameters at run time. When a user views a configuration parameter, the information is retrieved and displayed. The updated parameters are sent as a group to the driver when submitted. Minimal configuration of the MatrikonOPC Modbus Driver is required for it to function properly, but users can customize the driver’s behaviour as required. This chapter shows you how to configure the driver and describes each component in detail, including the windows, panels, and menu commands. The Driver Configuration section describes in detail how to configure the driver. H H Driver Configuration 15B The driver requires minimal configuration for it to run properly. You can also customize the driver’s behaviour as required. This section shows users how to create and edit objects using the Configuration window. Creating Objects 21B The Insert New Object and Create New windows are used to create Modbus Device Link objects. Insert New Object Window The Insert New Object window (Figure 1) displays a different set of options depending on the type of object selected and the types of objects already configured under it. 36B X X Note: Use the scroll bar at the bottom of the window to view all available options. Figure 1 shows two views of the same window so that you can see all of the available options; one view with the scroll bar moved to the left, and one with the scroll bar moved to the right. X X Figure 1 - Insert New Object Window Table 7 describes the types of objects that are available for insertion as a child in the Insert New Object window, depending on the object currently selected. X X Selected Object Insert New Object Window Options Modbus Ethernet PLC (TCP/IP) Modbus (Root Configuration) Modbus Serial Port Modbus Serial Slave Port Modbus+ SA85 or PCI85 Card Redundancy Group Server Status List TCP/IP Terminal Server MatrikonOPC Modbus Driver v4.5.1 User’s Manual 13 Selected Object Insert New Object Window Options UDP Port Modbus Ethernet PLC (TCP/IP) Not available. Modbus Serial Port Modbus Serial Device Modbus Serial Slave Port Modbus Serial Device Modbus+ SA85 or PCI85 Card - *Note: This option will only be available if driver of the card is installed. Modbus+ Device Redundancy Group Not available. TCP/IP Terminal Server Terminal Server PLC UDP Port Modbus UDP Device Table 7 - Objects Available Under Insert New Object Window To insert a new object: 1. On the Configuration window, either select the Define New menu option from the Edit menu, or click on the icon. 2. The Insert New Object window (Figure 1) appears. X X 3. From the displayed list, select the type of object to be created. Note: Different objects may be available depending on which object is currently selected in the tree view. 4. Click on the OK button. 5. The Create New window appears. To create a newly inserted object: 1. From the Create New window, enter a name for the object. This name is part of the item ID that globally identifies data items from under the object. Users may also choose to enter a description of the object. 2. Edit the configuration components as desired. 3. Click on the OK button. The object is created. Note: For the object to be used for communication, it must be enabled (i.e., Enabled checkbox is selected). This can be done at any time. Create New Window A device-specific window is displayed for each Modbus device: 37B Modbus Ethernet PLC (TCP/IP) H Modbus Serial Port H Modbus Serial Slave Port H Modbus+ SA85 or PCI85 Card H Redundancy Group H Server Status List H MatrikonOPC Modbus Driver v4.5.1 User’s Manual 14 TCP/IP Terminal Server H UDP Port H Modbus Serial Device H Terminal Server PLC H Modbus UDP Device H The following sections contain information on the types of objects available and how to create and configure them. Creating and Configuring a Modbus Ethernet PLC (TCP/IP) Device 2B The Create New window (Figure 2) displays the settings available for a connection to a Modbus Ethernet PLC (TCP/IP) device. X X Figure 2 - Create New Modbus Ethernet PLC (TCP/IP) Window Table 8 describes the components of the Create New Modbus Ethernet PLC (TCP/IP) window. X X Component Name Description Name of the object, which becomes an element of the item ID for data items under the object. MatrikonOPC Modbus Driver v4.5.1 User’s Manual 15 Component Description Automatically converted to title case for display purposes. Enabled Use this checkbox to enable (i.e., checkbox is selected) or disable (i.e., checkbox is cleared) communication for the object. Description This field is optional, takes any user-defined text (64-character maximum) for documentation purposes. By default, this field is blank. Hostname The network name of the device. IP Address The IP address of the device. Port Number The TCP port on which the device is listening. Modbus Address The Modbus address of the device (maximum length of 255). If set to 0, writing to this device will cause a Modbus broadcast message to go out to all devices on the communications port, writing to all devices simultaneously. When using a Modbus address of 0, you cannot read tags through the device link. Change the address to match the address of the Modbus slave from which you wish to read data. ASCII Mode If this checkbox is selected, communication will occur in ASCII mode. Confirm Connection If this checkbox is selected, a read will occur on register 0:00001 to verify the connection by trying to read the point. Reply Timeout The number of milliseconds to wait before a timeout occurs (maximum of 30000 milliseconds). Retries The number of retries if timeouts occur (maximum of 10). Reconnect Delay The number of seconds to wait before re-trying the connection (maximum of 3600 seconds). Max. Registers and Coil blocks per Transmission The maximum number of registers to read/write per transmission (maximum of 123). Setting this value to 0 will cause the server to select the optimal size. Table 8 - Create New Modbus Ethernet PLC (TCP/IP) Window Components To create a Modbus Ethernet PLC (TCP/IP) device: 1. On the Configuration window, select the Modbus configuration item and either: Right-click your mouse and select Define New from the menu that appears, or Select the Define New menu option from the Edit menu, or Click on the icon. 2. The Insert New Object window (Figure 1) appears. X X 3. From the displayed list, select the Modbus Ethernet PLC (TCP/IP) object type. 4. Click on the OK button. 5. The Create New window appears (Figure 2). X MatrikonOPC Modbus Driver v4.5.1 User’s Manual X 16 Note: The item selected in the Insert New Object window will determine which Create New window is displayed. For example, when Modbus Ethernet PLC (TCP/IP) is selected, then the Create New Modbus Ethernet PLC (TCP/IP) window is displayed. 6. From the Create New window, enter a name for the device link. Note: An error message is displayed when a valid name is not entered. If the entered name is a duplicate of an existing device link, the new device link will not be created. The Description field is optional. 7. Edit the configuration components as desired. Note: For the object to be used for communication, it must be enabled (i.e., the Enabled checkbox is selected). This can be done at any time. 8. Click on the OK button. The object is created and will appear as a child of the Modbus configuration item. Creating and Configuring a Modbus Serial Port Device 23B The Create New window (Figure 3) displays the settings available for a connection to a Modbus Serial Port. X X The Create New Modbus Serial Port window consists of two tabs: COMM Port H Advanced Options H H MatrikonOPC Modbus Driver v4.5.1 User’s Manual 17 COMM Port Tab 38B Figure 3 - Create New Modbus Serial Port Window – COMM Port Tab Table 9 describes the components of the Create New Modbus Serial Port – COMM Port tab. X X Component Description Name Name of the object, which becomes an element of the item ID for data items under the object. Automatically converted to title case for display purposes. Note: This information stays consistent across both tabs. Enabled Use this checkbox to enable (i.e., checkbox is selected) or disable (i.e., checkbox is cleared) communication for the object. Note: This information stays consistent across both tabs. Description Port This field is optional, takes any user-defined text (64-character maximum) for documentation purposes. By default, this field is blank. Note: This information stays consistent across both tabs. From the drop-down list, select the serial port to which the device is connected. MatrikonOPC Modbus Driver v4.5.1 User’s Manual 18 Component Description Default = COM1 Define the communication rate by selecting a value from the drop-down list. Values range between 110 and 256000. Default = 9600 Baud Rate Define the number of data bits by selecting a value from the drop-down list. Values range between 4 and 8. Data Bits Default = 8 Parity From the drop-down list, select the type of parity to be used. Options available are None, Odd, Even, Mark, and Space. Default = Even Stop Bits From the drop-down list, select the number of stop bits. Options available are 1, 1.5, and 2. Default = 1 Reply Timeout The number of milliseconds to wait for a device response before a timeout occurs (maximum of 30000 milliseconds). Note: This information stays consistent across both tabs. Retries The number of retries if timeouts occur (maximum of 10). Note: This information stays consistent across both tabs. Reconnect Delay The number of seconds to wait before re-trying the connection (maximum of 3600 seconds). Note: This configuration will be overridden by the Reconnect Delay of the Serial Device. Note: This information stays consistent across both tabs. Intermessage Delay The number of milliseconds to wait between messages (maximum of 60000 milliseconds). This delay can help control traffic load on the serial connection. Note: This information stays consistent across both tabs. Table 9 - Create New Modbus Serial Port Window – COMM Port Tab Components Advanced Options Tab The Create New Modbus Serial Port – Advanced Options tab (Figure 4) displays the advanced settings available for a connection to a serial port. 39B X MatrikonOPC Modbus Driver v4.5.1 User’s Manual X 19 Figure 4 - Create New Modbus Serial Port Window – Advanced Options Tab Table 10 describes the components of the Create New Modbus Serial Port – Advanced Options tab. X X Component Name Description Name of the object, which becomes an element of the item ID for data items under the object. Automatically converted to title case for display purposes. Note: This information stays consistent across both tabs. Enabled Use this checkbox to enable (i.e., checkbox is selected) or disable (i.e., checkbox is cleared) communication for the object. Note: This information stays consistent across both tabs. Description This field is optional, takes any user-defined text (64-character maximum) for documentation purposes. By default, this field is blank. Note: This information stays consistent across both tabs. DSR Flow Control This checkbox allows you to enable (i.e., select the checkbox) or disable (i.e., clear the checkbox) Data Set Ready (DSR) flow control. MatrikonOPC Modbus Driver v4.5.1 User’s Manual 20 Component Description Default = checkbox is cleared. CTS Flow Control DSR Sensitivity This checkbox allows you to enable (i.e., select the checkbox) or disable (i.e., clear the checkbox) Clear To Send (CTS) flow control. Default = checkbox is cleared. This checkbox allows you to enable (i.e., select the checkbox) or disable (i.e., clear the checkbox) Data Set Ready (DSR). Default = checkbox is cleared. XON/XOFF Flow Control This checkbox allows you to enable (i.e., select the checkbox) or disable (i.e., clear the checkbox) XON/XOFF software flow control. Default = checkbox is cleared. RTS Control From the drop-down list, select a Request To Send (RTS) preset. Available options are Disable, Enable, Handshake, and Toggle. Default = Enable RTS rise delay Allows you to enter the number of milliseconds (to a maximum of 1000) for rise delay. This option available only when RTS Control is set to Enable. Default = 20 DTR Control Allows you to select a Data Terminal Ready (DTR) preset from the dropdown list. Available options are Disable, Enable, and Handshake. Default = Enable RTS drop delay Allows you to enter the number of milliseconds (to a maximum of 1000) for drop delay. This option available only when RTS Control is set to Enable. Default = 20 Reply Timeout The number of milliseconds to wait for a device response before a timeout occurs (maximum of 30000 milliseconds). Note: This information stays consistent across both tabs. The number of retries if timeouts occur (maximum of 10). Retries Note: This information stays consistent across both tabs. Reconnect Delay The number of seconds to wait before re-trying the connection (maximum of 3600 seconds). Note: This configuration will be overridden by the Reconnect Delay of the Serial Device. Note: This information stays consistent across both tabs. Intermessage Delay The number of milliseconds to wait between messages (maximum of 60000 milliseconds). This delay can help control traffic load on the serial connection. Note: This information stays consistent across both tabs. Table 10 - Create New Modbus Serial Port Window – Advanced Options Tab Components To create a Modbus Serial Port device: 1. On the Configuration window, select the Modbus configuration item and either: MatrikonOPC Modbus Driver v4.5.1 User’s Manual 21 Right-click your mouse and select Define New from the menu that appears, or Select the Define New menu option from the Edit menu, or Click on the icon. 2. The Insert New Object window (Figure 1) appears. X X 3. From the displayed list, select the Modbus Serial Port object type. 4. Click on the OK button. 5. The Create New window appears (Figure 3). X X Note: The item selected in the Insert New Object window will determine which Create New window is displayed. For example, when Modbus Serial Port is selected, then the Create New Modbus Serial Port window is displayed. 6. From the Create New window, enter a name for the device link. Note: An error message is displayed when a valid name is not entered. If the entered name is a duplicate of an existing device link, the new device link will not be created. The Description field is optional. 7. Edit the configuration components as desired. Note: For the object to be used for communication, it must be enabled (i.e., the Enabled checkbox is selected). This can be done at any time. 8. Click on the OK button. The object is created and will appear as a child of the Modbus configuration item. Creating and Configuring a Modbus Serial Device 24B Note: A Modbus Serial Device can be created as a child of a Modbus Serial Port device or a Modbus Serial Slave Port device. The Create New window (Figure 5) displays the settings available for a connection to a Modbus Serial Device. X X MatrikonOPC Modbus Driver v4.5.1 User’s Manual 22 Figure 5 - Create New Modbus Serial Device Window Table 11 describes the components of the Create New Modbus Serial Device window. X X Component Description Name Name of the object, which becomes an element of the item ID for data items under the object. Automatically converted to title case for display purposes. Enabled Use this checkbox to enable (i.e., checkbox is selected) or disable (i.e., checkbox is cleared) communication for the object. Description This field is optional, takes any user-defined text (64-character maximum) for documentation purposes. By default, this field is blank. Modbus Address The Modbus address of the device (maximum length of 255). If set to 0, writing to this device will cause a Modbus broadcast message to go out to all devices on the communications port, writing to all devices simultaneously. When using a Modbus address of 0, you cannot read tags through the device link. Change the address to match the address of the Modbus slave from which you wish to read data. MatrikonOPC Modbus Driver v4.5.1 User’s Manual 23 Component Description ASCII Mode If this checkbox is selected, communication will occur in ASCII mode. Confirm Connection If this checkbox is selected, a read will occur on register 0:00001 to verify the connection by trying to read the point. Retries The number of retries if timeouts occur (maximum of 10). Reconnect Delay The number of seconds to wait before re-trying the connection (maximum of 3600 seconds). Note: This configuration will override the Reconnect Delay of the Serial Port. Max. Registers and Coil blocks per Transmission The maximum number of registers to read/write per transmission (maximum of 123). Setting this value to 0 will cause the server to select the optimal size. Table 11 - Create New Modbus Serial Device Window Components To create a Modbus Serial Device: 1. On the Configuration window, select a previously-created Modbus Serial Port device (for assistance, refer to Creating and Configuring a Modbus Serial Port Device) item and either: H H Right-click your mouse and select Define New from the menu that appears, or Select the Define New menu option from the Edit menu, or Click on the icon. 2. The Insert New Object window (Figure 6) appears. X X Figure 6 - Insert New Object 3. From the displayed list, select Modbus Serial Device. 4. Click on the OK button. 5. The Create New window (Figure 5) appears. X X Note: The item selected in the Insert New Object window will determine which Create New window is displayed. For example, when Modbus Serial Device is selected, then the Create New Modbus Serial Device window is displayed. 6. From the Create New window, enter a name for the device link. Note: An error message is displayed when a valid name is not entered. If the entered name is a duplicate of an existing device link, the new device link will not be created. The Description field is optional. MatrikonOPC Modbus Driver v4.5.1 User’s Manual 24 7. Click on the OK button. The object is created and will appear as a child of the Modbus Serial Port item. Creating and Configuring a Modbus Serial Slave Port Device 25B Note: A Modbus Serial Device can be created as a child of a Modbus Serial Port device or a Modbus Serial Slave Port device. For more information, refer to Creating and Configuring a Modbus Serial Device. H H The Create New window (Figure 7) displays the settings available for a connection to a Modbus Serial Slave Port. X X Figure 7 - Create New Modbus Serial Slave Port Window Table 12 describes the components of the Create New Modbus Serial Slave Port window. X X Component Description Name Name of the object, which becomes an element of the item ID for data items under the object. Automatically converted to title case for display purposes. Enabled Use this checkbox to enable (i.e., checkbox is selected) or disable (i.e., checkbox is cleared) communication for the object. Description This field is optional, takes any user-defined text (64-character MatrikonOPC Modbus Driver v4.5.1 User’s Manual 25 Component Description maximum) for documentation purposes. By default, this field is blank. From the drop-down list, select the serial port to which the device is connected. Default = COM1 Port Define the communication rate by selecting a value from the drop-down list. Values range between 110 and 256000. Baud Rate Default = 9600 Define the number of data bits by selecting a value from the drop-down list. Values range between 4 and 8. Default = 8 Data Bits From the drop-down list, select the type of parity to be used. Options available are None, Odd, Even, Mark, and Space. Parity Default = Even From the drop-down list, select the number of stop bits. Options available are 1, 1.5, and 2. Default = 1 Stop Bits Table 12 - Create New Modbus Serial Slave Port Window Components To create a Modbus Serial Slave Port device: 1. On the Configuration window, select the Modbus configuration item and either: Right-click your mouse and select Define New from the menu that appears, or Select the Define New menu option from the Edit menu, or Click on the icon. 2. The Insert New Object window (Figure 1) appears. X X 3. From the displayed list, select the Modbus Serial Slave Port object type. 4. Click on the OK button. 5. The Create New window appears (Figure 7). X X Note: The item selected in the Insert New Object window will determine which Create New window is displayed. For example, when Modbus Serial Slave Port is selected, then the Create New Modbus Serial Slave Port window is displayed. 6. From the Create New window, enter a name for the device link. Note: An error message is displayed when a valid name is not entered. If the entered name is a duplicate of an existing device link, the new device link will not be created. The Description field is optional. 7. Edit the configuration components as desired. Note: For the object to be used for communication, it must be enabled (i.e., the Enabled checkbox is selected). This can be done at any time. 8. Click on the OK button. The object is created and will appear as a child of the Modbus configuration item. MatrikonOPC Modbus Driver v4.5.1 User’s Manual 26 Creating and Configuring a Modbus+ SA85 or PCI85 Card 26B The Create New window (Figure 8) displays the settings available for a connection to a Modbus+ SA85 or PCI85 Card. X X Figure 8 - Create New Modbus+ SA85 or PCI85 Card Window Table 13 describes the components of the Create New Modbus+ SA85 or PCI85 Card window. X X Component Description Name Name of the object, which becomes an element of the item ID for data items under the object. Automatically converted to title case for display purposes. Enabled Use this checkbox to enable (i.e., checkbox is selected) or disable (i.e., checkbox is cleared) communication for the object. Description This field is optional, takes any user-defined text (64-character maximum) for documentation purposes. By default, this field is blank. Card Number The card number is the device number of the card installed. Modbus+ Address The Modbus+ node address of the SA85 or PCI85 card (maximum length of 255). Table 13 - Create New Modbus+ SA85 or PCI85 Card Window Components MatrikonOPC Modbus Driver v4.5.1 User’s Manual 27 To create a Modbus+ SA85 or PCI85 Card: 1. On the Configuration window, select the Modbus configuration item and either: Right-click your mouse and select Define New from the menu that appears, or Select the Define New menu option from the Edit menu, or Click on the icon. 2. The Insert New Object window (Figure 1) appears. X X 3. From the displayed list, select the Modbus+ SA85 or PCI85 Card object type. 4. Click on the OK button. 5. The Create New window appears (Figure 8). X X Note: The item selected in the Insert New Object window will determine which Create New window is displayed. For example, when Create New Modbus+ SA85 or PCI85 Card is selected, then the Modbus+ Device window is displayed. 6. From the Create New window, enter a name for the device link. Note: An error message is displayed when a valid name is not entered. If the entered name is a duplicate of an existing device link, the new device link will not be created. The Description field is optional. 7. Edit the configuration components as desired. Note: For the object to be used for communication, it must be enabled (i.e., the Enabled checkbox is selected). This can be done at any time. 8. Click on the OK button. The object is created and will appear as a child of the Modbus configuration item. Creating and Configuring a Modbus+ Device 27B Note: A Modbus+ Device can be created as a child of a Modbus+ SA85 or PCI85 Card. The Create New window (Figure 9) displays the settings available for a connection to a Modbus+ Device. X X MatrikonOPC Modbus Driver v4.5.1 User’s Manual 28 Figure 9 - Create New Modbus+ Device Window Table 14 describes the components of the Create New Modbus+ Device window. X X Component Description Name Name of the object, which becomes an element of the item ID for data items under the object. Automatically converted to title case for display purposes. Enabled Use this checkbox to enable (i.e., checkbox is selected) or disable (i.e., checkbox is cleared) communication for the object. Description This field is optional, takes any user-defined text (64-character maximum) for documentation purposes. By default, this field is blank. Modbus+ Routing This is the node address of the controller itself, not the SA85 or PCI85 card. Reply Timeout The number of milliseconds to wait before a timeout occurs (maximum of 30000 milliseconds). Retries The number of retries if timeouts occur (maximum of 10). Reconnect Delay The number of seconds to wait before re-trying the connection MatrikonOPC Modbus Driver v4.5.1 User’s Manual 29 Component Description (maximum of 3600 seconds). Table 14 - Create New Modbus+ Device Window Components To create a Modbus+ Device: 1. On the Configuration window, select a previously-created Modbus SA85 or PCI85 Card (for assistance, refer to Creating and Configuring a Modbus+ SA85 or PCI85 Card) item and either: H H Right-click your mouse and select Define New from the menu that appears, or Select the Define New menu option from the Edit menu, or Click on the icon. 2. The Insert New Object window (Figure 10) appears. X X Figure 10 - Insert New Object 3. From the displayed list, select Modbus+ Device. 4. Click on the OK button. 5. The Create New window (Figure 9) appears. X X Note: The item selected in the Insert New Object window will determine which Create New window is displayed. For example, when Modbus+ Device is selected, then the Create New Modbus+ Device window is displayed. 6. From the Create New window, enter a name for the device link. Note: An error message is displayed when a valid name is not entered. If the entered name is a duplicate of an existing device link, the new device link will not be created. The Description field is optional. 7. Click on the OK button. The object is created and will appear as a child of the Modbus+ SA85 or PCI85 Card item. Creating and Configuring a Redundancy Group Object 29B For configuration information of a Redundancy Group object, refer to the MatrikonOPC Server User’s Manual or the MatrikonOPC Universal Connectivity Server User’s Manual. Creating and Configuring a Server Status List 30B For configuration information of a Server Status List refer to the MatrikonOPC Server User’s Manual or the MatrikonOPC Universal Connectivity Server User’s Manual. MatrikonOPC Modbus Driver v4.5.1 User’s Manual 30 Creating and Configuring a TCP/IP Terminal Server Device 31B The Create New window (Figure 11) displays the settings available for a connection to a TCP/IP Terminal Service Device. X Figure 11 - Create New TCP/IP Terminal Server Window Table 15 describes the components of the Create New TCP/IP Terminal Server window. X X Component Name Description Name of the object, which becomes an element of the item ID for data items under the object. Automatically converted to title case for display purposes. Enabled Description Use this checkbox to enable (i.e., checkbox is selected) or disable (i.e., checkbox is cleared) communication for the object. This field is optional, takes any user-defined text (64-character maximum) for documentation purposes. By default, this field is blank. Hostname The network name of the device. IP Address The IP address of the device. Port Number The TCP port on which the device is listening. MatrikonOPC Modbus Driver v4.5.1 User’s Manual 31 Component Description The number of milliseconds to wait before a timeout occurs (maximum of 30000 milliseconds). Reply Timeout Table 15 - Create New TCP/IP Terminal Server Window Components To create a TCP/IP Terminal Server device: 1. On the Configuration window, select the Modbus configuration item and either: Right-click your mouse and select Define New from the menu that appears, or Select the Define New menu option from the Edit menu, or Click on the icon. 2. The Insert New Object window (Figure 1) appears. X X 3. From the displayed list, select the TCP/IP Terminal Server object type. 4. Click on the OK button. 5. The Create New window appears (Figure 11). X Note: The item selected in the Insert New Object window will determine which Create New window is displayed. For example, when TCP/IP Terminal Server is selected, then the Create New TCP/IP Terminal Server window is displayed. 6. From the Create New window, enter a name for the device link. Note: An error message is displayed when a valid name is not entered. If the entered name is a duplicate of an existing device link, the new device link will not be created. The Description field is optional. 7. Edit the configuration components as desired. Note: For the object to be used for communication, it must be enabled (i.e., the Enabled checkbox is selected). This can be done at any time. 8. Click on the OK button. The object is created and will appear as a child of the Modbus configuration item. Creating and Configuring a Terminal Server PLC Device 32B The Create New window (Figure 12) displays the settings available for a connection to a Terminal Server PLC. X MatrikonOPC Modbus Driver v4.5.1 User’s Manual 32 Figure 12 - Create New Terminal Server PLC Window Table 16 describes the components of the Create New Terminal Server PLC window. X X Component Description Name Name of the object, which becomes an element of the item ID for data items under the object. Automatically converted to title case for display purposes. Enabled Use this checkbox to enable (i.e., checkbox is selected) or disable (i.e., checkbox is cleared) communication for the object. Description This field is optional, takes any user-defined text (64-character maximum) for documentation purposes. By default, this field is blank. Modbus Address The Modbus address of the device (maximum length of 255). If set to 0, writing to this device will cause a Modbus broadcast message to go out to all devices on the communications port, writing to all devices simultaneously. When using a Modbus address of 0, you cannot read tags through the device link. Change the address to match the address of the Modbus slave from which you wish to read data. MatrikonOPC Modbus Driver v4.5.1 User’s Manual 33 Component Description Confirm Connection If this checkbox is selected, then a read will occur on register 0:00001 to verify the connection. Retries The number of retries if timeouts occur (maximum of 10). Reconnect Delay The number of seconds to wait before re-trying the connection (maximum of 3600 seconds). Max. Registers and Coil blocks per Transmission The maximum number of registers to read/write per transmission (maximum of 123). Setting this value to 0 will cause the server to select the optimal size. Table 16 - Create New Terminal Server PLC Window Components To create a Terminal Server PLC device: 1. On the Configuration window, select a previously-created TCP/IP Terminal Server device (for assistance, refer to Creating and Configuring a TCP/IP Terminal Server Device) item and either: H H Right-click your mouse and select Define New from the menu that appears, or Select the Define New menu option from the Edit menu, or Click on the icon. 2. The Insert New Object window (Figure 13) appears. X Figure 13 - Insert New Object 3. From the displayed list, select Terminal Server PLC. 4. Click on the OK button. 5. The Create New window (Figure 12) appears. X X Note: The item selected in the Insert New Object window will determine which Create New window is displayed. For example, when Terminal Server PLC is selected, then the Create New Terminal Server PLC window is displayed. 6. From the Create New window, enter a name for the device link. Note: An error message is displayed when a valid name is not entered. If the entered name is a duplicate of an existing device link, the new device link will not be created. The Description field is optional. 7. Click on the OK button. The object is created and will appear as a child of the TCP/IP Terminal Server item. MatrikonOPC Modbus Driver v4.5.1 User’s Manual 34 Creating and Configuring a UDP Port Device 3B The Create New window (Figure 14) displays the settings available for a connection to a UDP Port. X Figure 14 - Create New UDP Port Window Table 17 describes the components of the Create New UDP Port window. X X Component Description Name Name of the object, which becomes an element of the item ID for data items under the object. Automatically converted to title case for display purposes. Enabled Use this checkbox to enable (i.e., checkbox is selected) or disable (i.e., checkbox is cleared) communication for the object. Description This field is optional, takes any user-defined text (64-character maximum) for documentation purposes. By default, this field is blank. Hostname The network name of the device. IP Address The IP address of the device. Port Number The TCP port on which the device is listening. MatrikonOPC Modbus Driver v4.5.1 User’s Manual 35 Component Description Reply Timeout The number of milliseconds to wait before a timeout occurs (maximum of 30000 milliseconds). Retries The number of retries if timeouts occur (maximum of 10). Reconnect Delay The number of seconds to wait before re-trying the connection (maximum of 3600 seconds). Table 17 - Create New UDP Port Window Components To create a UDP Port Device: 1. On the Configuration window, select the Modbus configuration item and either: Right-click your mouse and select Define New from the menu that appears, or Select the Define New menu option from the Edit menu, or Click on the icon. 2. The Insert New Object window (Figure 1) appears. X X 3. From the displayed list, select the TCP/IP Terminal Server object type. 4. Click on the OK button. 5. The Create New window appears (Figure 14). X X Note: The item selected in the Insert New Object window will determine which Create New window is displayed. For example, when UDP Port is selected, then the Create New UDP Port window is displayed. 6. From the Create New window, enter a name for the device link. Note: An error message is displayed when a valid name is not entered. If the entered name is a duplicate of an existing device link, the new device link will not be created. The Description field is optional. 7. Edit the configuration components as desired. Note: For the object to be used for communication, it must be enabled (i.e., the Enabled checkbox is selected). This can be done at any time. 8. Click on the OK button. The object is created and will appear as a child of the Modbus configuration item. Creating and Configuring a Modbus UDP Device 34B The Create New window (Figure 15) displays the settings available for a connection to a Modbus UDP Device. X X MatrikonOPC Modbus Driver v4.5.1 User’s Manual 36 Figure 15 - Create New Modbus UDP Device Window Table 18 describes the components of the Create New Modbus UDP Device window. X X Component Description Name Name of the object, which becomes an element of the item ID for data items under the object. Automatically converted to title case for display purposes. Enabled Use this checkbox to enable (i.e., checkbox is selected) or disable (i.e., checkbox is cleared) communication for the object. Description This field is optional, takes any user-defined text (64-character maximum) for documentation purposes. By default, this field is blank. Modbus Address The Modbus address of the device (maximum length of 255). If set to 0, writing to this device will cause a Modbus broadcast message to go out to all devices on the communications port, writing to all devices simultaneously. When using a Modbus address of 0, you cannot read tags through the device link. Change the address to match the address of the Modbus slave from which you wish to read data. MatrikonOPC Modbus Driver v4.5.1 User’s Manual 37 Component Description Max. Registers and Coil blocks per Transmission The maximum number of registers to read/write per transmission (maximum of 123). Setting this value to 0 will cause the server to select the optimal size. ASCII Mode If this checkbox is selected, communication will occur in ASCII mode. Confirm Connection If this checkbox is selected, then a read will occur on register 0:00001 to verify the connection. Table 18 - Create New Modbus UDP Device Window Components To create a Modbus UDP Device: 1. On the Configuration window, select a previously-created UDP Port device (for assistance, refer to Creating and Configuring a UDP Port Device) item and either: H H Right-click your mouse and select Define New from the menu that appears, or Select the Define New menu option from the Edit menu, or Click on the icon. 2. The Insert New Object window (Figure 16) appears. X X Figure 16 - Insert New Object 3. From the displayed list, select Modbus UDP Device. 4. Click on the OK button. 5. The Create New window (Figure 15) appears. X Note: The item selected in the Insert New Object window will determine which Create New window is displayed. For example, when Modbus UDP Device is selected, then the Create New Modbus UDP Device window is displayed. 6. From the Create New window, enter a name for the device link. Note: An error message is displayed when a valid name is not entered. If the entered name is a duplicate of an existing device link, the new device link will not be created. The Description field is optional. 7. Click on the OK button. The object is created and will appear as a child of the UDP Port item. MatrikonOPC Modbus Driver v4.5.1 User’s Manual 38 OPC Data Items 3B This section describes the OPC data items used in the MatrikonOPC Modbus Driver. Modbus Items 16B The MatrikonOPC Modbus Driver OPC item ID syntax is as follows: [PORT.]DEVICE.X:YYYYY{:N}{D|F|U|P|A}[S}[/ZZ}* Table 19 shows the available item options. X X Field Description PORT Name of the SA85 Card, Serial Port, or UDP Port under which the Modbus device appears. Not required for Modbus Ethernet. DEVICE Name of the Modbus device. Modbus register file number. Not all devices support all file types. X File Type Description Size Read 0 Digital Output Coil 1 bit 1 Digital Input Coil 1 bit 3 Analog Input Register 16 bits 4 Analog Output Register 16 bits 3W Non-Standard Analog Input Register** 32 bits 4W Non-Standard Analog Output Register** 32 bits Write YYYYY Modbus register address. Possible range is from 1 to 65535. The actual range depends on the Modbus device configuration for the particular register file type. D Append a letter D to the end of an item ID to indicate that the 3X or 4X register pairs up with the next register to form a 32-bit integer. For example, 4:00000D reads the least significant word from 4:00000 and the most significant word from 4:00001. F Append a letter F to the end of an item ID to indicate that the 3X or 4X register pairs up with the next register to forma 32-bit IEEE floating-point real. U Append a letter U to the end of an item ID to indicate that the 3X or 4X register should be treated as an unsigned rather than a signed 16-bit integer. S Append a letter S to the end of an item ID after a D or an F to swap the word order from the default (least significant word in lowest address) reverse format (most significant word in lowest address). P Append a letter P to the end of an item ID to indicate that the 4X register should be written to using Function 6. This option may be used in conjunction with a U. When doing so, the P should be placed after the U. This option is available only with the Modbus Ethernet PLC and Modbus Serial devices. ZZ Append a forward slash followed by an integer to the end of an item ID to access an individual bit in a 3X or 4X register. The valid range for the bit index is 0 to 15 or, 0 to 31 if the D modifier is specified. These items are always read-only. A Append an “A” to the end of an item ID to indicate that the item should be parsed as an MatrikonOPC Modbus Driver v4.5.1 User’s Manual 39 Field Description ASCII String. Append a “:N” to the end of the item ID to indicate that the item should be an array of N elements starting from register YYYYY. :N Table 19 - Available Item Options * The syntax does not support items with a combination of D, F, and U modifiers. Although the Tag Studio allows these items to be added, the last letter in the combination is all that will be interpreted when reading values. For example, Port.Device.X:YYYYYDU will act as an unsigned 16-bit value as the D is ignored. ** Registers 3W and 4W are provided in case your unit does not conform to standard Modbus design. They should only be used in your Modbus unit uses the non-standard larger 32-bit registers. Since 32-bit register design is not part of the standard Modbus protocol, we cannot claim to successfully support his mode for any particular device. Examples 35B Consider the configuration shown in Figure 17. X X Figure 17 - Configuration Example The Sample Item IDs shown in Table 20 are examples that could be created from the configuration shown in Figure 18. X X X X Sample Item ID Description Com1.Device1.3:1 Analog Input (AI) register 1 on serial device Device1 communicating using serial port Com1. Com1.Device2.4:3P Analog Output (AO) register 3 on serial device Device2 communicating using serial port Com1. All writes to this register will be done with Function 6. Ethernetplc1.3:7FS AI register 7 on device Ethernetplc1 as a 32-bit IEEE MatrikonOPC Modbus Driver v4.5.1 User’s Manual 40 Sample Item ID Description float-point real with the words swapped (register 8 contains the least significant word). Ethernetplc1.4:8UP AI register 8 on device Ethernetplc1 as an unsigned 16bit integer and using Function 6 to write. Serialslave1.Slave1.4:231F AO register 231 on device Slave1 communicating on serial slave connection Serialslave1 as a 32-bit IEEE float-point real. Tcp-terminal-server.Terminal1.1:3DS DI coil 3 on device Terminal1 communicating on TCP/IP connection Tcp-terminal-server as a 32-bit integer with the words swapped (register 4 contains the least significant word). Bit 3 of Digital Output (DO) coil 4 on device Device1 communicating on UDP connection Udp1. Udp1.Device1.0:4/3 Note: Although the DO register file is normally writable, since this ItemID specifies a bit, it is read-only. Udp1.Device1.1:4U DI coil 4 on device Device1 communicating on UDP connection Udp1 as an unsigned integer. Udp1.Device2.1:9D/31 Bit 16 of DI coil 9 on device Device1 communicating on UDP connection Udp1 as a 32-bit integer (actually bit 15 of register 10). Udp1.Device2.1:9DS/31 Bit 16 of DI coil 9 on device Device1 communicating on UDP connection Udp1 as a 32-bit integer (actually bit 15 of register 9 since the words are reversed). Table 20 - Sample Item IDs MatrikonOPC Modbus Driver v4.5.1 User’s Manual 41 Limitations 4B MatrikonOPC Modbus Driver has the following limitation: 1. Array data type OPC items – OPC items with a data type of Array are read-only. Refer to the MatrikonOPC Modbus Driver Release Notes for known issues. MatrikonOPC Modbus Driver v4.5.1 User’s Manual 42 Troubleshooting 5B The following section addresses some of the most common problems encountered, and questions asked, while using this OPC product. Please check the following Problems/Solutions and Questions/Answers sections before contacting the MatrikonOPC Support team. H H H H Problems and Solutions 17B “This item is set to broadcast (address 0)” error message 40B Problem: While configuring Modbus, I get an error stating “This item is set to broadcast (address 0)”. Solution: If the Modbus address is set to 0, this indicates that the device link is configured for writing to all Modbus slaves that are available. When using a Modbus address of 0, you cannot read tags through the device link. Change the address to match the address of the Modbus slave from which you wish to read data. Trouble communicating through a network 41B Problem: Problems communicating to the Modbus device through a network. Solution: Make sure users can ping the device. 1. Use Start -> Run with the command CMD to bring up a command window. 2. In the command window, enter: Ping ipaddress ( e.g. C:\temp>ping 127.0.0.1 Pinging 127.0.0.1 with 32 bytes of data: Reply from 127.0.0.1: bytes=32 time<10ms TTL=128 Reply from 127.0.0.1: bytes=32 time<10ms TTL=128 Reply from 127.0.0.1: bytes=32 time<10ms TTL=128 Reply from 127.0.0.1: bytes=32 time<10ms TTL=128 Ping statistics for 127.0.0.1: Packets: Sent = 4, Received = 4, Lost = 0 (0% loss), Approximate round trip times in milli-seconds: Minimum = 0ms, Maximum = 0ms, Average = 0ms) Where ipaddress is the IP address of the user’s Modbus device. If it says “no response”, then there are likely network issues between the user’s computer and the Modbus device. Note: Refer to the DCOM Manual to further diagnose any DCOM issues. H H Minimizing communications to the devices 42B Problem: I need to minimize communications with my device. Solution: Consider which items change frequently and which do not. Having your OPC client or clients read different items at different rates (different OPC group update frequency) can result in reduced communications. If some items are not needed for a considerable period, consider having your OPC MatrikonOPC Modbus Driver v4.5.1 User’s Manual 43 client either remove them or disable/deactivate them. MatrikonOPC Modbus will not scan items unless they are actively demanded by at least one OPC client. Group items together sequentially. Modbus will send one packet to read sequential registers. For example: Reg 1 Reg 2 Reg 3 1 read (because registers are sequential) Reg 1 Reg 3 Reg 5 3 reads (because registers are not sequential) Trouble scheduling poll cycles 43B Problem: I need more options to schedule my polls at specific times or better manage the fairness of data access among devices. Solution: MatrikonOPC SCADA Modbus allows significantly more configuration options and is preferable in SCADA environments. Noisy communications 4B Problem: I am having interference problems when communication with my SCADA devices. Solution: MatrikonOPC Modbus has some head and tail squall squelch capabilities. Consider using MatrikonOPC SCADA Modbus for enhanced features. Reads and Writes time out 45B Problem: My device does not seem to want to communicate. All of my Reads and Writes time out. Solution: Check your configuration to make sure it matches the configuration of your Modbus device. In particular, make sure that the data/parity/stop settings match (serial), make sure you are using the correct node number or numbers, and make sure you have the correct IP address and port number (Ethernet Modbus). If your device is a Daniel (32-bit) device supporting Modbus-like protocol, you will need to use the 3W and 4W registers because this device will send and receive twice as much data per register as a normal Modbus device. If the time outs are occurring because your connection is slow, increase the Reply Timeout field value in the Configuration panel. This will increase the amount of time before a time out takes place. Questions and Answers 18B What is RS-485/RS-422 and can I connect it to my computer’s serial port? 46B Question: I don’t have any familiarity with RS-485/RS-422. Is it similar to RS-232? How can my computer talk to an RS-485/RS-422 device? Can I connect it to my computer’s serial ports? Solution: Computers come standard with RS-232 serial ports. RS-485 serial ports must either MatrikonOPC Modbus Driver v4.5.1 User’s Manual 44 be specially purchased, or an RS-232/RS-485 converter must be purchased. RS-485 and RS-422 allow you to serially chain all of the devices to a single communications port. The devices then take turns on the communication port. This allows reduced cost due to having to provide only a single communication port. Also results in reduced bandwidth since the total bandwidth provided to all devices cannot exceed the bandwidth of the communications port. Should I be using the 3W and 4W registers, or the 3 and 4 registers? 47B Question: What should I be using – 3W and 4W registers, or the 3 and 4 registers? Solution: The difference between 3W and 4W registers is the assumption as to the width of one register point. For example, in standard Modbus devices, register 4:1 will send and receive 16 bits of data. Daniel devices using a variant of the Modbus protocol 9 also called Daniel Modbus) use 32-bit registers, and send and receive 32 bits for each register requested or sent. The actual protocol is different, and they are mutually incompatible. A standard Modbus device will not correctly accept data fed to it using the 3W and 4W registers, and a Daniel Modbus device will not correctly accept data fed to it using the 3 and 4 registers. Your Modbus device User’s Manual should indicate whether the device registers are standard (16-bit) or Daniel (32-bit). Generally, if one type does not work, try the other. Search the MatrikonOPC Support Knowledge Base at www.opcsupport.com to find the answers to other commonly-asked MatrikonOPC Modbus Driver questions. H MatrikonOPC Modbus Driver v4.5.1 User’s Manual H 45