1
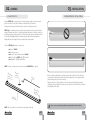
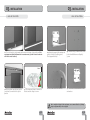
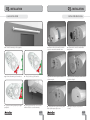
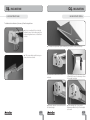
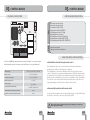
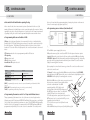
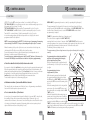
COFRE 136
INSTALLER AND USER’S MANUAL
v1.1
REV. 12/2014
00. CONTENT
01. SAFETY INSTRUCTIONS
▷ INDEX
STANDARDS TO FOLLOW ◁
ATTENTION:
00.CONTENT
▷ index | pág 01.A
▷ To ensure the safety of people, it is important that you read all the following
instructions.Incorrect installation or incorrect use of the product can cause physical
injury and material damage.
▷ Keep these instructions in a safe place for future reference.
▷ This product was designed and produced strictly for the use indicated in this
manual. Any other use, not expressly indicated here, could compromise the good condition/operation of the product and/or be a source of danger.
▷ ELECTROCELOS S.A. is not responsible for the improper use of the product,
or other use than that for which it was designed.
▷ ELECTROCELOS S.A. is not responsible if safety standards were not taken
into account when installing the equipment, or for any deformation that may occur to it.
▷ ELECTROCELOS S.A. is not responsible for the safety and proper operation
when using components not sold by them.
▷ Do not make any modifications to the operator components and / or their
accessories.
▷ Before installation unplug the automatism from the source of power.
▷ The installer must inform the client how to handle the product in case of
emergency and provide this manual to user.
▷ Keep remote controls away from children, to prevent the automated system
from being activated involuntarily.
▷ The customer shall not, under any circumstances, attempt to repair or tune
the operator. Must call qualified technician only.
▷ Connect the awning to a 230V plug with ground wire.
01. SAFETY INSTRUCTIONS
▷ standards to follow | pág 01.B
02. AWNING
▷ characteristics | pág 02.A
03. INSTALLATION
▷ information pre-installation | pág 02.B
▷ wall installation | pág 03.A
▷ ceiling installation | pág 04.B
04. INCLINATION
▷ arm inclination | pág 05.A
▷ safe inclination | pág 05.B
05. CONTROL BOARD
▷ technical specifications | pág 06.A
▷ control board connections | pág 06.B
▷ group or general centralization | pág 06.B
▷ functions | pág 07.A
▷ programming | pág 08.B
▷ safety standards | pág 10.A
▷ connection scheme | pág 10.B
01.A
01.B
02. AWNING
03. INSTALLATION
▷ CHARACTERISTICS
INFORMATION PRE-INSTALLATION ◁
Awning COFRE 136 is a completely closed awning giving total protection from atmospheric conditions to the fabric and interior components of the awning.
Awning articulated arms with twin cable to ensure a better fabric tension.
COFRE 136 is completely automatic and has an integrated electrical system inside the
awning. Rotating brackets in 90° that allow fixing the awning to a ceiling or a wall, also
providing a big angle of adjustement for it. Easy to fix using only two aluminum holders
to the wall/ceiling. Optionally, the awning may be provided with an independent
lighting kit that can be applied to the area protected by the awning.
The kit of COFRE 136 awning is composed of:
▷
▷
▷
▷
▷
01 motor TUB MT
01 emergency crank
02 remote controls with 4 channels MX4SP
01 control board MC6 with effort sensor
02 brackets of fixing wall/ceiling
NOTE: The rain, sun and wind sensor via wireless - WIWEATHER - is optional.
Mount
in
bracke g
ts
Remot
e
contro
ls
Before starting the installation, check the leveling of the wall. If the wall is hollow or
curved, please calibrate the wall with the help of a support in order to properly align
the fastening points (refer to above image).
This point should not be facilitated because the safety and stability of the awning
totally depend on the fixation. If the anchors are not fixed on a solid wall, the risk of the
awning falling will be high.
Crank
Mount
in
bracke g
ts
Cofre 1
36
Please, never open the awning without completely finish the installation!
NOTE: The motor and the control board are already inside the safe.
02.A
02.B
03. INSTALLATION
03. INSTALLATION
▷ WALL INSTALLATION
WALL INSTALLATION ◁
01 - Place the brackets on the awning and measure the distance between them. (It is
very important that this dimension is accurate exact, for the holes to be executed in the correct location).
A
=
04 - Using the support of the awning and
a pencil, mark the four fixing points.
Check perpendicularity.
05 - With the help of a drill machine, make
four holes with Ø20mm and depth of
90mm.
06 - Insert M12 anchors in the holes.
07 - Fasten the bracket with M12 screws
and washers.
100mm
=
02 - Measure that same distance on the
leveled wall, to mark the holes for the
fixation
=
03 - The minimum distance between the
bracket and the ceiling is 100mm.
Due to weight and length of the equipment, we recommend that the following
steps are performed by 2 or more people!
03.A
03.B
03. INSTALLATION
03. INSTALLATION
▷ WALL INSTALLATION
INSTALLATION ON CEILING ◁
08 - Insert the awning on the supports.
01 - Remove the sticker and loosen the
screw to remove the external cover.
09 - Incline the awning as shown above.
10 - First, fit the top of the bracket.
11 - Lower the awning keeping the upper
part fitted.
12 - Finally, fasten one M10 screw on the
wall brackets to secure the awning.
03 - Remove screws to free the inside
aluminum part.
04.A
05 - Turn the interior screw to slide the pin in
order to fit the space of the cover.
02 - Remove the control board and the
transformer.
04 - Rotate that same part until it reaches
the desired angle.
06 - Replace all parts and fasten all
screws.
04.B
04. INCLINATION
04. INCLINATION
▷ INCLINATION OF ARMS
INCLINATION OF COFRE ◁
To calibrate the inclination of the arms, follow the steps below:
01 - Use a screwdriver Nº17 to rotate the
indicated screws. By loosening one of the
bolts must tighten reverse so that there is
no slack.
01 - To make the adjustment of this inclination, first open the awning completely.
02 - The screws will move the knee up or
down, which ever desired.
02 - SLIGHTLY loosen the two screws
indicated.
04 - Turn the interior screw until it reaches
the desired angle.
05.A
03 - During the whole adjustment, assist
by hand the front of the awning to relieve
the weight on the pin.
05 - The awning safe 136 can reach a
maximum inclination of 60ºC when fixed
to the wall.
05.B
05. CONTROL BOARD
05. CONTROL BOARD
CN1
CONTROL BOARD CONNECTIONS ◁
01 ▷ Input connection Earth
02 ▷ Input connection Earth
03 ▷ Input line 230V ~ (FASE)
04 ▷ Input line 230V ~ (NEUTRAL)
05 ▷ Output motor Rise / Closing
06 ▷ Output motor Common
07 ▷ Output motor Descent / Opening
08 ▷ Output present light 230V ~ (FASE)
09 ▷ Output present light 230V ~ (NEUTRAL)
CN2
▷ TECHNICAL SPECIFICATIONS
Input massa antenna.
Input pole control board antenna.
GROUP OR GENERAL CENTRALIZATION ◁
Control board MC6, for awning automation, with possibility to connect presence light
with timer, with operation via remote control and Wireless Sensor (sun/wind/rain).
▷ Power supply
AC 230V 50/60Hz 1000W máx.
▷ Motor output
230V~ 500W máx.
▷ Output courtensy light
230V ~ 500W máx.
▷ Working temperature
▷ Radio receiver
▷ Compatible radio commanders
-20÷55°C
433,92 MHz
12-18 Bit - Rolling Code
▷ Number of radio commands for memorize
5 máx.
▷ Number of sensors Wireless for memorize
1 máx.
▷ Centralization via radio through remote control
The centralization of two or more control boards via radio allows simultaneous
movement of ascending or descending of more awnings.
The centralization is carried out by entering the same codes (keys) from a remote
control to all boards or to a group at a maximum distance of 20 meters from the point
of command, in order to get the general or partial motion of more automations. For a
satisfactory radio centralization, you must choose carefully the location of installation.
The scope is not only connected with the technical characteristics of the device, but
may vary depending on the radioelectric conditions of the location.
▷ Presence Light operation with remote control
It is also possible to program a remote control channel to turn on or off a 230Vac lamp
at a distance, connected to connectors of the board (8-9) CN1.
Whenever it is made a full opening/closing of the awning, the control board
turns off the presence light.
06.A
06.B
05. CONTROL BOARD
05. CONTROL BOARD
FUNCTIONS ◁
▷ FUNCTIONS
▷ Automatic Limit-Switch when opening/closing
first one, the unit exits the programming phase, leaving only a button on the remote
control to work step by step (open/stop/close).
In the control board, there is an automatic system of limit-switch to the use of the
awning. Whenever it is identified an excessive current absorption (by one motor) during
opening/closing, due to the possible presence of an obstacle or the complete movement
of opening/closing, the control board stops immediately the maneuver and relieves.
▷ Programming sensor wireless (sun/wind/rain)
▷ Programming buttons and indicator LEDs
SEL key: selects the type of function to be memorized, the choice is indicated by the
flashing of the LED. Pressing the button more times, it is possible to position yourself in
the desired function. The flashing LED indicates that the selection is active, but the
duration is 15 seconds. At the end of this period, the control board returns to its normal
status.
If you want to memorize a wireless sensor, follow these steps:
1º Turn ON the power supply of the sensor;
SET button: makes the choosen programming with the SEL button.
LED signaling
LED on: option saved
LED off: option not saved
Intermittent LED: option selected.
2º Open the memory of the control board MC6. For this step we have two options:
(option 1) - Open the control board as follows: position with the SEL button flashing
LED CODE. (option 2) - With the awning openned and lighting turned off, continually
press the remote’s opening channel memorized for more than 10 seconds until the
lightof the awning flashes one time;
▷ Main menu
After opening the control board’s memory, you have 10 seconds to send the sensor’s
order to the control board.
Ref. LED
LED OFF
LED ON
CODE
No code
Programmed code
CODE LAMP.
No code
Code of permanent light
programmed
T.MOT
Working Time - 3 min
Motor time programmed
3º (Sensor) Position yourself with the SEL button on the flashing of the LED CODE,
immediately press the SET button of the sensor so that it emits a rapid flashing of the
LED CODE until the light of the awning flashes one time;
CODE (Programming the remote control to operate the awning and the wireless Wind
Sensor)
CODE LAMP (Programming the remote control to operate a lamp)
T.MOT (Programming the Working Time/ motor)
▷ Programming the remote control 1 or 2 keys and Wireless Sensor
The programming of the transmission codes of the remote control is performed as
following: press the SEL button and CODE LED will blink. At the same time, send the first
code (closing) selected with the desired remote control. The LED CODE will flash rapidly.
Send the second code (opening) to be memorized, the LED CODE will remain ON and
programmation is finished. If the second code is not sent within 10 seconds from the
07.A
4º With the SEL button of the sensor, you must now select
the functions you want to leave activated in the
sensor the sun/wind/rain. Press SEL
repeatedly until the LED of the desired
function flashes. With the LED flashing, press
the SET button for more than 1 second until it
is fixed (LED turned on = active function).
To disable any function, repeat point 4 but press the
SET button at least 1 second and the LED goes out,
leaving the function disabled.
5º To test the sensor you should follow the next
instructions:
With the SEL button position yourself on the flashing of the
07.B
05. CONTROL BOARD
05. CONTROL BOARD
PROGRAMMING ◁
▷ FUNCTIONS
LED TEST. Press the SET button for more than 1 second and the LED stays on.
TEST RAIN SENSOR Place a wet finger over the sensor until the awning begins to close
(the awning will close during 5 seconds).
TEST WIND SENSOR Rotate the propeller. The awning will close for 5 seconds.
TEST SUN SENSOR Turn VR1 clockwise (+) and the awning will open for 5 seconds.
Turn the VR1 counterclockwise (-) and the awning will close for 5 seconds.
In case the awning performs the indicated operations successfully, the sensor is
programmed and the test finished.
NOTE: You must deactivate the LED TEST so that, in case of emergency, the awning
closes entirely. If the LED TEST stays on, the awning will only close for 5 seconds.
When the awning close by order of the sensor, we can see what order is being sent,
checking which LED of the sensor is ON, on the board’s monitor.
For more information on how to adjust the wind speed, sensitivity and sensor’s
illuminance, read the manual of Wiweather sensor.
To reset the sensor, simultaneously press the SEL and SET buttons of the sensor for
2 seconds. All LEDs light on and the sensor is back to the factory programming.
▷ Functions deactivation (sun/rain) via remote control
If you want to disable the Sun/Rain functions, please begin by opening the awning and
before the awning finishes the opening by the limit switch, press the transmitter, the
awning will stop immediately and turn off the Sun/Rain functions. However, whenever
the awning does not fully open by being stopped with the remote control, the
Sun/Rain functions are disabled and the Wind function remains active.
To reactivate the functions, let the awning fully open.
▷ Maximum number of memorable Wireless Sensors
The control board can only memorize 1 Wireless Sensor. Programming a new Wireless
Sensor will delete the previously memorized code.
▷ Poor communication of the Sensor
In case of poor of communication between the Wireless Sensor and MC6 control board,
the opening/closing will be automatically activated after 30 minutes. If poor of
communication continues, other remote controls will keep the control board in a state
of security, not allowing the opening of the awning (when receives opening order, it
opens a little bit and returns to the point of closed).
08.A
CODE LAMP (Programming the remote control for operating the light output)
The programming of the channels of the remote control is performed as follows:
position yourself with the SEL button on the flashing of the LED CODE LAMP. Then
send the desired channel of remote control. LED CODE LAMP remains lit and
programming is complete.
T. MOT. (Programming working time - 4 minutes max.)
The control board is supplied with LED T.MOT. OFF,
meaning that the motor time is 3 minutes. With T.MOT LED. OFF and the remote
control programmed, we can move the awning in the opening/closing direction, until
you make the adjustment of the limit switches. Follow the instructions.
The Working Time must always be set!
The programming of the working time must be performed during the closing of the
awning.
Programming the working time with limit
switches only in opening and closing by
effort is performed as follows:
Disadjust completely the closing limit switch
for the awning to close the full course and stop
by effort.
B
A
Programming time of motor
is performed as follows:
With the awning openned and already with
the opening limit switch adjusted, position
A
Limit switches
B
the SEL button to LED T. MOT, press and keep
pressing the SET button and the awning starts
to close.
When the awning finishes the closing and the
motor turns off, release the SET button, and
+
+
the working time is now defined and the LED
CLOSING
OPENING
T.MOT stays on.
When it is intended that the awning stops on
In this example, the motor is installed on the left.
opening and closing by limit switch, with the
When the motor is installed right, reverses the
position (opening goes to the B and closing to the A).
open awning and the two limit switches fully
regulated, with the SEL button, make the LED
T.MOT flash and press without releasing SET button until the awning closes and the
motor stops by limit switch. Wait more 2 seconds and release the SET button. LED
T.MOT will illuminate and working time will be programmed.
-
-
08.B
05. CONTROL BOARD
05. CONTROL BOARD
PROGRAMMING ◁
▷ PROGRAMMING
▷ Menu Extensive 1
▷ Cancellation Codes
The control board is supplied by the manufacturer with the possibility of selecting only the
main menu functions. To enable the functions described in menu 1, proceed as follows:
press the SET button continuously for 5 seconds and then there is the alternating flashing of
the LEDs CODE LAMP and LED T. MOT, in this mode, you have 30 seconds to select the 1
menu functions through the use of SEL and SET buttons, after 30 seconds, the control board
returns to the main menu.
The cancellation of all codes memorized for the functioning of awning (remote controls and
Wireless Sensor), proceed as follows: press the SEL button, LED CODE will flash, and then
press the SET button for less than 1 second, LED CODE turns off and the procedure ends.
MENU Extensive 1
Ref. LED
LED OFF
LED ON
CODE
PGM distance = ON
PGM distance = OFF
CODE LAMP.
Intermittent ON/OFF
T.MOT
Intermittent ON/OFF
The cancellation of all codes memorized for the operation of the permanence of light, is
carried out as follows, press the SEL button until the flashing of the LED CODE LAMP, and
next, press the SET button in less than 1 second, LED CODE LAMP switches off and the
procedure ends.
If necessary restore the control board to the initial factory settings, press the SEL and SET
buttons at the same time and the LED display will be lit temporarily, confirming the success
of the operation.
If you have been reached the memory limit (5 codes), repeating the programming operation,
all indicator LEDs will flash quickly, signaling that are not possible other memorizations.
CODE PGM
Programming a new remote control or Wireless Sensor
▷ Menu Extensive 2
The control board allows programming of another remote control, without intervening
directly in the SEL of the control board, performing an operation at a distance. The
programming code of a remote control on distance, is carried out as follows: with the open
awning and the lighting of the awning is off press continuously, for longer than 10 seconds,
the opening of a channel remote control previously memorized. After 10 seconds the control
board goes into programming mode (indicated by the flashing of the awning lighting the
lamp). Press the closing channel of the new remote control until the awning illumination
light flashes one time, and then press the release channel until the awning illumination light
flashes 1 time (successfully programming).
Programming the remote control, button of illumination the awning
With the illumination on, press continuously the lighting channel of a remote control
previously memorized, for longer than 10 seconds until the awning illumination light flashes
1 time. Press the channel of new remote control to memorize until the awning illumination
light flashes 1 time (successfully programming).
Programming the wireless sensor without access to control board
With open awning and the lighting of the awning off, press continuously the opening
channel remote control that a previously memorired, for longer than 10 seconds until the
awning illumination light flashes 1 time. Position with the SEL button flash to LED CODE
sensor, and then press the sensor SET button to this issue a quick flashing of the LED CODE
until the awning illumination light flashes 1 time (successfully programming).
09.A
The control board is supplied by the manufacturer with the possibility of selecting only the
main menu functions. To enable the functions described in menu 2, proceed as follows:
press the SET button continuously for 5 seconds and then there is the alternating flashing of
the LEDs CODE LAMP and LED T. MOT, in this mode, you have 30 seconds to select the 2
menu functions through the use of SEL and SET buttons, after 30 seconds, the control board
returns to the main menu.
MENU Extensive 2
Ref. LED
LED OFF
LED ON
CODE
12RPM
17RPM
CODE LAMP.
Intermittent ON/OFF
T.MOT
Intermittent ON/OFF
The control board is supplied by the manufacturer with programming for motor 12 RPM.
This function the extensive menu 2 allows be changed. When it comes to awning, to close, if
not use the limit switch of the motor to control board analyzes that the awning closed and
entered into effort and automatic turn off the motor after turning off the motor reverses
direction by thousandths of a second so you do not get to effort the fabric too much.. This
inversion time is selected through the extensive menu 2, in accordance with the motor
installed in the case of a motor 17 or 12 rotations to that the awning not reverse too much
time.
09.B
05. CONTROL BOARD
05. CONTROL BOARD
CONNECTION SCHEME ◁
▷ SAFETY STANDARDS
IMPORTANT FOR THE USER
SEL
- The device should not be used by children or people with limited physical capacity; only if
supervised by an adult or if instructed on the mode of use.
- Do not allow children to play with the device and keep the remote controls out of reach.
- ATTENTION: keep this instruction manual and respect the important safety prescriptions
contained herein. Failure to follow the prescriptions may cause serious damage and
accidents.
- Examine frequently the installation to detect possible damage signals. Do not use the
device if it needs repairements.
CN2
SET
CODE
CODE L.
FUSE
FUSE
IMPORTANT FOR THE INSTALLER
230V
CN1
- The control board is designed to allow the installer to automate closing and meet the
requirements of current regulations. The effective obtain of the obligations and obtaining
the minimum security requirements is always installer duty.
We advise you perform the installation in accordance with EN 60335-2-97 "Safety of
household and similar use" Part 2 "Special rules for motors for movemnt of shutters,
external awnings, curtains and appliances of similar winding"
- The control board must be permanently connected to the power supply and not present
any type of sectioning device power line 230 Vac, so the installer must to provide a
sectioning device in the implant. You must install a unipolar switch with category III
overvoltage, which must be positioned so as to be protected from accidental closures.
- For connections (power, output motors) it is advisable to use flexible cables with
insulating enclosure harmonized type policloropeno (H05RN-F) with minimum section of
the conductors equal to 0.75 mm².
- The fixing of the connection cables must be guaranteed by the assembly of the cable
clamp provided within the product.
For correct operation of the radio receiver, in case of using two or more control boards, the
installation is recommended with a distance of at least 3 meters between them.
In case of using two or more control boards, it is advisable to avoid radio interference, use
only the Wind Sensor one type of Wireless.
1
2
F
N
3
4
LAMP
COM
5
6
7
8
T.MOT.
9
MOTOR
ATTENTION
All operations which require the opening of the enclosure (cable connection, programming,
etc.) must be made in the installation phase by qualified personnel.
For other operation that reorder the opening of the enclosure (reprogramming, repair or
installation changes, contact technical support.
MC6
conforms to the requirements of Directives R & TTE 99/5/EC, EMC 2004/108/EC, LVD
2006/95/EC
10.A
10.B