1
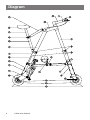
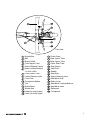
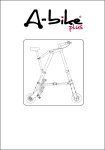
USER MANUAL PLEASE READ BEFORE ATTEMPTING TO OPEN THE BIKE Design registered and patented 2 A-bike User Manual 3 Introduction Congratulations and welcome to the A-bike, the world’s lightest and smallest folding bicycle. Before using the bike you must read these instructions. Designed for short trips and mixed mode transport the A-bike is unique in concept and design. This booklet will introduce you to, show you how to use, take care of and to make repairs to your A-bike. It is vital that you use and maintain the bike correctly to avoid damaging the product and harming yourself. Please pay particular attention to notes highlighted in a box as these are especially important and must be remembered at all times. TThe geometry of the A-bike is quite different from any other bike and hence may feel a little strange at first. After a bit of practice we are sure you will find the bike easy and comfortable to ride. Getting to know your A-bike will enable you to get the most out of it and know the limits, enabling you to use it safely. Box contents • A-bike folding bicycle • A-bike toolkit • A-bike user manual 4 A-bike User Manual Warnings Rider weight limit The bike has a maximum weight limit of 95 kg (210 lbs), this includes the rider and anything the rider is carrying, for example a back pack. Not a mountain bike The A-bike is designed for smooth roads and it’s lightweight construction means it’s not suitable for rough surfaces or off-road riding. Do not attempt stunts on the bike and avoid sudden drops or rises such as curbs. No maintenance tires The A-bike uses tubeless tires with a sealed, internal air chamber for shock absorption. Air pressure cannot be adjusted. Quick release levers and locking buttons When opening the bike ensure that all the locking buttons pop out. The two quick release levers should be hand tight and firmly secured. Donʼt step on the crosspiece The crosspiece is not designed to bear any load. Do not stand on or attach anything to this beam. Important Ages 5+. Choking hazard: contains small parts. Keep away from small children. Assembly and use should always be under adult supervision. Please retain retail receipt for date and purchase location verification. See page 31 for warranty information. 5 Diagram diagram Labelled 6 A-bike User Manual Top view Handle Bar Bell Brake Cable Front Upper Tube Quick Release Clamp Main Locking Buttons (on (on both both sides) side) Front Lower Tube Lower Steering Joint Front Fork Crosspiece Button Tire Brake Band Wheel Hub Pedal (on both sides) Crank (on both sides) Crank Case Rear Lower Tube Rear Upper Tube Outer Seat Tube Seat Clamp Seat Post Saddle Seat Stay Upper Steering Joint Handlebar Grip Brake Lever Handlebar Locking Buttons Handlebar stem Reflectors Crosspiece 7 Riding Safely When riding the A-bike it is important to remember to abide by local bicycle riding laws. Ride defensively and be vigilant of other road users. Always leave a large enough gap between you and obstacles, slow down and stop if necessary. Watch out for uneven surfaces and pot holes. When riding in the dark you should wear high visibility clothing and use lights when appropriate. Wet weather will reduce grip and increase stopping distances; ride slower if necessary. Icy conditions should be avoided entirely. Windy conditions can severely effect riding stability. Always wear a helmet when riding. Always wear suitable shoes. Sandals are not appropriate. Avoid loose clothing and anything that may get caught in the mechanisms of the bike. Become familiar with riding your bike slowly and in a safe environment before heading into areas with other traffic. Store your bike securely and safely in a clean and dry area to avoid damaging the bike. If there are any broken parts, they must be replaced before riding. 8 A-bike User Manual Adjusting saddle Adjusting saddleheight height Before riding riding the the bike, bike, check check that the Before the seat seat height height is is adjusted and that the DGMXVWHG WKH WiUHV DUH brakes LQÁDWHGwork. DQG WKH EUDNHV ZRUN Choosing the Correct Saddle Height :LWK ERWK IHHW ÁDW RQ WKH JURXQG DGMXVW WKH VDGGOH KHLJKW VR WKDW you can comfortably sit on the saddle. 1. Unlock the Seat Post quick release clamp. 2. Slide the Seat Post vertically to DGMXVW WKH 6DGGOH SRVLWLRQ DV UHTXLUHG The minimum insertion line should NOT be visible, it should be inside the outer tube. 3. Once the desired Saddle position has been selected, make sure the saddle is positioned forward and then lock the Seat Post quick release clamp so that you cannot twist the saddle out of alignment. Unlocked Minimum insertion line Locked If the saddle can twist then unlock the quick release lever and tighten with an allen key before locking the quick release again and re-testing. 9 Adjusting the brakes If the brake band is knocked it is possible for it to become misaligned with the braking hub and wheel. If this happens it may be necessary to gently bend the band back into shape. Care must be taken not to cause strain around the brake band mounts. If the brake band rubs against the wheel it can be gently bent away. H Hot brake bands and brake fade The band brakes will become hot when used, be aware of this when storing and handling the bike, allow the brakes to cool. Brake fade may occur when used for long periods of time. A Adjust the brakes ONLY when the bike is fully unfolded and extended as this can effect the brake cables. 10 A-bike User Manual Fine brake cable adjustment To adjust the Right Hand brake (Front wheel): To tighten brake band To loosen brake band Lon Sho Rotate ger rter Rotate Looser Tighter Rear wheel Front wheel Front wheel Front wheel T The fine adjustment wheel can be found on the brake handles. Turn it to change the length of the cable as shown in the diagrams. You may need to hold the cable still to prevent it from rotating. To adjust the rear wheel, do the same as above but on the left hand brake lever. 11 Major brake cable adjustment To loosen a tight brake Relax brake band to reduce braking force. M5 wrench Unscrew Relax cable tension M5 wrench Fasten nut To tighten loose brake When the brake is too loose. In l o sta ngest te Brake lever is close to handlebar AND Brake barrel adjuster is at the longest state. 12 A-bike User Manual Rotate brake barrel adjuster to move the brake barrel fully in. Dis Rotate plac e Unscrew M5 nut by wrench. M5 wrench Unscrew Wrap the brake band closely around the brake barrel, using pliers to pull the cable end out. Pull Enlarged N Tighten the nut Tighten 13 Unfolding the bike Please also refer to the illustrated photo guide which can be found at the beginning of this user manual. Trapped fingers Fold and unfold the bike slowly and take care to avoid trapping fingers, especially when dealing with the pedals. It is important to follow each step in the correct order, the bike does not need a lot of force to be unfolded and can be done in as little as 10 seconds. 1. Lift the Left and Right Handle Bar ends up to the horizontal position and slide them into the centre portion. Check that both locking buttons are fully engaged. 2a. Check BOTH quick release clamps are unlocked. 2b. Raise seat post to horizontal position. 14 A-bike User Manual Check BOTH quick release clamps are unlocked Raise seat post to horizontal position 3. Grasp handlebar stem and rear leg as shown and extend legs until all FOUR quick release buttons are locked. 4. Rotate the Handle Bars 180° clockwise (looking from the top). DO not force it in the wrong direction as this will wrap the brake cable around the stem of the handlebars and damage the bike. 5. Lock both quick release clamps. Quick release levers and locking buttons When opening the bike ensure that the locking buttons pop out. The two quick release levers here should be hand tight and firm. 15 Unfolding the bike (2) 6. To open out the legs, lower the bicycle down gently onto the top of your foot with a tire either side of the foot. As the legs part, simply push down to fully open out. 7. Press the crosspiece centre down until the quick release button pops up and locks. Crosspiece locking button The locking button the crosspiece must pop out when the bar is fully unfolded. 16 A-bike User Manual 8. Align Align the the Pedal Pedal parallel parallel to tothe theCrank, Crank, 8. and fold it outward. Be careful not to and fold it outward. Be careful not to pinch \RXU your ÀQJHUV fingers (on SLQFK 2Q some VRPH models PRGHOV of RI $ELNH WKLV PD\ QRW EH A-bike this may not be necessary). necessary) 9. Now that the A-bike is fully unfolded, check to make sure that both Handle Locking Buttons, four Main Locking Buttons and the Crosspiece Button are fully engaged, the Front and Rear Clamps are locked and the Crosspiece is straight and locked before riding. 17 Folding the Folding the bike bike To fold the bike 1. Press down the locking button on the Crosspiece and lift it up LQWR WKH IROGLQJ SRVLWLRQ 3XVK ERWK VLGHV RI WKH ELNH ÀUPO\ WRJHWKHU you should hear a click as the two sides clip together, this is important for the next step to work. 2. Rotate the handlebars 180 degrees counter clockwise viewed from above. 3. Ensure Ensure both both clamp clamp levers levers are are 3. unlocked. unlocked 18 A-bike User Manual 4. Press and hold all FOUR buttons and simultaneously push down on top of the bike. 5. Saddle will drop under its own weight when legs are fully telescoped down. 6. Press and hold the two Locking Buttons on the handle, pull the Left DQG 5LJKW +DQGOH %DUV RXW DQG ÁLS them down until both are in vertical position. 2 1 2 19 Folding the bike (2) 2 1 3UHVV LQZDUGV WR ÁLS ERWK 3HGDOV XS into vertical position. Be careful not to SLQFK \RXU ÀQJHUV Please ensure the pedals are aligned perpendicular to the crank as per unfolding instructions. 8. Now that the A-bike is successfully folded, you are now ready to carry your portable A-bike to your next destination. 20 A-bike User Manual Maintaining your Maintaining yourbike bike Like all all bikes bikes,the theA-bike A-bikerequires requiressome somesimple simplemainLike maintenance it’s optimum and prevent tenance to runtoatrun it’satoptimum and prevent parts parts from becoming damaged. from becoming damaged. It is vital that you maintain your A-bike! If you notice in a small change in performance of the bike we recommend you check the bike as this is often a sign of the beginning of a potentially serious problem. Weekly checks &KHFN \RXU $ELNH EHIRUH HYHU\ ULGH 6SHFLDO DWWHQWLRQ VKRXOG EH given to brakes, wheels, tires and all quick release clamps and locking buttons. &KHFN ZKHHOV DUH VHFXUHO\ DWWDFKHG WR WKH IUDPH DQG IRUNV are condition. Wheels with worn tires Check &KHFN that WiUHVtire DUHtreads LQÁDWHG WRin good SVL EDU GR QRW XVH FRPPHUshould be replaced. cial air lines) and tread is in good condition. &KHFN EUDNHV ZRUN HIIHFWLYHO\ DQG WKH EDQGV DUH DOLJQHG ZLWK WKH rim. &KHFN SHGDO FUDQNV DQG SHGDOV DUH VHFXUHO\ DWWDFKHG &KHFN DOO IRXU PDLQ ORFN EXWWRQV DUH IXOO\ ORFNHG &KHFN WKH &URVVSLHFH EXWWRQ LV ORFNHG &KHFN ERWK TXLFN UHOHDVH FODPSV DUH ORFNHG &KHFN ERWK KDQGOH EDUV ORFNLQJ EXWWRQV DUH IXOO\ HQJDJHG DQG locked. &KHFN 3HGDOV DUH XQIROGHG DQG ORFNHG &KHFN 6DGGOH DQG VHDW SRVW DUH VHFXUH DQG DGMXVWHG WR WKH correct height. ´/LVWHQLQJFKHFNµ 6SLQ ERWK ZKHHOV DQG OLVWHQ IRU DQ\ UXEELQJ VRXQGV ,QYHVWLJDWH DQG DGMXVW LI EUDNHV DUH UXEELQJ ´6QDJFKHFNµ &KHFN IRU IUD\HG FDEOHV WKDW PD\ VQDJ FORWKHV when riding. Replace worn or damaged cables where necessary. &KHFN IRU DQ\ GHIRUPHG RU FUDFNHG FRPSRQHQWV ZKLFK PXVW EH changed before use. 21 Maintenance Maintenance Clean the bike - dirt is the enemy of a smooth running bike and can eventually cause parts to seize in addition to causing corrosion. Carry out regular cleaning and corrosion protection of all parts of your A-bike. :H UHFRPPHQG ZDVKLQJ WKH $ELNH ZLWK D JHQWOH ÁRZ RI ZDWHU RU from a bucket, using a damp cloth. This is also a great opportunity to visually inspect your bike. Inspect the bike for damage Damage to parts can result in sudden failure of that part. The bike should be regularly inspected, looking for cracks, discolouration of material, scratches and loose fastenings. If damage is found you should contact the vendor and seek advice before attempting to ride the bike. Check your brakes - you should be able to stop the wheel from turning without the brake lever touching the handle grip. Test this ZKHQ VWRRG E\ WKH ELNH 127 ZKLOH ULGLQJ LW ,I \RX QHHG WR DGMXVW LW look at the Repairs section of this user guide. Clean the chain and lubricate regularly, this is vital to reducing ZHDU WR WKH ELNH DQG HIÀFLHQF\ 22 A-bike User Manual Adjusting Adjustingchain chaintension tension The A-bike chain tension is preset in the manufacturing process. If the chain needs to be replaced it should be referred to a bicycle mechanic or an A-bike dealer. If the chain is too slack it may be noisy and if too tight it may make LW GLIÀFXOW WR WXUQ WKH ZKHHO :KHQ YLHZHG WKH FKDLQ VKRXOG KDYH some slack. To adjust chain tension, unscrew and then rotate the Bearing Holder and the opposite one at the same time. Bearing Holder High chain tension Medium chain tension Low chain tension The A-bike has a two-chain drive system. Put the unfolded bike upside down on a clean surface. One chain can be obviously viewed, cleaned and lubricated through the gap in the crank casing where the wheel is. The other chain can be lubricated through a small inspection hole in the centre of the crank casing. 23 Wheelaremoval Fixing puncture Wheels with worn tires should be replaced. If you get a puncture you can repair this using a puncture repair kit suitable for high pressure applications. Removing the front wheel from your A-bike. 1. Remove the nut on the front wheel. 2. Pull the bolt out remembering the order of the spaces and washers for re assembly. Nylon Insert Nut Screw Spacer Spacer Washer 3. Hold the brake band out of the way to drop the wheel out. Take care not to stress the brake band mounting bolts. 5HÀWWLQJ LV WKH UHYHUVH RI UHPRYDO Check that the brake band is correctly aligned on the wheel and that the fasteners are tightened. 24 A-bike User Manual Fixing a puncture (2) Removing the rear wheel from your A-bike. This is a two stage operation. First the brake band is moved out of the way. Then the wheel is removed. 1. Place bike in folded position. (this slackens the brake cable) 2. Remove two Brake Assembly bolts. 3. With the bike folded, use the slack in the brake cable and withdraw the Brake Assembly out of the crank casing. Do not remove cable from Brake band. 4. Remove rear axle bolts. Please note that the bolt on the left hand side of the bike is Left-hand threaded and therefore can be undone by turning clockwise, standard bolts are undone by turning them counter-clockwise. 7R XQGR ERWK EROWV \RX PXVW ÀUPO\ KROG the wheel still while turning each bolt. 25 5. Slightly spread open crank casing to allow the Drive Axle to drop out, take the chain off the sprocket and drop the wheel out. 5HÀWWLQJ LV WKH UHYHUVH RI UHPRYDO &KHFN WKDW WKH EUDNH EDQG LV correctly aligned on the wheel and that the fasteners are securely WLJKWHQHG :KHQ UHÀWWLQJ %UDNH $VVHPEO\ IDVWHQHUV PDNH VXUH WKDW WKH DQWLYLEUDWLRQ ZDVKHUV DUH UHÀWWHG WRR 26 A-bike User Manual Replacing Replacingthe thebrake brakeband band As the brake bands are used they slowly wear, it is important that they are replaced to maintain brake performance and safety. 1. Detach the cap from the cable end by using pliers. (Note: The cap can be reused) Pliers Cap PULL Enlarged N 2. Unscrew the nut until the cable can slide freely. Use M5 wrench to unscrew the nut. Cap Enlarged N 3. Slide the brake band out until the brake cable is completely withdrawn. Cap 4. Unscrew fasteners 'a' and 'b' by using 2.5 mm Allen key. b a 2.5 mm Allen key Unscrew Cap Enlarged N 27 Cap a b Enlarged N Screw x 2pcs Spring washer x 2pcs washer x 2pcs Cap 5. Replace the worn brake band with a new brake band. a b Screw x 2pcs Spring washer x 2pcs washer x 2pcs Enlarged N Take down Worn brake band New brake band 6. Assemble back fasteners 'a' and 'b'. Make sure the screw is passing thought a spring washer followed by the plain washer. Screw Spring washer washer ab Cap Cap 28 A-bike User Manual Replacing the brake band (2) Hole C Cap 7. Lead brake cable end passing through hole 'C'. Cap Nut 8. Check below 'd' and 'e' before tightening the nut. d: brake barrel is always in shortest state. Enlarged N In s sta hortes te t e: BOTH quick release buttons are ejected. ! Ejected buttons 29 9. Wrap the brake band closely around the brake barrel, using pliers to pull the cable end out. Pull Cap Enlarged N 10. Tighten the nut Cap Tighten 11. Plug in cable cap to protect the cable end. 13. Adjust brake barrel to adjust braking force. Cap Enlarged N Sof t bra er ke. 12. Use pliers to clamp the cable cap tight. Pliers Enlarged N REMARK: To replace rear brake band, same as step 1 to 12. 30 A-bike User Manual Har bra der ke. Warranty Frame and components are warranted against defects in manufacturing for 6 months from the date of purchase. This warranty applies only to the original owner and is not transferable. This warranty is expressly limited to the repair or replacement of a defective frame or defective components. The manufacturer, at its sole discretion, reserves the right to replace the entire unit or defective parts only within the warranty period. For service during the warranty period, contact Sportcraft® Customer Service at 1-800-668-5480. Outside the warranty period, take your bike to a local bicycle repair shop where you will be responsible for all costs involved. Sportcraft® is not responsible for incidental or consequential damages or labour charges associated with replacing or repairing parts not covered by the warranty. This warranty does not cover normal wear and tear, follow-up maintenance by non-certified persons, or installation of parts or accessories not originally intended for the A-bike as sold. The warranty does not apply to damage or failure due to accident, misuse, abuse, neglect, incorrect assembly or normal wear. Modification of the frame or components voids this warranty. This warranty gives the consumer specific legal rights which may vary from locale to locale. This warranty does not affect the statutory rights of the consumer. IMPORTANT: Ages 5+. Assembly and use should always be under adult supervision. Please retain retail receipt for date and purchase location verification. Please record your serial number and date of purchase here: 31 Sportcraft® is a registered trademark of ABG-Sportcraft, LLC in the USA and other countries. Sportcraft™ is a trademark of ABG-Sportcraft, LLC. ©2014 ABG-Sportcraft, LLC. Imported and distributed under license by: Core Sports Inc., 6085 Belgrave Rd., Mississauga, Ontario, Canada, L5R 4E6 • Customer service: 1-800-668-5480 • CA 07820 Item# SC20006 MADE AND PRINTED IN CHINA