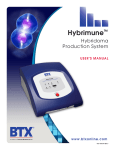
1
TM Cyto Pulse Sciences, Inc. Model PA-96W Programmable 96 Well Driver User Manual Cyto Pulse Sciences, Inc. P. O. Box 609 Columbia, MD 21045 1-410-787-1890 1-410-787-1891 FAX www.cytopulse.com Cyto Pulse Sciences, Inc. makes no warranty with respect to the product except for the warranty set forth in this Users Manual on page 5-1. The LIMITED WARRANTY SET FORTH ON PAGE 5-1 IS EXCLUSIVE AND NO OTHER WARRANTY WHETHER WRITTEN OR ORAL, IS EXPRESSED OR IMPLIED. Cyto Pulse Sciences, Inc. SPECIFICALLY DISCLAIMS IMPLIED WARRANTIES OF MERCHANTABILITY AND FITNESS FOR A PARTICULAR PURPOSE. License Agreement PA-96W Programmable 96-Well Driver Cyto Pulse Sciences, Inc. (Licensor), conveys to the licensee, for fee paid, a nonexclusive, nontransferable license to use the PulseAgile® hardware and software (equipment) for research purposes into perpetuity. Cyto Pulse Sciences, Inc., has patent allowance and patents pending covering the PulseAgile® and other process. If the licensee wishes to use the hardware and software for production or commercial purposes, an additional license shall be required. The equipment is not approved by the FDA for usewith in vitro or in vivo diagnostics or therapy. The information in this manual is subject to change without notice. Copyright 2000-2005 Cyto Pulse Sciences, Inc. PA96WUMANrev.1-11/04 Price $100.00 PA-96W User Manual: Rev.1-11/04 TM Cyto Pulse Sciences, Inc. Model PA-96W Programmable 96 Well Driver User Manual Cyto Pulse Sciences, Inc. P. O. Box 609 Columbia, MD 21045 1-410-787-1890 1-410-787-1891 FAX www.cytopulse.com Cyto Pulse Sciences, Inc. makes no warranty with respect to the product except for the warranty set forth in this Users Manual on page 5-1. The LIMITED WARRANTY SET FORTH ON PAGE 5-1 IS EXCLUSIVE AND NO OTHER WARRANTY WHETHER WRITTEN OR ORAL, IS EXPRESSED OR IMPLIED. Cyto Pulse Sciences, Inc. SPECIFICALLY DISCLAIMS IMPLIED WARRANTIES OF MERCHANTABILITY AND FITNESS FOR A PARTICULAR PURPOSE. License Agreement PA-96W Programmable 96-Well Driver Cyto Pulse Sciences, Inc. (Licensor), conveys to the licensee, for fee paid, a nonexclusive, nontransferable license to use the PulseAgile® hardware and software (equipment) for research purposes into perpetuity. Cyto Pulse Sciences, Inc., has patent allowance and patents pending covering the PulseAgile® and other process. If the licensee wishes to use the hardware and software for production or commercial purposes, an additional license shall be required. The equipment is not approved by the FDA foruse with in vitro or in vivo diagnostics or therapy. The information in this manual is subject to change without notice. Copyright 2000-2005 Cyto Pulse Sciences, Inc. PA96WUMANrev.1-11/04 Cyto Pulse Sciences, Inc. P. O. Box 609, Columbia, MD 21045 USA 410-787-1890 Price $100.00 i PA-96W User Manual: Rev.1-11/04 Blank Page ii Cyto Pulse Sciences, Inc. P. O. Box 609, Columbia, MD 21045 USA 410-787-1890 PA-96W User Manual: Rev.1-11/04 Table of Contents page 1. Introduction 1-1 2. PA-4000/PA-96W Set-up and Operation 2-1 2.1 2.2 2.3 2.4 2-1 2-1 2-2 2-2 2-2 2-2 2-2 2-2 2-3 2-3 2.5 2.6 3. Getting Started with the PA-96W 3-1 3.1 3.2 3-1 3-1 3-1 3-2 3-3 3-3 3-3 3-4 3-3 3.6 3-6 3.3 3.4 4. Introduction Preparation for electroporation 3.2.1 Polynucleotide concentration and cell density 3.2.2 Medium 3.2.3 Cleaning and sterilization of the electrode before use 3.2.4 Washes and other preparatory needs 3.2.5 Electroporation Pulse 3.2.6 Programming pulse protocols Sample protocols 3.3.1 Protocol Design Rules Results using similar protocols PA-96W Protocol/Programming Example 4-1 4.1 4.2 4.3 4-1 4-1 4-1 4-1 4-1 4-2 4-2 4-2 4-2 4-2 4-3 4-3 4-3 4-3 4-4 4.4 5. Introduction Connecting the PA-96W to the PA-4000 PA-96W Front panel functions Electrode Array, Base and Microplate 2.4.1 96W-A Electrode Array 2.4.2 96W-P Microplate 2.4.3 96W-B Base Unit 2.4.4 Operating the Base Unit Turning the System on Software Introduction Components Programming a protocol 4.3.1 General programming guidelines 4.3.1.1 Viewing programmed protocol 4.3.1.2 Changing, deleting or adding protocol parameters Sample protocol 4.4.1 Preparation 4.4.2 Materials List 4.4.3 Harvest cells 4.4.4 Cell processing 4.4.5 Electroporation 4.4.6 Harvesting processed cells 4.4.7 Culture of cells 4.4.8 Luciferase assay at 24-48 hours Customer Service 5-1 5.1 5.2 5-1 5-1 Appendix A Appendix B Appendix C Limited Warranty Customer Service Data Sheet PA-96W Switch and Electrode Array Connections Electrode Array Cleaning Cyto Pulse Sciences, Inc. P. O. Box 609, Columbia, MD 21045 USA 410-787-1890 iii PA-96W User Manual: Rev.1-11/04 List of Figures iv 2-1 2-2 2.3 2-4 The 96-Well Electroporation System Back panel Connections The 96W-B Base, 96W-A Array, and 96W-P Microplate Set-up Screen PA-96W with Protocol Open page 2-1 2-1 2-2 2-3 3-1 2-2 PulseAgile® ScreenAfter Opening a 12-Group Protocol Results of Optimization Protocols on K562 and HELA Cells 3-5 3-7 4-1 Example K562 Protocol results 4-4 Cyto Pulse Sciences, Inc. P. O. Box 609, Columbia, MD 21045 USA 410-787-1890 PA-96W User Manual: Rev.1-11/04 Caution Notice This instrument contains a high voltage power supply adjustable beyond 1,000 volts: such voltage can be lethal. The user must read this manual carefully before the instrument is placed into operation. Removing the cover may void the warranty. Do not connect or disconnect the high voltage cable with the high voltage enabled. To connect or disconnect the cable, turn line/mains power off and unplug the line/mains cord. Do not open the cuvette holder while the high voltage is on. If a problem occurs during a run, push the STOP/RESET button on the front panel. If there are any questions about the operation of this instrument, call Cyto Pulse Customer service. Cyto Pulse Sciences, Inc. P. O. Box 609, Columbia, MD 21045 USA 410-787-1890 v PA-96W User Manual: Rev.1-11/04 Blank Page vi Cyto Pulse Sciences, Inc. P. O. Box 609, Columbia, MD 21045 USA 410-787-1890 PA-96W User Manual: Rev.1-11/04 1. Introduction Electroporation has many uses in the fields of cell biology, medicine and microbiology. The PA-96W add-on to the PA-4000 computer-controlled electroporator provides the ability to electroporate cells in selected wells of a 96-well microplate. All parameters are computercontrolled to give the operator maximum flexibility in performing optimization protocols. This manual was designed to help you realize the maximum benefit from using the PA4000/PA-96W system featuring PulseAgile® electroporation. It contains information on how to operate the electroporator, safety tips, and protocol optimization. Note: The PA-4000 with the PA-96W contains a high voltage power supply and was designed with safety features to protect the user and the equipment. If used properly, the PA-4000 with the PA-96W is a safe and reliable instrument. Chapter 3 explains some important concepts related to operator safety, in addition to concepts needed for accurate use of the instrument. Chapter 3 must be read before setting up this instrument. Our goal is the safe and productive use of the PA-4000 with the PA-96W. Cyto Pulse Sciences, Inc., P. O. Box 609, Columbia, MD 21045 USA 410-787-1890 1-1 PA-96W User Manual: Rev.1-11/04 Blank Page 1-2 Cyto Pulse Sciences, Inc., P. O. Box 609, Columbia, MD 21045 USA 410-787-1890 PA-96W User Manual: Rev.1-11/04 2. PA-4000/PA96W Set-Up and Operation 2.1 Introduction The PA-96W is an attachment to the PA4000 PulseAgile® electroporator. It provides the capability of directing the pulse from the electroporator to a well(s) in the 96 well microplate. The method of addressing each well with one or more pulses is presented in Appendix B. The system consists of the following: PA-4000 PA-96W 96W-A 96W-B 96W-P LCMC CS-OPT Electroporator High voltage pulse switch Electrode array Base unit Microplate CytoFusion Medium Interface Cable Set Figure 2-1: The 96-Well Electroporation System PA-4000/PA-96W 2.2 Connecting the PA-96W to the PA-4000 Follow the instructions in Chapter 4 of the PA4000 manual to set-up the PA-4000. The PA-96W should be placed on top of the PA-4000. Figure 2-2 shows the connections to be made. The Mains/Line Power Switch must be off and the Main/Line cord unplugged from the PA-4000. • Connect the Option Interconnect cable between the DB25 connectors on the back of the PA96W and the PA-4000. DO NOT ATTACH TO A COMPUTER PARALLEL PORT OR A PRINTER! • Connect the high voltage cable between the MHV connectors on the back of the PA-96W and the PA-4000. This cord delivers the pulses generated by the PA-4000 to the PA-96W • • Figure 2-2: Back Panel Connections DO NOT USE A CABLE WITH BNC PLUGS! Connect the large high voltage cable with the multi-pin connector from the 96W-B Base to the PA-96W. Connect the small cable with the RCA-phono-style connector from the 96W-B Base to the Interlock jack on the back of the PA-4000. Cyto Pulse Sciences, Inc. P. O. Box 609, Columbia, MD 21045 USA 410-787-1890 2-1 PA-96W User Manual: Rev.1-11/04 2.3 PA-96W Front Panel Functions There are 96 indicators on the front panel. Each indicator will illuminate red or green depending on the direction of electric field in the well. One of the unique features of this system is the electric field in the well can be reversed from one pulse to the next. If both electrodes in the well are the same (plus or ground) then there is no illumination. This unit is powered from the PA-4000 Mains/Line Power switch. 2.4 Electrode Array, Base and Microplate The three components form a method by which the 192 separate gold electrodes are inserted into the microplate. A significant force is required to insure proper insertion. That force is supplied by the base unit which applies the force in a very uniform manner across the array. 2.4.1 96W-A Electrode Array The array consists of 96-pairs of gold-plated electrodes mounted in an insulating base. There are 12 column lines and 8 row lines and two interlock lines which are terminated in gold-plated contacts. 2.4.2 96W-P Microplate The 96-well microplate is made of injection molded polypropylene and cannot be autoclaved. It contains 96 square, flat bottomed wells into which the electrodes are inserted. 2.4.3 96W-B Base Unit Figure 2.3: The 96W-B Base, 96W-A Array, and 96W-P Microplate The Base Unit is connected to the PA-96W via a long cable which carries 20 high voltage pulse lines. The pulse lines are terminated at gold spring loaded contacts. The interlock system does not permit the high voltage to be enabled unless the Electrode Array is completely inserted and covering the pulsed high voltage gold contacts. 2.4.4 Operating the Base Unit First the Electrode Array is inserted into the Base. Next, the microplate is inserted with the contents filled. Both the Array and Plate must be totally inserted into the Base. Then the two handles must be pulled forward which raises the plate tray in the base. At the moment of engagement, the force required to pull the handle will increase. A steady motion should be maintained. If the force is too great, stop and make sure both the Plate and Array are fully inserted. Finally the lid should be closed. 2-2 Cyto Pulse Sciences, Inc. P. O. Box 609, Columbia, MD 21045 USA 410-787-1890 PA-96W User Manual: Rev.1-11/04 2.5 Turning the System on After the set-up described in Chapter 4 of the PA-4000 manual is complete and this chapter is read, the unit is ready to be used. The following steps need to be completed. • • • 2.6 Plug the Main/Line cord into the PA-4000. Turn on the Main/Line Switch on the front of the PA-4000. Check that the Power On and HV Off green LEDs are illuminated on the front of the PA4000. (Nothing will illuminate on the front panel of the PA-96W). Software Details of software installation and operation of the PA-4000 are described in Chapter 4 of the PA-4000 manual. The software that operates the PA-96W is included in the PA-4000 application. When the PA-96W Interface cable is connected, the software is available. • • • Open the PulseAgile® application software. If the PA-96W is connected properly the application software will recognize the unit. There will be three check marks at the top right of the screen. At the right bottom there is a portion of the screen called custom. In this area are the Three Units which address each row of the eight rows (Unit 1) and columns (Units 2 and 3). Open a protocol. If the user has developed protocols previously, just open the protocol folder and click on the desired protocol. If this is the first time, then open one of the supplied protocols such as PA96W Test.pro. Figure 2-4: Set-up Screen PA-96W with Protocol Opened Cyto Pulse Sciences, Inc. P. O. Box 609, Columbia, MD 21045 USA 410-787-1890 2-3 PA-96W User Manual: Rev.1-11/04 Blank Page 2-4 Cyto Pulse Sciences, Inc. P. O. Box 609, Columbia, MD 21045 USA 410-787-1890 PA-96W User Manual: Rev.1-11/04 3. Getting Started with the PA-96W 3.1 Introduction Electroporation using the PA-4000/PA-96W system increases the capacity to do a large number of electroporations. Each 96 well plate is equivalent to 96 individual cuvettes. This chapter introduces concepts behind 96 Well electroporation and provides information to allow optimal use of the system. The system consists of the PA-4000 Electroporator, PA-96W Switch, 96W-A Electrode Array, 96W-B Base and 96W-P Microplate. Several example experimental designs that can be used with 96 Well electroporation are: • • • Optimization using up to 12 different pulse waveform protocols Electroporation of different cell types in the same 96 well plate, each requiring different pulse protocols Electroporation using different plasmids, mRNA, siRNA or other material in each well There are, of course, many other experimental designs possible. The principles of electroporation are covered in detail in the accompanying PA-4000 manual. Some of these principles will be reviewed in this chapter. 3.2 Preparation for electroporation Prior to beginning a transfection using the 96 Well system, several factors need to be considered. The condition of the cells is the most important. Cells should have been recently passed and in a log phase of growth. For suspension cells, this means that a less than maximum cell density must be used. For adherent cells, less than 90% confluency is recommended. In addition, cells will change in their response to electroporation based transfection with increasing passage number. Some cell lines become more resistant to transfection with increasing cell line passage. Although this is different for different cells lines, it is recommended that the cells used be at a passage level less than 30. Since the equivalent of 96 cuvettes is used with a full 96 well electroporation, supplies will be needed for that many transfections. For instance, if a plasmid DNA concentration of 50 µg/ml is used and a cell density of 1 million cells/ml is used, then 1 mg of plasmid DNA and 20 million cells will be needed (using the minimum volume of 200 µl/well). 3.2.1 Polynucleotide concentration and cell density The underlying principle for considering polynucleotide concentration is that the molarity of the material is important. For instance, if a plasmid is used at a concentration of 50 µg/ml with a cell density of 1 million cells/ml then the same plasmid will be used at a concentration of 50 µg/ml if the cell density is changed to 10 million cells/ml. Typical concentrations used are: • • • Plasmid DNA 25-50 µg/ml siRNA 1 to 100 nM mRNA 1 to 20 µg/ml These polynucleotide concentrations are just examples. Concentrations outside these ranges are widely reported in the literature. Cyto Pulse Sciences, Inc., P. O. Box 609, Columbia, MD 21045 USA 410-787-1890 3-1 PA-96W User Manual: Rev.1-11/04 There are several factors to consider when deciding on the cell density. Cell density in culture prior to electroporation is dependent upon achieving a log phase harvest. This is a critical factor in achieving successful polynucleotide delivery. Cell density for culture after electroporation will depend upon the needs of individual cells. Adherent cells, for instance will need space on the plastic to adhere and to multiply. Cell density during electroporation is more flexible. The lower limit of cell density is dependent upon having enough cells to assay and culture after electroporation. Generally we use at least 0.5 million cells per ml. However, there is no theoretical reason why a lower cell density could not be used. The upper limit of cell density depends upon: 1. 2. 3. 4. The percent volume occupied by the cells (<1% recommended). the amount of ions leaking from cells (affects medium conductivity). The amount of cells available. Whether or not the low conductivity medium is left in culture after electroporation. Using these guidelines, 10-20 million cells/ml is a safe cell density. Cells densities up to 40 million cells/ml have been used. Cells in Cyto Pulse’s low conductivity medium must be diluted at least 1:5 in complete cell culture medium after electroporation. Adherent cells can be cultured for short periods with as little as a 1:2 dilution followed by complete removal and replacement after adherence to the tissue culture vessel. The requirement for this dilution may limit the practical minimum density of cells. 3.2.2 Medium Cells need to be in a low conductivity medium for two reasons. One reason is that the 96W system can pulse more that one well at a time. This means that there is more electrical current required from the pulse generator when more wells are pulsed simultaneously. There are limits on the maximum current that can be delivered and the use of low conductivity medium keeps the current demand below maximum limits. Second, the high current generated in a highly conductive media will cause excessive heating. The temperature in high conductivity medium can rise to critical levels and kill the cells. Conductivity is used to describe the resistance of the medium because conductivity takes into account the volume of liquid in a well or cuvette. Remember that, for a parallel plate electrode, conductivity is related to resistance (ohms) by the formula: R= where: 1 σ ∗ l 1 l2 = * ohms A 2 σ vol σ = Conductivity in S/cm = 1/ρ l = plate spacing A = plate area vol = volume of liquid = l * A Cyto Pulse Cytofusion TM Low Conductivity Medium C (CPS-LCMC) has a conductivity of 80 µS/cm. Conductivity is the reciprocal of resistivity which is 12,500 Ω-cm. To obtain a medium with a high resistivity or low conductivity, a low ionic medium formula is used. 3-2 Cyto Pulse Sciences, Inc., P. O. Box 609, Columbia, MD 21045 USA 410-787-1890 PA-96W User Manual: Rev.1-11/04 Another important property of the electrofusion medium is the osmolarity. The osmolarity of electroporation media is usually iso-osmolar (normal osmolarity of body fluids, 290 mOs). Cyto Pulse Cytofusion TM Medium C is an optimized iso-osmolar electrofusion medium designed for optimal results. Cyto Pulse recommends that this medium be used for electroporation. 3.2.3 Cleaning and sterilization of the electrode before use. The 96W-A Electrode Array and the 96W-P square well plate are not autoclaveable. The recommended cleaning procedure is: Rinse the array immediately after use with high quality water • • • If a film or material are present on the electrode, wash with a mild soap solution or Windex®. A soft toothbrush can be used Rinse thoroughly after cleaning with high quality water For sterilization Soak for 10 minutes in 3% hydrogen peroxide or Sporeklenz® Rinse in 70% alcohol, then soak for 10 minutes in 70% alcohol Air dry in a laminar flow hood The latter procedure will provide a well sanitized or sterilized array, useful for most electroporations and will insure maximum array life. The cleaning procedure is also given in Appendix C. Sterile plates are available for one time use. IMPORTANT! WHEN THE 96W-A ELECTRODE ARRAY IS REMOVED FROM THE MICROPLATE, CAPILLARY ACTION DRAWS SOME LIQUID BETWEEN THE CLOSELY SPACED ELECTRODES WHICH STRADLE THE WALLS. THE ARRAY MUST BE CLEANED AND DRIED PRIOR TO REUSE OR THE LIQUID WILL CAUSE AN ELECTRICAL ARC WHEN PULSED THAT MAY DAMAGE THE ARRAY. 3.2.4 Washes and other preparatory needs It is important that all tissue culture medium be washed from the cells prior to electroporation. This requires a minimum of one centrifugation plus two washes in Cytofusion TM Medium. It is advisable to do the washes immediately prior to electroporation. Electroporation medium is non-toxic, but cells will become fragile after excessive time (>1 hour) in the medium. 3.2.5 Electroporation Pulse Electroporation is done by applying one or more high voltage pulses to the cells, inducing permeability in the cell membranes. The voltage required must be above a threshold to induce membrane breakdown and below a maximum voltage causing cell death. Threshold voltage is approximately 0.5-1.5 volts across the cell membrane (1). The voltage across a cell is approximately equal to: Vt = 1.5 ∗ r ∗ E cos θ volts where: r = cell radius in cm E = electric field intensity in v/cm Θ = angle of the membrane in relation to the direction of the field Cyto Pulse Sciences, Inc., P. O. Box 609, Columbia, MD 21045 USA 410-787-1890 3-3 PA-96W User Manual: Rev.1-11/04 Electric fields 2-3 times threshold can be used. This should be optimized for the cells used. Multiple electroporation pulses may be more efficient than a single pulse. A special pulse waveform called PulseAgile® is available. This option is only available on the Cyto Pulse PA-4000 Electroporator, including the PA-96W system. PulseAgile® means the ability to change pulse parameters from pulse to pulse in the same well or cuvette. It is normally done by delivering one or more high electric field pulses followed by two or more lower electric field pulses. The higher electric field pulses induce permeability in a large area of the cell surface. The lower electric field pulses help move charged polynucleotides into cells by electrophoresis. 3.2.6 Programming pulse protocols Programming the pulse protocols for the PA-4000/PA-96W system consists of programming the electrical pulse parameters and the address where the system should deliver those pulses. These parameters are stored in a stack called a Group List. Each group in the list describes one set of electrical pulse parameters plus one well address. The groups are shown in a window on the software screen. As each group is completed, the next group is begun. Figure 2-1 on the next page shows an example screen. Begin with proper set up of the equipment and turn all equipment on. Open the PulseAgile® software. Click Electroporation/Pro Pulse Switch. The window on the left side of the screen has icons for file saving and opening, printing, communication status and a calculator. Open a saved protocol (several are supplied with the application). Figure 2-2 shows the screen after opening a protocol The center section contains entry sites for the electrical pulse parameters. The number of pulses, the pulse voltage, the pulse duration and the interval after each pulse are programmed here. Parameters must be stored in the group to be delivered during running of the protocol. There are three actions that can be taken. The parameters can be saved to the selected group by clicking the Replace button. The parameters can be added as a new group at the end of the list by clicking the Add button. The last group can be removed by clicking on the last group then clicking the Remove button. Changes made in this section must be saved before moving to another section or the changes will be lost. The section in the lower right of the screen labeled “96 Well PPS Mode” is the place where the pulses are addressed to wells. This section shows an 8 X 12 array for a 96 well plate. The buttons above the array allow selection of one or more columns to address the pulses. The buttons to the left of the array allow selection of one or more rows. Only columns or rows can be selected at any one time. That is, selection of columns and rows at the same time is not possible. Once the pulse parameters have been selected (including row or column addressing), one more action must be taken. The parameters must be either added to a new group or replace values in an existing group. The parameters are added to a new group by selecting the Add button at the top of the group list. The parameters replace the values in a group by selecting Replace at the bottom of the group list. A detailed protocol described in Chapter 4 will provide some practice in modifying parameters. 3-4 Cyto Pulse Sciences, Inc., P. O. Box 609, Columbia, MD 21045 USA 410-787-1890 PA-96W User Manual: Rev.1-11/04 Figure 3.1 3.3 PulseAgile® Screen After Opening a 12-Group 96W Protocol Sample protocols Several protocols are supplied pre-programmed for your use or modification. Included with the software are K562 Demo.pro, and the Opt N series. The Opt N series is a set of three protocols that can be used for initial optimization. The Opt N series forms a grid of electric field (2000 v/cm, 1600 v/cm and 1200 v/cm), Pulse Width (50µs, 100µs, 200µs, and 400µs), and numbers of pulses (1, 3 and 6). This 3X4X3 matrix is divided among 3 protocols based upon the number of pulses. They are called Opt N 1 Pulse, Opt N 3 Pulse and Opt N 6 Pulse. When one of these protocols is run, either the field intensity or pulse width is changed in each column of the plate. All eight rows of each column are identical, providing an 8 replicate sample. Sample protocol: Opt N 1 Pulse.pro – all 8 rows in a column pulsed simultaneously. Col Group 1 2 3 4 5 6 7 8 9 10 11 12 1 2 3 4 5 6 7 8 9 10 11 12 PA volts 1080 1080 1080 1080 865 865 865 865 650 650 650 650 PW µs 50 100 200 400 50 100 200 400 50 100 200 400 PI sec .125 .125 .125 .125 .125 .125 .125 .125 .125 .125 .125 .125 PN 1 1 1 1 1 1 1 1 1 1 1 1 Cyto Pulse Sciences, Inc., P. O. Box 609, Columbia, MD 21045 USA 410-787-1890 3-5 PA-96W User Manual: Rev.1-11/04 3.3.1 Protocol Design Rules 1. If a Protocol is designed that changes voltage from one group to the next, it should always be setup so the voltage change is decreasing between the groups. If the programmed voltage is increasing between groups, pulse amplitudes other than those set may be delivered. 2. When changing voltage from higher to lower between groups, always allow at least a one second pulse interval. This may require splitting each group into two groups if pulse intervals other than 1 second are desired. For instance, to program a pulse protocol to deliver six pulses with 0.125 seconds between each pulse, the following will have to be programmed: Five pulses with 0.125 second pulse interval plus one pulse with a one second pulse interval. Pulse intervals are actually the time from the beginning of a pulse until the beginning of the next pulse. Thus the delay occurs after a pulse. 3.4 Results using similar optimization protocols Two developmental optimization protocols, similar to the supplied sample protocols were tested on different cell lines. The Opt S protocol was tested using K562 cells and the Opt N protocol was tested using HELA cells. The exact procedure used is listed in chapter 4. Briefly, cells were mixed with a luciferase expression plasmid at a concentration of 50 µg/ml. The K562 cells were electroporated at 5 million cells/ml and the HELA cells were electroporated at 1.6 million cells/ml. The volume used in each electroporation well was 200 µl. The results are presented in Figure 2-2. There are several trends evident in this data. For the K562 cells the best protocols were 3 or 6 pulses of 2000 V/cm and 200 µs duration. In general, better results were obtained in the 2000 V/cm groups. With increasing numbers of pulses and pulse widths, a peak was reached, beyond which results diminished, probably due to cell death. For the HELA cells, better results were obtained with lower electric fields and lower pulse widths. (Note that the range of pulse widths tested was lower.) The HELA cells are larger in diameter than K562 cells and these results reflect that difference. In general, larger cells require lower electric fields and pulse widths than do smaller cells. 3-6 Cyto Pulse Sciences, Inc., P. O. Box 609, Columbia, MD 21045 USA 410-787-1890 PA-96W User Manual: Rev.1-11/04 HELA Cell 96W Optimization Protocol: Opt N 1 Pulse K562 Cell 96W Optimization Protocol: Opt S 1 Pulse 120000 80000 100 us 200 us 400 us 800 us 60000 40000 20000 30000 20000 10000 0 1200 V/cm 1600 V/cm 0 2000 V/cm 1200 V/cm Electric Field versus Pulse Width 50000 100 us 200 us 400 us 800 us 50 us 100 us 200 us 400 us 40000 80000 Luciferase RLU Luciferase RLU 2000 V/cm HELA Cell 96 W Optimization Protocol: Opnt N 3 Pulses 120000 60000 40000 20000 30000 20000 10000 0 1200 V/cm 1600 V/cm 0 2000 V/cm 1200 V/cm Electric Field versus Pulse Width 2000 V/cm HELA Cell 96W Optimization Protocol: Opt N 6 Pulses 120000 100000 1600 V/cm Electric Field Versus Pulse Width K562 Cell 96W Optimization Protocol: Opt S 6 Pulses 50000 100 us 200 us 400 us 800 us 50 us 100 us 200 us 400 us 40000 80000 Luciferase RLU Luciferase RLU 1600 V/cm Electric Field versus Pulse Width K562 Cell 96W Optimization Protocol: Opt S 3 Pulses 100000 50 us 100 us 200 us 400 us 40000 Luciferase RLU Luciferase RLU 100000 50000 60000 40000 30000 20000 10000 20000 0 1200 V/cm 1600 V/cm 2000 V/cm Electric Field versus Pulse Width 0 1200 V/cm 1600 V/cm 2000V/cm Electric field versus Pulse Width Figure 3-2: Results of Optimization Protocols on K562 and HELA Cells Cyto Pulse Sciences, Inc., P. O. Box 609, Columbia, MD 21045 USA 410-787-1890 3-7 PA-96W User Manual: Rev.1-11/04 Blank Page 3-8 Cyto Pulse Sciences, Inc., P. O. Box 609, Columbia, MD 21045 USA 410-787-1890 PA-96W User Manual: Rev.1-11/04 4. PA-96W Protocol/Programming Example 4.1 Introduction The PA-96W system can be used to optimize transfection of selected cell lines or can be used to deliver identical electrical protocols to wells of a 96-well microplate. A sample protocol will be presented showing an optimization protocol for K562 cells. 4.2 Components Cyto Pulse Sciences, Inc. PA-4000 with PA-96W accessory. Equipment must be set-up according to instructions given in Chapter 2. 4.3 Programming a protocol 4.3.1 General programming guidelines Start the program by clicking on the PulseAgile® Icon. Select Electroporation/Pro Pulse Switch in the upper left of the screen. The fastest way to get started programming is to open a pre-programmed protocol and modify desired parameters. For each group, the following parameters are programmed: • • • • • • Pulse voltage Pulse width Number of pulses in a group Pulse Interval (timed after each pulse including the last one in a group). Wells to apply pulse Direction of electric field in wells (in Custom mode only) When all pulses in a group have been delivered, the software selects the next group in the list and executes those pulses. Some rules must be observed in order for the pulses to be correctly delivered. • • • 4.3.1.1 Plan any changes of voltage so that the voltage is lowered or remains the same as you progress from group to group. That is, program higher voltage pulses to be delivered first. Entire rows or columns must be selected. Any number of columns or rows can be selected from 1 to 8 rows or 12 columns. The 96 well graphic in the lower right of the screen makes this selection easy. When decreasing voltage from one group to the next, program one second Pulse Interval or follow instructions given in section 3.3.1, paragraph 2. Viewing programmed protocol • • • Start the program by clicking the program icon Select Electroporation/Pro Pulse Switch Open the protocol called K562 Demo Opt Click on the open folder icon (upper left icon in the set of icons on the left side of the screen) Click on K562 Demo Opt Copyright-Cyto Pulse Sciences, Inc. P. O. Box 609, Columbia, MD 21045 USA 410-787-1890 4-1 PA-96W User Manual: Rev.1-11/04 4.3.1.2 4.4 Changing, deleting or adding protocol parameters • Parameters within a group are changed by changing the values on the screen then clicking Replace. The Replace button should be clicked after changing pulse parameters. For practice, click on Group 1 in the Group List. Change the number of pulses to 2 by either selecting the increase button under the pulse number or by selecting the number with a mouse and typing the number 2. Click Replace to change the parameters in group 1. Changes will not be permanently saved until the file is saved. These changes are not permanently needed so do not save the file. Protocol files, when needed, can be saved by clicking the disk icon and giving the new protocol a name. • Any group is deleted by clicking on it then selecting Remove. For practice, click on group 12 and click Remove. • Groups are added by clicking Add. This copies all parameters shown on the screen into a new group that will be added at the end of the group list. Parameters in that group can then be changed by changing then values on the screen and clicking “replace” For practice, click on Add to add a new group. Change the number of pulses in this group to 8 and click Replace Sample protocol 4.4.1 Preparation • Expand K562 Cells to two T-150 flasks, log growth, medium to high density • Obtain all items in the Materials List 4.4.2 Materials List • Cyto FusionTM Medium • Plasmid Expressing Luciferase • Complete Medium DMEM FBS 10% L-glutamine Penicillin Streptomycin • 96W-P, 96 well electroporation plate • 96 well culture plate, clear tissue culture, flat bottom • 96 well assay plate, white, opaque • 50 ml conical tubes • Luciferase reagent Luciferase Assay Kit, Tropix Inc # BC300L (Reagent A, Reagent B, Lysis buffer) Make sure that DTT has been added to the lysis buffer 4.4.3 Harvest cells • Select two T-150 flasks of K562 Cells • Place cells in 50 ml conical tubes 4-2 Cyto Pulse Sciences, Inc. P. O. Box 609, Columbia, MD 21045 USA 410-787-1890 PA-96W User Manual: Rev.1-11/04 4.4.4 Cell Processing • Centrifuge cells 1500 rpm X 10 minutes • Add 20 ml total Cytofusion Medium • Centrifuge cells 1500 rpm X 10 minutes • Add 20 ml total Cytofusion Medium • Centrifuge cells 1500 rpm X 10 minutes • Re-suspend in 7 ml Cytofusion Medium • Count______ X Dilution ______X 10,000 X Volume______ = Total Cells _______ • Re-suspend cells in Cytofusion Medium at a concentration of 5 million cells per ml Total cells________ / 5,000,000 cells/ ml = ___________ ml • Calculate amount of cells needed _ _wells X 0.2 ml/ well = _ ml (36 million cells) • Add plasmid DNA to a final concentration of 50 µg/ml to the cell suspension. 50 µg/ml X _______ ml = ________ µg DNA. Divide by _______ µg/µl = _________ µl. • Mix well and dispense 200 µl cell suspension to each well in three rows of the square-well 96-well electroporation plate. 4.4.5 Electroporation • Set-up the PA-4000 electroporator, PA-96W and base according to manual (See Chapter 2) • Program the following design (all at 2000 V/cm. 0.125 S pulse interval): Column 1 1080 V 100µs 1 Pulse Column 2 1080 V 200 µs 1 Pulse Column 3 1080 V 400 µs 1 Pulse Column 4 1080 V 800 µs 1 Pulse Column 5 1080 V 100µs 3 Pulses Column 6 1080 V 200 µs 3 Pulses Column 7 1080 V 400 µs 3 Pulses Column 8 1080 V 800 µs 3 Pulses Column 9 1080 V 100µs 6 Pulses Column 10 1080 V 200 µs 6 Pulses Column 11 1080 V 400 µs 6 Pulses Column 12 1080 V 800 µs 6 Pulses • Note: This design is called K562 Demo.pro in your protocol list. Simply open that file to input these parameters. Other optimization protocols are described in the Chapter 3. 4.4.6 Harvesting processed cells • Transfer all cells from electroporation plate to a second 96 well plate. Mix well and transfer 30 µl cells to identical wells of a 96 well assay plate • Add 120 µl Complete Medium/well 4.4.7 Culture of cells • Incubate at 37o C for one to two days, 5% CO2. Copyright-Cyto Pulse Sciences, Inc. P. O. Box 609, Columbia, MD 21045 USA 410-787-1890 4-3 PA-96W User Manual: Rev.1-11/04 4.4.8 Luciferase assay at 24-48 hours • Add 100 µl lysis buffer with DTT to each well • Mix each well by pipetting up and down 12 times • Add 75 µl lysed cell suspension to wells of a white assay plate for each sample • Standard curve (if used) Remove luciferase standard from –70o C freezer (1 mg/ml) Add 400 lysing solution to each of 9 tubes Add 1 ml lysing solution to 1 tube (Tube A) Add 10 µl luciferase to tube A, vortex (1:100 dilution) Transfer 10 µl from tube A to the first of the 9 tubes (1:41 dilution), vortex Transfer 200 µl to the second of 9 tubes (1:3 dilution) Serially transfer 200 µl to the remaining tubes (use last 8 tubes, discard first two) Add 75 µl standard to duplicate wells of the white plate • Place 50 µl reagent A in each well • Place reagent B in Luminometer injector and prime • Inject 50 µl • Read for 0.5 seconds per well Demonstration of K562 Cell Transfection Using 96 W System 2000 V/cm 120000 Luciferase RLU 100000 100 us 200 us 400 us 800 us 80000 60000 40000 20000 0 1 Pulse 3 Pulses 6 Pulses Number of Pulses versus Pulse Width Figure 4-1 Example K562 Protocol results 4-4 Cyto Pulse Sciences, Inc. P. O. Box 609, Columbia, MD 21045 USA 410-787-1890 PA-96W User Manual: Rev.1-11/04 5. Customer Service 5.1 Limited Warranty CYTO PULSE products are warranted against defect in materials and workmanship. If the customer provides notice of such a defect during warranty period, CYTO PULSE, at its option, will either repair or replace the products, which were found to be defective. The limited warranty set forth above is exclusive and no other warranty whether written or oral, is expressed or implied. CYTO PULSE specifically disclaims implied warranties of merchantability and fitness for a particular purpose. EXCEPT AS SET FORTH ABOVE, CYTO PULSE MAKES NO WARRANTY WITH RESPECT TO THE PRODUCT, AND IN NO EVENT, REGARDLESS OF CAUSE, SHALL CYTO PULSE BE LIABLE FOR INDIRECT, SPECIAL, OR CONSEQUENTIAL DAMAGES OR OTHER LOSSES OF ANY KIND ARISING FROM BREACH OR WARRANTY OR OTHER USES OF THIS PRODUCT. CYTO PULSE’S OBLIGATION TO REPAIR OR TO REPLACE TO THE EXTENT SET FORTH ABOVE CONSTITUTES THE EXCLUSIVE REMEDIES OF THE CUSTOMER FOR ANY BREACH OF WARRANTY. This warranty shall not apply to products, which after inspection by CYTO PULSE, were found to be improperly used or to have been modified in any manner. CYTO PULSE recommends that the user not open the product cabinet. This limited warranty is valid for one year from the date of shipment. 5.2 Customer Service If the user believes that there is a defect in the CYTO PULSE product, the customer should contact CYTO PULSE Customer Service through our website at www.cytopulse.com or phone 410-787-1890, or contact the local CYTO PULSE representative. A determination if the product is still in warranty will be made. If the warranty period is still in effect, the user will be given an authorization number (RMA) to return the product. If after receipt and inspection the product is found to be defective, it will be replaced or repaired and returned to the customer. If the product is found to have been modified or misused, the user will be given a quote for repair. If the warranty period has expired and the user requests repair, CYTO PULSE will inspect the product and provide a written quote for repair. The user must provide a purchase order number before the product will be repaired. If the unit is damaged in shipment, the user must recover the insured value to replace or repair from the carrier. Cyto Pulse Sciences, Inc. P. O. Box 609, Columbia, MD 21045 USA 410-787-1890 5-1 PA-96W User Manual: Rev.1-11/04 Blank page 5-2 Cyto Pulse Sciences, Inc. P. O. Box 609, Columbia, MD 21045 USA 410-787-1890 PA-96W User Manual: Rev.1-11/04 Appendix A Data Sheet Cyto Pulse Sciences, Inc. P. O. Box 609, Columbia, MD 21045 USA 410-787-1890 A-1 PA-96W User Manual: Rev.1-11/04 Blank Page A-2 Cyto Pulse Sciences, Inc. P. O. Box 609, Columbia, MD 21045 USA 410-715-1890 PA-96W User Manual: Rev.1-11/04 Cyto Pulse Sciences, Inc. P. O. Box 609, Columbia, MD 21045 USA 410-787-1890 A-3 PA-96W User Manual: Rev.1-11/04 A-4 Cyto Pulse Sciences, Inc. P. O. Box 609, Columbia, MD 21045 USA 410-715-1890 PA-96W User Manual: Rev.1-11/04 Appendix B PA-96W Switch and 96W-A Electrode Array Cyto Pulse Sciences, Inc. P. O. Box 609, Columbia, MD 21045 USA 410-787-1890 B-1 PA-96W User Manual: Rev.1-11/04 Blank Page B-2 Cyto Pulse Sciences, Inc. P. O. Box 609, Columbia, MD 21045 USA 410-787-1890 PA-96W User Manual: Rev.1-11/04 Cyto Pulse Sciences, Inc. P. O. Box 609, Columbia, MD 21045 USA 410-787-1890 B-3 PA-96W User Manual: Rev.1-11/04 B-4 Cyto Pulse Sciences, Inc. P. O. Box 609, Columbia, MD 21045 USA 410-787-1890 PA-96W User Manual: Rev.1-11/04 Appendix C Electrode Array Cleaning Cyto Pulse Sciences, Inc. P. O. Box 609, Columbia, MD 21045 USA 410-787-1890 C-1 PA-96W User Manual: Rev.1-11/04 Blank Page C-2 Cyto Pulse Sciences, Inc. P. O. Box 609, Columbia, MD 21045 USA 410-787-1890 PA-96W User Manual: Rev.1-11/04 Cyto Pulse Sciences, Inc. P. O. Box 609, Columbia, MD 21045 USA 410-787-1890 C-3 PA-96W User Manual: Rev.1-11/04 Blank Page C-4 Cyto Pulse Sciences, Inc. P. O. Box 609, Columbia, MD 21045 USA 410-787-1890