1
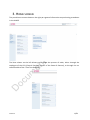
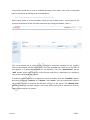
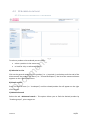
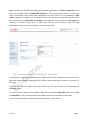
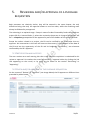
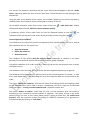
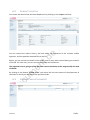
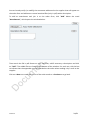
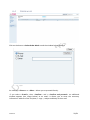
Université de Genève
User Book of Purchasing Portal
User Book of
Purchasing Portal
DIBAT
12.05.15
Version 1.5
WORKING DOCUMENT
30.04.2015
1/31
Université de Genève
User Book of Purchasing Portal
CONTENTS
1. INTRODUCTION ........................................................................................................................ 3
1.2 PURCHASING PORTAL ........................................................................................................... 3
1.2 THE PURCHASE PROCESSES ..................................................................................................... 3
2. ACCESS AND BROWSING THROUGH PURCHASING PORTAL ........................................................ 5
2.1 CONNECTION TO THE PORTAL ............................................................................................... 5
2.2 SCREEN’S ZONES ................................................................................................................... 5
3. HOME SCREEN .......................................................................................................................... 6
4.1 FREE ORDER REQUEST ........................................................................................................... 7
4.1.1 GENERAL DATA ................................................................................................................................... 7
4.1.2 SECOND SCREEN................................................................................................................................ 10
4.1.3 FIXED ASSETS .................................................................................................................................... 12
4.1.4 MULTIFINANCED ORDER ..................................................................................................................... 14
4.1.5 FINALIZATION OF THE PURCHASE REQUISTION ........................................................................................ 15
4.2 CCA ORDER ON CATALOG .................................................................................................... 16
4.2.1 SEARCH FOR THE PRODUCT TO BE ORDERED ........................................................................................... 16
4.2.2 Creation of a shopping basket……………………………………………………………………………….……18
4.3 CCA ORDER UPON ESTIMATE (OFF CATALOG)....................................................................... 19
5. REVIEWING AND/OR APPROVAL OF A PURCHASE REQUISITION…………………………………………...... 20
5.1 NOTIFICATION AND ACCESSES ............................................................................................... 20
5.2 CHECK AND/ OR APPROVAL OF THE PURCHASE REQUISITION ................................................ 20
6. PLACE THE ORDER .................................................................................................................. 22
6.1 NOTIFICATION AND ACCESS................................................................................................. 22
6.2 CONSULT THE DETAIL .......................................................................................................... 23
6.3 COMMENT AND ATTACHMENTS .......................................................................................... 23
6.4 ORDER MODE ..................................................................................................................... 25
7. RECEIVE AN ORDER ................................................................................................................. 26
7.1 ACCESS ............................................................................................................................... 27
7.2 RECEIVING ORDER SCREEN .................................................................................................. 27
7.3 GLOBAL RECEPTION............................................................................................................. 28
7.4 PARTIAL RECEPTION ............................................................................................................ 28
7.5 CANCEL OR CLOSE THE ORDER ............................................................................................. 29
8. CONSULT ITS OWN PURCHASE REQUISITIONS AND OTHER OPTIONS ........................................ 30
8.1 CONSULT ITS OWN PURCHASE REQUISITIONS........................................................................ 30
8.2 APPOINT A BACKUP PERSON ............................................................................................... 31
12.05.15
2/31
Université de Genève
User Book of Purchasing Portal
PRELIMINARY NOTE
The expressions on people used in this user guide must be understood in the feminine as well
as in the masculine.
1. INTRODUCTION
1.2 PURCHASING PORTAL
This user guide is meant for super users and it explains how to use the Purchasing Portal.
The Purchasing Portal allows someone to place purchase orders by dematerializing a major
part of the information exchanges, from the selection of items until the reception of the
goods and the payment of the invoice.
1.2 THE PURCHASE PROCESSES
The realization of a purchase requires several successive actions by the various actors of the
University. The following diagrams present the important stages of each of the 3 possible
types of Purchase Requisitions (PR) in the Purchase Portal:
12.05.15
3/31
Université de Genève
12.05.15
User Book of Purchasing Portal
4/31
Université de Genève
User Book of Purchasing Portal
2. ACCESS AND BROWSING THROUGH
PURCHASING PORTAL
2.1 CONNECTION TO THE PORTAL
The connection to the Purchasing Portal is made via the intranet portal of the UNIGE:
https://portail.unige.ch/accueil
By first clicking on the icon:
then by entering your personal password.
then by entering your Isis identifier and
2.2 SCREEN’S ZONES
The screen is divided into several zones, as shown below:
When there is an * next to a field, it means that it is compulsory to fill it in.
12.05.15
5/31
3. HOME SCREEN
The portal home screen shows on the right part general information on purchasing procedures
in the UNIGE.
The blue column on the left allows you to begin the process of order, either through the
catalogue of the CCA (Central Purchase Center of the State of Geneva), or through the socalled module of the "Free Text Ordering".
12.05.15
6/31
« My tasks » section
In this section or via the blue rectangles, the user can intervene in the various stages of the
cycle of purchases:
-
-
To consult its own purchase requisitions (below PR) being elaborated and/or submitted
even sent back by one or the other actors of the section " Draft/Returned" (see on this
matter chapter 8.1: " Consult its own purchase orders),
To intervene in order to check a PR : « Reviewing»,
To approve a PR with the section « Approving »,
To transform a PR into a command: « Ordering»,
To receive an order: «Receiving»
To send information by mail to the other actors: «Info flow.
The sections « User settings » and “ Help » comes to complete the device to allow respectively
the user to delegate its role in the process of purchase to another collaborator or to find a
support in case of questions on the application software.
4. CREATE A PURCHASE ORDER
4.1 FREE ORDER REQUEST
A free order request is an order, which concerns the purchase of a good or a service without
passing through the CCA.
4.1.1 GENERAL DATA
The general data relative to a free order must be filled in on the 1st screen, (cf. image below)
entitled "Free Order Request ».
12.05.15
7/31
A) Compulsory fields to be either filled in or filled in by default by the application
software
The following fields, marked by an asterisk, must be filled in:
-
-
-
-
Description: describe briefly the goods to be ordered.
Correspondent: the person who will guarantee the contact with the supplier about the
order and who will be able to receive the goods ordered through the Portal. The name
of this colleague, as well as his address and phone number will appear on the order
form generated automatically by the application software. The name of the requester
appears by default, it can be modified by means of the drop-down menu
where any
other employee of the organizational entity can be selected.
Invoicing address: the address of your accounting department, which will receive and
process the invoice of the supplier, appears by default. However it is possible to select
one or the other of the two accounting departments of the UNIGE.
Delivery address: the address of the requester appears by default. This one can also be
modified with any other address (connected to a colleague) of the UNIGE.
Beneficiary: select the name of the addressee or the main user of the ordered goods. If
the goods are intended for the use of one subdivision as a whole, indicate the person
in charge of this subdivision.
Supplier: by clicking on this section you reach the dialogue box shown below which
informs you about all the suppliers listed by the UNIGE
To look for a supplier in the list, enter some characters of the name in the blank field and
click the button "Search". To select a supplier, click the name in the list. You will then
return automatically to the previous screen.
You may observe that to the left of the names of each supplier appears this icon
which
allows you to add the supplier in the tab “Favourites “ (next to the tab "All"). This list will
be restricted to your favourite suppliers.
B) New Supplier
In case a supplier is not listed in the proposed list of suppliers, it is possible "to create" a
new supplier by adding his whereabouts: " Category of new supplier ", " New supplier
12.05.15
8/31
name", " New supplier name 2", " Street and Nr", "Post code",", "City", « Country ", « VAT
Nr - without separator and point " and " Email of new supplier ".
Currency: according to the selected supplier, the Portal proposes by default the currency,
which this company uses mainly for its invoicing with the UNIGE. Another currency can
however be chosen.
C) Optional data
Optional data appear in the 1st and the 2nd columns of the screen and are briefly
explained below.
-
-
-
-
-
Secondary expenses abroad ET (Foreign Currency): indicate for example the expenses
of the forwarder or delivery which will be charged, within the framework of the
delivery of the ordered goods, in currencies by an agent situated out of the Swiss
territory. The amount of expenses will automatically be ventilated in proportion to the
amount of purchase by fund (Web-reporting SAP).
Secondary expenses Switzerland ET (CHF): mention for example the expenses of
forwarder or delivery charged in Swiss francs by an agent situated on the Swiss
territory. The amount of expenses will automatically be ventilated in proportion to the
amount of purchase by fund (Web-reporting SAP).
Swiss VAT on foreign expenses and purchases ET: indicate the VAT deducted on fringe
expenses mentioned in both previous sections. The amount of the VAT will
automatically be ventilated in proportion to the amount of purchase by fund (Webreporting SAP).
Incoterms: mention the conditions of delivery guaranteed by the supplier. The
application software gives the choice of all available types of Incoterms.
Invoice payment by credit card: in the case of a purchase by credit card, mention if it is
a card of the UNIGE or if it is a personal card.
Credit card holder: indicate the name appearing on the credit card. These information
data will allow your accounting department to pay back the holder of the credit card
(in the case of a personal credit card).
Please note that a proof of purchase will be asked.
Transaction Nr Internet purchase: in case of on-line purchase, mention the number of
the transaction attributed by the web site.
CCA supplier: this field is explained in chapter 4.3 « Order CCA on estimate».
Tolerated variation of amount invoiced: by default the system will accept an invoicing
ruling out of 1 % of the amount of the order. A different tolerance can be chosen (0, 2,
5 or 10 %) thanks to this field. If the subsequent invoicing does not respect this
tolerance, the application software will indicate this during the receipt of the invoice
by your accounting department.
12.05.15
9/31
-
-
-
-
Reason of budget overrun: if the requester plans to use a fund, which will be
overdrawn by the order, he has to justify the overdraft to the approver(s) and the
accounting department.
Discount code: mention the conditions of discount granted by the supplier, data
appearing normally on his estimate or his offer.
Total amount of advanced payments: in case of down payment, indicate the total
amount of payments which occurred before the delivery of the good or the service.
Down payments rate: indicate the rate of the down payments (which occurred before
the delivery of the good or the fulfilment of the service) in relation with the total
amount of the expected total invoice.
Number of down payments: number of fraction payments occurring before the
delivery of the good or the fulfilment of the service.
Maturity date of the 1st down payment: date planned for the first instalment, which is
generally the order date.
Referenced command with partial purchase: if the purchase requisition follows a
previous order concerning the first part of a good (generally for big equipment),
indicate the number of this order.
Customer code: sometimes attributed to the client by the seller in order to benefit
from advantages and promotional sales.
Once all the compulsory or optional fields are filled in, click the button "Save" to
protect your data and click the button "Next" to pass on the second screen.
You can also click the button “Save template”. This action will create a template order,
which you will be able to use again through the menu “Free Text Templates” you find
in the home screen described on pages 6-7.
4.1.2 SECOND SCREEN
This screen (see image below) allows you to enter the rest of the data connected with the
order.
12.05.15
10/31
On the top of the screen various rows of ordered items will appear, which will be generated by
filling in the fields at the bottom. The latter is subdivided into three tabs:
1 General data: quantified and accounting data of the order.
2 Other data: fields to be filled in, in case the ordered good constitutes a fixed asset
according to the Administrative Memento of the UNIGE.
3 Allocation split: tab to be used in case the order has to be financed by more than one
fund.
A) General data
Compulsory fields to be filled in or to be filled in by default by the application
-
-
-
-
-
-
12.05.15
Group of products: select in the proposed list the group of products to which the
ordered good corresponds. These categories are important because they predefine in
particular its accounting nature and will facilitate its later posting.Product description:
report the one appearing generally on the offer of the supplier.
Quantity unit: the application software proposes by default “Unit” but it is possible, by
means of the drop-down menu, to choose another unit: "Box", "Can", "Day" (for
services,) etc.
Requested delivery date: appears in this field by default the current date (which by
default appears in the field 'creation date' + 7 days.) However, this date may be
changed based on the date agreed upon with the supplier.
It is possible to mention a specific date for each order line. The order form will indicate
for example: "delivery between January 10 and February 10, 2014. This date will
condition the commitment on the funds.
Gross sum: indicate the primary price of the item before discount and VAT.
Quantity: indicate the quantity of ordered items. The amount of this field multiplied by
the net price and under deduction of a possible discount will give the amount
appearing in the following field: Net sum. In certain cases of fixed assets (as for a PC or
a tablet), the system does not authorize to enter a quantity bigger than 1 by row (1
item / row of order) if the ordered total quantity is lower than 6.
Net sum: (see above).
VAT %: The application software calculates this rate according to the location of the
supplier and the type of the good. A reduced rate of 2 % is applied for example for
books and no VAT is applied for the suppliers located outside the Swiss territory.
Requester fund or connected to its structure and Other fund: in the first field, select
by means of the drop-down menu one of the funds (DIP or private) the requester of
which is the holder, the co-holder or awarded by a delegation of signature. If the order
will be financed by another fund (for example belonging to another subdivision), select
it by filling in the field "Other fund ".
Financial and cost centre: according to fund selected before, the system fills in
automatically these two fields.
11/31
-
Approver/validator 1 (Fund): According to the chosen fund, the application software
suggests as approver of the order the names of the people holders of the account or
being agents of signature. The person selected will be the one to whom will be
submitted the purchase requisition and which will have to validate it before the order
is sent to the supplier (see chapter 5 below).
- Approver 2 (financial centre): all orders above CHF 5 ' 000.- excluding tax must be
submitted to a second approver, generally the person in charge of the financial centre
or the person appointed for that purpose. Choose the appropriate person.
Teaching VAT exemption: « No » will appear by default on this field. However if the
order is bound to a foreign mandate of a service offer as for example to a teaching
performance and if it satisfies the conditions of exemption of VAT put “Yes”.
Net sum: it is possible to fill in this field and the program will calculate automatically
the gross sum, taking into account the applicable VAT rate.
B) Optional fields
Product code: Indicate the one shown in general on the offer of the supplier
Discount %: In the case of a discount granted by the supplier, please mention its rate.
The amount of the discount will be automatically calculated from the unit price and
will appear in the field: "The total of the discount”. It is not possible to use this feature
for the CCA commands on catalog.
Project (IO): if the good or the service ordered will be financed by a fund going into the
“projects accounting”, choose by means of the drop-down menu the concerned
project.
Reviewer: besides the compulsory circuit of approval of the purchase requisition
planned by the application software, the user can have his PR verified by a reviewer
who will have to validate its content at the formal level. This review can turn out
compulsory in the case of a specific project with an ad hoc budget and an official
reviewer.
Authorization code for alcohol: in case of order of alcohol, indicate the code
attributed by the supplier.
-
-
-
-
-
Apart from the optional fields, each command line must involve information of the fields
above.
4.1.3 FIXED ASSETS
In the case the ordered good have to be included in the UNIGE fixed assets "according to the
Administrative Memento (directive: Managing fixed assets "Nr 082), this tab must be filled in
by the requester, certain data being entered also by the Subsidies and Inventory Department.
12.05.15
12/31
-
Thesaurus: every type of fixed asset is listed in a table called “Thesaurus”. Select the
good category of fixed asset by means of the drop-down menu.
Cost centre of fixed asset: indicate the subdivision that will be responsible for the fixed
asset.
Partial purchase: “NO” will appear by default. Put “Yes” if the item ordered is
connected to a previous or a later order.
Fixed asset description: describe briefly the item eg. : MacBook Air etc.
Manufacturer: indicate the name of the manufacturer who can be different from the
one of the supplier.
Building: Select the UNIGE building in which the good will be installed.
Premises: indicate the premises in which the good will be installed.
Serial Nr: indicate the serial number of the good.
Fixed asset Nr: this data will be entered by the Subsidies and Inventory Department.
It should be noted that certain data of this tab (e.g.: building, premises, manufacturer and
serial Nr known most of the time at the delivery) can be corrected or entered later by the
user, in particular on reception of the good (see Chapter 7, below).
C) Redundant Data – Duplication of Order Rows
The button « Add New Order row » reveals a new row on the screen and opens a new
window of fields below.
It is possible to duplicate an order row by clicking the icon
found on top left of an order
row in order to copy this one and begin a new order row on the basis of this information. It is
also possible to delete an order row by clicking the icon
to the right of the row.
Certain data being recurrent on several rows, it is possible to edit partially several rows in the
same time. For the recurring data (e.g.: Requester Fund, Other fund, Approver 1 etc.), before
selecting the item data mark the square " Apply to all order rows" which is found in several
drop-down menus (see image below). This feature allows you to apply to all the row orders
the same data and avoids tedious data inputs.
12.05.15
13/31
4.1.4 MULTIFINANCED ORDER
–In case the item or the service ordered has to be charged over several accounting funds, it
will be necessary for each order row to:
1. Fill in the tab «General Data», with the exception of fields: « Requester fund or
connected to its structure », « Other Fund », « Reviewer», « Approver 1 (Fund) »,
« Approver 2 (Financial Centre) », « Financial Centre, « Cost Centre », « Project (IO) »
and the tab « Fixed asset »;
2. Go to tab« Allocation split »
3. Mark the box« Use allocation split»
4. Click the button « Add New Line »
Then appears the image below:
The field, entitled "% Distribution ", is not filled in yet. In this one, indicate in figures the
percentage (20 for 20 %) of the total of the order to which you want the fund to contribute,
as well as the approver-s (maybe also the reviewer or Project Nr). Then click on the
"Update" buttons then " Add a new line ". Repeat as many times the operation as there
are funds of financing, the total of fields "% Distribution" must equal obviously 100. If it’s
not the case, the application software will indicate it by an error message.
12.05.15
14/31
It should be noted that in case of multiple financing of an order, every row of command
must be ventilated according to the method above.
4.1.5 FINALIZATION OF THE PURCHASE REQUISITION
After having filled in all the necessary fields of the second screen, we proceed to the
screen of finalization of the purchase requisition by clicking the button « Next ».
This screen allows you to write (white rectangle) a comment intended for the supplier.
This text will appear on top of the order form (for example the reference to the offer of
the supplier or a practical instruction for the delivery). The icon "Attachments" via the
"Add" button allows you to attach to the future order form a document, for example a
copy of the estimate of the supplier.
In order to transmit the PR to its approver-s (even reviewer), click the “Autoflow” Button.
By means of buttons "Previous" or « Update » and « Save », you can respectively return to
the previous screen or interrupt the PR while saving it in the Portal. The "Manual Flow"
button is normally not used except in the cases where you have to submit the PR to an
actor not planned by the system.
12.05.15
15/31
4.2 CCA ORDER ON CATALOG
4.2.1 SEARCH FOR THE PRODUCT TO BE ORDERED
To select a product to be ordered you can either:
•
•
select a product in the menu tree
or look for it by an advanced search
A) Selection in a list
Click on the general category of the product (-i.e. « Imprimés ») and select until the end of the
arborescence the product you want (-i.e.: “Printed Envelopes”): the list of the concerned items
appears on the right of the screen.
B) Simple search
Enter the desired item (-i.e. “envelopes”) and the related product list will appear on the right
of the screen.
C) Advanced search
Select the tab « Advanced search ». This option allows you to find the desired product by
“Product groups”, price ranges etc.
12.05.15
16/31
4.2.2 CREATION OF A SHOPPING BASKET
Once the item is selected (on screen below called « Product Groups ») using the buttons + and
- (to the right of the screen) define the quantity of products desired, add products to the
"basket" using the icon "Add to shopping basket".
Complete the order by selecting other items according to the same process of selection of
products explained above. Then by using the icon « Go to the shopping basket »
to the screen « Shopping Basket » below.
Please note that the icons « Add to comparison »
pass
and « Go to product comparison »
allow you to select several types of different items and to compare their prices and
specificities.
12.05.15
17/31
Once the items are selected, pass to the screen « Shopping basket » below:
In order to bring modifications to the basket, the icon at the end of the line
allows you to
delete the item of the basket. The « New Quantity » column allows you to modify the quantity
of products, item by item, then to validate these modifications click on the button « Update »
at the bottom of the column.
The icon
allows to add a new item through the screen « Product groups ».
The icon
« Remove all items from shopping basket » erases the basket and redirects
towards the previous screen.
If some orders are recurrent, it is possible with the icons
« Save shopping basket » or
« Create shopping basket template » to create basket templates which can be later
reused.
12.05.15
18/31
When the basket is finalized, by clicking on the upper right button « Create a requisition » you
reach the entitled screen « Requisition Creation », (see image below) which is similar (but
more summarized: many fields were deleted) to the first screen of the procedure « Free
order» explained in chapter 4.1 and to which we can now refer to pursue the capture of the
PR. The features of « CCA Order on Catalog » are roughly the same as those in « Free-order »,
the major exception being that no order form will be sent directly to the CCA. CCA
collaborators will intervene as « Buyers » at the Portal’s level.
4.3 CCA ORDER -UPON ESTIMATE (OFF CATALOG)
According to the agreement between the UNIGE and the CCA, sometimes the former has to
deal with certain suppliers approved by the CCA to order some types of items or services (-i.e.
movings).
This type of order will follow the same process as the « Free-order » by respecting the
following points:
In the first screen, choose in the suppliers’ field the one entitled « CCA order» then at the field
« CCA supplier », (first column) select the supplier with whom you want to deal with.
The rest of the operations is then similar to those of the « Free order ».
12.05.15
19/31
5.
REVIEWING AND/OR APPROVAL OF A PURCHASE
REQUISITION
Both processes are relatively similar, they will be treated in the same chapter, the only
difference being that only the approval allows to send an order, while the reviewing must
always be followed by an approval.
The reviewing is an optional stage. Except in cases of orders financed by funds connected to a
project (IO for « Internal Order »), where the review by the person in charge of the project will
be a - compulsory prerequisite for the approval by one of the holders of the concerned fund.
Except the orders related to a project, the PR can be verified by an actor other than an
approver. His intervention in this case will concern the accuracy / completeness of the data of
the PR and not the opportunity of the PR and its budgetary "conformity", two elements
confirmed by the PR’s approver.
5.1 NOTIFICATION AND ACCESSES
The user receives an e-mail warning him that a new purchase requisition is submitted for his
review or approval. He reaches the screen of reviewing / approval either by clicking the link
URL appearing on the e-mail, or by going to the Portal to the section "Reviewing" or
"Approving".
5.2 CHECK AND/ OR APPROVAL OF THE PURCHASE REQUISITION
On the screen of "Review" or "Approval" (see image below) the PR appears on different lines
preceded by white boxes.
12.05.15
20/31
The "active" line appears in dark blue and the "main" data of the PR appear in the tab « Order
Level » appearing below the lines. You can pass from a PR to the other one by clicking on the
desired line.
Using the tabs at the bottom of the screen, the reviewer /approver can consult the History,
the Basic Data, the Comments and the Attachments relative to the PR.
He can add a comment, attach files and, by means of the icon
the detailed data of the PR, which he cannot however modify.
« edit order row", display
A temporary version of the order form can also be displayed thanks to the icon
informative flow can be sent to the actors of the purchase process using the icon
. An
.
How to approve/to validate?
Three buttons at the top of the screen correspond to the 3 possible actions for one or several
PRs selected in the list. The options are:
•
•
•
Approve selected
Reject the selection
Return to owner
The validation or the refusal must be entirely made (impossible to validate or to refuse
partially) on the whole PR. Several PR can be selected for global validation.
The global validation of an order consists in selecting the box for that purpose then to select
the chosen action.
The validation of the reviewer will redirect the PR to the appointed person(s) to approve.
The validation of the approver will redirect the PR to the second approver (if needed – in case
of an order above CHF 5 ' 000 excluding tax), or to the requester who can now proceed to the
order.
The option "Reject the selection" will have the effect of cancelling the PR and sending it back
to the requester who will be able to create a completely new PR or copy the PR cancelled
(with the button " to copy to create towards new ") towards another one.
The option "Return to Owner" sends back the « PR » to the requester, who can modify it
according to the instructions of the reviewer or approver. The choice of one of the three
options brings the user to the screen below which is going to allow him" To confirm and
proceed" with the purchase process (by adding if needed a comment) or to generate an
informative flow (by clicking on "Info flow")
12.05.15
21/31
At this last stage, we can also go back by pressing the button "Cancel".
6. PLACE THE ORDER
6.1
NOTIFICATION AND ACCESS
You reach your accepted requisitions, either by clicking the URL link appearing on the warning
e-mail, or by browsing the menu on the web site.
You can look for your Purchase Requisitions either by criteria of status, or - by creation’s date,
or by - PR and/or supplier’s number.
12.05.15
22/31
6.2
CONSULT THE DETAIL
You access the detail of the Purchase Requisition by clicking on the « Open » button.
You can consult the order’s history, the basic data, the comments of the reviewer and/or
approver, and the possible attached files to the PR.
Below, you can consult the details of the order rows as they were entered during the creation
of the PR. For each row, you can consult the history and comments.
The requester who is going to place the order cannot obviously at this stage modify the data
of the PR.
By clicking on the button "Create order" you access the last two screens of the placement of
the order in which you will finalize the purchase order.
6.3
12.05.15
COMMENT AND ATTACHMENTS
23/31
You can hereby verify (or modify) the comments addressed to the supplier that will appear on
the order form and add one or several attached files (only in pdf) with a description.
To add an attachment and join it to the order form, click "Add" below the word
"Attachments", which opens the window below:
Then search the file in pdf format on your computer, add if necessary a description and click
on "Add". The added files are listed on the bottom of the window. For each one, tick the box
to indicate that the appendix must be attached to the order when sending it by e-mail to the
supplier.
Click on « Next » to reach the choice of the order mode or « Previous » to go back.
12.05.15
24/31
6.4
ORDER MODE
Click on the button « Select Order Mode » and the window below appears:
An order by « Phone » or « Other » allows you to proceed directly.
If you select « E-mail », then « Confirm » and « « Confirm and proceed » an additional
window appears (see image below) as an email. It allows you to enter the necessary
information: address of the recipient, « copy », subject and body of the e-mail
12.05.15
25/31
Click on “Confirm” to validate this choice.
Then, click on “Confirm & continue” thus to generate the purchase order in PDF Format.
NB In case of "Other ", the PDF order form is automatically generated after having clicked
"Confirm" then "Confirm and Proceed".
7. RECEIVE AN ORDER
The new organization of the purchases system implies that supplier invoices are now sent
directly to the accounting department. It is important that the user "receives" in the Purchases
Portal the ordered item, operation which will give or not the green light to its payment by the
accounting department. This task will be carried out by the employee appointed as
"Correspondent" (it can also be obviously the "requester") who will receive an e-mail of
notification before - the delivery date, scheduled with - the supplier and which was registered
in the portal.
To do this, select in the home screen the option « Acknowledge receipt of »
12.05.15
26/31
7.1
ACCESS
In the screen « Receiving» select the order and click "Open." (NB: The top line allows you to
search orders by status, date, description, number and provider). Thus, you reach a screen
entitled "Receiving Order No."
7.2
RECEIVING ORDER SCREEN
At the top, you can consult PR’s history, its basic data, comments and attached files, even add
a comment.
At the bottom, the order rows appear with to the left the quantities of ordered items and to
the right their costs.
At each row, it is possible to « Edit Order Row » with the help of the icon
« Edit data » will appear as below:
and the tab
The user can at this stage check or complete or even modify the following data of location and
origin: « Effective delivery date », « Building », "Serial Nr", "Manufacturer" and "Premises".
In the centre of the screen, three different buttons allow either/or to:
-
Receive « globally » the goods: « Receive All» ;
Receive it « partially »: « Receive » ;
Or cancel the order « Cancel Order ».
These three options are explained below.
12.05.15
27/31
7.3
GLOBAL RECEPTION
Ideally quantities received match the ordered quantities, you don’t need to fill in, line by line
the item quantities received but simply click the button « Receive All ».
The below window appears which allows you to:
-
indicate the effective delivery date
the number of delivery note
indicate whether the goods are "usable" or not. By choosing "Yes" it informs in fact the
Subsidies and Inventory Department if he can begin to write off the delivered goods (if
these obviously are « fixed assets » in the accounting sense of the term). The
depreciation will begin from the mentioned delivery date.
7.4
PARTIAL RECEPTION
It can happen for various reasons that delivered quantities do not match ordered quantities. In
this case, the user has the possibility of entering a partial reception by specifying the effective
received quantities.
To do this, it is necessary to fill in line by line the boxes by indicating the actual received
quantities, then to click the « Received » button (meaning partially receive) which shows the
receiving window described in the previous paragraph that you have to fill in.
Note that the following window will then appear, screen from which we can later receive all or
part of the items not yet delivered.
12.05.15
28/31
In the lower part of the screen, the order appears row by row with the indication (to the left)
of the already delivered items (i.e.: 4 units means that on 4 ordered units 2 were delivered).
Icons on right of lines are the same as - for the previous screen.
This time, the user has through four different buttons the possibility of:
-
-
again partially receive the goods, the second delivery not having settled the requested
order, by clicking on "Receive" ;
receive the balance of the goods by clicking on « Receive All »;
Globally go back to the first partial reception -by clicking on "Cancellation Received". It
has the effect of cancelling it and it will be now necessary to enter again the quantities
actually received. It should be noted that such a cancellation of the partial reception
can also take place for a single order row by using of the button "Cancel" or the icon.
« Edit Good Receipt » and then click on “Cancel” button.
close the order (see Chapter 7.5 below).
7.5
CANCEL OR CLOSE THE ORDER
It sometimes happens that for various reasons (technical problem during the manufacturing of
the ordered items, bankruptcy, etc.) the supplier is not finally able to deliver all or part of the
goods ordered.
In case of a total absence of delivery, the user chooses the option « Cancel the order ».
In case of a partial delivery intervened but the balance of order will finally not be delivered,
please selection the option « Close the order » which will be chosen (cf. § 7.4 Partial
reception).
12.05.15
29/31
In both cases explained above the following window appears:
Please do not enter comments and do not tick the box « Notify supplier regarding closing this
order ». Simply click the « OK » button.
8. CONSULT ITS OWN PURCHASE REQUISITIONS AND
OTHER OPTIONS
8.1 CONSULT ITS OWN PURCHASE REQUISITIONS
From the Portal home menu, the user can access the PR which he created or that he is
entering through the headings "My Requisitions" or by the 1st blue rectangle, entitled
"Draft/returned", two paths leading to the same screen as below:
By default, the PRs called "Draft / returned" are listed on the screen. Using the right buttons,
the user can either open to see the details, or delete them.
12.05.15
30/31
Using the two filters (top left), he can refine the selection and choose his PR according to their
status (1st filter):
-
In flow: not yet processed by the one or the other actors
Forwarded to buyer: to the person who will place the order
Ordered
Partly received
Received
Rejected: in case of refusal of the reviewer or of the (one of the two) approver (s)
Added to consolidation. NB Feature not currently implemented
All
The second filter is used to list all PR of the requester or his requisitions with his actions.
The selection of the PR can also be made by dates (start or beginning), by description of the
order and by Nr or by supplier.
The user can then open the requisition consult it or even modify it according to his rights
devolved to him.
8.2
APPOINT A BACKUP PERSON
The option « User Settings » allows to access to the screen below:
In case of holidays or of planned absence, this screen allows the user to register for the
duration of his absence a backup person who will, however, have to have the same rights of
validation as him to be able to intervene in the purchasing process.
12.05.15
31/31