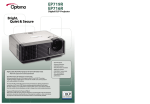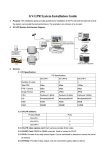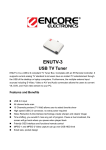
1
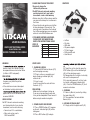
8. Computer Connection
8.1 Connect
LidCamFIRST
to computer with the supplied CONTENTS
USB cable.
PLEASE READ THIS
SECTION
8.2 LidCam can be connected to computer directly. No drive is needed.
8.3 Videos
! Be sure to charge
the can be displayed, downloaded and deleted on computer.
LidCam fully before use
Specifications
! Do NOT take out
card under working
Sensor
CMOS 5.0 Megapixel sensor
and storing state for it may lead to
Video resolution
HD(1280*720)
close-down, crash or data missing.
Focus range
1m ~
• Before using this
LidCam,
please
read
the8× Digital Zoom
Digital
zoom
Normal,
4× and
user manual and
keep
it as a reference
in
White
balance
Auto
the future.
Video
HD
Internal
memory your
32MB
• Please take time
to register
LidCam
External
memory
SD slotThe
(Max. 32GB)
to take advantage
of the
warranty.
Filelocated
format on the
AVI
warranty card is
inside of
Computer connect
the LidCam packaging
or you USB
can 2.0
register
TV outlet
NTSC
online at: www.RhinOutdoors.com
Battery
USER MANUAL
WATCH INSTRUCTIONAL VIDEO
Built-in Li-ion battery
IF YOU NEED FURTHER ASSISTANCE,
PLEASE VISIT OUR WEBSITE AND
WATCH THE INSTRUCTIONAL
VIDEO
State of indicator
Working state Indicator state
STATE OF
Stand-by
Green light on
INDICATOR
RHINOUTDOORS.COM
BEFORE TURNING ON THE CAMERA
Recording
Red flashing light
Charging
Red light on
Full charging
Green light on
Low battery
Red light flashing
•
•
•
•
•
•
•
LidCam
AV cable
USB cable
AC power adapter
12 Volt charger
2GB microSD card
User Manual
Location of controls
WARNING
electric shock, the LidCam shall not
be exposed to excessive heat or Water
(LidCam is NOT waterproof)
PRECAUTION:
frequency may affect the picture
and sound.
• If the data transmission interrupted
or failed due to static electricity or
application or cut off connection, and
reconnect USB/AV
USING LIDCAM
Do NOT take out card under working
and storing state for it may lead to
closedown, crash or data missing.
• Format card if it is used before.
• Max. card can be used is
32GB microSDHC.
START GUIDE
red
1. CHARGING LIDCAM
2.3 To put the unit in stand by, press the
1.1 Connect USB Cable to Lidcam (#12)
STBY button (#9) and the indicator light
and to charging accessory.
(#6) will be solid green again
1.2 Plug in wall or car receptacle and
2.4 No operation for 5 minutes in stand by
begin charging, indicator light (#6) WWW.RHINOUTDOORS.COM
will result in auto power off
864-814-1080
constant red
2.5 to manually power off, unit has to be
1.3 Insert a card
in stand by, solid green indicator light
Insert the card into the card slot from
(#6). Press the POWER button (#1) for 4
the back. (# 11)
seconds and release.
PRECAUTION:
3. ZOOMING
Make sure that card logo is facing up.
3.1 Zoom in (Max.8×) and out by sliding
If you are using a previously used card,
the zoom slider (#8)
it may not be compatible. Please format it
3.2 Three positions for zoom button:
before using to avoid missing data.
Normal,4×,8×
2. POWER ON/OFF AND RECORD
2.1 Press POWER button (#1) to power
up the unit, indicator light (#6) will be
solid green
2.2 Press REC button (#9) to begin
4. LIDCAM LED FLASH LIGHT
4.1 Simply switch the lights on/off (#2)
8.3 Videos can be displayed, downloaded and deleted on com
5. CONNECTING TO TV FOR PLAYBACK
5.1 Connect LidCam and TV with AV cable
5.2 Switch on LidCam.
5.3 Press POWER button to switch to
playback mode
5.4 Under playback mode, press REC
button to display video. Press REC button
again to stop video
Note: Only the last clip recorded can
be viewed on your TV. A computer is
necessary to view all clips recorded
6. ADJUSTING DATE/TIME
6.1 Connect TV with AV cable after
switching on.
6.2 Long press of POWER button to enter
date/time adjusting menu.
6.3 Press record button to put in
stand-by (solid green) or make sure it is
in stand-by mode.
6.4 Press the playback button to adjust.
6.5 Press POWER button to
choose date/time.
Rhino Outdoors Lid Cam
6.6 Long press of POWER to quit.
6.7 Long press of power button to reset
and start over
SPECIFICATIONS
Specifications
Sensor
7. DIRECT COMPUTER CONNECTION
7.1 Connect using supplied USB cable.
Red light will come on to indicate the unit
is charging
7.2 Press POWER button to turn on the
Lid Cam and use as a card reader
7.3 Prompt will pop up on screen to view
pictures or download videos, select it
7.4 Select DCIM folder
7.5 Select 100_coach to display
video clips recorded
Rhino Outdoors Lid Cam
SYSTEM REQUIREMENTS
The following requirements
•
•
•
•
•
Microsoft Windows 2000,XP or Vista
Intel® Pentium4 2.8GHz or higher
512MB or higher
Normal, USB1.1 or higher
Min.64MB graphic memory
Rhino Outdoors Lid Cam
CMOS 5.0 Megapixel sensor
Video resolution
HD(1280*720)
Focus range
1m ~
Digital zoom
Normal, 4× and 8× Digital Zoom
White balance
Auto
Video
HD
Internal memory
32MB
External memory
Card slot (Max. 32GB microSDHC)
File format
AVI
Computer connect
USB 2.0
TV outlet
NTSC
Battery
Built-in Li-ion battery
DISCLAIMER:
Rhino Outdoors, LLC reserves the right to make changes
State of indicator
to the LidCam features, functionality and physical design
Working state Indicator state
at it’s sole discretion. As a result, such changes may not
Stand-by
Green
lightofon
be reflected in this
version
the manual.
Recording
Red flashing light
microSD,
microSDHC
mark and logo
Red light
on
areGreen
trademarks
of SD-3C LLC.
Full charging
light on
Other brand names mentioned herein are
Low battery forRed
light flashing
identifications
purposes only and may
be trademarks of their respected holders.
Location of controls
Charging
1. POWER button
Power on/off and function switch.
2. LED flash light button
Control LED.
3. Reset button
Restart machine when it crashes.
4. LED lamp
Flash light.
5. Lens
Capture video.
6. Control indicator
Indicate working state.
7. Microphone
Capture sound.
WWW.RHINOUTDOOR
8. Zoom button
Turn the button to zoom in.
864-814-1080
9. Recording button
Record and display video.
10. AV jack
Connect with TV.
11. Card slot
Put expansion card in.
12. USB connect
Connect with computer.
System Requirements
1. POWER
Power on/off and function switch.
Symptom
Possible
causesbutton
2. LED
flash light
button card
Control
Solid Green Light, camera will not record
Camera
is locked
because
isLED.
full
Reset
button
it crashes.
Videos are not displayed, but audio can be heard You do3. not
have
the correctRestart
mediamachine
playerwhen
installed
4. LED lamp
The Power Turns Off Automatically
Recorded video not saved.
Far away images are out of focus
Memory card functions are not operable
Blurrybutton
image
1. POWER
Power on/off and function switch.
2. LED flash light button
Control LED.
4. LED lamp
Flash light.
None
of the
3. Reset
button
buttons
work.
Restart
machine when it crashes.
Flash light.
Power5.save
Lens mode
Capture video.
The battery
pack
is exhausted.
6. Control
indicator
Indicate working state.
The power
turns off before saving.
7. Microphone
Capture sound.
8. Zoom
button focus range.
Turn the button to zoom in.
Objects
are beyond
Recording
and
video.
Videos9.not
in AVIbutton
format areRecord
stored
indisplay
the card.
10.is
AVnot
jacksteadily held.Connect with TV.
LidCam
SD card slot
Put expansion card in.
Lens is11.dirty.
12. USBhappens
connect when Connect
with computer.
Short circuit
connected
to other facilities.
The following requirements must be satisfied.
Solutions
Microsoft Windows 2000,XP or Vista
Delete
videos
off card
Intel®
Pentium4
2.8GHz or higher
512MBVLC
or higher
Download
player, free from our website:
Normal,
USB1.1
higher
rhinoutdoors.com &orset
as default
Turn on again.
WWW.RHINOUTDOORS.COM
Charge the battery.
864-814-1080
Charge battery when low power is indicated.
Record in focus range.
Format the memory card. Do backup before formatting.
Hold steady when recording.
Clean the lens.
Press reset button to turn on again.