1
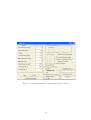
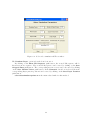
MDSP RESOLUTION ENHANCEMENT SOFTWARE
USER’S MANUAL 1
Sina Farsiu
May 4, 2004
1
This work was supported in part by the National Science Foundation Grant CCR-9984246, US Air
Force Grant F49620-03 SC 20030835, and by the National Science Foundation Science and Technology
Center for Adaptive Optics, managed by the University of California at Santa Cruz under Cooperative
Agreement No. AST-9876783. This software was developed under the supervision of Prof. Peyman
Milanfar by Sina Farsiu, who is the principal architect of the code, with significant contributions from
Dirk Robinson, particularly on the motion estimation algorithms. This software package is available
for licensing. Please contact Prof. Peyman Milanfar ([email protected]) if you wish to obtain this
code for research or commercial purposes.
Abstract
This software suite is a Matlab-based package for resolution enhancement from video, developed
at the Multi-Dimensional Signal Processing (MDSP) research lab at the University of California
at Santa Cruz.
The main objective of this software tool is the implementation of several super-resolution
techniques. In particular, the techniques described in [1], [2], and [3] and several references
therein are included. The techniques implemented cover robust methods, dynamic color superresolution methods, and simultaneous demosaicing and resolution enhancement.
This software also allows the user to create data sets for different simulation purposes. The
input images may have the “.AVI” or “.mat” formats. All output sequences can be saved as
“.mat”, or “.AVI” formats. The output results can also be shown as MATLAB figures and
therefore they can be saved in almost any imaging format (eps, JPEG, GIF, PNG, tif,... ).
Contents
1 Basics
1.1 Preliminary Set-Up . . . . . . .
1.2 Opening Files . . . . . . . . . .
1.3 Viewing LR Files . . . . . . . .
1.4 Cropping LR Files . . . . . . .
1.5 Motion Estimation . . . . . . .
1.6 Resolution Enhancement Factor
1.7 Reset Button . . . . . . . . . .
1.8 Fixed Parameter Check Box . .
1.9 Show/Save Buttons . . . . . . .
.
.
.
.
.
.
.
.
.
.
.
.
.
.
.
.
.
.
.
.
.
.
.
.
.
.
.
.
.
.
.
.
.
.
.
.
.
.
.
.
.
.
.
.
.
.
.
.
.
.
.
.
.
.
.
.
.
.
.
.
.
.
.
.
.
.
.
.
.
.
.
.
.
.
.
.
.
.
.
.
.
.
.
.
.
.
.
.
.
.
2 Static Super-Resolution of Grayscale Frames
2.1 S&A . . . . . . . . . . . . . . . . . . . . . . . . .
2.2 Bilateral S&A . . . . . . . . . . . . . . . . . . .
2.3 S&A with iterative deblurring . . . . . . . . . . .
2.4 Bilateral S&A with iterative deblurring . . . . .
2.5 Median S&A . . . . . . . . . . . . . . . . . . . .
2.6 Median S&A with iterative deblurring . . . . . .
2.7 Iterative Norm 2 . . . . . . . . . . . . . . . . . .
2.8 Iterative Norm 1 . . . . . . . . . . . . . . . . . .
2.9 Norm 2 data with L1 Regularization . . . . . . .
2.10 Robust(Median Gradient) with L2 regularization
2.11 Robust(Median Gradient) with L1 regularization
2.12 Cubic Spline Interpolation . . . . . . . . . . . . .
.
.
.
.
.
.
.
.
.
.
.
.
.
.
.
.
.
.
.
.
.
.
.
.
.
.
.
.
.
.
.
.
.
.
.
.
.
.
.
.
.
.
.
.
.
.
.
.
.
.
.
.
.
.
.
.
.
.
.
.
.
.
.
.
.
.
.
.
.
.
.
.
.
.
.
.
.
.
.
.
.
.
.
.
.
.
.
.
.
.
.
.
.
.
.
.
.
.
.
.
.
.
.
.
.
.
.
.
.
.
.
.
.
.
.
.
.
.
.
.
.
.
.
.
.
.
.
.
.
.
.
.
.
.
.
.
.
.
.
.
.
.
.
.
.
.
.
.
.
.
.
.
.
.
.
.
.
.
.
.
.
.
.
.
.
.
.
.
.
.
.
.
.
.
.
.
.
.
.
.
.
.
.
.
.
.
.
.
.
.
.
.
.
.
.
.
.
.
.
.
.
.
.
.
.
.
.
.
.
.
.
.
.
.
.
.
.
.
.
.
.
.
.
.
.
.
.
.
.
.
.
.
.
.
.
.
.
.
.
.
.
.
.
.
.
.
.
.
.
.
.
.
.
.
.
.
.
.
.
.
.
.
.
.
.
.
.
.
.
.
.
.
.
.
.
.
.
.
.
.
.
.
.
.
.
.
.
.
.
.
.
.
.
.
.
.
.
.
.
.
.
.
.
.
.
.
.
.
.
.
.
.
.
.
.
.
.
.
.
.
.
.
.
.
.
.
.
.
.
.
.
.
.
.
.
.
.
.
.
.
.
.
.
.
.
3
3
3
4
4
5
5
6
6
6
.
.
.
.
.
.
.
.
.
.
.
.
7
7
8
8
10
10
10
10
10
11
12
12
12
3 Dynamic Super-Resolution of Grayscale Frames
13
4 Static Multi-Frame Demosaicing and Color Super-Resolution
4.1 Static Color Super-Resolution . . . . . . . . . . . . . . . . . . . . . . . . . . .
4.2 Static Multi-Frame Demosaicing . . . . . . . . . . . . . . . . . . . . . . . . . .
15
15
15
5 Dynamic Multi-Frame Demosaicing and
5.1 Dynamic Color Super-Resolution . . . .
5.2 Dynamic Multi-Frame Demosaicing . .
5.3 Cubic Spline Interpolation . . . . . . .
17
17
17
17
1
Color
. . . .
. . . .
. . . .
Super-Resolution
. . . . . . . . . . . . . . . . . .
. . . . . . . . . . . . . . . . . .
. . . . . . . . . . . . . . . . . .
6 Data Simulator
6.1 Grayscale Video Simulation . . . . . . . . . . . . . . . . . . . . . . . . . . . . .
6.2 Static Multi-Frame Demosaicing Simulation (Creating a Color Filtered Sequence)
20
6.3 Dynamic Multi-Frame Demosaicing-Color SR Simulation . . . . . . . . . . . .
19
19
7 FAQ
7.1 Why does MATLAB produce an error message or crash when trying to read in
data from some AVI files? . . . . . . . . . . . . . . . . . . . . . . . . . . . . .
7.2 Why are some of the GUI icons (push-buttons, check-boxes,...) disabled? . . .
23
2
21
23
23
Chapter 1
Basics
1.1
Preliminary Set-Up
• Start MATLAB (Version 6.5 or later editions)
• Put the directory of files in the MATLAB path. Make sure that all subdirectories are
also added in the path.
• In the MATLAB command window type driverSRGUICOLOR. This command clears
the workspace memory, clears the screen and closes all open figures. An alternate to this
command is the SRGUICOLOR command, which starts the program without clearing
memory, screen, or opened figures.
The window that pops-up after using either of the commands driverSRGUICOLOR, SRGUICOLOR is called SRGUICOLOR window and most of the input-output operations
would be preformed via this graphical interface. The related files that control this window are:
• SRGUICOLOR.fig which controls the graphical properties of this window.
• SRGUICOLOR.m which programs all the push-buttons, radio-buttons,... and the
related pop-up windows.
1.2
Opening Files
• To open Black and White (grayscale) images or to read color images as grayscale, first
set the B/W Output radio button on (if it is not already selected). Then, choose the
File menu and click on the Open data File option. You have the choice of reading
“.avi” or “.mat” formats (default is the “.mat” format). After that simply search for the
directory where the input file is located and click on the file name.
• To open color images set the Color Output radio button on (if it is not already selected).
Then continue similarly to the grayscale procedure.
The first frame of the loaded sequence, which we call input or low-resolution (LR) sequence will
be shown on the top left corner of the SRGUICOLOR window. Throughout this document,
we call the image located at this position as Fig1.
3
Figure 1.1: SRGUICOLOR.fig screenshot.
1.3
Viewing LR Files
Click on the Show LR Seq. button to see a video of input frames. Alternatively, you can
click on the Show button under the Fig1 image. The first frame of the LR sequence would
be shown in a separate window.
1.4
Cropping LR Files
In the case that the input images are too large or they may contain different objects with
unequal speed, it is possible to compute the motion vectors and enhance the resolution of each
object/area separately. To do so click on the Crop input Frames radio button. The mouse
pointer changes its shape and lets you drag a rectangular over a desired object in Fig1. A larger
picture of the selected object would be shown in the top right section of the SRGUICOLOR
window. Throughout this document, we call the image located at this position as Fig2. If the
user approves the selected area, that object would be tracked throughout the sequence and a
video of the tracked object would be shown on the bottom left corner of the SRGUICOLOR
4
window. Throughout this document, we call the image located at this position as Fig3. If the
user approves the traced video, the original sequence would be replaced by the new tracked
(cropped) sequence. User may save this new sequence for future experiments by clicking on
Save Cropped Data push-button. Note that by clicking on the Save as AVI check box,
data will be save as an Avi sequence otherwise it will be saved as “.mat” file.
1.5
Motion Estimation
There are three different mechanisms for acquiring motion vectors1 :
• If the motion vectors have been already computed and saved in a ”.mat” file, they can
be loaded by clicking on the No-Motion Estimation radio-button.
• If the motion vectors are not available then they can be computed. For video sequences,
where the Field of View (FOV) is almost constant throughout the sequence (e.g. the
global motion is the result of simple shaking of camera), choose the Motion Estimation
radio-button. This option will register all images against one reference frame (typically
the first image in the sequence).
• For sequences, where the FOV changes (e.g. a panning translation motion of camera),
it is recommended to register the frames in a consecutive manner, that is the frame
number two in the sequence will be registered with respect to the frame number one and
the frame number three would be registered with respect to the frame number two and
so on and so forth. User can choose this option by clicking on the Progressive Motion
Estimation radio-button.
The motion estimation will be preformed as soon as super-resolution method is chosen. The
computed motion vectors can be saved by clicking on Save Motion Vector push-button.
1.6
Resolution Enhancement Factor
Resolution enhancement factor (the ratio of the number of pixels in the High-resolution (HR)
output and LR input frames), can be modified by changing the value of the number in the
right-side of the Apply New Resolution Factor push button (we refer to the resolution
factor by the symbol “r” throughout this document). For example resolution factor of “4”
means that the HR frames has four times more pixels in X and four times more pixels in Y
directions than any of the LR frames2 .
Once the motion vectors are computed, a matrix of numbers appears under the title “Distribution of Low-Resolution Frames”. This matrix shows how many LR frames have contributed
to estimate the pixels of any r × r block in the HR image.
Usually, a more uniform distribution of numbers in this matrix results in a better HR
estimation. The zeros in this matrix represent the pixels for which interpolation is necessary.
After the first time that the motion estimation is done, user can change the resolution factor
and click on the Apply New Resolution Factor push button, choosing a resolution factor
which may produce a different distribution.
1
Note that in this version of software, we only consider the global translation motion model.
The changes in the FOV throughout the sequence may result in a mosaicing effect in the HR output and
therefore the total number of pixels in the output may exceed the factor of “r” ratio.
2
5
1.7
Reset Button
During the execution of any iterative program, the user can click on the Reset push button
to stop the execution of that program. As the result, MATLAB memory will be cleared and
all open MATLAB figures will be closed.
1.8
Fixed Parameter Check Box
By checking the F.P. check box, certain predefined parameters would be set for some special
sequences. The user is referred to “norm1icip3.m” mfile (lines 25 to 50) to see an example of
the application of this option.
1.9
Show/Save Buttons
During or after the execution of any iterative or non-iterative method, images displayed in
Fig1, Fig2, or Fig3 can be shown as a MATLAB figure file by clicking on the corresponding
Show push-button. Note that the images displayed as a MATLAB figure can be saved in any
imaging format by choosing the FILE/EXPORT option on the corresponding figure. These
images can also be saved in “.mat” format by clicking on the Save push-button.
6
Chapter 2
Static Super-Resolution of
Grayscale Frames
In this section, we explain the resolution enhancement of a set of grayscale LR images to
produce one HR grayscale image. After loading images and choosing the motion estimation
method, user has the option of choosing among many super-resolution methods by clicking on
the B/W Super-Resolution Method pop-up menu. The super-resolution process starts,
by clicking on the Start Processing push-button. The following subsections describe each
method:
2.1
S&A
This method applies the Shift-and-Add (S&A) method as described in [4]. The pixels that are
not defined in the S&A step (under-determined case) will be estimated by a linear interpolation
step. This result will be shown in Fig2. Later a pop-up menu will be generated to set the
Figure 2.1: Shift-and-Add Deconvolution GUI screenshot.
7
deconvolution parameters. User has the option of choosing between Wiener, Lucy, and Blind
Lucy deconvolution methods (MATLAB subroutines are called to preform these deconvolution
methods).
User has the choice of setting the number of iteration for Lucy and Blind Lucy methods,
and the Noise to Signal ( SN1 R ) value for all these methods. User can modify the PSF kernel
either by typing a numerical matrix or by providing a MATLAB function that produces the
desired blurring kernel (e.g. the ”fspecial ” command). After the user clicks on the Deconvolve
button, the deconvolved image will be shown in Fig3. This pop-up window will be kept open so
that the user can try different parameters for deconvolution without redoing the S&A process.
User may close this window by clicking on the Cancel button.
driverSA.m is the main related mfile for this method.
2.2
Bilateral S&A
This method is similar to the S&A method, with an additional preprocessing outlier detection/removal algorithm as described in [5] (Section 6). A pop-up window will set the Bilateral
Figure 2.2: Bilateral outlier detection GUI screenshot.
frame rejection parameters. The parameters in the pop-up window are related to the parameters of Equation (16) of that paper, that is Bilateral Kernel Size, Bilateral Kernel
Variance and Rejection Coefficient are related to q, δ, and τ , respectively. The rest of the
process after removing outlier frames is similar to the ones explained in Section 2.1.
driverBilatframe.m is the main related mfile for this method.
2.3
S&A with iterative deblurring
In this method after the S&A step unlike the other two previous methods, interpolation and
deblurring are done simultaneously. The result of the S&A step without any interpolation will
be displayed in Fig2. For the under-determined cases, not all HR pixels can be defined in the
S&A step and the possible black blocks in Fig2 are the representatives of such pixels.
8
To preform the interpolation/deblurring step, a pop-up window gives the user the option
of choosing between L2 (Tikhonov) and L1 (Bilateral-TV) [1] regularization terms. Also, the
user has the choice between L2 and L1 penalty terms for the data fidelity term.
All the parameters used in Equation (24) of [1] can be modified by the user in this pop-up
window. Regularization Factor, Regularization Spatial Decaying Coef, Regularization Kernel Size, Step Size correspond to λ, α, P , and β in that equation. The PSF can
be defined in the Deconvolution Kernel window either by typing a numerical matrix or by
providing a MATLAB function that produces the desired blurring kernel. Number of steepest
descent iterations are defined in the Number of Iterations dialog box.
Figure 2.3: Iterative deblurring after Sift-and-Add GUI screenshot.
The result of of each iteration is displayed in Fig2 and the final result will be displayed in
Fig3. As it is not always desirable to display the result of every iteration, the frequency of
displaying HR estimate can be defined in the Frequency of Showing dialog box. The initial
guess for these iterations can be chosen from the options offered in Starting Point dialog box.
The user can choose between Zero, Shift and Add which is similar to the method described
in Section 2.1, Result of Previous Method (in case the number of iterations chosen in the
previous attempt was not sufficient), and Cubic Spline LR Frame which is the cubic spline
interpolation of the first LR frame in the sequence.
If in the previous Super-Resolution attempt the user ran this method and changed some
of the default parameters, he/she can retrieve those parameters by clicking on the Previous
Parameters push-button.
driveriterSA.m is the main related mfile for this method.
9
2.4
Bilateral S&A with iterative deblurring
This method is similar to the previous method with an additional preprocessing outlier detection/removal algorithm as described in Section 2.2.
driveriterbilat.m is the main related mfile for this method.
2.5
Median S&A
Similar to the method of Section 2.1 but the Shift and Add step is preformed using the Median
operator[5].
If in the previous Super-Resolution attempt user had used this method and changed the
default parameters, he/she can retrieve those parameters by clicking on the Previous Parameters push-button.
driverMEDIANSA.m is the main related mfile for this method.
2.6
Median S&A with iterative deblurring
This method is similar to the one explained in Section 2.3 but the Shift and Add step is
preformed using the Median operator. This method is explained in details in Section II.E of
[1].
driverMEDIANSA.m is the main related mfile for this method.
2.7
Iterative Norm 2
This method is explained in [6]. Regularization is preformed using Tikhonov regularization and
L2 norm is used as the data fidelity term. Equation (25) in [1] explains the basic formulation of
this method. Regularization factor refers to the parameter λ and Regularization Kernel is
the Γ operator in that equation. If in the previous Super-Resolution attempt the user ran this
method and changed the default parameters, he/she can retrieve those parameters by clicking
on the Previous Parameters push-button.
The initial guess for these iterations can be chosen from options offered in Starting Point
dialog box. The user can choose between Zero, Result of Previous Method (in case the
number of iterations chosen in the previous attempt was not sufficient), and Cubic Spline
LR Frame which is the cubic spline interpolation of the first LR frame in the sequence.
drivernorm2sd.m is the main related mfile for this method.
2.8
Iterative Norm 1
Addressed in [1], equation (22) explains the basic formulation of this method. Regularization
Factor, Regularization Spatial Decaying Coef, Regularization Kernel Size, Step
Size are related to λ, α, P , and β in that equation. The rest of parameters are similar to the
previous method.
drivernorm1.m is the main related mfile for this method.
10
Figure 2.4: Iterative Norm 2 GUI screenshot.
Figure 2.5: Iterative Norm 1 GUI screenshot.
2.9
Norm 2 data with L1 Regularization
This method applies L2 norm penalty term on the data fidelity term and takes advantage
of the Bilateral-TV prior. The formulation of this method is explained in the Section III of
Reference [1]. The parameters are similar to the previous method.
drivernorm2 1.m is the main related mfile for this method.
11
2.10
Robust(Median Gradient) with L2 regularization
This method is explained in [7]. We added an optional L2 norm (Tikhonov) regularization to
the formulation presented in [7]. The parameters are similar to the ones in Section 2.7.
driverMedian Gradient.m is the main related mfile for this method.
2.11
Robust(Median Gradient) with L1 regularization
This method is explained in [7]. We added an optional L1 norm (Bilateral-TV) regularization
to the formulation presented in [7]. The parameters are similar to the ones in Section 2.8.
driverMedian Gradientl1.m is the main related mfile for this method.
2.12
Cubic Spline Interpolation
This method preforms Cubic Spline Interpolation on the first LR frame of the input Sequence.
drivercubicspline.m is the main related mfile for this method.
12
Chapter 3
Dynamic Super-Resolution of
Grayscale Frames
In this section, we explain the resolution enhancement of a set of grayscale LR frames to
produce a set of HR grayscale images. This method is explained in [3] (the Chrominance and
Orientation regularization factors are set to zero as this method only deals with the grayscale
images). After loading images and choosing the appropriate motion estimation method, the
suggested motion estimation method for the dynamic case is the progressive method, user
should click on the BW Video Kalman push button. A pop-up window will appear.
Figure 3.1: Dynamic Super-Resolution of Grayscale Frames GUI screenshot.
Most of the parameters in this pop-up window are explained in the previous sections and
therefore we explain only the new icons .
Limited number of frames check box: limits the maximum number of LR input frames
13
that will be used to produce HR output frames. For example by activating this check box, and
setting the number of frames to 20, only the first 20 frames of the LR sequence will be used
to produce 20 HR frames.
Save Data check box: If this check box is checked, after starting the process a pop-up
window will appear. The user will define the file names and the directory in which output HR
frames will be individually saved (each frame in one separate file). The output files are the
results of the first stage (Shift-and-Add step) and the output after the deblurring step. Note
that the name of the output files in part consists of the name defined by user, plus a number
similar to the number of the corresponding LR frame. The Shift-and-Add frames will end in
“SA” to separate them from the deblurred frames. For example if the user chooses the name
“tankHR” for the output frames, then the files “tankHR24SA.mat” and “tankHR24.mat“ will
represent the 24th Shift and Add and Deblurred HR frames, respectively.
Note that the options in the Starting Point box refer to the initial guess for the deblurring
process. The choice of Result of Previous Iteration radio-button will result in using the
deblurred image of the previous frame as the initial guess for the deblurring process of the new
b n (t − 1) for X
b 0 (t). The choice of Shift-andframe (after proper shifting). That is, using X
Add image radio-button will use the result of Shift-and-Add step (after linear interpolation)
b
b 0 (t). The choice of LR start will result in using
as the initial guess. That is, using Z(t)
for X
b 0 (t).
the up-sampled LR frame as the initial guess. That is, using yb(t) ↑ for X
kalmanoneframeBW.m is the main related mfile for this method.
14
Chapter 4
Static Multi-Frame Demosaicing
and Color Super-Resolution
4.1
Static Color Super-Resolution
This method is explained in Reference [8]. This option produces a single color HR image from
a sequence of color LR frames. To use this functionality, the user should click on the Color
SR? radio button before loading the data. This guarantees that the input data will be read
as a color sequence and also enables some of the relevant push-buttons. After choosing an
appropriate motion estimation method, by clicking on the Demosaic/Color SR button, a
pop-up window will appear.
The parameters in this window are related to the parameters in Equations (6) and (7) of
Reference [8]. Bilat. Reg. Spatial Decay Coef, Bilat. Regularization Kernel Size,
Luminance Regul. Factor, Chrominance Regul. Factor, Orientation Regul. Factor,
and Step Size are related to the parameters α, P , λ0 , λ00 , λ000 , and β, respectively.
Checking the Single Channel Demosaic/Color SR check box, will result in super
resolution of each color channel independently (using only the Bilateral-TV regularization for
each channel).
colorsrdemosaicSA.m is the main related mfile for this method.
4.2
Static Multi-Frame Demosaicing
This method is explained in Reference [8]. This option produces a single color HR image from
a sequence of color-filtered LR frames (Single-Channel). Before loading the data, user should
click on the Demosaic? radio button.
The difference between this method and the one in Section 5.1 is that the after clicking
on the Demosaic/Color SR push-button the user is asked to provide The Bayer Position
File. This file contains a vector with a length equal to the number of available LR frames.
Each element of this vector may take one of the values equal to 1, 2, 3, or 4, which define one
of the four possible patterns of the Bayer pattern. The value “1” defines a pattern, where top
left two pixels of the Bayer pattern have Red and Green values (Figure 4.2.a), the value “2”
defines a pattern, where top left two pixels of the Bayer pattern have Green and Red values
(Figure 4.2.b), the value “3” defines a pattern, where top left two pixels of the Bayer pattern
15
Figure 4.1: Static Demosaic-Color SR GUI screenshot.
have Green and Blue values (Figure 4.2.c), and finally the value “4” defines a pattern, where
top left two pixels of the Bayer pattern have Blue and Green values (Figure 4.2.d).
The parameters used in for this method are similar to the ones used in Section 5.1.
a: Type 1
b: Type 2
c: Type 3
d: Type 4
Figure 4.2: Four possible configurations of the Bayer pattern. Each image (a,b,c, or d) represents a possible configuration of the top-left block in the color filter. The rest of the color
filter is constructed by replicating these blocks.
demosaicSA.m is the main related mfile for this method.
16
Chapter 5
Dynamic Multi-Frame Demosaicing
and Color Super-Resolution
5.1
Dynamic Color Super-Resolution
This method is explained in Reference [3]. This option produces a set of color HR images
from a sequence of color LR frames. Before loading data, user should click on the Color SR?
radio button. After choosing an appropriate motion estimation method (Progressive Motion
Estimation is recommended for this case), by clicking on the Color Video button, a pop-up
window will appear. All the parameters in this window are similar to the ones in Section 3,
the only difference is the choice of Chrominance Regul. Factor, and Orientation Regul.
Factor parameters, which are related to λ00 , and λ000 defined in equation (19) in Reference [3].
kalmanoneframe.m is the main related mfile for this method.
5.2
Dynamic Multi-Frame Demosaicing
This method is explained in Reference [3]. This option produces a sequence of color HR image
from a sequence of color-filtered LR frames. The set-up process is similar to the one described
in Section 4.2 but the user should click on the Video Demosaic push button. The Bayer
Position File window is also described in 4.2. The parameter pop-up window is exactly
similar to the one in Section 5.1.
kalmanoneframebayer.m is the main related mfile for this method.
5.3
Cubic Spline Interpolation
By clicking on the Color Cubic Spline push button the first LR frame of a color sequence
would be up-sampled by cubic spline method. The result will be displayed on Fig2.
drivercubicspline.m is the main related mfile for this method.
17
Figure 5.1: Dynamic Multi-Frame Demosaicing GUI screenshot.
18
Chapter 6
Data Simulator
The user has the option of producing raw data for different grayscale and color super-resolution
scenarios, which can be used for exploratory research and demonstration purposes. A single
image (color or grayscale) should be loaded to activate the related buttons.
6.1
Grayscale Video Simulation
This option produces a sequence of down-sampled, noisy, blurred grayscale frames from one
single HR image. That is, to produce each LR image, a section of this HR image will be
selected, then blurred by a user defined PSF, down-sampled by a factor (r) defined by user,
and some additive noise will be added. To construct the next LR frame, the section of the
HR frame used for making the previous image is shifted and the same degradation process is
applied to this shifted image.
The user first loads a single grayscale image. Then by clicking on the BW Video Simulator button a pop-up window appears. Resolution Factor edit-box defines the downsampling factor (r) in each direction. Number of Output Frames edit-box defines how
many LR frames are desired to be generated from this sequence. Signal to Noise Ratio
edit-box defines the amount of additive Gaussian noise (in units of dB) that would be added
to the LR sequence.
Output Width and Output Height edit-boxes define the width and height of each
generated LR frames (we refer to the width and hight of the resulting LR frames by the
symbols “W ” and “H” respectively, throughout this document). Note that the LR frames are
produced by moving a shifting window (of width r × W and hight r × H) over the input image.
Selecting smaller values for W and H will result in a smaller window with more space to move
on the original HR frame, increasing the maximum number of realizable LR frames.
The user has the option of choosing between two related motion generating mechanisms. If
the Motion by Hand check box is checked, then a window with the image of HR input frame
will pop-up. By consecutive clicking on this image, the user defines a trace (path) representing
the motion of a camera on this image.
If the Motion by Hand check box is not checked, then the camera trace (relative motion)
is computed automatically as a one pixel motion from left to right. The one pixel motion can
be altered by changing the value of the Motion Speed dialog box. The inserted number in
this box will be added to the one pixel motion. Beside the left to right motion, the consecutive
LR frames also experience a recursive vertical motion.
19
If the Random Motion Distribution check box is not checked, this vertical motion for
(r − 1) frames is one pixel in the up-down direction and for every r frame it is a down-up
direction motion by (r − 1) pixels. For example, suppose that to create the first LR frame, the
shifting window is centered on the pixel (x, y) of the HR frame, and r = 3. Then, to create the
next (second) frame this window will be shifted to pixel (x + 1, y + 1), for the third frame it
will be shifted to pixel (x + 2, y + 2), for the forth frame it will be shifted to pixel (x + 3, y), for
the fifth frame it will be shifted to pixel (x + 4, y + 1), and so on and so forth. If the Random
Motion Distribution check box is checked, then this vertical motion would be random.
To simulate the camera lens blurring effect, the LR images will be blurred by a PSF defined
in the Convolution Kernel edit-box, prior to the down-sampling step.
By clicking on the Show LR Sequence push-button, the created LR sequence will be
shown as a movie sequence. The created LR sequence can be saved by clicking on the Save
Cropped Data push-button. Also, the corresponding motion-vectors can be saved by clicking
on the Save Motion Vector push-button.
videosimulatorprfunc.m is the main related mfile for this method.
6.2
Static Multi-Frame Demosaicing Simulation (Creating a
Color Filtered Sequence)
This option produces a sequence of down-sampled noisy blurred color filtered (Bayer) images
from one HR image. That is, a HR image will be blurred by a user defined PSF, and then
down-sampled by a factor defined by user, and some additive noise will be also added to this
LR image. Finally, the LR frame will be color-filtered by the Bayer pattern. To construct the
next LR frame, the HR frame is shifted by one pixel in the vertical or horizontal directions
and the same degrading procedure will be applied on this shifted image.
The first experiment in [8] used this method to produce the input images. The user should
click on the Color Output radio-button and then open a single color image. Then, the
user should click on the Demosaic? radio-button. Then, by clicking on the DemosaicSimulator push-button a pop-up window will appear. The down-sampling factor is defined
in the Resolution Factor edit-window. By checking the Add Noise check box, Gaussian
additive noise will be added to the resulting images. The SNR of the resulting LR images
will be defined in the Signal to Noise Ratio edit-box. To simulate the camera lens blurring
effect, the LR images will be blurred by a PSF defined in the Convolution Kernel edit-box,
prior to the down-sampling step.
Each resulting individual LR frame will be color filtered by one of the four possible Bayer
patterns. Note that, although any given camera uses only one of the four Bayer configurations,
to simulate the effect of the camera super-pixel motion, it is necessary to use different Bayer
pattern set-ups.
A vector will be generated to save these four possible patterns of the Bayer pattern for the
resulting image sequence. Each element of this vector takes one of the values of “1”, “2”, “3”,
or “4”. The value “1” defines a pattern, where the top left two pixels of the Bayer pattern have
Red and Green values (Figure 4.2.a), the value “2” defines a pattern, where the top left two
pixels of the Bayer pattern have Green and Red values (Figure 4.2.b), the value “3” defines a
pattern, where the top left two pixels of the Bayer pattern have Green and Blue values (Figure
4.2.c), and finally the value “4” defines a pattern, where the top left two pixels of the Bayer
pattern have Blue and Green values (Figure 4.2.d).
20
Figure 6.1: Static Multi-Frame Demosaicing Simulation GUI screenshot.
Generation of color patterns can be done uniformly, e.g. for resolution factor of four (r = 4),
there would be four frames using pattern “1”, four frames using pattern “2”, four frames using
pattern “3”, and four frames using pattern “4”. Alternatively, the distribution of these patterns
can be random by checking the Random Bayer Pattern check box.
By clicking on the Show LR Sequence push-button, the created LR sequence will be
shown as a movie sequence. The created LR sequence can be saved by clicking on the Save
Cropped Data push-button. The corresponding motion-vectors can be also saved by clicking
on the Save Motion Vector push-button. The corresponding Bayer pattern positions can
be saved by clicking on the Save Bayer Position push-button.
randomlrdemosmaker.m is the main related mfile for this method.
6.3
Dynamic Multi-Frame Demosaicing-Color SR Simulation
This option produces a sequence of down-sampled noisy blurred color filtered (Bayer) images
from one HR image. The difference between this method and the one in Section 6.2 is that
there is a super-pixel motion between the resulting LR images. The first experiment in [3]
used this method to produce the input images.
The user should click on the Color Output radio-button and then open a single color
image. Then, the user should click on the Demosaic? radio-button. Then, by clicking on
the Color Video Simulator push-button a pop-up window will appear. This window is very
similar to the one explained in Section 6.1, and therefore we only explain the extra options.
The Demosaic check-box determines the output LR format. If the check-box is checked,
then output images will be color-filtered and therefore they are suitable for the multi-frame
demosaicing problem. If this box is not checked, then no color filtering would be applied on
the LR images and the resulting images will be suitable for the multi-frame color SR problem.
21
Figure 6.2: Color video simulation GUI screenshot.
The Random Bayer option is described in Section 6.2.
By clicking on the Show LR Sequence push-button, the created LR sequence will be
shown as a movie sequence. The created LR sequence can be saved by clicking on the Save
Cropped Data push-button. The corresponding motion-vectors can be also saved by clicking
on the Save Motion Vector push-button. If the Demosaic check-box is selected then the
corresponding Bayer pattern positions can be saved by clicking on the Save Bayer Position
push-button.
colorvideosimulatorprfunc.m is the main related mfile for this method.
22
Chapter 7
FAQ
7.1
Why does MATLAB produce an error message or crash
when trying to read in data from some AVI files?
You may need to install some compressors/decompressors (codecs) (as dll’s) on your Windows
machine. Please refer to the following webpage for a detailed discussion of this problem:
http://www.mathworks.com/support/solutions/data/27253.html
7.2
Why are some of the GUI icons (push-buttons, checkboxes,...) disabled?
There are two reasons for that.
• These icons are irrelevant to the particular loaded data file. For example when a sequence
of LR grayscale frames are loaded, the Color Video push-button will be automatically
disabled.
• Some of the push-buttons are related to the methods that will be added in the future
versions of this code.
23
Bibliography
[1] S. Farsiu, D. Robinson, M. Elad, and P. Milanfar, “Fast and robust multi-frame superresolution,” To appear in IEEE Trans. Image Processing, Oct. 2004.
[2] ——, “Advances and challenges in super-resolution,” Invited paper: to appear in the International Journal of Imaging Systems and Technology, Summer 2004.
[3] ——, “Fast dynamic super-resolution,” in To appear in the Proc. SPIE’s Conf. on Image
Reconstruction from Incomplete Data, Denver, CO. Aug. 2004.
[4] M. Elad and Y. Hel-Or, “A fast super-resolution reconstruction algorithm for pure translational motion and common space invariant blur,” IEEE Trans. Image Processing, vol. 10,
no. 8, pp. 1187–1193, Aug. 2001.
[5] S. Farsiu, D. Robinson, M. Elad, and P. Milanfar, “Robust shift and add approach to
super-resolution,” Proc. of the 2003 SPIE Conf. on Applications of Digital Signal and
Image Processing, pp. 121–130, Aug. 2003.
[6] M. Elad and A. Feuer, “Restoration of single super-resolution image from several blurred,
noisy and down-sampled measured images,” IEEE Trans. Image Processing, vol. 6, no. 12,
pp. 1646–1658, Dec. 1997.
[7] A. Zomet, A. Rav-Acha, and S. Peleg, “Robust super resolution,” in In Proc. of the Int.
Conf. on Computer Vision and Patern Recognition (CVPR), vol. 1, Dec. 2001, pp. 645–650.
[8] S. Farsiu, M. Elad, and P. Milanfar, “Multi-frame demosaicing and super-resolution from
under-sampled color images,” Proc. of the 2004 IS&T/SPIE 16th Annual Symposium on
Electronic Imaging, Jan. 2004.
24