1
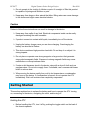
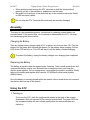
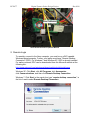
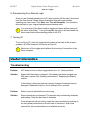
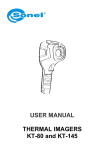
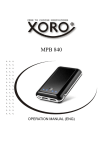
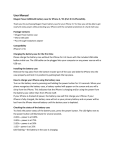
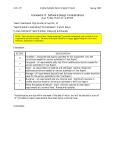
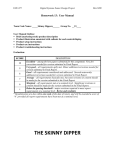
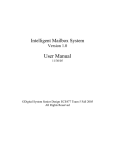
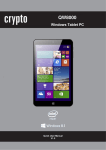
ECE 477
Digital Systems Senior Design Project
Rev 8/09
Homework 13: User Manual
Team Code Name: Autonomous Targeting Vehicle
Group No. 3
User Manual Outline:
Brief (marketing-style) product description
Product illustration annotated with callouts for each control/display
Product setup instructions
Product use instructions
Product troubleshooting instructions
Evaluation:
SCORE
DESCRIPTION
Excellent – among the best papers submitted for this assignment. Very few
corrections needed for version submitted in Final Report.
Very good – all requirements aptly met. Minor additions/corrections needed for
9
version submitted in Final Report.
Good – all requirements considered and addressed. Several noteworthy
8
additions/corrections needed for version submitted in Final Report.
Average – all requirements basically met, but some revisions in content should
7
be made for the version submitted in the Final Report.
Marginal – all requirements met at a nominal level. Significant revisions in
6
content should be made for the version submitted in the Final Report.
Below the passing threshold – major revisions required to meet report
*
requirements at a nominal level. Revise and resubmit.
* Resubmissions are due within one week of the date of return, and will be awarded a score of
“6” provided all report requirements have been met at a nominal level.
10
ECE 477
Digital Systems Senior Design Project
Rev 8/09
ATV
Autonomous Targeting Vehicle
USER MANUAL
Thank you for purchasing the ATV! This robot will easily enable you to track and follow
targets remotely via a WiFi connection and a friendly user interface. It is small enough
to navigate through small spaces, but large enough to travel over rough terrain. Live
WiFi feed will give you real time video of your target. Current position of the ATV is
continuously updated through the onboard GPS. An interactive map display facilitates
visual tracking and navigation of the ATV. Follow this guide to get started now with your
ATV!
Read this guide, including the “Safety Precautions” section before using the ATV.
Store this guide safely so that you can use it in the future.
Product Overview
The Autonomous Targeting Vehicle is a self navigating robot that uses GPS waypoints
given by the user to navigate to a location. It also has the ability to follow a target via its
webcam. The accompanying software will allow the user to input GPS points and/or
track a target.
Safety Precautions
•
•
Before using this product, please ensure that you read the safety precautions
described below. Always ensure that the product is used correctly.
The safety precautions noted on the following pages are intended to prevent
injuries to yourself and other persons, or damage to the equipment.
Warnings
Failure to follow these instructions can result in injury or death.
Store this product out of the reach of children. The device contains sharp edges
and loose wires that can easily tangle a small child.
Use only the recommended power source. Excessive power may cause the
device to become hot and may burn the user.
ECE 477
Digital Systems Senior Design Project
Rev 8/09
Do not operate in the vicinity of children or pets. At a weight of 5lbs this product
is capable of injuring small children or pets.
Keep away from dogs or other animal that bites. Biting wires can cause damage
to the device and might cause electrical shocks.
Caution
Failure to follow these instructions can result in damage to the device.
Keep away from spills of any kind. Electrical components inside can be easily
damaged rendering the robot unusable.
If product comes into contact with liquids, immediately turn off the device.
Unplug the battery charger once you are done charging. Overcharging the
battery can shorten its lifetime.
This device contains a high-precision hard disk. Do not drop it or subject it to
strong impacts.
Do not place or operate near strong magnets or large motors that generate
strong electromagnetic fields. Exposure to strong magnetic fields may cause
malfunctions or corrupt webcam data.
If water or dirt becomes stuck in the device, wipe with a dry soft cloth such as
eyeglass wiper. Do not rub or apply force. If available, use a commercial blower
brush to remove dust.
When moving the device rapidly from cold to hot temperatures, condensation
may form on the device. If condensation is formed, do not operate the ATV
immediately. Wait until moisture has completely evaporated.
Getting Started
This section explains how to replace the battery and how to operate the ATV: turning
on, connecting to the device, navigating the robot, and turning off.
Holding the ATV
•
Before handling the ATV, turn it off by pushing the toggle switch on the back of
the chassis upwards.
ECE 477
•
•
!
Digital Systems Senior Design Project
Rev 8/09
When picking up and moving the ATV, take care to hold the device without
pressing on any of the switches or pushbuttons on the sides.
Be careful not to pull any of the wires that are on the outside such as the Serialto-USB converter cables.
Do not drop the ATV! The hard disk inside may be severely damaged.
Assembly
This robot is a pre-assembled product. Instructions for replacing a dead battery are
provided below. If the product fails, do not attempt to disassemble the ATV. You may
end up damaging the device further.
Charging the Battery
Take any laptop battery charger rated at 12V or above, but no more than 14V. Plug the
battery into the power jack onboard the chassis. As the battery starts charging, the red
LED on the PCB will turn on. The LED will stay lit until the battery finishes charging.
!
To protect the battery, unplug the battery charger once charging has completed.
Replacing the Battery
The battery is placed inside the chassis under 3 shelves. Take a small screw driver and
unscrew the shelves one by one. Be careful not to tangle the wires, and keep the
shelves close together. Do not unplug wires; it may render the product unusable. Slowly
take out the battery and replace with a similar 12V 4200mAh nickel metal-hydride
(NiMH) battery.
Once the battery is securely placed within the chassis, take a screw driver and re-screw
the shelves back on top of the chassis.
Using the ATV
1. Turning on
To turn on the ATV, push the toggle switch located at the back of the chassis
downwards. Wait two minutes for the robot to activate itself. The green LEDs on
the compass module will start to flash rapidly when the microcontrollers are
turned on.
ECE 477
Digital Systems Senior Design Project
Rev 8/09
Toggle Switch, Back of Chassis
Compass Module: The compass is on the right.
The green LEDs indicate continuous communication
with the microcontrollers. The header on the left connects
compass to the microcontrollers.
To turn on the Atom board, momentarily press and hold the white pushbutton
located on the small rectangular PCB on the front side of the chassis.
A blue LED located on the serial to USB connector on the left side of the ATV will
turn on when the Atom board is fully powered up.
ECE 477
Digital Systems Senior Design Project
Rev 8/09
Atom Board External Peripherals Module
2. Remote Login
To remotely connect to the Atom computer, you must be on a WiFi capable
Windows laptop/computer. Further, your laptop must have “Remote Desktop
Connection” (RDC). For Windows 7 and Windows XP, RDC is already installed.
For earlier versions, RDC can be downloaded from the Microsoft website at the
following link:
http://www.microsoft.com/windowsxp/downloads/tools/rdclientdl.mspx
Windows XP: Click Start, click All Programs, click Accessories,
click Communications, and then click Remote Desktop Connection.
Windows 7: Click Start, in the search box type “remote desktop connection,” in
the list of results select Remote Desktop Connection.
ECE 477
Digital Systems Senior Design Project
Rev 8/09
Windows 7 Remote Desktop Connection
In the computer field type 169.254.1.112, then click Connect.
Atom Login Screen
Once connected, you will be prompted for a password, type ece477, then click
OK. When you see the Windows XP desktop of the Atom board, wait at least 5
minutes for it to properly setup all initializations. The GPS module takes several
minutes to obtain a satellite lock.
3. Start Tracking and Following
Run the ATV.exe executable on the desktop. Now you are ready to use the Atom
board to navigate the robot!
4. Entering GPS Points
The user interface is composed of two windows: A video feed, and a map
display. The map display shows the current position of the robot. Right clicking
on this map adds the GPS coordinates of the mouse to the front of the waypoint
queue. Shift-right clicking adds a point to the back of the queue. The robot will
find a path from its current location to the waypoint at the front of the queue, and
travel to it.
ECE 477
Digital Systems Senior Design Project
Rev 8/09
Map Display. The red dot indicates the current position of the ATV.
Right clicking on the screen draws a green line between the current position
of the robot and its end destination.
5. Tracking a Target
Left clicking on the video adds a “green dot” to the video at the location clicked.
These “dots” will follow the object on which they are placed. As many dots can be
placed as are desired. The camera will follow the average position of the dots,
and the robot will follow it as well. It is advisable to place several dots on a target
to make the targeting more robust to lost “dots.”
ECE 477
Digital Systems Senior Design Project
Rev 8/09
Dots on a Target
6. Disconnecting from Remote Login
Once you are finished operating the ATV, before turning off the robot, disconnect
from the Atom board. Please ensure all windows that were opened while
operating are now closed. Click Start, then Turn off Computer. You should be
returned back to your original laptop/computer desktop view.
!
You must turn off the Atom board as mentioned above before turning off
the robot in the Step 7. If you just Log Off, log back in and shut down the
Atom board before disconnecting power to the ATV.
7. Turning off
To turn off the ATV, push the toggle switch located at the back of the chassis
upwards. All LEDs located on the device will turn off.
!
Never turn off the toggle switch without first turning off connection to the
Atom computer.
Useful Information
Troubleshooting
Problem
ATV does not turn on when toggle switch is in “on” (down) position.
Solution
Ensure that the battery is charged. If the battery has been charged over
500 times, replace it by following instructions in “Replacing the Battery”
section.
If the battery is fairly new and was recently charged, the device may be
damaged. Replace the device; do not attempt to fix it yourself.
Problem
Robot is on but the wheels are not moving.
Solution
Ensure wheels are not jammed. The sensors may be detecting obstacles
and braking. Clear the area free of obstacles.
If the wheels are still not moving, reset the microcontrollers by pushing on
the two yellow pushbuttons on the left side of the device. Wait a few
seconds for the microcontrollers to re-initialize and re-try.
ECE 477
Digital Systems Senior Design Project
Rev 8/09
If there is still no movement, turn off the device completely by following
instructions in “Using the ATV” section, wait for 5 minutes, and reboot.
If none of the above solutions work, the sensors, motors, or any number of
other things may be damaged.
Problem
Unable to connect to Atom board using Remote Desktop Connection.
Solution
Ensure the correct IP address and password was entered while
connecting.
If the problem persists, take a cable and plug in a monitor to either the
blue VGA or the white DVI connector on the Atom board facing the back of
the robot. Also plug in a keyboard and mouse using USB cables. Login to
the Atom using the same password mentioned in Step 2 of “Using the
ATV.” Once logged in, ensure the Atom board is connected to the WiFi.
If the Atom board is connected to WiFi, ensure that the WiFi cable and/or
antenna are properly secured and undamaged. If they are loose, fasten
them. If they are damaged, replace them.
Problem
Remote Desktop Connection disconnects every few minutes.
Solution
The WiFi cable may be damaged or not properly secured. If they are
loose, fasten them. If they are damaged, replace them.
!
Do not attempt to manually disassemble this device. This may ultimately damage
the device or injure the user. If the device fails, replace it.
Disclaimer: The above items notwithstanding, the designers of this device accept no
liability for damages due to mistaken operation of this product.