1
IUCLID 5
Guidance and Support
Installation Guide for IUCLID 5 Version 5.3
Stand-alone Application
®
®
Custom Installation on Microsoft Windows
August 2011
Legal Notice
Neither the European Chemicals Agency nor any person
acting on behalf of the Agency is responsible for the use which might
be made of the following information.
A wealth of additional information on the European Union is available on the Internet.
It can be accessed at the addresses:
http://iuclid.echa.europa.eu.
http://echa.europa.eu.
http://europa.eu.
©European Chemicals Agency
Reproduction is authorised provided the source is acknowledged.
Table of Contents
1. Introduction ................................................................................................................................................ 1
1.1. Hardware requirements ....................................................................................................................... 1
1.2. Software requirements ........................................................................................................................ 1
2. Making a fresh installation of IUCLID 5 ......................................................................................................... 3
2.1. Installation of Software Required by IUCLID 5 ...................................................................................... 3
2.1.1. Installation of Java .................................................................................................................. 3
2.1.2. Installation of PostgreSQL ........................................................................................................ 5
2.1.3. Configuration of PostgreSQL .................................................................................................... 9
2.1.4. Installation and Configuration of Oracle .................................................................................... 14
2.2. Installation of IUCLID 5 ................................................................................................................... 14
2.3. Installation Check List - Example ....................................................................................................... 15
3. Upgrade .................................................................................................................................................... 17
3.1. Upgrading from a previous version of IUCLID 5.3 to the latest version of IUCLID 5.3 ................................. 17
3.2. Upgrading from IUCLID 5.2 to IUCLID 5.3 ........................................................................................ 17
3.2.1. The migration tool ................................................................................................................. 18
3.2.2. Starting IUCLID 5 ................................................................................................................. 18
3.3. Upgrading from IUCLID 5.0 / 5.1 to IUCLID 5.3 .................................................................................. 18
3.3.1. Migration of data to IUCLID 5.3 from a previous version ............................................................. 19
3.3.2. Database configuration for running IUCLID 5.3 and a previous version at the same time ..................... 19
3.3.3. IUCLID 5.0 / 5.1 was installed using the setup-kit ....................................................................... 19
3.3.4. IUCLID 5.0 / 5.1 was installed manually ................................................................................... 19
4. Initialisation of an installation of IUCLID 5 .................................................................................................... 20
4.1. Starting IUCLID 5 ........................................................................................................................... 20
4.2. First steps wizard ............................................................................................................................. 20
4.3. User management ............................................................................................................................ 26
5. Un-installation of IUCLID 5 ........................................................................................................................ 27
iii
Chapter 1. Introduction
IUCLID 5 can be installed either as a stand-alone application, or in a multi-user environment that uses client-server architecture.
The purpose of this document is to describe how to install manually, a single stand-alone application version of the IUCLID 5.2
software onto a computer running Microsoft® Windows® (hereafter referred to as Windows). The installation is performed by
ensuring that prerequisite software is installed, copying files to the computer and, if necessary, making some configuration
changes that are explained in this document. If the instructions in this document are followed exactly, no prior specialist
knowledge is required of either the IUCLID 5 software, or the software components required to run it.
The stand-alone installation of IUCLID 5 should be carried out manually if you want to use a database and version of Java other
than those that are used with the IUCLID 5 installer for Windows. For example, the database Oracle rather than PostgreSQL.
If you encounter any problems during the installation that cannot be solved using information in this manual, or the
documentation of third party softwares; before contacting ECHA Helpdesk, please try the IUCLID FAQ located at the IUCLID
web site http://iuclid.eu.
1.1. Hardware requirements
The following requirements are provided as only a guide.
• At least 1 GB of mother board RAM (2 GB for Windows Vista®)
• Pentium Core 2 duo or equivalent
An installation of IUCLID 5 will most likely run on a lower specified machine but the performance might not be satisfactory.
The requirements depend in part on the version of Windows and the IUCLID plugins that are in use. For example, using the
Query Tool plugin will increase the resources required to obtain a reasonable running speed; especially on a large database.
1.2. Software requirements
The software prerequisites for the installation are as follows:
• Windows preferably with knowledge of the administrator password.
It is recommended to carry out the installation from a standard type of Windows user account, rather than an administrator.
You will be prompted to enter the administrator password where necessary.
• Java - J2SE Runtime Environment v6
• Database - PostgreSQL 8.2, 8.3, 8.4 (recommended) or 9; or Oracle 10g. IUCLID 5 works with either. You do not need both
PostgreSQL and Oracle.
The Oracle driver for Java is no longer supplied with the IUCLID installation package. The correct driver for the combination
of Java and Oracle versions in use must be obtained from the oracle web site and installed in the appropriate folder. For
example, for Java 1.6 and Oracle 11g Release 2 (11.2.0.2.0), the name of the driver is ojdbc6.jar. For use with Tomcat,
the driver must be placed in Tomcat's library folder, e.g. Tomcat\lib.
• The IUCLID 5 manual workstation installation package, version 5.3, can be downloaded without charge from the IUCLID
5 web site.
• Once you have completed the installation of IUCLID 5, you should test it by starting and configuring it. The configuration
requires access to at least a legal entity file (LEOX). The creation of a LEOX is described on the IUCLID 5 web site where the
installation software is published. In addition, it is recommended to upload a set of reference substances and the EC inventory.
These are also available from the web site at which the IUCLID 5 software is published.
1
Tip
Time and IT resources can be saved by importing into IUCLID only the Reference substances you need. Various
different sizes of Reference substance inventory can be downloaded from the IUCLID web site. There is a
full set, a reduced list, and a function that allows you to create your own inventory using common identifiers
as selection criteria, such as EC Number, and IUPAC name. Before importing the full set, consider carefully
whether it is really necessary. Reference substances that are not imported during the initialisation process can
be imported later. A simple compromise is to start with the reduced list.
For more information regarding system requirements, see the FAQ on the IUCLID web site located at http://iuclid.eu.
2
Chapter 2. Making a fresh installation of
IUCLID 5
If Java and PostgreSQL are already installed, go straight to section Section 2.1.3, “Configuration of PostgreSQL”.
2.1. Installation of Software Required by IUCLID 5
The installation of third party software is described by the respective publishers. Please refer to their web sites for full instructions.
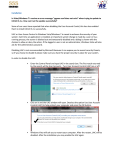
2.1.1. Installation of Java
1. Verify whether Java (JRE) of the correct version is installed on the computer to which IUCLID will be installed:
Open a command prompt (Start # Run… # Open: cmd). At the command prompt, enter the following:
java -version
Figure 2.1. Check version of Java
2. If a message similar to the one shown in the screen shot above is not shown, or the version of Java is not 1.6 or higher, install
the latest version. It can be downloaded from the Sun site at www.java.com.
3
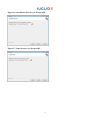
Figure 2.2. Installation wizard for Java
Figure 2.3. Choose installation directory for Java
4
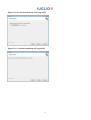
Figure 2.4. Installation of Java is complete
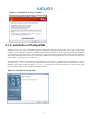
2.1.2. Installation of PostgreSQL
If either version 8.2, 8.3 or 8.4 of PostgreSQL is already installed and running as a service with a user postgres, the existing
installation can be used. There is no need to upgrade to 9, although 9 is supported. If PostgreSQL is not already installed on the
computer, or you would like to upgrade to 9, download PostgreSQL 9 from the site www.postgresql.org/download and install
it. The web site of PostgreSQL offers a range of alternative ways to download and install the PostgreSQL software. The screen
shots shown below show the use of the one click installer available from the PostgreSQL web site. An example of the file name
of the installer is postgresql-9.0.4-1-windows.exe.
The default fresh installation of PostgreSQL, made using the one click installer, automatically starts PostgreSQL as a service,
creates the user postgres if necessary, and supplies administration tools (e.g. pgAdmin III) that can be used to create the
database. If the installer creates the superuser postgres, you will have to create a password for it, as shown in the figure
below, and enter it later into the configuration file for IUCLID 5.
Figure 2.5. Installer for PostgreSQL
5
Figure 2.6. Installation directory for PostgreSQL
Figure 2.7. Data directory for PostgreSQL
6
Figure 2.8. Password for the database superuser (postgres) and the Windows service account
(postgres)
Figure 2.9. Port number for PostgreSQL
7
Figure 2.10. Set the default locale for PostgreSQL
Figure 2.11. Confirm installation of PostgreSQL
8
Figure 2.12. Installation of PostgreSQL in progress
Figure 2.13. Installation of PostgreSQL complete
2.1.3. Configuration of PostgreSQL
A new user and a new database need to be created.
Tip
IUCLID 5 is configured by default to connect to the database using username:iuclid5 and password:iuclid5. It is
convenient to specify the same password now, and change it later when the application is set up correctly.
Important
Take note of the password of this user. This user name and password will be needed later to connect IUCLID 5
to the database.
9
The program pgAdmin III can be used to create the database as follows. Start pgAdmin III from the menu Start / All Programs /
PostgreSQL9.0. After the splash screen has appeared and you have closed the pop-up window that shows usage tips, the following
screen is shown.
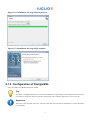
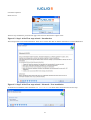
Figure 2.14. pgAdmin III interface on first opening
Right-click the text PostgreSQL 9.0 (localhost:5432) that is under the word Servers highlighted in blue in the figure above.
Select connect as shown below.
Figure 2.15. Connect pgAdmin III to PostgreSQL as user postgres
Enter the password for user postgres as given in the postgres installer Figure 2.8, “Password for the database superuser (postgres)
and the Windows service account (postgres)” then click OK. It is recommended to store the password to facilitate future access.
10
Figure 2.16. Authenticate the user postgres
If you elect to save the password, the following warning might be displayed. Click OK
Figure 2.17. Saving passwords Warning
Expand the tree for PostgreSQL 9.0 (localhost:5432) by clicking the plus sign that has just appeared next to it, as shown in
the figure below.
Figure 2.18. Initial screen in pgAdmin III
11
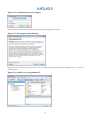
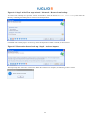
Right-click on Login Roles and select New Login Role....
Figure 2.19. Select create a new user option
Enter the role name iuclid5. Set the password.
Important
Make a note of the user name and password. They are referred to later in the installation, in section Section 2.2,
“Installation of IUCLID 5” [15]. We recommend using iuclid5 as both the user name and the password.
Figure 2.20. Create a new role (i.e. a user) with the name iuclid5
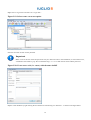
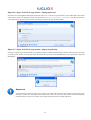
Request a new database by right-clicking the text Databases and selecting New Database... as shown in the figure below.
12
Figure 2.21. Request a new database in pgAdmin III
Enter the details you require. Normally these are only name=iuclid5 and owner=iuclid5. The encoding should be UTF8. Click
OK.
Important
Make a note of the database name. It is referred to later in the installation, in section Section 2.2, “Installation of
IUCLID 5” [15]. We recommend using the name iuclid5.
Figure 2.22. Enter the details of IUCLID 5's database into pgAdmin III
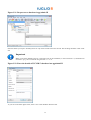
As you can see from the figure below, there is now a new database named iuclid5.
13
Figure 2.23. List of databases in pgAdmin III
You can now close pgAdmin III and move directly to the installation of IUCLID 5.
2.1.4. Installation and Configuration of Oracle
The installation and configuration of an Oracle database are out of the scope of this document. The parameters that must be
defined for IUCLID 5 are shown below, in an extract from the settings file for IUCLID 5. This file, named workstation.properties,
can be found in the installation directory of IUCLID 5 as described later in this document:
# Settings for using ORACLE 10g #
hibernate.connection.username=<username>
hibernate.connection.password=<password>
hibernate.connection.driver_class=oracle.jdbc.driver.OracleDriver
hibernate.connection.url=jdbc:oracle:thin:@localhost:1521:iuclid5
hibernate.hbm2ddl.auto=validate
hibernate.dialect=eu.eca.iuclid.server.system.persistence.ExtendedOracle9Dialect
hibernate.jdbc.use_streams_for_binary=false
2.2. Installation of IUCLID 5
Unzip the archive that contains the software for the manual installation of IUCLID 5. Do not unzip or change the relative location
of any of the plugin archives. Create an installation directory for IUCLID 5 somewhere convenient (for example C:\ Program
Files \ IUCLID5). Copy the directory workstation and all its contents into the installation directory. Use your favourite
text editor to edit the file workstation.properties so that it conforms to your system. If you experience difficulties
in saving changes to the properties file, try explicitly granting write access for it to standard local users. This can be done by
right-clicking the file, selecting properties / security, highlighting your user group or user name, then ticking the box allow for
write. You will need to supply an administrator password. The write permission can be revoked after your IUCLID 5 has been
successfully configured.
14
If you are using PostgreSQL with only default values, the changes required for the properties file can be as simple as adding
the password for the user postgres, as follows:
hibernate.connection.password=<password for the user that connects to the database, e.g. postgres>
For the parameters that relate to a type of database that is not being used, place a # symbol at the start of each line. The default
configuration file delivered with the installation is shown below:
# $Id: workstation.properties,v 1.5 2007/05/10 09:10:04 hallerp Exp $
# Default workstation properties over-riding hard coded defaults in application
# application.type=workstation scavenger.frequency=60 session.timeout=7600
# # Settings for using PostgreSQL#
hibernate.connection.username=iuclid5
hibernate.connection.password=iuclid5password
hibernate.connection.driver_class=org.postgresql.Driver
hibernate.connection.url=jdbc:postgresql://localhost:5433/iuclid5
hibernate.hbm2ddl.auto=validate
hibernate.dialect=org.hibernate.dialect.PostgreSQLDialect
hibernate.jdbc.use_streams_for_binary=false
# # Settings for using ORACLE 10g #
#hibernate.connection.username=iuclid5a
#hibernate.connection.password={aXVjbGlkNWE=}
#hibernate.connection.driver_class=oracle.jdbc.driver.OracleDriver
#hibernate.connection.url=jdbc:oracle:thin:@localhost:1521:iuclid5
#hibernate.hbm2ddl.auto=validate
#hibernate.dialect=eu.eca.iuclid.server.system.persistence.ExtendedOracle9Dialect
#hibernate.jdbc.use_streams_for_binary=false
2.3. Installation Check List - Example
What follows is a check list of an example of the sequence of actions required to make a fresh installation of IUCLID 5, Java
and the PostgreSQL database. It contains all that an experienced Windows administrator needs to know to perform such an
installation. More detailed instructions are given later in this document. To use an Oracle database, the procedure is similar.
1. Install the latest JRE for your version of Windows from Sun, available without charge within the limits of the license, from
the site www.java.com.
2. Install the latest PostgreSQL for your version of Windows, available without charge within the limits of the license, from
www.postgresql.org/download. If a user postgres does not exist already, the wizard will create one and ask you to give it a
password. Remember the password for subsequent steps.
15
3. Create a database named iuclid5. A convenient way to do this is using the graphical admin tool pgAdmin III that comes
with PostgreSQL.
4. Create an installation directory for IUCLID 5 somewhere convenient, for example C:\Program Files\IUCLID5.
5. Copy into the installation directory, all the contents of the directory named workstation supplied in the zipped archive
of the IUCLID 5 download. Do not unzip any of the plugin files.
6. Edit the supplied IUCLID 5 settings file, workstation.properties so that it contains the password for the Windows
user that connects to the database, e.g.:
hibernate.connection.username=postgres
hibernate.connection.password=<password>
7. Start IUCLID 5 by running the executable file iuclid5.cmd from the installation directory. If IUCLID 5 does not run first
time, check that PostgreSQL is running as a service and that there is a user named postgres.
8. Follow the instructions to configure IUCLID 5. If you need detailed help, see the help pages that can be accessed from the
link denoted by a question mark, ? at the bottom left of the page of the configuration wizard.
9. If the installation has been a success, create any links to iuclid5.cmd you might require, for example a shortcut from the
Desktop. There is an icon in the installation folder that you can use with a shortcut.
16
Chapter 3. Upgrade
This chapter describes how to upgrade a previous version of IUCLID 5 to the most recent version of IUCLID 5.3. Dependent
upon the version of IUCLID 5 that is being upgraded, there are three main scenarios in the upgrade process: upgrade from a
previous version of 5.3, upgrade from any version of 5.2, and upgrade from 5.0 or 5.1. These are each described in a dedicated
sub-section of this chapter. In all scenarios, before starting the upgrade, it is important to back-up the database. Use the builtin back-up functionality of IUCLID, and/or the back-up functionality of the database. Making only a copy of the file system on
which IUCLID is installed is not recommended as a means of backing-up.
3.1. Upgrading from a previous version of IUCLID 5.3
to the latest version of IUCLID 5.3
This section applies only to users who have an existing IUCLID 5.3 installation. If you are unsure which version you are currently
using, you can read it from within the interface of IUCLID 5. Start IUCLID 5, log-in, then click 'Help' and select 'About'.
1. Save the configuration files and plug-ins from your existing IUCLID 5.3 directory to a temporary location. These are located
in the following directories in your iuclid5 folder:
/plugins/
/conf/
2. Unzip the archive that contains the software for the manual installation of IUCLID 5. Do not unzip or change the relative
location of any of the plugin archives.
3. Create an installation directory for IUCLID 5 somewhere convenient, for example C:\Program Files\IUCLID5.
4. Copy the directory "workstation" and all its contents into the installation directory.
5. Copy the plugins that were saved in step 1, over to the directory /plugins/ in the new installation.
Important
When copying your pre-existing plugins, do not overwrite the new plugins that were installed with the latest
version of IUCLID 5.3.
6. Replace the configuration files in the directory /conf/ with the copies that were saved to a temporary directory in step 1.
7. Start IUCLID 5
3.2. Upgrading from IUCLID 5.2 to IUCLID 5.3
This section is relevant only if the upgrade is from IUCLID 5.2. For earlier versions, see the next section. The version can be
seen from within the interface of IUCLID 5. To see the version, start IUCLID 5, log-in, then click Help and select About. The
upgrade process consists of the following parts:
1. Back-up the database. Use the built-in back-up functionality of IUCLID, and/or the back-up function of the database software,
for example PostgreSQL.
2. Remove the executable program files for the previous version of IUCLID. Note that the plugins for IUCLID 5.2.x are not
compatible with IUCLID 5.3. Therefore, they must not be copied over to the new installation.
17
3. Install the program files for the latest version of IUCLID 5.3 as follows. Unzip the archive that contains the software for the
manual installation of IUCLID 5. Create an installation directory for IUCLID 5 somewhere convenient, for example C:\
Program Files \ IUCLID5. Copy the directory workstation and all its contents into the installation directory.
4. Adapt the configuration files for IUCLID if necessary and copy to the new installation. Note that if the Oracle database is
used, the file server.properties must contain the following entry:
hibernate.connection.driver_class=oracle.jdbc.OracleDriver
The previous value was:
hibernate.connection.driver_class=oracle.jdbc.driver.OracleDriver
5. If the database is an Oracle database, please note that the driver for Java is no longer supplied with the IUCLID installation
package. The correct driver for the combination of Java and Oracle versions in use must be obtained from the Oracle web
site and installed in the appropriate folder. For example, for Java 1.6 and Oracle 11g Release 2 (11.2.0.2.0), the name of the
driver is ojdbc6.jar.
6. Migrate the database by running the migration tool, as described below. This is a script that is supplied along with the
installation package. It migrates existing IUCLID data into the new format for IUCLID 5.3. IUCLID cannot be started until
the migration tool has been run successfully.
7. Once the migration process has been completed successfully, the new version of IUCLID can be started and checked before
being entered into production.
3.2.1. The migration tool
The migration tool is a script supplied with the installation package. The file name is update.bat. Run the script as you
would any other script either from the command line, or by double-clicking on its icon in the Windows file manager. Be careful
not to interrupt the running of the script, for example by closing the window associated with the script, or by shutting Windows
down etc.. When the script has finished running, the window will close automatically. If the migration is interrupted, or fails,
for whatever reason, the database must be restored from the back-up and the migration started again.
3.2.2. Starting IUCLID 5
If the migration tool has run successfully, you can now launch the newly installed IUCLID 5.3 by double-clicking the icon that
the installer created on your Desktop, as shown below. It is also possible to launch IUCLID 5 by running the file iuclid5.cmd
that is included in the installation directory. The initialisation process is not required. All of the data that was present in the
upgraded system should be present in the new system. Therefore, it should be possible to log in to any of the user accounts
from the previous system.
Figure 3.1. A shortcut to the IUCLID 5 application
3.3. Upgrading from IUCLID 5.0 / 5.1 to IUCLID 5.3
Important
There is no automatic upgrade of the database from IUCLID 5.0 / 5.1 to IUCLID 5.3. The data must be transferred
manually from the old to the new database as described in the sub-section below.
18
Each installation of IUCLID 5 must have its own database.
3.3.1. Migration of data to IUCLID 5.3 from a previous version
Before starting to install IUCLID 5.3, all the data must be exported from the old IUCLID 5 using the Back-up plugin that
is available on the IUCLID web site. The export process is essential because the exported data will later be imported into
IUCLID 5.3. When it is run, the Back-up plugin asks the user to create and enter a single password. This will become the
password for all the user accounts in the new installation. An exception is the account SuperUser which has a default password
of root. To import the exported data into IUCLID 5.3, use the built-in Restore feature of IUCLID 5.3 that can be found from
the menu File / Administrative tools. This feature allows the upload of data that was exported using the Back-up plugin on the
old version of IUCLID 5.
3.3.2. Database configuration for running IUCLID 5.3 and a
previous version at the same time
If you already have a previous version of IUCLID 5, it is recommended to keep it for the time being. It can be deleted in the
future when you are absolutely sure that it is no longer needed. What follows is some information and advice as to how you
can manage more than one version of IUCLID 5. As stated above, each installation of IUCLID 5 must have its own database. A
new database must be created for IUCLID 5.3 because the structure of the database differs from that of previous versions. This
requirement can be met in a variety of different ways. The following sub-sections describe two common sets of circumstances.
The database for IUCLID 5.3 can be run on the same instance of the database software as a previous version of IUCLID 5,
however, it must have a unique name within that instance of the database software. When IUCLID 5.3 is run for the first time
on an empty database, it will automatically create all the correct tables and the initialisation wizard will start.
3.3.3. IUCLID 5.0 / 5.1 was installed using the setup-kit
The IUCLID 5 set-up kit included the database software PostgresSQL. The set-up kit installed the PostgreSQL database software,
the IUCLID 5 software, and stored the database data, all under the same folder named IUCLID. The set-up kit created installations
of IUCLID 5 that run PostgreSQL on a non-standard port (5433). Therefore, if an installation of IUCLID 5.3 is made with
an independent installation of PostgreSQL running on the standard port (5432), it is possible to run it at the same time as
an installation that was made with the set-up kit. For example, if IUCLID 5.3 is installed using the installer according to its
instructions and with default settings, the new installation can be run at the same time as a previous installation that was made
with the set-up kit.
3.3.4. IUCLID 5.0 / 5.1 was installed manually
In this case, you will already have an installation of PostgreSQL that is independent of IUCLID, and a database for use with
IUCLID 5.0 / 5.1. There is no need to install PostgreSQL again, although you might want to take this opportunity to upgrade
to PostgreSQL 9. There can be more than one database running on a single instance of the database software. Therefore, to be
able to run IUCLID 5.3 and a previous version at the same time, create a new empty database for IUCLID 5.3. The name of the
new database must be unique within that instance of the database software.
19
Chapter 4. Initialisation of an installation of
IUCLID 5
This chapter describes the configuration that is required to create a working IUCLID 5 system from an installation of IUCLID
5 that has an empty database. There are two scenarios: either to create a working installation from scratch, or to load data from
a back-up that was made using the built-in back-up function of IUCLID. During initialisation from scratch, reference substance
data and a legal entity are uploaded into the database, and the required user accounts can be created. For initialisation from backup, make sure that the back-up files are accessible from the system on which IUCLID will be initialised. What to do in each
scenario is described in the rest of this chapter.
4.1. Starting IUCLID 5
Connect to the application by running the file named iuclid5.cmd that is supplied with the installation files. It is convenient
to create a shortcut that points to iuclid5.cmd and to attach the IUCLID 5 icon that is supplied with the installation files.
Figure 4.1. A shortcut to the IUCLID 5 application
4.2. First steps wizard
When you start IUCLID 5 for the first time, the First steps wizard is run automatically. It guides you through the steps required
to make a working user account and to upload the data required to use IUCLID 5 in a practical setting. The settings that relate
to user accounts can also be changed after having run the wizard, using the features described in the IUCLID 5 User Manual.
Important
This wizard allows a single user account to be created, per run. This user is in addition to the SuperUser account
that comes with the installation. It is essential to have at least one user account in addition to SuperUser because
SuperUser should be used only for the special tasks that only it can carry out. See the IUCLID 5 User Manual
for more detail.
As part of the First steps wizard, a legal entity must be uploaded into the IUCLID 5 installation in the form of a
LEOX file. Therefore, before running this wizard, make sure that a LEOX file for the legal entity of your company
or organisation is accessible to your computer. For more information, see the IUCLID 5 User Manual.
The First steps wizard provides the option of uploading the following information to your IUCLID 5 installation.
For details, see the IUCLID 5 User Manual:
• EC Inventory
• Inventory of Reference substances
Although these uploads are optional, it is strongly recommended to do them during the first run of the First steps
wizard. To do so, you will need to have the data accessible to your computer whilst running this wizard.
The First steps wizard can be run at any time, but only by the SuperUser. This is done from the file menu within IUCLID 5
Administrative tools / Initialise.
When starting the IUCLID 5 for the first time, the only user available is an administrator named SuperUser. Log in as SuperUser
by entering the following case-sensitive values into the login screen as shown below:
20
Username: SuperUser
Password: root
The First steps wizard then proceeds. Each page of the wizard is described in a figure below.
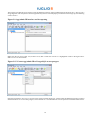
Figure 4.2. Step 1 of the First steps wizard - Introduction
The wizard presents some useful information. There are no actions other than to read the information. Click the Next button.
Figure 4.3. Step 2 of the First steps wizard - Init mode - New installation
To initialise a new database, select the button New Installationas shown below and continue to the next step.
21
Figure 4.4. Step 2 of the First steps wizard - Init mode - Restore from backup
To restore from a backup of a previous version of IUCLID 5, select the button Restore from backup then enter the
directory containing the backup files as shown in the example below.
Click Next. The wizard jumps to its last step, where the importation of data is started, as shown below.
Figure 4.5. Restoration from a back-up - Step 8 - Activate imports
The import may take some time. Click Finish. When the restoration is complete, the following screen is shown.
22
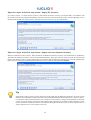
Figure 4.6. Step 3 of the First steps wizard - Change password
If you have not yet changed the default password of the SuperUser to a more secure value than root, the traffic light in the wizard
screen will be yellow. To change the password, check the box Change SuperUser password , enter the old password
root and then enter the new password. After confirming the password, click the button Next.
Figure 4.7. Step 4 of the First steps wizard - Import Legal Entity
To import a Legal entity (see the IUCLID 5 User Manual) select its LEOX file by browsing to the file. The browsing is accessed
by clicking on the folder icon to the right of the field Select the import file. Click the Next button. The Legal entity is imported
immediately.
Important
You must import at least one Legal entity in order to succeed with this wizard. If you have no Legal entity in the
IUCLID 5 system, the traffic light in the wizard screen will be red. The First steps wizard will be automatically
launched when you log in to IUCLID 5 until a Legal entity has been successfully imported.
23
Figure 4.8. Step 5 of the First steps wizard - Import EC Inventory
EC inventory import - To import the EC inventory, select the file for the EC inventory (see the IUCLID 5 User Manual). The
EC Inventory will not be imported immediately. The import will start at the end of the First steps wizard. Depending on your
machine speed and the size of the inventory, this import can take some time, e.g. up to half an hour.
Figure 4.9. Step 6 of the First steps wizard - Import reference substance inventory
Reference substance inventory import - Select the file for the Reference substance inventory (see the IUCLID 5 User Manual).
The Reference substance inventory will not be imported immediately. The import will start at the end of the first steps wizard
together with the EC Inventory import. Depending on your machine speed and the size of the inventory, this bulk operation may
take a long time. The import of the Reference substance inventory itself can take up to several hours.
Tip
Time and IT resources can be saved by importing into IUCLID only the Reference substances you need. Various
different sizes of Reference substance inventory can be downloaded from the IUCLID web site. There is a full set,
a reduced list, and a function that allows you to create your own inventory using common identifiers as selection
criteria, such as EC Number, and IUPAC name. Before importing the full set, consider carefully whether it is really
necessary. Reference substances that are not imported during the initialisation process can be imported later. A
simple compromise is to start with the reduced list.
24
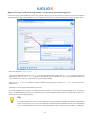
Figure 4.10. Step 7 of the First steps wizard - Create user account and assign role
Create a new user account and define its user access rights by assigning it a role. It is essential to create a new user because general
working within IUCLID 5 with the SuperUser is not supported. Only one user can be created per run of the First steps wizard.
• Select the checkbox Create user.
Fill in all the fields. The user needs a Login name for identification during login. The Full name is used for proper user
identification. The Assigned role is needed to administrate the access permissions. In a newly installed IUCLID 5, the
roles Administrator, Full access and Read-only are provided by default.
• Enter a Login name, as it should be used for identification during login, and the Full name used for proper user
identification.
• Optionally, click Set password and define a password.
• Click and highlight a role in the list of unassigned roles and assign it to the user by clicking the Right arrow. Assigning a
Role is needed to administrate the access permissions (in a newly installed IUCLID 5, the roles Administrator, Full access
and Read-only are provided by default).
Tip
It is recommended to create a user with the Administrator Role regardless of whether a stand alone or a distributed
version of IUCLID 5 is set up. Once a user has been created, the IUCLID 5 administrator (in case of a distributed
version) can define different other user(s) and assign different role(s) to them (see the IUCLID 5 User Manual).
25
• Assign a Legal entity (normally the Legal entity imported in the third step of this wizard) by clicking the green plus button and
performing a search for the desired Legal entity. In the Query field Legal entity name, enter the name of the desired
Legal entity or an asterisk (*) as wildcard and click the Search button. In the Query results list, click the desired entry and
then click the Assign button.
• Optionally, select default attachment and import/export directories. These settings can be changed at a later stage, as described
in the IUCLID 5 User Manual.
• Click the Next button
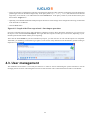
Figure 4.11. Step 8 of the First steps wizard - Start import procedure
If you have selected an EC Inventory and/or Reference substances inventory file(s) during the wizard steps, you can now run
the imports. Click the button Execute imports. Note again that these imports can take up to several hours, depending on your
machine speed and the amount of data you are importing.
Then click the button Finish. If you have launched any imports, you will now have to wait until the imports are completed.
Afterwards, you should log out and then log in again as a user for the newly defined account. Remember: general working as
SuperUser is not supported.
4.3. User management
The installation of IUCLID 5 is now ready for hand-over to whoever will be maintaining the system and whoever will be
managing the user accounts. The management of user accounts and their roles is described in the IUCLID 5 User Manual.
26
Chapter 5. Un-installation of IUCLID 5
The un-installation of IUCLID is a manual process. IUCLID can be un-installed by deleting the files that were copied to the
destination machine, and reversing any changes made during the installation process. For more details about the actions that
might be required, see the IUCLID FAQ located at the IUCLID web site http://iuclid.eu.
27