1
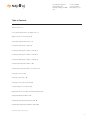
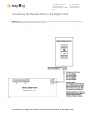
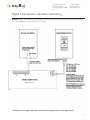
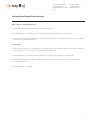
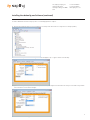
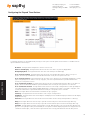
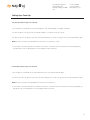
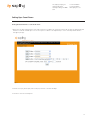
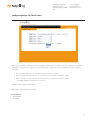
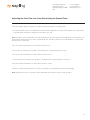
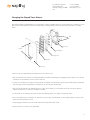
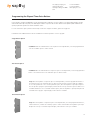
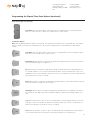
The Sapling Company, Inc.
1633 Republic Road
Huntingdon Valley, PA 19006
USA
+1.215.322.6063 P.
+1.215.322.8498 F.
www.sapling-inc.com
Installation Manual V5
Elapsed Timer
1
The Sapling Company, Inc.
1633 Republic Road
Huntingdon Valley, PA 19006
USA
+1.215.322.6063 P.
+1.215.322.8498 F.
www.sapling-inc.com
Table of Contents
Table of Contents—2
Connecting the Elapsed Timer to the Digital Clock—3
Digital Clock Nurse’s Call Interfacing—4
Setting Up the Elapsed Timer Interface—5
Installing the sbdconfig.exe Software—6
Installing the sbdconfig.exe Software (continued)—7
Installing the sbdconfig.exe Software (continued)—8
Installing the sbdconfig.exe Software (continued)—9
Configuring the Elapsed Timer Buttons—10
Configuring the Elapsed Timer Buttons (continued)—11
Setting Up a Count Up—12
Setting Up a Count Down—13
Setting Up a Count Down (continued)—14
Configuring Relays for Count Down—15
Adjusting the Time of a Count Down Using the Elapsed Timer—16
Changing the Elapsed Timer Buttons—17
Programing the Elapsed Timer Extra Buttons—18 - 19
Programming the Elapsed Timer Extra Button Lights—20
*Manuals may change without prior notice
2
The Sapling Company, Inc.
1633 Republic Road
Huntingdon Valley, PA 19006
USA
+1.215.322.6063 P.
+1.215.322.8498 F.
www.sapling-inc.com
Connecting the Elapsed Timer to the Digital Clock
REMINDER: Electricity can be harmful to your health at higher voltages. Keep the electricity to this device turned off until after the wiring has
been added. Do not add new circuitry while the device is operating.
3200/3300 Series Only
Fig. 1
*Customer must supply CAT5 cable to connect the Elapsed Timer to the digital clock.
3
The Sapling Company, Inc.
1633 Republic Road
Huntingdon Valley, PA 19006
USA
+1.215.322.6063 P.
+1.215.322.8498 F.
www.sapling-inc.com
Digital Clock Nurse’s Call Station Interfacing
REMINDER: Electricity can be harmful to your health at higher voltages. Keep the electricity to this device turned off until after the wiring has
been added. Do not add new circuitry while the device is operating.
3300 Series Only
Fig. 2
*Customer must supply CAT5 cable to connect the Elapsed Timer to the digital clock.
4
The Sapling Company, Inc.
1633 Republic Road
Huntingdon Valley, PA 19006
USA
+1.215.322.6063 P.
+1.215.322.8498 F.
www.sapling-inc.com
Setting Up the Elapsed Timer Interface
Wired – Wireless – TalkBack Clock Systems
1. Open the sbdconfig.exe software. This will load the Elapsed Timer interface utility.
2. Once the Elapsed Timer is connected to the back of the digital clock (see page 3), press any button on the Elapsed Timer.
3. Close out of and reload the sbdconfig software page. The Elapsed Timer tab will appear in the taskbar. After this step is done once, the digital clock will always recognize the Elapsed Timer.
IP Clock System
1. Type the IP address of the IP clock into a web browser such as Internet Explorer or Firefox. This will load the IP clock’s web interface. Type in the password for the IP clock (see the specific IP clock’s user manual for more information).
2. Once the Elapsed Timer is connected to the back of the digital IP clock (see page 3), press any button on the Elapsed Timer.
3. Refresh the web interface page. The Elapsed Timer tab will appear in the menu bar. After this step is done once, the IP clock will always recognize the Elapsed Timer.
*For IP Clock Configuration, see page 10.
5
The Sapling Company, Inc.
1633 Republic Road
Huntingdon Valley, PA 19006
USA
+1.215.322.6063 P.
+1.215.322.8498 F.
www.sapling-inc.com
Installing the sbdconfig.exe Software
Note: The sbdconfig.exe software only works with the SBD 3200 or 3300 series.
Note: Sapling’s USB to RS485 converter needs to be purchased separately. Other USB to 485 converters will not work.
Windows 7
1. Insert the USB to RS485 converter into a USB connector port.
Note: If computer does not recognize the USB to RS485 converter after it is plugged in, unplug the converter, rotate it and plug it back into the USB port.
2. Plug in the USB to RS485 converter into the J7 port on the board, located on the back of the digital clock.
3. Power up the digital clock.
4. Computer will indicate ‘Found New Hardware.’
5. It will then display, ‘New Hardware Installed.’
6. Next, click on Start menu --> Control Panel --> Hardware and Sound.
7. Click on “Device Manager” under Devices and Printers.
Software
*Instructions continued on next page
6
The Sapling Company, Inc.
1633 Republic Road
Huntingdon Valley, PA 19006
USA
+1.215.322.6063 P.
+1.215.322.8498 F.
www.sapling-inc.com
Installing the sbdconfig.exe Software (continued)
8. Scroll down to Universal Serial Bus controllers and click the + sign to open.
9. Double-click on the USB Serial Converter. A new window will open.
10. Click in the Advanced tab and check the box next to ‘Load VCP’ and click OK.
*Instructions continued on next page
7
The Sapling Company, Inc.
1633 Republic Road
Huntingdon Valley, PA 19006
USA
+1.215.322.6063 P.
+1.215.322.8498 F.
www.sapling-inc.com
Installing the sbdconfig.exe Software (continued)
11. Remove RS485 device from the USB port, wait 5 seconds and plug back into USB port.
12. Open the Device Manager and scroll to Ports. Make note of what port the USB Serial Port is assigned to. For example: (COM 4).
13. Load the sbdconfig.exe software from disk (provided with the digital clock) or copy the software to the desktop.
14. Open the SBD config software, click on Serial Port (in the menu bar) --> Configure Serial Port. Match the Com port on the SBD config software to the USB Serial Port in the Device Manager.
8
*Instructions continued on next page
The Sapling Company, Inc.
1633 Republic Road
Huntingdon Valley, PA 19006
USA
+1.215.322.6063 P.
+1.215.322.8498 F.
www.sapling-inc.com
Installing the sbdconfig.exe Software (continued)
15. When Com ports match, click apply. The SBD 3000 settings are ready to be configured.
16. Click the ‘Read Clock’ button. The default settings will populate the tabs on the SBD config software. Once the ‘Read Clock’ button is clicked, another window will open that will signify the upload process
9
The Sapling Company, Inc.
1633 Republic Road
Huntingdon Valley, PA 19006
USA
+1.215.322.6063 P.
+1.215.322.8498 F.
www.sapling-inc.com
Configuring the Elapsed Timer Buttons
1. Program the first button on the Elapsed Timer by selecting one of the options in the drop down list next to Button 1. Listed below are the
options and what their functionality is:
No Action - Pressing this button will perform no functions on the IP clock.
Return to Time Display - Pressing this button will cause the IP clock to return to its previously displayed time.
Briefly Display Date - Pressing this button will cause the IP clock to briefly show a date display.
Go to Count Up and Hold - Pressing this button will cause the IP clock to display and hold at zero. While a count up is in progress, if the Count Up and Hold button is pressed and held for three seconds, the count up will reset to zero.
Go to Count Up and Start - Pressing this button will cause the IP clock to switch from its current display and begin the counting up process beginning from zero. While a count up is in progress, if the Count Up and Start button is pressed and held for three seconds, the count up will reset to zero.
Go to Count Down and Hold - Pressing this button will cause the IP clock to display and hold at zero. While a count down is in progress, if the Count Down and Hold button is pressed and held for three seconds, the count up will reset to its start time.
Web Interface
Go to Count Down and Start - Pressing this button will cause the IP clock to begin counting down from a time specified by the user and will switch from its current display and begin displaying the count down process. While a count down is in progress, if the Count Down and Start button is pressed and held for three seconds, the count up will reset to its start time.
Reset - Pressing this button will restart whatever countdown/count up is in progress.
Start/Stop - Pressing this button will cause the timer to start or stop its counting functions.
Shift Digits - Pressing this button will cause the digits to shift displays from an Hour/Minutes display to a Minutes/Seconds display (4 digit IP clocks only).
Flash Time - Pressing this button will cause the time to flash in the midst of another activity the Elapsed Timer is conducting.
Relay 1 - Pressing this button will cause the relay to open and receive the time protocol from the network (Sync-Wire only).
Relay 2 - Pressing this button will cause the relay to open and receive the 2nd time protocol from the network (Sync-Wire only).
Code Blue - Pressing this button activates a special-purpose count up. When pressed once, the count up will start. When pressed again, the count up will pause. When pressed and held, the count up will clear and the display will go back to showing the time. This overrides the interface lights, so that the interface is green while the time is running, and red when the timer has been paused.
10
The Sapling Company, Inc.
1633 Republic Road
Huntingdon Valley, PA 19006
USA
+1.215.322.6063 P.
+1.215.322.8498 F.
www.sapling-inc.com
Configuring the Elapsed Timer Buttons (continued)
2. Program the ‘Lights’ settings that will display on the Elapsed Timer when a particular button is pushed. The lights on the Elapsed Timer must be programmed separately for each button. The lights on the Elapsed Timer will only turn off if the user configures it into the buttons. Listed below are the options and their functionality:
Note: When configuring the lights for a specific button, any changes made to the light functions of the remaining three buttons are only affected
when the selected button is pushed. E.g. If the button 1 lights dialog box is open, adjusting the lights on buttons 2,3 and 4 will only have an affect
when button 1 is pushed.
Fig. 4
• No Change: When selected, a particular button’s settings will remain unaltered from its previous selected state.
• Off: This option will turn off the lights on a particular Elapsed Timer button.
• Green / Red: This option allows the user to choose either green or red backlighting on the Elapsed Timer when the button is pressed.
• Blink On / Off: This option will allow the user to turn on or off the light blinking function. When this is set to Off, the backlight will
stay on. When this is set to On, the backlight will flash.
• Submit: This button saves all of the options that were entered.
• Close: This button will close the Light Changes window.
3. Repeat steps 1 and 2 for the three remaining buttons.
4. After all four buttons and the lights on the Elapsed Timer are set, click Save to store the selected options.
11
The Sapling Company, Inc.
1633 Republic Road
Huntingdon Valley, PA 19006
USA
+1.215.322.6063 P.
+1.215.322.8498 F.
www.sapling-inc.com
Setting Up a Count Up
If Count Up and Hold option is selected:
1. Press the button associated with the Count Up and Hold option. Zeros will be displayed on the digital clock display.
2. In order to begin the count up, press the Count Up and Hold button a second time to start the count up.
3. In order to pause the count up process, press the Count Up and Hold button. To resume count up, press the Count Up and Hold button again.
NOTE: The Start / Stop option can be programmed to start / stop the count up process, as well.
4. To return back to the system time, make sure the Return to Time option is selected for any of the four buttons in the initial programming
(See page 10). Press the corresponding button to have the display show the system time.
If Count Up and Start option is selected:
1. Press the button associated with the Count Up and Start button. The count up will automatically begin.
2. In order to pause the count up process, press the Count Up and Start button. To resume count up, press the Count Up and Start button again.
NOTE: The Start / Stop option can be programmed to start / stop the count up process.
3. To return back to the system time, make sure the Return to Time option is selected for any of the four buttons in the initial programming (see page 10). Press the corresponding button to have the display show the system time.
12
The Sapling Company, Inc.
1633 Republic Road
Huntingdon Valley, PA 19006
USA
+1.215.322.6063 P.
+1.215.322.8498 F.
www.sapling-inc.com
Setting Up a Count Down
Setting the desired time to count down from:
1. Before the Count Down and Hold option can be used, the time the clock begins the count down from must be selected in the Elapsed Timer tab. When the Count Down and Hold option is chosen as an option for a button on the Elapsed Timer, a section on the Elapsed Timer Interface will appear (see Fig 5).
Fig. 5
2. Enter the hours (Hr:), minutes (Mn:) and seconds (Sec:) where the count down will begin.
3. Click Save to store the selected options.
13
The Sapling Company, Inc.
1633 Republic Road
Huntingdon Valley, PA 19006
USA
+1.215.322.6063 P.
+1.215.322.8498 F.
www.sapling-inc.com
Setting Up a Count Down (continued)
If Count Down and Hold option is selected:
1. Press the button associated with the Count Down and Hold option. The preset count down time will be shown.
2. In order to begin the count down, press the Count Down and Hold button a second time.
3. In order to pause the count down, press the Count Down and Hold button on the Elapsed Timer. To resume count down, press the Count Down and Hold button again.
NOTE: The Start / Stop option can be programmed to start / stop the count down process.
4. To return back to the system time, make sure the Return to Time option is selected for any of the four buttons in the initial programming (see page 10). Press the corresponding button to have the display show the system time.
If Count Down and Start option is selected:
1. Press the button associated with the Count Down and Start option. The preset count down time will be shown and the clock will begin counting down.
2. In order to pause the count down, press the Count Down and Start button on the Elapsed Timer. To resume count down, press the Count Down and Start button again.
NOTE: The Start / Stop option can be programmed to start / stop the count down process.
3. To return back to the system time, make sure the Return to Time option is selected for any of the four buttons in the initial programming (see page 10). Press the corresponding button to have the display show the system time.
14
The Sapling Company, Inc.
1633 Republic Road
Huntingdon Valley, PA 19006
USA
+1.215.322.6063 P.
+1.215.322.8498 F.
www.sapling-inc.com
Configuring Relays for Count Down
Fig. 6
1. When a user is scheduling a Count Down, they also have the ability to specify a relay closure after a count down is complete (if using a 3300 Series Digital Clock). There are three options to choose from: None, Relay 1 or Relay 2 for X seconds. Listed below are the options and their functionality:
• None - This option allows the user to close neither relay after count down is complete.
• Relay 1 – This option allows the user to choose to close Relay 1 for X seconds after count down is complete.
• Relay 2 – This option allows the user to choose to close Relay 2 for X seconds after count down is complete.
* The maximum number of seconds relays can close for is 9.
2. Click Save in order to store the selected options.
3. Repeat Steps 1 and 2 if setting up a second relay.
* Contact Rating:
•
0.3A at 110 VAC
•
1A at 24 VDC
15
The Sapling Company, Inc.
1633 Republic Road
Huntingdon Valley, PA 19006
USA
+1.215.322.6063 P.
+1.215.322.8498 F.
www.sapling-inc.com
Adjusting the Start Time of a Count Down Using the Elapsed Timer
A user has the ability to adjust the start time of a count down directly from the buttons on the Elapsed Timer.
1. Press and hold the button that is associated with the Count Down. While holding down the selected count down button, press any other button on the Elapsed Timer. The display on the digital clock will change to hours (Hr:).
Note: If both buttons are pressed and held for 5 seconds, the Elapsed Timer will enter testing mode. If the Elapsed Timer is in testing mode, a user
will be unable to program the buttons. In order to exit testing mode, press and hold any two buttons on the Elapsed Timer for 5 seconds and the
device will return to normal mode.
2. Press the selected count down button in order to advance the time in hours.
3. Once the hour is selected, press any other button on the Elapsed Timer to change the display to minutes (In:).
4. Press the selected count down button in order to advance the time in minutes.
5. Once the minutes are selected, press any other button on the Elapsed Timer to change the display to seconds (Sec:).
6. Press the selected count down button in order to advance the time in seconds.
7. When the count down start time has been chosen, press any other button on the Elapsed Timer to return to the time display.
Note: Changing the start time of a count down using the Elapsed Timer will not affect the ‘Lights’ settings. See page 11.
16
The Sapling Company, Inc.
1633 Republic Road
Huntingdon Valley, PA 19006
USA
+1.215.322.6063 P.
+1.215.322.8498 F.
www.sapling-inc.com
Changing the Elapsed Timer Buttons
With Sapling’s Extra Button kit (SBD-ELT-BUT-0), a user has the ability to change the standard four buttons (Count Up, Start/Stop, Time, Countdown) to a custom
button set up on the Elapsed Timer. Shown below are the different parts of the Elapsed Timer you will need to reference when in the process of changing
buttons.
Tabs
Back Cover
Screws
Circuit Board
Button(s) Case
Button(s)
Front Cover
1. Remove the face of the Elapsed Timer by unscrewing the two screws on the front cover.
2. Next, you will need to remove the back cover. Flip the Elapsed Timer over with button side facing down and slightly pull up each tab (two on each side) and lift the back cover off. Underneath, you will see a green circuit board.
3. To remove the circuit board, you must squeeze the 4 gray tabs that are holding the circuit board in place. Squeeze the top two tabs together, followed by the bottom two tabs, until the circuit board detaches from the button case. Lift circuit board off and set aside.
4. Next, you will see the backside of the standard four buttons. In order to remove the buttons, you must squeeze the two tabs on the side of each button together until the button is loose. Remove as many buttons as needed.
5. In order to add one or more button(s) from the kit, line up the selected button(s) with the holes and press until the button snaps in.
6. Once you have placed all the necessary buttons into the button case, place the green circuit board, with connector towards the bottom of the timer, over the buttons until all four gray tabs are secured.
7. Following that, place the back cover over the circuit board until all four white tabs have been secured.
8. Finally, screw the front cover back onto the Elapsed Timer.
17
The Sapling Company, Inc.
1633 Republic Road
Huntingdon Valley, PA 19006
USA
+1.215.322.6063 P.
+1.215.322.8498 F.
www.sapling-inc.com
Programming the Elapsed Timer Extra Buttons
If a user decides to change the standard buttons (Count Up, Start/Stop, Time, Countdown) to a new set of buttons, a user must program the buttons through
either the web interface (IP Clock System) or the sbdconfig.exe software in conjunction with the USB to RS485 Converter (Wireless, Wired or TalkBack Clock
Systems) to perform the specific actions that the new buttons call for.
For a list of the button options, what their functionality is and how to configure each button, please refer to page 10.
Listed below are the additional buttons that are included in the kit and an explanation on how to program:
Single Button Option
Code Blue: When the Code Blue button is the only button on the Elapsed Timer, a user must program buttons
1-4 to the ‘Code Blue’ option in order to activate.
Two Button Option
Code Blue: When the Code Blue button occupies two spaces on the Elapsed Timer, a user must program either
buttons 1 & 2 or buttons 3 & 4 to the ‘Code Blue’ option in order to activate.
Stop: When the Stop button occupies two spaces on the Elapsed Timer, a user must program either buttons 1
& 2 or buttons 3 & 4 to the ‘Start/Stop’ option in order to activate. If used in conjunction with the ‘Code Blue,’
‘Go to Count up and Hold’ or ‘Go to Count Up and Start’ option, when the Stop button is pressed, it will pause
the count up that’s in progress. If pressed again, it will resume the count up. If used in conjunction with a ‘Go to
Countdown and Hold’ or ‘Go to Countdown and Start’ option, when the Stop button is pressed, it will pause the
countdown that’s in progress. If pressed again, it will resume the countdown.
Three Button Option
Stop: When the Stop button occupies three spaces on the Elapsed Timer, a user must program either buttons 1,
2 and 3 or buttons 2, 3 and 4 to the ‘Start/Stop’ option in order to activate. When the Stop button is pressed, it
will pause the count up or countdown. If pressed again, it will restart the count up or countdown.
18
The Sapling Company, Inc.
1633 Republic Road
Huntingdon Valley, PA 19006
USA
+1.215.322.6063 P.
+1.215.322.8498 F.
www.sapling-inc.com
Programming the Elapsed Timer Extra Buttons (continued)
Three Button Option (continued)
Code Blue: When the Code Blue button occupies three spaces on the Elapsed Timer, a user must program either
buttons 1, 2 and 3 or buttons 2, 3 and 4 to the ‘Code Blue’ option in order to activate.
Four Button Option
Note: When programming the buttons below, a user must make sure to program the actual button for the corresponding space on the Elapsed
Timer. For example, if a user places the ‘Code Blue’ button in space 3, they must program button 3 on the Web Interface or sbdconfig.exe
software.
Code Blue: When the Code Blue button occupies one space on the Elapsed Timer, a user must program the specific
button space to the ‘Code Blue’ option in order to activate.
Blank Button: When this button is installed on the Elapsed Timer, program the button to ‘No Action’. If the button
is pressed, nothing will happen on the digital clock.
Set: When this button is installed on the Elapsed Timer, Sapling recommends that this button be programmed to ‘Go
to Countdown and Hold’ or ‘Go to Count Up and Hold.’ When the button is pressed, it will perform the option it was
programmed to carry out. If pressed again, it will pause the count up or countdown that is in progress. If pressed a third
time, it will resume the count up or countdown.
Reset: When this button is installed on the Elapsed Timer, program the button to ‘Reset’. When the button is pressed,
it will restart whatever countdown/count up is in progress.
Shift Digit: When this button is installed on the Elapsed Timer, program the button to ‘Shift Digits’. If the button is
pressed, it will cause the digits to shift from an Hour/Minutes display to a Minutes/Seconds display (4 digit IP clocks
only).
Stop: When the Stop button occupies one space on the Elapsed Timer, a user must program the button to the ‘Start/
Stop’ option in order to activate. When the Stop button is pressed, it will pause the count up or countdown that is in
progress. If pressed again, it will resume the count up or countdown.
Start: When the Start button occupies one space on the Elapsed Timer and is programmed as the ‘Start/Stop’ option,
a count up will commence when the Start button is pressed. If pressed again, the count up will pause.
19
The Sapling Company, Inc.
1633 Republic Road
Huntingdon Valley, PA 19006
USA
+1.215.322.6063 P.
+1.215.322.8498 F.
www.sapling-inc.com
Programming the Elapsed Timer Extra Button Lights
Programing the ‘Lights’ settings allow a user to choose which color light will display on the Elapsed Timer when a particular button is pushed.
The lights on the Elapsed Timer must be programmed separately for each button. The lights on the Elapsed Timer will only turn off if the user
configures it into the buttons.
For example, if a user installs the ‘Stop’ button that is placed in the Button 1 and Button 2 space, a user must program the lights for both Button 1
and Button 2 in order for the lights to operate correctly.
For an explanation of the ‘Lights’ options and their functionality, please refer to page 11.
Please Note: If a user changes from the standard buttons to a ‘Code Blue’ button, the lights will automatically configure to display Green during
a count up and Red when the count up is paused.
20