1
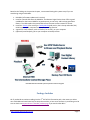
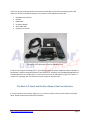
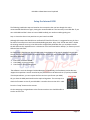
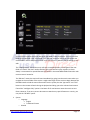
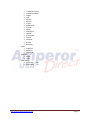
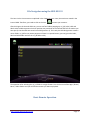
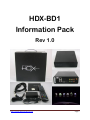
HDX-BD1 Information Pack Rev 1.0 http://www.amperordirect.com Page 1 Preface Dear Reader, Thanks for your interest in checking out the HDX-BD1. This information pack is by no means an exhaustive “Bible” that explains every detail and feature, but rather my own interpretations and discoveries as an HDX-BD1 user. If you are still in the middle of your purchase decision making process, please read the first half of this document carefully. The HDX-BD1 is indeed a powerful media playback device. However, like other cutting edge products, it has its own limits. You need to first make sure HDXBD1 can meet your basic media playback requirements. You can then use the HDX-BD1 happily every day, and enjoy the constant improvements delivered by the HDX design team, via firmware upgrades. If you are a new HDX-BD1 owner, please jump to second half (starting from the “recommended system” chapter) directly. Beginning from unpacking the box, I’ll lead you through the set up process by both text and graphics. Hopefully, at the end of this document, you will have developed a good handle on your new toy. If you are an advanced HDX-BD1 user, you might already know everything described here. However, please still glance through the document and send me your comments. Your feedback is very important. You might help save a lot of trial-and-error time for your fellow HDX-BD1 users in setting up the machine. Update 2010-0623: HDX has released the firmware version 4.18.1. Users have reported that this version enables the DVD iso Network stream and playback function using NFS. I’ll try the firmware myself and publish an updated version soon. Sincerely Yours, Howard Chang PS. I’m not a native English speaker, so please bear with my occasional improper English writing skill. (For example, I wrote “please bare with me…” at the first place.) http://www.amperordirect.com Page 2 Table of Contents Preface ............................................................................................................................................ 2 Introduction .................................................................................................................................... 4 Hardware Specifications ................................................................................................................. 4 Software Specifications................................................................................................................... 5 Beyond the Specifications ............................................................................................................... 6 Recommended System ................................................................................................................... 7 Package Includes ............................................................................................................................. 8 The Back I/O Panel and the Root Menu of the User Interface ....................................................... 9 Setup the Internal HDD ................................................................................................................. 11 Upgrade the firmware .................................................................................................................. 13 Go through the Setup Menu ......................................................................................................... 14 Transfer Contents into / out of the HDX-BD1 ............................................................................... 20 File Navigation using the HDX-BD1 UI .......................................................................................... 21 Basic Remote Operation ............................................................................................................... 21 Playback the Contents Stored in an External USB Storage Device ............................................... 22 Stream and Playback ..................................................................................................................... 23 What’s Next .................................................................................................................................. 24 Appendix A.: How to Downgrade the Firmware ........................................................................... 25 http://www.amperordirect.com Page 3 Introduction HDX-BD1 is the next generation product of the award winning media streamer, HDX 1000. Like its predecessor, HDX-BD1 aims to provide an easy way to playback your digital content library on the big screen TV. With the upgraded hardware components, HDX-BD1 can now deal with Blue Ray movies, and provides faster user interface response and file navigation time. Additionally, HDX has made a bold move by developing its own system software: HDX Voir, instead of using the NMT software from Syabas like they did in the HDX 1000. There are good and bad qualities of this decision. We’ll discuss them in the later chapter. Hardware Specifications Chipset: o Sigma Designs SMP8642, 667MHz CPU with floating point coprocessor. Memory: o 512MBytes DDR2 DRAM o 256MBytes NAND Flash o 1GB internal flash drive (for BDLive or other content) Audio/Video Outputs: o HDMI v1.3a supports deep color and true HD audio enjoyment o Component Video o Composite Video o Stereo Analog Audio o S/PDIF Optical and Coaxial Digital Audio Interface: o Power button via remote with standby and reset button o 2x USB 2.0 host in the back o 1x SATA (one occupied by HDD tray) o 1x eSATA (for external HDD or BD Rom Connectivity) o 3.5" HDD tray Network: o Gigabit Ready LAN adapter http://www.amperordirect.com Page 4 Power: o 100~240V AC, 50~60 Hz, max 2.5A usual power consumption o 10 W (no device connected) o maximum power consumption: 36 W Footprint: o Width x Depth x Height : 170mm x160mm x 50mm (6.69" x 6.29" x 1.96") Weight: o 1kg (2lbs 2oz) Software Specifications Connectivity: o Bonjour, UPnP SSDP, UPnP AV, Windows Media Connect, Windows Media Player NSS, Samba, NFS o UPNP Media Servers: TVersity, Twonkymedia o BitTorrent P2P o Usenet downloader o NAS Access : SMB, NFS, FTP Video containers: o MPEG1/2/4 Elementary (M1V, M2V, M4V) o MPEG1/2 PS (M2P, MPG, DAT, VOB) o MPEG2 Transport Stream (TS, TP, TRP, M2T, M2TS, MTS) o AVI, ASF, WMV o Matroska (MKV) o MOV (H.264), MP4 o AVS Video Decoders: o XVID SD/HD o MPEG-1 o MPEG-2 MP@HL o MPEG-4.2 ASP@L5, 720p, 1-point GMC o MPEG-4.10 (H.264) : BP@L3, [email protected], [email protected], [email protected] o WMV9 : MP@HL o SMPTE 421M (VC-1) : MP@HL, AP@L3 Audio Containers: http://www.amperordirect.com Page 5 o AAC, M4A, MPEG audio (MP1, MP2, MP3, MPA), WAV, WMA, FLAC, OGG, APE Audio Decoders: o Dolby Digital, DTS, WMA, WMA Pro, MPEG-1 Layer 1, 2, 3, MPEG-4 AAC-LC, MPEG-4 HEAAC, MPEG-4 BSAC, LPCM, FLAC, Vorbis Audio Pass-Through: o DTS, DTS-HD HR, DTS-HD MA o Dolby Digital, Dolby Digital Plus, Dolby True HD Other Formats: o ISO, IFO navigation o AVCHD navigation o Blu-ray** ready (requires addition of compatible external BD-ROM) Photo Formats: o JPEG, BMP, PNG, GIF, TIFF Subtitle Formats: o SRT, MicroDVD SUB, SSA, SUB/IDX Beyond the Specifications As the specification suggests, HDX-BD1 has the potential to become a great media player / streamer. Has HDX delivered a machine which can live up to its full potential? The answer is: it depends. Based on the way you use HDX-BD1, you might have different feelings about the product. A perfect machine to playback the local stored contents: If you plan to install an HDD inside the HDX-BD1 and aren’t against the concept of using the internal HDD as the intermediate content storing location, this is the right machine for you. Despite its somewhat trailing network capability, HDX-BD1 does a wonderful job for playback of the local stored contents. It supports a wide range of media format playback, including the most resource demanding .mkv HD content. It can output the HD audio and can do dts-downmixing well. Among all the current generation media players / streamers, HDX-BD1 users report the least amount of Audio / video sync issues. You just need to take time to ftp the contents in and out of the machine, or remove the HDD from HDX-BD1 and perform the file maintenance task externally. Works with UPNP media server and can playback BDMV format: http://www.amperordirect.com Page 6 If you are new to this media player / streamer concept, HDX-BD1 can work for you, too. You can use AnyDVD_HD to backup Blue Ray movies into BDMV format (or backup DVD movies into .vob format), store the backups in a convenient place, install an UPNP media server on your computer (or enable the UPNP media server on your NAS), and playback the movies on your big screen TV. I still recommend installing an internal HDD on your HDX-BD1 to enjoy the full potential of the machine. However, using UPNP media server can be a workaround, before HDX can sort out the network issues using other communication protocols, such as the NFS and Samba. I know mastering the whole procedure can involve a deep learning curve. But, a clear quick start guide is what you will find in the second half of this information pack. UPNP protocol cannot recognize .iso format content: If you have already collected a huge pile of backup movies, using the most popular .iso format, you need to think twice before purchasing an HDX-BD1. Currently, UPNP protocol cannot recognize .iso format files. HDX-BD1 can recognize .iso format files using another media server, such as the NFS or Samba. But, the stream and playback results over the network in such setups are unacceptable. Slow responding and stuttering in playback can be experienced. Although some advanced users reported that they can solve the issues by tweaking the network settings, there is still no clear document in guiding others to work on the issue. It sounds to me like the firmware is not stable to work in these conditions and there are still compatibility issues in both software and hardware. Can work as a Bit torrent stand-alone downloading machine: Bit torrent downloading is enabled in the latest firmware: 4.1.4 update. I have not tried this function myself while writing this information pack. If the Bit torrent downloading function can work as advertised, HDX-BD1 will be a good alternative to download contents from the Internet. Now-a-days, the big public Bit torrent portals, such as mininova and isohunt, are forced to take off the copyrightedprotected materials. If you switch to those private invitation based torrent sites, you need to maintain a certain download / upload ratio. You can turn-off your computer at night and use HDX-BD1 to work as a stand-alone Bit torrent downloading machine, to save some power and fulfill the upload requirement while you are asleep. In conclusion, HDX-BD1 is a wonderful media playback device. You can use it as a stand-alone Bit torrent downloading machine. However, the content streaming function over the network can still use lots of improvement. Recommended System http://www.amperordirect.com Page 7 Based on the findings in the previous chapter, I recommend having this system setup if you are considering using the HDX-BD1: 1. HDX-BD1 (w firmware update to 4.9 version) 2. Install an internal HDD onto the HDX-BD1. The Western Digital Caviar Green 2TB is a good candidate for the internal HDD for its good capacity to cost ratio, and less heat generation feature. The HDD needs to be partitioned into ext3 format to allow remote FTP access. 3. Install the Tversity (free version) or TwonkyMedia (paid version, but is cheap and under $20) UPNP server on your computer for network streaming function. 4. A good FTP client software, such as Filezilla (free version), on your computer. 5. (Optional) Install AnyDVD_HD on your computer to backup movies. HDX-BD1 Recommended System Operation Block Diagram Package Includes OK. If you decide to continue reading into the 2nd half of this information pack, that means you either own a HDX-BD1 and need some help to setup the machine, or have some interests in purchasing one. Be sure to check out AmperorDirect’s HDX-BD1 product page if you need an HDX-BD1! http://www.amperordirect.com Page 8 The first thing you need to do when you receive your HDX-BD1 is to check the package contents and make sure all of the included accessories are in the box. The included accessories are: HDX-BD1 main machine. Remote HDMI cable AC power adapter 4pcs rubber pad A paper user manual Everything in the Retail Box except the HDX-BD1 itself If you are still using an old analog CRT TV, you need to prepare your own composite cable set. Besides, it has become a hassle to transport batteries from China to US. Therefore, the HDX-BD1 package does not include batteries for the remote. But, it is not hard to find a pair of AAA batteries, right? Yes, there is a manual in the package. But, the manual is way too simple to help new users. The Back I/O Panel and the Root Menu of the User Interface It’s time to hook up your new toy and give it a run. You first need to connect all the cables to the back panel. Please see the below picture for illustration. http://www.amperordirect.com Page 9 Ports at the HDX-BD1 Back Panel The HDX-BD1 does not come with a hard switch for power on / off. This first worries me because what if the system freezes in the middle of operation? I don’t want to go re-cycle the power cable input from the AC power adapter! However, my concern turned out to be unnecessary. I have used the HDX-BD1 for a month now. There was no single time that power button on the remote could not reset the machine. Below, you will see the UI root menu and the explanation of each icon on the screen. http://www.amperordirect.com Page 10 HDX-BD1 UI Root Menu Icons Explained Setup the Internal HDD The following installation steps are based on the assumption that you have bought the entire recommended HDX-BD1 set. Again, having the recommended set is the best way to use HDX-BD1. If you own a HDX-BD1 and don’t have an internal HDD installed, you need to consider getting one. Step 1: Create the three Linux partitions on your brand new HDD Although HDX states that HDX-BD1 can read both NTFS and Ext3 format, it is suggested to use the Linux format for future ftp access and content downloading purposes. Why I said: “brand new HDD”? I doubt the existing contents can stay in the HDD and be recognized by HDX-BD1 after you somehow transfer the old HDD into the required format. It is better to use a brand new HDD or backup / re-format your old HDD and start out fresh. As of May 2010, HDX does not ship HDX-BD1 with the application to format the installed internal HDD. You will need to format the HDD via computer before installing it into the HDX-BD1. The HDD needs to have three partitions: 1. Linux Ext3, minimum 256MB. 2. Linux SWAP, minimum 512MB. 3. Linux Ext3 for the remaining space. The software I use is the Paragon Partition Manager. Unfortunately, the free demo version does not support Linux partition. You will need to buy the paid version to be able to do so. (If you buy the HDD from AmperorDirect, you can request the free service to pre-format your HDD.) OK, you have the HDD partitioned into the required segments. The next step is to check the firmware version of your HDX-BD1. It needs to be at version 9.2.1.4.8.0. Press the “setup” button on the remote. On the setup page, navigate down to the firmware section. You should be able to see the version here. http://www.amperordirect.com Page 11 If you have a newer version of firmware, please use the steps in appendix A. to downgrade to version 4.8. If it is version 4.8, congratulations, you are ready to install the HDD. Unlike the previous generation HDX-1000, HDX-BD1 has a HDD Bay built-in. You don’t even need to get a hold of a screw driver to unscrew anything this time! Slide the side HDD cover metal sheet toward the “open” direction as shown in the below picture. Insert the HDD into the HDD bay. Make sure the HDD is not upside-down, or you might damage the HDD and the bay. HDD Installation Compartment. Connect the SATA cable, push the HDD all the way into the bay, slide back the side HDD cover metal sheet and you are done. http://www.amperordirect.com Page 12 HDD installed. Beware of the installation direction. Upgrade the firmware Currently, your HDX-BD1 cannot access the firmware update files via Internet. You need to use a USB thumb drive to perform the update. The 4.9 version firmware can be found here. Download the firmware and unzip it to the root directory of a USB thumb drive. Restart your HDX-BD1 with the USB thumb drive plugged into one of the two USB ports on the back panel. Press the “setup” button on the remote. On the setup page, navigate down to the firmware section. Click on the “Upgrade” button and the process will be started. Please note the upgrade process cannot be started if you have used HDX-BD1 to do some other things after the system boot-up. You will see a message saying: “Played AV after boot. Disable upgrade. Reboot then upgrade directly.” This just means you need to re-start the HDX-BD1 with the USB thumb drive plugged in. http://www.amperordirect.com Page 13 After the update has run for some time, the HDX-BD1 will ask you to re-cycle the power button on the remote. Your system will be brought to the 4.9 version after it successfully boots up. Go through the Setup Menu If you believe in simple, you will be happy when you see the HDX-BD1 setup screen. There are not many knobs to tweak and you can set most of the settings without reading the manual. I will list the set up options below: Audio o Channel 5.1 / 7.1 Stereo o Digital Decode Internal S/PDIF Bypass HDMI Bypass http://www.amperordirect.com Page 14 If you have a receiver and you want the receiver to decode the HD sound, please pick either “HDMI Bypass” or “S/PDIF Bypass” depending on the way you send audio signal from your HDXBD1 to your receiver. Video o HDMI / YPbPr 480P / 576P 720P 1080I 1080P o Frame Rate 50Hz / Pal 60Hz / NTSC 24Hz o Aspect Ratio Auto 16:9 4:3 o Play Mode General Intelligent Play BD Navi http://www.amperordirect.com Page 15 You can pick the options that work best with your audio / video equipment. The only item that needs to be explained is the “Play mode”. The “General” selection means you can browse the movie folder in the UI and pick one of the .m2ts A/V stream in a Blue Ray movie backup to start with. The “Intelligent Play” means the movie will start immediately when you navigate to the root folder of a movie. You don’t need to find the right .m2ts stream to play anymore, as there always is a commercial or special features A/V stream in the same BDMV folder where the main movie stream is located at. The “BD Navi” means the movie will start immediately by going into the movie menu when you navigate to the root folder of the movie. It might take longer for the movie to begin because the HDX-BD1 needs to load the menu information into the system, but the “pop menu” and “Title” button on the remote will work during the playback and bring you to the selected movie menu. I found the “Intelligent Play” option is the better fit for me because I want the movie to start faster. However, if you are a person who wants to watch every special feature on a movie, you can pick the “BD Navi” option. System o Language English Traditional Chinese o Subtitle http://www.amperordirect.com Page 16 o o o Traditional Chinese Simplified Chinese English Thai Deutsch Russian France Netherlands Espanol Italian Portuguese Hebrew Vietnamese Turkish Japanese Korean Romanian Photo Single File Multi File Slide Show Loop Play Single Loop Time Setting Slides Span __ sec. Saver Delay __ sec. http://www.amperordirect.com Page 17 Not much to explain here. Network o IP Policy DHCP Static o IP Address o Subnet Mask o Gateway o DNS Address http://www.amperordirect.com Page 18 No much to explain here, either. Firmware You can check your firmware version here or update the firmware using the steps listed in the previous chapter. http://www.amperordirect.com Page 19 Transfer Contents into / out of the HDX-BD1 The primary way I use to transfer contents into / out of the internal HDD of my HDX-BD1 is by using the FTP service. If you have followed the previous chapters to setup an HDD with the three Linux partitions in your HDX-BD1, the only thing you need now is an FTP client software installed on your computer. The software I use is called Filezilla. You can download the free software at here. The FTP client software on your computer will need the following information to access the HDD installed in HDX-BD1: IP Address: Go to Setup > Network, you will find the IP address assigned to your HDX-BD1. Sometimes, if you are using DHCP service, the IP address might be changed after each system reset. Please be sure to check the IP address again before using the FTP service. The default user name is ftpuser and the password is 1234. My FTP client setting After you successfully access the HDD remotely by using an FTP client software, you should be able to drag and drop contents into the related Apps / Music / Photo / Video folders. Those folders reside in the 3rd partition of your HDD. In the next chapter, you will learn how to navigate to those files in the HDXBD1 UI. http://www.amperordirect.com Page 20 File Navigation using the HDX-BD1 UI The icons in the UI root menu are explained in the chapter 3. In our case, the movies are stored in the internal HDD. Therefore, you need to click on the icon: to access your contents. After clicking on the internal HDD icon, you can see four folders popping up: csi_hd, hda1, hda2 and hda3. Hda1 to hda3 represent the Linux partition1 to partition3 on the internal HDD. All the movies you have just ftp into the HDD are stored in the hd3 (partition 3). This is why the HDX design team creates a mirror folder: csi_hd for easy access purposes. If there is no special reason, you can ignore the hda1, hda2 and hda3 folder and use the csi_hd folder solely. The operation after selecting the csi_hd folder is straight forward. Just click on one of the Apps / Photo / Music / Video folders and you will find the content you want to playback. Basic Remote Operation http://www.amperordirect.com Page 21 The basic remote operations such as playback, pause forward and stop are straight forward, too. What you see on the description of the button on the remote is what you can expect to happen if you press that button. Here are some notes to help you better use the remote: While performing the file navigation in UI, the “ROOT MENU” button will bring you back to the root menu of the UI. If you are playing-back a movie, pressing the “ROOT MENU” will sometimes bring you to the title menu of the movie and sometimes will result in no action. If you want to go back to the UI root menu, you need to “STOP” the movie and then click on the “ROOT MENU”. The “NEXT” (chapter) button sometimes doesn’t work during the FBI warning and the commercial movie preview sections at the beginning of the movie. You need to use “FWD” to fast-forward and get pass these sections. Sometimes, when you press the “SUBTITLE” button during the movie playback, the system will jump directly to the 2nd built-in subtitle. Don’t panic and think the HDX-BD1 will not display the English subtitle. You just need to keep pressing the “SUBTITLE” button until the system finishes showing the various kinds of built-in subtitles and goes back to the 1st one. The “REV” button does not always work. For some movie backups, pressing the “REV” button during playback will stop the movie. You can try to use the “TIME SEEK” button to go back to the certain time frame and restart the movie from there. Playback the Contents Stored in an External USB Storage Device If you have survived all the way to this chapter, you have achieved the basic understanding of your HDXBD1. Congratulations! Now, go play some high definition movies and see what the HDX-BD1 can do for you. Thinking about building up your Blu Ray movie jukebox? No problem. As long as you know how to backup the BD movies, you have the right equipment: HDX-BD1 with an internal HDD installed, to do so now. There are other ways to use HDX-BD1 to playback your digital contents. First, you can store the contents on an external drive. It can be an HDD or an USB thumb drive. (But, you will need to find a 50GB USB thumb drive to store the BD movie backup…). Anytime you want to playback the contents, you can move the USB drive to where your HDX-BD1 is located, connect the USB drive to the USB port of the HDX-BD1, and use the HDX-BD1 to playback the contents. The icon: , in the UI root menu, represents the external USB device. Click on it and you can start to navigate through the folders in the external USB device. http://www.amperordirect.com Page 22 Stream and Playback The network streaming and playback function is where the HDX-BD1 can use a lot of improvement. Currently, on firmware 4.9, the suggested way to do this function is to install an UPNP media server on your computer (or enable the UPNP server on your NAS) so that the HDX-BD1 can successfully communicate with your computer. The drawback is the UPNP protocol cannot handle the .iso format files. You will need to backup your movies into the BDMV or .vob format. The UPNP media server I am currently using is the Twonky Media server. It was suggested by the HDX engineer for its better handling of the non-English language. Although it is a paid version, it is really not expensive and costs me only $15 dollars. PacketVideo, the designer of the Twonky Media Server, has a clean installation guide on Youtube: http://www.youtube.com/watch?v=LVjQR1F5IEM. If you need help, you can check out the video. Twonky Media Server I have also tried the free Tversity UPNP media server. It is not difficult to setup and will work right, also. The icon: , in the UI root menu, represents the network storage locations. Click on it and select the UPNP folder. On the new page, you will see all of the UPNP media servers available on your Network. Select the one running on your computer and you can browse to the movie you want to playback. Just http://www.amperordirect.com Page 23 one quick note in file navigation: after selecting “Video” folder, don’t click on the “All” folder. While using AnyDVD_HD to back up a Blu Ray movie, it will save the movie into several audio / video .m2ts streams. Those streams use the same naming mechanism: 000001.m2ts, 000002.m2ts…, and won’t change among different movies. If you take the short cut to click on the “All” folder, you will very likely see several duplicated 00000x.m2ts files in the “All” folder and won’t know which one is which. It is better to navigate via the “Folders” option. Found the Twonky Media Server on my computer What’s Next As stated in the beginning, HDX-BD1 is equipped with powerful hardware components and has the potential to become a top-of-the - line product for this generation Media Player / Streamer. What HDX needs to do is to speed up the firmware improvement so the HDX-BD1 can live up to its full potential. If you own an HDX-BD1, you need to constantly check out the following places: AmperorDirect.com. (Do I need to mention this?) Hdx1080.com: to check the status of the new firmware development and chat with other HDXBD1 power users. http://www.amperordirect.com Page 24 Going through the list, you might have already seen some negative comments about the HDX-BD1. Apparently, there are some communication issues. Users are getting anxious because of the delay of the new firmware publishing date and the silence of the HDX people on the official forum. The good news is that there are really friendly advanced users, such as Roelio on the hdx1080 forum, who are willing to help. Besides, after reading this document up to this point, I think you have established the right expectation about what you will get from the machine and have a clear path forward to setup your HDXBD1. According to the information in the HDX1080 forum, HDX is currently working on: BD-ROM compatible list Manual IP input for share drive, SAMBA and NFS. (With user/pass) Hard drive installation wizard with support for BT transmission and Usenet Input Localized language GUI and filename support Auto frame rate improvements Wireless support through USB Adapter (T Plink WN821N) YAM J or other similar jukebox support Internet Content delivery Improve network streaming capability In addition, they are fixing the following bugs with: advanced audio coding mp3 and flac playback *.ISO Support UTF-8 Dutch Subtitles the small letter l (L) is written as big letter i (I) The good news is, beta testers have reported some major progress, such as the capability to playback DVD iso format files over the NFS network, in the upcoming version firmware. Hopefully, the new firmware will be published soon to offer better media streaming and playback over the Network. Appendix A.: How to Downgrade the Firmware to version 4.8 The 4.8 version firmware can be found here. Download the firmware and unzip it to the root directory of a USB thumb drive. Restart your HDX-BD1 with the USB thumb drive plugged into one of the two USB ports on the back panel. Press the “setup” button on the remote. On the setup page, navigate down to the firmware section. Click on the “Upgrade” button and the process will be started. http://www.amperordirect.com Page 25 Please note the upgrade process cannot be started if you have used HDX-BD1 to do some other things after the system boot-up. You will see a message saying: “Played AV after boot. Disable upgrade. Reboot then upgrade directly.” This just means you need to re-start the HDX-BD1 with the USB thumb drive plugged in. After the update has run for some time, the HDX-BD1 will ask you to re-cycle the power button on the remote. Your system will be brought to the 4.9 version after it successfully boots up. http://www.amperordirect.com Page 26