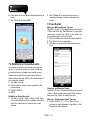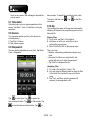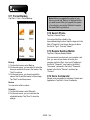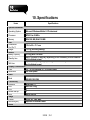
1
Regulatory Agency Identifications
For regulatory identification purposes, your product is assigned a model number of S1205.
To ensure continued reliable and safe operation of your device, use only the accessories listed below with your
device.
Note:
This product is intended for use with a certified Class 2 or Class 3 Limited Power Source, rated 5 Volts
DC, maximum 1 Amp power supply unit.
European Union Notice
Products with CE marking comply with the R&TTE Directive (99/5/EC), the EMC Directive (89/336/EEC), and
the Low Voltage Directive (73/23/EEC) & (2006/95/EC) issued by the Commission of the European
Community.
Compliance with these directives implies conformity to the following European Norms (in parentheses are the
equivalent international standards)
• EN 60950-1 (IEC 60950-1)
Safety of Information Technology Equipment.
• ETSI EN 301 511
Global system for mobile communications (GSM); Harmonized EN for mobile stations in the GSM 900 and
GSM 1800 bands, covering essential requirements of article 3.2 of the R&TTE directive (1995/5/EC).
• ETSI EN 301 489-1
Electromagnetic compatibility and Radio spectrum Matters (ERM); ElectroMagnetic Compatibility (EMC)
standard for radio equipment and services; Part 1: Common technical requirements.
• ETSI EN 301 489-7
Electromagnetic compatibility and Radio spectrum Matters (ERM); ElectroMagnetic Compatibility (EMC)
standard for radio equipment and services; Part 7: Specific conditions for mobile and portable radio and
ancillary equipment of digital cellular radio telecommunications systems (GSM and DCS).
• ETSI EN 301 489-17
Electromagnetic compatibility and Radio spectrum Matters (ERM); ElectroMagnetic Compatibility (EMC)
standard for radio equipment and services; Part 17: Specific conditions for 2.4 GHz wideband transmission
systems and 5 GHz high performance RLAN equipment.
S1205│ 0-3
Safety Information
This chapter contains important information on safe and efficient operation. Please read this information before
using the device.
Exposure to Radio Frequency (RF) Energy
The device contains a transmitter and a receiver. When it is ON, it receives and transmits RF energy. Please
use the device appropriately.
Specific Absorption Rate Data
The Max SAR value for this device when tested for use at the ear NCC Max. SAR measurement
GSM 900 MHz: 0.606 W/kg。
DCS 1800 MHz: 0.339 W/kg。
Road Safety
Check the laws and regulations on the use of phones in the area where you drive. Do NOT use this device
unless you use hands-free operation while driving or riding.
Potentially Explosive Atmospheres
Turn off your phone prior to entering any area with a potentially explosive atmosphere such as gas stations,
explosive chemicals, or flammable objects.
Aircraft Safety
While in flight, turn off the functions of Wi-Fi, Bluetooth, Phone, and GPRS. When instructed to do so, turn off
your phone when on board an aircraft.
Facilities
Turn off the device in any facility where posted notices instruct you to do so. These facilities may include
hospitals or health care facilities that may be using equipment that is sensitive to external RF energy.
Approved Accessories and Batteries
Use only original or manufacturer approved accessories, batteries and chargers.
S1205│ 0-2
Copyright
All mobile products by GIGA-BYTE COMMUNICATIONS INC. mentioned in this document, including the
device, accessories, software, text, music, and pictures, are owned by, or authorized by original manufacturers
to GIGA-BYTE COMMUNICATIONS INC. Reproduction, transfer, distribution, or storage of part or all of the
contents in this document in any form without the prior written permission of GIGA-BYTE COMMUNICATIONS
INC. is prohibited.
GIGA-BYTE Group, GIGA-BYTE COMMUNICATIONS INC.
S1205│0-1
• ETSI EN 300 328
Electromagnetic compatibility and Radio spectrum Matters (ERM); Wideband Transmission systems; data
transmission equipment operating in the 2.4 GHz ISM band and using spread spectrum modulation
techniques.
Safety precautions for RF exposure
• Use only original manufacturer-approved accessories, or accessories that do not contain any metal.
• Use of non-original manufacturer-approved accessories may violate your local RF exposure guidelines and
should be avoided.
Exposure to Radio Frequency (RF) Signals
Your device contains a radio transmitter and receiver. The radiated output power is far below the international
radio frequency exposure limits. These limits are part of comprehensive guidelines and establish permitted
levels of RF energy for the general population. The guidelines are based on the safety standards previously set
by international standards bodies:
• American National Standards Institute (ANSI) IEEE. C95.1-1992
• National Council on Radiation Protection and Measurement (NCRP). Report 86. 1986
• International Commission on Non-Ionizing Radiation Protection (ICNIRP) 1996
• Ministry of Health (Canada), Safety Code 6. The standards include a substantial safety margin designed to
assure the safety of all persons, regardless of age and health.
The exposure standard for wireless mobile phones employs a unit of measurement known as the Specific
Absorption Rate, or SAR. The standard incorporates a substantial margin of safety to give additional protection
for the public and to account for any variations in usage.
As with other mobile radio transmitting equipment, users are advised that for satisfactory operation of the
equipment and for the safety of personnel, it is recommended that no part of the human body be allowed to
come too close to the antenna during operation of the equipment.
Your device has an internal antenna. Use only the supplied integral antenna. Use of unauthorized or modified
antennas may impair call quality and damage the phone, causing loss of performance and SAR levels
exceeding the recommended limits as well as result in non-compliance with local regulatory requirements in
your country.
To assure optimal phone performance and ensure human exposure to RF energy is within the guidelines set
forth in the relevant standards; always use your device only in its normal-use position. Do not touch or hold the
antenna area unnecessarily when placing or receiving a phone call. Contact with the antenna area may impair
call quality and cause your device to operate at a higher power level than needed. Avoiding contact with the
S1205│ 0-4
antenna area when the phone is IN USE optimizes the antenna performance and the battery life.
Telecommunications & Internet Association (TIA) safety information
Pacemakers
The Health Industry Manufacturers Association recommends that a minimum separation of six inches be
maintained between a handheld wireless phone and a pacemaker to avoid potential interference with the
pacemaker. These recommendations are consistent with the independent research by and recommendations
of Wireless Technology Research. Persons with pacemakers:
• Should ALWAYS keep the phone more than six inches from their pacemaker when the phone is turned ON.
• Should not carry the phone in a breast pocket.
• Should use the ear opposite the pacemaker to minimize the potential for interference. If you have any reason
to suspect that interference is taking place, turn the phone OFF immediately
Hearing Aids
Some digital wireless phones may interfere with some hearing aids. In the event of such interference, you may
want to consult your service provider, or call the customer service line to discuss alternatives.
Other Medical Devices
If you use any other personal medical device, consult the manufacturer of your device to determine if they are
adequately shielded from external RF energy. Your physician may be able to assist you in obtaining this
information.
Turn the phone OFF in health care facilities when any regulations posted in these areas instruct you to do so.
Hospitals or health care facilities may be using equipment that could be sensitive to external RF energy.
WEEE Notice
The Directive on Waste Electrical and Electronic Equipment (WEEE), which entered into force as European
law on 13th February 2003, resulted in a major change in the treatment of electrical equipment at end-of-life.
The purpose of this Directive is, as a first priority, the prevention of WEEE, and in addition, to promote the
reuse, recycling and other forms of recovery of such wastes so as to reduce disposal.
The WEEE logo (shown at the left) on the product or on its box indicates that this product must not be disposed
of or dumped with your other household waste. You are liable to dispose of all your electronic or electrical
waste equipment by relocating over to the specified collection point for recycling of such hazardous waste.
Isolated collection and proper recovery of your electronic and electrical waste equipment at the time of disposal
will allow us to help conserving natural resources. Moreover, proper recycling of the electronic and electrical
waste equipment will ensure safety of human health and environment. For more information about electronic
and electrical waste equipment disposal, recovery, and collection points, please contact your local city center,
S1205│ 0-5
household waste disposal service, shop from where you purchased the equipment, or manufacturer of the
equipment.
RoHS Compliance
This product is in compliance with Directive 2002/95/EC of the European Parliament and of the Council of 27
January 2003, on the restriction of the use of certain hazardous substances in electrical and electronic
equipment (RoHS) and its amendments.
S1205│ 0-6
General Information
This chapter contains important information on safe and efficient operation. Please read this information before
using the device. Ignorance of the following notices may lead to violations of the law.
•
•
•
•
•
•
•
•
•
•
•
•
•
•
•
Before using the device, please make sure you have fully charged the battery.
Do NOT remove the battery from the device during charging.
Before inserting SIM card into the device, make sure that the device is switched off.
Do NOT attempt to dissemble the device on your own. This should be done by an authorized person.
Use the device in accordance to instructions when in public facilities.
In some countries, it is a violation against the law to record phone conversations. Always ask permission of
the other party when you are going to record a conversation.
To protect your ears, turn down the volume before you use stereo headsets or other audio devices.
To avoid damaging the touch screen and the device, do NOT apply excessive pressure on them, and
remove the device from your pants’ pocket before you sit down. It is also recommended that you only use
the stylus or your finger to interact with the touch screen. It is not covered by the warranty that you crack the
touch screen because of the improper usage.
When you use the device for a long time, such as talking on the phone, browsing online, or charging the
battery, the device may become warm. In most cases, this condition is normal.
Refer servicing to the provider, or an authorized technician under the following conditions: 1. The device
has been damaged. 2. When you follow the instructions to use your device, it does not operate normally. 3.
The device has been exposed to water. 4. Liquid has been spilled or an object has fallen onto the device.
Do Not push unauthorized objects into slots and openings in your device.
The device should be placed away from heat sources such as stoves, radiators, heat registers, or other
products that produce heat.
Condensation may form on or within your device, when you move your device between environments with
very different temperature and/or humidity ranges. To avoid damaging your device, make the moisture to
evaporate before you use the device.
To avoid damaging your device, do Not put your device on an unstable table, stand, bracket, or other
places.
Before you clean your device, unplug it, please. Use a damp cloth for cleaning, but do Not use water, liquid
cleaners, or aerosol cleaners to clean the touch screen.
S1205│ 0-7
Table of Contents
Copyright .................................................................................................................................................... 0-1
Safety Information ...................................................................................................................................... 0-2
Regulatory Agency Identifications .............................................................................................................. 0-3
General Information .................................................................................................................................... 0-7
Chapter 1 Getting Started ........................................................................................................................ 1-1
1.1 Device Information................................................................................................................................ 1-1
1.2 Battery .................................................................................................................................................. 1-3
1.3 SIM Card .............................................................................................................................................. 1-3
1.4 Lock/Unlock .......................................................................................................................................... 1-4
1.5 Screen Orientation................................................................................................................................ 1-4
1.6 Display Information ............................................................................................................................... 1-5
Chapter 2 Phone Functions ..................................................................................................................... 2-1
2.1 Use Your Phone ................................................................................................................................... 2-1
2.2 Receive/Ignore a Call ........................................................................................................................... 2-1
2.3 Call History ........................................................................................................................................... 2-1
2.4 Other Information.................................................................................................................................. 2-3
Chapter 3 Input ......................................................................................................................................... 3-1
3.1 Input Method ........................................................................................................................................ 3-1
3.2 Draw on the Screen .............................................................................................................................. 3-2
3.3 Record a Message ............................................................................................................................... 3-3
Chapter 4 Settings .................................................................................................................................... 4-1
4.1 Personal ............................................................................................................................................... 4-1
4.2 System ................................................................................................................................................. 4-2
Chapter 5 Synchronization ...................................................................................................................... 5-1
5.1 About ActiveSync ................................................................................................................................. 5-1
5.2 Install and Use ActiveSync ................................................................................................................... 5-1
5.3 Synchronize via Bluetooth .................................................................................................................... 5-2
Chapter 6 Getting Connected .................................................................................................................. 6-1
6.1 Internet Access ..................................................................................................................................... 6-1
6.2 GPRS Connection Settings .................................................................................................................. 6-1
6.3 Bluetooth Wireless Transmissions........................................................................................................ 6-2
6.4 Internet Sharing .................................................................................................................................... 6-2
6.5 Wi-Fi ..................................................................................................................................................... 6-3
6.6 USB To PC ........................................................................................................................................... 6-3
6.7 Domain Enroll ....................................................................................................................................... 6-3
S1205│ 0-8
6.8 Beam .................................................................................................................................................... 6-4
Chapter 7 Messaging ............................................................................................................................... 7-1
7.1 SMS\MMS ............................................................................................................................................ 7-1
7.2 Establish an E-mail Account ................................................................................................................. 7-2
7.3 Use E-mail ............................................................................................................................................ 7-2
7.4 Synchronously Process E-mail ............................................................................................................. 7-2
7.5 Use Push E-mail ................................................................................................................................... 7-3
7.6 Messenger............................................................................................................................................ 7-4
Chapter 8 Multimedia ............................................................................................................................... 8-1
8.1 Camera................................................................................................................................................. 8-1
8.2 Video Mode .......................................................................................................................................... 8-2
8.3 Pictures & Videos ................................................................................................................................. 8-2
8.4 JAVA .................................................................................................................................................... 8-3
8.5 FM Radio .............................................................................................................................................. 8-3
8.6 Photo Album ......................................................................................................................................... 8-3
Chapter 9 Applications ............................................................................................................................ 9-1
9.1 Calendar ............................................................................................................................................... 9-1
9.2 Contacts ............................................................................................................................................... 9-1
9.3 Tasks .................................................................................................................................................... 9-2
9.4 Microsoft Office Mobile ......................................................................................................................... 9-2
9.5 Windows Media Player ......................................................................................................................... 9-3
9.6 Internet Explore .................................................................................................................................... 9-4
9.7 Calculator ............................................................................................................................................. 9-5
9.8 Games .................................................................................................................................................. 9-5
9.9 Stopwatch ............................................................................................................................................. 9-5
9.10 Zip ...................................................................................................................................................... 9-5
9.11 Pocket Backup.................................................................................................................................... 9-5
9.12 Search Phone ..................................................................................................................................... 9-6
9.13 Remote Desktop Mobile ..................................................................................................................... 9-6
9.14 Voice Commander .............................................................................................................................. 9-6
Chapter 10 Specifications........................................................................................................................ 10-1
Chapter 11 FAQ ........................................................................................................................................ 11-1
S1205│ 0-9
1. Getting Started
1.1 Device Information
This section introduces you to the hardware of the
device.
4
Call Key
Press this key to make or
answer a call.
5
End Key
Press this key to end a call
or to return to Today
screen from any screen.
6
Confirm Key
7
8
9
No.
1
Touch Screen
Items
2
Windows Flag
Key
Functions
Display screen. Use stylus
to select items on screen.
Press to open Start menu
options.
3
Phone Settings
Key
Press to launch phone
settings screen
Select an icon on screen,
and then, press this key to
activate the function of that
icon.
The LED indicator
indicates the status of your
device by showing
different colors.
Red: Charging is
LED Indicator
activated.
Green: Mobile network is
detected.
Blue: Bluetooth, Wi-Fi,
GPS is activated.
The source of music and
Receiver/Speaker
voice.
Hold down this key for a
Power Key
few seconds to turn on/off
your device.
10 Micro USB slot
Use USB connector to
synchronize data with your
desktop PC, and transmit
data or charge the battery.
It is also a handset plug.
11 Headset Plug
You can listen to music via
headset.
S1205│ 1-1
hold down on a desired item
until the pop-up menu
appears.
12 Volume Key
13
Micro SD card
slot
14 Camera Key
Press the key to increase or
decrease the earpiece
volume during a call or
when playing music.
You can insert your Micro
SD card here.
Press this key to launch
camera.
15 Camera Lens
The Camera on the back of
the device supports
3-mega-pixel photo and
high-quality video.
16 Stylus
There are 2 ways to use
your stylus:
․Tap:Tap a desired item by
your stylus, and then, lift the
stylus from the screen.
․Press:Use your stylus to
No.
Items
Functions
Remove the battery cover,
and then, install the battery
and insert your SIM card into
the carrier.
17 Battery Cover
Remove the battery cover
and the stylus. Then you can
find the reset button. Press it
to reset your phone.
1.2 Battery
Your device comes with a removable and
rechargeable Lithium Polymer battery. The standby
time and talk time will vary depending on the local
network and individual usage.
S1205│ 1-2
Note: Using any battery pack or AC adapter
(charger) not specified/endorsed by GSmart
on this phone may be dangerous and may
invalidate any warranty and approval given to
the device. Unplug the charger from the
power supply when it is not in use.
Open Battery Cover
Push the battery cover upwards, and then, remove it.
Charging the Battery
Please make sure that the battery is installed and
fully charged when use your device for the first time.
You may charge the battery in the following ways:
1. Universal AC Adapter: Plug your AC adapter into
a suitable main power socket, and plug the
connector to the charging slot of your device. The
phone will start charging automatically.
2. USB Cable: Connect your device and your PC
with the USB cable supplied in your package.
Power On/Off
Press Power On/Off key on the top of the device to
turn on/off the device.
To reduce the power consumption of your device,
you may change the backlight duration and
brightness level.
period of time, the device enters Sleep Mode
automatically. You may also manually enter
Sleep mode by pressing Power Key. The
backlight of the screen will turn off and the device
will activate Sleep Mode. When your device is in
Sleep Mode, it will not respond to any operation
or touches on screen and on the keypad.
2. Press Power Key again to exit Sleep mode.
3. You may adjust time to activate Sleep Mode. The
device will enter Sleep Mode automatically, when
no operation is done within a period of time.
․Tap Start > Settings > Power > Advanced tab.
․Select your desired time period on “On battery
power” or “On external power”.
․Tap OK to complete this setting.
1.3 SIM Card
Before inserting/removing a SIM card, please make
sure that the device is turned off and is not
connected to any power supply.
1. Push the battery cover upwards, and then
remove it.
2. Find the SIM card slot on the upper section of the
device.
3. Insert the SIM card into the slot. The metal
contacts on the SIM please face down. There are
two slots for two SIM cards. Upper slot is for
SIM1, SIM2 slot is on the underside.
Tap Start > Settings > Power > Advanced tab, and
then, select the duration of the backlight. This
function helps you save power.
Battery Power
Tap Start > Settings > Power > Battery tab. The bar
indicates the remaining power of the battery.
Sleep Mode
1. Sleep Mode is a power saving mode designed to
reserve the power of the battery. After idling for a
4. Please always remember to pull down the SIM
card latch for locking your SIM card safely. If you
don’t pull down the SIM card latch, the device
S1205│ 1-3
won’t power on and battery cover can’t be pulled
back. The SIM card latch is on the upper-right
corner of the device.
5. Return the battery back to the battery slot, and
then, return the battery cover back onto the
device.
6. Push the battery cover back, and then, you will
hear “click”.
1.4 Lock/Unlock
1. Lock the device:
Tap Start > Lock to lock the device. The device
will not respond to touches on screen nor react to
any input on the keypad, when it is locked.
2. Unlock the device:
Slide Lock icon on the screen, and then, the
device will be unlocked.
Note: The Lock/Unlock procedure is based
on the lock display of Windows Default.
Advanced Lock Settings
You can create a personal password to lock your
device.
A strong password must have at least 7 characters
that are a combination of uppercase and lower case
letters, numerals, and punctuations.
1. Tap Start > Settings > Lock
2. To enable this function, select how long your
device must be turned off before the password is
required for using the device. Tap “Prompt if
phone unused for”.
3. Select the type of password you would like to use:
Strong alphanumeric or Simple PIN.
4. Enter the password, and type it again in Confirm
field.
5. On Hint tab, the system provides a hint for the
password in case you forget your password. This
hint may be visible by others.
6. On Display tab, you can change the unlock
display.
7. Tap OK to save the settings.
․If your device is configured to connect to network,
use a strong password to help protect network
security.
․If you forget your password, you must reset the
device. The reset function will erase all files, data,
and programs.
․If you have used ActiveSync to create a backup
file, all of your program data can be restored.
1.5 Screen Orientation
You can change the display of the screen. The
Portrait mode allows you to get a better view or a
better operation of certain programs on your device,
while Landscape may be optimal for viewing longer
text files. Tap Start > Settings > System > Screen >
General tab.
1. On General tab, select your desired orientation:
Portrait, Landscape (right-handed), or Landscape
(left-handed).
2. Tap OK, and the screen will be changed
accordingly.
S1205│ 1-4
certain programs and important information of
today. Tap Start > Settings > Today, you can
change the settings of Today screen.
4. Command Area
Depending on different mode, this area contains
different features such as menu options, Input
Method and commands to create or edit a file.
5. Pop-up Window
It allows you to access an item quickly. Tap the
selected item to perform an action. To cancel this
pop-up window, tap other areas of this screen.
Portrait
Landscape
1.6 Display Information
The main screen displays the following information:
1. Start Menu
Tap “Start” to open Start Menu. Tap Start > Today,
you can return to Today screen at any time.
2. Status & Icon Area
Display icons of notifications and the status of the
system. You can tap the icons to get the details of
the functions.
3. Today Screen
On Today screen, this area contains shortcuts to
S1205│ 1-5
E-mail
Contacts
Internet
Explorer
Getting
Started
Marketplace
Messenger
Start Menu
Icons
Microsoft My
Phone
Programs
Today
Descriptions
Switch to Today
Screen.
Settings
Help you adjust
your device.
Games
Camera, Pictures
& Videos, FM
Radio, Photo
Album, Windows
Media
Calculator, Zip,
Stopwatch,
Calendar,
RingtoneSettings,
Notes, ActiveSync,
Pocket Backup,
Adoebe Reader LE
Tasks
Multimedia
Tools
Phone
Text
Windows Live
Office Mobile
File Explorer
Search Phone
Phone functions.
SMS\MMS.
Help
S1205│ 1-6
SMS\MMS, Setup
E-mail.
Your contacts in
your device.
Help you Browse
online.
A quick guide for
some functions you
may use frequently.
Help you get more
applications.
Perform MSN.
My Phone service
synchronize your
data in your device
with you’re my
Phone account.
A search engine of
Microsoft.
Bubble Breaker,
Solitaire.
Help you track
unfinished tasks.
Word Mobile, Excel
Mobile, PowerPoint
Mobile, and
OneNote Mobile.
Manage the files in
your device and
storage card (if you
have).
Search for all data,
programs, and
files.
Help you use the
applications.
Connect, and
control your
desktop computer
from your device.
Remote
Desktop
Mobile
Search
Widget
Live Search.
Voice
Commander
Spb
Keyboard
Start programs and
functions with
voice.
Spb input method
and some options
Settings
Tap Start > Settings
Programs
Descriptions
Bluetooth
Settings for Bluetooth functions.
Clock &
Alarms
Settings for time and alarms.
You can create a personal
password for the device.
Help you examine power status
Power
and wireless signals.
Sounds&
Settings for sounds, notifications,
Notifications and vibrations.
Settings for the items which are
Today
displayed on Today screen.
Lock
Connections More Connections Settings.
Personal
More Personal Settings.
System
More System Settings.
Tap Start > Settings > Connections
Programs
Descriptions
You can choose to receive all
Beam
incoming beams.
Settings and management for
Connections
modem connections.
Enrolling in a domain will
Domain Enroll connect your device with
company resources.
Set data connection auto
ConnectConfig
configure or not.
Using SIM1 or SIM2 for current
NetworkRouter
connection.
Select ActiveSync or Disk Drive
USB to PC
for connection type.
Wi-Fi
Configurations for Wi-Fi.
Turn on/off Wi-Fi, Bluetooth,
Wireless
Phone, GPRS, Push E-mail, and
Manager
Flight Mode.
Tap Start > Settings > Personal
Programs
Descriptions
Owner
Information
You may assign programs to hard
keys.
You can adjust your preferred input
method.
You may input your personal
information.
Phone
Settings for functions of your phone.
Buttons
Input
Tap Start > Settings > System
Programs
Descriptions
About
Contain information of the device.
Backlight
Settings for the backlight.
Clean all the personal information, and
CleanBoot
restore to default.
Customer
Customer Experience Improvement
S1205│ 1-7
Feedback
Device
Information
Encryption
Error
Reporting
External
GPS
Program.
You can check the information of your
device.
Encrypt data in your Micro SD card.
Report the errors which exist in the
system operation.
Managed
Programs
Help you examine the installed
programs.
Status & Icon Area
This area shows status and alerts of the system. You
can tap the icons to get the details and the settings.
Status
Icons
Descriptions
Types
The power of the battery is
full.
GPS settings
Battery
Help you examine memory status and
running. programs.
You can activate Quick Menu Setting
Quick Menu
to help you adjust the frequently used
Setting
settings.
Regional
Settings for region, number, currency,
Settings
time, and date.
Remove
Remove programs from your device.
Programs
The power of the battery is
low. Please recharge.
Memory
Schedule
On/Off
Screen
Task
Manager
Battery is charging.
Call forward.
Call on hold.
Calls
Set when the power will on or off
You have missed calls.
Help you adjust screen orientation,
screen alignment, and text size.
Help you examine the applications
which are using. You can examine
their amount of memory and their CPU
consumption.
Voice
Settings about activating programs
Commander
and functions with voice.
Settings
Data call.
Voice call is active.
No connections
GPRS is in range.
Connection
GPRS is connected.
Building connection to
GPRS.
Bluetooth is activated.
S1205│ 1-8
You have one or more new
voice mail(s).
Wi-Fi is activated; a Wi-Fi
network is in range; Wi-Fi
network is connected.
You have one or more
instant message(s).
SIM1 has strong signal.
SIM2 has strong signal.
System volume.
Ring volume
Volume
Ringer is on.
SIM1 no service.
Ringer is off.
SIM2 no service.
SIM1 has no SIM card.
Signal
Quick Menu
Setting
SIM2 has no SIM card.
SIM1 phone off.
SIM2 phone off.
Roaming.
Trying to connect GPS;
GPS is connected.
Message
You have one or more new
message(s).
S1205│ 1-9
Help you adjust the
frequently used settings.
2. Phone Functions
tapping the letters of alphabet located at the left side
of the screen helps you find your contacts quickly.
2.1 Use Your Phone
Press Call Key to enter Phone function screen.
Please insert a SIM card before using these
functions.
Tap
to hide Search Menu, and
to show it.
1. Slide the bar upwards or downwards to browse
contacts by initial letters in Contacts.
2. You can select a contact to make a call to him or
her.
3. Tap “Menu” for more options.
Phone Dial Screen
1. The number you entered
2. Clear numbers
3. Keypad
4. Call History
5. Make a phone call by SIM1
6. Make a phone call by SIM2
7. Hide Keypad
8. Menu
Create a New Contact
On Contacts screen, tap “New” first. Then, you can
select “Outlook Contact” or “SIM Contact”. After you
select one of them, you can edit the contact’s
information.
1. You can create a photo for an incoming call, and it
will be displayed as a Photo ID.
2. You may also tap Ring tone field to adjust the ring
tones for your contacts.
3. Tap OK to save the new contact, and then, exit
the screen.
2.2 Receive/Ignore a Call
When you receive a phone call, a message of
notification will appear. To answer the incoming call,
tap “Answer” or “Talk”. To ignore or reject a call, tap
“Ignore” or “End”. This behavior may divert the call to
your voice mail depending on your network operator.
2.3 Call History
Make a Call from Contacts
On Today screen, you can tap Contacts which is on
the down left of the screen to enter Contacts.
Enter a contact name or phone number you intend to
search in the search field, the phone will search for
the contact that matches this condition. Besides,
Call History contains all outgoing calls, incoming
calls, and missed calls. You may choose to display
all or only display the highlighted items.
1. On Today screen, tap Call Key.
2. Then tap Menu to select “Call History”.
3. Tap Menu to select a desired function to perform.
S1205│2-1
You may change the display method of Call
History by selecting “Filter”; You can also select
“Call Timers” to check numbers of incoming calls
and calling time.
4. On Call History screen, select a contact to redial
the number.
5. On Call History screen, hold down on a phone
number to open a menu for more options.
2.4 Other Information
Phone Settings
Setting for Phone functions.
You can easily view, and change settings, such as
Ring type, Ring tone, and Keypad. You can also
protect your device from the unauthorized use.
If you select Long tones, the tones of the keys will be
continuous, when you input a phone number. If you
select Short tones, the tones of the keys will be only
continued one or two seconds, when you input a
phone number. If you select Off, the tones of the
keys will be cancelled, when you input a phone
number.
Security tab
You can check “Require PIN when phone is used” to
enhance the security of your phone. Tap “Change
PIN” or “Change PIN2” to change the PIN number of
your SIM.
Services tab
Settings include Call Barring, Caller ID, Call
Forwarding, Call Waiting, Voice Mail and Text
Messages, and Fixed Dialing.
․Tap Start > Settings > Personal > Phone.
Phone tab
On Phone tab, you can adjust the following items:
Ring type
You can change the way that you are notified when a
call is incoming. For example, you can choose to be
notified by a ring, a vibration, or a combination of
both. Tap the list of Ring type, and select an item.
Ring tone
Display the list of Ring tone, and then, select an item.
1. To use .wav or .midi files as ring tones, use
ActiveSync on your PC to copy the files to the
Rings folder on your device. Then, select an item
in the list of Ring tone.
2. To download ring tones, you can make a
connection to the Internet, and then, download
ring tones that are compatible with the formats
of .wav or .midi.
1. Tap Start > Settings > Personal > Phone >
Services tab.
2. Select an item, and then, tap Get Settings.
3. Tap OK to save settings.
Options
Descriptions
Call Barring Block incoming and/or outgoing calls.
Display your name and/or phone
Caller ID
number for outgoing calls.
Call
Forward all or selected incoming calls
Forwarding to a different phone number.
Notify you an incoming call while you
Call Waiting
are on the line.
Voice Mail
Settings about voice mail and SMS
and Text
service center.
Messages
Fixed
You can only dial some phone number.
Dialing
Keypad
You can use this function to change the tones of the
keys.
S1205│2-2
Note: All services in Services tab are provided
by operators. Please contact your operator for
more information.
Network tab
Tap Start > Settings > Personal > Phone > Network
tab.
․Under Current network, tap "Find Network” to
search for the network automatically.
․Under Network selection, select “Automatic” or
“Manual” for searching a network automatically or
manually.
․Under Preferred networks, tap “Set Networks” to
adjust the preferred order of networks.
Make an International Call
When you make an international call, you need to
insert an international access code before the dialed
phone number. If you enter “+” as prefix, you do not
need to enter the international access code.
The "+" can be reached by holding down the "0" key
until it turns into a "+".
1. Enter the full phone number you want to dial. It
should include the country code, area code
(without the leading zero), and phone number.
2. Tap Talk, or press Call Key.
Make an Emergency Call
Enter the international emergency number 112, and
then, tap “Talk” or press Call Key. Additional
emergency numbers may be included in your SIM
card. Contact your network operator for more
information.
If your device has entered Device Lock Mode, you
have to unlock the device before you make an
emergency call.
S1205│2-3
3. Input
3.1 Input Method
1. Start a program such as Word Mobile and Notes.
2. Input Method at the lower center of the screen.
Tap the arrow beside Input Method to select an
input method.
Letter Recognizer.
2. Write letters and numbers in a corresponding
field.
Spb Keyboard
Spb Keyboard is a unique onscreen keyboard for
quick and accurate finger typing. A visible
feedback of the key currently pressed make finger
typing very convenient and as easy as sliding a
finger over the screen. Half and full screen modes
are available to satisfy your typing needs.
Half-Screen Mode
Spb Keyboard works in half-screen mode so you can
use it as the standard input method that integrates
very well with Windows Mobile. This keyboard has
been also designed for finger-tip typing for faster
input and less effort.
Block Recognizer
1. Tap the arrow beside Input Method to select
Block Recognizer.
2. Write letters and numbers in a corresponding
field, the system will display the letters/numbers
identified from your handwriting.
3. Do not write letters outside of the input fields.
Keyboard
1. Tap the arrow beside input Method to select
Keyboard.
2. Tap “CAP” or “Shift” to input capital letters.
Letter Recognizer
1. Tap the arrow beside Input Method to select
1. Characters zone.
2. Shift key (for case switching). Tap twice to keep it
active.
3. Symbols switching key.
4. Keyboard key. Switch to the full-screen mode. Tap
and hold to switch to the standard keyboard mode.
5. The Control key is used to perform a special
operation when tapped in conjunction with another
key (for example, Control-C -> Copy). This key can
be used to change the keyboard language layout
S1205│ 3-1
when a second language is added.
6. Enter key.
7. Backspace key.
Full-Screen Mode
Spb keyboard works in full screen mode (landscape)
so you can use the entire device screen area to type
text. The full screen mode allows you to type with
your finger tips. Full Screen mode is a standard
QWERTY keyboard that was specially designed for
thump-tip typing.
combination of both. Transcriber works transparently
in the background of programs, recognizing words
with its integrated dictionary. When Transcriber is
turned on, it interprets stylus movement anywhere on
the screen as handwriting input.
1. Tap the arrow beside Input Method to select
Transcriber.
2. Position the cursor where you want texts to
appear.
3. Use the stylus to write anywhere on the screen.
The handwriting will be converted to texts after
you lift the stylus from the screen.
3.2 Draw on the Screen
You can draw on the screen in the same way that
you write on the screen. The difference between
writing and drawing on the screen is how you select
items and how they can be edited. For example, the
selected drawings can be resized, while writing
cannot. Tap Start > Tools > Notes. Then, tap “New” to
create a new note.
1. Characters zone.
2. Shift key (for case switching). Tap twice to keep it
active.
3. Symbols switching key.
4. Keyboard key. To switch to the half-screen mode.
5. To change the keyboard language layout.
6. Move left key.
7. Move right key.
8. Enter key.
9. Backspace key.
10. The text zone.
11. Tap to open Spb Keyboard menu and view the
available options.
Create a Drawing
Cross three ruled lines on your first stroke. A drawing
box appears. Subsequent strokes in the drawing box
will become parts of the drawing. Drawings that do
not cross three ruled lines will be treated as writing.
Transcriber
Transcriber is a program of handwriting recognition
that allows you to write in cursive, print, or a
S1205│ 3-2
4. To start recording, tap
.
5. To stop recording, tap
the note.
.
Select a Drawing
To edit a drawing, select it first.
1. Use the stylus to hold down on a drawing until a
“+” appears. Drag this “+” to select the drawing
you want, and then, lift the stylus.
2. You can cut, copy, and paste the selected
drawings by selecting those items in Menu.
6. To play a recording, tap
3.3 Record a Message
Menu > View Recording Toolbar. Tap
Create a Recording
1. To add a recording to a note, open a note before
recording. Tap Start > Notes. Then, tap “New” to
create a new note.
2. If there is no Recording Toolbar, tap Menu > View
Recording Toolbar.
3. Move your device’s microphone near your mouth
or other sources of sounds.
will be added in
in a note, or tap
in the list of Notes.
The recording can be saved in the list of Notes. Tap
tap
S1205│ 3-3
.
, and then,
4. Settings
Clock & Alarms
Adjust time and alarms. Tap Start > Settings > Clock
& Alarms.
1. On Time tab, adjust Time Zone, Date, and Time.
2. Tap OK, and then, the pop-up window will ask
whether you will save the changes.
3. Tap “Yes” to save the changes and exit.
․On Alarms tab, you can adjust the settings of
alarms.
․On More tab, you can adjust more settings.
․Tap Start > Settings > System > Regional
Settings to change the format of the time or the
date.
“Browse” to locate the desired file.
3. Choose a folder, and then, tap the file you want.
4. Tap OK to save it.
Note: The recommended picture size for the
background is 240 x 400 pixels in jpeg file
format. To beam a favorite theme to a friend,
select the desired theme, and then, tap
“Beam” on Appearance tab.
To customize the displayed information:
1. Tap Start > Settings > Today > Items tab.
2. Select the items you want. Then they will be
displayed on Today screen.
3. To customize further, select an item, and then, tap
“Options” (not available for all items).
Sounds & Notifications
Adjust sounds of alarms, notifications, and
vibrations.
Turning off sounds and notifications helps conserve
the power of the battery.
1. Tap Start > Settings > Sounds & Notifications.
2. On Sounds tab, you can check the items you
want.
3. On Notifications tab, you can customize how you
are notified. Select an event, and then, select the
type of the reminder.
4. On Vibrations tab, you can enable vibrations.
Today
Change screen appearance and items displayed on
Today screen.
To change the theme of Today screen:
1. Tap Start > Settings > Today.
2. On Appearance tab, select the desired theme. To
use your own background, check “Use this
picture as the background”, and then, tap
Microsoft My Phone
My Phone service synchronize your phone’s
contacts, calendar, tasks, text messages, music,
photos, videos, and other documents with your My
Phone account at http://myphone.microsoft.com.
1. Tap Start > Microsoft My Phone.
2. Sign with your Windows Live ID and password.
Then tap “Sign in.”
3. Select a synchronization method. Then, tap Next.
4. Select the data types to sync.
5. Follow the instructions, and then, tap Finish.
6. Tap Sync to begin the synchronization.
4.1 Personal
Buttons
You may assign programs to a hardware button.
Tap Start > Settings > Personal > Buttons.
S1205│ 4-1
Owner Information
You can input your personal information in Owner
Information to help you identify your phone.
1. Tap Start > Settings > Personal > Owner
Information.
2. On Identification tab, enter your personal
information.
issuer and the expiration date. Tap Start > Settings >
System > Certificates.
Input
You can set input settings here. Tap Start > Settings
> Personal > Input.
․On Input Method tab, you can choose input
method options.
․On Word Completion tab, you can check the boxes
if you want suggest words or enable auto correct.
․On Options tab, you can choose voice recording
format, and check the boxes if you would like
capitalize first letter of sentence or scroll upon
reaching the last line.
Customer Feedback
It is Customer Experience Improvement Program
designed by Microsoft®. You can check “Send
Feedback” to participate or “Don't Send Feedback” to
reject. Tap Start > Settings > System > Customer
Feedback.
CleanBoot
This application will clean all your personal
information, and restore the default settings. Tap
Start > Settings > System > CleanBoot.
4.2 System
About
This function contains the information of your device.
Tap Start > Settings > System > About.
Backlight
Adjust the settings of the backlight, and adjust the
level of the brightness to save power. Tap Start >
Settings > System > Backlight.
․On Battery Power tab, you can turn ON/OFF the
backlight, when you use the power of the battery.
․On External Power tab, you can turn ON/OFF the
backlight, when you use the external power.
․On Extended tab, you can adjust the level of the
brightness.
․Tap “Power” to adjust the settings of the power.
Certificates
Tap Certificates to view the name of the certificate
Device Information
Check the information of your phone. Tap Start >
Settings > System > Device Information.
Encryption
You can encrypt files stored on the Micro SD card by
simply checking “Encrypt files when placed on a
storage card”. Once encrypted, such files are only
readable by this device. Tap Start > Settings >
System > Encryption.
Error Reporting
To help Microsoft improve the products you use, your
device can collect information on software operation
for later reporting in the event of a serious error.
Reporting the information is completely voluntary
and confidential. Tap Start > Settings > System >
Error Reporting.
External GPS
This is GPS setting application.
․On Programs tab, you can choose the port that
programs will use to obtain GPS data.
․On Hardware tab, specify the hardware port to
which your GPS device is connected.
․On Access tab, Windows Mobile manages access
S1205│ 4-2
to your GPS device and allows multiple programs
to obtain GPS data simultaneously.
Managed Programs
Examine the installed programs. Tap Start > Settings
> System > Managed Programs.
Memory
Display memories of programs that are currently
running. You may need to stop a program, if it
becomes unstable. Tap Start > Settings > System >
Memory.
․Main tab displays the amount of the memory. This
tab shows storage’s and program’s memories. You
can examine the total, in-use, and free memories.
․Storage Card tab displays how much memory is
available on the storage card.
Quick Menu Setting
Help you adjust the frequently used settings. Tap
Start > Settings > System > Quick Menu Setting.
Screen
Adjust screen’s orientation, screen alignment, and
text size. Tap Start > Settings > System > Screen.
Task Manager
Examine the applications that you are using. You can
examine the amount of the memory and the
consumption of CPU. Tap Start > Settings > System
> Task Manager.
Voice Commander Settings
․Voice Commander: You can go to “Voice
Commander” in Start to start what you record.
․Voice Commander Settings: You may record voice
tags under “Voice Commander Settings”, or train
you the way of digit speaking under digit training.
Tap Start > Settings > System > Voice Commander
Settings.
Regional Settings
This function allows you to customize the unit and
format for the region you are in. Tap Start > Settings
> System > Regional Settings. Adjust the formats of
region, number, currency, time, and date.
Remove Programs
This function allows you to uninstall programs that
are saved in your device’s storage memory. It also
shows the total available storage memory. Select a
program that you would like to remove from the
program box, and then, tap “Remove”. Tap Start >
Settings > System > Remove Programs.
Schedule Power On/Off
You can choose when you want the device power on
or off. Tap Start > Settings > System > Schedule
Power On/Off.
․On Contacts tab, select a contact in the list of
contacts.
․Select a contact, and then, tap
S1205│ 4-3
to create
a voice tag.
․If the selected contact has different phone
numbers, select one of them, please.
․After you tap
voice.
, the system will record your
․When the voice tag is built,
showed beside the contact.
will be
to re-build a voice tag.
․You can tap
Tap
to delete a voice tag.
․On Application tab, you can record a voice tag of
an application.
․On Music tab: If you have MP3 files in the device
or in Micro SD card, you may record voice tags for
those MP3 files.
․On Digit Training tab, you can practice your
pronunciations. You can press
to record
the following digits in “Digit model adaptation”. You
to delete the recorded
can press
pronunciations.
․On Digit Settings tab, you can adjust the length of
phone number showed in Voice Commander.
․On Advanced Settings tab, you can change the
recording sensitivity.
․On About tab, you can get the details of Voice
Commander.
S1205│ 4-4
5. Synchronization
5.1 About ActiveSync
You may use Microsoft ActiveSync to synchronize
data in this device with your personal computer.
․You can update Outlook data in this device and in
your personal computer synchronously.
․You can synchronize Microsoft Word and Microsoft
Excel files in this device and in your personal
computer. The files will convert to the compatible
version automatically.
The default of ActiveSync is not to synchronize all
data automatically. If you would like to change the
default, you may activate or disable the function of
the synchronization for specific data in ActiveSync
Option.
ActiveSync may also be used for the following
purposes:
․Back up or restore the saved data in this device.
․Copy files between this device and personal
computer.
․Synchronize while connecting to your personal
computer or selecting synchronization command.
․Synchronize specific types and range of files. For
example, you may choose to synchronize
appointments of the past few weeks.
ActiveSync on Windows XP
1. ActiveSync Installation:
Install Microsoft ActiveSync in your personal
computer. Please download the Microsoft
ActiveSync from Microsoft web site www.microsoft.com/getstarted.
2. Hardware Connection:
Connect your Windows Mobile-based device to
your personal computer with a USB cable.
3. Use ActiveSync Program:
The ActiveSync wizard will give you step-by-step
instructions for synchronizing files and loading
programs onto your device. Follow the
instructions to complete the settings, please.
․After you connect this device to your personal
computer with a USB cable, the screen of the
computer will display “Connected” upon successful
connection. A green icon
representing
“connected” will appear on the task bar of your
computer screen.
․Select the Explore button of ActiveSync program
to view the files in your device. You may manage
several files in the device simultaneously.
5.2 Install and Use ActiveSync
Note: Before installing ActiveSync, do not
connect your device to the computer. You
can connect your device to the computer with
a USB cable after installing ActiveSync.
S1205│5-1
ActiveSync on Windows Vista
Microsoft Windows Mobile Device Center is the
replacement for Microsoft ActiveSync on Windows
Vista. Start by visiting Microsoft Web Site.
A Windows Mobile partnership needs to be created,
when you connect your phone to your PC and start
Windows Mobile Device Center for the first time. The
steps are below:
1. Connect your phone to your computer. Windows
Mobile Device Center configures itself, and then, it
will open.
2. Follow the instructions to complete the settings,
please.
3. Select the items to synchronize, tap “Next”.
4. After you complete the settings, Microsoft
Windows Mobile Device Center will synchronize
your phone automatically.
5.3 Synchronize via Bluetooth
You can synchronize data via Bluetooth. Tap Start >
ActiveSync > Menu, and then, select “Connect via
Bluetooth” and tap ”Sync” in this device to process
synchronization.
Note: If you want to synchronize your phone
and your computer via Bluetooth, your
computer needs to have a Bluetooth receiver,
a host adapter, or a built-in Bluetooth.
S1205│5-2
6. Getting Connected
6.1 Internet Access
Before you use GPRS to connect to the Internet,
please make sure your system operator provide this
service. It is convenient to work at home or travel by
using GPRS. You can use this device to browse
online, read or send E-mail, and MSN messages
through a wireless network.
6.2 GPRS Connection Settings
GPRS Settings
1. Tap Start > Settings > Connections >
Connections > Advanced tab.
2. Tap “Select Networks” to open Network
Management Screen.
2. Input an URL address in the address field, and
then, tap
to connect to that website.
3. After completing a connection,
will become
.
4. Or you may select Start > Settings > Connections
> Connections > Tasks tab. Tap “Manage
existing connections,” and then, go to Modem tab.
Hold down on a connection to activate the pop-up
menu, and then, select “Connect”.
ConnectConfig
You can set data connection auto-config.
3. Select a desired network from the list; tap “New”
to add an available network to list; tap “Edit” to
modify the settings of the original network.
4. Tap OK to save and exit.
1. Tap Start > Settings > Connections >
ConnectConfig.
2. Choose Enable or Disable.
3. Tap OK to save.
Activate GPRS Connections
1. Tap Start > Internet Explorer.
S1205│6-1
6.3 Bluetooth Wireless
Transmissions
When you want to form a connection through
Bluetooth, please make sure the device you would
like to make connections which is also equipped with
Bluetooth.
Bluetooth Connection Settings
When Bluetooth is activated, tap
side of Today screen. You will find
window.
on the upper
on the pop-up
Bluetooth is a short distance wireless communication
technology. Before you use Bluetooth, you need to
finish settings of connections.
NetworkRouter
You can choose which SIM card to connect.
1. Tap Start > Settings > Connections >
NetworkRouter.
2. Choose SIM1 or SIM2 to be current connection.
3. Tap Ok to save.
1. Select Start > Settings > Bluetooth > Mode tab.
2. Check “Turn on Bluetooth”.
3. If you want this device to be detected by other
devices with Bluetooth, please check “Make this
device visible to other devices”. (Without
checking this item, other devices with Bluetooth
are unable to detect your device.)
4. Tap Devices tab to check the formed
connections.
5. On Devices tab, tap “Add new device” to search
for other devices with Bluetooth within an
effective area.
6. Select a device, and then, tap “Next“. The system
will ask you to input your password. After you
input the password, tap “Next“.
7. If the entered password is correct, the connection
will be formed.
Note: Optional accessories of Bluetooth are
available. Please contact with your local
dealer for more information.
S1205│ 6-2
COM Ports
For example, when you purchase Bluetooth GPS,
you can register this device as an effective serial port
by following the instructions:
Select Start > Settings > Bluetooth > COM Ports tab.
Register a New Serial Port:
1. Connect your device and Bluetooth GPS via
Bluetooth, first. Then, select “New Incoming Port”
to enter Setup Screen.
2. Select a port.
3. Select “Finish”.
6.4 Internet Sharing
You can use the device as a wireless modem.
Internet Sharing allows your PC/Notebook to be
connected to a wireless network. If you would like to
connect to PC with a USB cable, you will need to
install ActiveSync 4.5 or later version in your PC.
1. Tap Start > Internet Sharing.
2. Select “USB” or “Bluetooth PAN” in PC
Connection.
3. Connect your phone to a PC/Notebook with a
USB cable or Bluetooth, and then, tap “Connect”.
Note: Before you tap “Connect”, you need to
make sure:
1. You have inserted a SIM card which supports
GPRS.
2. You have connected this phone to your
PC/Notebook with a USB cable or Bluetooth.
3. You have disabled ActiveSync.
6.5 Wi-Fi
Your device can connect to the detected network
through Wi-Fi.
1. Select Start > Settings > Connections > Wireless
Manager.
2. Tap “Wi-Fi”.
3. Tap OK to activate wireless network and exit.
When you activate Wi-Fi, a new window, “Network
Detected”, will appear. Select one and input your
password to the local network. Tap “Connect” to
connect to this device via local network.
Note: Reboot is required when you change the
IP address in Start > Settings > Connections >
Wi-Fi > Network Adapters tab > Edit > IP
Address tab.
6.6 USB to PC
You may use your device as a mass storage device
or a reader of Micro SD card.
1. Tap Start > Settings > Connections > USB to PC.
2. Select ActiveSync or Disk Drive for connection
type.
3. Connect the device to the computer with a USB
cable.
4. Your computer will detect the new hardware
automatically.
6.7 Domain Enroll
Domain enroll will contact your phone with company
resources. Your phone may be restarted and please
be sure to back up your data before continuing.
You need the password provided by your system
administrator.
1. Tap Start > Settings > Connections > Domain
Enroll.
2. Press “Enroll”.
3. Enter the company E-mail address and password,
press “Next”.
4. Then follow instructions to complete this setting.
S1205│6-3
6.8 Beam
You can choose to receive all incoming beam or not.
Tap Start > Settings > Connections > Beam. Check
the box to receive all incoming beams.
S1205│ 6-4
7. Messaging
Messaging includes text messages (SMS),
multimedia messages (MMS), and E-mail. Before
receiving and sending your e-mail, please make sure
this device has connected to a network. When your
device is connected to a network, you may go to
“Messaging” to receive, and send your e-mail.
You may:
1. Use this device to connect with e-mail server, and
receive, or send letter directly.
2. Update the Microsoft Outlook or e-mail in
Microsoft Exchange Server in this device and in
your computer synchronously.
For receiving and sending SMS\MMS, you only need
to ensure that Phone function is activated and the
satellite icon on the top of status bar shows
. It is
not necessary to activate the connection or establish
a new e-mail account in Messaging.
7.1 SMS\MMS
Select Start >SMS.
1. Tap Inbox, outbox, Draft, Sent Items, Deleted
Items to see all messages.
2. Hold on a message to activate the pop-up menu.
3. Tap Menu > New to create a new SMS or MMS.
4. Tap Input icon at the lower center of the screen to
activate the input methods, and then, edit the
message.
When Read a SMS\MMS, You can:
Tap Start >SMS, read and reply a SMS\MMS.
1. Tap the phone number which is showed on the
screen to save this contact as a new contact.
2. Tap the message to reply back immediately.
3. Tap Input icon on the lower center of the screen
to activate the input methods.
4. Tap Menu for more information.
Note: Make sure the MMS you send is within
the limits of size allowed by your wireless
service provider.
Compose, and send a SMS:
1. Tap Start >SMS > Menu > New > SMS to write a
new SMS.
2. Tap “To” field to input receivers’ phone numbers,
or tap Menu > Add Recipient to add recipients.
S1205│7-1
3. You can input contents on the text area. Tap
Input Method at the lower center of the screen to
switch the input methods.
4. Hold down on the text area to activate the pop-up
menu.
5. Select “Send” to send this SMS.
Copy a SMS to the SIM Card:
1. Tap Menu > SMS Options > Display tab > choose
Normal mode.
2. Select a message that you want to copy to the
SIM card, tap Menu > Copy to Card1 or Copy to
Card2.
Reply a SMS with the Function of MMS:
1. In the inbox of SMS\MMS, you select a message,
and then, open it.
2. Tap Menu > Reply > Reply via MMS.
3. Tap Menu > Insert, and then, insert t the wanted
item (Image or Video, Audio, Record audio, Text,
Frames, Attachment, Templates) into the MMS.
4. Tap “Send” to send this MMS.
Compose, and Send a MMS:
1. Tap Start >SMS > Menu > New > MMS to write a
new MMS.
2. Choose a MMS.
3. Tap the fields of “To”, “Cc”, or “Bcc” to input
receivers’ phone numbers, or tap Menu >
Recipients > Add recipient, from Contacts to add
recipients.
4. Tap the field of “Subject” to input a subject for
your new message.
5. You can input contents on the text area. Tap
Input Method at the lower center of the screen to
switch the input methods.
S1205│ 7-2
2. See “Chapter 6” to connect this device to a
network and begin to receive and send your
e-mail.
6. Hold down on the text area to activate the pop-up
menu.
7. Tap “Send” to send this MMS.
7.3 Use E-mail
When you Read an E-mail, You can:
Tap Start > E-mail > “the established e-mail account”
> Menu, and then, tap “Send/Receive” to send, and
receive new e-mails. Tap “Inbox” to view Inbox. Tap
any unread e-mail to view its content.
1. Tap Input Method to activate the Input methods.
2. Tap “Menu” for more information.
3. Hold down on an e-mail to activate the pop-up
menu.
7.2 Establish an E-mail Account
If you have e-mail accounts already, you may use
“E-mail” to receive or send your e-mail. Follow the
instructions below to create a new e-mail account.
Please acquire the following information from the
Internet Server Provider (ISP) or the administrator of
your company network:
1. Tap Start > E-mail.
2. E-mail address, account name, password, and
domain name.
3. POP3 or IMAP4.
4. SMTP.
Establish an E-mail Account:
1. Tap Start > E-mail > Menu > Setup E-mail. Input
your e-mail address and your password, and then,
follow the instructions to create a new e-mail
account.
Compose, and Send an E-mail:
Tap Start > E-mail > “the established e-mail account”
> Menu > New to write a new e-mail. After writing a
new e-mail, tap “Send” to send this e-mail.
When you Compose an E-mail, You can:
1. Tap the fields of “To”, “Cc”, or “Bcc” to input
receivers’ e-mail addresses, or tap Menu > Add
Recipient to add recipients.
S1205│7-3
2. Tap the field of “Subject” to input a subject for
your new e-mail.
3. You can input contents in the text area.
4. Tap “Send” to send this e-mail.
5. Tap Input Method on the lower center of the
screen to activate the input methods.
6. Tap “Menu“ for more information.
7. Hold down on the text area to activate the pop-up
menu.
7.4 Synchronously Process E-mail
If you want to manage your e-mail synchronously,
you must activate the synchronization of “Inbox” via
ActiveSync. For more information about the
synchronization of “Inbox”, please read the online
Help of ActiveSync in your computer.
Rules about the synchronization of “Inbox”:
1. Please read the units related to ActiveSync.
2. If you do not want to transmit data via ActiveSync,
you can copy or move e-mails between this
device and your computer manually.
3. Only the e-mails in “Inbox” of your computer will
be synchronized.
4. Only the e-mails in Microsoft Exchange Server or
Microsoft Outlook can be synchronized.
5. The e-mails from “Outbox” in this device will be
sent to your computer first, and then, they will be
delivered through Microsoft Exchange Server or
Microsoft Outlook.
6. If an e-mail is deleted in this device, then it will
also be deleted in your computer when you
process the synchronization.
7. SMS\MMS in this device will not be synchronized.
8. You may directly receive new e-mails from the
e-mail server without connecting to a computer.
9. You can work online or offline. If it is online, you
may read and reply an e-mail directly when this
device is connected to the e-mail server.
7.5 Use Push E-mail
To use push e-mail, please turn on Wi-Fi or GPRS to
connect to Microsoft Exchange Server.
Use Push E-mail in Your PC:
1. Connect your device to the PC with a USB cable.
2. Follow the instructions on the pop-up window of
ActiveSync, and then, click “NEXT”.
3. Input your server address, user name, password,
and domain. If your server requires SSL
Encryption, please check “This server requires an
encrypted (SSL) connection.” Then, Click
“NEXT”.
4. Check the items you would like to synchronize,
for example, you may check E-mail, Calendar,
Contacts, and Tasks.
Use Push E-mail in Your Device:
1. Tap Start > Tools > ActiveSync > Menu > Add
Server Source.
S1205│ 7-4
7.6 Messenger
Messenger helps you use Windows Live Messenger
when you use your device. To use Messenger, you
need to turn on Wi-Fi or GPRS.
Windows Live Messenger:
1. Tap Start > Messenger.
2. Select your status, and then, tap “Sign in”.
3. Input your account of MSN and password. Then,
follow the instructions to finish the settings.
2. Input your e-mail address, and then, tap “Next”.
3. Input your user name, password, and domain,
and then, tap “Next”.
4. Tap “Skip” to skip automatic configuration or wait
for its procession.
5. Input your server address, and then, tap “Next”.
6. Select the desired items to synchronize, and then,
tap “Finish”.
Now you have established a cooperative relationship
for the device and the Exchange Server. When you
tap Start > ActiveSync > Sync, you may synchronize
with Microsoft Exchange Server via Wi-Fi or GPRS.
Note: To use push e-mail, you need to make
sure Wi-Fi or GPRS is active and make sure
your server is Microsoft Exchange Server. To
find out more information about Microsoft
Exchange Server, please visit Microsoft’s
website,
http://www.microsoft.com.
S1205│7-5
8. Multimedia
8.1 Camera
The Descriptions of Settings Icons on the Bar
Icons
Descriptions
You may use camera in this device to capture
important moments.
Camera Mode
Tap Start > Multimedia > Camera or press Camera
Key to launch camera.
Scene:
Auto, Portrait, Landscape, Sport,
Night, Document, Anti-shake
Capture mode:
Normal, Best shot, EV bracket
sel., 4 Continuous shot,
8 Continuous shot,
16 Continuous shot
Self timer: Off, 5 seconds,
10 seconds, 15 seconds,
30 seconds
Exit
Camera Settings (click the bottom of the screen)
Effects:
Normal, Grayscale, Sepia, Sepia
green, Sepia blue, Color invert,
Gray invert, Blackboard,
whiteboard, Copper carving,
Embossment, Blue carving,
Jean, Sketch, Oil paint.
Adjust brightness
Photo Album
Camera Settings:
1. Image size: QVGA, VGA, 1MP, 2MP, 3MP
2. Adjust: Saturation, Sharpness, Contrast
3. White balance: Auto, Cloudy, Daylight,
Incandescence, Fluorescent, Tungsten
S1205│ 8-1
4. ISO: Auto, ISO100, ISO200, ISO400, ISO800,
ISO1600
5. Advance:
․Location: Device, SD Card
․Image quality: High, Medium, Low
․Postview: Off, On
․Banding: 50Hz, 60Hz
․Restore default
6. About: some information about camera
Record size:
176X144(QCIF), 320x240(QVGA),
640X480(VGA)
Exit
Effects:
Normal, Grayscale, Sepia, Sepia
green, Sepia blue, Color invert,
Gray invert, Blackboard,
whiteboard, Copper carving,
Embossment, Blue carving, Jean,
Sketch, Oil paint.
8.2 Video Mode
Tap Start > Multimedia > Camera, and tap
.
Adjust brightness
Photo Album
Recording:
Target the object you want to record, and then, press
Camera Key to record. Press Camera Key again to
finish the recording.
The Descriptions of Settings Icons on the Bar:
Icons
Descriptions
Video Mode
Scene:
Auto, Night,
Record limit:
No limit, 15 seconds,
30 seconds, 60 seconds.
Video Settings:
1. Adjust: Saturation, Sharpness, Contrast.
2. White Balance: Auto, Cloudy, Daylight,
Incandescence, Fluorescent, Tungsten.
3. Advance:
․Location: Device, SD Card
․Video quality: High, Medium, Low
․Video type: MP4, 3GP
․Microphone: On, Off
․Banding: 50Hz, 60Hz
․Restore default
4. About: Some information about video mode.
8.3 Pictures & Videos
You may use “Pictures & Videos” to manage your
photos and videos. Tap Start > Multimedia > Pictures
& Videos > Menu > Tools > Options > General tab,
you may resize pictures.
In “Pictures & Videos”, you can
1. Tap “My Pictures” to open different folders.
S1205│ 8-2
2. Tap “Date” to select the arrangements of the
photos.
3. View the selected picture.
4. Tap “Menu” for more options.
1. Tap Start > Multimedia > FM Radio.
2. Tap
8.4 JAVA
This device supports JAVA, and therefore, you can
use applications of JAVA. Tap Start > Multimedia >
Java.
8.5 FM Radio
Insert the stereo headset to listen to radio. You can
only activate FM Radio, when you insert your stereo
headset.
3. Tap
4. Tap
to decrease the frequency by 0.1MHz.
to search for the last channel.
to search for the next channel.
5. Tap
to increase the frequency by 0.1MHz.
6. Tap
or
to switch Voice Source.
is your stereo headset,
7. Tap
8. Tap
mode.
is the speaker.
to show channel list.
to be mute. Tap
back to the vocal
Menu
Tap menu shows more information.
S1205│ 8-3
8.6 Photo Album
You can view photos in Photo Viewer. Tap Start >
Multimedia > Photo Album. It shows all the photo
files, and lists name, the first photo and how many
pictures.
Tap a file to see all the photos in this file. Tap
play slide show.
to
Tap Settings to set Transition and Slide show.
During slide show, you can tap a photo to show
some options.
S1205│ 8-4
1. Tap
to choose Assign to contact, Send, Set
as Wallpaper or Cancel.
2. Tap
to go to previous photo.
3. Tap
to back to slide show.
4. Tap
to go to next photo.
5. Tap
to delete the photo.
S1205│ 8-5
9. Applications
appointment. If you want to change the details of an
appointment, tap Menu > Edit.
9.1 Calendar
Appointments and Meetings:
You may use “Calendar” to arrange appointments,
meetings, and other events. Tap Start > Tools >
Calendar to activate Calendar.
You may select the preferred display by tapping “Day,
Week, Month, Year, and Agenda.”
1. Select the desired date.
2. Select an appointment on the list to view or edit
the details of the appointment.
3. Tap “Menu” for more information.
9.2 Contacts
Tap Start > Tools > Calendar > Menu > Tools >
Options to adjust the display of Calendar and the
settings of reminders.
Create an Appointment:
1. Tap Start > Tools > Calendar. Select the date and
the time of appointment.
2. Tap Menu > New Appointment > Appointment
tab.
3. Select the field of “Subject” to edit the field.
4. Select the field of “Location” to edit the field.
5. Select the field of “Starts” to adjust Start Time.
6. Select the field of “Ends” to adjust End Time.
7. You can add your personal notes in Notes tab.
8. Tap OK to save the appointment, and return to
Calendar.
If you select “Remind me” in the field of “Reminder”,
then the device will remind you by an alert sound
according to the settings in Start > Settings > Sounds
& Notifications.
View and Update Calendar:
Select an appointment to view the summary of the
Send Meeting Notice:
You may use “Calendar” to create a meeting notice
by combining with the information on Outlook or
Pocket Outlook. When you synchronize messages or
connect this device with e-mail server, meeting
reminders will be generated automatically. Tap Start
Tools > Calendar > Menu > Tools > Options >
Appointments tab, and select the desired meeting
sending method in “Send meeting requests via”.
“Contacts” on Today screen. It is your storage of
friends’ information. It stores phone numbers, e-mail
addresses, home addresses, and other information
that relates to contacts. You can also add a picture
or assign a ring tone to a contact.
Phone Book:
“Contacts” helps you manage your phone book.
1. Tap the field of “Enter a name…”to input part of
name or phone number to search for that contact
in the list of contacts.
2. Tap the field of “Enter a name…”and input a letter
search for that contact that starts with that letter.
3. Tap a contact’s name or a phone number to view
or edit the details.
4. Hold down on a contact to activate the pop-up
menu.
5. Tap “New” to add new contacts.
6. Tap “Menu” for more options.
Add Contacts:
1. Tap “New” in Contacts. Then select Contact
Type.
2. Move the scroll bar on the right side of the screen
S1205│ 9-1
to adjust the display of the screen.
3. Select the field of “Ring tone” to choose a special
ring tone for that contact.
4. If you want to add notes, select Note tab to input
the desired contents.
5. Tap OK to save and return to Contacts.
Search for Contacts:
Searching methods are below.
․Input the contact’s name or phone number in the
field of “Enter a name”, and then, the list of
contacts will show the information of this contact.
․Tap Menu > Filter and select the way to
display contacts, by which your list of Contacts will
only display contacts in this category.
․If you want to view the contacts by the companies,
tap Menu > View By > Company, and then, the list
of Contacts will display in the order of the
companies.
․To search for a contact, Tap Start > Search Phone.
Enter the name of the contact in the field of
“Search for” and select “Contacts” in the field of
“Type”. Tap “Search” to start searching.
View and Update New Contacts:
Select a contact in the list of Contacts to view the
summaries of the contacts. To edit a contact’s details,
tap Menu > Edit.
9.3 Tasks
You may use “Tasks” in Start to help you track
unfinished tasks.
1. To add a new task, tap the field of “Tap here to
add a new task”.
2. ” ! ” represents the first priority.
3. You can check the information of tasks in the list
of Tasks.
4. Hold down on a task to activate the pop-up menu.
5. Tap Menu > New Task to add tasks.
6. You may change the arrangement of the list of
Tasks. Tap Menu > Sort By.
7. You may display a specific category of the task in
the list of Tasks. Tap Menu > Filter.
Add a New Task:
1. Tap Menu > New Task in Tasks.
2. Select a field to input data.
3. Select the field of “Starts” and “Due” to adjust the
first and last day of task.
4. You may select “Occurs” to select the periodicity
of the task.
5. You may select “Reminder” to adjust the time to
remind you or select “None” (unnecessary to
alert).
6. Tap “Categories” to categorize a task.
7. To add notes, tap Notes tab, and then, input the
contents.
8. Tap OK to save the task, and return to “Tasks”.
Check and Update Tasks:
You may select a task from the list of Tasks to view
the summary of the task. Tap the selected task, and
then, select “Edit” to edit this task.
9.4 Microsoft Office Mobile
Word Mobile
You may use Word Mobile to edit files. Through the
synchronization, you may keep the updated contents
in both of this device and your computer.
You may use your Word Mobile to generate
documents like letters, meeting minutes, and reports.
If you want to generate a new file, tap Start > Office
Mobile > Word Mobile > New. Your Word Mobile can
only open one document at one time.
After you open a Word file, you can
1. Add / Delete folders in “All Folders”.
2. Tap “Name” (Date, Size, or Type) to change the
S1205│ 9-2
PowerPoint Mobile
You may use PowerPoint Mobile to edit files.
Through the synchronization, you may keep the
updated content in both of this device and your
computer.
arrangement of the list.
3. Tap a file, and then, open it.
4. Hold down on a file to activate the open pop-up
menu.
5. Tap “New” to create a new document.
6. Tap Input Method to activate the input methods.
7. Tap “Menu” for more options.
You may use PowerPoint Mobile to browse or play
PowerPoint file. If you want to open a
PowerPoint file, tap Start > Office Mobile >
PowerPoint Mobile.
Note: When you are synchronizing or
copying files from the device to PC, Word
Mobile files will be transformed into Word
files. While most of the texts and paragraphs
will be kept during this transformation, some
of the format and properties may be lost.
Excel Mobile
You may use Excel Mobile to edit files. Through the
synchronization, you can keep the updated content
in both of this device and your computer. You may
use Excel Mobile to create documents like Statement
of Income and Expenditure.
If you want to create a new Excel file, tap Start >
Office Mobile > Excel Mobile > New. Your Excel
Mobile can only open one document at one time.
1. Add / Delete folders in “All Folders”.
2. Tap “Name” (“Date”, “Size”, or “Type”) to change
the arrangement of the list.
3. Tap a file, and then, open it.
4. Hold down on a file to activate the pop-up menu.
5. Tap “Open” to open a file.
6. Tap “Menu” for more options.
OneNote Mobile
OneNote Mobile allows you to edit notes. Tap Start >
Office Mobile > OneNote Mobile > New to create a
new note. After editing, you may select “Done” to end
editing.
9.5 Windows Media Player
The saved Excel Mobile file will be saved in the list of
“Excel Mobile”. To delete, copy, or send a file, hold
down on the desired file to activate the pop-up menu.
Your Excel Mobile provides basic worksheet tools,
for example, formula, function, sorting, and filtering.
Your Windows Media Player allows you to play audio
and video. Tap Start > Multimedia > Windows Media,
activate Windows Media Player.
Note: When you are synchronizing or copying
files from the device to PC, Excel Mobile files
will be transformed into Excel files. While most
of the settings will be kept during this
transformation, some of the format and
properties may be lost.
S1205│ 9-3
Player in this device can play Windows Media and
MP3 files.
9.6 Internet Explorer
You may use the following methods to browse
websites. Tap Start > Internet Explorer to activate
Internet Explorer.
You may:
Synchronize your favorite URL links from your PC to
the device. These URL links are saved in “My
Favorite” in Internet Explorer in your computer.
Connect to an Internet Server Provider (ISP) or
network, and browse websites. You can download
files and programs from the Internet or business
Intranet.
1. Tap
to view in full screen.
to display the wanted website, from
2. Tap
which find the wanted music and image to play.
3. Tap
to return to the previous file.
4. Tap
or
5. Tap
to skip to the next file.
to play or pause.
6. Tap
or
Browsing Internet:
1. Connect this device with the Internet via GPRS or
Wi-Fi.
2. Tap Start > Internet Explorer
3. Tap
to get more settings.
4. Tap
to return to the previous page. Tap
to launch Favorites. Tap
Input Method. Tap
to adjust the volume.
Tap Menu > Library, and then select the location of
storage to open files.
1. Tap Menu > Open File to open files. Tap Menu >
Update Library to update files in your phone and
files in Micro SD card to the libraries in phone and
in Micro SD card.
2. In order to play music or video, select a file you
want in Library, and then, tap “Play.”
You may use the synchronization to copy the files
from your computer to this device. Windows Media
contents of the webpage. Tap
Menu.
5. In Favorites, tap
page, tap
to activate
to enlarge or shrink the
to launch
to return to the previous
to add your favorite webpage, tap
to add a new folder, tap
to edit the
to delete webpage
webpage and folders, tap
and folders.
6. Input a website in the URL field. Tap the icon
beside the URL field to browse the website. Hold
S1205│ 9-4
down on any area of the webpage to activate the
pop-up menu.
9.7 Calculator
Calculator helps you run simple operations in this
device. Tap Start > Tools > Calculator to use your
calculator.
save records. To adjust the countdown clock, slide
Time icon, and then, tap
countdown.
. Tap
to start the
9.10 Zip
You can save the space of storage and increase the
efficiency of the device by compressing some of your
files with Zip.
9.8 Games
You can select games you like in this device for
entertainments.
1. Tap Start > Games
2. Then select a game.
Zipping Files:
1. To zip a file, tap Start > File Explorer.
2. Hold down on a file you would like to zip to
activate the pop-up menu.
3. Select “Add to Zip file” on the pop-up menu.
9.9 Stopwatch
You can use the stopwatch to count time. Tap Start >
Tools > Stopwatch.
Then, you may:
․Select a compressing method according to your
need.
․Encrypt a file. When you unzip the file, the
system will ask you to input the password.
․Tap “Start” to compress the file.
Unzipping Files:
1. To unzip a file, tap Start > Tools > Zip.
2. You may select a different folder for more Zip files.
In the list of files, tap the file you would like to
unzip.
3. Tap “Yes”, and then, input the password (if
required) to decompress the file.
Tap
to count time. Tap
time-counting function. Tap
to pause the
to add records. Tap
to stop the time-counting function. Tap
to
S1205│ 9-5
9.11 Pocket Backup
Tap Start > Tools > Pocket Backup.
Note: Before you upgrade the system of your
device, you can tap “Backup” to backup the files
you want to save. After you upgrade the system
of your device, you can tap “Restore” to restore
the saved files to your device.
9.12 Search Phone
Tap Start > Search Phone.
You can get the files or data by the
keyword-searching function. Input the keyword in the
field of “Search for” and choose the type of data in
the field of “Type”. Then tap “Search”.
9.13 Remote Desktop Mobile
Tap Start > Remote Desktop Mobile.
Backup
1. On the initial screen, select Backup.
2. On the next screen, you are asked to select the
items you would like to save in the backup. Tap
“Next” to continue.
3. On the next screen, you should provide the
name of the file and the location of the storage.
Tap “Next” to start the process.
Restore
You can select a file to restore.
You can connect your device to your computer, and
then, you can use your device to control your
computer via Active Sync. Input your IP address in
the field of “Computer”, user name in the field of
“User name”, password in the field of “Password”,
domain in the field of “Domain”, and then, tap
“Connect.”
9.14 Voice Commander
Record voice commands for activating Contacts and
Applications. Tap Start > Voice Commander.
Schedule
1. On the initial screen, select Schedule.
2. On the next screen, you can customize the
scheduled backup. Tap “Done” to save the
settings.
S1205│ 9-6
10. Specifications
Items
Specifications
System Information
Operating System
Microsoft Windows Mobile 6.5 Professional
Processor
MT6516 at 416MHz
Memory
ROM 256 MB, RAM 128 MB
Size
Dimensions
(L x W x T)
Weight
Battery
Battery Capacity
Standby time
Talk time
110.6 x 55 x 13.1 mm
114.5 g (including Battery)
Li-Poly pack 1320 mAh
Up to 150 hours (It may vary depending on the availability of local networks
and individual usage.)
Up to 4 hours (It may vary depending on the availability of local networks
and individual usage.)
Display Characteristics
Type
3.2”, 65, 536 WQVGA TFT LCD touch panel
Resolution
240 x 400 pixels
Band
*GSM/GPRS/EDGE
Band
850/900/1800/1900
Connectivity
Bluetooth
Bluetooth 2.1
Wi-Fi
IEEE 802.11b/g
CSD
Y
Modem dial-up
Y
USB
Micro USB 2.0
Image
Format
JPEG, GIF, PNG, BMP
Max Size (per)
Depends on available RAM
Audio
S1205│ 10-1
Format
Max Size
Video
Format
Max Size
Phonebook
Size
Ringtone
Type
Polyphone
Digital Camera
Type
Camera
Video Recording
Message
Windows Live
Messenger
SMS
MMS
E-mail
External Memory
Type
Max Size
Operating Temperature
MP3, AMR, AAC, MIDI
Depends on available RAM
Temperature
-10℃~45℃
3GP, WMV7/8/9, H.264 D1
Depends on available RAM
Depends on available RAM
MP3, AAC, AMR
64 polyphonic MIDI file
JPEG, GIF, PNG, BMP
3.0 mega pixels
Y
Y
Y
Y
Y
Micro SD Card
Maximum to 16 GB
S1205│ 10-2
11. FAQ
Why can’t I turn on the device?
Please make sure that the device has sufficient
power, and that the battery is secured in the device.
Plug the device to an outlet by the AC charger.
Check whether the LED light on the device has
turned on, and then, press Power Key on the device
to turn on the device.
Why can’t my device make any sound alerts?
on the upper-right corner
Tap the speaker icon
of the screen, and then, adjust the volume.
When I open a file or activate a program, an
“Insufficient Memory” message pops up. How
should I do?
The memory of the device is shared by both of the
storage and programs. You can follow the steps
below to release memory.
1. Remove the rarely used programs.
2. Remove the rarely used files.
If the connection still fails, remove ActiveSync in your
computer, and reinstall it.
How do I take out the Micro SD card from the SD
adapter?
The card slot on this device is designed for the Micro
SD card. To remove the Micro SD card from the SD
card adapter, please press the card, and then, take
out it.
Can I synchronize information with PC and
Microsoft Exchange Server at the same time?
No. You can only synchronize information either with
PC or with Exchange Server at one time.
How do I connect a Bluetooth headset to my
device?
1. Tap Start > Settings > Bluetooth > Devices tab,
and then, tap “Add new device”.
2. Tap the name of the Bluetooth headset, and then,
tap “Next”. The device will pair the device with the
Bluetooth headset automatically.
3. Windows Mobile will try one of the preconfigured
password (0000, 1234…) to pair the Bluetooth
headset with the device automatically.
Why doesn’t the screen respond to my touch
accurately?
Tap Start > Settings > System > Screen > General
tab. Select “Align Screen” to align the screen.
My device cannot form a successful connection
with ActiveSync. How should I do?
Please make sure you have installed ActiveSync 4.5
or later version in your computer. You can download
the latest version from Microsoft’s website.
Please make sure you have connected the device to
the computer with a USB cable.
Make sure that you are not running another program
that is using the same serial port.
How do I create a sound alert for incoming text
messages in my device?
1. Tap Start > Settings > Sounds & Notifications.
2. In Notifications tab, select “Messaging: New text
message” in the Event menu.
3. Check “Play sound”, and then, choose a sound.
How do I process Restore to Default by using
hard keys?
This operation will delete all your personal data, and
restore all setting to manufacturer default.
1. Press Side Key (Volume Up) and Camera Key at
the same time, and then press Power Key.
S1205│11-1
2. Follow the on-screen instructions, press Side Key
(Volume down) to restore manufacturer default
value. If you want to cancel this operation, press
other keys.
Note: When the power of the battery is low, you
may not process Restore to Default.
How can I get a hard copy of the user manual?
You may download the user manual in the Product
page of GSmart’s official website
(www.gigabytecm.com).
If this document is modified, please download the
latest version from GSmart’s official website.
GIGA-BYTE COMMUNICATIONS INC.
B2, No. 207, Sec. 3, Beixin Road,
Xindian, Taipei, 231, Taiwan
+886-2-89132220
www.gigabytecm.com
S1205│11-2