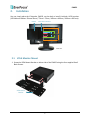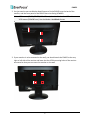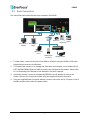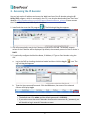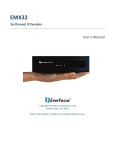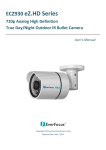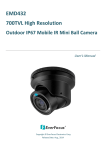
1
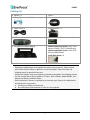
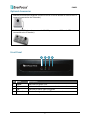
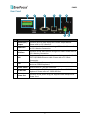
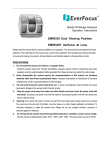
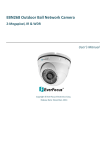
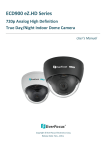
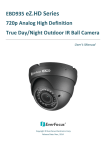
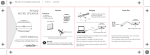
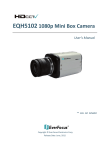
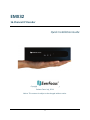
EMX32 16-Channel IP Decoder Quick Installation Guide Copyright © EverFocus Electronics Corp, Release Date: July, 2014 Notice: This content is subject to be changed without notice. ii EMX32 1. Introduction The EverFocus EMX32 IP Decoder is an open, true 1080p HD Decoder. The device can simultaneously decode up to four high definition (1080P) or standard definition (720P) video streams, and display those streams in up to four division screens on a monitor. The EMX32 IP Decoder can display its views on HD monitors or televisions. The EMX32 IP Decoder is able to decode IP streams from EverFocus and ONVIF and RTSP-compliant IP devices. It is used as a medium to connect the cameras and the monitor for displaying video in different screen division. It supports the third-party IP cameras which are compatible with ONVIF standards and RTSP protocol, and it can automatically search for ONVIF supported third-party IP devices under the same LAN. The cost-effective EMX32 IP Decoder eliminates the cost of the traditional DVR or PC. Just used with a monitor only, you can easily view all the IP or analog video streams. The operator can control and configure the settings either through the user-friendly local display OSD or by the intuitive web-based user interface. The EMX32 provide two video outputs HDMI and VGA, and both video output ports can be used simultaneously. It also has one RS-485 port for connecting joystick or keyboard. This slim, compact and VESA-mountable design is easy to install and can be used anywhere such as retail stores or offices. System Requirements Before installing, please check that your computer meets the following system requirements. Operating System CPU RAM VGA LAN Speed Web Browser Other Remote Application Windows XP (32-bit) / Win7 (32 and 64-bit) Intel Core 2 Duo, 2.6GHz 2GB AGP or PCI-Express, 800x600 (1280x1024 recommended), 32-bit color 10 / 100 / 1000 Mbps (RJ45) Windows (IE 8, 9, 10, Chrome, Firefox, Safari), MAC (TBD) 1. EverFocus’ CMS: Power Video Plus (Windows AP) 2. EverFocus’ mobile app: MobileFocus for iOS and Android devices MobileFocusHD for iPad EverFocus IP Camera Support List The latest EverFocus IP Camera Support List for EMX32 will be updated on our website, please go to http://www.everfocus.com.tw/HQ/Support/DownloadCenter_p1.aspx to download the document. 1 EMX32 Packing List • EMX32 x 1 • CD x 1 (Please see Note 3.) • QIG x 1 • Mouse x 1 • Power Cord x 1 • Power Adaptor x 1 • IR Remote Control x 1 • AAA Battery x 2 (Please see Note 4.) • VESA Monitor Mount Bracket • Washer Head Sliver Screw x 4 for VESA Mount ( 50x50 / 75x75 / 100x100 mm) • Washer Head Black Screw x 4 for VESA Mount( 200x200 mm) • Small Black Screw x 4 Note: 1. Equipment configurations and supplied accessories vary by country. Please consult your local EverFocus office or agents for more information. Please also keep the shipping carton for possible future use. 2. Contact the shipper if any items appear to have been damaged in the shipping process. 3. The CD contains the IP Utility software, EF Player, JAVA software, Adobe Reader, User Manual and Quick Installation Guide. 4. Risk of explosion if battery is replaced by an incorrect type. Dispose of used batteries according to the instructions. a. Use only two AAA dry cell batteries. b. Do not dispose of the batteries in a fire as it may explode. 2 EMX32 Optional Accessories • EKB200 (USB controller keyboard: connect to the PC or the IP decoder to control the PTZ cameras connected to the IP decoder). • EKB500 (RS-485 keyboard: connect to the RS-485 port to control OSD or the PTZ cameras connected to the IP decoder). Front Panel 1 No. 1 2 3 4 Name Power LAN I/O IR Receiver 2 3 4 Description Indicates the power is on. Indicates the IP decoder is connected to the network. Indicates an alarm input is triggered. Receiver for signals from the IR remote control. 3 EMX32 Rear Panel 1 2 3 4 5 6 7 No. Name Alarm Input / 1 Output 2 HDMI Port 3 VGA Port 4 LAN 5 USB 6 Power Switch 7 RS-485 Port 8 Power Port 8 Description Connects up to 4 alarm inputs and 1 alarm output devices. Please refer to 2.3.3 Alarm IO. Connects to the Main monitor using a HDMI cable. Please refer to 2.3.1 Monitor Connection. Connects to the Main monitor using a VGA cable. Please refer to 2.3.1 Monitor Connection. Connects to IP cameras or to the network using a standard RJ-45 CAT5 10/100Mb Ethernet cable. Please refer to 2.3 Basic Connection. The USB2.0 port for connecting to a mouse, external storage device or EKB200 keyboard. Press to turn On / Off the IP decoder. Connects to the RS-485 device, such as EverFocus’ EKB-500 keyboard. Please refer to 2.3.4 RS-485 Port. Connects to the power using the supplied Power Adaptor and Power Cord. 4 EMX32 2. Installation You can simply place the IP decoder, EMX32, on the desk or install it behind a VESA monitor. (VESA Mount Bracket: 50mmx 50mm / 75mm x 75mm / 100mm x 100mm / 200mm x 200 mm). EMX32 VESA Mount Bracket 50 75 100 200 Unit: mm 2.1 VESA Monitor Mount 1. Screw the VESA Mount Bracket on either side of the EMX32 using the four supplied Small Black Screws. VESA Mount Bracket 5 EMX32 2. You just need to use two Washer Head Screws to fix the EMX32 onto the back of the monitor, and the front panel of the EMX32 has to be facing UPWARD. Note: VESA mount (50x50 / 75x75 / 100x100 mm): Use the Washer Head Sliver Screws. VESA mount (200x200 mm): Use the Washer Head Black Screws. 3. If your monitor is to be mounted on the wall, you should attach the EMX32 to the very right or left side of the monitor and leave the four VESA mounting holes of the monitor uncovered so that you can screw the monitor on the wall. 6 EMX32 2.2 Basic Connection The instructions below describe the basic connection for EMX32. 1 2 Network Main Monitor Main Monitor (VGA) (HDMI) Web Remote Client 3 4 Power Mouse or EKB200 supply Keyboard DVR ONVIF/RTSP IP Camera Analog Camera 1. To view videos, connect a monitor to the HDMI or VGA port using the HDMI or VGA cable supplied by the monitor manufacturer. 2. To receive video streams or to manage the IP decoder over network, use a standard RJ-45 CAT5 10/100/1000Mb Ethernet cable to connect the LAN port to the network. Please refer to 2.4 Connecting the IP decoder to the Network in the User’s Manual. 3. Optionally connect a mouse or a keyboard (EKB200) to the IP decoder to control the system. You can also control the system using the supplied IR Remote Controller. 4. Using the supplied Power Cord with Adaptor, connect one end to the DC 12V port on the IP decoder and the other end to the power outlet. 7 EMX32 3. Accessing the IP decoder You can look up the IP address and access the Web interface of the IP decoder using the IP Utility (IPU) program, which is contained in the CD. It can also be downloaded from EverFocus’ Website: http://www.everfocus.com/HQ/Support/DownloadCenter_p1.aspx. Please connect the IP decoder in the same LAN of your computer. 1. Install and then start the IPU program . The following dialog box appears. 2. IPU will automatically search the IP devices connected in the LAN. The default network values of the IP devices will be displayed. By default, the network protocol of the IP device is DHCP. 3. To optionally configure the Machine Name, IP Address, IP Type or Port Number using the IPU: a. Log in the DVR by checking the desired model and then click the Log in Log in dialog box appears. b. Type the Username and Password. Click the OK button, the status of the selected camera will display Login. icon. The Note: 1. The default user ID is admin and the default password is 11111111. 2. If you select more than one IP decoders that have the same user ID / password, you will be able to log in several IP decoders at once. 8 EMX32 c. Right click the column to configure the setting. Click Apply Changes apply and save the settings. button to Note: Most networks uses DHCP to assign IP address, if you are unsure of your network settings, please consult your network administrators for configuration details. 4. To access to the Live View window, double click the IP address of the desired device, the login window pops up. Type the user ID and password to log in. By default, the user ID is admin and the password is 11111111. 5. When first connecting to the IP decoder’s IP address, the following dialog may appear. Please check the “Always trust content from this publisher” box and click the Run button to run the EverFocus Viewer application. 9 EMX32 6. You might be required to download ActiveX and JAVA software for viewing the camera feed. If asked, click Yes. For more details, please refer to 5. Install JAVA Runtime and 6. Browser Security Setting. 7. You may need to turn User Account Control off if you still can’t see the Remote Live View, please see the step below. 8. On the computer, click Start > Control Panel > System and Security > Action Center (click Change User Account Control Settings), the User Account Control Settings window appears. Adjust the slide bar to Never Notify and then click OK. Restart your computer if requested. 9. If your PC or laptop is running with Windows, it’s required to run the browser as administrator when first entering the remote web page (IE browser) of the device. Go to C:\Program Files (x86)\Internet Explorer, right-click the browser and then click Run as administrator. 10. Now you will be able to see the remote live page. 10 EMX32 4. Installing JAVA Runtime You need to install the latest JAVA software for stable operation. 1. When first connecting to the IP decoder’s IP address, the following dialog will show up if you didn’t install the JAVA software or its latest version on your computer. 2. Please click Update to go to the JAVA website http://www.java.com/en/, and download the latest version of the JAVA software. 3. Please go to the Control Panel > JAVA Control Panel to change settings. 4. If you can’t find the JAVA in the Control Panel, please go to Program Files > Java > jre7 > bin and double-click the javacpl (JAVA Control Panel). 5. Click Advanced tap on the top of the window, and scroll to “Mixed code (sandboxed vs. trusted) security verification”, and select the Enable – hide warning and run with protections. 11 EMX32 6. Scroll to “Check for certificate revocation using”, and select the Online Certificate Status Protocol (OCSP). Also, check Place JAVA icon in system tray in “Miscellaneous” option. 7. Scroll to “Default JAVA for Browser” and check Mozilla family. 8. Connect the IP decoder’s IP address again and the yellow bar may pop up on the top of the window. Please click it to run the JAVA application. 12 EMX32 5. Browser Security Setting 5.1 Installing ActiveX Controls Follow the steps below to install the ActiveX Controls when you first connect to the IP decoder’s IP address. If you do not see the images below, your security settings may be too high. If so, go to “Section 5.2 Enabling ActiveX Controls.” 1. You may also prompt to install the MSXML file. Please right-click the yellow bar and select “Run Add-on…” 2. Install the MSXML file when prompted to do so. 3. Now you will be able to see the remote live page. 4. Please refer to 4. Accessing the IP decoder to adjust the settings of the User Account Control if you still can’t see the remote live view. 13 EMX32 5.2 Enabling Active Controls Note this section is only necessary if you DO NOT see the image in step 1 of the 5.1 Installing ActiveX Controls popping up when you first connect to the IP decoder. 1. At the top of the Internet Explorer Window, click on Tools and then select Internet Options. 2. Click the Security tab at the top of the window and then click Custom Level…. 14 EMX32 3. In the Security Settings window, scroll to “ActiveX controls and plug-ins”. Set the controls as follows: “Enable”: Allow previously unused ActiveX controls to run without prompt (Internet Explorer 7 only) Allow scriptlets (IE7 only) Automatic prompting for ActiveX controls Binary and script behaviors Display video and animation on a webpage that does not use external media player (IE7 only) Run ActiveX controls and plug-ins Script ActiveX controls marked safe for scripting “Prompt”: Download signed ActiveX controls Download unsigned ActiveX controls “Disable”: Initialize and script ActiveX controls not marked as safe 4. Click OK and then choose Yes to change the security settings. 5. Close the window so you are back at the login screen. 15 EMX32 6. Click the Refresh button to reload the page. 7. You may need to run the EverFocusViewer application when prompted to do so. 8. The login page will show up. Type in the user name and password and click Login to view the cameras. The default User Name is admin, while the password is 11111111. 16 EverFocus Electronics Corp. EverFocus Taiwan: 12F, No.79, Sec. 1, Shin-Tai Wu Road, Hsi-Chih, Taipei, Taiwan TEL: +886 2 2698 2334 FAX: +886 2 2698 2380 www.everfocus.com.tw [email protected] EverFocus Europe - Germany: Albert-Einstein-Strasse 1, D-46446 Emmerich, Germany TEL: +49 2822 93940 FAX: +49 2822 939495 www.everfocus.de [email protected] EverFocus China - Beijing: Room 609, Technology Trade Building, Shangdi Information Industry Base, Haidian District, Beijing 100085, China TEL: +86 10 6297 3336~39 FAX: +86 10 6297 1423 www.everfocus.com.cn [email protected] EverFocus China - Shenzhen: 4F, No. 2, D4 Building, Wan Yelong Industrial Park, Tangtou Road, Shiyan, Baoan, Shenzhen, Guangdong 518101, China TEL: +86 755 2765 1313 FAX: +86 755 2765 0337 www.everfocus.com.cn [email protected] EverFocus USA - California: 1801 Highland Avenue, Unit A, Duarte, CA 91010, USA TEL: +1 626 844 8888 FAX: +1 626 844 8838 www.everfocus.com [email protected] EverFocus USA - New York: 415 Oser Avenue, Unit S, Hauppauge, NY 11788, USA TEL: +1 631 436 5070 FAX: +1 631 436 5027 www.everfocus.com [email protected] EverFocus Japan: 3F, Kuramochi, Building II, 2-2-3 Koto-Bashi,Sumida-Ku, Tokyo, 130-0022, Japan TEL: +81 3 5625 8188 FAX: +81 3 5625 8189 www.everfocus.co.jp [email protected] EverFocus China - Shanghai: Room 403, Ruijin Business Center, No.96, Zhaojiabang Road, Luwan district, Shanghai 200020, China TEL: +86 21 6471 2229 / 6471 2291 FAX: +86 21 6471 0566 www.everfocus.com.cn [email protected] EverFocus India: Suite 803, Housefin Bhavan, C-21, Bandra Kurla Complex, Bandra (East), Mumbai 400051, India TEL: +91 22 6128 8700 FAX: +91 22 6128 8705 www.everfocus.in [email protected] Your EverFocus product is designed and manufactured with high quality materials and components which can be recycled and reused. This symbol means that electrical and electronic equipment, at their end-of-life, should be disposed of separately from your household waste. Please, dispose of this equipment at your local community waste collection/recycling centre. In the European Union there are separate collection systems for used electrical and electronic product. Please, help us to conserve the environment we live in! Ihr EverFocus Produkt wurde entwickelt und hergestellt mit qualitativ hochwertigen Materialien und Komponenten, die recycelt und wieder verwendet werden können. Dieses Symbol bedeutet, dass elektrische und elektronische Geräte am Ende ihrer Nutzungsdauer vom Hausmüll getrennt entsorgt werden sollen. Bitte entsorgen Sie dieses Gerät bei Ihrer örtlichen kommunalen Sammelstelle oder im Recycling Centre. Helfen Sie uns bitte, die Umwelt zu erhalten, in der wir leben! P/N: 4605PEMX32B022A