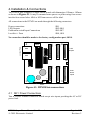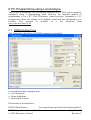
1
1. Introduction The DTM30 Super Tower Master is an advanced controller to operate and display DCC accessories around a layout. It is designed to control and display points, track occupancy sensors & signals & can also control other DCC accessory devices. The DTM30 Super Tower Master automates “layout control panels” and similar devices. It allows points, sensors and signals around the layout to be displayed with LEDs and controlled with pushbuttons. These interactions are all controlled through LocoNet, the local area network supported by Digitrax and other DCC systems. This means that the control panel has minimal wiring associated with it – typically just power and LocoNet into the panel. Multiple panels can be used to control parts of the layout. The ability to control the accessory devices through handheld throttles, or using a PC, is not affected. The DTM30 allows interoperability with PC control programs. This allows both computer and manual control of trackwork, while making sure accidents don’t occur. The operator can have full control, or control only when the PC says it is safe. Throttle Throttle SP:70 SP:70 User Constructed Control Panel Pushbutton switch inputs 9-12V AC or DC DTM30 Tower Master DCS100/ DB150 Command Station LED Drive Outputs LocoNet BDL168 Sensor Board DAC10 Accessory Decoder DS64 Accessory Decoder SIGM20 Signal Controller 3 or 4 aspect signals point motors LocoNet is a Registered Trade Mark of Digitrax, Inc., Norcross, GA, USA DTM30 Super Tower Master User Manual CML Electronics Limited Page 1 of 47 Revision: 2 1.1 Feature Overview The DTM30 is designed to automate user provided layout control panels or CTC panels. This is to allow control and display of points, block occupancy sensors and other devices on a layout. All of this is controlled through the DCC and Loconet buses without requiring any further wiring to the accessory devices themselves. The board has 30 control “cells”. Each cell controls and/or displays a layout device; it can have one or two LEDs and one or two pushbuttons. Each cell may: • Display & control a point on the track. The point is displayed with two LEDs (closed, thrown) and controlled normally by one button. The point’s state is displayed correctly whether it was operated by a DTM30 cell or by a throttle. A “cascade” mechanism allows the “active” path into a yard to be displayed, with points not on the active path unlit. • Points can be interlocked with a PC application such as Railroad & Co: this allows the PC software to prevent changes to the track settings while it runs trains through them. • Display the state of two block occupancy sensors. This is useful to construct occupancy diagrams, for example to show train position on hidden tracks. • Display & control the aspect of a signal on an SE8c or SIGM10 controller. The signal aspect can be shown using two or 4 LEDs per signal. • Display & control the track direction for a SIGM10 reverse running zone. This allows the operator to control the direction for single track working. • Display & control other devices operated by DCC accessory decoders. Attached devices such as turntables & lighting can be controlled using pushbuttons to set them to either state. The DTM30 supports local Routes. Each route may set up to 12 points; routes can cascade, and can be invoked either from a pushbutton or by a throttle. There is also an “Initialisation” function that can set the state of all controlled points with a single button press. A PC based tool takes the drudgery out of configuring the unit. The settings are entered & stored on the PC, and downloaded directly through LocoNet using an MS100 or LocoBuffer unit. lit if CLOSED pushbutton Point Cell lit if THROWN Signal cell: shows current signal aspect lit if THROWN Sensor Cell: lit if block occupied DTM30 reverse running zone direction Point Cell lit if CLOSED DTM30 Super Tower Master User Manual CML Electronics Limited lit if E-W lit if W-E Page 2 of 47 Revision: 2 Example of panel display possible with the DTM30 1.2 User Manual Content 1. Introduction .......................................................................................................................... 1 1.1 Feature Overview ........................................................................................................................ 2 1.2 User Manual Content .................................................................................................................. 3 2. Safety First! .......................................................................................................................... 4 3. Getting Started ...................................................................................................................... 5 Used For ............................................................................................................................................ 5 4. Installation & Connections................................................................................................... 6 4.1 SK1: Power Connections............................................................................................................. 6 4.2 SK2-SK4: LED Drive Outputs.................................................................................................... 7 4.3 SK5-SK7: Pushbutton Switch Inputs.......................................................................................... 9 4.4 SK8, SK9: LocoNet Connections ........................................................................................... 11 4.5 JP1 ............................................................................................................................................. 12 4.6 LED Test Function .................................................................................................................... 12 5. Detailed description of DTM30 Functions.......................................................................... 13 5.1 Output Control Cells ................................................................................................................. 13 5.1.1 Point Control Cells ................................................................................................................. 13 5.1.2 Track Occupancy Sensor Cells................................................................................................ 16 5.1.3 SIGM10 Signal Cells.............................................................................................................. 17 5.1.4 SIGM10 Reverse Running Zone Cells .................................................................................... 18 5.1.5 SE8c Signal Cells ................................................................................................................... 19 5.1.6 Interlock Cells ........................................................................................................................ 20 5.1.7 “Copy” Cells .......................................................................................................................... 22 5.1.8 “Board mode” Cells................................................................................................................ 22 5.2 Routes ........................................................................................................................................ 23 5.2.1 “To/From” Mode.................................................................................................................... 24 5.2.2 Pushbuttons ............................................................................................................................ 25 5.2.3 Cascading Routes ................................................................................................................... 25 5.2.4 External activation.................................................................................................................. 25 5.3 Other Pushbutton Functions ..................................................................................................... 25 5.4 Initialise ..................................................................................................................................... 26 5.5 Operating Modes ....................................................................................................................... 26 6. 7. PC Programming using LocoAnalyse................................................................................. 28 6.1 DTM30 Editing Form................................................................................................................ 28 6.2 DTM30 Cell Editing dialog ....................................................................................................... 31 6.2.1 Pushbutton Functions.............................................................................................................. 33 6.2.2 Typical programming of pushbuttons...................................................................................... 34 6.3 DTM30 Route Editing Form ..................................................................................................... 35 DTM30 Configuration Variables (CVs).............................................................................. 36 Appendix A LocoNet Interrogation Sequence........................................................................ 37 Appendix B Upgrades for DTM16 rev A Products .................................................................... 38 DTM30 Super Tower Master User Manual CML Electronics Limited Page 3 of 47 Revision: 2 Appendix C Upgrades for DTM16 rev B Products .................................................................... 40 Appendix D DTM30 and Slips................................................................................................... 42 Appendix E Interlock Cells ....................................................................................................... 44 Appendix F Interlocking with Railroad & Co........................................................................... 45 2. Safety First! Before beginning to use the DTM30, there are a few safety points to remember: • Hold the board by its edges. By the nature of its construction, some of the pins on the reverse side of the board are sharp and could cause skin abrasions etc if handled incorrectly. • Allow airflow around the board. Some of its components may run warm in use. Do not obstruct free circulation of air, or allow cloths etc to cover the board. • Do not exceed rated operating voltage. The board could be damaged if an excessive input voltage is applied. The input voltage must not exceed 16v DC. 9V DC is sufficient for normal operation • Do not handle the board when in use. The voltages present on the board (<25v DC) are not considered hazardous to health. However if they should come into contact with sensitive parts of the body (e.g. the mouth) a nasty shock might result. The same is true of the voltage on the rails of a DCC (or other model railway) system, so take care! • Don’t rest the board when operating on the black bag: it is conductive! • Do not power the board from the same transformer winding as the command station. The board should be fed from a separate transformer output. The same transformer can feed several DTM30 units, and it is believed it can share the same power feed with BDL-16 and BDL-162 boards. • Do not connect the LocoNet feed to the “front” connectors for UP3 or similar panels. This will not cause damage, but it will not allow correct operation. DTM30 Super Tower Master User Manual CML Electronics Limited Page 4 of 47 Revision: 2 3. Getting Started This product has a lot of functions and options. These can appear daunting at first. However it isn’t necessary to absorb all of the manual, or all of the features, to get started. this guide is written to point to the appropriate sections to get going. By a long way, the easiest way to configure the board is with a PC. This is accomplished using the “Locoanalyse” program which can be downloaded free from our website. Locoanalyse allows users to choose all of the settings for the board, download them to the board’s memory, and save the settings to disk. The PC is not required for normal operation thereafter. Use of this program is described in section 6. The various board cell types are described in section 5. The wiring instructions for LEDs and pushbuttons are described there for each cell type. This includes recommending how LEDs and pushbuttons should be connected. The connectors to be used for this are described in section 4.2 and 4.3. Many users will want to get started with simple uses of the following cell types. The manual sections are as follows: Cell Type Used For Manual section Point Cell Controlling points, crossovers etc 5.1.1 Sensor Cell Display a block detector 5.1.2 Routes Set a track path through several points 5.2 SIGM10/20 Signal Cells Display & control a signal 5.1.3 SIGM10/20 Reverse Display & control track running 5.1.4 Running Zones direction SE8c signal cells Display & control a signal 5.1.5 Some users may want to control their railway both manually and using a PC program. For those users, the sections on board modes and Interlock Cells is relevant; see sections 5.1.6, 5.1.8, 5.5, Appendix E and Appendix F. DTM30 Super Tower Master User Manual CML Electronics Limited Page 5 of 47 Revision: 2 4. Installation & Connections The DTM30 unit comprises a single circuit board with dimensions 102mm x 102mm as shown in Figure 4.1. It may be mounted onto spacers or pillars using four screws into the four corner holes: 6BA or M2.5mm screws will be ideal. All connections to the DTM30 are made through the following connectors: Power connections LED Outputs Pushbutton switch Input Connections LocoNet Ports SK1 SK2-SK4 SK5-SK7 SK8, SK9 No connection should be made to the factory configuration port, SK10. 0 0 7 7 Loconet Ports SK4 2 1 SK3 2 1 SK2 2 1 SK10 LED Outputs SK8 SK9 26 25 0 26 25 26 25 SK7 2 1 SK6 2 1 SK5 2 1 7 SW1 Pushbutton Inputs JP1 26 25 26 25 SK1 26 25 LED1 Power Figure 4.1: DTM30 Interconnections 4.1 SK1: Power Connections This is a screw terminal connectors which accept wire inputs providing the AC or DC power feed. DTM30 Super Tower Master User Manual CML Electronics Limited Page 6 of 47 Revision: 2 SK1 AC AC 2 1 SK1: 2 pin screw terminal Pin SK1 pin 1 SK1 pin 2 Function DC power Signal Level Connects to 9-12v DC input. DC power Connect to programming track for configuration We recommend a DC power feed to the board. In normal use, SK1 is connected to 9V-12V DC in. It may be connected either way round. In general, the lower the supply voltage the better: the board needs no more than 9v DC for normal operation. This power must not come from the same transformer winding as the command station. It is believed that the DTM30 may be connected to the same power feed as for BDL16 or BDL162 boards. If configuration via a DCC programming track is needed, the DCC programming track should be connected to the 2 pins of SK1. The DCC programming track input is not polarity sensitive: either rail input may be connected to either pin. This is not needed if LocoNet programming from a PC is being used (see section 6). In normal use the DTM30 derives its operating power from the AC/DC input. With all LEDs lit it consumes up to approximately 450mA from the input; with half of the LEDs lit (typical in most cases) it will consume 250mA. The power feed can be obtained from many sources and should be readily available within the model railway world. Suitable power supplies from Argos are: • 982-7253 (300mA: will usually supply one DTM30 board); • 982-7538 (1200mA: will supply 3 - 4 DTM30 boards). The voltage regulator (the device with a metal tab near the power input connector) can get very hot depending on the input supply voltage and the number of LEDs lit. It may be necessary to use a heatsink on the regulator device. A piece of aluminium approx. 2” x 3” should be sufficient. Alternatively a suitable heatsink can be purchased from CML Electronics Limited. The temperature is minimised if the input supply voltage is minimised as described above. 4.2 SK2-SK4: LED Drive Outputs These pins allow connection of external Light Emitting Diodes (LEDs) to monitor the position of the sensors or controlled points. Typically these will be fitted into an operator panel alongside of the layout. The DTM30 includes built in current limiting resistors for these LED outputs; these limit the current to approximately 7mA. The board is best used with “high brightness” LEDs which are bright at this current setting. DTM30 Super Tower Master User Manual CML Electronics Limited Page 7 of 47 Revision: 2 Each cell has 2 LEDs: LEDxA and LEDxB. For example cell 17 has LED17A, LED17B. The LEDs are wired in groups of 4 LEDs, with each group having a common return. The LEDs are wired with their cathodes (negative connection) to the named pin, and their anodes (positive connection) to the named common return. To facilitate this, the ribbon cable can be split into 5 strips each of 5 wires, starting from the “red stripe” end (pin 1). The 26th wire on each cable is not used and can be cut off. For example the first 4 cells would be wired as follows: 5 1 2 3 4 LED 1,2 common 10 LED1A 6 LED1B 7 LED2A 8 LED2B 9 LED 3,4 common LED3A LED3B LED4A LED4B ribbon cable wire number DO NOT CONNECT THE COMMON RETURNS TOGETHER! “LED1,2 common” must NOT be connected to “LED3,4common” etc or damage may result. The ribbon cables are assembled by crimping the connector onto the cable using a vice. Be careful to check by eye that the cable’s conductors are aligned with the “vee” shaped contacts that pierce the insulation. arro w re d in e=p strip 1 1 5 6 10 11 15 nd tr a e d s st rd la is c a d 16 The red stripe must be by the arrow marking pin 1; but the ribbon of wire can come out of either side of the connector. 20 21 25 DTM30 Super Tower Master User Manual CML Electronics Limited Page 8 of 47 Revision: 2 Pin 1 2 3 4 5 6 7 8 9 10 11 12 13 14 15 16 17 18 19 20 21 22 23 24 25 26 SK2 LED1A LED1B LED2A LED2B LED1,2 common LED3A LED3B LED4A LED4B LED3,4 common LED5A LED5B LED6A LED6B LED5,6 common LED7A LED7B LED8A LED8B LED7,8 common LED9A LED9B LED10A LED10B LED9,10 common Unused SK3 LED11A LED11B LED12A LED12B LED11,12 common LED13A LED13B LED14A LED14B LED13,14 common LED15A LED15B LED16A LED16B LED15,16 common LED17A LED17B LED18A LED18B LED17,18 common LED19A LED19B LED20A LED20B LED19,20 common Unused SK4 LED21A LED21B LED22A LED22B LED21,22 common LED23A LED23B LED24A LED24B LED23,24 common LED25A LED25B LED26A LED26B LED25,26 common LED27A LED27B LED28A LED28B LED27,28 common LED29A LED29B LED30A LED30B LED29,30 common Unused Specific information for wiring these LEDs for each cell type are provided in Section 5. The LED “Anode” is the terminal which is positive when the LED is lit. The “Cathode” is the pin that is connected to the negative supply. A small 9v battery can be used to determine this. Generally the cathode can be identified because it has an “anvil” like structure inside the LED. Commonly – but sadly not universally - the anode will have a longer lead than the cathode. 4.3 SK5-SK7: Pushbutton Switch Inputs These pins are provided to connect pushbutton switches to control assigned devices. The only type of switch that may be used is a “push to make, release to break” type. Latching switches – e.g. toggle switches – must not be used. DTM30 Super Tower Master User Manual CML Electronics Limited Page 9 of 47 Revision: 2 Each cell has 2 pushbutton switch inputs: SWxA and SWxB. For example cell 17 has SW17A, SW17B. The pushbutton switches are wired in groups of 4 switches, with each group having a common return. To facilitate this, the ribbon cable can be split into 5 strips each of 5 wires, starting from the “red stripe” end (pin 1). The 26th wire is not used and can be cut off. Pin 1 2 3 4 5 6 7 8 9 10 11 12 13 14 15 16 17 18 19 20 21 22 23 24 25 26 SK5 SW1A SW1B SW2A SW2B SW1,2 common SW3A SW3B SW4A SW4B SW3,4 common SW5A SW5B SW6A SW6B SW5,6 common SW7A SW7B SW8A SW8B SW7,8 common SW9A SW9B SW10A SW10B SW9,10 common Unused SK6 SW11A SW11B SW12A SW12B SW11,12 common SW13A SW13B SW14A SW14B SW13,14 common SW15A SW15B SW16A SW16B SW15,16 common SW17A SW17B SW18A SW18B SW17,18 common SW19A SW19B SW20A SW20B SW19,20 common Unused SK7 SW21A SW21B SW22A SW22B SW21,22 common SW23A SW23B SW24A SW24B SW23,24 common SW25A SW25B SW26A SW26B SW25,26 common SW27A SW27B SW28A SW28B SW27,28 common SW29A SW29B SW30A SW30B SW29,30 common Unused For example the first 4 cells would be wired as follows: DTM30 Super Tower Master User Manual CML Electronics Limited Page 10 of 47 Revision: 2 1 2 3 4 5 SW1A 6 SW1B 7 SW2A 8 SW2B 9 SW 1,2 common 10 SW3A SW3B SW4A SW4B SW 3,4 common DO NOT CONNECT THE COMMON RETURNS TOGETHER! “SW1,2 common” must NOT be connected to “SW3,4common” etc or damage may result. If more than one switch should be pressed, the unit will ignore all switch input until all are released. 4.4 SK8, SK9: LocoNet Connections These two identical connectors allow for connection to a LocoNet network using conventional 6 pin RJ12 (US style telephone) connectors. The two connectors are wired in parallel: the LocoNet wiring may be connected to either port, or may be daisy-chained through the DTM30. Do not connect via the “front” connectors on a Digitrax throttle panel, e.g. UP3. The board will not function correctly because the Rail_Sync signals are propagated differently on those connectors. SK8, SK9 Pin 1 2 3 4 5 6 6 pin RJ12 Function RAIL_SYNCLocoNet Ground LocoNet LocoNet + LocoNet Ground RAIL_SYNC+ These signals are defined in the LocoNet Specification which is available from Digitrax. The board decodes the DCC accessory packets from the RAIL_SYNC signals on these connectors. DTM30 Super Tower Master User Manual CML Electronics Limited Page 11 of 47 Revision: 2 4.5 JP1 This jumper should be inserted if it is necessary to program the board on a programming track. In all other conditions it should be removed. JP1 Position Installed Not installed 2 position jumper Function Board configuration in service mode Normal use. (JP1 is located adjacent to power connector SK1) 4.6 LED Test Function The DTM30 has a “lamp test” function to ensure that all cells have been wired correctly. It is recommended that this test be used to establish that the wiring is correct. This test is invoked by powering up the board while the pushbutton switch mounted on the board is pressed. This has the following effect: • All cell LEDs will be lit in turn, for approximately 1 second per LED. This is done in the sequence: cell 1 LED A; cell 1 LED B; cell 2 LED A; cell 2 LED B; cell 3 LED A; etc • When all cell LEDs have been lit, a single “beep” will be sounded. (If no LocoNet connection is found, 5 beeps will be generated at this point). Thereafter, the cell pushbuttons will light corresponding LEDs: Cell 1 pushbutton A will light cell 1 LED A; Cell 1 pushbutton B will light cell 1 LED B; Cell 2 pushbutton A will light cell 2 LED A; Cell 2 pushbutton B will light cell 2 LED B; Cell 3 pushbutton A will light cell 3 LED A; Cell 3 pushbutton B will light cell 3 LED B etc To resume normal operation, remove then re-apply power. DTM30 Super Tower Master User Manual CML Electronics Limited Page 12 of 47 Revision: 2 5. Detailed description of DTM30 Functions This section describes, in detail, the behaviour of each cell type. It recommends how the LEDs and pushbuttons should be used; however experienced users may be able to determine other effective combinations. 5.1 Output Control Cells Devices operated or displayed by the board each need to be assigned to a cell. The DTM30 board has a total of 30 cells available; any function can be assigned to any cell. This section lists the functions of each cell type. 5.1.1 Point Control Cells Point control cells are used primarily to operate points. They may also be used to operate other devices that are controlled by DCC accessory decoders that respond to “Thrown” or “Closed” settings. A point is displayed by two LEDs: LED A is lit if the point is THROWN and LED B is lit if the point is CLOSED. Commonly, a panel will display the state using two LEDs (one in each exit path from the point) and be controlled by one pushbutton, which changes its state every time a button is pressed. lit if CLOSED pushbutton lit if THROWN 5.1.1.1 Recommended LED Usage It is recommended that two LEDs of the same colour are used. They display the state of the point correctly (whether the point is controlled from the DTM30 or from a LocoNet throttle) as follows: LED A Off On Off * Off LED B Off Off On Off * Point State Unknown (after power is applied) Thrown Closed LED A flashes when the point is being changed to Thrown LED B flashes when the point is being changed to Closed DTM30 Super Tower Master User Manual CML Electronics Limited Page 13 of 47 Revision: 2 The flashing state indicates the point is in the process of changing. If the points are selected for “Turnout Feedback” monitoring – appropriate only where microswitches indicate the point tiebar position to the Accessory Decoder – then the flashing continues until a response message is seen from the Accessory decoder. LED common THROWN CLOSED LEDA LEDB 5.1.1.2 Pushbuttons The point can be controlled using pushbuttons connected to the cell. There are three button types that can be programmed. The most common use is with one pushbutton per point: every time it is pressed, the point state changes. To achieve this, one button per cell (e.g. pushbutton A) is programmed to have the “Change Point” function. The other button can be used to control routes or other effects. For some uses, it may be appropriate to use two buttons, explicitly to set the point to a particular direction. This is most useful for devices other than points: for example to control a turntable, where each press on “closed” makes the turntable rotate anticlockwise and each press of “thrown” makes it rotate clockwise. In this case, two pushbuttons would be used; one would be programmed as “Set Point Closed” and the other as “Set Point Thrown” 5.1.1.3 Cascading The point display can be augmented so that the route into a yard or other complex junction is clear, by turning off indications for points that aren’t on the active path. This is appropriate e.g. for entry into a yard where several points cascade into parallel tracks. If the cascade logic is not used, then the LEDs for all points will be lit: this can be confusing. The cascade logic allows the LEDs for points only leading to the “input” track to be lit. This indicates the “route” into the yard and no others. (In this description a point is closed if set to the leftmost position; thrown for the rightmost position. Other conventions can of course be used as long as the user is consistent in programming). DTM30 Super Tower Master User Manual CML Electronics Limited Page 14 of 47 Revision: 2 cc bc A ac C B at ct bt D closed cc bc A ac at dt closed (no cascade programming) ct B dc thrown C bt D dc dt thrown (with cascade programming) Without cascade programming, each point will have one of the two LEDs lit. To reach the top track from the input in the diagram above, with no cascade programming the point display could be as shown in the left diagram. This has two LEDs lit in the storage road tracks which may be confusing. “dc” is lit, but the train cannot get there. With “Cascade” programmed, only the points forming part of the active route will have their LEDs lit. To reach the same track, with cascade programmed, point D will have no LEDs lit leading to the unambiguous diagram on the right. To program this junction, it is necessary to program each cell as follows: Cell A: no specific programming needed; Cell B: cascades from Cell A, closed side; Cell C: cascades from Cell B, closed side; Cell D: cascades from Cell A, thrown side. 5.1.1.4 Advanced Functions Point cells can be interlocked with PC software (e.g. RR&Co) through the use on Interlock Cells: see section 5.1.6. When assigned to one of the four available Interlocks, the pushbuttons will only operate to change the point position if the interlock is active (i.e. its LED is green). If it is pressed while the interlock is inactive, the button will be ignored and a short “beep” will sound. There is an “emergency override” facility: if the button is pressed for more than two seconds, the point will be activated as normal. Be aware, however, this probably means that the track is reserved by the PC for train movements. Points are normally sensed by the DCC accessory messages sent to them. However, if the layout is wired for “turnout feedback” reporting with microswitches on the point tiebars, then the cells can be programmed to respond to those messages instead In that case, the DCC messages are ignored and indication is provided in response to the “turnout feedback” messages only. This means that if the point does not respond (e.g. because its tiebar is stuck) the display will not change. DTM30 Super Tower Master User Manual CML Electronics Limited Page 15 of 47 Revision: 2 5.1.2 Track Occupancy Sensor Cells A DTM30 “cell” can be programmed to display the state of two consecutive track occupancy detectors, or any other device interfaced to LocoNet sensor inputs. This is useful to provide display to the operator of train position as the trains move around the railway, for example on hidden tracks. 5.1.2.1 Recommended LED Usage The two sensors are displayed on two LEDs. LED B displays the programmed sensor number; LED A displays the next higher sensor number. For example if the cell is programmed to display sensor 7 on board 15: LED B displays 15,7 and A displays 15,8. LED common LEDA When a LocoNet sensor message is detected: • If sensor occupied, LED becomes lit; • If sensor unoccupied, LED becomes off. LEDB It is recommended that the LED colours should be different from that used to display point position. When the sensor state is unknown (e.g. immediately after power up) the LED display can be set to have both LEDs off, or both LEDs flashing. The latter option explicitly indicates that the state isn’t known, and can be useful to debug message communication problems (e.g. caused by a poorly crimped LocoNet cable). 5.1.2.2 Pushbuttons In most cases, pushbuttons are not needed for sensor cells; the two pushbutton inputs can be used for other effects (e.g. controlling routes). 5.1.2.3 Advanced Functions For specialised applications it is possible to use pushbuttons to generate sensor messages. This may be useful to allow interaction with a PC software program: for example pressing a button to trigger a sensor message could be used to reserve a piece of track, or request a PC controlled route. There are two sensor button types that may be programmed: • “sensor message ON when pressed”: when this button is pressed, the sensor state is set to “on” and a sensor “on” message is sent to LocoNet. PC software ca be programmed to respond to that message. When the button is released, a sensor “off” message is sent. DTM30 Super Tower Master User Manual Page 16 of 47 CML Electronics Limited Revision: 2 • “sensor message toggle”: when this button is pressed, the sensor state is inverted and a sensor message is sent to LocoNet. This each successive press generates sensor on, off, on, off, on etc messages. This allows latching operation and may be useful if it is necessary to indicate that something is reserved or needed until the operator is ready to release it. 5.1.3 SIGM10 Signal Cells These cells are used to display the state of a signal controlled by the SIGM10 or SIGM20 Automatic Signal Controller. These signals change state in response to train movements and other signal settings, and generate a special message to show their state. Signal cells often need to be able to display several possible aspects. This may require more than two LEDs that are available from a single cell. Consequently the DTM30 has a special facility called a “copy cell” (see section 5.1.7) that can be used to extend the number of LEDs available for display of each signal. Some possible combinations are described below. 5.1.3.1 Simple LED Usage The most simple display is via a bi-colour LED. To use this, the signal aspect display needs to be programmed to “Bi-Colour LED”. This is a package with separate red & green LEDs internally. The DTM30 will light red or green to display those aspects, or both (which mix to give an amber colour) to display the “amber” aspect. LED common bicolour LED green LEDA LEDB red Note the bi-colour LED needs to be a “common anode” type; e.g. Rapid electronics part number 55-1682 The common (anode) is the centre wire for CML Electronics supplied LEDs 5.1.3.2 Multiple Aspect display More complex displays with 4 LEDs may be created by using a “copy” cell. The signal cell is set to provide one aspect display (usually driving the red & green LEDs), and the copy cell drives additional LEDs. The combination of the two allows 4 LEDs to provide a more realistic display. The signal cell is normally programmed to “red & green LEDs”. Its two LEDs provide those aspect displays. It may also be programmed to “red & green LEDs, DTM30 Super Tower Master User Manual CML Electronics Limited Page 17 of 47 Revision: 2 flash red if forced” in which case the red LED will flash if the signal has been overridden to red by manual intervention. The “copy” cell is programmed to copy the state of the signal cell, and display further LEDs. There are currently two possible displays: “amber & 2nd amber” used for 4 aspect signals, or “amber & reverse running” used for 3 aspect signals. Signal Cell wiring Copy Cell wiring LED common red green LED common 2nd amber LEDA LEDA LEDB LEDB Signal Appearance amber green amber red 2nd amber LED wiring for “amber & 2nd amber” display Signal Cell wiring Copy Cell wiring LED common green red LED common rev run LEDA LEDA LEDB LEDB Signal Appearance amber reverse running green amber red LED wiring for “amber & reverse running” display 5.1.3.3 Pushbuttons In many cases, it will not be necessary to have pushbuttons; the pushbuttons can be used for other effects (e.g. controlling Routes). However, the SIGM10 does have a “manual override” to allow the operator to force a signal to red. If the user wants access to that facility, then two pushbuttons should be programmed as follows: • One button should be programmed to “Force Signal Red”. When pressed, it will force the signal red. • One button should be programmed to “Normal Signal Operation”. When pressed, it will release the signal to normal operation. 5.1.4 SIGM10 Reverse Running Zone Cells The SIGM10 & SIGM20 Automatic Signal Controllers provide control over the direction in which a single piece of track is to be run. This allows the signals to be set appropriately for the current direction. By convention the two directions are called “West to East” and “East to West”. DTM30 Super Tower Master User Manual CML Electronics Limited Page 18 of 47 Revision: 2 The DTM30 provides a cell type to control and display the running direction of the zone. This allows the direction that has been set automatically to be seen, and if necessary overridden. 5.1.4.1 Recommended LED Usage Two LEDs are used: “A” is lit for “West to East” operation and “B” is lit for “East to West” operation. It is suggested that these be a different colour than used elsewhere on the panel. LED common WestEast LEDA EastWest The LEDs can be programmed to flash if the zone direction has been locked by manual intervention. LEDB 5.1.4.2 Pushbuttons Two pushbuttons can be used to provide manual control over the current running direction. The two buttons should be programmed to “Set Reverse Running Zone W-E” and to “Set Reverse Running Zone E-W” respectively. Each press of these buttons sends a DCC accessory message to the SIGM10, to request a change of running direction. It is possible to lock the direction by pressing the button for a two second period: this causes the signal controller not to change the direction automatically until it has been released by a further “normal” button press. 5.1.5 SE8c Signal Cells These cells are used to display & control the state of a signal controlled by the SE8c Signal Controller. These signals are controlled by combinations of one or two DCC accessory addresses, depending on how the SE8c is set up. Signal cells often need to be able to display several possible aspects. This may require more than two LEDs that are available from a single cell. Consequently the DTM30 has a special facility called a “copy cell” (see section 5.1.7) that can be used to extend the number of LEDs available for display of each signal. Some possible combinations are described below. 5.1.5.1 Simple LED Usage The most simple display is via a bi-colour LED. To use this, the signal aspect display needs to be programmed to “Bi-Colour LED”. This is a package with separate red & green LEDs internally. The DTM30 will light red or green to display those aspects, or DTM30 Super Tower Master User Manual CML Electronics Limited Page 19 of 47 Revision: 2 both (which mix to give an amber colour) to display the “amber” aspect. When the signal is set to “flashing amber”, the red & green LEDs both flash to simulate a flashing amber colour. LED common bicolour LED green red Note the bi-colour LED needs to be a “common anode” type; e.g. Rapid electronics part number 55-1682 The common (anode) is the centre wire for CML Electronics supplied LEDs LEDA LEDB 5.1.5.2 Multiple Aspect display More complex displays with 4 LEDs may be created by using a “copy” cell. The signal cell is set to provide one aspect display (usually driving the red & green LEDs), and the copy cell drives additional LEDs. The combination of the two allows 4 LEDs to provide a more realistic display. The signal cell is programmed to “red & green LEDs”. Its two LEDs provide those aspect displays. The “copy” cell is programmed to copy the signal cell’s state, and display the “amber & 2nd amber” aspect. The amber LED will blink if the signal shows the “flashing amber” aspect. Signal Cell wiring Copy Cell wiring LED common green Signal Appearance LED common red amber LEDA LEDA LEDB LEDB green amber red 5.1.5.3 Pushbuttons If the user needs to be able to control the signal aspect, a cell pushbutton should be programmed to “Step SE8c Signal aspect”. This will cause the signal aspect to be stepped on each button press in a cycle. 5.1.6 Interlock Cells This section is appropriate if you are using a PC for railway control as well as local panels. DTM30 Super Tower Master User Manual CML Electronics Limited Page 20 of 47 Revision: 2 In “Interlocked” mode (see section 5.5), each DTM30 board can interact with up to 4 zones of track where individual “protected” operation is needed. Each point can be assigned to one of the four zones (and can be assigned to “no zone” if unrestricted operation is desired). When the User wishes to operate points in a “protected” zone, she must first determine that the PC application does not have that track reserved for another operation. This is achieved by a special cell type known as a “Interlock” cell. The behaviour of an Interlock cell is intimately connected with programming of the PC control software. At the time of writing, Interlocks are not explicitly supported by Railroad & Co and the behaviour needs to be programmed carefully by the user. Information regarding this programming is provided in Appendix E; it is recommended that this mode is not used except by users familiar with the PC software and how to program its behaviour. Interlocks begin in an “Inactive” state. In this state, the track is assumed to be reserved by the PC, and point control would be unsafe. In this condition, the points will not respond to their pushbuttons. When the Interlock cell’s pushbutton is pressed, the DTM30 requests use of the track from the PC software. If that request is granted, the cell enters “Active” state and the LEDs change state. Points will now respond normally to their pushbuttons. The PC software will recognise the track as being used for manual operations, and will hold other trains outside the protected zone until the operation is complete. When manual operation has concluded, the Interlock cell’s pushbutton is again pressed, and the DTM30 requests release of the track from the PC software. If that request is granted, the cell enters “Inctive” state and the LEDs change state. (There is no strong reason, other than message failure, for the request not to be granted; however formally there is a message exchange for this operation). 5.1.6.1 Recommended LED Usage An Interlock cell has two LEDs: B (green) and A (red). When Red, the zone is controlled by the PC and the user is locked out. When green, the user is able to control points in the zone. LED common red LEDA LEDB green A lit if point operation not safe; B lit if point operation is OK The LED flashes while the unit is exchanging information with the PC. DTM30 Super Tower Master User Manual CML Electronics Limited Page 21 of 47 Revision: 2 5.1.6.2 Pushbuttons One push button for the cell should be programmed as “Change Interlock”. The other may be used for other effects (e.g. controlling routes). 5.1.7 “Copy” Cells A copy cell displays the state that belongs to another cell. There are two common uses for copy cells: • If it is required to light several LEDs for one point (for example if it is displayed twice on the panel). In this case one cell is programmed as normal for the point; the additional LEDs are driven by one or more “copy” cells that simply act the same way as the cell they imitate. • Some signal cell displays need more than two LEDs: for example a 4 aspect signal needs 4 LEDs. A “copy” cell is used to provide the additional LEDs: see sections 5.1.3.2 and 5.1.5.2. A copy cell does not need any push button inputs of its own. Its pushbutton inputs can be used for other purposes, e.g. triggering routes. 5.1.8 “Board mode” Cells A Board Mode cell can be used if desired to display the mode that the board is in (see section 5.5). If the user intends the board to be changed between “Standalone” mode and “Interlocked” mode, it may be useful to have LEDs on the console to inform the operator of the currently selected mode. This is achieved by programming a cell to act as a board mode display. A “board mode” cell is not always needed: it is only required if the user wants LED display of the current mode. If the board is not to be used with PC software, and the board will always be in “Standalone” mode, there is absolutely no need to program a board mode cell. 5.1.8.1 Recommended LED Usage It is recommended that two LEDs are used, with different colours from others on the panel to avoid confusion. They are lit as follows: LED common LEDA LEDB • If the board is in “Standalone” mode: no LEDs are lit • If the board is in “Interlocked” mode: LED A is lit • If the board is in “Slave” mode: LED B is lit DTM30 Super Tower Master User Manual CML Electronics Limited Page 22 of 47 Revision: 2 5.1.8.2 Pushbuttons A Board Mode cell does not need any push button inputs of its own. There are two pushbutton functions that may be desired, however: • Toggle Interlock Mode: if this function is programmed into any cell’s push button, then each press will change the board mode between Standalone mode and Interlocked mode. • Toggle Slave Mode: if this function is programmed into any cell’s push button, then each press will change the board mode between Standalone mode and Slave mode. Additionally, the board mode can be changed in response to DCC commands to two accessory addresses (which are programmed through the PC as normal). Address Enter Slave mode Enter Slave mode Enter Interlocked mode Enter Interlocked mode Setting Closed Thrown Closed Thrown Effect Board enters “Standalone” mode Board enters “Slave” mode Board enters “Standalone” mode Board enters “Interlocked” mode 5.2 Routes Each DTM30 can control 24 Local Routes. Each route allows up to 12 points to be set to a particular state. This is useful to preset a particular route through the trackwork – for example into a station or into a fiddle yard. Points may be those controlled by cells within the DTM30 unit, or may be any other point. Each route is invoked in response to a button press. When pressed, the set of up to 12 points will be commanded to go to the required state (closed or thrown). The instructions to the command station are issued one at a time, with a programmable delay between them. This is to allow time for any capacitor discharge units to recharge between point setting commands. Each route consists of up to 12 entries. The entries can be used to hold the following information: • Each point in the route belonging to a DTM30 cell needs one entry; • Each point in the route that doesn’t belong to a DTM30 cell needs two entries; • A cascading route after this route needs one entry; • If “to/from” mode is used, the start and end locations use one entry each. Common combinations of available entries might include: DTM30 Super Tower Master User Manual CML Electronics Limited Page 23 of 47 Revision: 2 • • • • • 12 points local to the DTM30 executed in normal route mode; 10 points local to the DTM30 executed in “to/from” mode; 11 points local to the DTM30 in normal route mode, plus a cascaded route; 9 points local to the DTM30 in “to/from” mode, plus a cascaded route; 8 points local to the DTM30 in normal route mode, plus 2 points not listed in the DTM30’s cells; • etc. A route button being pressed causes a long “beep” to sound. 5.2.1 “To/From” Mode Most commonly, routes are invoked with a single button press; the user’s panel may have a table that says words to the effect of: • “route 1 gets me from the main line to station platform 1” • “route 2 gets me from the main line to station platform 2” • “route 5 gets me from station platform 1 to engine shed access road” • “route 6 gets me from station platform 2 to engine shed access road” • “route 9 gets me from engine shed access road to engine shed road 1” • “route 11 gets me from engine shed access road to engine shed road 3” • etc To get a locomotive from station platform 2 to engine shed road 3 needs TWO routes to be identified from the table then executed: route 6 followed by route 11. An alternative way to use routes supported by the DTM30 is to have TWO button presses that encode the “start location” and the “end location”. This is called “to/from” route mode. In this mode, each route is programmed with a start and end location; when the two buttons are detected (in either order) the route is executed. A long “beep” sounds when the route is found and executed; a short “beep” happens if that route combination hasn’t been programmed. For the example above, the track diagram on the control panel would have pushbuttons inserted into certain track positions: • • • • • • • • Route button 1 in station platform 1 track; Route button 2 in station platform 2 track; Route button 3 in station platform 3 track; Route button 4 in station platform 4 track; Route button 5 in main line; Route button 6 in engine shed road 1; Route button 7 in engine shed road 2; Route button 8 in engine shed road 3. DTM30 Super Tower Master User Manual CML Electronics Limited Page 24 of 47 Revision: 2 To get a locomotive from station platform 2 to engine shed road 3 needs two button presses, but only one route. Press the button in the station platform 2 track, then the button in the engine shed road 3 track. The user does not need to remember the route table. platform 4 platform 3 platform 2 platform 1 main line Dingleberry station road 1 road 2 road 3 Engine Shed Note that is necessary for the user to define all the valid combinations of route; the DTM30 doesn’t know the track connections and cannot work it out itself! 5.2.2 Pushbuttons Unlike the board’s cells, Routes do not have their “own” pushbuttons. Instead, any unused buttons belonging to the cells can be used to execute routes. For a DTM30 with all cells controlling points and each using pushbutton “A” to change each point, there will be 30 pushbutton “B” inputs available to control routes. 5.2.3 Cascading Routes Routes may be cascaded. For example when route 3 has executed, route 5 may be automatically executed after it. A “cascade” entry takes up one route entry. 5.2.4 External activation Each local route can be invoked by setting a DCC accessory device to THROWN or CLOSED. The board occupies 25 accessory addresses to allow the local routes to be remotely activated. The 25th address activates the “Initialise” function described in section 5.4. 5.3 Other Pushbutton Functions There are a number of pushbutton functions that do not “belong” to a cell type, but can be programmed into any cell with unused pushbuttons. These have the following effects: DTM30 Super Tower Master User Manual Page 25 of 47 CML Electronics Limited Revision: 2 Initialise All Points Toggle Interlock Mode Toggle Slave Mode Track Power On Track Power Off Emergency Stop Start Interrogate Sequence Execute Route Number Sets all point cells to the state programmed for them (see section 5.4). Useful to get trackwork to a fixed condition Change between “Standalone” & “Interlock” mode on each press. See section 5.1.8.2. Change between “Standalone” & “Slave” mode on each press. See section 5.1.8.2. Turns track power on. Turns track power off. Stops all trains, leaving power on. Initiates the “interrogate” sequence used to discover all track & sensor settings. Initiates a route. See section 5.2. 5.4 Initialise There is an “initialise” function available on the board. When activated, all points will be set to a programmed state, as defined in each cell’s settings. This facility is useful to set all trackwork to an initial condition, e.g. at the start of an operating session. The initialise function is activated by a pushbutton programmed to the “Initialise All Points” setting. This pushbutton can be defined in any cell. When pressed, all points will be set to the state defined in their programming (Closed, Thrown, or left unchanged). The initialise command can also be invoked by a DCC accessory command. See section 5.2.4 for details. 5.5 Operating Modes The board has three operating modes. Two of these are only relevant if using PC railway automation software (e.g. Winlok, Railroad & Co) as well as DTM30 and other manual control products. The modes affect the way the board responds to pushbutton messages; in all cases, the LED displays will behave as normal. If in doubt, stick to Standalone mode! • “Standalone” mode is the most common operating mode, and should be used when the points etc are to be controlled directly in response to pushbutton presses. In this mode the DTM30 behaves similarly to a handheld throttle. When a point control pushbutton is pressed, the DTM30 sets the point by sending a “switch DTM30 Super Tower Master User Manual CML Electronics Limited Page 26 of 47 Revision: 2 request” message to the command station. All functions, including routes, operate normally. • “Slave” mode is used where the DTM30 is used purely to send commands to a PC program such as Winlok or Railroad & Co. All pushbuttons send a sensor message, instead of having their normal functions. Points etc are controlled by the PC program, rather than by the DTM30. Do not use this mode unless you are confident of what you are doing! • “Interlocked” mode is a “half and half” mode used in conjunction with a PC control program such as Railroad & Co, and affects control of points only. In this mode, the DTM30 directly controls points but only when allowed to do so by the PC program. This allows the PC program to reserve track for train movements, and the DTM30 will not change the state of points in reserved sections. Up to 4 reserved sections can be defined, each with its own Interlock. Points can be assigned to one Interlock; points that are not assigned to any Interlock may be controlled directly as normal. Do not use this mode unless you are a proficient user of the PC software! The board mode at power-up can be programmed, and the mode can be changed either by pushbuttons or in response to DCC accessory messages; see section 5.1.8 for more details. DTM30 Super Tower Master User Manual CML Electronics Limited Page 27 of 47 Revision: 2 6. PC Programming using LocoAnalyse The DTM30 is defined by over 500 system Variables (SVs). These can be manually configured using a programming track. However the intended method of programming is via a PC. CML Electronics Limited provides Locoanalyse, a PC program that allows the settings to be defined, stored and then downloaded over LocoNet. This program is available as a free download from www.cmlelectronics.co.uk 6.1 DTM30 Editing Form This form allows the full set of DTM30 settings to be specified. It is divided into three principal parts: • Cell definitions; • Route definitions; • Board mode Control. Each section is described here. DTM30 Identification Two controls that specify the board being defined: DTM30 Super Tower Master User Manual CML Electronics Limited Page 28 of 47 Revision: 2 Board Name Serial Number Cell Definitions Cell List Route Definitions Route List To/from Numbering DCC Address Board Mode Control Mode after power up Sensors Used A user defined name for the board. This is only used by the software to identify the board in lists. The board number to which programming instructions will be sent; marked on the processor chip. Defines the behaviour of each of the cells on the board. A list of all of the cells on the board, with a summary of their programming shown. Double clicking on an entry invokes the Cell Editor to change the definition for the cell. Specifies up to 24 routes to invoke a path through several points. A list of all of the routes available, with a summary of their programming shown. Double clicking on an entry invokes the Route Editor to change the points included in the route. When checked, routes are invoked by two button presses. The first press defines the “start” track and the second defines the “end” track. When not checked, a single button press selects a route. Defines a block of 25 DCC accessory addresses, starting at this number. These addresses when activated to either “Thrown” or “Closed” will cause the routes to be activated. If set to 0, this feature is disabled and no addresses are used. Controls the overall board operating mode. This sets the mode the board enters when switched on (Standalone, Slave or Interlock). This determines the sensor addresses are reserved by the board. • If the board is used in slave mode, it always uses 4 sensor board numbers1; • In Interlock mode, it will use 4 sensor addresses i.e ¼ of a full set. These are set to numbers 1-4, 5- 1 The terminology follows the convention for the BDL16x products from Digitrax; One BDL16x board occupies one sensor board number between 1-256; each board has 16 individual sensors. DTM30 Super Tower Master User Manual CML Electronics Limited Page 29 of 47 Revision: 2 8, 9-12 or 13-16 allowing 4 DTM30 boards to share a single sensor address. Sensor Board number DCC addr for Slave DCC Addr for Interlock Delay between Outputs Sets the sensor board number used in Interlock and Slave mode. In slave mode, the board will generate messages covering four sensor boards starting at this number; in interlock mode it will use 4 sensor addresses on this one board number. This DCC accessory address changes the board mode between Standalone and Slave modes. • If set to Thrown, enters “Slave” mode; • If set to Closed, enters “Standalone” mode. This DCC accessory address changes the board mode between Standalone and Interlock modes. • If set to Thrown, enters “Interlock” mode; • If set to Closed, enters “Standalone” mode. This control sets a delay in seconds between output commands for routes. This is provided to allow time for Capacitor Discharge units to recharge, if the Accessory Decoders do not provide that time delay themselves. DTM30 Super Tower Master User Manual CML Electronics Limited Page 30 of 47 Revision: 2 6.2 DTM30 Cell Editing dialog This dialog defines the configuration of one cell on the board. The top part applies to any cell; the bottom part has a number of sections that depend on the cell type selected. Description Cell Type Cell Number Pushbutton A&B Functions Point Cells User’s description for the cell. Used for documentation; doesn’t affect behaviour. Selects the cell type from a list. The settings for the remainder of the dialog is dependent on the chosen cell type. Used to specify a number: • DCC Accessory number for Point Cells • Board number for Sensor Cells • DCC Accessory number for Signal Cells • Cell number for “Copy” cells • DCC Accessory number for Interlock Cells Sets the functions of each of the two pushbuttons These settings are available if the cell type is set to “Point Cell”: see section 5.1.1. DTM30 Super Tower Master User Manual CML Electronics Limited Page 31 of 47 Revision: 2 Initialise Assigned to Interlock Cascade Use Turnout Feedback Sensor Cells Sensor Number Flash if Unknown Interlock Cells Interlock Number Signal Cells Aspect SIGM10 Reverse Zone Cells Flash if Direction Locked Sets the direction to which the point is set by the “Initialise” command, when used. specifies an interlock number on the board to which this point is assigned, if any. See section 5.1.6. This can be set to cascade from another point cell on the board. When that point is not in the state entered here, this cell’s LEDs are extinguished. This allows the “active” route through a junction to be more clearly lit. See section 5.1.1.3. When checked, the point state will be sensed from the layout using “Turnout Feedback” messages. Use this only if your accessory decoders have feedback microswitches wired to point tiebars. These settings are available if the cell type is set to “Sensor Cell”. See section 5.1.2. Sensor number on the board (1 to 16) When checked, the LEDs for each sensor will flash if the sensor state is not known. These settings are available if the cell type is set to “Interlock Cell”. See section 5.1.6. Specifies the board’s interlock number (1 to 4) controlled by this cell. These settings are available if the cell type is set to “SIGM10 Signal Cell” (section 5.1.3)or “SE8c Signal Cell” (section 5.1.5). Specifies how the signal state is shown on the two LEDs. Cells can be duplicated using “Copy” cells so that additional LEDs are available. These settings are available if the cell type is set to “SIGM10 Rev Zone Cell” (see section 5.1.4). When checked, the LEDs will flash if the running direction for zone has been locked by manual intervention. DTM30 Super Tower Master User Manual CML Electronics Limited Page 32 of 47 Revision: 2 6.2.1 Pushbutton Functions Each DTM30 cell has two assigned pushbuttons. The functions of these are programmable. The range of functions available is as follows: Cell Dependent Pushbuttons: (These buttons only function correctly when the cell type is set to the intended setting. If a button type is set to an unexpected value, it will not function correctly). Change Point Changes a point cell to the opposite of its current state; used with a single pushbutton per point. Set Point Closed Sets a point cell to Closed. Used if two pushbuttons per point are wanted for explicit direction setting. Set Point Thrown As above, but sets point cell Thrown. Sensor Message Toggle For sensor cells, sends a sensor message that is to the opposite of the current state. May be used to signal to PC software etc. Sensor Message on when pressed For sensor cells, sends a sensor “on” message when pressed & “off” message when released. May be used to signal to PC software etc Change Interlock For Interlock Cells, requests that the Interlock with PC software be activated or deactivated. The cell LEDs show whether this was successful or not. Force Signal Red For SIGM10 signal cells, override the signal to red state. Normal Signal Operation For SIGM10 signal cells, release the signal to automatic control. Set Reverse Running Zone W-E For SIGM10 reverse running zone cells, set the direction of the zone to the state shown. If the button is pressed for more than 2 seconds, the zone is set to “locked” in that direction and cannot be set automatically. Set Reverse Running Zone E-W See above. Step Signal Aspect for SE8c signal cells, step the aspect shown to the next possible state on each press. Other Pushbuttons: Initialise All Points (These pushbutton types do not depend on cell type and may be assigned to any otherwise unused pushbutton) Sets all point cells to the state programmed into them. Useful to get trackwork to a fixed condition DTM30 Super Tower Master User Manual CML Electronics Limited Page 33 of 47 Revision: 2 Toggle Interlock Mode Toggle Slave Mode Track Power On Track Power Off Emergency Stop Start Interrogate Sequence Execute Route Number Change between “Standalone” & “Interlock” mode on each press. Change between “Standalone” & “Slave” mode on each press. Turns track power on. Turns track power off. Stops all trains, leaving power on. initiates the “interrogate” sequence used to discover all track & sensor settings. Initiates a route; user enters the route number. 6.2.2 Typical programming of pushbuttons For guidance, typically the cells for a DTM30 will need their pushbuttons configured in particular ways. It is suggested that users begin with this configuration, and adopt others as experience grows. Cell Type Point Cell Sensor Cell SIGM10 Signal Cell SIGM10 Rev Zone Cell SE8c signal Cell Interlock Cell Copy Cell Board mode Cell Pushbuttons Defined Typically, one pushbutton is set to “Change Point”. Normally, no pushbuttons are used Normally, no pushbuttons are used. Pushbuttons are not always needed. Pushbutton are not usually needed. Normally, one pushbutton is used to request and release the interlock. This is set to “Change Interlock”. No buttons are needed. No buttons are needed. More advanced settings: DTM30 Super Tower Master User Manual CML Electronics Limited Page 34 of 47 Revision: 2 Cell Type Point Cell Pushbuttons Defined If it is desired to have two buttons (one for Closed, one for Thrown) then two buttons need to be defined; these should be set to “Set Point Closed” or “Set Point Thrown”. Sensor Cell Exceptionally, if a message needs to be sent to a PC program, a button can be assigned to send sensor messages… but this is rare. SIGM10 Signal Cell A button can be added to set the signal manually to red, in which case a second button is needed to release it to normal operation. SIGM10 Rev Zone Cell Two pushbuttons can be used to control the running direction: one should be programmed to “Set Reverse Running Zone W-E” and the other to “Set Reverse Running Zone E-W” SE8c signal Cell One pushbutton can be used to step between the various aspects. This is programmed to “Step SE8c Signal Aspect” Where buttons are not needed by the above functions, the “unused” buttons can be assigned to any of the “other pushbutton” button types listed above. Commonly, route buttons will be used in this way wherever spaces are available. 6.3 DTM30 Route Editing Form List of Points This is a list of all of the points forming the route, and the direction they are driven to for the route. At the end is a message indicating whether the DTM30 Super Tower Master User Manual CML Electronics Limited Page 35 of 47 Revision: 2 Point State Controls From, To Buttons Cascade Route number route fits into the space available. (If not, consider using two cascaded routes). At the bottom of the screen are two controls for editing a route entry. To change an entry: • Select the entry in the list; • Set the required direction using the combo box. Set to “Undefined” to remove an entry. • Set the point number in the left hand box. Note this is the DCC accessory number – as used on a throttle - not a cell number. • As changes are made, they are reflected into the list box above. If the board is in “To/From” mode, two button numbers are needed to invoke the route. These two numbers specify a pair of button numbers; when pressed one after the other, in either order, the route will be invoked. When checked, at the end of executing this route another route is also invoked. This can be used to create larger routes. Chooses the number of the other route cascaded from this one. 7. DTM30 Configuration Variables (CVs) A programming utility called “locoanalyse” can be downloaded free to configure this product. For those that are unable to use the PC method, a list of CVs is available as a download or on request from CML Electronics Limited. DTM30 Super Tower Master User Manual CML Electronics Limited Page 36 of 47 Revision: 2 Appendix A LocoNet Interrogation Sequence The DTM30 participates in the LocoNet accessory and sensor interrogation sequence which is controlled by some command stations (e.g. DCS100). This sequence is invoked after power is applied to the layout to find out the initial state of all points and track occupancy sensors. In a Digitrax system controlled by a DCS100, the command station sends accessory commands to special addresses. The accessory decoders respond by reporting their state over LocoNet. The DTM30 monitors these messages to discover the initial state of all attached devices. The LEDs are then lit accordingly. In a system controlled by some older command stations, the interrogate sequence is never invoked. The DTM30 will learn point states in those systems by detecting the first operation of a point. If a point state is not yet known and the pushbutton is pressed, by convention the point will be set to THROWN. Where the accessory decoders do not have a LocoNet connection – for example the Digitrax DS44 or decoders from other manufacturers, the initial state can only be discovered after DCC control packets have been sent to the device. Using the “Initialise” button on the DTM30 will set all points to a known state and set the LEDs accordingly. The DTM30 is also able to generate this sequence. This is sometimes useful to refresh the settings held by a PC software program. This can be achieves by setting an unallocated pushbutton to “Start Interrogate Sequence”. DTM30 Super Tower Master User Manual CML Electronics Limited Page 37 of 47 Revision: 2 Appendix B Upgrades for DTM16 rev A Products For users of DTM16 products, processor upgrades are available that extend the functionality. This enables the upgraded board to offer the new software features of the DTM30, but limited to the number of cells available in the original product. In most cases, the processor will be supplied for user upgrade. It is necessary to carry out a careful installation process, followed by setting the new board’s serial number. Usually this should be set to the original number for the board that has been upgraded. There are some differences regarding pushbutton & LED connections: • Each cell has two LEDs available for use. Ideally these should be wired according to the “new” wiring instructions for DTM30 boards; however in most cases the previous wiring for point and sensor cells will be OK without changes. • Pushbuttons that are used to toggle points, and buttons used to control routes, can be used as before without rewiring. Other functions new to the DTM30 can be assigned if needed. • It is a good idea to run through the lamp test (see section 4.6) to confirm wiring. Pushbuttons The pushbuttons will be reassigned as follows: From pin 1 3 5 7 9 11 13 15 17 19 21 23 25 27 29 31 33 To pin 2 4 6 8 10 12 14 16 18 20 22 24 26 28 30 32 34 SK5 Function Cell 1 pushbutton A Cell 2 pushbutton A Cell 3 pushbutton A Cell 4 pushbutton A Cell 5 pushbutton A Cell 6 pushbutton A Cell 7 pushbutton A Cell 8 pushbutton A Cell 9 pushbutton A Cell 10 pushbutton A Cell 11 pushbutton A Cell 12 pushbutton A Cell 13 pushbutton A Cell 14 pushbutton A Cell 15 pushbutton A No connection No connection From pin 1 3 5 7 9 11 13 15 17 19 21 23 25 27 29 31 33 To pin 2 4 6 8 10 12 14 16 18 20 22 24 26 28 30 32 34 SK6 Function Cell 16 pushbutton A Cell 1 pushbutton B Cell 2 pushbutton B Cell 3 pushbutton B Cell 4 pushbutton B Cell 5 pushbutton B Cell 6 pushbutton B Cell 7 pushbutton B Cell 8 pushbutton B Cell 9 pushbutton B Cell 10 pushbutton B Cell 11 pushbutton B Cell 12 pushbutton B Not used Cell 14 pushbutton B No connection No connection LED Outputs The LED outputs are employed as follows: DTM30 Super Tower Master User Manual CML Electronics Limited Page 38 of 47 Revision: 2 Signal Function LEDxA, Each LED output provides two pins: LEDxA and LEDxB. The LED should be LEDxB connected between these two signals and ground. Pin Number Function Pin Number Function SK3 pin 1 Do not connect SK3 pin 2 Do not connect SK3 pin 3 LED1A (for o/p 1) SK3 pin 4 LED1B SK3 pin 5 LED2A SK3 pin 6 LED2B SK3 pin 7 LED3A SK3 pin 8 LED3B SK3 pin 9 LED4A SK3 pin 10 LED4B SK3 pin 11 LED5A SK3 pin 12 LED5B SK3 pin 13 LED6A SK3 pin 14 LED6B SK3 pin 15 LED7A SK3 pin 16 LED7B SK3 pin 17 LED8A SK3 pin 18 LED8B SK3 pin 19 Do not connect SK3 pin 20 Do not connect Pin Number SK4 pin 1 SK4 pin 3 SK4 pin 5 SK4 pin 7 SK4 pin 9 SK4 pin 11 SK4 pin 13 SK4 pin 15 SK4 pin 17 SK4 pin 19 Function Do not connect LED9A (for o/p 9) LED10A LED11A LED12A LED13A LED14A LED15A LED16A Do not connect Pin Number SK4 pin 2 SK4 pin 4 SK4 pin 6 SK4 pin 8 SK4 pin 10 SK4 pin 12 SK4 pin 14 SK4 pin 16 SK4 pin 18 SK4 pin 20 Function Do not connect LED9B LED10B LED11B LED12B LED13B LED14B LED15B LED16B Do not connect LEDs should ideally be connected as per the instructions in sections 3 and 5. However, the cell output drive the LED anodes and the LED cathodes are all connected to the board “ground” connection. However, for point cells with existing wiring with “back to back” diodes, the existing wiring should be OK. DTM30 Super Tower Master User Manual CML Electronics Limited Page 39 of 47 Revision: 2 Appendix C Upgrades for DTM16 rev B Products For users of DTM16 products, processor upgrades are available that extend the functionality. This enables the upgraded board to offer the new software features of the DTM30, but limited to the number of cells available in the original product. In most cases, the processor will be supplied for user upgrade. It is necessary to carry out a careful installation process, followed by setting the new board’s serial number. Usually this should be set to the original number for the board that has been upgraded. There are some differences regarding pushbutton & LED connections: • Each cell has two LEDs available for use. Ideally these should be wired according to the “new” wiring instructions for DTM30 boards; however in most cases the previous wiring for point and sensor cells will be OK without changes. • Pushbuttons that are used to toggle points, and buttons used to control routes, can be used as before without rewiring. Other functions new to the DTM30 can be assigned if needed. • It is a good idea to run through the lamp test (see section 4.6) to confirm wiring. LED Outputs Connector type Pin 1 2 3 4 5 5 pin header plug, 0.1” pitch Function Cell X output A Cell X output B Cell X+1 output A Cell X+1 output B GND Connector Cells PL1 PL2 PL3 PL4 PL5 PL6 PL7 PL8 PL9 PL10 1, 2 3, 4 5, 6 7, 8 9, 10 11, 12 13, 14 15, 16 17, 18 19, 20 Note pin 1 is adjacent to an unused square pad on the board in each case, i.e. nearest to the top edge of the board. LEDs should ideally be connected as per the instructions in sections 3 and 5. However, the cell output drive the LED anodes and the LED cathodes are all connected to the “ground” pins. However, for point cells with existing wiring with “back to back” diodes, the existing wiring should be OK. Pushbuttons The pushbuttons will be reassigned as follows: DTM30 Super Tower Master User Manual CML Electronics Limited Page 40 of 47 Revision: 2 From pin 1 3 5 7 9 11 13 15 17 19 21 23 25 27 29 31 33 To pin 2 4 6 8 10 12 14 16 18 20 22 24 26 28 30 32 34 SK5 Function Cell 1 pushbutton A Cell 2 pushbutton A Cell 3 pushbutton A Cell 4 pushbutton A Cell 5 pushbutton A Cell 6 pushbutton A Cell 7 pushbutton A Cell 8 pushbutton A Cell 9 pushbutton A Cell 10 pushbutton A Cell 11 pushbutton A Cell 12 pushbutton A Cell 13 pushbutton A Cell 14 pushbutton A Cell 15 pushbutton A Cell 16 pushbutton A Cell 17 pushbutton A DTM30 Super Tower Master User Manual CML Electronics Limited From pin 1 3 5 7 9 11 13 15 17 19 21 23 25 27 29 31 33 To pin 2 4 6 8 10 12 14 16 18 20 22 24 26 28 30 32 34 SK6 Function Cell 18 pushbutton A Cell 19 pushbutton A Cell 20 pushbutton A Cell 1 pushbutton B Cell 2 pushbutton B Cell 3 pushbutton B Cell 4 pushbutton B Cell 5 pushbutton B Cell 6 pushbutton B Cell 7 pushbutton B Cell 8 pushbutton B Cell 9 pushbutton B Cell 10 pushbutton B Cell 11 pushbutton B Cell 12 pushbutton B Not used Cell 14 pushbutton B Page 41 of 47 Revision: 2 Appendix D DTM30 and Slips The double slip is a piece of trackwork which may behave as a diamond crossing or as points to offer the “curved” routes. It is controlled by two point motors each operating a tie bar (one at each end). It has four possible states. The states controlled by the tiebars and a possible way of indicating the route with LEDs is shown below. State 1: Left = CLOSED Right = CLOSED Bottom curved available. State 2: Left = CLOSED Right = THROWN route Straight route available. State 3: Left = THROWN Right = CLOSED Diagonal route available. LED1 LED2 LED3 State 4: Left = THROWN Right = THROWN LED4 Top curved route available. It can be seen from this that: • The right hand tie bar controls the left hand exit route and vice versa; • The switches and LEDs for a double slip should be installed at the opposite end from the point motor they control to get a meaningful display. Single Slips The single slip is like a double slip but with only one “curved” route. It is controlled by two point motors each operating a tie bar (one at each end). It has four possible states. However, it can be controlled by a single accessory decoder output driving two point motors, with both tiebars driven by the same throttle command. The states controlled by the tiebars and a possible way of indicating the route with LEDs is shown below. DTM30 Super Tower Master User Manual CML Electronics Limited Page 42 of 47 Revision: 2 State 1: Left = CLOSED Right = CLOSED LED1 LED2 LED3 LED4 Note both diagonal and straight through routes are available. State 4: Left = THROWN Right = THROWN Upper curve available. route only With a single accessory decoder driving both point motors, states 1 & 4 are the only two options. There are two other states the single slip can enter, but they offer no more useful options for a train to take: State 2: Left = CLOSED Right = THROWN Straight available. through route State 3: Left = THROWN Right = CLOSED Diagonal route only available. A single accessory address to control both tiebars can be achieved by: • Use a DAC10 to drive two point motors; use its “output following” feature to have one cell “copy” the other. • Use a DAC10 cell to drive two solenoid point motors directly; • Use two tortoise type point motors, driven by one decoder output (many accessory decoders can do that). DTM30 Super Tower Master User Manual CML Electronics Limited Page 43 of 47 Revision: 2 Appendix E Interlock Cells If you are not using a PC to control your railway, then ignore this section! Some users have computerised train control, but want a degree of manual control too. For example, a PC program might control train operations on the main line, allowing a user to operate a station: when a train arrives, the operator decouples the loco, and puts a new loco onto the front of the train ready for its exit. Ordinarily, this could sometimes lead to hazardous conditions: if the PC program is driving a train through a point which is then changed by the station operator, chaos can result. Interlock Cells allow points to be controlled by a local panel only when the PC program allows the operation. A description of how to use this feature with the well known PC program “Railroad & Co” is given in Appendix F. An interlock has two basic states: active and inactive. • When the interlock is active, points attached to that interlock cell can be controlled as normal. It is set to active state by setting a DCC accessory address programmed into the cell to THROWN. If its pushbutton is pressed, it sends a LocoNet sensor “off” message. • When the interlock is inactive, points attached to that interlock cell do not respond to normal button presses. It is set to active state by setting a DCC accessory address programmed into the cell to CLOSED. If its pushbutton is pressed, it sends a LocoNet sensor “on” message. To make this work, the PC program needs to be set to respond to the sensor “on” and sensor “off” messages: • When the PC program receives a sensor “on” message for the interlock cell, it must decide if it is safe for the points in that zone to be operated. Typically this is done by requesting a route through the zone; if the PC program doesn’t have that route reserved for something else, then the route is set. The point number controlling the interlock is set to THROWN as part of that route. If the track is reserved for something else, the PC must ignore the sensor “on” message. • When the PC program receives a sensor “off” message for the interlock cell, it should release the route used to reserve the track (for the “on” command) and set the DCC accessory address to CLOSED. When the button is first pressed to request the use of the track, the sensor “on” message is generated and the green LED starts to flash. If the PC can reserve the track, the DTM30 receives the DCC accessory “thrown” message and the green LED lights fully; the points will now operate as normal. If it does not get the DCC accessory “thrown” message, then the LED will stop flashing after 10 seconds and the cell will return to “inactive” state. DTM30 Super Tower Master User Manual CML Electronics Limited Page 44 of 47 Revision: 2 Appendix F Interlocking with Railroad & Co Traincontroller assumes that it has total control over all switches and routes on a layout. Sometimes it is desirable to allow manual control and allow the operator to set manual paths for shunting operations using the DTM30 to change switches in a terminus, goods yard or through station. If TrainController is not locked out the relevant area of the layout, there is a risk of it changing switches under a manual train movement or even worse setting a route and taking a train into the area when the operator wants to have complete control. In addition TrainController has some unusual features that can surprise the operator. TrainController reserves an unreserved block for a train irrespective of its occupancy state. Imagine you have moved a train manually into platform 4. The track indicators show occupied, but because TrainController doesn't KNOW what train is in platform 4, it will try and reserve it for an incoming train. TrainController will not reserve a block if it cannot set the route through the junction to that block. To stop TrainController allowing a train to reserve a particular block, the block must be disabled. Setting the red diagonal cross in the block achieves this. To stop TrainController taking a train from a particular block, the exit in that direction must be blocked. TrainController will still start a schedule from that block, but the train will not try an exit the platform. By default TrainController will take a train from an un-restricted block if there is a readily available train in an adjacent block, all things being equal. TrainController never triggers actions on the state of a component a second time if it is already in that state. If TrainController has an action assigned to an occupancy detector when it changes to occupied, TrainController will not execute that action on receipt of an occupied message for that sensor, if TrainController thinks that occupancy detector is already occupied. The method used on McKinley railway to interlock TrainController with the operators takes two forms. The first is a token mechanism that blocks TrainController from taking control an inopportune times by setting a route through the approach to a yard or station. The second is a method of stopping individual trains in the yard or station from being taken It is described is as follows. 1. A button (BUT1) linked to the DTM30 is configured as an interlock cell (see section 5.1.6; it will send a sensor message SEN1. 2. A sensor indicator is added to the TrainController Switchboard and is linked to the sensor message (SEN1) generated by BUT1. DTM30 Super Tower Master User Manual Page 45 of 47 CML Electronics Limited Revision: 2 3. A simple route covering as short a distance as possible that blocks all possible paths on a particular junction area is created in TrainController RUT1. It is important that this route conflicts with all normal routes out though that piece of track. 4. An operation is assigned to the TrainController sensor SEN1 to set the route RUT1 when SEN1 becomes occupied. A second action is assigned to the sensor SEN1 to releaser the route when the unoccupied message is received. 5. An operation is assigned to RUT1 to set a virtual switch SW1 (one that does not exist on the layout) to Thrown when the route RUT1 is set. Another switch message is created in the operation of RUT1 when the route is un-set to set SW1 to closed. 6. The Interlock cell looks for the specific switch address SW1 programmed for that cell. 7. Two LEDs (LED1 & LED2) are wired to the display output for BUT1 that will show red/green. The sequence of events works like this. 1. The operator requests control of the yard by pressing BUT1. The DTM30 starts flashing LED1 green to indicate a request to lock the section has been sent. The DTM30 sends a sensor message SEN1. 2. TrainController receives the message and sets the occupancy of the Sensor SEN1 to occupied. This triggers an action within TrainController to set route RU1. 3. If there are no other routes set in TrainController that conflict with RU1, it is set. This then triggers another internal action in TrainController to send a switch message SW1 Thrown out over LocoNet. The DTM30 waits for 10 seconds to receive the switch command SW1. 4. If the DTM30 sees switch message SW1 Thrown, it sets the state of LED1 to permanent green. 8. If the DTM30 does not see a SW1 Thrown message within 10 seconds, it sends the SEN1 unoccupied message to release the request within TrainController. If LED1 is green, the operator has total control of the protected area of track and can make as many movements as necessary without the worry of a computer controlled train coming through at any moment. When the operator has finished his work, he flicks the button BUT1 off and this triggers the following sequence of events. 1. The operator requests release of the yard by pressing BUT1. The DTM30 sets the state of LED2 to flashing red. The DTM30 sends an free (unoccupied) sensor message SEN1. 2. TrainController receives the message and sets the state of sensor linked to SEN1 to unoccupied. This triggers an internal operation to release the route RUT1. DTM30 Super Tower Master User Manual CML Electronics Limited Page 46 of 47 Revision: 2 3. When the route RUT1 is released it triggers an operation to send the switch command SW1 Closed. 4. When the DTM30 sees the SW1 Closed message it sets the state of LED2 to permanent red. 8. If the DTM30 does not see a SW1 Closed message within 10 seconds, it sends the SEN1 occupied message to reassert the lock on the block of track. If LED2 is red, TrainController has control of that section of the layout; If LED1 is green, the local panel has control. If either is flashing, the interaction is still taking place. The configuration is designed to be resilient. If at any state the two systems become out of sync, the throwing of the switch BUT1 a second time will ensure that both become in sync again. Behaviour of an “Interlock” Cell • To reserve a zone for manual operation, push the “change interlock” button; • The Interlock cell sends a “sensor on” message, and sets a green LED flashing. • If RR&Co can reserve the track for shunting operation it sets a known point address to “Thrown”, and the DTM30 knows the track is reserved: it sets the LED green. • If this doesn’t happen within 10s, the DTM30 knows the request failed and beeps & sets the LED red. (This is a failure condition and probably indicates a failure of the PC to see LocoNet messages; however it must be catered for). • When the Interlock is constant Green, the DTM30 will operate points as normal in response to pushbutton presses and route activations. • When the Interlock LED is in any other state, the DTM30 refuses to operate the points from normal button presses. • If a “long button press” is used by the user, this overrides the Interlock and operates the point normally (for emergency operations only). • When the user has finished shunting, the Interlock cell button is pressed again. • A “sensor off” message is sent; the Interlock LED goes flashing red. • If RR&Co releases the reserved track, it sets the point address to “closed”; the LED goes Red. • If this doesn’t happen within 10s, the DTM30 knows the request failed and beeps & sets the LED green. DTM30 Super Tower Master User Manual CML Electronics Limited Page 47 of 47 Revision: 2