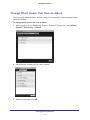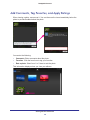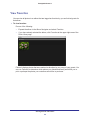
1
ReadyNAS Photos II Add- On M anual Firmware: R AI D iator 4 . 2 R A I D iator 5.3 350 East Plumeria Drive San Jose, CA 95134 USA March 2012 202-10958-01 ReadyNAS Photos II © 2012 NETGEAR, Inc. All rights reserved No part of this publication may be reproduced, transmitted, transcribed, stored in a retrieval system, or translated into any language in any form or by any means without the written permission of NETGEAR, Inc. Technical Support Thank you for choosing NETGEAR. To register your product, get the latest product updates, get support online, or for more information about the topics covered in this manual, visit the Support website at http://support.netgear.com Phone (US & Canada only): 1-888-NETGEAR Phone (Other Countries): Check the list of phone numbers at http://support.netgear.com/app/answers/detail/a_id/984 Trademarks NETGEAR, the NETGEAR logo, and Connect with Innovation are trademarks and/or registered trademarks of NETGEAR, Inc. and/or its subsidiaries in the United States and/or other countries. Information is subject to change without notice. Other brand and product names are registered trademarks or trademarks of their respective holders. © 2012 NETGEAR, Inc. All rights reserved. Statement of Conditions To improve internal design, operational function, and/or reliability, NETGEAR reserves the right to make changes to the products described in this document without notice. NETGEAR does not assume any liability that may occur due to the use, or application of, the product(s) or circuit layout(s) described herein. 2 Contents Chapter 1 Getting Started About ReadyNAS Photos II . . . . . . . . . . . . . . . . . . . . . . . . . . . . . . . . . . . . . 6 Compatible Products . . . . . . . . . . . . . . . . . . . . . . . . . . . . . . . . . . . . . . . . 6 Network Requirements . . . . . . . . . . . . . . . . . . . . . . . . . . . . . . . . . . . . . . . 6 Photo File Formats . . . . . . . . . . . . . . . . . . . . . . . . . . . . . . . . . . . . . . . . . . 7 Start Using Photos II. . . . . . . . . . . . . . . . . . . . . . . . . . . . . . . . . . . . . . . . . . . 8 Change the Language for Photos II . . . . . . . . . . . . . . . . . . . . . . . . . . . . . . . 8 Set Up Web Forwarding . . . . . . . . . . . . . . . . . . . . . . . . . . . . . . . . . . . . . . . . 9 Create Your ReadyNAS Photos II Admin Account . . . . . . . . . . . . . . . . . . . 10 Create Your First Photo Album. . . . . . . . . . . . . . . . . . . . . . . . . . . . . . . . . . 11 Invite Others to View Your Album. . . . . . . . . . . . . . . . . . . . . . . . . . . . . . . . 12 Chapter 2 Manage Your Albums and Photos Photos II Views and Navigation . . . . . . . . . . . . . . . . . . . . . . . . . . . . . . . . . 15 Album View. . . . . . . . . . . . . . . . . . . . . . . . . . . . . . . . . . . . . . . . . . . . . . . 15 Album Navigator . . . . . . . . . . . . . . . . . . . . . . . . . . . . . . . . . . . . . . . . . . . 15 Slideshow Mode . . . . . . . . . . . . . . . . . . . . . . . . . . . . . . . . . . . . . . . . . . . 16 Album Photos View . . . . . . . . . . . . . . . . . . . . . . . . . . . . . . . . . . . . . . . . 16 Import and Upload Photos . . . . . . . . . . . . . . . . . . . . . . . . . . . . . . . . . . . . . 20 Import Photos from Your ReadyNAS Folders. . . . . . . . . . . . . . . . . . . . . 20 Use Remote Upload with Mobile Devices and Eye-Fi . . . . . . . . . . . . . . 21 Customize Your Albums . . . . . . . . . . . . . . . . . . . . . . . . . . . . . . . . . . . . . . . 22 Change the Title and Description of an Album . . . . . . . . . . . . . . . . . . . . 22 Change the Cover Image for an Album . . . . . . . . . . . . . . . . . . . . . . . . . 23 Set the Display Quality for Your Photos . . . . . . . . . . . . . . . . . . . . . . . . . 24 Sort Your Album into Categories . . . . . . . . . . . . . . . . . . . . . . . . . . . . . . 25 Move or Remove Photos in an Album . . . . . . . . . . . . . . . . . . . . . . . . . . . . 27 Slideshows . . . . . . . . . . . . . . . . . . . . . . . . . . . . . . . . . . . . . . . . . . . . . . . . . 29 View Slideshows with Categories. . . . . . . . . . . . . . . . . . . . . . . . . . . . . . 29 Create a Playlist of Songs for a Slideshow. . . . . . . . . . . . . . . . . . . . . . . 29 Add a Caption to a Photo . . . . . . . . . . . . . . . . . . . . . . . . . . . . . . . . . . . . . . 31 3 ReadyNAS Photos II Chapter 3 Sharing Albums and Photos Personalize Your Host Name . . . . . . . . . . . . . . . . . . . . . . . . . . . . . . . . . . . 33 Add Contacts . . . . . . . . . . . . . . . . . . . . . . . . . . . . . . . . . . . . . . . . . . . . . . . 34 Set Permissions for Guests . . . . . . . . . . . . . . . . . . . . . . . . . . . . . . . . . . . . 35 Change Which Guests Can View an Album. . . . . . . . . . . . . . . . . . . . . . . . 37 Share an Individual Photo . . . . . . . . . . . . . . . . . . . . . . . . . . . . . . . . . . . . . 38 Add Comments, Tag Favorites, and Apply Ratings . . . . . . . . . . . . . . . . . . 39 View Favorites . . . . . . . . . . . . . . . . . . . . . . . . . . . . . . . . . . . . . . . . . . . . . . 40 Chapter 4 Administration and Account Management Set Up Photographer Accounts . . . . . . . . . . . . . . . . . . . . . . . . . . . . . . . . . 42 Create a Photographer Account . . . . . . . . . . . . . . . . . . . . . . . . . . . . . . . 42 Change the Password for a Photographer Account . . . . . . . . . . . . . . . . 43 Enable Scheduled Backups of Your Albums . . . . . . . . . . . . . . . . . . . . . . . 44 View Album and Photo Statistics . . . . . . . . . . . . . . . . . . . . . . . . . . . . . . . . 45 Chapter 5 Troubleshooting Diagnose Errors . . . . . . . . . . . . . . . . . . . . . . . . . . . . . . . . . . . . . . . . . . . . . 47 No UPnP-Capable Router . . . . . . . . . . . . . . . . . . . . . . . . . . . . . . . . . . . 48 Host Name Is Not Available . . . . . . . . . . . . . . . . . . . . . . . . . . . . . . . . . . 49 Fail to Access Photos II from the Internet. . . . . . . . . . . . . . . . . . . . . . . . 49 Fail to Find your Public IP Address . . . . . . . . . . . . . . . . . . . . . . . . . . . . 50 Broken Photo Link . . . . . . . . . . . . . . . . . . . . . . . . . . . . . . . . . . . . . . . . . . . 50 Reset Photos II Account Password . . . . . . . . . . . . . . . . . . . . . . . . . . . . . . 50 Download Photos II . . . . . . . . . . . . . . . . . . . . . . . . . . . . . . . . . . . . . . . . . . 52 4 1. Getting Started 1 This chapter covers the following topics: • About ReadyNAS Photos II • Start Using Photos II • Change the Language for Photos II • Set Up Web Forwarding • Create Your ReadyNAS Photos II Admin Account • Create Your First Photo Album • Invite Others to View Your Album For help, watch the Installing ReadyNAS Photos II add-on video at www.youtube.com/watch?v=qbiv4eRnGMs. For more information about using ReadyNAS Photos II, watch the ReadyNAS Photos II: Photographer Controls video at www.youtube.com/watch?v=iIF8ozMLWbk. You can also visit the ReadyNAS Photos II Community Support Forum at www.readynas.com/forum/viewforum.php?f=145. 5 ReadyNAS Photos II About ReadyNAS Photos II ReadyNAS Photos II is an add-on for most ReadyNAS storage systems. It allows you to share photos directly from your ReadyNAS system. With Photos II, you can share your photos without uploading them to a social media or photo-sharing website. You can host, in effect, your own personal photo sharing site. Photos II can also handle slide shows that combine photos and music. Before you install the Photos II add-on, you must install your ReadyNAS system and set it up as described in your ReadyNAS installation guide, hardware manual, and software manual. To do this, you use the free, downloadable RAIDar application available at www.readynas.com/?p=4867. After your ReadyNAS unit is up and running on your network, download the Photos II add-on and install it. Compatible Products ReadyNAS Photos II is available for the following Intel-based ReadyNAS desktop systems running RAIDiator 4.2.17 or later: • ReadyNAS Ultra 2/4/6 • ReadyNAS Ultra 2/4/6 Plus • ReadyNAS Pro 2/4/6 • ReadyNAS Pro Pioneer • ReadyNAS Pro Business • ReadyNAS NVX Pioneer • ReadyNAS NVX It is also available for the following units using RAIDiator 5.3.1 or later: • ReadyNAS Duo v2 • ReadyNAS NV+ v2 Network Requirements Photos II uses a web forwarding feature so that others can view your photos over the Internet. For this reason, to use Photos II, either your router must support UPnP, or you must set up port forwarding. When you set up web forwarding, Photos II attempts to locate a UPnP-capable router. Photos II displays a diagnostic message if it does not detect a UPnP-capable router. Note that most late-model routers have built-in UPnP support; however, if you have an older router, you might need to set up port forwarding manually. Getting Started 6 ReadyNAS Photos II Photo File Formats The Photos II add-on supports the photo file formats shown in the following table. File Extension Description .jpg or .jpeg JPEG .raw Kyocera .cr2 Canon .tif TIFF (Canon) .crw Canon .nef Nikon .raf Fuji .dcr Kodak .dcr Olympus .pef Pentax .mrv Konica-Minolta .srf Sony .sr2 Sony .arw Sony .mef Mamiya .erf Epson .dng Adobe (Casio, Richo) .rw2 Leica .srw Samsung Getting Started 7 ReadyNAS Photos II Start Using Photos II Photos II is included on the Available Add-ons tab in FrontView, (firmware version 4.2) and it is included in Dashboard (firmware version 5.3.x). If you removed Photos II from FrontView, and you want to download it, see Download Photos II on page 52. To install Photos II in FrontView: 1. From FrontView (firmware version 4.2), select Add-ons > Add New. 2. Click the Install button. The Photos II Add-on is installed, and is now shown on the Add-ons > Installed screen. Change the Language for Photos II You can select your preferred language. To change the language: 1. While logged in to your ReadyNAS Photos II account, click SETTINGS > Preferences > Languages. Select your preferred language and click Set. Getting Started 8 ReadyNAS Photos II Set Up Web Forwarding Make sure that the your ReadyNAS unit is set up correctly to use the web forwarding service. Web forwarding must be working before you can allow others to view your photos from the Internet. To set up web forwarding: 1. Navigate to the Add-Ons screen and scroll down to view ReadyNAS Photos II. 2. Click the Manage ReadyNAS Photos II button. The Summary screen displays:. 3. (Optional) Click the Web Forwarding tab to view more information, such as the host name.: Getting Started 9 ReadyNAS Photos II 4. Click the Diagnose button. When the service is ready, the Diagnose Result screen displays:. All items are okay. Error messages show that the set up is not correct. If error messages are displayed, you need to correct one or more problems. See Diagnose Errors on page 47. Next, create your ReadyNAS Photos II account as described in the following section. Create Your ReadyNAS Photos II Admin Account You must create a ReadyNAS Photos II admin account so that you can share your photos. To create your ReadyNAS Photos II admin account: 1. In the FrontView Installed Add-Ons screen, scroll down to view ReadyNAS Photos II. 2. Click the Start sharing photos button. The Create Admin Account screen displays. 3. Complete the fields and click Create. Getting Started 10 ReadyNAS Photos II Create Your First Photo Album You create albums for the photos that you want to share. You can control who has access to each album. To create a new album: 1. While logged in to your ReadyNAS Photos II account, click CREATE NEW ALBUM. The New Album screen displays:. 2. Enter a title and description for your new album and click Start Upload. 3. Click Browse and select the files that you want to include in your album. Getting Started 11 ReadyNAS Photos II 4. Click Upload. Your album displays. Invite Others to View Your Album You can send email invitations to people so that they can view your album. To share your album with others: 1. While logged in to your ReadyNAS Photos II account in Album view, do one of the following: (gear) icon and select Share. • Click the • Click the album cover and select Album Options > Share. Getting Started 12 ReadyNAS Photos II The Share Album screen displays. 2. Enter the email addresses of the people you want to invite to view your album, along with your message. 3. Click Send. The people you invited to view your photos are added automatically to your Photos II contacts. 4. (Optional) Enter the first and last name for each email address and click Update. Note: You can also add contacts to the album without sending an invitation. See Add Contacts on page 34. Getting Started 13 2. Manage Your Albums and Photos This chapter covers the following topics: • Photos II Views and Navigation • Import and Upload Photos • Customize Your Albums • Slideshows • Add a Caption to a Photo 14 2 ReadyNAS Photos II Photos II Views and Navigation Photos II has a number of different views. The onscreen menus displayed depend on the context of the view. Album View View all your albums. Each album has a cover image and the description that you entered when you created it. Clicking an album takes you to Album view. Album Navigator Album Navigator is on the left side of the screen. Click + to expand it. Clicking the for an album listed in Album Navigator displays the Album menu. (gear) icon The Album Navigator is useful when you want to jump to a specific album, perform action on an album that is not currently selected, or go to a specific category of an album. For information about categories, see Sort Your Album into Categories on page 25. Manage Your Albums and Photos 15 ReadyNAS Photos II Slideshow Mode To view a slideshow of the photos in an album, click the Slideshow To exit Slideshow mode, mouse over a photo and click the button. button. Album Photos View Click an album to go to Album Photos view. This displays all the photos within an album. Manage Your Albums and Photos 16 ReadyNAS Photos II To rotate a photo, mouse over the photo to display the gear icon, then click the icon to display a left and right arrow for rotation. Cover Flow View Click a photo to go to Cover Flow view. The currently selected photo is shown in the center of the screen, and you can quickly browse and select other photos. Click a photo to go to Photo View as described in the following section. Manage Your Albums and Photos 17 ReadyNAS Photos II Photo Detail View If you mouse over the photo, icons are displayed toward the bottom of the image, as shown: The icons let you control the view: Previous photo Next photo Switch between high quality and standard quality display. Switch between standard screen and full screen display. View EXIF information for the displayed photo. This includes white balance, flash mode, ISO, exposure, and so on. Delete the displayed photo. Close the view. You can also use the following keyboard shortcuts: • Press Escape (Esc) to exit. • Press the right-arrow key to go to the next photo. • Press the left-arrow key to go left. Manage Your Albums and Photos 18 ReadyNAS Photos II Return to Album View To exit Album Photos View and return to Album view, click RETURN TO ALBUM VIEW. A screen sequence similar to the following displays: Manage Your Albums and Photos 19 ReadyNAS Photos II Import and Upload Photos You can import photos from your ReadyNAS folders or upload them from mobile devices or cameras using a network-enabled Eye-Fi card. Photos II is self-contained, so if you want your photos to show up in Photos II, you must import them from other folders in your ReadyNAS storage system or upload them from your computer. Import Photos from Your ReadyNAS Folders To import photos from your ReadyNAS shares or folders: 1. From FrontView, select Manage ReadyNAS Photos II > Photographer Menu. 2. Click Prepare to import from this ReadyNAS. A screen similar to the following displays:. 3. In the Share to import from list, select a share (from your ReadyNAS storage system). 4. In the Folder to import from field, browse and select the folder with the photos you want to import. If you want to import all the folders in the share, leave this field blank. Manage Your Albums and Photos 20 ReadyNAS Photos II 5. If you want all photos in the folder you selected to be placed in the same album, select the Single Album Mode check box. If you do not select this check box, each sub folder in the currently selected folder becomes a separate album. 6. Click Save. Use Remote Upload with Mobile Devices and Eye-Fi Remote Upload allows you or your friends to upload photos to a specific album in your Photos II account. You can do this in two ways. You can upload photos from a mobile device using email, or you can use a camera with an Eye-Fi SD card. • Email Upload. A unique email address is generated for you. You can attach your photos and send them to this unique email address using any mobile device with email capability. • Eye-Fi SD card. Eye-Fi network SD cards allow you to use the camera network to upload photos from your camera to your computer as you are taking pictures. Once remote upload is set up, your photos can go straight to your ReadyNAS Photos II album. Anyone with whom you have shared the album can see your photos almost instantly. To set up remote upload of your photos: 1. While logged in to your ReadyNAS Photos II account, select SETTINGS > Preferences > Remote Upload. 2. Select the Enable Remote Upload check box. 3. In the Passcode field, enter a 4-character alphanumeric code. 4. In the Upload option field, select the setting that you want. You use this setting to specify from which email address photos can be uploaded to your album. • Photographers. • Photographers and invited guests. • Any email address Manage Your Albums and Photos 21 ReadyNAS Photos II 5. Select an album as the default target album for uploaded photos. 6. Click Set to save the settings. A unique email address is generated for you. You can change your passcode at any time. Customize Your Albums You can change the title and description for an album and its cover image. You can also specify the quality level that is displayed and sort the photos within each album into categories. Change the Title and Description of an Album After you create an album, you can change its title and description. To change the title and description of an album: 1. While logged in to your ReadyNAS Photos II account, select Album Options > Preferences > Info. 2. Enter the new title and description, and click Update. Manage Your Albums and Photos 22 ReadyNAS Photos II Change the Cover Image for an Album You can change the photograph that is displayed as the cover for your album. The cover is used as the stamp image in your email invitations. To change the cover of an album: 1. While logged in to your ReadyNAS Photos II account, select the album to go to Album Photos View. 2. Locate the photo that you want to use as the new cover image. Click its then select Album Cover. A screen sequence similar to the following displays. Manage Your Albums and Photos 23 (gear) icon, and ReadyNAS Photos II Set the Display Quality for Your Photos Display quality affects private and public viewers. You can specify the quality in two ways: • Specify the quality settings for an album. • Specify the quality settings for all albums created in the future. To modify the quality settings for an album: 1. While logged in to your ReadyNAS Photos II account in Album View, select Album Options > Preferences > Quality. 2. Select the Allow guests to view photos in high quality (HQ) mode check box. 3. Select the radio button for the default resolution that you want. 4. Click Set. Manage Your Albums and Photos 24 ReadyNAS Photos II To specify quality settings for albums created in the future: 1. While logged in to your ReadyNAS Photos II account in Album view, select SETTINGS > Preferences. 2. Click the Quality tab. 3. Select the Allow guests to view photos in high quality (HQ) mode check box. 4. Select the radio button for the default resolution that you want. 5. Click Set. Sort Your Album into Categories You can group your photos into categories to make it easier for your visitors to understand the context in which you took your photos. For example, an event like a wedding can consist of photos taken before the ceremony, during the ceremony, and at the reception. You can combine these shoots into one album, but still keep the shots separate with album categories. Album categories are like chapters, and your slideshow includes the category descriptions that you create. Manage Your Albums and Photos 25 ReadyNAS Photos II To add categories: 1. While logged in to your ReadyNAS Photos II account in Album view, select Album Options > New Category. 2. Create at least two categories, clicking Create after each category creation. To sort photos into categories: 1. In Album view, select ALBUM OPTIONS > Move/Remove Photos. 2. Select a category, and click Move to move a photo into that category. Manage Your Albums and Photos 26 ReadyNAS Photos II After you put the first photo into a category, the remaining photos automatically go into a category called Unsorted. In this album, one photo is in the Flowers category. 3. Click the tabs to view the photos in each category. Move or Remove Photos in an Album After you upload photos, you can use the Move or Remove Photos feature to change the order of the photos and to remove individual photos or groups of photos. To move or remove photos: 1. Select Settings > Move/Remove Photos. 2. Use the Move To drop-down list to select the album or a category within an album. Manage Your Albums and Photos 27 ReadyNAS Photos II 3. Select one or more photos. You can select a range of adjacent photos by pressing Shift when you click, or select multiple non-adjacent photos by pressing Control when you click (Windows) or Command (Mac). 4. To move a photo drag and drop it in a new position. 5. To delete a photo, click the Delete button on the upper right of the screen. Manage Your Albums and Photos 28 ReadyNAS Photos II Slideshows When you click the Slideshow button, you automatically go to Slideshow mode. View Slideshows with Categories To enhance your slideshow, you can use categories as described in Sort Your Album into Categories on page 25. When you view a slideshow that has categories, the name of each category displays when you view the first photo in that category. Create a Playlist of Songs for a Slideshow You can select songs to go with your album when it is viewed in SlideShow mode. To create a slide show with a playlist of songs: 1. While logged in to your ReadyNAS Photos II account in Album view, select Album Options > Preferences > SlideShow. Manage Your Albums and Photos 29 ReadyNAS Photos II If you previously uploaded songs, they are listed. In this example, no songs are in the slideshow. 2. Click Upload. A dialog box displays. 3. Browse and select the songs you want to add and click the Upload button. The songs are displayed in the Available Songs list. 4. Set up your album playlist. a. From the Available Songs list, drag songs to the Playlist. b. In the Playlist, drag and drop the songs to put them in the play order you want. 5. To close this screen, click the X ( ) icon in the upper right corner. Manage Your Albums and Photos 30 ReadyNAS Photos II Add a Caption to a Photo To add a caption to a photo: 1. While logged in to your ReadyNAS Photos II account, go to Cover Flow view or Photo View. 2. Click the (gear) icon for a photo. 3. Select Caption. A screen similar to the following displays:. 4. Type a caption and click Update. Manage Your Albums and Photos 31 3. Sharing Albums and Photos This chapter covers the following topics: • Personalize Your Host Name • Add Contacts • Set Permissions for Guests • Change Which Guests Can View an Album • Share an Individual Photo • Add Comments, Tag Favorites, and Apply Ratings • View Favorites 32 3 ReadyNAS Photos II Personalize Your Host Name You can personalize the host name used for web forwarding. The URL that others use to view your photos from the Internet has the form: http://photos.readynas.com/<hostname>/<Photographer> The host name and photographer are specific to your setup. Note the following: • <hostname> is assigned by the ReadyNAS Photos II Add-on (such as, nas-A9-A2-E2). You can personalize this host name by following the instructions in this section. • <Photographer> is your ReadyNAS Photos II photographer name. If you have more than one photographer, each has the same host name, but a different photographer name in the URL. To personalize your host name: 1. From the ReadyNAS Photos II Add-on Management screen, click Web Forwarding. 2. Enter your host name choice and click Check Hostname Availability. 3. Click Save. 4. Click Diagnose to reverify the readiness of the web forwarding service. To resolve any errors, see Diagnose Errors on page 47. Sharing Albums and Photos 33 ReadyNAS Photos II Add Contacts If you invite people to view an album, their email addresses are automatically added to your Photos II contacts. You can also enter your contacts. You can organize your contacts into the groups Family, Friends, and Colleagues. To add contacts: 1. While logged in to your ReadyNAS Photos II account, select CONTACTS. 2. In the All Contacts pane, click + to type in the email address and name of each contact. To add a new contact group: 1. Click the + below the Groups pane. 2. Type the group name and press Enter. The new group is created. To add contacts to a group: 1. For a new contact, highlight the group in the Groups pane, click + beneath the Contacts pane, and enter the new contact. 2. To add an existing contact to a group, select the contact in the Contacts pane, click Edit, and select the check box for that group. Sharing Albums and Photos 34 ReadyNAS Photos II Set Permissions for Guests You can specify the permissions for private and public guests. • You can modify the permission settings for an existing album. • You can also specify the permission settings for all albums created in the future. The permissions for your other existing albums remain the same unless you specifically change them. To change the permissions for an existing album: 1. While logged in to your ReadyNAS Photos II account, expand ALBUM NAVIGATOR (in the upper left corner). 2. Select the album, click its (gear) icon, and select Preferences. 3. On the Album Preferences screen, click the Permission tab. A screen similar to the following displays. Sharing Albums and Photos 35 ReadyNAS Photos II 4. Make your selections as follows: • Private Guest Settings. You can specify the maximum download resolution of the photos you want to allow, and specify if you want to allow feedback • Public Guest Settings. Specify if downloads are allowed, and at what resolution, whether you want to allow ratings, and if public access is allowed. If you allow public access to the album, a URL is displayed here. You can copy and paste it in your email or other postings. • Album List URL. This URL leads to a list of your publicly available albums. You can copy and paste it in your email or other postings. 5. Click Update To specify viewing permissions for albums created in the future: 1. Select SETTINGS > Preferences > Permissions. 2. Make your selections and click Update. Sharing Albums and Photos 36 ReadyNAS Photos II Change Which Guests Can View an Album You can specify which contacts can view an album. You can add or remove guests without sending invitations. To change which guests can view an album: 1. While logged in to your ReadyNAS Photos II account in Photos view, select Album Options > Preferences > Shared. 2. Add or remove contacts with the + and - buttons. 3. When you are done, click OK. Sharing Albums and Photos 37 ReadyNAS Photos II Share an Individual Photo Individual photos can be accessed directly with an encrypted URL. This allows you to embed links to photos that you post online (such as blogs or public forums) without compromising access to the rest of your albums and photos. To share an individual photo: 1. While logged in to your ReadyNAS Photos II account, locate the photo you want to share and mouse over the photo to activate its menu. 2. Click the photo’s (gear) icon and select Share. A screen similar to the following displays: 3. Click Share. A screen similar to the following displays. 4. Select the resolution you want, click the photo’s copy ( Sharing Albums and Photos 38 ) icon, and click OK. ReadyNAS Photos II Add Comments, Tag Favorites, and Apply Ratings When viewing a photo, mouse over it. You can then use the icons immediately below the photo to provide feedback about the photo. You can do the following: • Comments. Enter comments about the photo. • Favorites. Click the heart icon to tag your favorites. • Rate a photo. Select from 1 to 5 stars to rate the photo. This information displays when you view your albums: Sharing Albums and Photos 39 ReadyNAS Photos II View Favorites You can view all photos in an album that are tagged as favorites by you and invited guests for that album. To view favorites: Do one of the following: • Expand the album in the Album Navigator and select Favorites. • If you have already selected the album, click Favorites at the upper right area of the Photo Views page. Photos II displays photos that were marked as favorites by you or any of your guests. You can use Favorites to determine which photos your friends and family would like you to print or perhaps the photos your customers would like to purchase. Sharing Albums and Photos 40 4. Administration and Account Management 4 This chapter covers the following topics: • Set Up Photographer Accounts • Enable Scheduled Backups of Your Albums • View Album and Photo Statistics For information about setting up your account, see Create Your ReadyNAS Photos II Admin Account on page 10. 41 ReadyNAS Photos II Set Up Photographer Accounts You can set up multiple photographers so that they can share photos from the same ReadyNAS storage system. Photos II allows you to create multiple photographer accounts so that each photographer can share his or her own albums to separate contact lists. The photographers do not need to be on your local network or have share-level access to your ReadyNAS storage system to manage or upload their photos. Instead, they can upload and share from anywhere they have Internet access. Create a Photographer Account To set up a photographer account: 1. While logged in to your ReadyNAS Photos II account, select SETTINGS > Manage Photographers. 2. Click +. The New Photographer Account screen displays. Administration and Account Management 42 ReadyNAS Photos II 3. Enter the account information and click Create Photographer Account. If you select the Admin Privilege check box, the account can to be used to create additional accounts or delete existing ones, so issue this privilege with care. Change the Password for a Photographer Account If you do not have the password for the first Photos II account that you set up, then you cannot log in to Photos II. In this situation, you can reset the password. See Reset Photos II Account Password on page 50. You can change the password for your photographer account, or for other photographer accounts. To change the password for a photographer account: 1. Select Settings > Manage Photographers. 2. Select a photographer and click Edit. 3. Enter the password, re-enter it, and click Update. Administration and Account Management 43 ReadyNAS Photos II Enable Scheduled Backups of Your Albums NETGEAR recommends that you regularly back up your ReadyNAS Photos II albums. To enable scheduled backups of your albums: 1. On the ReadyNAS Photos II Add-on Management screen, click Backup. A screen similar to the following displays. 2. Select the Enable periodical backup of ReadyNAS Photos II check box. A screen similar to the following displays. 3. Make your selections and click Save. Administration and Account Management 44 ReadyNAS Photos II View Album and Photo Statistics You can view the statistics for your albums and photos. When this feature is enabled, you see the view count at the upper left corner of the album and each photo in the album. View statistics for this album To view album and photo statistics: 1. While logged in to your ReadyNAS Photos II account, click SETTINGS > Preferences. A screen sequence similar to the following displays: 2. On the Preferences screen, click Statistic. A screen similar to the following displays: 3. Select the Show Album/Photos Statistics check box and click Set. Administration and Account Management 45 5. Troubleshooting 5 For help with installing and using ReadyNAS Photos II, visit the ReadyNAS Photos II Community Support forum at www.readynas.com/forum/viewforum.php?f=145. This chapter covers the following topics: • Diagnose Errors • Broken Photo Link • Reset Photos II Account Password • Download Photos II 46 ReadyNAS Photos II Diagnose Errors If you clicked Diagnose when installing the ReadyNAS Photos II add-on and a problem was discovered, a screen similar to the following displays: Your service is not ready because of one or more of the reasons described in the following sections: • No UPnP-Capable Router on page 48 • Host Name Is Not Available on page 49 • Fail to Access Photos II from the Internet on page 49 • Fail to Find your Public IP Address on page 50 Troubleshooting 47 ReadyNAS Photos II No UPnP-Capable Router If your router does not support Universal Plug and Play (UPnP) capability, the Cannot find UPnP capable router error message displays. If this happens, then to use web forwarding, you must specify the configured port number for the Photos II service and also set up port forwarding at your router. To specify the configured port number for the Photos II service: 1. View the Summary tab of the ReadyNAS Photos II Management screen. This screen enables you to find the port number that was configured for the Photos II service. In general, ReadyNAS Photos II asks the router on your network to determine which port is available starting from port 8086. In this example, port 8086 is available. But port 8087 or port 8088, and so forth, might be available instead depending on the setup of your network. 2. On the ReadyNAS Photos II Management screen, click the UPnP Router tab. A screen similar to the following displays. Troubleshooting 48 ReadyNAS Photos II 3. Select the Disable auto configuration of UPnP capable router check box. A screen similar to the following displays. 4. Enter the port number used for external access to Photos II. In this example, port 8086 was entered. 5. Click Save. 6. For information about how to set up port forwarding at your router, consult your router documentation. If you are unable to find the procedure, the following site has information about many routers: http://portforward.com/english/routers/port_forwarding/routerindex.htm 7. Repeat the procedure in Set Up Web Forwarding on page 9. Host Name Is Not Available If the error message Hostname is not available displays, try using a different host name. See Personalize Your Host Name on page 33. Fail to Access Photos II from the Internet Your router is preventing Photos II access from the Internet from being forwarded to your ReadyNAS storage system. 1. For information about how to set up port forwarding at your router, consult your router documentation. If you are unable to find the procedure, the following site has information about many routers: http://portforward.com/english/routers/port_forwarding/routerindex.htm 2. Repeat the procedure in Set Up Web Forwarding on page 9. Troubleshooting 49 ReadyNAS Photos II Fail to Find your Public IP Address Photos II cannot find your public IP address. 1. Contact your Internet service provider. 2. Repeat the procedure in Set Up Web Forwarding on page 9. Broken Photo Link The link to your photo that you post in emails and on web pages includes your host name: photos.readynas.com/<hostname>/<EncryptedTag> If you change your host name, you break this link. Example: You post the following link to one of your photos: photos.readynas.com/nas-A9-A2-E2/?k=2QnrTL&i=7&sz=X You then change your host name from nas-A9-A2-E2 to <SomethingElse>. This link no longer works. For information about setting your host name, see Personalize Your Host Name on page 33. Reset Photos II Account Password The first photographer has administrator privileges on the ReadyNAS Photos II account on the ReadyNAS.com website. You can reset this password. To reset your ReadyNAS Photos II account administrator password: 1. On the ReadyNAS Photos II Management screen, select the Photographer Menu tab. Troubleshooting 50 ReadyNAS Photos II 2. Click Reset the first photographer password. The following screen displays, indicating that the password was reset to netgear1. 3. Click OK. 4. Log in to your ReadyNAS Photos II account and select SETTINGS > Manage Photographers. A screen similar to the following displays. Troubleshooting 51 ReadyNAS Photos II 5. Select the primary photographer and click Edit. A screen similar to the following displays. 6. Enter a new password and click Update. Download Photos II This section only applies to ReadyNAS systems that use RAIDiator 5.2.x firmware. If you removed Photos II from FrontView and you want to install it again, you can download it from the ReadyNAS website and install it. To download Photos II: 1. Go to the ReadyNAS Photos II download link on the ReadyNAS website at www.readynas.com/?p=5599. 2. Click x86 to download the ReadyNAS Photos II Add-on. Troubleshooting 52 ReadyNAS Photos II To install Photos II: 1. Use RAIDar to locate the ReadyNAS storage system on your network as described in the documentation that came with your ReadyNAS product. 2. Select your ReadyNAS system. FrontView displays. 3. Browse and select the Photos II file that you downloaded. 4. Click Upload and verify images. 5. In FrontView, select Add-ons > Add New. Troubleshooting 53