1
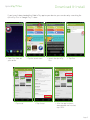
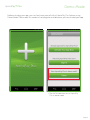
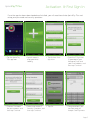
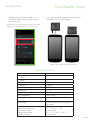
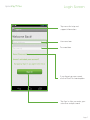
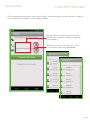
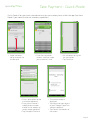
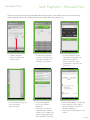
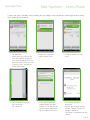
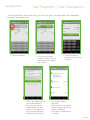
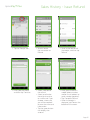
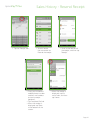
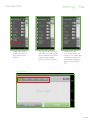
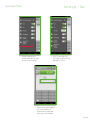
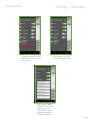
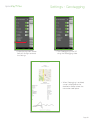
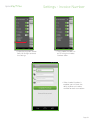
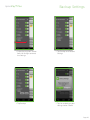
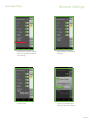
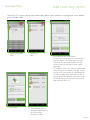
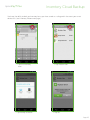
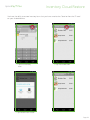
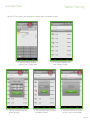
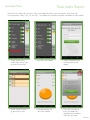
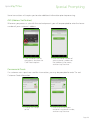
AprivaPay™ Plus
Version 2.5
User Guide for Android™
AprivaPay™ Plus
Table of Contents
Download & Install.................................................................................................................3
Demo Mode............................................................................................................................4
Activation & First Sign In......................................................................................................5
Card Reader Setup.................................................................................................................6
Login Screen............................................................................................................................ 7
Customer Receipts................................................................................................................8
Take Payment - Quick Mode...............................................................................................9
Take Payment - Manual Entry............................................................................................10
Take Payment - Items Mode.............................................................................................. 11
Take Payment - Cash Transaction....................................................................................12
Sales History - Issue Refund..............................................................................................13
Sales History - Resend Receipt.........................................................................................14
Settings - Tips........................................................................................................................15
Settings - Tax..........................................................................................................................16
Settings - Receipts................................................................................................................ 17
Settings - Geotagging..........................................................................................................18
Settings - Invoice Number.................................................................................................19
Backup Settings................................................................................................................... 20
Restore Settings....................................................................................................................21
Add Inventory Items........................................................................................................... 22
Inventory Cloud Backup.................................................................................................... 23
Inventory Cloud Restore................................................................................................... 24
Sales History......................................................................................................................... 25
Total Sales Report................................................................................................................ 26
Partial Authorization............................................................................................................27
Special Prompting............................................................................................................... 28
Page 2
Download & Install
AprivaPay™ Plus
If you haven’t downloaded the Mobile Pay app to your device you can do so by searching for
AprivaPay Plus in Google Play™ store.
• Open Play Store on
your device.
• Tap Install.
• Tap the search icon.
• Tap Accept.
• Search for AprivaPay
Plus.
• Tap Free.
• After the app has been
downloaded and installed,
tap OPEN.
Page 3
AprivaPay™ Plus
Demo Mode
Before activating your app, you can familiarize yourself with all AprivaPay Plus features using
Demo Mode. Please note, this mode will no longer be available once you’ve activated your app.
• Tap the Demo button to start AprivaPay
Plus in demo mode.
Page 4
Activation & First Sign In
AprivaPay™ Plus
Once the app has been downloaded and installed, you will need to activate AprivaPay Plus and
setup your password and security questions.
• Tap the AprivaPay
Plus app icon.
• Splash screen is
displayed while
loading.
• Tap Activate Your
App Now.
• Enter the 5 Digit User
ID provided in your
Welcome Email and
your Email address, and
then tap Continue.
• Create a Password
for your account, and
then tap Continue.
• Select and answer 3
Security Questions, and
then tap Continue.
• Tap OK.
• Congratulations, you
are now ready to
Accept Card Payments.
Page 5
Card Reader Setup
AprivaPay™ Plus
1. Before using the Rambler reader, turn
the Media Volume of your device up to
maximum level,
2. Insert the Rambler card reader into you device’s
headphone jack as shown below:
Please refer to your smart phone’s user manual for more
information on adjusting your device’s volume levels.
NOTE: Phone images are for reference only.
Reader Specifications
Color
Dimensions
Height
Width
Length
Weight
Communications Ports
Certifications
Encryption Algorithm
Key Management
Power
Card Reader
Environment
Operating Temperature
Operating Humidity
Storage Temperature:
Storage Humidity:
Black
0.7”
1.9”
1.9”
25 grams
4 poles 3.5mm Audio Jack
FCC, CE
TDES /AES
Fixed / DUKPT
Internal Lithium Battery 225mAH,
3.0V
Dual track (track 1 and 2) magnetic
strip reader
0 C – 55 C (32 F – 131 F)
Maximum 95%
-30 C – 70 C (-22 F – 158 F)
Maximum 95%
Page 6
AprivaPay™ Plus
Login Screen
Tap menu for help and
support information
Username box
Password box
If you forget your password,
use the Reset Password option
Tap Sign In after you enter your
username and password
Page 7
AprivaPay™ Plus
Customer Receipts
After completing transactions, you have the ability to send electronic receipts to your customer.
You can send SMS receipts, e-mail receipts or both.
Tap the Mobile number field or Email field
to enter your customer’s mobile number or
e-mail address.
Tap the contacts icon to select an SMS or
e-mail contact from your phonebook.
Page 8
AprivaPay™ Plus
Take Payment - Quick Mode
Quick Mode is for merchants who do not wish to use inventory items within the app (See Items
Mode if you would like to use inventory capabilities).
• Swipe the lower
tab up to reveal the
number pad.
• Enter the transaction
amount, and then swipe
your customer’s card.
• Enter a description for the
transaction (optional).
• Enter your customer’s
mobile phone number
and/or e-mail address to
send a receipt (optional).
• Tap Complete Purchase.
• Ask customer to sign for
the transaction.
• Tap Continue.
• Transaction receipt is
displayed.
• Tap the printer icon to print
to your Google Cloud Print
account (optional).
• Tap Done at the bottom of
the screen.
Page 9
AprivaPay™ Plus
Take Payment - Manual Entry
When you wish to take a payment but do not have your card reader with you, manual entry
allows you to enter the customer’s payment information by keying it in.
• Swipe the lower
tab up to reveal the
number pad.
• Ask customer to sign for
the transaction.
• Tap Continue.
• Enter the transaction
amount, and then tap
the green button that
displays the amount.
• Enter a description
for the transaction
(optional).
• Enter your customer’s
mobile phone number
and/or e-mail address to
send a receipt (optional).
• Tap Complete Purchase.
• If the customer’s card is
not present, deselect the
card present option.
• Enter customer’s card
information, and then tap
Continue.
• Transaction receipt is displayed.
• Tap the printer icon to print
to your Google Cloud Print
account (optional).
• Tap Done at the bottom of the
screen.
Page 10
AprivaPay™ Plus
Take Payment - Items Mode
If you have your inventory items stored, you may begin a transaction by selecting the item rather
than entering the amount.
• Tap Add item.
• Note: you may also use the
Scan Item button to quickly
scan the barcode of items to
be purchased. Please see Add
Inventory Items section for
more information.
• Ask customer to sign for
the transaction.
• Tap Continue.
• Select items and then
tap the check mark.
• Enter your customer’s
mobile phone number
and/or e-mail address to
send a receipt (optional).
• Tap Complete Purchase.
• Swipe customer’s credit
card.
• Transaction receipt is
displayed.
• Tap the printer icon to print
to your Google Cloud Print
account (optional).
• Tap Done at the bottom of the
screen.
Page 11
Take Payment - Cash Transaction
AprivaPay™ Plus
If all or part of your sales are by cash, you can track your cash transactions for a complete
picture of your overall sales.
• Tap the card icon.
• Enter the transaction
amount, and then tap the
green button that displays
the amount.
• Enter a description for the
transaction (optional).
• Enter your customer’s
mobile phone number
and/or e-mail address to
send a receipt (optional).
• Tap Complete Purchase.
• Enter the Amount
Tendered, and then tap
Continue.
• Transaction receipt is
displayed.
• Tap the printer icon to print
to your Google Cloud Print
account (optional).
• Tap Done at the bottom of
the screen.
Page 12
AprivaPay™ Plus
Sales History - Issue Refund
• Tap the Receipt icon.
• Search/Locate
the transaction to
Refund.
• Scroll to the bottom of
the receipt, and then tap
Refund.
• Enter your password,
and then tap Continue.
• Select a reason for
the refund.
• Select to refund to
the original card, or
to a new card. If you
choose a new card,
you will be required
to enter the new card
information.
• Tap the green button
that displays the
amount.
• Enter your customer’s
mobile phone number
and/or e-mail address to
send a receipt (optional).
• Tap Complete Refund.
• When the receipt is
displayed, tap Done at the
bottom of the screen.
Page 13
Sales History - Resend Receipt
AprivaPay™ Plus
• Tap the Receipt icon.
• Search/Locate
the transaction to
Resend the receipt.
• Enter your customer’s
mobile phone number
and/or e-mail address
to send a receipt
(optional).
• Tap Complete Refund.
• When the receipt is
displayed, tap Done
at the bottom of the
screen.
• Scroll to the bottom of
the receipt, and then tap
Receipt.
• When the receipt is
displayed, tap the
menu icon, and then
tap Home.
Page 14
Settings - Tips
AprivaPay™ Plus
• Swipe the payment
screen from left to
right to reveal the
Settings.
• Turn Tips on or Off using
the slider. By enabling tips,
your customers can select
a percentage to add a
gratuity to their purchase.
• Additionally, you
may enable smart tip
amounts that allow your
customers to tip using
whole dollar amounts
for purchases below
$10.
Tip Prompt
Page 15
Settings - Tax
AprivaPay™ Plus
• Swipe the payment
screen from left to right
to reveal the Settings.
• Turn Tax on with the
Tax slider and key in the
desired Tax Rate.
• When taxes are enabled,
the sales amount is
automatically adjusted
during the transaction.
Page 16
Settings - Receipts
AprivaPay™ Plus
• Swipe the payment screen
from left to right to reveal
the Settings.
• Turn Receipts On or Off
using the Receipts slider.
• Enter up to 3 Mobile
Numbers and 3 Email
Addresses that will
automatically receive
electronic copies of
transaction receipts.
Page 17
AprivaPay™ Plus
• Swipe the payment screen
from left to right to reveal
the Settings.
Settings - Geotagging
• Turn Geotagging On or Off
using the Geotagging slider.
• When Geotagging is enabled,
a map is displayed on the
electronic receipt where the
transaction took place.
Page 18
AprivaPay™ Plus
• Swipe the payment screen
from left to right to reveal
the Settings.
Settings - Invoice Number
• Turn Invoice Number On
or Off using the Invoice
Number slider.
• When Invoice Number is
enabled, you will have the
ability to enter an invoice
number for each transaction.
Page 19
AprivaPay™ Plus
Backup Settings
• Swipe the payment screen
from left to right to reveal
the Settings.
• Tap Backup and Restore
Settings.
• Tap Backup.
• Tap Yes to back up your
settings to the Cloud.
Page 20
AprivaPay™ Plus
Restore Settings
• Swipe the payment screen
from left to right to reveal
the Settings.
• Tap Backup and Restore
Settings.
• Tap Restore.
• Tap Yes to restore your
settings from the Cloud.
Page 21
Add Inventory Items
AprivaPay™ Plus
AprivaPay Plus allows you to store information about your inventory including item name, photo,
price, and bar code.
• Tap the Inventory
icon.
• Tap Create.
• Tap the (+)
icon.
• Enter desired item information.
• To take a picture of your item to include in
your list, touch the ‘Tap to add an image’
icon and use your phone’s own camera
to take a picture and add it to the space
provided.
• As an option, you may also use the barcode
scanner feature included in the app. Simply
tap the Scan Item button at the bottom left.
An area will pop up to allow you to take a
picture of the bar code on your item (if you
have one) using your device’s camera and
add it to your items list
• The inventory item is
displayed alphabetically
on the Manage
Inventory screen.
Page 22
AprivaPay™ Plus
Inventory Cloud Backup
You have the ability to back up inventory items you have saved as a safeguard in the event your smart
device fails. (see Inventory Restore next page)
• Tap the Inventory
icon.
• Tap Backup to cloud.
• Tap the disk icon.
• Tap Yes.
Page 23
AprivaPay™ Plus
Inventory Cloud Restore
You have the ability to restore inventory items that you have saved to the Cloud or from the SD card
on your Android device.
• Tap the Inventory
icon.
• Tap the restore icon.
• Tap Restore from cloud.
Page 24
Sales History
AprivaPay™ Plus
AprivaPay Plus allows you to search and view your transaction history.
• From the Home Screen,
tap the Sales History icon.
• Tap the calendar icon to
search by date.
• The system displays the
Sales History Screen.
• Tap the dollar icon to search
by dollar amount.
• Tap the card icon to search
by last 4 of a card number.
Page 25
Total Sales Report
AprivaPay™ Plus
AprivaPay Plus allows you to view a Total Sales Report by date range that displays all of your sales
summarized by Credit, Cash, Tax and Tips. This report can then be emailed to a recipient of your choice.
• Swipe the payment
screen from left to right
to reveal the Settings.
• Tap Total Sales Report.
• Select the desired start
and end date for the
report.
• Select a date to view a
graph of your sales.
• The app displays the
Total Sales Report.
• Tap the email icon to
email the report to a
specified email address,
and then tap Done.
Page 26
Partial Authorization
AprivaPay™ Plus
A partial authorization partially approves a transaction if a cardholder does not have enough
credit on their credit card to cover the transaction amount. You may then allow the cardholder
to pay the remaining balance owed with another card or cash. Note: This is completed in two
separate transactions. The first transaction for the approved amount and a second transaction
for the remaining balance.
• Enter Sale Amount,
and then swipe your
customer’s card.
• Ask your customer to sign for
the transaction, and then tap
Complete Purchase.
• Enter customer phone
number, e-mail or both,
and then tap Send Receipt.
• Tap Continue.
• Tap Done at the
bottom of the
receipt screen.
• Enter the remaining Sale
Amount, and then swipe your
customer’s alternate card.
• Ask your customer to
sign for the transaction,
and then tap Complete
Purchase.
• Enter customer phone
number, e-mail or both,
and then tap Send Receipt.
• Receipt is displayed.
• Scroll down and tap
Done.
Page 27
Special Prompting
AprivaPay™ Plus
Some transactions will require you to enter additional information prior to processing:
AVS (Address Verification)
Whenever you process a sale with the card not present, you will be prompted to enter the house
number of your customer’s address.
• If the customer’s card is
not present, de-select the
Card Present option.
• Enter the house number of
your customer’s address on
the Additional Info screen,
and then tap Continue.
Commercial Cards
If a customer uses a purchase card for a transaction, you may be prompted to enter Tax and
Customer Code information:
• Change Tax Exempt
to No.
• Enter a tax rate and your
customer’s customer number,
and then tap Continue.
Page 28