1
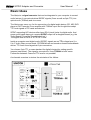
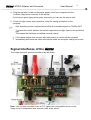
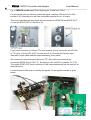
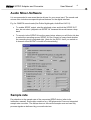
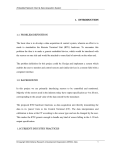
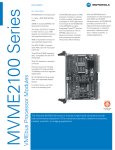
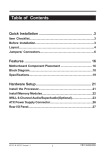
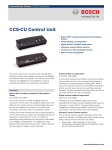
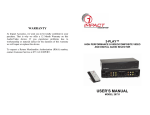
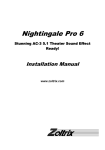
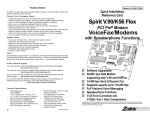
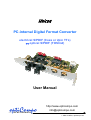
Unicon PC-internal Digital Format Converter electrical S/PDIF (Coax or 2pin TTL) ↔ optical S/PDIF (TOSlink) User Manual optiCompo http://www.opticompo.com [email protected] ELECTRONICS 4/25/1999 Ver. 1.0, 3/3/2000 Ver. 1.1, 01.02.2001 Ver. 2.0, 07/22/2002 Ver 2.1 Silke Schäfers, optiCompo.com Unicon 2 S/PDIF Converter and Adapter User Manual Thank you for purchasing optiCompo’s Unicon. Please read the following installation procedure carefully and you will enjoy a wide variety of optical recording options with your sound card. Some features your Unicon has to offer: Interconnectivity – Using the Unicon you are finally able to connect your S/PDIF audio devices to a wide variety of sound cards. • Independence – You can interconnect S/PDIF audio devices independent of their output type - coaxial or optical jack or even 2-pin TTL. • Service – If you have any problems with your Unicon, please check our homepage for useful hints and solutions: • http://www.opticompo.com/ Before contacting optiCompo, try to solve the problem by reading this User Manual or the manuals and help files for the other used devices or software tools. We provide e-mail support at [email protected] So than: Just enjoy the digital world of music. Your optiCompo team Warning Do not eat or pulverize any of the components of the Unicon, because some components contain toxic material! • We are not liable for any damages caused by improper use of the Unicon or it’s components! • ******************** Information in this manual is subject to change without notice. Trademark Acknowledgement: All trademarks referred herein are the property of their respective owners. Unicon 3 S/PDIF Adapter and Converter User Manual 3 Basic Ideas The Unicon is a signal converter that can be integrated to your computer in several useful setups. It converts electrical S/PDIF signals (Coax as well as 2pin TTL) into optical ones (TOSlink) and vice versa. The Unicon may serve e.g. for the connection of a digital audio device (CD, MD, DVD player or DAT recorder) to an amplifier with TOSlink input. But it might also adapt TTL level signals of PC cards and devices. SPDIF supporting HiFi devices often have RCA (cinch) jacks for digital audio. And some sound cards have got a coaxial S/PDIF-output via a daughter-board (e.g. the Turtle Beach Fiji and the SoundblasterLive! ). The signal level on RCA is -0.5 to +0.5 Volts. Inside a computer most digital audio (S/PDIF) signals are on TTL voltage level (i.e. 0 to 5 Volts). Many sound cards, CD-ROM drives and sound-on-board motherboards deliver TTL-level sound signals at 2-pin-connectors. You choose 2-pin TTL or coax standard for digital in/output by setting specific jumpers (see below). The signal is converted to / from TOSlink in both cases. Conversion between Coax and TTL level is not possible! A schematic overview to picture the principles of the Unicon: 4 Unicon S/PDIF Converter and Adapter User Manual Selecting the signal type Preselect the S/PDIF signal type to be converted from / to TOSlink: 1-2-3 1-2-3 OUT IN JP1 TOSlink ! x (Output) JP2 Invert the output signal JP3 y !TOSlink (Input) JP4 Invert the input signal 1-2 x = TTL Off y=TTL Off 2-3 x=Coax On y=Coax On Position Choose the signal to convert to or from at JP1 and JP3: • TTL – e.g. a CD-ROM drive digital audio signal, a sound card • Coax (RCA/Cinch) – e.g. a HiFi device, a sound card … OR The inversion jumpers JP2 and JP4: • disable (Off) for most signals. • enable (On) for a few sound cards or DVD players that take inverted signals (This can help if the signal sounds very distorted). Installing the Unicon 1. Switch off your computer, remove the power supply cable and unscrew the computer casing. Make sure to avoid electrostatic charging (caused by clothes, carpets etc.); they can destroy electronic components. ! 2. If TTL signals from inside your computer will be converted, connect them now. Refer to the “Signal interfaces” chapter for detailed instructions. 3. Choose a free slot to install the Unicon module. Remove the slot cover and screw the Unicon tight in its place. ! If possible the Unicon bracket should be installed with a little distance to highspeed AGP or PCI cards, which may cause interference. Unicon 5 S/PDIF Adapter and Converter User Manual 5 4. Plug the included Y-cable to the power supply unit of you computer and the Y-cable’s floppy drive connector to the Unicon. If you have a spare floppy drive power connector you can use this one as well. 5. Check for tight screws and connectors, close the casing and switch on the computer. L ! After switching on the computer there will be an immediate signal on TOSlink-OUT. To check this control whether the optical output emits red light (remove the protective cap). This means the hardware is installed correctly, bravo! If the optical output does not emit light after power-on, switch off the computer immediately and check the cable connections inside the computer casing once more. Signal interfaces of the Unicon The image shows all connections offered by the Unicon: Note: You can only use either Coax or TTL signal; the configuration shown on the image is just a visualization and does not really make sense. 6 Unicon S/PDIF Converter and Adapter User Manual TTL connections Take the accessory 2pin cable and connect it to the TTL-S/PDIF connectors of Unicon and signal source / destination. The jumper-array-like TTL-connectors are mostly labeled S/PDIF-IN/ -OUT (check the corresponding manual!). ! L It is important that the signal lines are interconnected correctly (‘polarity’): signal DATA pin connected to DATA of Unicon and GND pin to GND of the Unicon! • • The GND-pin is identified by the asterisk-like connection from GND-pin to ground-plane of the board. To identify which cable lead carries the signal/GND refer to the different colors of the cable leads. Coax connections The Unicon has got two RCA connectors (cinch), which are intended to connect HiFi devices or sound cards like the SBAudigy! or Fiji (digital daughter board with RCA connectors). Connect the Unicon to this device via the included cinch cable – device's digital output to the Unicon 's input and the device's input to the Unicon 's output (see examples). L For high quality signal transfers, especially at long distances, please use shielded coaxial cables and plugs to prevent interference with other signals. The output has got a voltage level of 1.6 Vpp and its ground is not coupled to the computer's ground. The input works on signal levels between 0.5 and 5Vpp. Optical connections Take a TOSlink cable, which is offered in different lengths in your favorite audio shop. The length should not be bigger than 10 meters because the cable damping diminishes the signal quality. There are mainly two different types of TOSlink cable jacks: • TOSlink or ODT jack (for HiFi, MD-recorder, DAT-recorder and Unicon) • 3,5mm opti jack (for small portable devices like MD-, DAT-recorder, ...) Make sure to have the right jacks on your TOSlink cable or a suitable adapter. L Use the protective caps for the TOSlink jacks when the optical module is not in use. This avoids malfunctions caused by dust, scratches, etc. Unicon 7 S/PDIF Adapter and Converter User Manual Examples (jumper settings and connections) Coax (RCA) → TOSlink interface conversion - Connect the Coax S/PDIF signal source to the cinch socket of the Unicon. - Make sure you have selected RCA at the input jumper (JP3, position 2-3). - Tap the optical S/PDIF signal at the TOSlink output. TOSlink → Coax (RCA) interface conversion - Connect the optical S/PDIF signal source to the TOSlink socket of the Unicon. - Make sure you have selected RCA at the output jumper (JP1, position 2-3). - Tap the Coax S/PDIF signal at the cinch output. e.g. a digital I/O board with cinch connectors (SB Audigy, Turtle Beach Fiji, …) - set JP1 and JP3 to RCA (position 2-3) - connect the coax to coax : e.g. sound card, motherboard or CDROM/DVD drive with two 2-pin connectors (SPDIF-in/out) - set JP 1 and JP3 to position 1-2 (TTL) - use the included 2pin-cable ! pay attention to the right polarity of the wires ! . 7 8 Unicon S/PDIF Converter and Adapter User Manual e.g. a CMI8738 sound card (Zoltrix Nightingale, AudioExcel AV511, …). For this sound card you have to enable the signal inversion (JP2 and JP4 to ON / position 2-3). Otherwise you will hear a distorted signal at the in- or output. This sound card has got two jumper-like connectors for SPDIF-IN and SPDIF-OUT (1) and an SPDIF-OUT in Cinch-form (2) If you prefer a mixture of internal (TTL) and external (Coax) connection set JP3 (IN) to TTL (pins 1-2) and JP3 (OUT) to coax (pins 2-3). Connect the Unicon’s input internally via 2pin cable and the output externally (cinch cable). We recommend connecting the Unicon via TTL 2pin cable to the internal pinconnectors SPDIF-IN and -OUT (1). Set Unicon's JP1 and JP3 to position 1-2 (TTL). The card's SPDIF-OUT cinch connector (2) will keep enabled and can be used for an external device. It is sometimes a little tricky to identify the signals. So an explicit example is given below. Unicon 9 S/PDIF Adapter and Converter User Manual 9 Audio Mixer-Software It is recommended to use recent device drivers for your sound card. The sound card mixers often include some special options/features for the digital interface. E.g. for CMI8738 sound cards (like Zoltrix Nightingale, AudioExcel AV511): • To enable S/PDIF output, start the playback mixer and tick the S/PDIF OUT box; do not select “playback via S/PDIF IN” because this would cause a loopback. • To record via the S/PDIF IN use the record mixer where you will find a tick box to select the recording source S/PDIF IN. Don't forget to cross check whether the recording level is adjusted right. (Note for the AV511 that if you switch on 4-channel sound S/PDIF is turned off automatically.) Sample rate Pay attention to the sample rate of the connected SPDIF device (refer to its instruction manual). Some older models of e.g. MD players don't have an integrated sample rate converter. The Unicon does not convert the sample rare and can only process signals as delivered by your audio devices. 10 Unicon S/PDIF Converter and Adapter User Manual List of supported S/PDIF sample rates The Unicon is able to deliver S/PDIF signals of any currently available sampling rate up to 96 kHz e.g. • 32kHz (2.05 MBit/s) – Digital Radio (DSR) • 44.1kHz (2.82 MBit/s) – CD-ROM • 48kHz (3.07 MBit/s) – Sound Card (e.g. SB Live!) • up to 96kHz – DVD where the output sample rate is determined by the input signal's rate. List of supported S/PDIF devices The Unicon supports all audio devices that deliver an optical (TOSlink) or electrical (Coax or 2pin TTL) S/PDIF signal. Devices delivering TTL (2-pin) S/PDIF sound are e.g. • CD-ROM drives • Sound-on-board Motherboards (like PC-Chips, Asus P5AB-Sound,…) • Sound cards EMU10K Sound Chip Cards: Sound Blaster Live! , Audigy Sound Chip Cards: Sound Blaster Audigy, CMI8738 Sound Chip Cards: Zoltrix Nightingale, AudioExcel AV511, CMI8338 Sound Chip Cards: AudioExcel AV510, PC-Chips, … • DVD Decoders (like VideoLogic “DVD Player”, …) Specifications supply current approx. 50mA operating voltage 12V, via Y-cable from computer’s power supply unit operating temperature approx. 5°C – 60°C optical in/out TOSlink, 670nm coaxial input cinch (RCA) connector, 0.5 .. ~ 5 Vpp coaxial output cinch (RCA) connector, 1.6 Vpp TTL in/out 2pin, 0 .. 5 Vpp sample rate, in/out 0 .. 6 Mbit/s (0 .. 96 kHz) for e.g. 2,05 MBit/s (32 kHz, e.g. DSR) 2,82 MBit/s (44.1 kHz, e.g. CD) 3,07 MBit/s (48 kHz, e.g. DAT)