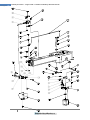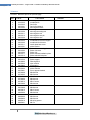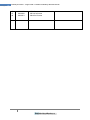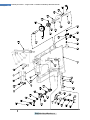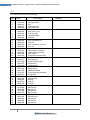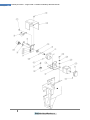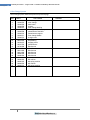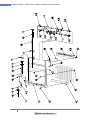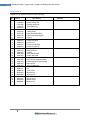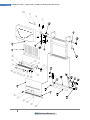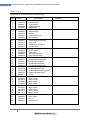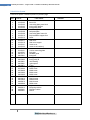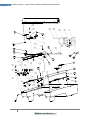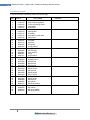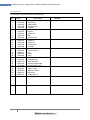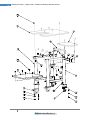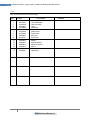
1
Butterfly Embroidery Machine B1201B/T Single Head 12 Needle Manual © Copyright 2010: TheEmbroideryWarehouse TheEmbroideryWarehouse Page |2 Butterfly B1201B/T - Single Head 12 Needle Embroidery Machine Manual © 2010 TheEmbroideryWarehouse PO BOX 11977 Fort Worth, Texas All rights reserved. No part of this manual may be reproduced, transmitted, or viewed in any form or by any means without permission in writing by its publisher. Version 1.3C Page |3 Butterfly B1201B/T - Single Head 12 Needle Embroidery Machine Manual Table of Contents About this document .................................................................................................................................... 6 About this document ................................................................................................................................ 6 General Information ..................................................................................................................................... 7 About the Machine ................................................................................................................................... 7 Compatible Design Formats ...................................................................................................................... 7 Type of Embroidery Applications .............................................................................................................. 7 Warranty and return policy ...................................................................................................................... 8 Contact and technical information ........................................................................................................... 8 Setting up your equipment ......................................................................................................................... 10 Included with your equipment ............................................................................................................... 10 Getting to know your machine ............................................................................................................... 11 Out of the crate setup ............................................................................................................................. 13 Setting up stand (cart) ........................................................................................................................ 13 Placing machine on stand (cart) .......................................................................................................... 13 Setting up thread rack (tree)............................................................................................................... 13 Setting the threads (spools) .................................................................................................................... 14 Threading and tensions of your machine ............................................................................................... 16 Upper thread threading ...................................................................................................................... 16 Upper Thread Tension ........................................................................................................................ 19 Bobbin thread ..................................................................................................................................... 20 Bobbin Thread Tensions...................................................................................................................... 21 Hooping ....................................................................................................................................................... 22 Setting up the tubular arms .................................................................................................................... 22 Hooping a tubular hoop .......................................................................................................................... 22 Using the Control Panel .............................................................................................................................. 24 About the control panel .......................................................................................................................... 24 Keyboard Layout ..................................................................................................................................... 25 Main Screen Layout ................................................................................................................................ 28 Basic Control Panel Operations .............................................................................................................. 31 Load design from USB / Memory stick................................................................................................ 31 Load design from memory (internal memory) ................................................................................... 32 Page |4 Butterfly B1201B/T - Single Head 12 Needle Embroidery Machine Manual Confirm Embroidery Design ................................................................................................................ 34 Color Changes ..................................................................................................................................... 35 Types of color changes ........................................................................................................................ 35 Setting the color sequence ................................................................................................................. 36 Control Panel Cheat Sheet .......................................................................................................................... 37 Load design from USB / Memory stick................................................................................................ 37 Load design from memory (internal memory) ................................................................................... 37 Confirm Embroidery Design ................................................................................................................ 37 Setting the color sequence ..................................................................................................................... 37 Maintenance ............................................................................................................................................... 38 Oiling ....................................................................................................................................................... 38 Oil Point Breakdown ........................................................................................................................... 39 Glossary ....................................................................................................................................................... 40 Glossary ................................................................................................................................................... 40 Frequently Asked Questions ....................................................................................................................... 41 FAQS ........................................................................................................................................................ 41 Specifications .............................................................................................................................................. 42 Machine specifications ........................................................................................................................... 42 Troubleshooting and Technical Support ..................................................................................................... 43 Technical Support ................................................................................................................................... 43 Troubleshooting ...................................................................................................................................... 43 Pictures ....................................................................................................................................................... 44 Pictures & Videos .................................................................................................................................... 44 Part Book ..................................................................................................................................................... 45 Parts Book ............................................................................................................................................... 45 Table Top............................................................................................................................................. 47 Rotary Hook Base ................................................................................................................................ 49 Trimmers ............................................................................................................................................. 51 Arm...................................................................................................................................................... 54 Needle Bar Driver ................................................................................................................................ 57 Upper Thread Hook ............................................................................................................................. 59 Color Change System .......................................................................................................................... 61 Page |5 Butterfly B1201B/T - Single Head 12 Needle Embroidery Machine Manual Needle Case A ..................................................................................................................................... 63 Needle Case B ..................................................................................................................................... 65 X-Axis Drive System ............................................................................................................................. 67 Y-Axis Drive System ............................................................................................................................. 69 Tension Base ....................................................................................................................................... 71 Thread Stand ....................................................................................................................................... 73 Bobbin Winder .................................................................................................................................... 75 Electronics ........................................................................................................................................... 77 Hoops / Frames ................................................................................................................................... 79 Cap Driver ........................................................................................................................................... 81 Cap Frame ........................................................................................................................................... 83 Cart ...................................................................................................................................................... 85 Page |6 Butterfly B1201B/T - Single Head 12 Needle Embroidery Machine Manual About this document About this document This document is to be used as a reference user’s manual for the Butterfly B1201B/T – Single Head 12 Needle Embroidery Machine. We highly encourage you to completely review the entire contents of this manual before setting up or using your embroidery machine. To download a copy of this manual at anytime, please go to: http://www.ButterFlyEmb.com/Butterfly_Embroidery_Machine_Manual.pdf Page |7 Butterfly B1201B/T - Single Head 12 Needle Embroidery Machine Manual General Information About the Machine The Butterfly B1201B/T is a single head (single station) embroidery machine with 12 needles (colors). This allows the user to embroider up to one garment at one time with one needle at a time. The machine automatically color changes (as indicated or preprogrammed by the embroidery machine design). A color change is in essence selecting a different needle with a different color thread in the needle. The machine has a USB port (memory stick) that reads several different embroidery formats. The user manually loads the pre-digitized designs into the machine off of the USB port and/or the network when applicable. Compatible Design Formats The Butterfly machine work with the following design formats all saved on a standard USB flash (thumb or memory) drive. Instruction on how to save to these formats can be found in your software user manual. If you do not have software that will write to one of the compatible formats, please go to http://www.MadPunch.com to download Mad Punch - Free Digitizing / Editing Embroidery Software. DST (Tajima Format) EXP (Melco DOS Format) Type of Embroidery Applications The Butterfly machine is comparable with most all of the major industrial (commercial) embroidery machines. Some embroidery equipment may or may not have special equipment attached to offer additional types of embroidery. The following general list includes several applications where the Butterfly Embroidery Machine might be used. Typically to change from one type of embroidery setting to the next requires the operator to manually change out adapters. This general list includes but is not limited to: Flat Embroidery Work o Flat embroidery work typically includes works done when the embroidery machine tabletop (removable on the Butterfly) is left on the machine. This refers to anything typically flat in nature or design such as Drapery Table Cloths Aprons Yard goods (yard referring to a measurement of fabric/material) Etc Tubular Embroidery Work o Tubular Embroidery Work typically refers work that is done with the removable tabletop removed from the machine. This allows for the embroidery work to be draped down from the machine hanging from the embroidery hoop. Tubular is currently the most popular form because it makes hooping and embroidering Page |8 Butterfly B1201B/T - Single Head 12 Needle Embroidery Machine Manual shirts much easier. Hooping a Tubular Frame is general much less time consuming and easier than hooping with other types of hoops or frames. T-Shirt Polos Pillow Cases Etc Cap (270 degree) Embroidery o Cap embroidery refers to embroidery done directly on a baseball style cap/hat Baseball Caps Etc Warranty and return policy Below is a summary of our warranty and return policy. We highly recommend you to read the full warranty and return policy document. Our warranty covers up to 2 years on all non-consumable parts and electronics one the Butterfly Embroidery Machine. Our warranty does not cover misuse or user damages. To redeem warranty repairs or service, the device must be sent back to our corporate office. Labor is covered for one year via phone support, web support (email, webcam, chat, etc) and in-house (OUR HEADQUARTERS). Labor warranty is automatically voided if the machine is worked on by non-authorized or non-approved parties. Returns may be accepted for up to 5 days after receiving the equipment. The equipment must be returned in its original packing, undamaged. Full refund will be issued upon returning the device minus ALL shipping costs. A restocking fee may apply. Contact and technical information Corporate office: 2954 SE Loop 820 Fort Worth, Texas 76140 / USA +1-817-346-7691 http://www.ButterFlyEmb.com MAILING: PO BOX 11977 Fort Worth, Texas 76110 / USA Parts and Accessories: http://www.EmbAccess.com Page |9 Butterfly B1201B/T - Single Head 12 Needle Embroidery Machine Manual Electronics Repairs and servicing: http://www.PLRElectronics.com P a g e | 10 Butterfly B1201B/T - Single Head 12 Needle Embroidery Machine Manual Setting up your equipment Included with your equipment Included in a standard purchase of the B1201B/T embroidery machine typically includes***: Power Cable Standard Tool kit with the following o Scissors o Tweezers o Threading Rod o Oil Can o Philips Screw Driver o Flat Screw Driver o USB Memory Stick o Etc Single Head Stand Removable Table Top Light (typically attached to the machine) Border Sash Stand (cart) *** The above list may contain items not included with your particular machine. It is highly recommend getting a complete list from your sales representative. The above list is only a generalization. P a g e | 11 Butterfly B1201B/T - Single Head 12 Needle Embroidery Machine Manual Getting to know your machine Pictures and description of the Butterfly B1201B/T embroidery machine below: Image 1.A – Butterfly B1201B/T Embroidery Machine – Single head 12 needle embroidery machine. The machine assembled on the cart/stand. This example is with the tubular hoop attachment installed and the removable table removed. Image 1.B – Control panel – The control panel is where the entire machine is controlled. This includes your Stop, Start, Emergency Stop and Power button at the bottom of the machine. On the right side of the machine is the USB port for inserting a USB memory stick for inputting designs into the machine. The Speed Up and Speed Down button are used to control the embroidery speeds of the machine during operation. The recommended speed to run the machine is between 600 – 800 stitches per minute. The same buttons also double as back and forward buttons for the menu, etc. P a g e | 12 Butterfly B1201B/T - Single Head 12 Needle Embroidery Machine Manual Image 1.C – Head Left Side – View looking to the left side of the embroidery machine. Various motors are shown on the left side of the machine. The wiper motor control the wipers which grab the embroidery thread after the thread is cut. The reciprocator motor is what controls the arm which grabs the needle bar and moves it up and down. Image 1.D – Head Right side – View looking to the right side of the embroidery machine. The color change where is used to move the head to the left or to the right (to different needles). The timing sight is a glass window you can view the timing numbers through (for setting machine parameters during maintenance). The timing wheel moves the needle bar through its cycles from 0 to 360 degrees. The laser light is used to highlight the needle plate hole or, the point at which the embroidery machine needle makes penetration. P a g e | 13 Butterfly B1201B/T - Single Head 12 Needle Embroidery Machine Manual Out of the crate setup If your equipment has been shipped to you then there are certain steps you will need to take to uncrate and setup. The steps may vary from machine to machine and crate to crate. SEE SUPPLEMENT GUIDE Setting up stand (cart) SEE SUPPLEMENT GUIDE Placing machine on stand (cart) SEE SUPPLEMENT GUIDE Setting up thread rack (tree) SECTION A - Assembly of the Thread Rack (also known as the Threading Tree) – See Image 1. The thread rack is the part of the machine which includes the first set of tension knobs. The primary function of the thread rack is to smoothly unwind thread off of the spool of thread. Step 1 – Screw Thread Stand Shafts (2 pcs) in by hand into threaded holes A and B on the Thread Stand. Step 2 – Tighten thread shafts using the flat adjustor C on each shaft with a wrench. Step 3- Place the Thread Rack/Tree onto thread stand shafts with the knobs of the thread rack facing towards the head (front most Image 1 – Thread Rack part of the machine) Step 4 – Tighten Allen screws on top of the thread rack. SECTION B- Assembly of the threading tubes. – See Image 2. The primary functions of the thread tubes are to keep the threads from raveling together under wind, etc. Step 1 – Insert a Thread Tube Joint (end of a Thread Tube) into the top USLOT. Start by inserting one end of one tube in U-Slot A1. A1 is located on the Thread Rack. Step 2 – Insert the other end of the Thread Tube into A2. A2 is located on the machine head, on the Tension Knob Base. Image 2 – Thread Tubes Step 3- Proceed by installing each thread tube in the same manner. P a g e | 14 Butterfly B1201B/T - Single Head 12 Needle Embroidery Machine Manual Setting the threads (spools) The Butterfly B1201B/T is a 12 color machine meaning it can hold up to 12 different spools of thread. Generally most users will use 12 different colors of thread designating at least 6 of the colors for basics such as white, black, red, blue, green, yellow, etc. There are various brands and types of threads. The most common types are Rayon and Polyester. Rayon is a softer but weaker thread. Typically polyester (or “poly”) is recommended due to its strength which also reduces thread breaks. Step A – Begin by placing 12 spools of thread on the thread stand. Step B – Take the first spool (1) thread and pass it through eyelet ‘2’ in the image followed by ‘3’ then ‘4’. Step C – Take the second spool (5) thread and pass it through eyelet ‘6’ in the image followed by ‘7’. Step D - Take the third spool thread (8) and pass it through eyelet ‘9’ in the image Step E – Continue with the next spool in sequence (to the right of spool 1). Continue till the entire thread rack is threaded. You can choose to thread the tension knob while threading the thread rack or, wait till the entire thread rack is threaded and then thread the rest of the machine (proceeding pages). P a g e | 15 Butterfly B1201B/T - Single Head 12 Needle Embroidery Machine Manual Image 3 - Threading P a g e | 16 Butterfly B1201B/T - Single Head 12 Needle Embroidery Machine Manual Threading and tensions of your machine Be sure you have already completed the previous sections before proceeding. See previous Images 3. Proper threading and tensions of your embroidery machine are essential to production, thread breaks, and final embroidery quality. Without properly threading your machine and setting the correct tensions per spool, needle and bobbin, your machine may not run. It is very important that the threading tracks and tensions are constantly checked. Upper thread threading The upper thread refers to the thread that is seen on the top of the embroidered item. The upper threading track is show in Image 3. An upper thread break typically refers to when the current spool of thread that is embroidering, has broken. Upper thread is also physically located at the top of the machine whereas the lower thread (bobbin) is located towards the bottom. Upper thread is the common spool of thread used to embroidery designs. Refer to Image 3 to thread. Step A – First complete the section “Setting the threads”. Step 1 – Insert the first thread into the eyelet of the pretension knob. The pretension knob is the one at the very top of the machine and is the first tension knob the thread passes through Step 2 – Place the thread in between the 2 disks of the pretension knob going to the right. Step 3 – Detach the top of the thread tube and place thread through U-Slot Step 4/5/6 – For this step you will need the threading rod. The Threading Rod is a narrow piece of plastic approximately 2 feet long about the width of a pencil tip that comes with the standard tool kit. If you do not have a threading rod, you can also use a guitar string or anything similar. On the end of the threading rod, there is a cut out notch. Insert the threading rod from the bottom of the threading tube, notch end first. Pass the threading rod through the entire threading tube until the notched end comes out. Attach the thread to the notch and (5) pull the other end of the threading rod back out of the threading tube so that the thread is completely through the tube. (6) Attach both ends of the threading tube back onto the machine. Step 7 – Pass the thread under the thread guide. The thread guide is a piece of metal loosely attached to the machine by a screw and spring. The function of the thread guide is to unravel threads that might still be raveled and to keep threads going straight in their designated paths. Step 8 – Pass the thread through the main tension knob in the same manner as it goes through the pretension knob Step 9 – Place thread to the left of the guide rod Step 10 – Place thread to the right of the guide rod on the rotary wheel, and then under the next guide rod to the left of the rotary wheel. The rotary, or Thread Break wheel, is used to detect P a g e | 17 Butterfly B1201B/T - Single Head 12 Needle Embroidery Machine Manual thread breaks. If your machine is giving false thread breaks, first check that this wheel is properly threaded. If this wheel is properly threaded, check the entire thread track for any misthreading. Step 11 – Place thread over the rotary wheel and then to the right of the wheel and then to the left of the next thread guide rod. If your machine is detecting false thread breaks but threaded properly, you might try wrapping the thread around the rotary wheel a second time. Step 12 – Place thread under the next thread guide. Step 13 – Open the head case cover. To the right of the machine behind the cover, on the head, there is a lever that goes up and down. Push the lever down as far as it goes. When you do, you will see several (12) small wires/springs. These are known as the Check Springs. Step 14 – Place the thread to the right of the right most cylinder rod where check springs come out of when the check spring lever is pressed down. Place the thread through the check spring eyelet from the right to the left. Bring the thread back up to the left of the leftmost rod corresponding to the current thread you are threading. Move the lever so that the checks springs go back up all the way and then bring it back down about 1mm to give the springs a little bit more spring than if they were all the way up. Not placing the check springs in the correct position will cause trimming problems and problems when changing colors. Step 15 – Bring the thread back up about 3 inches into the take up lever eyelet. Step 16 – Bring the thread back down, past the check spring to the bottom of the head and through the last thread guide/eyelet Step 17 - Place the thread through the needle eye from the front to the back. It is recommended that you cut the thread at a 45 degree angle to give it a point. Once you cut the thread, use your fingers to straighten out the end. Hold the thread with your index and thumb leaving about 1 – 1 ½ inches out keeping the thread at straight as possible as you pass it through the needle. Once thru the needle, pass it through the needle bar hole. Step 18 – Place the thread in between the long spring at the bottom of the machine. There is no need to wrap it in the spring and it is recommended placing it into the spring gently without much tension. The spring is only used to temporarily hold the thread. Cut the thread at the end leaving about 1/3 inch extra. Step B – Continue with the next spool of thread, threading in the same manner as the previous thread. Further examples are shown on the next page. P a g e | 18 Butterfly B1201B/T - Single Head 12 Needle Embroidery Machine Manual P a g e | 19 Butterfly B1201B/T - Single Head 12 Needle Embroidery Machine Manual Upper Thread Tension The upper thread tension refers to how tense or tight the thread feels when you pull it through the very last thread guide eyelet when the thread is properly threaded. There are many metrics for measuring this. However, the final metric usually just depends on what the final embroidery looks like. Upper thread tension is completely different between one cone and the next and the tensions change as the thread is used. Therefore, the tensions must constantly be checked. Because the B1201B/T has 12 needles and only one bobbin, it is always best to preset the bobbin tensions (next section) first and then change the upper threads to conform to the bobbin tension. In other words, once the bobbin is set, it should not be adjusted much. Each time the bobbin is changed, it may need to be set again. The operator should always recheck bobbin tensions when changing the bobbin (next section). When pulling the upper thread from the final thread guide eyelet hole (NOT through the needle), the tension on the thread should feel about the same as if the other end of the thread was tied to 3 US Quarters ($0.75), being dragged across a smooth surface. Generally you should start with tightening both tension knobs at about 50% and then slowly adjusting from there. Once everything is set, you should only adjust with the second tension knob located on the tension base. Minor adjustments during and after embroidery will be required and should only be done with this second knob. When the machine is embroidering (assuming the bobbin tension is set) you can visually tell if the tensions are set or need adjusting. It is common (and required) to make minor adjustments often. If the thread appears to be loopy then the tension knob needs to be tightened. Typically it takes about ½ turn to make even a slight difference. If the thread appears too tight and/or there are a lot of thread breaks, then the tensions need to be loosened. It is recommended during the first run of a design to slow the machine speed down as slow as possible and make minor adjustments to the tension while slowly speeding the machine up until the tensions are correct. If bobbin thread is coming up on the top of the embroidery then the upper thread may be too tight assuming the bobbin is set correctly. If the bobbin is not set correctly, then the bobbin might be too loose. There are several other ways to test tensions. One is referred to as the ‘H’ or ‘I’ or ‘Column’ test. In this test, once the embroidery is completed, look underneath the embroidered item. Columns of embroidery such as the column of an ‘I’ should be 1/3 bobbin with 1/3 thread on each sides of the bobbin. - - If the bobbin is correctly set o Too much bobbin (more than 1/3 of the column)? – Loosen upper thread o Too little bobbin (less than 1/3 of the column)? – Tighten upper thread If the bobbin is not set o Too much bobbin (more than 1/3 of the column)? – Tighten bobbin o Too little bobbin (less than 1/3 of the column)? – Loosen bobbin P a g e | 20 Butterfly B1201B/T - Single Head 12 Needle Embroidery Machine Manual Bobbin thread The B1201B/T uses style ‘L’ bobbins and bobbin cases which are also known as Standard Bobbins. We recommend using prewound polyester bobbins with cardboard sides. The bobbin is located inside the bobbin case and is near the bottom of the machine under the needle plate. The bobbin should be cleaned and replaced regularly to ensure proper tensions. Lint typically clogs the bobbin case which will produce variations in tensions and poor embroidery quality. It’s a good indication that it’s time to replace the bobbin case if the bobbin pulls out of the bobbin case rough after the case has been cleaned. Because bobbin cases are so inexpensive, it is recommended to purchase new ones rather than replace or repair used ones. To remove the bobbin case from the hook of the machine, pull the bobbin case handle while extracting the case. When inserting the bobbin case back into the hook, make sure that the handle is pointing straight to the right. Do not pull the handle when inserting the case back into the hook. To thread your bobbin into the bobbin case, follow the following steps. Step 1 – Insert the style ‘L’ prewound standard cardboard sided bobbin into the bobbin case. Step 2 – Insert the bobbin thread into the slot/notch on the side of the metal bobbin case. Step 2/B – When pulling the bobbin thread through the notch, the bobbin should spin clockwise when looking at the side/top of the bobbin. If it is not spinning clockwise, remove the bobbin and flip it over. Step 3 – Pull the bobbin thread through the notch and under the hook located right by the notch. Step 4 – Place the thread under the pig tail of the bobbin case. Be sure that the bobbin thread passes from the bottom opening of the pig tail and exits for the very top and not from the side of the pigtail. P a g e | 21 Butterfly B1201B/T - Single Head 12 Needle Embroidery Machine Manual Step 5 – Pull the bobbin thread out about 6 inches while checking tensions (next section). Adjust if needed. Step 5/B – Always check tensions on the bobbin when replacing it. The bobbin lasts approximately 32,000 stitches. Bobbin tensions might vary from bobbin to bobbin and the tension does change as the bobbin is used. Bobbin Thread Tensions The bobbin thread tension is typically considered much more important that the upper thread tension because all 12 needles depend on the tensions of the bobbin in order to embroidery properly. It is important to set the bobbin tensions one time and try not to adjust it per color but rather adjust each other color/needle to conform to the bobbin. The bobbin tensions might need to be changed when replacing the bobbin and should be checked regardless. The operator should check the tensions of the bobbin after each run by looking at the bobbin of the final embroidery product for excess or shortage of bobbin thread. Generally on a column stitch 1/3 of the column should be bobbin thread and the other 2/3 upper thread. An adjuster screw is located on the tension spring. Next to the adjuster screw is a fixed screw that holds down the tension spring. This fixed screw should never be touched. Tightening (turning clockwise) will tighten the tension of the bobbin. When tightening the bobbin, less bobbin thread will show underneath the final embroidered item. Loosening (turning counterclockwise) will lessen the bobbin tension. When loosening the bobbin, more bobbin thread will show underneath the final embroidered item. The bobbin tension should be set about the same at the upper thread tension. The same example of the 3 quarters ($0.75) can be applied. Another way to check tension is to hold the bobbin thread and drop the bobbin case. The case should fall approximately 1 – 3 inches. If it falls too far, the tensions need to be tightened. If it falls too short, tensions will need to be loosened. However, that is only an example and tensions will variate from bobbin to bobbin and from bobbin case to bobbin case. The only way to set the tension accurately is by eye, based on the final embroidery quality. *Note - If you are using a bobbin case tension gauge the approximate setting should be between 25-35 grams P a g e | 22 Butterfly B1201B/T - Single Head 12 Needle Embroidery Machine Manual Hooping Setting up the tubular arms The tubular arms are what hold the tubular hoops onto the machine. The tubular arms attach to the machine onto the pantograph. The tubular setup is the most common type of embroidery used on these types of machines. The tubular system utilizes the tubular hoops. The tubular system is most common because it’s a much quicker and easier way to hoop. To use the tubular system you will need to first install the tubular arms if they have not already been installed. To install the tubular arms start by sliding the left tubular arm into the pantograph into one the slots on the left side of the pantograph (1). There are several slots on the pantograph for different size of hoops. It does not matter which slots are uses as long as the hoop will fit once both arms have been installed. (2) Slightly tighten the 2 screws on the tubular arm, onto the pantograph. The next step will be to select the hoop size you would like to use (3). Many embroidery machines such as the Butterfly will accept large, medium and small hoops. Large hoops are overall larger from the far left tab to the far right tab where as small hoops are smaller from one tab to the next. On standard size hoops (which might be 9cm, 12cm, 15cm, 18cm, etc) the length from one tab end to the next is 360mm. Once you select the hoop size, measure the hoop from tab to tab. Next install the right tubular arm (4) in the slots on the pantograph the same distance away from each other as the length of the hoop. Slightly tighten (5) the 2 screws on the tubular arm. It is recommended that you then place the hoop into the tubular arms to ensure it fits correctly and that the arms are not at an angle. On each of the tubular tabs, there are sides that have beveled ends. These beveled ends slide into the tubular arm springs at a 30 – 45 degree angle. Place the hoop into the tubular arms under the tubular arm springs. It is not necessary to have anything hooped into the hoop at this time. Check that the arms are not angled and then tighten the 4 tubular arm screws (2) & (5). Hooping a tubular hoop Tubular hoops are the most common type of hoops used in commercial embroidery machines. They are very easy to hoop compared to the alternatives and are ideal for embroidery on assembled P a g e | 23 Butterfly B1201B/T - Single Head 12 Needle Embroidery Machine Manual goods such as shirts, etc. Embroidery on unassembled goods (raw fabric) is typically best done with other types of hoop systems but most all embroidery done commercially will be on assembled garments. There are many guides available on the internet and in other embroidery training manuals that explain the best way to hoop certain items depending on sizes, sex, type, etc of the garments. This manual will not get into the techniques and it is recommended that the operator search on the internet for further training. However, when using a tubular hoop as shown the outer ring (piece without the metal tabs) goes inside or under the garment. For example, on a t-shirt the outer ring will go inside the shirt around the area that is to be embroidered. Backing or Stabilizer is then place on top of the outer right in between the garment. The top part of the hoop is then place on top of the garment, inside the outer ring. The top part of the hoop includes the beveled tabs. The beveled part of the tab will always be on top. The garment should be hooped so that the final embroidery imaged is parallel with the beveled tabs. P a g e | 24 Butterfly B1201B/T - Single Head 12 Needle Embroidery Machine Manual Using the Control Panel About the control panel The control panel for the Butterfly Embroidery Machine is relatively easy to use. The control panel has a lot of uses that on a normal basis will never be used. We recommend that you become familiar with all the buttons and features but, you can also refer to the Cheat Sheet to find all you need to operate the control panel. Please refer below to the general layout of the control panel. Display USB Memory Port Screen Network Connector Keyboard Emergency Stop / Power OFF Power Switch Start Button button Stop Button button P a g e | 25 Butterfly B1201B/T - Single Head 12 Needle Embroidery Machine Manual Keyboard Layout The control panel includes: ① Number Keypad, ② Function/Menu keys, ③ Manual Framemoving (direction keys), ④ and the Confirm key (Enter key). The keys are named and described as follows: Key icon Key name Embroider Key function Confirms or cancels embroidering mode Confirm (Enter) Standard ENTER key Auxiliary function Use to enter the “Auxiliary function” menu Pattern Memory Enters the Memory (designs) menu Pattern storage Used to load off or manage USB Memory stick Idling When jogging, can be used to speed up or down jog speed. P a g e | 26 Butterfly B1201B/T - Single Head 12 Needle Embroidery Machine Manual Help System info key Trimming Used to prefer a manual color change Jogging Prefers a rotation on the main shaft (motor) Color-sequence To change the color sequence Color-changing Back to ORG. Back to Stop point Digital Space key “+”, “-” symbol Changes the procedure of color changes such as manual or automatic color changes Returns back to the origin (start point) of embroidery design Used to go back the stopped position of the current embroider job Standard 10 key bad 10+ plus. Used to enter the number 10, 11 and 12 (10+0 = 10 , 10+1=11 , 10+2=12) Used in various menus ①Used to increase the embroidering speed Increased speed ② Page Back ①Used to decrease the embroidering speed Decreased speed ② Page Forward Exit Exit / Back button Back and cancel Cancel Button Left and right Left and right P a g e | 27 Butterfly B1201B/T - Single Head 12 Needle Embroidery Machine Manual Up and down Up and down Frame Speed Changes the manual frame movement speed Embroidery If on, confirms embroidery is ready. Normally should Confirmation Indicator be light when you are ready to embroider. Main Shaft Indicator Color-change Indicator Indicates if the main shaft is in the correct place. Normally should be light. If on, indicate the machine is in the correct color change position. Normally should be light. High/Low speed frame Indicates the speed the frame is set to move at in Indicator manual mode P a g e | 28 Butterfly B1201B/T - Single Head 12 Needle Embroidery Machine Manual Main Screen Layout On the screen, the main menu / display should look similar as follows: The following icons will explain each part of the main display screen. Icon state Embroidery Preparation mode 1 Embroidery Confirmation mode Content/handle instruction Press“ ” and “ ” key to switch the embroidery modes. To embroidery, you want the CONFIRM ‘Green’ mode. To load, designs or make changes to designs, the PREPARATION state should be on. Auto color-change, auto start 2 Auto color-change, manual start Press “ ” key to switch the mode of color- changes. The ‘Green’ mode is standard. Manual color changing. P a g e | 29 Butterfly B1201B/T - Single Head 12 Needle Embroidery Machine Manual Normal embroidering 3 High-speed idling Press “ ” key to switch the state of idling. The ‘Green’ mode is standard. Low-speed idling Manual high speed frame-moving 4 Manual low speed frame-moving 5 6 Press “ ” key to switch the state of framemoving. Changes the speed at which the frame moves when manually moving it with the arrow keys. Display X,Y position Press “ info. H: The highest rotated speed Shows the max ‘H’ and minimum ‘L’ L: The lowest rotated speed embroidery speeds. 7 This number indicates the current embroidery speed. 8 Rotated speed in actual embroidering of main shaft At Stop point 9 Not at stop point Press “ speed. ” key to cancel/hide XY position ” or “ ” keys to change the Shows the actual embroidery speed Press “ ” and “ ” key to begin the operation of moving to the exact stop point. The machine must be at the stop point to operate 10 Current embroidery needle Needle number in use 11 Indicates is the machine is properly on a needle If not green, press the key pad to change to the proper color or, use the manual color change wheel till the machine is on a needle 12 Color change sequence 13 Indicates if the offset embroidery is on or off. Press “ ” key to set/change the sequence of the color changes. Typically OFF. This can be turned on and off in “Auxiliary Functions”. P a g e | 30 Butterfly B1201B/T - Single Head 12 Needle Embroidery Machine Manual 14 Pattern information Information on the current embroidery design Ready to embroider; Machine was running but has stopped; Thread break; 15 Embroidery states Embroidery has finished; Machine is color-changing; System is in jump stitch mode. 16 Pattern has been set to repeat Set the X, Y repetition and times in “Embroidery Parameter”. Typically this is not set Pattern has not been set to repeat System has been set to cycle embroidery 17 System has not been set to cycle embroidery 18 19 20 21 Direction (rotation/mirror) of design In “Machine parameter” you can set whether to cycle The F indicates the direction the embroidery design will sew. For example, and upside down F indicates the design will sew upside down For specialty embroidery devices. Not used Specialty Working Mode Completion Bar often Show process of current embroidery design Disk in use icon When on, indicates that the system is accessing the disk drive USB in use icon When on, indicates that the system is accessing the USB stick 22 P a g e | 31 Butterfly B1201B/T - Single Head 12 Needle Embroidery Machine Manual 23 24 25 Network connection state When on, indicates that the network is connected Control cable When on, indicates that the system is connected with direct connect cable Time zone can be adjusted in “Machine Parameter”. Current System Time Basic Control Panel Operations Generally, there are very few operations needed to run the Butterfly embroidery machine. We will simplify the learning process by only showing the Basic operations on the control panel in this section and show further advanced (but rarely used) operation on another section. Load design from USB / Memory stick The first step to embroidering a design is to load it into the Butterflys control panel. You will need to save your design from your PC onto a memory stick. The standard format is the Tajima DST format. Please refer to your software manual on how to save the designs as DST. Once the design is saved onto the stick: 1. Insert USB stick into the control panel then press “ shown below. 2. Select “Input” then press “ 3. Use the keys “ ” and “ once the design is selected. ” key to enter “USB Disk Management” as ” key to confirm. ” to select the pattern in memory you want, then press “ ” key P a g e | 32 Butterfly B1201B/T - Single Head 12 Needle Embroidery Machine Manual ※If you want to enter a different directory of the USB stick, press “ the directory you want and then press “ press the “ ” and “ ” to select ” key to confirm. To go back a directory select “..”, and ” key. 4. The system with then show the prompt: “Input PAT NO.”, and show the next available pattern number in memory, press “ ” key to use this pattern number. ※If you don’t want to use this pattern number, you can use the 10 keypad to input a new pattern number. You can press “ key to confirm. ” key to delete the current number. Once done, press “ 5. The system with then show the prompt: “Compensate the stitches?” Then press “ key to select “ Yes ” or “ No ” and press “ ” ” and “ ” key to confirm. ※If select the flat-equalized stitches, it will prompt that input the equalized value. 6. Input the pattern in disk to system memory, then it will prompt: “Continue?” , select “yes” to continue input pattern and select “No” or press “ ” key to exit this operation. Load design from memory (internal memory) Once the design is loaded off the USB stick (see previous tutorial) and on the Butterflys internal memory, then it can be loaded to embroider. 1. In the preparation mode ( ) press “ ” key. The following screen will display: ” P a g e | 33 Butterfly B1201B/T - Single Head 12 Needle Embroidery Machine Manual 2. With the cursor on “Select”, press the “ ” key 3. The screen will display all the patterns in memory. Press “ next page, press “ ” and “ ” key to select the design. Press “ ”&“ ” keys to go to the ” key to confirm. ※If the start-point of the pattern has been saved (the design will have a “*” next to it), the system will prompt: “Do you want to restore ORG?” If you select “Yes”, the embroidery frame will move to the saved point of origin. If you select “No”, the frame will not move. ※If the system has saved the “Embroidery Parameter” or the “Color Sequence Table” of the design, and its different from the current parameter, the system will prompt: “Do you want to restore EMB PARA?” If you select “Yes”, system will load the previously saved embroidery parameter but if you select “No” the current system will use the last default settings P a g e | 34 Butterfly B1201B/T - Single Head 12 Needle Embroidery Machine Manual 4. Press “ ” key to use the current embroidery parameter. Press “ ” key to return to the “Select EMB. Pattern” page. Press others key to enter the “Edit EMB. PARA” page. ※If you wish, you can use the 10 key to change any parameters. Use the direction keys “ and “ ” to select different options, and press “ ” ” to modify them. When finished, press the “ ” key to save the modified changes and return to main page. Confirm Embroidery Design Once the design is loaded into memory, you must confirm it to put the machine into embroidery mode. With the machine in “Preparation mode” “ ”, press “ ” key, until the screen shows: “Confirm embroidering?”. Press “ ” key to enter embroidering mode (“ green, press the start button to start embroidering. ” icon will turn ※If current position of the machine is not at the origin point of the pattern (as set in “Frame Origin Setting”), the system will ask: “Save current ORG setting for this pattern?”. Press “ ” key to select “Yes” or “No”, then press “ ” and “ ” key to confirm. ※If the current embroidery parameter is different from the saved one in the system, the machine will ask: “Save current parameter setting for this pattern?”. Press “ ”, “ ” key, select “Yes” to save current embroidery parameter, or select “No” to not save. ” and “ ※ If the system color sequence table is different from current color table, the machine will ask: “Save color table?”, select “ Yes ” to save current color-sequence table to this pattern or select “ No ” to not save. P a g e | 35 Butterfly B1201B/T - Single Head 12 Needle Embroidery Machine Manual Color Changes Once the design is confirmed you can program color changes. Color-Change Icon Types of color changes The icon above is the color-change icon. When the embroidery machine is not embroidering, press “ ” key to switch the types of color-changes. 1 Manual color-change When the machine is not running (in any color-change mode), press any number on the 10 keypad to perform a manual color-change. 2 Manual change the color while embroidering In this mode, the machine will stop at each color change and wait till the next color is entered with the 10 keypad. Once the color is set, use start to continue embroidering with that specified needle number. 3 Auto color-change, manual start In this mode, the colors are preprogrammed however, the machine will still stop at each color change waiting for the operator to hit start to continue embroidering. 4 Auto color-change, auto start P a g e | 36 Butterfly B1201B/T - Single Head 12 Needle Embroidery Machine Manual In this mode, color-changes are preprogrammed by the operator and the machine will automatically select the needles at color changes and start on its own. This is the normally used color-change mode Setting the color sequence 1. Press “ ” key to show the color-sequence menu: Color sequence Three options will display. You can use either one of the 3 to change color sequence. 2. Insert and repeat: Used to enter each color individually in sequence. Press “ ” to select the Insert & Repeat option. Using the 10 keypad, enter each color change 1 by one and once done entering all the color changes, press the “ ” key to confirm, the color sequence. 3. Modify: Used to change just specific needles. Press “ ”. Use direction keys “ ” and “ ” to move the cursor to the color you want to change. Use the 10 key pad to change the color number and then press the “ ” key to confirm. 4. Replace color: Used to change all of the color on one needle to another all at the same time. Press “ ”. Enter the original needle number followed by the new needle number and then press the “ ” key to confirm. P a g e | 37 Butterfly B1201B/T - Single Head 12 Needle Embroidery Machine Manual Control Panel Cheat Sheet Load design from USB / Memory stick Insert USB stick Use & to select the design Load design from memory (internal memory) In Mode: ( ) & to select the design IF - “Do you want to restore ORG?” IF - “Do you want to restore EMB PARA?” Confirm Embroidery Design In Mode: ( ) “Confirm embroidering?” Setting the color sequence Use keypad to enter first color entering all colors … after last color is entered used keypad to enter next color continue P a g e | 38 Butterfly B1201B/T - Single Head 12 Needle Embroidery Machine Manual Maintenance Oiling To ensure your Butterfly Embroidery Machine lasts a long and healthy life, it is recommended to oil the machine when required. Although it is recommend oiling the machine, it is highly discouraged to over oil the machine as the oil can accumulate over electronics, the garments, and other parts that are not designed to be oiled. It is also not recommend to oil parts not specified in this guide. Standard sewing or embroidery machine oil should be used. It is recommended to oil the machine after each shift to give the oil time to settle. When starting the machine at the next shift for the first time, it is recommend to sew a sample run and to sew each run using solvy. Solvy helps to catch any excess oil from dripping on and staining the garments. A) – Needle bars – Once every (20) hours of embroidery. Oil each bar through the opening. Do not place more than one drop per bar per 8 hour shift. There is a felt piece inside that head that absorbs the oil and lubricates the shafts. B) – Rotary Hook – Once every (4) hours of embroidery. It is recommended to oil the hook once at the beginning of the day and then once each (4) hours after. The oil point of the hook (basket that holds the bobbin case) is at the very top of the hook directly under the needle plate. It is not necessary to remove the needle plate if the oiler has a stray. The oil goes between the inner basket that stays stationary and the outer part that spins during embroidery. You will see the hook point at the bottom. Turn the hand-wheel on the right side of machine to move the hook point to the 10 o'clock position. This will place the top of the raceway at about 9o'clock. Place one drop at top of race at side of basket. Next, press the stop button. This will cycle the machine to a proper head up position. P a g e | 39 Butterfly B1201B/T - Single Head 12 Needle Embroidery Machine Manual Do not place more than one drop per needle bar per 8 hour shift. It is recommended to remove the bobbin case when oiling and run a few trims without the bobbin in the case to circulate the oil. If you embroidery machine start to make a constant clicking sound it is usually due to a lack of oil on the hook. C) – Upper Head Assembly (Reciprocator Shaft) - Once every (16 - 32) Hours of embroidery. The Reciprocator shaft is what the reciprocator rides up and down on. The shaft is not easily accessible directly from the front of the machine so, you must access it from the sides through troughs on the head. To access these troughs, either move the head all the way to needle number 1 or to needle number 12. If you are on needle number 1, the trough will be accessible from the right side of the head. If you are needle number 12, the trough will be accessible from the left of the head. A couple drops should fill the trough. Move the head to the opposite and place a couple more drops on that opposite side. D) – Oil Stickers – As indicated on the sticker. There are several oiling stickers/holes noted on the machine. These oiling points should be oil as often and as much as noted on the stickers. Oil Point Breakdown A) – One drop once every (20) Hours of embroidery B) – One Drop once every (4) Hours of embroidery C) – One to two drops on each size once every (16 - 32) Hours of embroidery D) – As indicated on sticker P a g e | 40 Butterfly B1201B/T - Single Head 12 Needle Embroidery Machine Manual Glossary Glossary - - - - Backing – Foundation used to stabilize and keep garment flat. Most backings are paper like. Bobbin – Thread used to tie a knot under the embroidery garment which holds down the upper thread Bobbin Case – Holds the bobbin Check Springs – Spring used in threading track which removes whiplash during embroidery Consumables – Consumables are parts used on the machine such as hooks, needles, and bobbin cases, etc that are to be replaced on a regular basis of normal operation. Digitized(ing) – Digitizing (in embroidery) is the act of converting a logo, design, symbol, etc into an embroidery file readable by embroidery machines and software. A digitized design is one that has all stitches, color changes, trims, etc programmed in so that the embroidery machine. Hook – Part which ties thread onto the bobbin and makes the embroidery stitch Non-consumables –Non-consumables are parts that are not designed to be replaced on a general basis such as motors, shafts, etc. Pantograph – Device on machine that moves hoop in the X and Y direction (left, right, up and down) Polyester – Type of textile. In embroidery machines, its typically a stronger thread type than Rayon Pre-digitized – A design that has already been digitized. Rayon - Type of textile. In embroidery machines, its typically a stronger thread type than Polyester Solvy – A plastic like sheet sometimes used on top of embroidery very similar to cellophane. Used to add more foundation on the embroidery. Typically dissolves under water. Stabilizer – See Backing Tensions – In embroidery, typically refers to how tight the thread feels when pulling it through a threaded machine or through the threaded bobbin. Improper tension will cause both false and actual thread breaks, and poor final embroidery quality among many other problems. Threading Rod – Used to thread embroidery thread through the embroidery tubes. Topping – Used on the top of a garment such as solvy. Tubular Arms – Arms that attach to the pantograph. The tubular hoops then attach to these arms Tubular Hoop/Frame – A special type of hoop consisting of a plastic ring and another plastic piece that goes into this ring. This hoop has a metal clip which speeds up the process of loading the hoop into the machine. Upper Thread Break – Typically refers to the current spool of thread that is embroidering, has broke. Wash-a-Way – See Solvy P a g e | 41 Butterfly B1201B/T - Single Head 12 Needle Embroidery Machine Manual Frequently Asked Questions FAQS - How does the Butterfly B1201B/T compare to other commercial/industrial embroidery machines? The Butterfly B1201B/T will benchmark against any other machine in its class. The final embroidery quality is just as good as any other machine run under the variables (design type, thread quality, etc). P a g e | 42 Butterfly B1201B/T - Single Head 12 Needle Embroidery Machine Manual Specifications Machine specifications Listed below are common specifications of the Butterfly B1201B/T embroidery machine Belts Bobbin Size / Style Cap System Color Changes Dimensions Display Embroidery Area Flat Embroidery Heads Input Languages Make Memory Capacity Model Needles Needle sizes (recommended) Oil Type Power Reciprocator Driver Solenoids Speed (max) Table Top Trace Trimmers Tubular Weight Wiper Driver Italian Size / Style ‘L’ or Standard. Prewound polyester recommended 270 Degree Automatic or Manual Approximately 3’ x 3’ x 3’ without stand 4” Color LCD Display 40cm x 50cm ~(15in x 16 in) Yes 1 USB / Network (on certain models) English / Español (Spanish) Butterfly 16,000,000 Stitches or 500 designs B1201B/T 12 Standard 75/11 titanium for most applications but works with most any industrial embroidery machine type. Different needs recommend on different applications such as leather goods, etc. Standard sewing/embroidery machine oil 110W factory. 220w available on order. Pulse Motor Japanese 1000 (Stitches/Minute) Removable Yes Yes Yes Approximately 100kgs (~220lbs) Pulse Motor P a g e | 43 Butterfly B1201B/T - Single Head 12 Needle Embroidery Machine Manual Troubleshooting and Technical Support Technical Support Please direct all technical questions to [email protected] You may also try our live support by going to http://www.ButterFlyEmb.com and clicking the LIVE SUPPORT icon. Troubleshooting Symptoms False thread breaks Noise – Clicking Sound Power up – Machine does not turn on Thread Breaks Resolution -Ensure the machine is properly threaded. -Oil Hook -Ensure that the power cord is securely attached to a 110V outlet and that the 110V outlet is outputting power. -Check fuses. -Poor quality or old thread -Timing issue -Dull, bent, burred, etc needle -Check for any burs in thread track (eyelets, etc) P a g e | 44 Butterfly B1201B/T - Single Head 12 Needle Embroidery Machine Manual Pictures Pictures & Videos High quality pictures and videos can be founds by going to http://www.ButterFlyEmb.com and clicking on either the PHOTOS or VIDEOS tab. P a g e | 45 Butterfly B1201B/T - Single Head 12 Needle Embroidery Machine Manual Part Book Parts Book Butterfly Embroidery Machine B1201B/T Single Head 12 Needle Parts Book (Manual Addition) © Copyright 2010: TheEmbroideryWarehouse P a g e | 46 Butterfly B1201B/T - Single Head 12 Needle Embroidery Machine Manual P a g e | 47 Butterfly B1201B/T - Single Head 12 Needle Embroidery Machine Manual Table Top Parts of the table, chassis and bed. Reference picture on previous page. NO 1 2 3 4 5 6 7 8 9 10 11 12 13 14 15 16 17 18 19 20 21 22 23 24 Part # 03010103 03010201 03010202 03010203 03010204 03010210 03010211 03010212 03010213 03010214 03010301 03010302 03010303 03010304 03010305 03010309 80270821 80700205 80700206 80700302 80746406 80746408 80813308 80860410 Part Name base cover front R cover front L cover rear R cover rear L cover bracket connecting plate cover bracket cover bracket cover bracket flatbed embroidery table support board table support base table cushion table back block cushion felt adjustment support arm 4x16 screw 4x16 screw 3x12 screw M4x6 screw 4x8 screw M3x8 screw M4x10screw Remark P a g e | 48 Butterfly B1201B/T - Single Head 12 Needle Embroidery Machine Manual P a g e | 49 Butterfly B1201B/T - Single Head 12 Needle Embroidery Machine Manual Rotary Hook Base Rotary Hook Base. Reference picture on previous page NO 1 2 3 4 5 6 7 8 9 10 11 12 13 14 15 16 17 18 19 20 21 22 23 24 25 26 27 28 29 30 31 32 33 34 35 36 37 Part # 02101121 02101131 03021101 03021102 03021103 03021105 03021106 03021107 03021301 03021321 03021381 03021382 80025506 80025602 80031524 80037901 80037912 80310701 80620291 80620301 80620302 80685135 80740308 80810516 80811035 80811245 80880506 80880508 80880608 80900513 80901002 80901013 80901202 80901213 80924114 80924122 80924131 Part Name baffle bearing collar rotary hook base front bracket rear bracket cover back cover lower shaft needle plate base rotary position hook needle plate bent needle plate timing belt timing pulley bearing bearing collar bearing collar servo motor rotary hook bobbin case bobbin 3x16 spring pin M3x8 screw M5x16 screw M10x35 screw M12x45 screw M5x6 screw M5x8 screw M6x8 screw M5 spring spacer M10 spacer M10 spring spacer M12 plain spacer M12 spring spacer 11/64x12 screw 9/64x8 screw 11/64x6 screw Remark P a g e | 50 Butterfly B1201B/T - Single Head 12 Needle Embroidery Machine Manual P a g e | 51 Butterfly B1201B/T - Single Head 12 Needle Embroidery Machine Manual Trimmers Trimmers. Reference picture on previous page NO 1 2 3 4 5 6 7 8 9 10 11 12 13 14 15 16 17 18 19 20 21 22 23 24 25 26 27 28 29 30 31 32 33 34 35 36 37 38 39 40 41 42 43 44 45 Part # 02101231 02101232 02101233 03021201 03021202 03021203 03021204 03021211 03021212 03021220 03021221 03021232 03021242 03021311 03021501 03021502 03021503 03021504 03021511 03021512 03021513 03021524 03040605 80030540 80030803 80304203 80320204 80333601 80740308 80744303 80744310 80746406 80746408 80746512 80810306 80810312 80810408 80810410 80810412 80860306 80860324 80880306 80880406 80900318 80900421 Part Name trimming drive arm movable knife fixed knife fixed knife shrapnel trimming drive block trimming induction block trimming connecting rod trimming drive rod trimming drive arm pin trimming drive arm trimming pull rod movable knife drive arm clipper movable knife drive arm needle plate base cover picker bracket picker fork connecting pin picker fork base picker fork picker solenoid installation plate picker solenoid limit plate picker connecting rod picker stopper silencing block nylon cushion face bearing trimming motor picker solenoid micro approach switch M3x8 screw M3x3 screw M3x10 screw M4x6 screw M4x8 screw M5x12 screw M3x6 screw M3x12 screw M4x8 screw M4x10 screw M4x12 screw M3x6 screw M3x4 screw M3x6 screw M4x6 screw M3 spring spacer M4 nut Remark P a g e | 52 Butterfly B1201B/T - Single Head 12 Needle Embroidery Machine Manual 46 47 48 80924150 80924201 80924211 9/64x5 screw M2.5x4-3x2 screw M4x4-5x3.5 screw P a g e | 53 Butterfly B1201B/T - Single Head 12 Needle Embroidery Machine Manual P a g e | 54 Butterfly B1201B/T - Single Head 12 Needle Embroidery Machine Manual Arm Arm. Reference picture on previous page NO 1 2 3 4 5 6 7 8 9 10 11 12 13 14 15 16 17 18 19 20 21 22 23 24 25 26 27 28 29 30 31 32 33 34 35 36 37 38 39 40 41 42 43 44 45 Part # 01030131 01030132 03040101 03040121 03040123 03040124 03040125 03040126 03040180 03040184 03040201 03040202 03040203 03040204 03040205 03041201 03041202 03041203 03041204 03041207 03041208 03041211 03041222 03041281 03041301 03041302 03041303 03041304 03160702 80025601 80030831 80031502 80032022 80682101 80685135 80742304 80744406 80746406 80746408 80810410 80810412 80811245 80880406 80880506 80880508 Part Name bevel gear big bevel gear small arm positioning plate lower front cover front cover R front cover L front cover Up guide rail baffle straight guide rail eccentric pin drive connecting rod arm cam drive connecting rod screw cam pin upper shaft upper shaft front bushing upper shaft rear bushing cam cushion zero position detection disk zero position coupler bracket main shaft dial arm shaft pulley baffle dial observer handle bushing handle shaft handle spring adjustment handle zero position detection plate timing pulley bearing bearing collar bearing 6x30 pin 3x16 pin M3x4 screw M4x6 screw M4x6 screw M4x8 screw M4x10 screw M4x12 screw M12x45 screw M4x6 screw M5x6 screw M5x8 screw Remark P a g e | 55 Butterfly B1201B/T - Single Head 12 Needle Embroidery Machine Manual 46 47 48 49 50 51 52 53 54 80880608 80880610 80900408 80900413 80901202 80901213 80920403 80924122 80924144 M6x8 screw M6x10 screw M4 plain washer M4 spring washer M12 spacer M12 spring spacer M4x8 screw 9/64x8 screw M4x12 screw P a g e | 56 Butterfly B1201B/T - Single Head 12 Needle Embroidery Machine Manual P a g e | 57 Butterfly B1201B/T - Single Head 12 Needle Embroidery Machine Manual Needle Bar Driver Needle bar Driver. Reference picture on previous page NO 1 2 3 4 5 6 7 8 9 10 11 12 13 14 15 16 17 18 19 20 21 22 23 24 25 26 27 28 29 30 31 32 33 34 35 36 37 38 39 40 41 42 43 44 Part # 03040111 03040122 03040301 03040302 03040304 03040305 03040306 03040321 03040322 03040351 03040352 03040401 03040402 03040403 03040411 03040412 03040421 03040422 03040423 03040424 03040425 03040426 03041101 03041102 03041181 03041183 80030431 80030803 80030811 80030851 80030902 80031072 80260801 80260802 80740203 80740204 80742304 80810304 80810412 80810516 80880508 80900502 80900513 80900521 Part Name oil fencing felt drive shaft collar needle bar drive block shaft bushing torsion spring positioning block drive block driver returning spring silencing base support drive block support arm drive shaft wick presser foot drive connecting shaft presser foot cam guide rod presser foot connecting rod connecting rod pin-up connecting rod pin-lower presser foot slide bracket shaft bushing A shaft bushing B presser foot drive block presser foot guide spring presser foot buffer cushion take-up bar base take-up connecting rod-main take-up connecting rod take-up connecting lever pin bearing face bushing straight bushing steel washer bearing elastic collar roller pin wheel roller pin M2x3 screw M2x4 screw M3x4 screw M3x4 screw M4x12 screw M5x16 screw M5x8 screw M5 spacer M5 spring spacer M5 nut Remark P a g e | 58 Butterfly B1201B/T - Single Head 12 Needle Embroidery Machine Manual P a g e | 59 Butterfly B1201B/T - Single Head 12 Needle Embroidery Machine Manual Upper Thread Hook Upper Thread Hook. Reference picture on previous page NO 1 2 3 4 5 6 7 8 9 10 11 12 13 14 15 16 17 18 19 20 21 22 23 24 25 26 27 28 29 30 31 32 33 34 35 Part # 03040151 03040154 03040601 03040602 03040603 03040604 03040605 03040606 03040607 03040608 03040610 03040611 03040631 03040701 03040702 03040703 03040704 03040705 80304201 80742304 80742306 80746406 80746408 80746512 80810310 80810320 80810406 80810410 80860306 80860406 80900301 80900321 80900402 80900413 80924211 Part Name baffle-lower baffle bracket-lower thread hook plate hook motor base hook drive arm drive arm returning spring silencing block thread hook connecting bar thread hook positioning block hexagon ring thread hook connecting block thread hook hook guide arm motor plate arm jumping plate jumping lever bracket plastic washer jumping torsion spring stepping motor M3x4 screw M3x6 screw M4x6 screw M4x8 screw M5x12 screw M3x10 screw M3x20 screw M4x6 screw M4x10 screw M3x6 screw M4x6 screw M3 plain cushion M3 plain nut M4 cushion M4 spring cushion M4x4-5x3.5 screw Remark P a g e | 60 Butterfly B1201B/T - Single Head 12 Needle Embroidery Machine Manual P a g e | 61 Butterfly B1201B/T - Single Head 12 Needle Embroidery Machine Manual Color Change System Color Change System. Reference picture on previous page NO 1 2 3 4 5 6 7 8 9 10 11 12 13 14 15 16 17 18 19 20 21 22 23 24 25 Part # 01293105 03040503 03040504 03040506 03040507 03040508 03040509 03040510 03040511 03040512 80030722 80031003 80304212 80333702 80746408 80810512 80813406 80813408 80860306 80880304 80880406 80900402 80900418 80900502 80900513 Part Name color change cam color change base motor support color change bushing change bearing pin base plate breakage detection potentiometer fixed bolt potentiometer support color change handle change cover bearing step bearing stepping motor potentiometer M4x8 screw M5x12 screw M4x6 screw M4x8 screw M3x6 screw M3x4 screw M4x6 screw M4 cushion M4 spring cushion M5 cushion M5 spring cushion Remark P a g e | 62 Butterfly B1201B/T - Single Head 12 Needle Embroidery Machine Manual P a g e | 63 Butterfly B1201B/T - Single Head 12 Needle Embroidery Machine Manual Needle Case A Needle Case A. Reference picture on previous page N O1 2 3 4 5 6 7 8 9 1 0 11 12 13 14 15 16 17 18 19 20 21 22 23 24 25 26 27 28 29 30 31 32 33 34 Part # 01221532 01221605 01221606 01222102 01222109 01222183 01222184 01222192 01222193 01227102 03080101 03080102 03080103 03080104 03080108 03081112 03081121 03081202 03081293 03081301 03081501 03081502 03081503 03081504 03081505 80621101 80681101 80685135 80742304 80746306 80810310 80810412 80810420 80880406 Part Name take-up lever shaft rubber cushion felt packing needle bar screw baffle ring needle clamp screw needle clamp upper dead point clamp needle bar connecting pin magnet needle bar needle bar spring presser foot presser foot bushing presser foot spring needle case lower guide rail cushion color change plate needle bar guide take-up lever plastic block take-up lever positioning block positioning block torsion spring take-up lever take-up shaft block needle pin 3x16 screw M3x4 screw M3x6 screw M3x10 screw M4x12 screw M4x20 screw M4x6 screw Remark P a g e | 64 Butterfly B1201B/T - Single Head 12 Needle Embroidery Machine Manual P a g e | 65 Butterfly B1201B/T - Single Head 12 Needle Embroidery Machine Manual Needle Case B Needle Case B. Reference picture on previous page NO 1 2 3 4 5 6 7 8 9 10 11 12 13 14 15 16 17 18 19 20 21 22 23 24 25 26 27 28 29 30 31 32 33 34 35 36 37 38 39 40 41 42 43 44 Part # 03081302 03081303 03082301 03082302 03082303 03082304 03082305 03082306 03082501 03082503 03082502 03082511 03082512 03082513 03082523 03082524 03082525 03082526 03082527 03082528 03082530 03082531 03086101 03086102 03086103 03086123 03086124 03086125 03086131 80030471 80628133 80740308 80030310 80740406 80746408 80746410 80813304 80813306 80813316 80813410 80860304 80880304 80900331 80924121 Part Name upper face plate front face plate cover support plastic front cover magnet base connecting shaft magnet clamp magnet lower thread course spring bracket lower thread spring middle thread course base roller stand middle thread course pin tension wrench spring bevel cushion shaft collar take-up spring collar take-up spring baffle take-up spring middle thread course shaft face thread clamp base face thread clamp plate face thread clamp bracket thread suspender disk thread suspender baffle thread suspender spring presser thread suspender spring E-ring porcelain bushing M3x8 screw M3x10 screw M4x6 screw M4x8 screw M4x10 screw M3x4 screw M3x6 screw M3x16 screw M4x10 screw M3x4 screw M3x4 screw M3 nut 9/64x6 screw Remark P a g e | 66 Butterfly B1201B/T - Single Head 12 Needle Embroidery Machine Manual P a g e | 67 Butterfly B1201B/T - Single Head 12 Needle Embroidery Machine Manual X-Axis Drive System X-Axis Drive System. Reference picture on previous page NO 1 2 3 4 5 6 7 8 9 10 11 12 13 14 15 16 17 18 19 20 21 22 23 24 25 26 27 28 29 30 31 32 33 34 35 36 37 38 39 Part # 03100101 03100102 03100104 03100105 03100106 03100107 03100108 03100109 03100110 03100112 03100116 03100117 03100118 03100121 03100122 03100123 03100131 03160701 80010115 80023521 80023601 80023602 80030831 80030861 80030871 80305752 80742304 80746408 80810304 80810306 80810308 80810412 80810420 80860410 80880508 80900302 80900313 80900401 80900421 Part Name drive shaft frame felt connecting plate press block timing pulley bracket timing pulley shaft tension support belt press plate connecting plate frame felt limit installation support limit buffer cover side cover side cover support motor cover motor cover bracket-L motor cover bracket-R X drive connecting plate limit plate standard guide timing belt timing pulley A timing pulley B roller bearing nylon spacer E-ring stepping motor M3x4 screw M4x8 screw M3x4 screw M3x6 screw M3x8 screw M4x12 screw M4x20 screw M4x10 screw M5x8 screw M3 plain cushion M3 spring cushion M4 plain cushion M4 nut Remark P a g e | 68 Butterfly B1201B/T - Single Head 12 Needle Embroidery Machine Manual P a g e | 69 Butterfly B1201B/T - Single Head 12 Needle Embroidery Machine Manual Y-Axis Drive System Y-Axis Drive System. Reference picture on previous page NO 1 2 3 4 5 6 7 8 9 10 11 12 13 14 15 16 17 18 19 20 21 22 23 24 25 26 27 28 29 30 31 32 33 34 35 36 37 38 39 Part # 03100108 03105101 03105102 03105103 03105111 03105112 03105114 03105115 03105116 03105132 03105133 03160701 80015116 80023522 80023615 80023616 80030822 80030861 80030871 80031211 80031223 80308653 80742304 80746408 80810308 80810316 80810320 80810406 80810620 80813412 80813520 80813620 80880608 80900302 80900313 80900521 80900602 80900613 80900618 Part Name belt press plate drive connecting plate-R X drive connecting plate-L guide buffer motor base drive shaft bearing base limit buffer limit optical coupler base pulley shaft tension base limit plate guide rail timing belt timing pulley A timing pulley B roller bearing nylon washer E-ring shaft cushion bearing stepping motor M3x4 screw M4x8 screw M3x8 screw M3x16 screw M3x20 screw M4x6 screw M6x20 screw M4x12 screw M5x20 screw M6x20 screw M6x8 screw M3 cushion M3 spring cushion M5 nut M6 cushion M6 spring washer M6 spring washer Remark P a g e | 70 Butterfly B1201B/T - Single Head 12 Needle Embroidery Machine Manual P a g e | 71 Butterfly B1201B/T - Single Head 12 Needle Embroidery Machine Manual Tension Base Tension Base. Reference picture on previous page NO 1 2 3 4 5 6 7 8 9 10 11 12 13 14 15 16 17 18 19 20 21 22 23 24 25 26 27 Part # 03130112 03130114 03130118 03130119 03130120 03130131 03130132 03130141 03130142 03130143 03130144 03130145 03131204 03131215 03131220 03131221 03131222 03160703 03160801 80700202 80700301 80700306 80746306 80813412 80813420 80900521 80924203 Part Name thread course wheel tension disk thread presser spring thread presser breakage detection disk support-L support-R thread tension screw thread tension disk adjust button small knob thread presser spring thread tension plate thread guide plate thread lead plate slider rear cover breakage detection plate alarm plate M3x6 screw 3x8 screw 3x6 screw M3x6 screw M4x12 screw M4x20 screw M5 nut M3x4-4x4 screw Remark P a g e | 72 Butterfly B1201B/T - Single Head 12 Needle Embroidery Machine Manual P a g e | 73 Butterfly B1201B/T - Single Head 12 Needle Embroidery Machine Manual Thread Stand Thread Stand. Reference picture on previous page NO 1 2 3 4 5 6 7 8 9 10 11 12 13 14 15 16 17 18 19 20 21 22 23 24 25 26 27 28 29 30 Part # 01901201 01901202 01901203 01901204 01901205 01901206 01901207 01902101 01903123 03010302 03040127 03044101 03044102 03044103 03044104 03044105 03044106 03044111 03044112 03044120 03044121 03044122 80628131 80628132 80746408 80746508 80746512 80900501 80900513 80900521 Part Name tension bolt thread lead plate tension spring tension regulator tension plate felt packing tension gasket coil bolt thread course hose support upper cover plate A support support A thread stand A thread stand Bstand C thread thread stand D coil stand hose joint stand lead plate thread hose joint core white porcelain bushing red porcelain bushing M4x8 screw M5x8 screw M5x12 screw M5 plain washer M5 spring washer M5 nut Remark P a g e | 74 Butterfly B1201B/T - Single Head 12 Needle Embroidery Machine Manual P a g e | 75 Butterfly B1201B/T - Single Head 12 Needle Embroidery Machine Manual Bobbin Winder Bobbin Winder. Reference picture on previous page NO 1 2 3 4 5 6 7 8 9 10 11 12 13 14 15 16 17 Part # 03041502 03041503 03041504 03041505 03041506 03041517 03041518 03041521 03041522 03041523 80030671 80030851 80030871 80740406 80740410 80746408 80880406 Part Name thread winder support arm thread winder shaft rubber roller roller shaft arm spring support limit stand shrapn spring el winder plate limit E-ring stan cushion d E-ring baffl screw M4x6 e M4x10 screw M4x8 screw M4x6 screw Remark P a g e | 76 Butterfly B1201B/T - Single Head 12 Needle Embroidery Machine Manual P a g e | 77 Butterfly B1201B/T - Single Head 12 Needle Embroidery Machine Manual Electronics Electronics. Reference picture on previous page NO 1 2 3 4 5 6 7 8 9 10 11 12 13 14 Part # 03040132 03044201 03044202 03044203 03160101 03160180 03160210 03160370 03160450 03160691 80030642 80746408 80746512 80810412 Part Name rear cover face plate bracket base face plate support base face plate stand power wire power box driver operation panel drive plate computer box nylon cushion M4x8 screw M5x12 screw M4x12 screw Remark P a g e | 78 Butterfly B1201B/T - Single Head 12 Needle Embroidery Machine Manual P a g e | 79 Butterfly B1201B/T - Single Head 12 Needle Embroidery Machine Manual Hoops / Frames Hoops / Frames. Reference picture on previous page NO 1 2 3 4 5 6 7 8 9 Part # 03100291 03100292 03171181 03171681 03172181 03172681 03173181 03173691 80813410 Part Name frame bracket-R frame bracket-L round frame-90 round frame-120 round frame-150 round frame-200 rectangle frame-290x290 rectangle frame-540x360 M4x10 screw Remark P a g e | 80 Butterfly B1201B/T - Single Head 12 Needle Embroidery Machine Manual P a g e | 81 Butterfly B1201B/T - Single Head 12 Needle Embroidery Machine Manual Cap Driver Cap Driver. Reference picture on previous page NO 1 2 3 4 5 6 7 8 9 10 11 12 13 14 15 16 17 18 19 20 21 22 23 24 25 26 27 28 29 30 31 32 33 34 35 36 37 38 39 40 41 42 43 Part # 02810102 02810103 02810105 02810106 02810301 02810302 02810303 02810304 02810305 02810306 02810307 02810308 02810309 02810310 02810313 02810313 02810351 02811203 80030525 80030525 80030525 80030525 80030641 80030842 80740306 80740406 80740408 80810512 80810516 80813406 80813412 80813508 80860304 80880304 80900310 80900405 80900502 80900513 80900553 80900602 80900621 80900802 80900821 Part Name shaft A nylon rod pin shaft trolley cap frame support plate support bracket shaft B steel bar adjustment slider adjustment slider presser plate plastic bracket plate nylon wheel plastic bar cap frame base cap frame main support screw steel wire support plate support-L support-R U stand roller bearing bearing bearing M3x6 screw M4x6 screw M4x8 screw M5x12 screw M5x16 screw M4x6 screw M4x12 screw M5x8 screw M3x4 screw M3x4 screw M3 plain washer M4 plain washer M5 plain washer M5 plain washer M5 screw cap M6 plain washer M6 nut M8 plain washer M8 nut Remark P a g e | 82 Butterfly B1201B/T - Single Head 12 Needle Embroidery Machine Manual P a g e | 83 Butterfly B1201B/T - Single Head 12 Needle Embroidery Machine Manual Cap Frame Cap Frame. Reference picture on previous page NO 1 2 3 4 5 6 7 8 9 10 11 12 13 14 15 16 17 18 19 20 21 22 23 24 25 26 27 28 Part # 02810201 02810203 02810204 02810211 02810212 02810213 02810215 02810216 02810217 02810272 02810281 02811006 02811009 02811010 02811011 02811012 02811019 02811031 02811081 80030671 80740304 80740406 80813304 80860304 80900301 80900321 80900408 80900421 Part Name cap casing collar A positioning block clamp base A clamp base B clamp screw collar spring A collar spring B shrapnel collar B positioning block clamp ring cap strapping rod cap strapping rob cap clamp bracket tapered end hook rubber bushing tapered end E-ring M3x4 screw M4x6 screw M3x4 screw M3x4 screw M3 screw M3 nut M4 plain washer M4 nut Remark P a g e | 84 Butterfly B1201B/T - Single Head 12 Needle Embroidery Machine Manual P a g e | 85 Butterfly B1201B/T - Single Head 12 Needle Embroidery Machine Manual Cart Cart. Reference picture on previous page NO 1 2 3 4 5 6 7 8 9 10 11 12 13 14 15 16 17 Part # 03010306 03010307 03010308 03018001 03018002 03018003 80270304 80270305 80390901 80700121 80813816 80813825 80900801 80900818 80900821 80900824 80920201 Part Name rack upper table rack middle table rack lower table rack-L rack beam rack-R rotary truckle fixed truckle pore plug 4x16 screw M8x16 screw M8x25 M8 plain washer M8 spring washer M8 nut M8 nut M8x30 bolt Remark