1
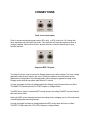
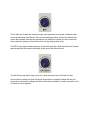
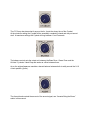
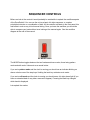
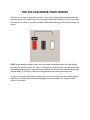
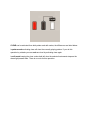
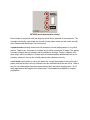
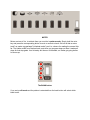
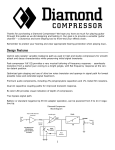
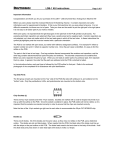
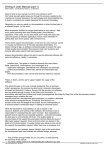
Thank you for your purchase of the DrumDokta2 eurorack module. At the core of the DrumDokta2 is the same analog sound engine from the original DrumDokta module which itself was based on a 30 year old Japanese drum machine. The original had a rather grungy “electro” sound and the DrumDokta2 is no different in this regard, but with some added controls and extensions over the voice parameters the sound can be taken beyond the original unit. As with the originals the DrumDokta2 inherits cool things like the ability to accent notes after they have been struck. We’ve also added a powerful sequencer with trigger outs and vactrol distortion and limiting to make a complete drum solution in a small package. You can use it standalone or as a compliment to an existing drum setup or a combination of both, the choice is yours. What we have ended up with is a modern polyrhythmic drum module with vintage tone, charm and character. The original DrumDokta idea started since I was often using more than 50% of my modular just to make drum sounds. Sure there were already drum modules on the market but most took up vast amounts of modular real estate and that's not to mention the price. There had to be a better way I thought. So here you have the second iteration of that same idea, a low cost solution for drums that won’t break the bank or take up too much room in your case (ok we’ve used a little more space this time). Now before you head off and explore the possibilities please take a moment to read the installation and quick start notes, it won’t take a moment and will make all the difference. If you are still stuck then be sure to check the troubleshooting guide towards the end of the manual. I hope you will be satisfied with your new module Paul Who reads manuals anyway? I know right? but please at least read the installation and quick start. Installation The DrumDokta2 has reverse power protection, so plugging the power cable in backwards should result in no damage to the module itself. However plugging things in backwards is never a good idea and could potentially damage other parts of your system. The protection is there in case of plugging the power cable in backwards by accident, please still take care to check the orientation of the cable when connecting it for the first time. figure 1 the correct and wrong way to connect power Before installing please power off your modular case. Connect one end of the cable to the module as shown in figure 1. Connect the other end of the cable to your modular case bus board, please check your case’s manual for the correct orientation. The stripe on the cable should be connected to 12. After you have connected the power you can mount the module using the included screws, the DrumDokta2 requires 36HP of cabinet space. Accents bring the boom! Can’t stress this point enough.The accent is key to getting phat drum sounds, not only do accents make drum sounds louder but will enable some dynamics between accented and non accented sounds. Personally I like to have the accent knob dialed at maximum and accents triggered on at least the bass drum and snares. Accent also affects sounds after they have been triggered, try setting the cymbal to max decay and triggering accents on the tail, this is a quirk of the original circuit and can lead to some interesting rhythmic sounds! Finally the as with the original the accent has a tone itself, albeit subtle it can be used to great effect. AUTOSAVE 30 SECONDS AFTER LAST KEY PRESS! wow what’s with all the shouting? :) well of course it’s important to note that we use a leveling autosave routine (with 60 or so years of retention). This means that if you have been programming beats you should wait a little over 30 seconds before shutting off your DrumDokta2 in order for them to be saved. the DrumDokta2 front panel. The DrumDokta2 is laid out in a logical configuration, based loosely on the classic “x0x” style sequencing but using a shift key to save on horizontal space. The panel has input and output jacks on the top row, voicing controls in the middle and finally at the bottom the sequencer controls, the step entry keys (18 unshifted, 916 shifted) and the bank key. Lets look at the panel in detail and explain what everything does. CONNECTIONS Clock in and reset inputs. Clock in accepts a standard square wave (50% duty) or LFO clock up to 12v, timing with other waveforms will most likely be erratic. The reset jack will reset the sequencer when a voltage is applied. Most midi to clock/cv devices will have a reset to keep things in sync, connect this here. Snap and BPF CV inputs. The Snap CV jack is used to control the Snappy amount via control voltage. The more voltage applied the less noise is heard in the voice. In fact its possible to mute the snare portion (dependant on the position of the Snappy knob). When voltage is applied the range of the Snappy control knob is less subtle than without CV control. If a jack is plugged in without a voltage applied the Snappy control knob will have no effect. The SNAP CV works best with LFO / ENV outputs or voltage offsets. The BPF jack is used to control the BPF control amount via voltage.The BPF control knob will then work as an offset. Setting the BPF control towards maximum and using control voltages over 6v will create some unusual high pitched sounding timbres. If a jack is plugged in without a voltage applied the BPF control knob will have no effect. The BPF CV works best with LFO / ENV outputs or voltage offsets. auxiliary trigger outputs Six auxiliary outputs allow you to connect to other drum modules, trigger envelopes or ping filters in your system. The output carries the voice signal, ~10v pp in clean mode with accents. We recommend use of an output attenuators or mixers in order to balance the various output modes with the other modules in your system. The output of the DrumDokta2 while considerably louder and less noisy than the original DrumDokta, is pretty much at its limits in relation to background noise. VOICING CONTROLS The DrumDokta2 Bass Drum has been extended from the original japanese Bass Drum. The tone control affects the initial transient click and the decay controls the length of the sound like on the vintage machines. Naming it tone is perhaps a little misleading but it seemed to be a good idea to stick with the odd naming convention. The Snare Drum is made from two elements, a noise generator and an oscillator, the controls allow you to manipulate these elements independently. The Snappy control lets you set the amount of the noise portion of the snare sound. After around 30% or so additional added noise is subtle. The control also doubles as an offset for the Snap CV input jack. The Pitch control lets you adjust the tuning of the snare drum oscillator portion. When adjusting the pitch knob a whooshing sound can be heard, this is normal (an adopted behaviour from the original DrumDokta). The HiHats and Cymbal are created using a noise generator and several oscillators which are mixed and band pass filtered. There are two band pass filters, the first one affects both hihats and cymbals, whereas the second one only affects the cymbal. As is the norm with drum machines, playing a closed hihat will mute any playing open hihat. The BPF control sets the base frequency of the band pass filter. Both the hihats and Cymbal pass through this filter and so the setting of this control will affect them all. The OH Decay does what it says on the tin, it sets the decay time of the Open HiHat. At the minimum setting the Open HiHat will be almost be completely closed and may not sound at all. At maximum settings the Open HiHat will ring between 1 and 2 seconds or until a Closed HiHat is triggered. The CY Decay also does what it says on the tin, it sets the decay time of the Cymbal. At the minimum setting the Cymbal will be essentially completely closed and may not sound at all. At maximum settings the Cymbal will ring between 1 and 2 seconds. The balance control sets the output mix between the Bass Drum / Snare Drum and the HiHats / Cymbals / Hand Clap and works as a filter between them. As on the original japanese machine a decent balance between both is oddly around the 910 o’clock position (ymmv). The Accent knob controls the amount of the accent signal, see “Accents Bring the Boom” earlier in this manual. The RYO optodist JR The RYO optodist JR vactrol distorton/limiter is a condensed version of the RYO Optodist from Ljunggren Audio. The output is sweepable from as clean as possible (10v pp with the most dynamics), to the six o’clock position (slight compression/limiting with less dynamics) through to the 12 o’clock position (full distortion/limiting). Past 12 o’clock (black area) noise and loudness is exponentially increased, and while at maximum the signal is still only 10v pp it will have a much more perceived loudness due to compression and limited dynamics. SEQUENCER CONTROLS Before we look at the controls it would probably be worthwhile to explain the workflow aspects of the DrumDokta2. You can use the unit as a basic x0x style sequencer, a complex polyrhythmic device or a combination of both. All the controls are listed on the front panel, this was made in such a way to limit manual diving. Once you learn the workflow you should be able to compose your beats without ever looking at the manual again. See the workflow diagram at the end of the manual. the MODE button The MODE button toggles between the two fundamental use modes, those being pattern mode and edit mode. It also acts as a cancel button. If you are in pattern mode and the clock is running you should see an indicator blinking on above or below one of the step keys. Holding the bank key activates mute mode. If you are in edit mode and the clock is running you should see a x0x style chase light (if you have an extended bank it may take a moment to appear). Pressing the bank key changes which bank is displayed. Lets explain the modes. Pattern Mode This mode could be considered the performance mode, here you use the step keys with or without the shift key to choose between 16 pattern banks. A pattern bank has the default length of 16 steps but can be extended up to 64 steps entirely or track based (poly rhythms) . You can chain patterns by holding step keys together up to all 16 patterns (via shift) with the exception of pattern 19 due to it being the same button. Edit Mode Edit mode allows you to edit the currently selected sound, when you press a step it will toggle its state from off/on. When the chase light passes the sound will play on the lit steps. If the pattern has been extended then the bank key will allow you to change pages (up to 64 steps when fully extended) note : extending patterns has two modes which will depend on which current mode you are in , see extend mode the INST button To change which instrument to edit, press and hold the INST key then press the corresponding instrument. When you release the INST key you will jump direct to edit mode. This is a workflow improvement since you don’t need to change the selected instrument other when when you intend to edit it. Once you are finished editing, press the MODE button to return to pattern mode. the SHIFT button The shift key allows you to reuse the step keys to program the bottom steps 916 with a single bank, 2532 with a 32 step bank and 4148/5764 with a 64 step bank. THE VULCAN NERVE PINCH MODES There are four vulcan nerve pinches to learn. To do one you first hold the labeled button then follow the arrow to the qualifier key. Once you have performed the pinch you can let go of the buttons and you will be in the various modes listed below depending on which main mode you were in. COPY is activated from pattern mode. When activated the blinking pattern will stop blinking and stay lit to signal the mode. To copy you first press the source button once and then press the destination button once. Once you have completed the operation the selected pattern light will blink again. If you wish to cancel the copy operation press the mode button once. tip: you can copy from any bank to another and you do not have to copy the currently playing bank. So you can play one pattern while copying another to another slot. Could be useful under a live situation. CLEAR can be activated from both pattern and edit modes, the differences are listed below. In pattern mode activating clear will clear the currently playing pattern. If you do this operation by mistake you can undo one level by activating clear again. In edit mode keeping the clear combo held will clear the selected instruments steps as the chase light passes them. There is no undo for this operation. LAST STEP mode is activated from edit mode. When you activate last step mode, all step leds up to the last step will be lit. If the pattern is extended then the last step may be on another page, use the bank key to change. For example, if the last step is step 5 only the first 5 steps will be lit and if the last step is 64 then all leds in all four banks will be lit. As with copy mode, pressing the MODE key will cancel. EXTEND (arrow shortened for clarity) Extend mode in conjunction with last step can unlock the full potential of the sequencer. The concepts are actually quite simple and it works in both pattern mode and edit mode, but with some fundamental differences. Lets review them. In pattern mode activating extend once will extend the current playing pattern, in a cyclical manner. Thats to say, if a pattern is 16 steps long it will be extended to 32 steps. If the pattern is already 32 steps and you extend it will be extended to 64 steps. Finally if a pattern is 64 steps long it will be truncated to 16 steps (with all extended pattern data deleted) and so on. In pattern mode you can use this to build patterns with variations on the fly. In edit mode extend works in exactly the same way, except that instead of setting the entire pattern and instruments it will only extend the current selected instrument and not all. Thats to say you can extend single instrument tracks and set their last step to anything from 1 to 64 steps regardless of the lengths of the other tracks. This enables the possibility of complex polyrhythms. MUTES Mutes are tons of fun, to activate them you must be in pattern mode . Simply hold the mute key and press the corresponding button to mute or unmute a track. Oh look is that an extra track? an easter egg perhaps? infradead mode? yes it is, a bonus for reading the manual this far. The hidden mode is on that last track, and when you program steps on there it makes all steps for that step gates. Its a bit wacky but then so is Infradead, so i better get going before he shows up. The BANK button If you are in edit mode and the pattern is extended then the bank button will select which bank to edit. Trouble Shooting Q: I can’t get the booming sounds as in the online videos you made. A: Don’t forget to trigger the accents, please read the “Accents bring the boom” section. Q: With the balance at 50% the hats and cymbals are too loud. A: This is the same on the original unit, personally I prefer to have the balance around the 10 o'clock mark which is a nice mix between the sounds. Q: I hear a whooshing sound when turning the Snare Drum pitch knob. A: This is normal behaviour. Q: I hear a little “pffing” sound on the accents. A: This is inherited from the original japanese machine. Q: I can’t hear (a particular) drum. A: Check that you don’t have the sound muted via mute mode or filtered via the balance control. Q: I was playing polyrhythms and they got out of sync. A: This is a common theme by nature, you can reset using the reset jack or automatically by changing the pattern to another then back again. Acknowledgements many thanks go out to Julian Schmitt from http://www.sonicpotions.com for the on board sequencer. Andreas and Benjamin from http://ljunggrenaudio.com for the Optodist JR Stephen Kwartler from http://www.promodular.com for the panel design. Chris “Infradead” Lehfeldt for having long hair against all odds. Specifications 16 pattern memories x 8 tracks x 64 steps with data retention ( with 1000 auto saves a day the eeprom should last about 65 years) Width 36 HP Depth 20 mm, measured from the rear of the faceplate . 30 mm, measured from the rear of the faceplate to the edge of the supplied and connected power cable. Power consumption: max 50 ma +12 10 ma 12 http://www.dinsync.info [email protected]