1
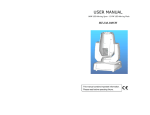
LED BAR 123 FC IP
Manuel d’utilisation
Nouvelle technologie LED
Nous vous recommandons de lire attentivement le manuel avant toute
utilisation.
installation, operation and maintenance.
Please keep this User Manual for future consultation. If you sell the unit to another user, be
sure that they also receive this instruction booklet.
Unpack and check carefully there is no transportation damage before using the unit.
Before operating, ensure that the voltage and frequency of power supply match the power
requirements of the unit.
It‟s important to ground the yellow/green conductor to earth in order to avoid electric shock.
The unit is for indoor and outdoor use.
The unit must be installed in a location with adequate ventilation, at least 50cm from
adjacent surfaces. Be sure that no ventilation slots are blocked.
Disconnect mains power before fuse replacement or servicing.
Make sure there are not flammable materials close to the unit while operating as it is fire
hazard.
Use safety cable when fixes this unit.
Maximum ambient temperature is 40°C and don‟t operate it where the temperature is higher
than this.
There are no user serviceable parts inside the fixture. Do not open the housing or attempt
any repairs by yourself. In the unlikely event your fixture may require service, please contact
the nearest authorized technical assistance center and always use the same type spare
parts.
The housing must be replaced if they are visibly damaged.
Do not touch any wire during operation as high voltage may cause electric shock.
Do not look directly at the LED light beam while the fixture is on.
Do not look at the beam light directly to avoid any visual problems.
Possibly hazardous optical radiation emitted from this product.
2. Technical specifications
Weight: 3.8kg
Size: 11.4 x 12 x 12 cm
Power input: AC230V/50 HZ
Wattage: 60W
LEDS: 12*tri-3W LEDs
Beam angle: 40 degree
IP rate: IP65
7-
LED display for easier operation.
Selectable built-in programs, Auto running, DMX mode, M/S mode and colours
DMX modes:
7 / 36 channels
3. Working modes
Operate with three buttons. There are two kinds of function for the first button:
A/ press the “mode” above 2 seconds, until the LED display show enter next working mode,
then it is enter another kind of working mode. This operation can switch into 5 working
modes.
B/ press the “mode” button, then enter the son menu of the current working mode.
3.1 Built-in program mode
Press the “mode” button above 2 seconds, switch into 5 working modes, until it shows “P.xx
(01~35).It is the manual build-in programs.
Press the “UP” or “down” to choose the build-in programs effects (P.01~P.35).
Press “mode” button until it shows “S.xx” (01~99~FL) Press “up” or “down” can adjust the
build-in programs speed.
Press the “mode” button, show “F.xx” (00~99) Press the button “up” or “down” to adjust the
build-in programs strobe speed.
3.2 Auto running mode
Press the button “mode” above 2 seconds, switch into 5 working modes, until it shows
“AUT”, then it is enter the auto running mode.
Press the “mode”, show “S.xx” (01~99~FL). Then press the “up” or “down” to adjust the auto
running mode speed.
Press the “mode”, show“F.xx” (00~99). Press “up” or “down” to adjust the auto running
strobe speed.
3.3 DMX mode
Press the “mode” above 2 seconds, switch into 5 working modes, when it shows “xxx”
(001~512). It is the DMX control mode. Press the “up” or “down” to set up the address of this
kind of products. Press the “mode” button, show “03c”or“07c”or“36c. Press the “up” or
“down” to choose the working mode; There are 3 channel,7channel,36 channel for your
choose.
8-
DMX working mode 1:03c(3CH)
CHANNEL
VALUE
CH1
0-255
RED
CH2
0-255
GREEN
CH3
0-255
BLUE
DMX working mode 2:07c (7CH)
CHANNEL
VALUE
FUNCTION
CH1
0-255
RED
CH2
0-255
GREEN
CH3
0-255
BLUE
0-255
MASTER DIMMER
0-6
CH1~ CH4 DIMMER
juil-13
PR.01
14-20
PR.02
21-27
PR.03
28-34
PR.04
35-41
PR.05
42-48
PR.06
49-55
PR.07
56-62
PR.08
63-69
PR.09
70-76
PR.10
77-83
PR.11
84-90
PR.12
91-97
PR.13
98-104
PR.14
105-111
PR.15
112-118
PR.16
119-125
PR.17
126-132
PR.18
133-139
PR.19
140-146
PR.20
CH4
CH5
FUNCTION
9-
CH5
147-153
PR.21
154-160
PR.22
161-167
PR.23
168-174
PR.24
175-181
PR.25
182-188
PR.26
189-195
PR.27
196-202
PR.28
203-209
PR.29
210-216
PR.30
217-223
PR.31
224-230
PR.32
231-237
PR.33
238-244
PR.34
245-255
PR.35
0-255
Adjust speed
0-15
NO FUNCTION
CH6
16-255
Strobe(R\G\B DIMMER、
CH7
PR.XX)
DMX working mode 3:36c (36CH)
CHANNEL VALUE FUNCTION SECTION
CH1
0-255
RED
CH2
0-255
GREEN
CH3
0-255
BLUE
CH4
0-255
RED
CH5
0-255
GREEN
CH6
0-255
BLUE
CH7
0-255
RED
CH8
0-255
GREEN
CH9
0-255
BLUE
CH10
0-255
RED
CH11
0-255
GREEN
1
2
3
4
10-
CH12
0-255
BLUE
CH13
0-255
RED
CH14
0-255
GREEN
CH15
0-255
BLUE
CH16
0-255
RED
CH17
0-255
GREEN
CH18
0-255
BLUE
CH19
0-255
RED
CH20
0-255
GREEN
CH21
0-255
BLUE
CH22
0-255
RED
CH23
0-255
GREEN
CH24
0-255
BLUE
CH25
0-255
RED
CH26
0-255
GREEN
CH27
0-255
BLUE
CH28
0-255
RED
CH29
0-255
GREEN
CH30
0-255
BLUE
CH31
0-255
RED
CH32
0-255
GREEN
CH33
0-255
BLUE
CH34
0-255
RED
CH35
0-255
GREEN
CH36
0-255
BLUE
5
6
7
8
9
10
11
12
3.4 M/S mode
Press the “mode” above 2 seconds, switch into 5 working modes, when it shows “SLA”. It is
the slave mode. The master fixture and the slave fixtures are with the same
synchronization-change when the master fixture is on the situation of built-in program, auto
running or static color mode.
11-
3.4 Static colour mode
Press the “mode” above 2 seconds, switch into 5 working modes, when it shows “COL”,it is
the static color mode.
Press the “mode” button, when it shows “1.-r” or “2.rg”or “3.-g”or “4.gb”or “5.-b”or “6.rb”or
“7.FL”or “8.0F”. Press the “up” or “down” to choose the single color.
Press the “mode”, show “F.xx” (00~99). Press the “up” or “down” to adjust the single color
strobe speed.
12-