1
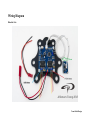
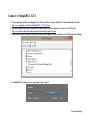
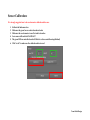
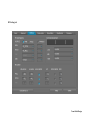
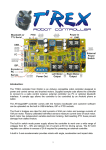
Team Rebel Design AlexMos SimpleBGC user Manual V0.7a Team Rebel Design Preface Beholder, Beholder Plus, and Beholder Lite with BaseCam® Simple BGC are Ready-To-Go (RTG) packages. RTG gimbals will have their proper profile files included in TRD_SBGC_profile.zip downloadable on our website. (The vendor you purchased from shall also have this link in their product page accordingly.) o The profile files will be following such naming pattern: prodname_board_date.Profile o Eg, Beholder_3rd_328p_20130927.profile indicates that the given profile is for Beholder gimbal 3rd axis extension board made on 2013-09-27. (328p indicates Atmel mega 328p based controller board. Does not matter at the moment) o All RTG gimbals are preconfigured/calibrated with reference sensor for testing. It is strongly suggested to do a local calibration before use. All the current Team Rebel Design brushless controller boards (up to 20130927) are compatible to both SimpleBGC and OSBruGi. TRD SimpleBGC releases are all encoded with authorized SGBC bootloader. Warranty will be void if, but not limited to, upload unauthorized firmware, erase bootloader, modify the controller with 3rd part tools. This user manual will only cover basic configuration process for TRD brushless controller. More information about advanced tuning, if interested, please refer to SBGC official manual. http://www.simplebgc.com/eng/downloads/ Team Rebel Design Wiring Diagram Beholder Lite: Team Rebel Design Connect to SimpleBGC GUI 1. Current gimbal controllers are shipped with v2.2b2 preinstalled. You may find the GUI downloadable thru the link. http://www.simplebgc.com/files/v10/SimpleBGC_GUI_2_2b2.zip 2. For some computer that does not automatically install driver, you may find the correct driver to CP21x2 here. http://www.silabs.com/products/mcu/pages/usbtouartbridgevcpdrivers.aspx 3. Once driver is correctly installed, you may find the correct com port for the controller here in Windows Device Manage 4. In SimpleBGC Gui, choose correct com comport and “connect” Team Rebel Design Sensor Calibration: It is strongly suggested user to do accelerometer calibration before use. 1. 2. 3. 4. 5. 6. In Basic tab find sensor box Make sure the green box are selected as shown below Make sure the accelerometer is on a flat and level surface Leave sensor still and click CALIB.ACC The green LED on controller board will flash for a few seconds then stop(finished) Click “write” to make sure the calibration data is saved Team Rebel Design Default Settings Basic tab Team Rebel Design Advanced tab Team Rebel Design RC Setting tab Team Rebel Design