1
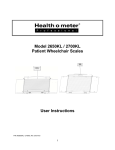
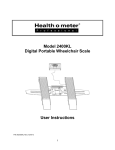
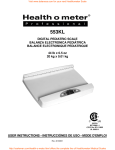
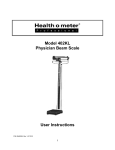
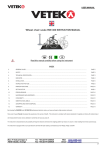
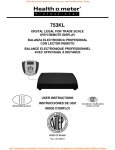
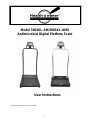
Model 3001KL-AM/3001KL-AMX Antimicrobial Digital Platform Scale User Instructions P/N UM3001KL-AM/3001KL-AMXE Rev20170807 1 Model 3001KL-AM/3001KL-AMX Thank you for your purchase of this Health o meter® Professional product. Please read this manual carefully, and keep it for easy reference or training. TABLE OF CONTENTS Cautions and Warnings ............................................................................................. 3 Specifications ............................................................................................................ 4 Certifications / Connectivity / Disposal ...................................................................... 5 Assembly Instructions .............................................................................................. 6 Set-up Instructions ................................................................................................... 9 Operating Instructions ............................................................................................... 12 Maintenance.............................................................................................................. 18 Calibration....…………………………………..………………………………..…………...19 Troubleshooting …………………………………………………………………………….21 Warranty..…………………………………………………………………………………….22 Note: This scale has been factory calibrated, and does not require calibration prior to use. Please register your scale for warranty coverage at: http://homscales.com/product-support/technical-support/product-warranty-registration For User Instructions updates and revisions please go to: www.homscales.com 2 CAUTIONS AND WARNINGS To prevent patient/caregiver injury or damage to your scale, please follow the instructions in this user manual very carefully. Do not exceed the weight capacity specified for this scale. For accurate weighing, this scale must be placed on a flat, stable surface. For accurate weighing, verify before each use the proper operation according to the procedure described in this manual. Do not use in the presence of flammable or explosive materials. If the scale becomes damaged, it should not be operated until properly serviced. Do not wheel or pull the scale down stairs, doing so may damage internal parts. Ensure that the AC adapter and scale do not come in contact with liquids, excessive temperature, or excessive humidity. Patient/caregiver safety This scale is designed for static weighing of patients only. No scale should be used for patient transfer. To prevent patient injury, the patient must be attended throughout the entire weighing event. Caregivers should ensure that the patient is stable and provide support as needed when getting onto and off of the scale. Patient should wear socks or other form of lightweight foot covering during weighing event. When operating the scale with the AC adapter: Operate this scale exclusively with the AC adapter that is provided (ADPT30). Use of an unspecified adapter will void the warranty, and can pose a serious safety hazard. Prior to using this scale, inspect the AC adapter cord for cracking / fraying, or for broken / bent plug prongs. Prior to using this scale, ensure that the AC adapter is plugged into an outlet with the rated voltage appropriate for operation. Ensure that the AC adapter outlet is wired to a circuit breaker or other protected power source. Unplug the AC adapter, and carefully store both the adapter and adapter cord before moving the scale. Operating this scale at voltages and frequencies other than specified can damage the equipment and will void the warranty. When operating the scale with batteries: For accurate weighing, if the battery icon indicates that the batteries are low replace the batteries or switch to the AC adapter as soon as possible. When replacing / inserting batteries, be sure to use all new batteries. Pelstar, LLC assumes no responsibility for damages or injuries associated with the assembly or use of this product. 3 SPECIFICATIONS General Model 3001KL-AM/3001KL-AMX digital scales use highly sophisticated microprocessor technology. Each precision scale is designed to provide accurate, reliable and repeatable weight measurements. This scale uses motion-sensing weighing technology to determine the weight of a moving patient. Although the patient’s weight can be displayed in either pounds (LB) or kilograms (KG), the scale can be “locked” such that the user cannot change the displayed Unit of Measurement (UOM). Note: The scale is shipped from the factory locked in “KG” mode. Refer to Page 10 to learn more about configuring the scale. Antimicrobial Powder Coating Unique to the 3001KL-AM/3001KL-AMX scales, the handrails and transport handle have been fabricated with a permanent, antimicrobial powder coating. The antimicrobial coating utilizes silver ionic technology to inhibit the growth of microbes. Scale Specifications Capacity and Resolution 1000 lb x 0.2 lb (454 kg x 0.1 kg) Power Requirements 110-240VAC, 50-60Hz to 9V DC Adapter, ADPT30 (included) or 6 D batteries (not included) Environmental Operating temperatures: 50°F to 95°F (10°C to 35°C) Storage temperatures: 30°F to 125°F (0°C to 50°C) Maximum Humidity: 85% RH Platform Dimensions Length: 15 3/4” (460 mm) Width: 22” (560 mm) Height: 2 5/8” (60 mm) Assembled Dimensions 3001KL-AM: Depth: 33” / 838 mm Width: 22 ¼” / 565 mm Height: 52” / 1321 mm 3001KL-AMX: Depth: 34 1/2” / 841 mm Width: 22 ¼” / 565 mm Height:52” / 1321 mm 4 CERTIFICATIONS / CONNECTIVITY / DISPOSAL Certification Descriptions Pelstar, LLC has been officially certified as a manufacturer of Health o meter® Professional medical devices to be in compliance with stringent ISO requirements. The Pelstar, LLC quality assurance system covers the design, marketing, and distribution of specialized scales for the Healthcare Industry. Connectivity Information To enable reliable transmission of weight, height, and Body Mass Index (BMI) data, this scale is designed to connect to a computer, monitor, or other electronic device via various Health o meter® Professional Connectivity Solutions. This connectivity helps minimize transcription errors when recording patient data. For more information regarding how to connect this scale to other electronic devices, please contact Health o meter® Professional Scales Technical Support at 1-800-6383722 or visit www.homscales.com/innovations/connectivity-solutions. Scale Disposal This Health o meter® Professional scale must be disposed of properly as electronic waste. Follow the national, regional or local regulations which apply to you for disposal of electronic waste or batteries. Do not dispose of this device in the domestic waste stream. 5 ASSEMBLY INSTRUCTIONS *If you have received your scale already assembled, skip to Set Up Instructions on page 9. Before Assembly Carefully inspect the carton for shipping damage before unpacking. If damage is found, contact your shipper or a Health o meter® Professional representative immediately at 1-800-815-6615. Claims must be filed with the shipper as soon as possible after receipt of the package. The following information details what you will find inside the main carton as you unpack the parts for assembly. To prevent scratching any components, carefully remove each assembly from the carton and unwrap the packing materials. Set the carton aside for storage. To avoid damaging the scale parts when unpacking, do not use a box cutter, knife, scissors, or any sharp object to open the protective inner packaging. Parts List (1) Scale platform (1) Handrail (with load cell connector cable inside) (1) Display Head (1) AC Adapter Holder (4) Feet (8) M8 1.25 x 20 bolts (4) M4 x 0.7 x 10mm screws (2) #8 ½” Sheet metal screws Tools Required 13mm box wrench (included), Phillips head screwdriver (not included) Note: Assembly photos in this User Instruction manual depict the gray handrails on scale model 3001KL-AM. Assembly instructions are the same for scale model 3001KL-AMX. Handrails for the 3001KL-AMX are the white handrails depicted below. 3001KL-AMX Handrails 3001KL-AM Handrails 6 ASSEMBLY INSTRUCTIONS Health o meter® Professional Scales recommends that assembly is performed by two people. Warning: Do not drop scale, as this can permanently damage the load cells. 1. Remove the scale platform from the carton and place it on a flat, level, and dry surface with the bottom facing up. Thread the (4) feet into the underside of the platform. Each foot should be completely hand tightened. 2. Turn the platform over so it is facing up. Locate the handrail and untie the load cell cable connector. Position the handrail over the handrail supports on the platform and feed the cable through the round hole located on the right handrail support. 3. Holding the handrail in place, tip the platform forward to be able to access the underside of the platform. Pull the cable through the round hole behind the wheel then feed the cable through the metal shield as shown. Pull Pull cable cable through through circle hole Feed cable through shield 7 ASSEMBLY INSTRUCTIONS 4. Tip the platform and handrails back to an upright position. Fasten the handrail to the platform using the (8) included M8 1.25 x 20 bolts (4 bolts per each handrail support). Use the included 13mm box wrench to tighten the bolts. 5. Carefully tilt the scale forward to access the underside of the platform. Plug the load cell connector cable into the port. Load cell connector cable port 6. Carefully tilt the scale back to an upright position. Obtain the display head and align the four holes on the back of the display head with the four mounting holes on the display support. Using the (4) included M4 x 0.7 x 10mm screws, fasten the display head onto the display support using a Phillips head screwdriver to tighten the screws. 7. Plug the load cell connector cable into the load cell port on the rear of the display head. The scale is now assembled. See Powering the Scale on page 9 for battery/AC adapter instructions. If powering the scale via AC adapter, see the next step for attaching the adapter holder. 8. Optional Step – For powering the scale via AC power adapter. Attach the adapter holder to the handrail using the (2) included sheet metal screws. Use a Phillips head screwdriver to tighten the screws. 8 SET-UP INSTRUCTIONS For Pre-Assembled Scales 1. Carefully lift the fully assembled scale from the carton and place scale platform on a flat, level, and dry surface. 2. Remove the protective plastic film covering the display head (the film is printed “FACTORY CALIBRATED”). 3. See Powering the Scale or Battery Installation, below, for battery and AC adapter instructions. Powering the Scale Plug the AC adapter into the power adapter jack (the jack is located on the rear of the display head), then plug the scale’s AC adapter into the power source. Warning: To avoid a safety hazard, do not use an unspecified AC adapter. Only use the Health o meter® Professional AC adapter model ADPT30 designed for this scale. Power Adapter Jack For battery operation, see Battery Installation below. Battery Installation 1. If connected, unplug the AC adapter from the power source. Use a Phillips head screwdriver to remove the battery cover on the side of the display head by unscrewing the battery cover screw. 2. Remove the battery pack from the display head. Replace or install fresh batteries, making sure to install them in the proper direction. Health o meter Professional recommends using alkaline batteries rated for 130°F (54°C) operation. Do not use Zinc-Carbon batteries. 3. Re-insert the battery pack into the display head, ensuring the end with the silver contacts is facing the inside of the display. Re-attach the battery cover to the display head by replacing the battery cover screw. Warning: If the scale will not be used for some time, remove the batteries to avoid a safety hazard. Disposal of batteries must be performed in accordance with the prevailing national, regional or local regulations that apply to you. 9 SET-UP INSTRUCTIONS (CONT) The scale must be powered on before performing any of the following operations. Press to turn on the scale. Unit of Measure Configuration The weight measuring unit (pounds/LB or kilograms/KG) can be changed by pressing To lock the weight measuring unit, follow this procedure. 1. Press Help Unit . to access the Help menu options. 2. While in the Help menu, press to select “Set Options”. Press to advance to the next menu. 3. While in the “Set Options” sub-menu, select “Units Lock”. 4. Press to change the “Units Lock” option. Choose “Unlocked”, “LBS Locked”, or “KG Locked”. Note: You must press Enter to save your selection. Setting Sound Options The display can be set to stay silent or beep while operating the scale. Follow this procedure to set the preferred option. 1. Press Help to access the Help menu options. 2. While in the Help menu, press to select “Set Options”. Press to advance to the next menu. 3. While in the “Set Options” sub-menu, select “Sounds”. 4. Press to change the “Sounds” option. Choose “Disable” for the display to stay silent while operating the scale. Choose “Enable” for the display to beep while operating the scale. Note: You must press Enter to save your selection. Activating/Deactivating AC Auto Off When powering the scale via the AC adapter, the display can be set to power off after a period of inactivity. Follow this procedure to set the preferred option. Note: When powering the scale via batteries, the scale will automatically power off after a period of inactivity. See the next section to set the preferred time of inactivity before power off. 1. Press Help to access the Help menu options. 2. While in the Help menu, press to select “Set Options”. Press to advance to the next menu. 3. While in the “Set Options” sub-menu, select “AC Auto Off”. 4. Press to change the “AC Auto Off” option. Choose “Enable” for the display to turn off after a period of inactivity. Choose “Disable” for the display to always remain on. Note: You must press Enter to save your selection. 10 SET-UP INSTRUCTIONS (CONT) Setting Auto Off Timer When powering the scale via batteries, or if Auto Off is Enabled for the AC adapter, the period of inactivity before the scale powers off can be set to a specific amount of time. Follow this procedure to set the amount of seconds of inactivity before power off. 1. Press Help to access the Help menu options. 2. While in the Help menu, press to select “Set Options”. Press to advance to the next menu. 3. While in the “Set Options” sub-menu, select “Auto Off Seconds”. to change the “Auto Off Seconds” option. Choose from 60, 90, 120, 150 or 180 seconds. Note: You must press Enter to save your selection. 4. Press Setting Date and Time 1. Press Help to access the Help menu options. 2. While in the Help menu, press to select “Set Clock”. 3. Use and to set the time and date. Note: You must press Enter to save the information. Setting Auto Zero Option When a scale is set to zero, it creates a reference point for weights that are placed on it. There are two approaches to how this can take place. This option allows the user to select whether the scale will re-set itself to ZERO each time it is powered up or whether it will use the zero reading from the last time it was zeroed. “Enable” means the scale will zero itself when it is powered on and this may take a few seconds. After each use, the scale will clear the weight of the patient and set itself back to the initial ZERO level it found on start-up. Health o meter® Professional recommends keeping this setting as Enable. Note: Hitting a key to wake the scale from sleep mode will not prompt the scale to zero. “Disable” means the scale does not attempt to find a zero when powered on, rather it will use the last zero setting it had from its most recent use. There will be no delay in using the scale if the Auto Zero is disabled. Health o meter® Professional recommends that if the Disable option is selected, users should manually zero the scale before each weight measurement by pressing Zero . (Clear) Users will see dashes appear on the screen as the scale is finding zero. 1. Press Help to access the Help menu options. 2. While in the Help menu, press to select “Set Options”. Press to advance to the next menu. 3. While in the “Set Options” sub-menu, select “Auto Zero on Power Up”. 4. Press to change the “Auto Zero on Power Up” option. Choose from Enable or Disable. Note: You must press Enter to save your selection. 11 OPERATING INSTRUCTIONS Key definitions can also be found by pressing submenu. Help and selecting “Key Definitions” in the Keypad Function Description Powers scale on and off. Zero/ (Clear) Hold/ Release Zeroes the scale prior to a weighing. Also used as a screen navigation key to exit a display menu. Holds the weight value on the display until the button is pressed again to clear the value. Prompts entry of height data to calculate patient’s Body Mass Index (BMI). BMI Recall Recalls the previous weight. Tare TARE-Deducts the weight of an object on the platform. PRETARE-When held for 3 seconds, prompts entry of a weight value to be deducted from the weight on the platform. Also releases tare weight (returns display to zero). Unit Toggles between pounds and kilograms. Reweigh Enter Allows repeated weighing of the patient without stepping off the scale. Used to accept height value in BMI mode, and tare value in PRETARE mode. Also used to save selections in Set Options menu. Display navigation keys. Weight Unit Battery Power Weight Measurement Time Date 12 OPERATING INSTRUCTIONS Weighing a Patient 1. Make sure there is nothing on the weighing platform and the display shows “0.0”. 2. Ask the patient to step on the scale. The scale will begin to display the patient’s weight and the word “PROCESSING”. Depending on the movement of the patient on the scale, it may take several seconds for the scale to lock onto the weight. The display will show the patient’s weight and the word “LOCKED” when measuring is completed. Note: The scale will not lock on a weight less than 5 lb / 2.27 kg. Hold/ 3. The weight may be held on the display by pressing Release . The scale will continue to display the patient’s weight after they step off the scale and will remain on the display until Hold/ released or the scale is powered off. To release, press Release . 4. To reweigh the patient without having them step off of the scale, press Reweigh . 5. To see the patient’s weight in another unit of measurement, press and hold down Unit . If the scale is in LB mode, it will convert the weight to KG. If the scale is in KG mode, it will convert the weight to LB. This function is available whether the unit of measurement is locked or unlocked. Weight Recall 1. To recall the last weight measured, press Recall . 2. To clear the display of the recalled weight, press 13 Zero (Clear) . OPERATING INSTRUCTIONS (CONT) BMI Function 1. Make sure there is nothing on the weighing platform and the display shows “0.0”. 2. Ask the patient to step on the scale. The scale will begin to display the patient’s weight and will lock on the patient’s weight when completed. Depending on the movement of the patient on the scale, it may take several seconds for the scale to lock onto the weight. 3. After obtaining the patient’s weight, and with the patient remaining on the scale, press BMI . 4. The scale will prompt entry of the patient’s height. Use the arrow keys to enter the patient’s height. Note: When weighing in pounds, the height is displayed in inches. When weighing in kilograms, the height is displayed in centimeters. 5. Once height is keyed in, press Enter . 6. The display will show the patient’s BMI. 7. Press Zero (Clear) to return to the normal weighing mode. 14 OPERATING INSTRUCTIONS (CONT) Tare Function When using this scale, the weight of an object, such as a portable oxygen tank, can be subtracted from the total weight in order to determine the weight of the patient alone. The Tare Function automatically performs this subtraction. The scale allows a tared weight to be entered manually by using the keypad, or automatically, as outlined in this section. To Tare with an Unknown Weight 1. Wait until “0.0” appears on the display. 2. Place the object to be tared on the scale. The display will show the object’s weight. The minimum weight that can be tared is 5 lb / 2.27 kg. Note: The scale must lock onto a weight before it can be tared. 3. With the object remaining on the scale, press Tare . The scale will zero, and the word “TARE” will appear at the bottom center of the display along with the tared weight. Remove the object from the scale. 4. Place the patient and the object back on the scale. The scale will automatically deduct the tare weight of the object from the gross weight of the patient and object together. The display will show the patient’s weight. 5. With no weight on the scale, the display will show the tare value as a negative amount. The tared value will remain on the display until changed, cleared, or until the scale is powered off. Tare 6. To remove the Tare, press . The word “TARE” will disappear from the bottom of the display, and the tare value will be cleared from the display. The scale will resume normal operation. 15 OPERATING INSTRUCTIONS (CONT) To Tare with a Known Weight / Pre-Tare (Limit 200 lb / 91 kg) 1. Wait until “0.0” appears on the display. 2. Press and hold Tare for approximately 3 seconds. The display will change and prompt entry of the weight value to be tared. Use the arrow keys to enter the weight to be tared. Press Enter to save the tare value. The minimum weight that can be pre-tared is 0.2 lb / 0.1 kg. 3. The scale will zero and the tare value will show as a negative weight on the display. The word “TARE” will also appear at the bottom center of the display along with the tare value. 4. Place the patient on the scale along with the tared item. The scale will automatically deduct the tare value from the weight of the patient. The display will show the patient’s weight. 5. To remove the Tare, press Tare . The word “TARE” will disappear from the bottom of the display, and the tare value will be cleared from the display. The scale will resume normal operation. 16 OPERATING INSTRUCTIONS (CONT) Parent/Child Function The Parent/Child function on Health o meter® Professional scales provides the convenience of weighing a small child or infant while being held by a parent. Follow these simple steps to subtract the parent’s weight from the total so only the child’s weight is displayed. 1. Wait until “0.0” appears on the display. 2. Ask the parent to step onto the scale without the child. The display will show a value for the parent’s weight. Tare 3. With the parent on the scale press . The scale will zero, and the word “TARE” will appear at the bottom center of the display along with the parent’s tared weight. 4. Carefully place the child into the parent’s arms. The scale will automatically deduct the weight of the parent and only display the child’s weight. Note: For an alternate method, after taring the parent’s weight in step 3, have the parent step off of the scale. With no weight on the scale, the display will show the tare value as a negative amount. Have the parent to step back onto the scale while holding the child. The scale will automatically deduct the weight of the parent and only display the child’s weight. 5. The tared value will remain on the display until changed, cleared, or until the scale is powered off. To remove the Tare, press Tare . The word “TARE” will disappear from the bottom of the display, and the tare value will be cleared from the display. The scale will resume normal operation. 17 MAINTENANCE Maintenance The following pages provide instructions for maintenance, cleaning, calibration, and troubleshooting for the 3001KL-AM/3001KL-AMX scales. Maintenance operations other than those described in this manual should be performed by qualified service personnel. Caution: Before first use, or after long periods of non-use, check the scale for proper operation and function. If the scale does not operate correctly, refer to qualified service personnel. 1. Check the overall appearance of the scale for obvious damage, wear, and tear. 2. If applicable, inspect the AC adapter cord for cracking, fraying, and/or broken/bent prongs. Cleaning Proper care and cleaning is essential to ensure a long life of accurate and effective weighing. Caution: Disconnect the scale from the AC adapter power source prior to cleaning the unit. Note: Routine cleaning does not affect the antimicrobial properties of the handrail coating. 1. Clean all external surfaces with a clean damp cloth or tissue. Dry with a clean soft cloth. 2. Do not immerse the scale into cleaning or other liquid solutions. 3. Do not use Isopropyl Alcohol or other solutions to clean the display surface. 4. Do not use abrasive cleaners. 18 CALIBRATION This scale has been factory calibrated, and does not require calibration prior to use. Calibration of your scale can be performed using kilogram (kg) or pound (lb) weight standards. Minimum calibration is 200 lb / 100 kg. Maximum calibration weight is 1000 lb / 454 kg. The required calibration standard will be the Unit of Measure (UOM) for which the scale is configured. Note: Only weights certified and traceable to national standards are to be used for calibration. Warning: Always ensure that the scale is returned to the correct UOM after scale calibration. 1. Press Help to access the Help menu options. 2. While in the Help menu, press to select “Calibrate”. Press to advance to the next step. 3. The display will prompt for entry of the password. Press the following keys in this sequence to proceed with the calibration procedure. 4. Follow the screen prompt and ensure the scale is on a level surface with no weight on the platform. 5. The display will show “Zeroing Scale” as it calculates the zero value. Do not touch the scale during the zeroing process. 6. When the zeroing process is complete the display will prompt for entry of the calibration weight. Minimum calibration is 200 lb / 100 kg. Maximum calibration weight is 1000 lb / 454 kg. Calibration weight can be adjusted in 10 lb increments. Press Enter when the calibration weight is set. 19 CALIBRATION (CONT) 7. The display will prompt for the calibration weights to be placed on the platform. Press Enter after calibration weights are placed on the platform. 8. The display will show “Calibrating” during the calibration process. 9. If calibration is successful, the display will show “Calibration Complete” with a 4 digit calibration count. 10. If calibration is unsuccessful, the display will show an error message that the entered calibration weight and the certified weights do not match. The display will then revert back to the set calibration weight screen for entry of calibration weight. 20 TROUBLESHOOTING Troubleshooting Before contacting service personnel, refer to the following instructions to check and to correct any failures. For further assistance, contact Health o meter® Professional Scales Technical Support at 1-800-638-3722. Symptom Scale does not power on Questionable weight or the scale does not zero Possible Cause Corrective Action 1. Dead Battery 1. Replace batteries 2. Faulty electrical outlet 2. Use a different outlet 3. Bad power supply 3. Replace AC adapter 1. External object interfering with the scale 1. Remove interfering object from the scale 2. Ask the patient to get off the 2. The display did not show “0.0” before weighing scale, press Zero (Clear) to zero the scale and begin weighing process again 3. Scale is not placed on a level floor or feet are not properly balanced 3. Place the scale on a level floor. Tighten the feet on the underside of the platform to ensure all 4 feet are properly balanced 4. Scale is out of calibration 4. Check weight with known weight value Weighing is performed but the weighing process takes too long and the weight does not lock on the display The patient is not standing still Ask the patient to stand still The battery icon on the display indicates that the batteries are low The batteries are depleted Replace batteries according to instructions on page 9 Scale is displaying “Load Cell Cable Not Detected” The load cell cable is not completely plugged into the ports Inspect the load cell cable to ensure it is completely plugged into the ports on the back of the display head and the back of the platform. See page 8. If cable was plugged in, unplug and plug in again until it clicks into place. In the Help menu, display is not advancing to the next screen for the menu selection and saying “invalid key” Correct key is not being pressed To make a selection in the Help Menu and advance the screen, press 21 WARRANTY Limited Warranty What does the Warranty Cover? This Health o meter® Professional scale is warranted from date of purchase against defects of materials or in workmanship for a period of two (2) years. If product fails to function properly, return the product, freight prepaid and properly packed to Pelstar, LLC (see “To Get Warranty Service”, below, for instructions). If the manufacturer determines that a defect of material or in workmanship exists, the customer’s sole remedy will be replacement of the scale at no charge. Replacement will be made with a new or remanufactured product or component. If the product is no longer available, replacement may be made with a similar product of equal or greater value. All replaced parts are covered only for the original warranty period. Who is Covered? The original purchaser of the product must have proof of purchase to receive warranty service. Please save your invoice or receipt. Pelstar dealers or retail stores selling Pelstar products do not have the right to alter, or modify or any way change the terms and conditions of this warranty. What is Excluded? Your warranty does not cover normal wear of parts or damage resulting from any of the following: negligent use or misuse of the product, use on improper voltage or current, use contrary to the operating instructions, abuse including tampering, damage in transit, or unauthorized repair or alternations. Further, the warranty does not cover natural disasters, such as fire, flood, hurricanes and tornadoes. This warranty gives you specific legal rights, and you may also have other rights that vary from country to country, state to state, province to province or jurisdiction to jurisdiction. To get Warranty Service make sure you keep your sales receipt or document showing proof of purchase. Call (+1) 800-638-3722 or (+1) 708-377-0600 to receive a return authorization (RA) number, which must be included on the return label. Attach your proof of purchase to your defective product along with your name, address, daytime telephone number and description of the problem. Carefully package the product and send with shipping and insurance prepaid to: Pelstar, LLC Attention R/A#_____________ Return Department 9500 West 55th Street McCook, IL 60525 Extended Warranty Available This scale is eligible for Health o meter® Professional ScaleSurance Extended Warranty Program. ScaleSurance extends the warranty period for an additional two years. This extension to the standard Limited Warranty can be purchased with new scales or for a facility’s existing scale before its current warranty has expired. To learn more, visit www.homscales.com/scalesurance/ or contact your medical supply distributor. PELSTAR, LLC 9500 West 55th Street • McCook, IL 60525 • USA 1-800-638-3722 or 1-708-377-0600 PLEASE REGISTER YOUR SCALE FOR WARRANTY COVERAGE AT: http://www.homscales.com Health o meter® is a registered trademark of Sunbeam Products, Inc. used under license. Health o meter® Professional products are manufactured, designed, and owned by Pelstar, LLC. We reserve the right to improve, enhance, or modify Health o meter® Professional product features or specifications without notice. © Pelstar, LLC 2017 P/N UM3001KL-AM/3001KL-AMX Rev20170807 22