1
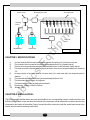
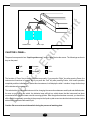
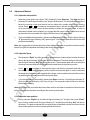
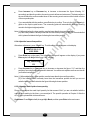
MICROPLATE WASHER
User Manual
Model : LMW-9620
Please read this manual carefully before using the instrument
Labnics Equipment
Table of Content
Sr.No.
Contents
1
INTRODUCTION
1
1.1
Working Conditions
1
1.2
Storage and Transportation Conditions
1
2
WORKING PRINCIPLE
1
3
SPECIFICATIONS
2
4
INSTALLATION
2
5
PANEL
3
6
ADJUSTMENT
4
6.1
Enter to Adjusting Menu
4
6.2
Adjustment Method
5
6.2.1
Adjust the start position
5
6.2.2
Adjust the Space
5
6.2.3
Adjust the lower position
5
6.2.4
Adjust the imoverflow position
6
6.2.5
Adjust the wash liquid volume quantity
6
WASHING
7
7.1
Select Washing Mode
7
7.2
Select Washing Program
7
7.3
Make Washing Program
7
7.4
Wash Plate
8
8
WASHING QUANTITY
9
9
SCOURING
9
10
MAINTENANCE,STORAGE AND TRANSPORTATION
11
11
TROBLE SHOOTING
12
12
NOTES
12
13
EQUIPMENT PARTS LIST
13
14
WARRANTY
13
15
NOTES
16
7
Pg. No.
CHAPTER 1. INTRODUCTION:LMW-9620 Microplate Washer is an accessory for the Microplate Reader. As for the safety classification, it belongs
to Class I, B Type, and according to management classification, it belongs to Class II. The main function of the
instrument is to wash enzymatic plate after detecting, so it is mainly used in medical department. It can also wash
or add reagents in other fields such as refined chemistry, medicine and biochemistry.
Note: The reagent used in this instrument won't be provided by the manufacturer.
The instrument has a liquid crystal display. You can easily complete all your work just according to the instrument's
prompts. It is a highly automated instrument, enables you to program by yourselves and saves previously-set
programs in the memory so that later on you can use them conveniently. The wash liquid is taken out directly from
the wash liquid bottles to the Microplate Washer, and then it flows into the Microplate Reader. After then, the waste
liquid flows from the Microplate Washer to the collecting utensils.
1.1
Working Conditions:
(1) Environmental Temperature: 5 – 40℃.
(2) Relative Humidity: ≤ 80%.
(3) Keep it away from dust, shake and caustic gases.
(4) The single-phase AC power supply should be grounded perfectly.
220V、50 H, Input 60VA
(5) Fuse: φ5×20 2A.
(6) Safety Type: Class: I; Group: B.
1.2
Storage and Transportation Conditions:
(1) Environmental Temperature : -20℃ ~+55℃
(2) Relative Humidity
: ≤ 93%
(3) Atmospheric Pressure
: 500hPa - 1060hPa
CHAPTER 2. FEATURES & WORKING PRINCIPLE
Working principle and arrangement features are shown as Fig. 1. There are 8 or 12 pairs of stainless steel
injection/suction needle tubes on the scouring nozzle. Each pair of needle tubes is perfectly set to match the holes
of the enzymatic plate. Suction pump sucks wash liquid from the washing-liquid bottle to the instrument. The
washing liquid will pass through electromagnetic valve, scouring nozzle and injection/suction needle tubes before
being injected to the holes of enzymatic plate, then wait for washing. After washing, waste liquid will pass through
injection/suction needle tubes, scouring nozzle and then drawn out by another pump. During the process of
washing, you can program to control a lot of parameters such as displacement of enzymatic plate, rise or fall of the
scouring nozzle, injecting volume of washing liquid, time of steeping and times of scouring etc. The instrument has
two bottles: one for washing liquid and another for distilled water. They are connected to suction pump through a
switching device.
-1-
Suction Pump
Electromagnetic Valve
Scouring Nozzle
Switching
Device
Enzymatic
Plate
Distilled Water
Wash Liquid
Venting Pump
Fig. 1: System Schematics
CHAPTER 3. SPECIFICATIONS
1)
2)
3)
4)
You can wash the 96-holes enzymatic plate by means of washing 8 or 12 holes in every line.
The number of lines for each time scouring can be adjusted from 1 to 12(easily adjust).
The time of an enzymatic plate steeping can be adjusted from 1 to 600 seconds. (easily adjust).
The mean error of the injected washing liquid volumes in the holes of enzymatic plate is no more than
5)
5%.
Average residue of scouring liquid is not more than 2µl in each hole after the enzymatic plate is
6)
7)
8)
9)
10)
washed.
The automatically circulated scouring time can be adjusted from 1 to 9.
The instrument can save up to 16 programs.
The instrument can scour its pipeline automatically.
Dimensions: 480mm×360mm×140mm.
Weight: 11Kg.
CHAPTER 4. INSTALLATION:(Fig.2)Connects the distilled water and wash liquid bottles to the corresponding nozzles via silicon-rubber duct
according to the labels on the nozzles at the left side of the instrument. (Note that the silicon-rubber duct must be
connected to the bottom of the bottles) Finally, connect the silicon-rubber duct with the waste liquid nozzle to the
utensil, which is used for collecting waste liquid.
-2-
Distilled Water
Wash Liquid
Fig. 2: Installation Schematics
CHAPTER 5. PANEL:The panel is composed of one “liquid crystal screen” and six “keys” below the screen. The followings are the six
keys on the panel.
Right
Increase
Left
Pause
Decrease
Enter
The function of “Pause” key is to stop operation temporarily. If you press the “Right” key after pressing Pause, the
instrument will continue to operate. But if you press the “Left” key after pressing Pause, it will cease operation
completely and then initialize itself. Under this circumstance, it will display the initial interface. Usage of other keys
will be introduced in succession.
The switch at the left side of the instrument is for changing the connections between wash liquid and distilled water.
As soon as you turn on the switch, the indicator lamp will light on, which shows that the instrument has been
connected with the distilled water used for scouring pipeline. After the pipeline has been scoured, you should turn
off the switch immediately according to the prompt on the liquid crystal screen to make the instrument return to the
state of being connected with wash liquid.
Caution: Be sure not to touch the switch during the process of washing plate.
-3-
CHAPTER 6. ADJUSTMENT:The instrument has been precisely adjusted and strictly tested. Since enzymatic plates from different factories or of
different types have some discrepancies in specification or dimensions, you may need another adjustment. After
adjustment, the adjusting results are saved. The following shows the adjusting steps.
6.1
Enter the Adjusting Menu:
Turn on the instrument, the LCD displays
LMW-9620
Microplate Washer
At first, the instrument initializes itself. Then the liquid crystal screen will display the main menu.
Main Menu
Wash Scour Adj
At this time the cursor will glint on “Wash”, so you should press the Right key to move cursor to
“Adj”. Then press “Enter key”. The screen will display the adjusting menu.
Adj B 220 S 15
L153 D 500
·
The cursor will glint on 15. The figures in above interface are just for illustration, and may not be
the right numbers. The following introduction is about the adjusting menu.
On that menu, “S” means SPACE FOR ADJUSTMENT. “B” means START POSITION; “L”
means LOWER POSITION and “D” means INJECTED VOLUME.
The figure “15” following S is set at the time when the instrument leaves factory. You can adjust
the space of suction needle tubes between two sucking operations by increasing or decreasing
the value.
The figure “220” following B is set at the time when the instrument leaves factory. You can
adjust the space between holes of enzymatic plate in the first row and suction needle tubes by
increasing or decreasing the value.
The figure “153” following L is set at the time when the instrument leaves factory. You can
increase or decrease the figure following L to adjust the lowest position of suction needle tubes.
The figure “500” following D shows the volume of wash liquid being injected to enzymatic plate.
The volume of injected liquid is from 10µl to 3000µl.
-4-
6.2
Adjustment Method:
6.2.1 Adjust the start position:
When the cursor glints on the figure “220” following B, press Enter key. Then both the figure
following “B” and the figure following “Adj” will glint on the screen. The enzymatic plate will move
below the scouring nozzle and aims its first row holes at the needle tubes on the scouring
nozzle. Press
or
to increase or decrease the figure, and then the enzymatic plate will
move accordingly. Please select the best position to place the enzymatic plate. In order to
eliminate the waste liquid completely, we suggest that the longer suction needle tubes should
be placed as close as possible to the right side of the holes of enzymatic plate.
If you are satisfied with the position, please press Enter key to confirm. Only the figure following
“B” glints and the figure following “Adj” does not glint. The enzymatic plate will return to the start
position automatically.
Note: We suggest that you should adjust more than one time and observe reposition of the enzymatic
plate till you get the best position according to the scouring needle tubes.
6.2.2 Adjust the Space:
First press the “Right” key after completing the adjustment of start position to make the cursor
glint on the figure following “S” and then press the Enter key. Then both the figure following “S”
and the figure following “Adj” will glint on the screen. The enzymatic plate will move below the
scouring nozzle and aims its first row holes at the needle tubes on the scouring nozzle.
Press
or
to increase or decrease the figure, and then the enzymatic plate will move
accordingly. Please select the best position to place the enzymatic plate. In order to eliminate
the waste liquid completely, we suggest that the longer suction needle tubes should be as close
as possible to the left side of the holes of enzymatic plate.
If you are satisfied with the position, please press Enter to confirm. Only the figure following “S”
glints and the figure following “Adj” does not glint. The enzymatic plate will return to the start
position automatically.
Note: We suggest that you should adjust more than one time and observe reposition of the enzymatic
plate till you get the best position according to the scouring needle tubes.
6.2.3 Adjust the lower position:
Firstly, press the “Right” key, and then the figures following “L” will glint. Now, press “Enter”
key to confirm, and then both the figure following “L” and the figure following “Adj” will glint on
the screen. The plate connected with scouring nozzle will descend to make the suction needle
tubes entering the holes of the enzymatic plate at the first row.
-5-
Press Increase key or Decrease key to increase or decrease the figure following “L”
accordingly and then the position of scouring nozzle will ascend or descend. The best position is
the one at which the suction needle tubes on the scouring nozzle can touch the bottom of holes
of the enzymatic plate.
If you are satisfied with the position, press Enter key to confirm. Then only the figure following L
glints on the liquid crystal screen. The connecting plate will automatically lead the scouring
nozzle to the highest original position.
Note: (1) When adjusting, the lower position must be lower than the imoverflow position.
(2) If the lower position is already lower than the imoverflow position but still you are not satisfied
with it, please first delete the figure following the imoverflow position.
6.2.4 Adjust the imoverflow position:
After above adjustment, press “Right” key. The following menu will appear on the display.
NEXT B 220 S 15
L153 D 500
Press Enter key on the panel. The following message will appear on the display. If you press
Enter again, both Adj and the figure “131” will glint.
Adj Imoverflow
131
Press Increase key or Decrease key to increase or decrease the figure “131” and then the
position of scouring nozzle will ascend or descend. You will have to adjust more than one time till
you find the best position.
Note: (1) When adjusting, the lower position must be lower than the imoverflow position.
(2) If the lower position is already lower than the imoverflow position but still you are not
satisfied with it, please first delete the figure following the lower position.
6.2.5 Adjust the wash liquid volume quantity:
Please do not adjust the wash liquid quantity for that moment. But if you are not satisfied with the
quantity while working in the future, you can adjust it. The specific operation is Chapter 8. After the
a,b,c,d steps, please back to the main menu.
Operations: Press Right or Left, change Adj to Back, and then press Enter to the main menu.
-6-
CHAPTER 7. WASHING:7.1
Select Washing Mode:
After it comes to the main menu, the cursor will move to Wash. Press Enter key to confirm and then it will go
into “Washing Means” selecting menu:
Washing Means
0 1
Here, the cursor will stay on “0”.
If there is any liquid in the holes of the enzymatic plate, waiting for scouring, please select “1”.
Then the instrument will take the liquid out before wash liquid is injected.
If there is not any liquid in the holes of the enzymatic plate, waiting for scouring, please select “0”.
Then the instrument will directly inject wash liquid to the enzymatic plate.
Please press Left key or Right key to make the cursor stay on the corresponding number and then
press Enter key. Subsequently, it will display the following menu.
P 6T 3R8
V 9s I 9s Wash
Here, the cursor will stay on Wash. The program displayed in the menu is the one that the instrument has
executed last time.
Note: (1)
(2)
7.2
“P” means PROGRAM; 'T” means TIMES; “R” means ROW;
“V” VIBRATE; “I” means IMMERSE.
The numbers can be adjusted.
Select Washing Program:
If the parameters displayed on the menu do not match with your needs, please press Right key to make the
cursor stay on the figure following “P”. Press Increase key or Decrease key to alter the program number.
The washing parameters on the liquid crystal screen will change with the program number. So please select
the most suitable washing program.
7.3
Create Washing Program:
If all 100 programs saved in the instrument can not match your needs, then you can create washing program
by yourselves. The work is divided into four steps. We will introduce them one by one.
1)
Set the program number
Select an inapplicable program from the 100 programs saved in the instrument and use its number as
the program number, which is under programming. After that, please carefully read the program to
ensure that this program does not cover other programs, which will be used in the future.
-7-
2)
Set washing times
After setting the program number, please press Right key to make the cursor stay on the figure
following “T”. Press Increase key or Decrease key to change the figure to set washing times of the
enzymatic plate. You can set any between one and twenty times.
3)
Set washing rows
Sometimes you do not need to wash all the 8 or 12 rows of the enzymatic plate. Press Right key to
make the cursor stay on the figure before “R” on the screen and then press Increase key or
Decrease key to change the figure in order to set washing rows of the enzymatic plate. You must keep
in mind that the rows which you set should be closest to the scouring nozzle from row 1 to row 12 and
you can't set alternate rows to wash.
4)
Set immersing time
Press Right key to make the cursor stay on the figure following “I” on the screen. Then press
Increase key or Decrease key to set the time that wash liquid will immerse in the holes of the
enzymatic plate. The range of immersing time is from 0 to 3600 seconds.
Thus a new program is finished and the instrument will save it automatically. During the process of
programming, if you do not want to change some parameters, skip them and set the other
parameters.
7.4
Wash Plate
Make the enzymatic plate wait for washing on the tray. Then adjust the liquid crystal screen according to the
above methods to display the following menu.
P 6T 3R8
V 9s I 9s Wash
1.
Here the cursor stays on Wash and all the figures on above menu are just for illustration. Confirm that
all the parameters are ok (Otherwise you should have to select another appropriate program or create
a new program). Then press Enter key to confirm, when the cursor stays on Wash. After that, the
instrument will wash the enzymatic plate based on the selected program. During the process of
washing, the remaining work will appear on the screen.
T 3 R 8
V 9s W
Attention: If an accident happened to the instrument during the process of washing, please press Pause
key to stop the operation for a while and then if you press the Right key after pressing Pause key, the
instrument will continue to operate. But if you press the Left key after pressing Pause key, it will cease
operation completely and then initialize itself.
-8-
2.
After washing gets over, the enzymatic plate will return to the original position automatically. The
following menu will appear on the screen.
End
Continue
Here, the cursor stays on Continue.
3.
If you want to continue washing enzymatic plate, please put another enzymatic plate on the tray
and then it will wash the new plate by using the same program.
4.
If you want to finish washing, please press Right key to make the cursor stay on Back to the menu.
After you press Enter key to confirm, it will return to the main menu. At the same time, the instrument
will memorize the number of program being carried out just now for the convenience of other usages.
CHAPTER 8. WASHING QUANTITY:In daily use, the user can adjust the wash liquid quantity, the steps are as follows:
Adj B 220 S 15
L153 D 500
All figures on the above menu are just for illustration, press Right to make the cursor stay on “500” and then press
Enter key, at this time; you can adjust with Increase and Decrease key.
Note: The instrument will check whether the quantity is adequate or not, we suggest you to record the quantity to
make a reference.
CHAPTER 9. SCOURING
It is very important to scour pipeline. As everyone knows, during the process of evaporation, wash liquid of the
enzymatic plate will separate out some small crystals. The aggradations of small crystals may block pipeline of the
instrument, especially the fine-spun needle tubes on the scouring nozzle. If blockage happens, it can not be
recovered. So you must pay attention to the following operations.
You must use distilled water to scour pipeline and replace the old wash liquid present in the pipeline every
time before shutting down the instrument. If the instrument is continuously working for long time, crystals will
also continue to gets separate out due to vaporization. So you must stop scouring if you feel that the pipeline
is blocked.
Moreover, you should replace distilled water with wash liquid after you switch on the instrument or while
working after the pipeline is scoured. Thus the instrument can work properly.
-9-
On the main menu, press Left key or Right key to make the cursor stay on Scour and then press the Enter
key. The screen will display Scour Pipeline menu.
Scour Pipeline
Scour Change Bank
Here, the cursor stays on Scour.
1.
Scour Pipeline
a)
On above menu, press Left key or Right key to make the cursor stay on Scour and then press the
Enter key. The following menu will appear.
<Scour>
5g
b)
Press Left key or Right key to make the cursor stay on the figure before “S” and then press Increase
key or Decrease key to change the figure to set scouring time, within the range from 1 to 600 seconds.
Check Switch
Press any key
2.
c)
According to the message of the screen, press square shaped switch at the left side of the panel,
which is set for changing the wash liquid. Indicator light will be on to show that the instrument
connects well with the distilled water bottle. Press Enter key to confirm and then the scouring nozzle
placed above the scouring groove, which is located at the left side of the enzymatic plate holding tray,
will automatically descend to scour the pipeline. The following menu will appear on the screen.
d)
After scouring is completed, scouring nozzle will return to the original position. Then press the square
shaped switch to turn off the indicator light. After that, it will return to scouring pipeline menu.
Change wash liquid
a)
On the scouring pipeline menu, press Left key or Right key to make the cursor stay on Change and
then press Enter key to confirm. The following message will appear on the screen.
Check Switch
Press any key
b)
Confirm whether the square shaped switch for changing wash liquid is turned off. After you press
“Enter” key, the scouring nozzle placed above the scouring groove, located at the left side of the
enzymatic plate holding tray, will automatically descend to replace distilled water with wash liquid.
The following page will appear on the screen.
Wait
Changing Now
- 10 -
c)
After changing is over, it will return to the scouring pipeline menu.
Return to the Main Menu.
d)
On the scouring pipeline menu, press Right key to make the cursor stay on Back and then press
Enter key to confirm. Finally it will return to the main menu.
CHAPTER 10. MAINTENANCE, STORAGE AND TRANSPORTATION:The operation of the instrument is stable and reliable. Moreover, it has no stringent requirements at ambient
conditions. However, in order to prolong its working life and avoiding malfunctions, you should have to pay
attention to the maintenance of the instrument.
1)
You can't turn the instrument on or off frequently and should wait for at least 20 seconds since starting
for next turning on.
2)
You should pay high regards to the work of scouring pipeline. Distilled water must be used to scour
pipeline every time before you shut down the instrument. Please note: serious blockage of the
scouring nozzle can't be recovered and even it isn't within the scope of repair. Another thing to be
remembered right after you switch on the instrument is to replace distilled water in the pipeline with
wash liquid.
3)
Strictly avoid collision with the scouring nozzle from any direction.
4)
Strictly avoid spilling wash liquid or other liquids inside the instrument.
5)
The instrument can't be placed in a location, where it will be irradiated by sun or near heat sources. By
all means ensure good ventilation and strictly avoid damp in order to avoid rusting of instrument.
6)
If you do not use the instrument for a long time, please carefully pack it by using original packaging
box. Suitable temperature for storage is from -20℃ to 55℃ . Relative humidity should be less than
93%. There must be no caustic gases present in room and good ventilation shall be maintained.
7)
Be careful to avoid severe shaking, inversion, rolling and soaking by rain during the process of
transportation.
8)
If fuse burned out, you should cut off the power first and then replace it with the new fuse of the same
standard under the guidance of specialist.
- 11 -
CHAPTER 11. TROUBLE-SHOOTING
Trouble Descriptions
Possible Causes
Correction
The screen does
not display.
Power may not be
switched on.
Check the switch to ensure
whether power is perfectly
connected or not.
No response on
pressing the square
shaped switch.
Electromagnetism
disturbance
Shut the instrument off and
restart it after at least
20 seconds.
The screen does not
display normally.
Electromagnetism
disturbance
Shut the instrument off and
restart it after at least
20 seconds.
It is blocked, when
trying to inject or suck
wash liquid
Ageing of duct or
crystals present
in wash liquid.
Change out the old silica gel
duct, which is used for
scouring pipeline.
Some ducts are blocked
Needle tubes are
blocked.
Use medical injection
pinhead to dredge ducts.
The scouring nozzle
inclines.
The connecting plate
bends or fixing bolts
become loose.
Adjust the connecting plate
and scouring nozzle. Check
whether the bolt is loose or not.
Frictional noises can
be noticed when the
instrument is running
Lack of lubrication
in the orbit.
Smear some medical Vaseline.
CHAPTER 12. NOTES:1)
2)
3)
The power supply must be grounded perfectly.
Wash the tubes with distilled water before turning off every time.
No crash on nozzle.
- 12 -
Note
Avoid splashing
inside the instrument.
After fixing the
malfunction, you must
re-adjust the position
of the scouring
nozzle.
CHAPTER 13. PACKING LIST:LMW-9620 Microplate Washer
1
Enzymatic plate scouring nozzles with 8 or 12 pairs needle tubes
1
Bottle for distilled water
1
Bottle for wash liquid
1
Bottle for waste liquid
1
Silicon-rubber duct
3m
Pinhead for dredging needle tubes
2
Fuse ϕ
5*20 2A
2
User's manual
1
Product certificate
1
User inspection and acceptance sheet
2
Operating rules
1
CHAPTER 14. QUALITY GUARANTEE
We will repair or replace the instrument or accessories free of cost if there is any problem with the instrument,
provided that you have complied with the instructions of this user's manual, and it is within one year from the date of
purchase. You will be charged if you have not followed this operating manual or you have disassembled the
instrument without prior authorization.
- 13 -
NOTES :
- 14 -