1
Program and Documentation Written and Produced by:
SPALDING SOFTWARE, INC.
154 Technology Parkway, Suite 250
Norcross, GA 30092 USA
Voice: (770) 449-0594
Fax: (770) 449-0052
www.spaldingsoft.com
© 1986-1997 by Spalding Software, Inc. All rights reserved. This manual and the software described in
it are copyrighted with all rights reserved. No part of this publication may be reproduced, transmitted,
transcribed, stored in a retrieval system or translated into any language in any form by any means for
any commercial purpose without the written permission of Spalding Software, Inc.
DataImport is a registered trademark of Spalding Software, Inc. Brand names and product names are
trademarks or registered trademarks of their respective companies
Program
Development Team
Rob Lichtefeld
Dick Hays
Documentation Team
Steve Joyce
Joseph Fernandez
Dick Hays
Rob Lichtefeld
Anthony Martinich
Rob Hays
Support
Spalding Software provides support to regitered users in the North America and all countries not
serviced by one of the international affiliates listed below.
International Affiliates
Germany, Hungary, France, Switzerland
IIT GmbH
Ferdinand-Porsche Str. 9
76275 Ettlingen , Germany
Voice: +49 7243 57 99 0
Fax: +49 07243 57 99 31
www.iit-gmbh.de
Austria
Michael Birnbacher & Co. KEG
Zollergasse 16/8
A-1070 Wien, Austria
Voice/Fax: +43-1-523 69 31
www.birnbacher.co.at
United Kingdom, Ireland
AuditWare Systems Limited
Nevill Estate Yard
Eridge Road, Eridge Green
Turnbridge KENT TN3 9JR , England
Voice: +44 01892 512348
Fax: +44 1892 512342
Netherlands
AuditWare Nederland BV
Bocsensingel 79
2411 KW Bodegraven
The Netherlands
Voice: +31-172-610255
Fax: +31-172-610258
Contents
Chapter 1: Installation
7
Installing DataImport ................................................................................................................7
Single User Installation ...............................................................................................7
LAN Installation........................................................................................................................9
How the Number of Users are Controlled.................................................................10
About this Version ..................................................................................................................10
The README File ...................................................................................................10
What's new in DataImport 5.0...................................................................................11
Upgrading to DataImport 5.0. ...................................................................................12
Technical Support ...................................................................................................................12
Chapter 2: Introduction
13
DataImport for Windows.........................................................................................................13
Why DataImport?......................................................................................................13
What Does DataImport Do?......................................................................................13
What Kinds of Files Can Be Translated? ..................................................................14
How Does DataImport Work? ..................................................................................16
Exploring DataImport .............................................................................................................17
DataImport Program Group ......................................................................................17
DataImport Mask Window........................................................................................18
Chapter 3: Tutorial
19
Running DataImport................................................................................................................19
Loading a File To Be Translated.............................................................................................19
Creating a Mask for Data Extraction.......................................................................................21
Choosing Data by Highlighting.................................................................................21
Extracting Columns of Data......................................................................................22
Specifying the Type of Data in a Column .................................................................27
Extracting Specific Lines of Data .............................................................................28
Extracting Non-Columnar Data.................................................................................30
Report Titles and Headings.......................................................................................32
Translating Data ......................................................................................................................35
Choosing an Output File Type ..................................................................................35
Running a Translation ...............................................................................................36
Saving Masks for Reuse ..........................................................................................................38
Using the Output .....................................................................................................................39
DataImport
Contents • 3
Chapter 4: Fitting DataImport to Your Needs
40
Input and Output......................................................................................................................40
Input Files .................................................................................................................41
Output Files...............................................................................................................43
Cleaning-Up Input Files ..........................................................................................................45
Special Characters.....................................................................................................45
Blank Lines ...............................................................................................................45
Page Ejects................................................................................................................45
Duplicate Lines .........................................................................................................46
Extracting Data........................................................................................................................46
Columnar Data ..........................................................................................................46
Default Line Treatment .............................................................................................52
Titles and Headings...................................................................................................52
Reorganizing Data...................................................................................................................52
Resequencing Data Columns.....................................................................................53
Unstacking Multiple Lines of Data ...........................................................................53
Getting Data from Multiple Lines into the Same Cell...............................................55
Pulling Data out of Page and Section Headings........................................................55
Extracting Data from Forms......................................................................................58
Filling Blank Column Cells.......................................................................................60
Transpose Rows and Columns ..................................................................................61
Recognizing Data Types and Formats.....................................................................................61
Numeric ....................................................................................................................62
Text ...........................................................................................................................63
Date...........................................................................................................................64
Time of Day ..............................................................................................................65
Name Parse ...............................................................................................................65
Address Parse............................................................................................................65
Signed Overpunch Numbers .....................................................................................65
Code Page Settings ...................................................................................................66
Performing Calculations..........................................................................................................67
Formulas in Columns ................................................................................................67
Inserting Formula Rows ............................................................................................67
Working with Database Files ..................................................................................................69
Chapter 5: DataImport Mask Reference
72
DataImport Mask.....................................................................................................................72
File ............................................................................................................................72
Search .......................................................................................................................77
Column......................................................................................................................79
Tag ............................................................................................................................84
Include ......................................................................................................................87
Exclude .....................................................................................................................90
Line ...........................................................................................................................95
Unstack .....................................................................................................................98
Options....................................................................................................................100
DataImport
Contents • 4
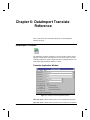
Chapter 6: DataImport Translate Reference
112
DataImport Translate.............................................................................................................112
Translate Application Window ...............................................................................112
File ..........................................................................................................................113
Options....................................................................................................................114
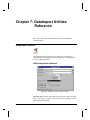
Chapter 7: DataImport Utilities Reference
116
DataImport Utilities...............................................................................................................116
Utilities Application Window .................................................................................116
Processing Types ....................................................................................................117
File ..........................................................................................................................123
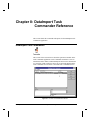
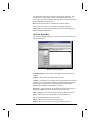
Chapter 8: DataImport Task Commander Reference
124
DataImport Task Commander ...............................................................................................124
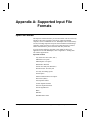
Appendix A: Supported Input File Formats
127
Input File Formats .................................................................................................................127
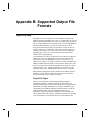
Appendix B: Supported Output File Formats
128
Output Formats......................................................................................................................128
Output File Types ...................................................................................................128
Output File List .......................................................................................................129
ASCII (ASC)...........................................................................................................131
Alpha (DBF) ...........................................................................................................131
Clarion (DAT).........................................................................................................131
Clipper (DBF) .........................................................................................................131
Columnwise DIF (DIF) ...........................................................................................131
Comma Separated Value (CSV) .............................................................................131
dBase II, III, IV (DBF) ...........................................................................................131
Excel 2.1, 3.0, 4.0, 5.0 7.0 (XLS) ...........................................................................131
Fixed length file (FXD)...........................................................................................132
FoxPro (DBF) .........................................................................................................132
HTML Tables (HTM).............................................................................................132
Lotus 1-2-3 1A, 2.0, 3.0, 4.0, 5.0 (WK*)................................................................132
Mailing Label (LBL)...............................................................................................133
Microsoft Access 1.1, 2.0 (MDB)...........................................................................133
Microsoft Word Merge File(WRD) ........................................................................133
Paradox 3.5, 4.0 (DB) .............................................................................................133
Print Image (PRN) ..................................................................................................133
Quattro (WKQ) .......................................................................................................133
Quattro Pro (WQ1) .................................................................................................133
Quattro Pro 5.0 for Windows (WB1)......................................................................134
Standard Data Format (SDF) ..................................................................................134
Sylk (SLK) ..............................................................................................................134
Symphony 1.0, 1.1 (WRK, WR1) ...........................................................................134
DataImport
Contents • 5
Tab Separated Variable (TSV) ...............................................................................134
User-Defined Delimited (UDD)..............................................................................134
WordPerfect 5.0, 5.1 (W5*)....................................................................................135
xBase applications (DBF) .......................................................................................135
Appendix C: Getting Data out of Other Applications
136
Generating an Input File........................................................................................................136
Generating Output...................................................................................................136
Printing to a File in Windows .................................................................................137
Printing to a File in DOS Applications ...................................................................137
Appendix D: Data Type Colors and Indicators
141
How Cell Types are Indicated ...............................................................................................141
Appendix E: Shortcut Keys
142
Cursor Key Operations..........................................................................................................142
Shortcut Function Key Operations ........................................................................................143
Appendix F: Match String Wildcard Characters
144
Pattern Match Characters ......................................................................................................144
Appendix G: Command Line Use
145
Translate Command Line ......................................................................................................145
Utilities Command Line ........................................................................................................148
Task Commander Command Line.........................................................................................152
Appendix H: Customizing the Dictionary File
153
Default Dictionary.................................................................................................................153
Editing the Default.dic file......................................................................................153
Appendix I: Frequently Asked Questions
155
DataImport Questions............................................................................................................155
DataImport
Contents • 6
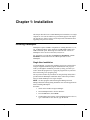
Chapter 1: Installation
This chapter describes how to install DataImport for Windows on a single
computer or on a network and how to get technical support. This chapter
also lists the new features in this version and provides information about
upgrading from previous versions.
Installing DataImport
DataImport requires an IBM or compatible PC running Windows 3.1, 95,
NT, or IBM OS/2 Warp with a minimum of 4MB RAM available and
4MB of hard disk space. Both single user and multi-user versions of
DataImport can be run from a network (LAN) server.
We suggest that you read either the Single User Installation or LAN
Installation sections and follow the outlined procedure to load
DataImport.
Single User Installation
To use DataImport, you must first install the program on your hard drive
using the supplied installation program called SETUP. This program
walks you through the installation procedure by asking you where you
want to install the program files, copying the program files to your hard
drive and creating a new program group.
The steps below outline the procedures for using the Setup utility that is
provided with the DataImport installation disks. Follow the procedures
below to install DataImport on a single computer.
NOTE No other programs other than Program Manager and File
Manager should be running during installation. Exit all other applications
before installing DataImport.
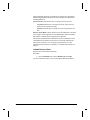
Procedure:
DataImport
1.
Switch to the Windows Program Manager.
2.
Insert DataImport Disk 1 into the disk drive.
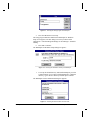
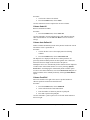
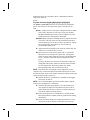
3.
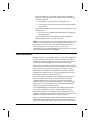
From the File menu, choose Run...
4.
The Run dialog box appears. If the installation disk is in drive A,
type A:\SETUP. If it is in drive B, type B:\SETUP.
Chapter 1: Installation • 7
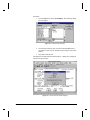
Figure 1-1 Running the Setup program for DataImport
5.
Press the OK button to run Setup.
The Setup program initializes and then the DataImport for Windows
Setup screen appears. The first dialog box warns you that no other
applications—other than Program Manager or File Manager—should be
running.
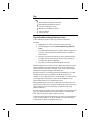
6.
Press OK to continue.
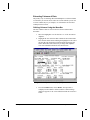
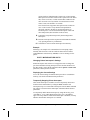
The DataImport for Windows Setup dialog box appears:
Figure 1-2 Choosing the destination directory for DataImport
7.
To accept the default directory and install DataImport, press the
Continue button. If you want to install DataImport to a different
directory, type in the new directory and then press Continue.
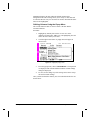
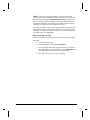
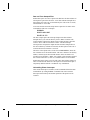
The DataImport License Information dialog box appears:
Figure 1-3 Entering the serial number and user name
DataImport
Chapter 1: Installation • 8
The serial number for your product is located on the distribution
disks, the registration card and on the disk envelope imprinted with
the license agreement.
8.
Type in the serial number in the Serial Number field.
9.
Type the name of the licensed user in the Licensed to field and
press Continue.
The installation begins and a dialog box indicates the progress of the
Setup program.
10. If necessary, insert additional installation disks as prompted by
the Setup program.
After copying files, the Setup program will build a DataImport
program group and notify you upon completion.
NOTE The Setup program writes a log of the installation process called
INSTALL.LOG to the directory where DataImport is located. This log
lists what files were copied to your hard disk and where the files are
located. Keep this file as a record in case you or your system
administrator need to uninstall DataImport. Please read the next section if
you are installing DataImport on a network
LAN Installation
Both the single user version and the multi-user version of DataImport can
be run on a network. The multi-user version of DataImport will allow
multiple users to share a single copy of the program files. The multi-user
version uses standard NETBIOS calls for file and record locking.
Both versions of the software automatically keep track of the number of
concurrent users, and will reject users if the maximum number of licensed
users is exceeded. As soon as a user exits from the software, a slot is
made available for another user. Installation on a network is similar to
installation on a stand alone PC. Use the Setup program located on the
first diskette to install the software to the server.
If the setup program detects that you are installing the program onto a
remote network drive on a server, it will copy all the files from the
installation diskettes onto the server. Some of the files will remain
compressed as they are on the installation diskettes. The setup program
will not copy any .DLL or .VBX files onto this workstation during the
install, nor will it create a Program Group.
To install DataImport on a workstation run the Setup program on the
server. This will install any necessary .VBX and .DLL files to the
workstations and will create a Program Group pointing to the server’s
programs. A DataImport INI file will be created in the workstation’s local
Windows directory the first time the user runs the program.
Do not set the READ-ONLY attribute of the following files on the server:
DIWNUMUS.EXE and DIWLOCK.EXE. Users must have Read and
Write access to these files. If these files do not exist, they will be created
DataImport
Chapter 1: Installation • 9
the next time the software is run. The other .EXE files can be protected
by setting their READ ONLY attributes.
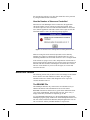
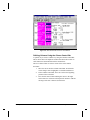
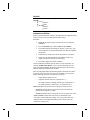
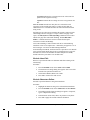
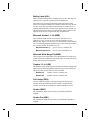
How the Number of Users are Controlled
When the user runs DataImport from a workstation, the application
checks the number of users currently accessing the program. If the
execution request does not exceed the maximum number of concurrent
users, then the application will load as usual. If the request exceeds the
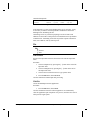
maximum number of users, the following message appears:
Figure 1-4 LAN version error message when exceeding maximum users
While accessing files on the network, Input Files can be shared by
multiple users. However, Output Files are locked whenever a user is
translating and Mask Files are locked whenever a user is saving the mask.
If the software is trying to access a file, and permission is denied due to
the file being locked by another user, the software retries several times at
different time intervals before informing the user that the file is locked.
The user can at that time try to access the file again, or can wait and
access the file later.
About this Version
The following sections tell you where to check for changes to the manual
and/or software since this manual was written. They also supply
information about new features and changes that users of previous
versions should be aware of.
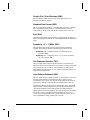
The README File
The DataImport diskettes may contain some new information not yet
added to this manual. This information will be in a file named
README.TXT. Please read this file to get the latest information about
your version of DataImport. If this file does not exist, don’t worry; it
simply means that your manual is completely up to date.
To view README information, go to the Program Manager and in the
DataImport program group, double click on the DataImport Readme icon.
The text will be loaded into the Windows Notepad application. You can
also view the file with any standard Windows word processor.
DataImport
Chapter 1: Installation • 10
What's new in DataImport 5.0.
The following is a list of new features and improvements in DataImport
5.0.:
•
Task Commander allows you to automate a series of Utilities
and Translate functions.
•
New Column/Tag Types:
Name Parse (Last, First) and Name Parse (First Last)
Formats data into Prefix, First Name, Middle Name, Last Name,
and Suffix.
Address Parse formats data into City, State and Zip/Postal
Code.
There is a dictionary file, DEFAULT.DIC that contains the
definitions for the names and addresses. The dictionary can be
set in the Options Global dialog box. You can customize and
create your own dictionaries.
Text Block keeps adding data from multiple lines within a
column into the same cell (or field) during translation until the
next line is to be output or a blank cell in the column is
encountered, or you can configure how many lines should be in
the block.
Text (Left Justified) removes spaces from beginning of the text
•
Long File Names support under Windows 95 and Windows NT
•
New Reference Point types:
Top of Form (1st line and each line after a Form Feed
character)
Form Length (1st line and each "x" number lines after that)
•
100 Reference points can now be defined, up from 5.
•
Line tags that are associated with Reference points that don't
necessarily occur in every data set can now be cleared. For
example, this is useful when working with a second optional
address line which is not always present, as shown below:
NAME: Arthur Garfunkel School of Drama
ADDR1: 1971 Hazbin Ave.
ADDR2: Suite 150 (this line not always present, set flag)
CITY: Bridgewater
STATE: CT ZIP: 14092
DataImport
•
Translation into HTML version 2.0 tables, with an .HTM file
extension.
•
Push/pull feature moves over all existing column definitions to
the left or right a specified number of positions.
•
User-specified default number of lines of your input file to
load into your mask screen.
Chapter 1: Installation • 11
•
Allow editing of previously defined Include/Exclude Reference
Point match strings.
•
Column names can be output as headings when translating
into spreadsheets and CSV files.
•
The Output Width of Tags & Columns can be specified
independently of the column width on the mask screen.
•
Line Tags can change order with Columns
•
Print the Input File from the Mask Window.
•
Button Bar with Tool Tips.
•
Description and Author fields saved in Mask files.
Upgrading to DataImport 5.0.
Users of previous versions of DataImport should be aware of the
following changes:
•
The up and down highlighter has been eliminated. The
highlighter is now used for only making horizontal selections.
Use the line control bar to specify line treatments.
•
Undo has been changed to Edit.
•
Find has been changed to Search on the main menu.
•
Unstack has been moved up to the main menu structure.
•
Value lines are now called Output lines.
•
Masks from 4.0 and previous versions will work in 5.0.
However, once you have saved the old mask in version 5.0, it
may become unusable in DataImport 4.0.
Technical Support
If you have problems with installation and use of the program, please call
the support phone number on page 2 of this manual. Before calling
for support:
DataImport
•
Print your mask settings. Review this page to see the selections
you have made. Often times you will discover the problem. If
not, have this in hand when you call.
•
Try to duplicate the problem, step by step, to see exactly what
happened and when the problem occurred.
•
Know your Operating System version.
•
Know your DataImport Version (This can be found in the Help
About dialog box).
•
Be at your computer when you call. Have your manual and your
DataImport serial number handy.
Chapter 1: Installation • 12
Chapter 2: Introduction
This chapter introduces you to the many benefits of using DataImport and
briefly describes the program’s primary features. It also supplies answers
to commonly asked questions about DataImport and its capabilities.
DataImport for Windows
Now that you have DataImport for Windows loaded on your machine or
network, you may be asking yourself, “What am I supposed to do with
this?” The following section will answer this question and introduce you
to the benefits of automated data translation.
Why DataImport?
Because you have data downloaded from your mainframe or in a PC
program that you cannot access in your spreadsheet, database, or other
PC application.
The data files used by PC software products such as spreadsheets and
databases have special file formats that are unique to each product. The
files are encoded in a way that saves disk space and contains not only
data, but descriptions concerning the arrangement and use of the data.
Some PC software products provide importing capabilities for data files
that are not in their special format. However, these capabilities are often
so limited that they are not of practical use, especially in cases where
your file is not specifically intended for use in a spreadsheet or database.
Before DataImport, the only sure way to get data into these products was
to manually key-in the data, or write a specialized importing program.
What Does DataImport Do?
DataImport converts plain text reports into spreadsheet and database
files, as well as many other PC file formats. The reports might have
come from an application on the PC or from a mainframe computer. They
were designed to be printed on paper, but you can print them to a disk file
on the PC instead. With DataImport you can convert these reports into
useful file formats such as Excel, Lotus 1-2-3, Paradox, Access, HTML
Tables, or dBase files.
DataImport has many uses. Perhaps the computer at your company’s
home office periodically sends you a comprehensive sales report, but you
DataImport
Chapter 2: Introduction • 13
need just the data for your city or region. DataImport can extract the data
you want, and put it into a database or a spreadsheet.
If your accounting software does not produce graphs, DataImport can
take a report from your software and let you import it into Excel. You can
then manipulate the data into the form you want and graph the results.
If a number of locations send you a report each week, and you need to
produce a summary report, DataImport can extract totals from each report
and append them to the spreadsheet you are creating. Since you may have
to do this every week, DataImport will remember the report format, so
that you can extract the needed data from each subsequent report with a
single command.
Other uses of DataImport include:
•
Converting a mainframe report, downloaded as a print image
file, to a PC spreadsheet such as Lotus 1-2-3, Quattro, or Excel
(including “@” formulas for subtotals).
•
Extracting data from a World Wide Web site and appending it to
an existing dBase, Paradox or Access file.
•
Extracting numbers from a word processing document for
insertion in a report.
•
Transferring only selected information from a mainframe or PC
database into a PC spreadsheet.
•
Creating an HTML page of your company’s products from a
report printed to disk.
•
Parsing names and addresses in a mailing list into separate
columns in a spreadsheet or database.
The above examples show the advantages of using DataImport: It
eliminates the need to re-key important data, avoiding the high error rates
associated with manual keying. It saves you the repetitive work of finding
certain lines in a large report and from the tedious reformatting of data. It
is also ideal when you need to summarize or extract data from complex
reports currently on your mainframe or PC.
DataImport enables you to get the data you need into your application
without waiting for someone else to write a special program or report for
you. Many MIS/DP departments are backed up with years worth of
requests for new reports. With DataImport, you can import existing
reports into applications like 1-2-3, dBase, or Excel and start using your
data immediately.
What Kinds of Files Can Be Translated?
With DataImport, you can translate data from any ASCII file. An ASCII
file is a plain text file or printer output file. Most DOS applications will
produce text output by a process called “print to disk”. This simply means
sending a report to a disk file instead of printing it. Windows applications
DataImport
Chapter 2: Introduction • 14
usually have an ASCII text output option or can print a report to a text
file with the Generic / Text Only printer driver.
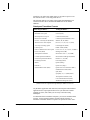
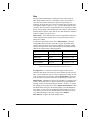
The following table gives a listing of the formats that DataImport can
read and write. Be sure to check the README file for last minute
additions.
DataImport Translation Formats
From any of these . . .
To any of these . . .
Any ASCII Text file: (TXT, ASC...)
ASCII (ASC)
Mainframe text reports
Clarion (DAT)
Minicomputer text reports
Columnwise DIF (DIF)
DOS Print to Disk file
Comma Separated Variable (CSV)
Generic / Text Only file (Windows)
dBase II, III, IV (DBF)
Word Processor Text Only file
Excel 2.1, 3.0, 4.0, 5.0, 7.0 (XLS)
Text only accounting reports
Fixed length file (FXD)
E-mail reports
HTML Tables (HTM)
Online communications text capture
Lotus 1-2-3 1A, 2.0, 3.0, 4.0, 5.0 (WK*)
Print to File (PRN)
Mailing Label (LBL)
Tab Separated Variables
Microsoft Access 1.1, 2.0 (MDB)
Comma Separated Variables†
Microsoft Word Merge File (WRD)
Character Separated Variables†
Paradox 3.5, 4.0 (DB)
Fixed length record†
Print Image (PRN)
dBase†
Quattro (WKQ)
EBCDIC†
Quattro Pro (WQ1)
Standard Data Format (SDF)
Quattro Pro 5.0 for Windows (WB1)
Standard Data Format (SDF)
Sylk (SLK)
Symphony 1.0, 1.1 (WRK, WR1)
Tab Separated Variable (TSV)
User-Defined Delimited (UDD)
WordPerfect Merge File (W5*)
Figure 2-1 Input and Output capabilities of DataImport for Windows
†These formats are supported through DataImport Utilities conversions.
Any Windows application and most DOS, minicomputer and mainframe
applications have output options that convert your data into a humanreadable text form, from which you can easily extract data using
DataImport.
To obtain data from a mainframe computer, you can use communications
software, such as terminal emulators and file transfer packages, or
mainframe virtual disk utilities to capture text reports to PC files. Since
DataImport
Chapter 2: Introduction • 15
DataImport does not change any information on the mainframe, your
MIS/DP department need not be concerned about data integrity.
If a file contains special control characters such as those used for printer
control (escape codes), DataImport can remove these characters
automatically during translation.
In addition to using ASCII plain text files, DataImport features a set of
integrated utilities for converting several other popular types of files into
a plain text file that can be translated by DataImport, including dBase
files, Fixed Length Record, EBCDIC and Comma Separated Value files.
DataImport can translate information from virtually any ASCII file of any
size.
How Does DataImport Work?
DataImport’s visual interface displays your original file in a window. You
simply point at the rows and columns you want to import and mark the
rows or columns using “point-and-pick” operations like those in Excel
and other programs. You select the portions of a file you want to
translate. No special knowledge of file structures or command languages
is needed to use DataImport.
DataImport “translates” the original data you select into the file formats
required by your target application software, such as WKS, HTM, WR1,
WK3, WKQ, XLS, or DBF. Your selections and instructions for
translating the data in a report are saved in a “mask” file that can be
reused later. Using “masks” saves you time, particularly if you need to
prepare the same, or similar, reports on a regular basis. You can even
automate translations by using DataImport's Task Commander or
incorporating them into a batch file.
DataImport does more than simply extract data from one file and put it
into another. It distinguishes between numeric and non-numeric
information, and handles both appropriately. When DataImport creates a
spreadsheet file, it automatically sets up the numbers to include commas,
currency symbols, and percent signs. It handles names, numbers, dates,
and times.
DataImport
Chapter 2: Introduction • 16
Exploring DataImport
This section provides a quick introduction to DataImport, including the
DataImport program group and the DataImport Mask application
window.
DataImport Program Group
The DataImport Setup program creates this program group in the
Microsoft Windows Program Manager.
Mask
This application encompasses the main features of
DataImport. This program is where you create masks and
translate files.
Translate This application lets you directly access the translation
engine of DataImport. Once you have defined a mask, you
can quickly re-use masks with this application.
Utilities
This application provides special use utilities for
reformatting and reorganizing Input Files.
Task Commander This application automates the DataImport
translate and utilities processes, allowing you to write
scripts for repetitive multi-step translation jobs.
DataImport Readme This file provides the latest release
information about your version of DataImport. It may
contain corrections to this documentation or information
not otherwise included in the manual: READ THIS FILE.
Load any of these programs or the README file by moving the cursor
over an icon and double clicking the left mouse button.
DataImport
Chapter 2: Introduction • 17
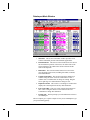
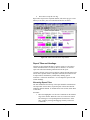
DataImport Mask Window
1.
Menu Bar This section of the Mask window provides access
to menu commands, just like other Windows applications.
2.
Information Bar This section of the window shows the current
line and character position of the cursor, the ASCII code of the
selected character, the width of the current selection and the
name of the Input File.
3.
Button Bar This section contains buttons for several of the
more frequently used actions, including Save Mask, Translate,
and Column Define.
4.
Column Control Bar This section controls the definition of
columns. Drag the cursor across the Control Bar to create a
column. Press a column button to change its settings. Drag the
left or right edge of a column button to change its size.
5.
Input File window This section is a scrolling text window that
displays the current Input File and any mask definitions.
6.
Line Control Bar This gray section controls the treatment of
lines. Click or drag the cursor over the buttons of the Line
Control Bar to change their definition.
7.
Prompt Line This bar prompts you with information on how to
use DataImport.
The next chapter gives a quick example of how you use DataImport to get
you up and running quickly.
DataImport
Chapter 2: Introduction • 18
Chapter 3: Tutorial
This chapter covers the basics of using DataImport to get you up and
running as quickly and productively as possible. The chapter shows you
how to load a file, choose the data you want to extract, select an output
format and run a translation to extract your data.
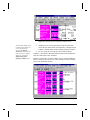
The first step in using DataImport to translate a file is to define a “mask”
for your data file that tells DataImport what information you want to
extract and how you want it extracted. The masking process takes place
while your data file or report (Input File) is displayed in a window.
As you select the data from your report, DataImport confirms your
selections by displaying the selected portions in different colors. The
colors of the masked data indicate how it will be extracted. For example,
data with a blue background will be translated as numbers, data with a
magenta background will be translated as text (character data) and data
with a green background will be translated as dates.
After the Mask is defined, it can be immediately used to perform a
translation and extract your data to a spreadsheet or database file. The
mask can also be saved for repeated translations of a similar report.
Running DataImport
To begin the mask definition process, you must first run the DataImport
Mask application. From the DataImport 5.0 program group, double click
on the Mask icon as shown below.
The Mask window is initially displayed with no Input File or mask
displayed.
Loading a File To Be Translated
The INVEST.PRN file is
located in the directory
containing the DataImport
programs, usually C:\DIW\.
DataImport
Generally, the first step to defining a mask is to load a report, or Input
File, into the Mask window. Let’s start by loading a sample report named
INVEST.PRN as our Input File:
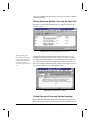
Chapter 3: Tutorial • 19
Procedure:
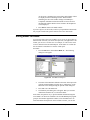
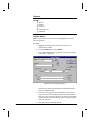
1.
From the File menu, choose Load Input... The following dialog
box will appear:
Figure 3-1 Load Input File dialog box
2.
From the File Name list box, choose the INVEST.PRN file by
moving the cursor over the filename and pressing the left mouse
button.
3.
Press OK to load the file.
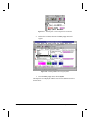
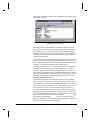
The Input File is loaded into the Mask window. A dialog box will appear
like the one shown below:
Figure 3-2 Load Input File as initially displayed
DataImport
Chapter 3: Tutorial • 20
Now you are ready to define which data you want to extract. DataImport
can load many different types of files, including computerized reports,
saved e-mail messages, web page data, and many other kinds of text files.
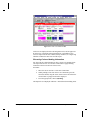
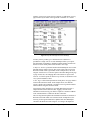
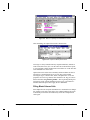
Creating a Mask for Data Extraction
Our example Input File is an Investment Report. The report is organized
by Customer with a listing of each customer’s investments.
Figure 3-3 Loaded Input File
Let us assume that we want to put the investment data into a spreadsheet.
In this spreadsheet, we would like each investment on a separate line. We
also want the customer’s name and phone number on the investment
lines. Therefore, when we sort the investments by maturity date the
customer contact information will be on the same line. The following
sections will show you how to create a mask that will extract just the data
you want quickly and accurately.
Choosing Data by Highlighting
The cursor changes to a
highlighter when it is over
the Input File window.
The primary type of tool used in the Mask window is a “highlighting
marker” or highlighter. In DataImport, you use the highlighter to mark the
data you want to extract.
Highlighting, or selecting, is done by moving the cursor (highlighter) to
the beginning of an area where an action is to take place, holding down
the left mouse button, dragging the highlighter to the end of where the
action is to take place and releasing the mouse button.
DataImport
Chapter 3: Tutorial • 21
Extracting Columns of Data
The primary way of extracting data with DataImport is to define columns
over the data you want to extract. There are several methods you can use
to create columns. By way of example, we will introduce each of these
techniques in this section.
Defining Columns Using the Menu Bar
The first column of data we want to extract is the Investment Name.
Procedure:
1.
Move the Highlighter over the first letter ‘A’ of the investment
Alphatex.
2.
Highlight the area on the line that contains the investment name.
Press the left mouse button and drag the highlighter to the end of
the area that can contain the investment names and release the
button. Remember some names may be longer than Alphatex.
Your screen should look like the one shown below:
Figure 3-4 Defining a data column by highlighting the investment name
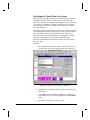
3.
DataImport
From the Column menu, choose Define. The Input File is
redisplayed with column A defined, and the Column Settings
dialog box appears. Your screen should look like the one shown
below:
Chapter 3: Tutorial • 22
Figure 3-5 Column Settings dialog box is displayed while defining column A
4.
5.
This dialog box is used to define the settings of a column, such
as its sequence and data type. Notice that the current setting for
the column type is Numeric. However, since Alphatex is text,
select the Text (Character/Label) option.
Press OK to accept the column settings.
Once you've defined the column, your screen should look like this:
Figure 3-6 Mask window with column A defined
DataImport
Chapter 3: Tutorial • 23
DataImport displays the data within the defined column with a
background color. This coloring allows you to easily see what data will
be extracted. Do not worry for now that text on lines other than the detail
lines are also highlighted.
Defining Columns Using the Popup Menu
The second column of data we want to extract is the date that the
investment matures.
Procedure:
1.
Highlight any maturity date such as “23 JUL 99” on the
Alphatex investment line. Make sure your highlighting does not
start in the first column you created.
2.
Click the right mouse button. A popup menu will appear as
shown below:
Figure 3-7 Highlighter popup menu
3.
From the popup menu, choose Column Define... The Input File
is redisplayed with column B defined and the Column Settings
dialog box displayed.
4.
For now, do not change any of the settings. Press OK to accept
the current column settings.
Once you have defined the column, your screen should look like the one
shown below:
DataImport
Chapter 3: Tutorial • 24
Figure 3-8 Mask window with columns A and B defined
Defining Columns Using the Column Control Bar
A quicker way to create a column is by using the Column Control Bar.
This is the bar above the Input File window that shows the location of
each column as a button labeled with the column letter.
The next column of data we want to extract is the Value column.
Procedure:
DataImport
1.
Move the cursor into the Column Control Bar. Note that the
cursor changes from a highlighter to a double-headed arrow.
2.
In the Column Control Bar, move the cursor to the beginning
position of the Value data.
3.
Press the left mouse button and drag the cursor to the right.
Notice that a box is drawn on the Input File window to indicate
the range of the new column as shown below:
Chapter 3: Tutorial • 25
Figure 3-9 Using the Column Control Bar to define a column
The automatic display of the
Column Settings dialog box
can be suppressed by
choosing the Options
Preferences command, and
in the Preferences Settings
dialog box, unmark the
Display dialog when
defining a column option.
4.
When the box is correctly positioned around the Value data,
release the left mouse button. The Input File is redisplayed with
column C defined and the Column Settings dialog box appears.
5.
For now, press OK to accept the current column settings
Column C is now defined. Remember that only data with a background
color other than white will be translated.
Now that you know how to define columns, use any of these methods to
define a column for the interest rate. After creating all of these columns,
your screen should look like this:
Figure 3-10 Mask window with all investment detail columns defined
DataImport
Chapter 3: Tutorial • 26
Specifying the Type of Data in a Column
The colors of the masked data indicate how the data from the report will
be translated: blue for numeric, magenta for text, and green for dates.
These colors indicate what formatting will be applied to your data when it
is extracted to a spreadsheet or database. Selecting the correct column
type in DataImport will make your data cleaner and easier to handle in
your target application.
The maturity dates in column B of this report are currently displayed with
a magenta background. This coloring tells us the dates will be translated
into a spreadsheet with a text format applied to them. Therefore, we
would not be able to perform calculations in the spreadsheet with this
data, such as calculating how long until the investment matures.
The data in column B should be translated as dates, so change column
B’s type to Date:
Procedure:
1.
Press column button B in the Column Control Bar at the top of
second column. The Column Settings dialog box is displayed:
Figure 3-11 Changing column B’s type to a Date format
DataImport
2.
Click the arrow to the right of the Type option to open its pulldown list box.
3.
Choose Date. Note that DataImport handles several different
date formats. Be sure to select the appropriate one (day-monthyear).
4.
Press OK to accept the new column settings.
Chapter 3: Tutorial • 27
The data in column B that DataImport recognizes as dates is now
displayed with a green background. The background color of data that
cannot be recognized as dates is not changed.
Extracting Specific Lines of Data
A lower case o in the line
control bar indicates that
the current default line
treatment is “output”. A line
with an output treatment is
translated to the Output
File.
At this point we have defined the columns of data on the investment
detail line. We now need to tell DataImport to extract only lines on this
report that are investment detail lines. Currently in our example report,
every line on the report is selected for translation. There are two ways
that we know this; there are background colors on each line within the
defined columns, and a lowercase "o" on the Line Control Bar at the left
of every line.
There are many ways to select which lines or rows in the Input File are
translated by DataImport. Specific lines are selected for output by either
including or excluding lines that meet “matching” criteria.
We only want to include the investment lines, so we will find a common
character or string of characters that is unique to these lines. One such
common character is the decimal point in the Interest column:
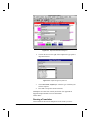
Procedure:
1.
Highlight the decimal point in the interest rate at position 50 on
any of the investment lines where it occurs.
2.
From the Include menu, choose Lines and then Define... The
Define Include Line dialog box appears.
Figure 3-12 Include Line dialog box with “.” text string highlighted
DataImport
Chapter 3: Tutorial • 28
3.
This dialog box is used to define the settings of an Include Line
match string. These settings include pattern match
specifications, the character position where the match string
must occur, and how many lines are included in the Output File
when a match occurs. Press OK to accept the current settings.
Once you have defined the Include Line, your screen should look like the
one below:
Figure 3-13 Lines containing a decimal point at position 50 are defined as
Include Lines
Notice that only the lines with the decimal point at position 50 now have
colored backgrounds within the defined columns. This coloring indicates
which data will be translated to the Output File. Notice that these lines
also have an uppercase I in the Line Control Bar on the left edge of the
Input File window indicating that they are Include Lines.
You can manually specify
the default line treatment by
choosing the Options
Global command, and from
the Global Settings dialog
box, changing the setting for
Default Line Treatment to
either Output lines or Skip
lines.
DataImport
All of the other lines on the report have lost their colored backgrounds,
which means that they will not be translated to the Output File. These
lines are automatically excluded from translation because DataImport
automatically changed the default line treatment to “Skip” after we
defined an Include Line match string. The application of the default Skip
Line treatment is indicated by a lowercase s in the line control bar.
The Include Lines function is an easy way to pick only the data you want
from an Input File, instead of sifting through the data in your target
application. DataImport has another function called Exclude Lines which
allows you to exclude specific data lines from translation. See Chapter 4:
Fitting DataImport to Your Needs, “Extracting Data.”
Chapter 3: Tutorial • 29
Extracting Non-Columnar Data
As we mentioned earlier, we will also need the client’s name, phone
number and location output on each investment line. This data is in a noncolumnar arrangement above the investment lines. In order to accomplish
this, we will use Line Tags and Reference Points.
Defining Reference Points
A reference point is a positional anchor which DataImport uses to locate
data that changes within a form or other non-columnar area on a report.
One such anchor in our investment report is “Accnt:”.
Procedure:
1.
Using the Highlighter, select the character string “Accnt:”.
2.
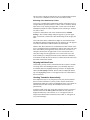
From the Tag menu, choose Define Match String Reference
Point. A dialog box will appear. Press OK.
The reference point “Accnt:” should now be shown as red text with a gray
background. Now that we have our reference point we can begin to select
information about the customer that we want output on each investment
line.
Figure 3-14 All occurrences of “Accnt:” defined at Reference Points.
Defining Line Tags
Line tags are the non-columnar data that we want to get into our
spreadsheet. When translated, Line Tag information is output on each
extracted line. For this report, we will be defining several tags: the
client’s name, city, state, zip, and telephone number.
DataImport
Chapter 3: Tutorial • 30
Procedure:
1.
Using the Highlighter, select the character string “Steve Nixon”
and enough blank spaces to the right to select the longest name
that will occur.
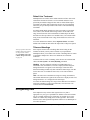
2.
From the Tag menu, choose Line Tag Define. In the Tag
Settings dialog box, set the type to Name Parse (first last) You
will then see several checkboxes to indicate how you want the
names handled.
Figure 3-15 Tag Settings Dialog Box with columns E (first name) and F (last
name) defined.
3.
Since the clients names are simple first and last names with no
titles, uncheck the prefix box and then check the boxes for first
and last name. Note that DataImport can also handle prefixes
(ex. Dr., Mr.), middle names, and suffixes (ex. MD, JR.).
4.
Press OK to accept the Line Tag.
“Steve Nixon” and all other client names should now be shown as
magenta text with a gray background. The client’s first and last names
will be output to columns E and F on each investment line.
The next data to select is the City/State/Zip data. This is done in much the
same way as names.
You can also click the right
mouse button to display the
shortcut menu and then
select Line Tag Define
DataImport
Procedure:
1.
Using the Highlighter, highlight the character string “Troy, MI
62314” and the necessary additional blank spaces.
2.
From the Tag menu, choose Line Tag Define. In the Tag
Settings dialog box, set the type to Address. You will then see
several checkboxes to indicate which parts of the address you
want output.
3.
Check the appropriate boxes for City and State.
Chapter 3: Tutorial • 31
4.
Press OK to accept the Line Tag.
Repeat these steps for the telephone number, and set the tag type to Text.
When you are done, your screen should look like the one below.
Figure 3-16 Mask screen with all Line Tags defined.
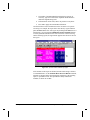
Report Titles and Headings
Now that we have defined the data we want to extract, we also want to
extract information that is not strictly data. For instance, we want the
report title and column heading information from the report.
Currently, all lines in our report except those with the decimal point in the
interest rate at position 50 have a Skip line treatment; these lines will not
be output when a translation is performed. By defining special
treatments—called Line Treatments—we can output the report title and
column headings.
Extracting Report Titles
The title information from the top of the report should be translated into
our Output File as entire lines; not just the parts of these lines that fall
within the defined columns. To translate these lines as titles, define them
as Title lines:
Procedure:
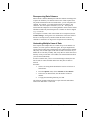
1.
DataImport
Move the Highlighter over the Line Control Bar on the leftmost
edge of the window. When the cursor is over the Line Control
Bar it changes to a left pointing hand as shown below. Select
lines 1 and 2 by clicking and dragging vertically on the Line
Control Bar.
Chapter 3: Tutorial • 32
Figure 3-17
2.
Selecting lines 1 and 2 using the Line Control Bar
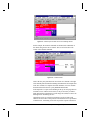
Release the left mouse button. The Line popup menu will
appear.
Figure 3-18 Selecting Title on the Line popup menu
3.
From the Line popup menu, choose (T)itle.
The Input File is redisplayed with the first two lines defined as Title as
shown below:
DataImport
Chapter 3: Tutorial • 33
Figure 3-19 Lines 1 & 2 defined as Title
Title Lines are displayed with a red background color, and an uppercase
T on the Line Control Bar. When translated into a spreadsheet, Title
Lines are output into the first column (usually column A) as a single long
label that contains the entire line from the report.
Extracting Column Heading Information
We also want the column headings on lines 7 and 8 to be translated into
our Output file one time. Use the Line Control Bar to apply Heading
treatments to the first occurrence of these lines.
Procedure:
1.
Move the cursor onto line 7 of the Line Control Bar.
2.
While pointing to line four on the Line Control Bar, press the
left mouse button, drag the cursor down to line 8 and release the
mouse button. A popup menu will be displayed.
3.
From the popup menu, choose (H)eading.
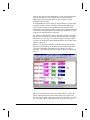
The Input File is redisplayed with lines 7 and 8 defined as Heading Lines.
DataImport
Chapter 3: Tutorial • 34
Figure 3-20 Mask window with all relevant data defined.
Heading Lines are displayed with a magenta background color within
defined columns, and with an uppercase H on the Line Control Bar.
When translated into a spreadsheet, Heading Lines are formatted as labels
and are placed as individual cells into their respective columns.
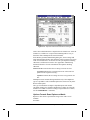
Translating Data
We have selected the rows and columns of data from the report that we
want translated into our spreadsheet. Now we need to select an output file
type and extract the data to a file.
Choosing an Output File Type
DataImport can translate data from the Input File into Output Files of
many different types. In this example, we will select the Output File type
Excel 5.0 (which is the same format as Excel 7.0). You may want to
choose a different file type.
Procedure:
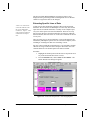
1.
DataImport
From the File menu, choose Define Output File. The Output
File Selections dialog box is displayed:
Chapter 3: Tutorial • 35
Figure 3-21 Output File Selections dialog box
2.
Click on the arrow to the right of the Output File Type option’s
drop down list box.
Figure 3-22 Output File type drop down list
3.
Choose Excel 5.0, 7.0 [XLS] or select the type of file that your
software requires.
4.
Press OK to accept the current selections.
DataImport can create files in nearly 40 formats. See Appendix B:
Supported Output Formats for more information.
Almost done!
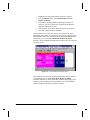
Running a Translation
Now translate the file into the Output File in the format you chose:
DataImport
Chapter 3: Tutorial • 36
Procedure:
1.
From the Files menu, choose Translate. The Translation
Parameters dialog box is displayed:
Figure 3-23 Translation Parameters dialog box.
2.
Press the Translate button to begin the translation process. The
Translation Progress window is displayed:
Figure 3-24 Translating Progress window
DataImport
Chapter 3: Tutorial • 37
As the report is translated, the selected lines and columns of data
are displayed in the Translating window. When finished
translating, the title of the window changes to DataImport Completed! Information about the number of lines read from
the Input File and the number of lines written to the Output File
is also displayed.
3.
Press Exit to return to the Mask window.
If you are eager to see the results, switch to your spreadsheet and load the
file you just created. Then, please come back for a few final words.
Saving Masks for Reuse
If you get the same report every month or every week, you do not have to
define a mask each time you convert the report into your application’s file
format; you can save it for later use. For example, we will save the mask
we have defined for the Investment Report. In the future we can then use
the saved mask to translate new versions of this report.
Procedure:
1.
From the File menu, choose Save Mask As... The following
dialog box will appear:
Figure 3-25 Save Mask As dialog box
2.
The name of the Mask File defaults to the name of the Input File
with the extension MSK. The name, drive, and directory of the
Mask File can be changed using the options in this dialog box.
3.
Press OK to save the Mask File.
4.
The Summary Info dialog box will appear. Here you can enter
information about the file, as well as the author.
In the future, the quickest way to perform another translation using this
saved Mask is to choose the Translate icon from the DataImport program
group. In the Translate application window, select the Mask File to be
used and translate the Input File. In the Translate window, you can also
DataImport
Chapter 3: Tutorial • 38
temporarily or permanently change the Input File name, Output File
name, or translation type saved in the Mask File.
If you will be performing multiple translations on a regular basis this can
be automated using DataImport's Task Commander.
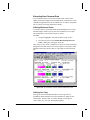
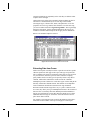
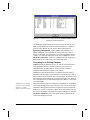
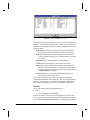
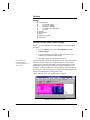
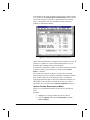
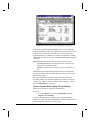
Using the Output
You can use the spreadsheet file, or any other file format, created by
DataImport in your software just as if you had key entered all of the
translated data. Following is the spreadsheet that DataImport translated
from the example Investment Report loaded into Microsoft Excel:
Figure 3- 26 Excel with translated data
Notice that all data is properly formatted: dates are formatted as dates,
numbers as numbers and columns are set to their proper width.
Now you are ready to do your own translations! Load your own Input File
and start masking! If you have trouble loading a file, see the Input and
Output section of Chapter 4: Fitting DataImport to Your Needs. The next
chapter will also help you deal with problems specific to your Input File
and to your data extraction needs. If you have trouble generating an Input
File from the application that contains the data you want, check out
Appendix C: Getting Data out of Other Applications.
DataImport
Chapter 3: Tutorial • 39
Chapter 4: Fitting DataImport to
Your Needs
This chapter identifies specific types of problems in extracting data from
input files and how to use DataImport to solve these problems. It is
recommended that you read the chapters titled “Introduction” and
“Tutorial” first to understand the basic operation of the program.
Input and Output
This section discusses how to get your data into DataImport and out to
your spreadsheet, database or analysis program.
Input Files
DataImport works best with Input Files in ASCII text format. If your
data application allows it, save a copy of your data to an ASCII text file
for best results. If this is not possible, look for a printing option in your
data application that will print to a text file, rather than to the printer.
These types of options are usually called “print to disk” or “print to file.”
Microsoft Windows provides a printer driver called “Generic / Text
Only” print driver that will produce a file you can use with DataImport. If
you are familiar with printer drivers, install this driver and connect the
driver to the “FILE:” port. If you still need help creating an ASCII text
Input File, see Appendix C: Getting Data out of Other Applications.
Output Files
DataImport can create output files for most spreadsheet and database
programs including Excel, Lotus 1-2-3, Quattro Pro, Access, Paradox and
dBase compatible applications. The list below shows the types of formats
DataImport can read and write. If you do not see the format you need,
check the README for last-minute format additions.
NOTE Keep in mind that most programs can read earlier versions of
their file formats. In most cases, a file format with a version number equal
to or less than your software version will work, unless you are combining
or appending files. In this case, you must output your data as the same
version as the existing output file. You can also output it as an earlier
version and append it from within the software.
DataImport
Chapter 4: Fitting DataImport to Your Needs • 40
DataImport Translation Formats
From any of these . . .
To any of these . . .
Any ASCII Text file: (TXT, ASC...)
ASCII (ASC)
Mainframe text reports
Clarion (DAT)
Minicomputer text reports
Columnwise DIF (DIF)
DOS Print to Disk file
Comma Separated Variable (CSV)
Generic / Text Only file (Windows)
dBase II, III, IV (DBF)
Word Processor Text Only file
Excel 2.1, 3.0, 4.0, 5.0, 7.0 (XLS)
Text only accounting reports
Fixed length file (FXD)
E-mail reports
HTML Tables (HTM)
Online communications text capture
Lotus 1-2-3 1A, 2.0, 3.0, 4.0, 5.0 (WK*)
Print to File (PRN)
Mailing Label (LBL)
Tab Separated Variables
Microsoft Access 1.1, 2.0 (MDB)
Comma Separated Variables†
Microsoft Word Merge File (WRD)
Character Separated Variables†
Paradox 3.5, 4.0 (DB)
Fixed length record†
Print Image (PRN)
dBase†
Quattro (WKQ)
EBCDIC†
Quattro Pro (WQ1)
Standard Data Format (SDF)
Quattro Pro 5.0 for Windows (WB1)
Standard Data Format (SDF)
Sylk (SLK)
Symphony 1.0, 1.1 (WRK, WR1)
Tab Separated Variable (TSV)
User-Defined Delimited (UDD)
WordPerfect Merge File (W5*)
Figure 4-1 Input and Output capabilities of DataImport for Windows
†These formats are supported through DataImport Utilities conversions.
Input Files
The Input File contains the data you want to translate. The file can be any
ASCII file and is typically a print file or output from an application on a
mainframe, minicomputer, LAN or stand alone PC.
There is no limit to the number of lines or records in an input file.
However, information can only be displayed from the first 16,384 lines of
a file. With DataImport you can view and translate lines or records as
long as 2048 characters from the Input File. Characters beyond the first
2048 characters are ignored.
NOTE If you have a file that is longer than this maximum line width
and you need to view or translate characters beyond the 2048 limit, use
the DataImport Utilities application and perform a Line Split by Length
DataImport
Chapter 4: Fitting DataImport to Your Needs • 41
on the file. Similarly, if you need to view lines beyond the 16,384 limit,
use the Records per File Split process in the Utilities application. Lines
beyond the 16,384 limit are processed by DataImport—even though you
may not see them in the Input File window—with all mask definitions
except for manually applied Line Treatments.
DataImport can handle files that have their information formatted many
different ways. Files that have their data in a columnar format are easier
to work with. Utilities are provided that convert several types of nonASCII and/or non-columnar files into ASCII columnar files.
The Input File can contain printer control codes (ASCII characters 0
through 31). The control codes can be removed by using the Mask
application’s Exclude Characters All Special Characters command.
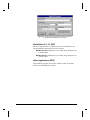
Loading an Input File
The Input File containing the information to be translated can be selected
from either the Mask application or the Translation application.
Procedure in the Mask application:
1.
From the File menu, choose Load Input...
2.
Choose a file from the File Name list box or type the name of
the file to be loaded including the full path under File Name.
3.
Press OK to load the file.
After an Input File is chosen, it is displayed in the Mask window. If the
file does not load or loads with a lot of garbage characters, the Input File
is probably not an ASCII text file. Check the output settings in the
program from which you obtained your data to make sure it is set to an
ASCII text format and try outputting the data again.
If the new data file still has a high percentage of garbage characters, try
excluding these characters with the Exclude Characters All Special
Characters command and see if the text looks right.
If the Input File is still not usable, read the section below to see if you
can use the DataImport Utilities application to translate the file.
Converting Other Types of Input Files for use by
DataImport
Prior to displaying a file for mask definition, you may want to convert the
file using the functions available in the DataImport Utilities program.
These functions make mask definition easier and more effective for
certain types of files. The following types of conversions are available:
Comma Separated Values Converts a comma separated value file to
a fixed length column or file. Users can also specify a separator and
string delimiter with this process by typing in the ASCII code of the
character.
dBase convert Converts a dBase II, III, or IV data file into an ASCII
columnar file with the database field names above each column.
DataImport
Chapter 4: Fitting DataImport to Your Needs • 42
EBCDIC -> ASCII Converts a file that has been downloaded from an
IBM mainframe or midrange computer that has EBCDIC encoding into
an ASCII encoded file.
Fixed length Breaks up a file with fixed length records without record
separators into a fixed length file with record separators.
Line split by length Splits the Input File vertically by producing two
or more files, each with a shorter specified part of each line.
Parse spaces Converts a space separated variable file into a file with
fixed length fields.
Records per file split Splits a file with a large number of records into
several files, each with a specified number of lines.
Tab expansion Expands tabs by inserting spaces to align the data in
columns.
Unstack Makes single-line items from multiple lines that logically go
together.
Chapter 7: DataImport Utilities Reference provides a complete
description of these functions, with illustrations.
Output Files
DataImport places the extracted data in an Output File whose name, file
type, and location on the disk is specified by the user. For more
information and a list of supported output formats, see Appendix B:
Supported Output File Formats.
Choosing an Output File Type
DataImport can translate a file into many different file formats. The
correct file extension is automatically appended to each Output File.
The Output File type can be defined from either the Mask or Translate
applications. In the Mask application, choose File Define Output File...
and then choose the output type from the Output File Type: pull-down
menu. In the Translate application, choose the output type from the
Output File Type pull-down menu.
The available translation types are displayed in the pull-down menu. The
currently selected type is highlighted at the top of the menu. Examine the
documentation accompanying your target software application to
determine the file type and/or file extension required. Remember that
most software packages can read an older version of their file formats and
can often read the file formats from other programs. Use a format that
most closely matches the current version of the software you are using.
Choosing an Output File Name
The Output File name defaults to the Input File name plus the extension
of the file format you have chosen. You can change the name of the
Output File to any name supported by the operating system. DataImport
DataImport
Chapter 4: Fitting DataImport to Your Needs • 43
adds the file extension based on the type of Output File you want created
when the translation is performed.
When a mask is saved, DataImport saves the name of the last specified
Output File with the mask. This name is used again when the mask is
used for translation later unless you change it then.
The Output File name can be specified in the Mask application by
selecting the File Define Output File... command. You may also specify
the Output File name in the Translation application by selecting the
Output File Name option.
NOTE If you are performing a file append or combining files, the
output file name must have the same name as the existing output file. See
the next section for more information about appending and combining.
Translating to Existing Output Files
The output of a DataImport translation is usually to a new file, however,
you can direct the output to an existing file. DataImport can simply
replace the data in the existing file with data from the current translation
and—in some cases—append the new data to the end of the existing file
or combine the new data with the data in the existing file.
You set DataImport to automatically Append, Combine or Replace by
choosing File Define Output File... and selecting one of these options
from the Action when output exists menu.
Appending Data to an Existing File
If the Output File type is a spreadsheet or a database, DataImport can
append the data from the current translation to the end of the existing file.
Combining Data into an Existing Spreadsheet File
For spreadsheet output types, DataImport can combine the data from the
current translation into the existing spreadsheet file at a specific row and
column address. To set the starting address for a file combine, choose
Options Global, type in the Starting Cell Address and press OK.
DataImport’s combine option works in much the same way as the File
Combine option in Lotus 1-2-3 and other spreadsheet programs.
Database File Considerations
Database files contain a database structure that contains information such
as field names, field lengths, and field types. This information is written
to the database file when it is created.
If a database file exists when you output the data, DataImport uses the
current database structure—even if it is different from the structure in the
mask. If the file does not exist, DataImport automatically creates a
structure using the settings defined in the mask.
IMPORTANT!: If you are using DataImport to create the structure
of the database and you redefine the mask to include more or fewer
columns, change a field type or column width after translating, delete
the database file and associated structure created by DataImport
DataImport
Chapter 4: Fitting DataImport to Your Needs • 44
before proceeding. If you do not delete the first database, the
structure will remain intact and DataImport will not alter the
structure even if you change the mask.
Cleaning-Up Input Files
In many cases, your Input Files may not be a simple ASCII text file,
especially if they are print to disk files from a mainframe, midrange or
PC. These files often contain printer codes, control codes or other special
characters. Special characters are non-alphanumeric characters with
ASCII codes from 0 through 31. This section discusses how to remove
these characters from the Mask display and your Output Files.
NOTE All clean-up functions described in this section do not in any
way change the actual content of the Input File. These functions simply
suppress the display of specific characters or text in the Mask window
and tell DataImport to ignore this information when translating a file.
Special Characters
An Input File can contain any number of special characters or “garbage
characters” that make a file harder to read and are not needed in the
Output File. All single character control codes can be removed with the
Exclude Characters All Special Characters command. This option
removes all ASCII characters with codes of 0 through 31 except for the
escape character (ASCII 27). Escape characters are not removed so that
printer control codes can be identified and excluded more easily.
Blank Lines
To remove all blank lines in an Input File, choose the Exclude Blank
Lines command. The current status of this command is indicated with a
check mark next to the Blank Lines option in the Exclude menu. If the
check mark is present, the Exclude Blank Lines command is active.
Page Ejects
A page eject or the ASCII 12 character is a standard printer control code
for causing a printer to feed to the top of the next page. To remove all
page eject characters from the current Input File, choose Exclude Page
Ejects.
The current status of this command is indicated with a check mark next to
the Page Ejects option in the Exclude menu. If the check mark is present,
the Exclude Page Ejects command is active.
Duplicate Lines
Some programs print a line, perform a carriage return without a line feed,
and print the line again. This results in “bold” print that is used for
emphasizing titles and headings on reports. The Exclude Duplicate Lines
DataImport
Chapter 4: Fitting DataImport to Your Needs • 45
command removes the second line of print from this style of report or any
line that is exactly the same as the preceding line.
The current status of this command is indicated with a check mark next to
the Duplicate Lines option in the Exclude menu. If the check mark is
present, the Exclude Duplicate Lines command is active.
Escape Sequences
Escape sequences are a string of two or more characters beginning with
the escape character (ASCII 27) that provide control instructions to a
printer.
To remove an escape sequence, or any other string of characters, select
the sequence with the highlighter and choose Exclude Characters
Define... Apply the exclude function by pressing OK.
First Position Carriage Control
Carriage control characters are another type of printer control that is
included in reports created by some programming languages on certain
computers. FORTRAN, for example, uses the first character position of
each line to indicate line feeds and form feeds to the printer.
To ignore carriage control characters in the first position of every line,
choose Options Global... and in the First positions to exclude field, type
the number of characters to exclude (usually 1) and press OK. The file
will then be re-displayed with these positions removed.
Extracting Data
DataImport provides many facilities for extracting data from columnar
reports and forms. If your data is not columnar, also see “Unstacking
Multiple Lines of Data” on page 53 and “Putting Header or Form
Information into Columns“ on page 55 for information on organizing
data in columnar format.
This section discusses how to use DataImport’s Masking processes to
extract data and other information from computerized reports, including
defining columns, extracting groups of information, excluding lines and
extracting specific lines.
Columnar Data
DataImport is effective in extracting data arranged in columnar format
and provides many facilities for extracting this data efficiently. One of the
primary tools that DataImport provides is the capability of including
specific data lines in the translation process. These features allow you to
easily extract only the data you want without extensive processing in your
spreadsheet or database manager.
Defining Columns
Columns are used to define the positions, or cells, within each line of the
Input File that will be translated to the Output File. Data is translated only
DataImport
Chapter 4: Fitting DataImport to Your Needs • 46
if included within the defined range of a column, or a line tag as
explained later in this chapter. A column encompasses all lines in the
Input File for the range specified. A maximum of 256 columns can be
defined in any one mask and columns cannot overlap.
To extract data from an Input File, columns are usually defined. As you
learned in Chapter 3: Tutorial, there are several ways of defining
columns. You can create a column in several ways manually, or use
DataImport’s AutoColumn feature to automatically define columns. You
can also add columns or remove columns from an existing mask to suit a
particular need.
After a column is defined, the type of data in the column can be specified.
The output sequence of columns can also be defined, see “Resequencing
Data Columns” on page 53.
Manual Column Definition
Columns may be defined by highlighting sample data that indicates the
width of a column and either using the Column Define... command, or by
using the right mouse button to do a Column Define. Columns can also be
defined by dragging the cursor over the Column Control Bar. Columns
cannot overlap each other.
Automatic Column Definition
You can automatically define columns by simply selecting a line in the
file for DataImport to use as a pattern to establish column positions. This
method disregards all previous column specifications and defines
columns for the entire length of the selected line.
To define columns using this method, place the cursor on the line to be
used as the pattern, then choose the Column Auto Define All command.
The Input File will then be re-displayed with the new column definitions.
DataImport can also be set to automatically define columns when an
Input File is first displayed on the Mask Screen. If the resulting columns
are inappropriate (the complexities of some file structures may produce
undesirable column definitions), you can modify the automatic column
definitions accordingly.
To activate the automatic column definition feature choose Options
Preferences and mark the Automatically define columns option.
Removing Columns
All columns or a specific column can be removed from the mask. To
remove all columns from the mask, select the Column Undo All option.
To remove a specific column, move the cursor into the column and then
choose the Column Undo command.
Including Data Lines
In some cases, you may want to include specific lines of data from
computer reports. You may be specifically interested in data from
particular regions or information about a certain product. The DataImport
DataImport
Chapter 4: Fitting DataImport to Your Needs • 47
Mask application allows you to include this information from your input
files using the Include functions.
There are three ways to specifically include lines for translation to an
Output File. By setting DataImport to globally Output Lines (Options
Global, Default Line Treatment: Output Lines Mode), all lines in an
input file are included in the Output File. Lines containing a specified
string of characters can be automatically output. Or, a particular line can
be included manually.
Including Lines with a Match String on the Line
DataImport can include all lines for translation that contain a specified
match string. The match string can be a specific string of characters, or a
pattern match string that contains wildcard characters. This feature
(usually used in Global Skip Line Mode), is useful when selecting
specific lines that all contain common information, or a range of lines
starting with a line containing the specified string of characters.
Lines included in this way are translated the same way as Output Lines. A
line already treated as an Output Line, Title or Heading that does not
contain the specified string is not affected by the use of the Include Line
feature; they are always output.
To include lines, examine the lines that are to be output and identify a
string of characters or a pattern unique to these lines. Now define these
characters as the criteria for including lines using the Include Line
Define... command:
1.
Highlight a text string to cause the line to be included in the
translation.
2.
From the Include menu, choose Lines and then Define...
3.
The Define Include Line dialog box appears. If necessary, type
in new characters or pattern match characters under the Original
String field.
If the match string should be exactly what you selected, do not make any
changes to the text. If the match string should be different, change the text
as necessary. If the match string should be a general pattern, use the
wildcard characters to define the type of characters allowed in each
position.
The following wildcard characters are used to define the type of
characters allowed in each position of a Match String. All other
characters in the pattern match string require that character at that
position.
^
(caret)
Any number (0 through 9)
!
(exclamation)
Any character except 0 through 9
~
(tilde)
Any character except blank
_
(underscore)
Any character including blank
Figure 4-2 Pattern Match wildcard characters
DataImport
Chapter 4: Fitting DataImport to Your Needs • 48
4.
In the Position on line field, choose At position or Anywhere.
Choose At position if the lines should be included only when the string is
found at the same character position as the original match string. Choose
Anywhere if the line should be included if the string is found at any
position in the line.
5.
Press OK to apply the Include command.
The file will be re-displayed with the lines to be included marked with an
“I” in the Line Control Bar on the left side of the Input File window.
Including a Variable Number of Lines with a Single Match
String on or Before the Lines
Some reports group a varying number of lines together for a region,
product or sales office with the name of the group shown only above or
on the first line of that group. There is no unique text on each line of the
desired group that can be used as a match string for the Include Line
feature. In this case, you can include these lines by using the Pause and
Resume feature.
Pause and Resume commands start or stop translation of a file when
match strings are encountered. When a Pause match string is encountered
in an input file, that and all lines after it will be skipped until a Resume
match string is encountered.
To include line groups in the Output File, identify a character string that
identifies the beginning of the line groups that you want to include and
then use the Include Resume Define... command to insert a resume in
translation at these points. In the Define Resume String dialog box,
check the Begin in Pause Mode box if the lines to be included are not at
the beginning of the report.
The Mask window will display the Input File with the new resume
definition. Resumed lines will have color highlighting.
To stop extracting lines, identify a character string that identifies the end
of the lines that you want to include and then use the Exclude Pause
Define... command to insert a pause in translation at these points.
The Mask window will display the Input File with the new pause
definitions. Paused lines will not have any color highlighting and a “P”
will appear in the left margin for any paused line. Only one Pause and
one Resume definition can be defined in a Mask.
Outputting Individual Lines
Occasionally you may need to include lines that do not share a common
text string. In this case DataImport allows you to manually Output lines.
To manually output lines, highlight a range of lines and choose the Line
(O)utput command. The line will be re-displayed with color highlighting
and a “o” will appear in the Line Control Bar to the left of the line.
DataImport
Chapter 4: Fitting DataImport to Your Needs • 49
Excluding Data Lines
In some cases, you may want to ignore or exclude specific lines from
being translated. You may not be interested in data from particular
regions or information about a certain product. The DataImport Mask
application allows you to exclude this information from your output files
using the Exclude functions.
There are four ways to exclude lines from output. By setting DataImport
to globally Skip Lines (Options Global, Default Line Treatment: Skip
Line Mode) all lines in an input file are excluded. Lines containing a
specified string of characters can be automatically excluded. Lines can be
set to be skipped individually based on their line position in the input file.
Or, lines that contain a specific range of values within a column can be
excluded from translation.
Excluding Lines with a Match String on the Line
DataImport can be instructed to exclude all lines from translation that
contain a specified match string. The match string is a specific string of
characters, or a pattern match string that contains wildcard characters.
This feature (usually used in Global Output Lines Mode), is useful when
excluding lines that contain common information from translation into the
Output File. This feature can also be used to exclude recurring page titles
and headers.
To exclude lines, examine the lines that are to be ignored and identify a
string of characters or a pattern of numbers or letters unique to these
lines. Now define these characters as the criteria for excluding lines using
the Exclude Line Define... command:
1.
Highlight a text string to cause the line to be excluded from
translation.
2.
From the Exclude menu, choose Lines and then Define...
3.
The Define Exclude Line dialog box appears. If necessary, type
in new characters or pattern match characters under the Original
String field.
If the match string should be exactly what you selected, do not
make any changes to the text. If the match string should be
different, change the text as necessary. If the match string should
be a general pattern, use the wildcard characters to define the type
of characters allowed in each position. For a list of pattern match
characters, see Appendix F: Match String Wildcard Characters.
4.
In the Position on line field, choose At position or Anywhere.
Choose At position if the lines should be excluded only when the
string is found at the same character position as the original match
string. Choose Anywhere if the line should be excluded if the string
is found at any position in the line.
5.
DataImport
Press OK to apply the Exclude command.
Chapter 4: Fitting DataImport to Your Needs • 50
The file will be redisplayed with the lines to be excluded marked with an
“E” in the Line Control Bar on the left side of the Mask window.
Excluding Lines with Column Limits
Lines can be excluded from translation that contain values that are lower
or higher than the specified limits in a column. After a column is defined,
limits can be set by entering an upper limit, a lower limit, or both. How
DataImport prompts for limits is dependent on the column type; numeric,
text, date, or time.
To define a column limit, click in the column and choose Column
Settings... The Column Settings dialog box appears. Type in an upper
limit, a lower limit or both in the Limits fields and press OK to apply the
limit.
Lines with values in the column that are higher or lower than the limits
are displayed without a background color. An uppercase “E” also appears
in the Line Control Bar to indicate that the line is Excluded.
Numeric data, dates and times are excluded based on their numeric value.
Text is excluded based on its alphanumeric ASCII value order. This order
starts with numbers, then uppercase letters, then lower case letters. For
example a limit between an upper limit of 1A to a lower limit of Z is
valid, but a range from an upper limit of A to a lower limit of 9 is not.
If the column type is changed, the limits for the column are eliminated.
To eliminate or undo the test for limits in a column, delete the limits from
the Limits fields for the column.
Skipping Individual Lines
Occasionally you may need to exclude lines that do not share a common
text string. In this case DataImport allows you to manually skip lines.
To manually skip lines, highlight the range of lines to be skipped and
choose the Line (S)kip command. The line will be redisplayed without
any color highlighting and an “S” will appear in the Line Control Bar to
the left of the line.
Aborting Translation Automatically
Some Input Files may be very long and you may only need to translate
the first section of the data or you may want to test the results before
translating the whole file. In this case DataImport allows you to define an
artificial end of file that will stop the translation when it reaches a
particular line.
To define an end of file, click on the line below the last one you want to
translate and choose the Line (A)bort command. The line will be redisplayed without any color selection, an “A” will appear in the left
margin of the Mask window for that line and a small “a” will appear on
every line following it.
DataImport
Chapter 4: Fitting DataImport to Your Needs • 51
Default Line Treatment
DataImport has two modes for the default treatment of lines. One mode
assumes that the data on all lines is to be translated unless the line is
specifically Excluded or Skipped. This mode is called Global Output
Line Mode. The other mode assumes that no lines are to be translated
unless they are specifically included. This mode is called Global Skip
Line Mode.
In Global Output Mode, Include Lines have precedence over Exclude
Lines. That is, if an include match string occurs in an Exclude Lines’
range, the Include Lines will be translated. In Global Skip Line Mode,
Exclude Lines have precedence over Include Lines; if an exclude match
string occurs in an Include Lines’ range, the Exclude Lines will not be
translated.
To set the default line treatment, choose Options Global... and under
Default Line Treatment mark either the Output lines or Skip lines option.
Titles and Headings
To keep repetitive titles and
headings from being output,
see the previous section
titled Excluding Lines with
a Match String on the Line
on page 50.
Some reports contain a title or headings that do not belong in data
columns but which you may want to include in your spreadsheet.
DataImport allows you to define lines as titles or headings that are written
to spreadsheet Output Files. These line definitions are called line
treatments.
To define a line as a Title or Heading, select the lines to be defined and
choose the Line (T)itle or the Line (H)eading command.
Heading The data within the columns on each Heading Line is
translated as text (non-numeric). The line is displayed with a magenta
background and an “H” appears in the left margin. Notice that lines
defined as headings include only data in defined column ranges, not data
for the entire line. To include the entire line, see the Title treatment
below.
Title The entire line is translated as a single text string (non-numeric)
and column definitions are ignored. The entire line is displayed with a red
background and a “T” is displayed in the left margin.
To restore the default setting for a range of lines that have been defined
with Titles, Headings or other Line Treatments, select the lines to be
restored and choose Line Default.
Reorganizing Data
Some Input Files may not have data organized in a way that is
appropriate for your type of spreadsheet or database. Rows and columns
may be switched, different types of data may be stacked on top of one
another or columns may simply not be in the right order. This section
discusses some data organization problems and how to use DataImport to
solve these problems.
DataImport
Chapter 4: Fitting DataImport to Your Needs • 52
Resequencing Data Columns
When a mask is defined, DataImport orders the columns according to the
sequence in which they are defined on the screen. If this sequence does
not put the information in the most usable order, you can resequence the
columns. For example, you could switch positions of column C and
column A. The new sequence would be C, B, A, D.... This option is
useful when the Output File is an existing database whose structure orders
information differently from the Input File. Columns can also be skipped
(e.g., A, D, E, K).
To resequence a column, click in the column to be resequenced, choose
Column Settings... and type the new column letter in the Letter field. If
the letter is already in use by another column the letters of the two
columns are switched. Line Tags can be resequenced in a similar way.
Unstacking Multiple Lines of Data
Some reports stack multiple line sets of data on top of one another. For
instance, in a sales report for different regions, the report might list the
region on the first line along with the daily sales and then list the monthly
and yearly sales for that region on the next two lines. The easiest way to
handle this is if the daily, monthly, and yearly data are on the same line so
that they can be put into their own columns. The Unstack function allows
you to do this automatically.
In order to unstack data, you use a text match string to identify the first
line of each set of lines and then define how many lines of data are
stacked.
Procedure:
1.
Select a text string which identifies the first line of each set of
stacked lines.
2.
From the Options menu, choose Unstack and then Define...
3.
In the Lines to unstack field, enter the number of lines to
unstack.
4.
To apply the unstacking function, press OK.
The following example illustrates how a report file with stacked lines
looks before and after it is converted.
DataImport
Chapter 4: Fitting DataImport to Your Needs • 53
Figure 4-3 Stacked Input File with columns and headings defined
In this example, the Unstack command was defined with “MONTH” as
the match string and 2 Lines to unstack. The screen below shows the
results of the Unstack command.
Figure 4-4 Unstacked data
Notice that the yearly data has been moved into new columns to the right
of the monthly data and that the Heading information has been duplicated
in the new columns. To complete the mask definition, two new columns
should be defined for the new yearly PERIOD and SALES.
If the Input File is a report with a heading at the top of each page that can
sometimes occur within a block of lines, it may be necessary to define a
mask and perform a translation to a print image file (.PRN) to remove the
headings before unstacking the file.
Unstacking is also very useful for preparing a text file of names and
addresses created with a word processor for translation into a spreadsheet
or database file. Unstacking such a file can produce separate columns for
DataImport
Chapter 4: Fitting DataImport to Your Needs • 54
name, street address, and city/state/zip code. Only one Unstack command
is allowed per Mask.
Getting Data from Multiple Lines into the Same Cell
Sometimes reports contain multiple lines for a single field, such as this
inventory report:
Figure 4-5 Input File with Multiple Data Lines per Field
When outputting a text
block, make sure that you
set the column width on the
Column Define dialog box
to be wide enough to
contain the longest block of
text.
Note that the description field contains multiple lines of data. To get
multiple lines of data into the same cell, use the column type Text Block.
Text Block instructs DataImport to keep adding data from multiple lines
in a column into the same cell (or field) during translation until the next
line is to be output or a blank cell in the column is encountered. You can
also specify the Block to be a fixed number of lines.
Figure 4-6 Translated file with Text Block
Pulling Data out of Page and Section Headings
Reports often list information in headers or elsewhere on the page. This
data is not listed in columns and is often preceded by a repeated title. For
DataImport
Chapter 4: Fitting DataImport to Your Needs • 55
instance, on an invoice report, the title “Region:” would appear on every
page followed by the name of the region like “Northeast” or “South”.
Figure 4-7 Input file with Page and Section Headings
You may want to put this type of information into a database or
spreadsheet as single rows or records. DataImport allows you to place
this information in columns by defining positional anchors or Reference
Points on a sheet which point to fields of data or Line Tags.
A Reference Point is a positional anchor which DataImport uses to locate
data that changes within a form or other report. There can be up to 100
Reference Points within a given Mask. In the example above, the word
"Region” would serve as a reference point to data that changes from page
to page. In this case, the changing data is the location or region of the
invoices. A reference point can also be a top of form, or assumed to occur
every specified number of lines.
A Line Tag is a field of data positioned at fixed places on a page which is
located with a Reference Point. In the example above, the different
regions (“South” and “Northeast”) would be a Line Tag which would be
located with the “Region” Reference Point.
Line Tagging works much the way it sounds: Data from Line Tags is
output on each extracted data line, thus “tagging” each line with
information. Each Line Tag you define is output as a column in addition
to the columns that have a button on the line control bar.
The Line Tag function updates the information each time it encounters a
Reference Point with which it is associated. In the example above, the
Line Tag for the region information is updated each time DataImport
encounters the Reference Point “Region:” text string in the Input File.
DataImport
Chapter 4: Fitting DataImport to Your Needs • 56
The Line Tag function allows DataImport to “read” certain data from the
Input file by looking for a keyword (the Reference Point) and then
looking down, and to the right and left of the keyword for specific
information (the Line Tag).
You tell DataImport where to find Line Tag information by first defining
a match string that is used as a Reference Point and then defining the
relative position of the Line Tag information to the Reference Point.
Information in each Line Tag column is repeated on each output line until
the Reference Point match string is encountered on another line, at which
point the Line Tag information is refreshed.
For example, if the Input File contains a date in the heading of each page,
the date can be output on every line. By defining a Reference Point and
then the date as a Line Tag, every time the program encounters another
occurrence of the Reference Point during translation, the next date will be
output as a Line Tag.
Before a Line Tag can be defined, at least one Reference Point must be
defined . You can define up to 100 Reference Point match strings. There
is no limit to the number of defined Line Tags. When a Line Tag is
defined, it is associated with the closest Reference Point occurring before
the tag.
Figure 4-8 Input file with all relevant data defined
Make sure to define the Line Tag with a selection that is as wide as the
largest information that will occur in that position. For example, if the
first Line Tag is “South”, make sure to select some space after “h” so that
the “east” at the end of “Northeast” does not get cut off. Line Tags are
DataImport
Chapter 4: Fitting DataImport to Your Needs • 57
assigned column letters sequentially in the order they are defined. Their
sequence can be changed.
Options that can be selected for a normally defined column can also be
selected for a column defined by use of Line Tags. This includes
selecting the Type, Column Letter, Name, and @Function. To set the
properties for a Line Tag column, click inside the text of the Line Tag
you want to define and choose Tag Line-Tag Define... The Tag Settings
dialog box will appear. Set the column definitions for the Tag as you
would for a normal column and press OK to apply the new definitions.
Below is the translated input file in Excel.
Figure 4-9 Translated invoice data in Excel format
Extracting Data from Forms
Data in form reports is usually located on a specific line and at a specific
character position on each page of the report. This type of report looks
like a computerized version of an insurance form; there is a line or block
for your last name, first name, previous doctor, insurance company,
policy number and so on. This type of report may not have any data in
columns, which makes it difficult to format records for a database.
DataImport provides a function to “read” these types of forms and put the
data they contain into columnar format. This function is accomplished
with a combination of Reference Point and Line Tag commands.
Reference Points and Line Tags offer a way to “point” to data in a form.
In a sense, they allow you to give DataImport directions to the location of
data in a form. As with any directions, DataImport needs landmarks to
find its way and locate the correct data. Reference Points serve as these
landmarks and Line Tags are “directions” from a Reference Point to a
place where data is located.
For example, if an insurance form report like the Input File below has a
field titled “LAST NAME” at the top of each page of a form report
DataImport
Chapter 4: Fitting DataImport to Your Needs • 58
followed by the last name, the last name information for each form can be
extracted to a column.
Figure 4-10 Form type report
By defining the text “LAST NAME” as a Reference Point and the last
name of the patient as a Line Tag, the program will output the last name
of the patient into a cell on each row that it outputs. When DataImport
encounters another occurrence of the Reference Point “LAST NAME” it
will update its current tag information and continue to tag each data line
with the new information.
Let’s say that you have a form-type report like the one pictured above and
you want to put this information in a spreadsheet where you have a Last
Name column, a First Name Column and a Patient # column. DataImport
will allow you to put this information into columnar format.
To output each patient as a row of a spreadsheet, change to Global Skip
Line Mode, define a column that will capture the last piece of data on
each form (Patient #) and then define an Include Line to extract the last
line of data for each patient. Then use Reference Points and Line Tags to
capture the rest of the data for the patient. Define a Reference Point at the
beginning of each patient and then define what data to extract with the
Tag Line-Tag Define command.
In the following example, the default line treatment was set to Global
Skip Lines. Then, to capture the last unit of data on each form, a column
was defined to capture the Patient # and then an Include Line was defined
with a match string of “PATIENT #” to create a single data line for each
form. Notice the “I” in the Line Control Bar to the left of “Patient #.”
A Reference Point and two line tags were then added to extract the Last
Name and First Name of the patients to separate columns. The Reference
Point was created using the match string “LAST NAME” and two Line
Tags were created: one with the selection “AARON
“ and
one with the section “HANK
”. These selections were made
larger than the name in order to capture longer names that may appear on
the forms. The resulting mask is shown below:
DataImport
Chapter 4: Fitting DataImport to Your Needs • 59
Figure 4-11 Mask for outputting form information to columns
After translating, the output of this mask is shown below:
Figure 4-12 Output from Mask pictured above.
Line Tags are always included into any outputted data lines (Include or
Value Lines) that occur after or on the same line as the Reference point,
so it is important to define the Reference Point before or on the same line
as the Included Line on the form.
Options that can be selected for a normally defined column can also be
selected for a column defined by use of Line Tags. This includes
selecting the Type, Column Letter, Name, and @Function. To set the
properties for a Line Tag column, click inside the Line Tag you want to
define and choose Tag Line-Tag Define... The Tag Settings dialog box
will appear. Set the column definitions for the Tag as you would for a
normal column and press OK to apply the new definitions.
Filling Blank Column Cells
Some Input Files do not repeat information in a column unless it changes.
For example, in the sales report below, the column indicating the region
in which the person works is included only for the first salesperson in
each region.
DataImport
Chapter 4: Fitting DataImport to Your Needs • 60
(Col A)
(Col B)
Region
Salesperson
Southwest John F.
Joan K.
Terri Y.
Northeast Jim B.
Jill S.
Tim R.
(Col C)
Units Sold
10
14
15
16
12
14
Figure 4-13 Report with blanks in column A
To tell DataImport to fill all the blanks in the column with the most
current information, select the Column Blank Duplicate option. In this
example, click in column A, choose Column Settings... and under When
Blank, mark the Fill-down option.
(Col A)
(Col B)
(Col C)
Region
Salesperson
Units Sold
Southwest John F.
10
Southwest Joan K.
14
Southwest Terri Y.
15
Northeast Jim B.
16
Northeast Jill S.
12
Northeast Tim R.
14
Figure 4-14 Report output with Fill-down applied to column A
Transpose Rows and Columns
Some reports may print data that should be in columns on a line or may
print data in columns that should be on lines. For output used with a
spreadsheet, DataImport can transpose columns and lines. That is, data
displayed as columns in the Mask Screen will be output as lines, and vice
versa.
To output rows as columns and columns as rows, choose Options
Global..., mark the Transpose rows and columns option and press OK.
The display will not change, but the data output to a spreadsheet file will
be transposed.
If this option is selected, column widths defined in the mask are not used
during translation. The Output File will be displayed using the
spreadsheet program’s default column width.
Recognizing Data Types and Formats
Data in computerized reports can come in many different styles.
Depending on the person or system that produced the report, data formats
for numbers, dates and times can vary widely. You may receive reports
from the United States, Japan, Germany or Australia that use different
date, currency and decimal formats. DataImport can recognize a wide
variety of data types and formats—assuming it knows what to look for.
DataImport
Chapter 4: Fitting DataImport to Your Needs • 61
The way that DataImport recognizes data is the Type setting for the
definition of the Column. Whenever you define a column, DataImport
defaults to the column type specified in the Preferences. You can change
this definition for a specific column by clicking in the column, selecting
Column Settings... and choosing an option from the Type pull-down
menu.
There are several data types you can define in DataImport. These are
discussed below.
Numeric
When you define a column with this type, the program will attempt to
treat all the data in a cell of this type as numeric values. If DataImport
cannot translate the cells as numeric values, it will translate them as text.
Data that will be translated as numbers is displayed in a blue color.
DataImport understands how numbers are represented on reports and
translates them correctly into the Output File. It also understands that
negative numbers can be represented several ways, either with a minus
sign before or after the number, with parentheses, or with a CR or DR
next to the number (credits and debits).
DataImport understands that a percent sign (%) indicates the number
should be divided by 100. It even handles subtotals that are marked with
asterisks. DataImport can also translate numbers that are expressed in
scientific notation.
Computer systems in the U.S. use the dollar sign ($) to express currency,
a period (.) to indicate the decimal point, and a comma (,) as the
thousands separator. DataImport uses these settings as defaults but it can
be instructed to use other symbols for recognizing currency, thousands
and decimals, as explained below.
Currency DataImport can recognize any currency format. By default
the currency setting is set to US dollars ($). The following are some of
the pre-set symbols that can be recognized as currency symbols:
Symbol (currency name)
$
(dollar)
¢
(centavo)
£
(pound)
¥
(yen)
A$ (Australian dollar)
C$ (Canadian dollar)
Dkr (Danish Krone)
DM (German mark)
Fr. (French Franc)
Gld (Guilder)
L
(Lira)
NKr (Norwegian Krone)
p
(peseta)
DataImport
Chapter 4: Fitting DataImport to Your Needs • 62
SFr (Swiss Franc)
SKr (Swedish Krona)
To select the current currency symbol, choose Options International...
and under Number Format, either choose the currency symbol from the
Currency pull-down menu or type in the currency symbol.
Thousands Notation The symbol for separating thousands in the U.S. is
the comma; also used in other countries are the period and the space.
DataImport supports all three of these notations.
To select the thousands symbol, choose Options International... and
under Number Format, choose the thousands notation symbol from the
Thousands pull-down menu.
Decimal Points The symbol for separating the fractional or decimal part
of a number from the integer portion of a number can be defined as either
the period or the comma.
To select the current decimal symbol, choose Options International...
and in the Number Format field choose the decimal symbol from the
Decimal pull-down menu.
Text
This type instructs DataImport to translate the cells in the columns as the
same characters that are in the Input File. When another column type,
such as numeric or date, are selected and DataImport cannot translate that
data into the requested type, DataImport will output the data as text. Data
that will be translated as text is displayed in a magenta color.
There are three kinds of Text selections.
Character/Label text instructs DataImport to translate the data in the
column as text characters. This is the most commonly used text type.
Left Justified text instructs DataImport to remove spaces from the
beginning of text.
Block Text instructs DataImport to keep adding data from multiple lines
within a column into the same cell (or field) during translation until the
next line is to be output or a blank cell in the column is encountered. You
can also specify the Block to be a fixed number of lines.
Case There are four case settings, three of which affect the
capitalization of text when they are output. The following table illustrates
the effects of these options on sample text:
Case Setting
Input
Output
(As-Is)
Miami
Miami
(Lowercase)
Miami
miami
(Uppercase)
Miami
MIAMI
(Proper)
MIAMI
Miami
Figure 4-15 Case Settings and their effects
DataImport
Chapter 4: Fitting DataImport to Your Needs • 63
Date
This type instructs DataImport to translate the cells in the column as
dates. In spreadsheets, the date is the number of days since January 1,
1900. The format of the date must be specified. Eight formats are
supported. All of the date types except for Custom require a blank space
or a separator character such as a "/" or "-" between the month, day, and
year parts. The custom date is used when there are no separators or blank
spaces. If the program cannot translate the cells as dates, it will attempt to
translate them as numeric values, then as text. Data that will be translated
as dates is displayed in a green color.
Date Custom The custom format is used to recognize dates that do not
contain separators and is applied when you specify the Date (Custom)
setting for a column.
To define the custom date format, choose Options Dates... and in the
Custom Date Format enter the custom date. Type in the format string
using the letters D, M and Y as positional indicators for the day, month
and year. The table below shows some examples of custom date formats
and how they interpret dates without separators.
Type this:
To recognize this:
As this:
YYMMDD
961231
December 31, 1996
MMYYDD
129631
December 31, 1996
DDMMYY
311296
December 31, 1996
YYYYMMDD
19961231
December 31, 1996
Figure 4-16 Custom date examples and results. These results
assume that two-digit year interpretation is set to 96 or less.
Two Digit Years For dates that contain two digits for the year, the
cutoff date that divides 19xx from 20xx can be defined. In some files, the
date 11/25/55 could mean 1955 or 2055. To define the two digit year that
is the cutoff between 19xx and 20xx, choose Options Dates... and in the
Year for 19XX field type the cutoff date for interpreting two-digit years.
Month Names DataImport recognizes the standard U.S. spellings of the
names of the months, but it can also be instructed to recognize different
spellings, such as the German spelling of October: “Oktober”. To specify
the spellings of the month names, choose Options International... and in
the Month Name field type in the month spellings you want DataImport
to recognize. To save your custom Month spelling definitions for use in
future masks, press the Save as defaults button. If you want to use these
saved month spellings at a later date, simply choose Options
International... and press the Load defaults button.
DataImport
Chapter 4: Fitting DataImport to Your Needs • 64
Time of Day
This type instructs DataImport to translate the cells in the column as the
time of day. The time is translated to a decimal number between 0 and 1.
0 indicates midnight, and 0.5 indicates noon. Spreadsheets will show this
number as a time. If the program cannot translate the cells as times, it will
attempt to translate them as numeric values, then as text. Data that will be
translated as the time of day is displayed in a yellow color.
Name Parse
This type instructs DataImport to translate the data in the cells of the
column as names, which are split into separate text columns (or fields)
during translation. Names can be parsed into prefix, first, middle, last and
suffix, i.e. Mr./John/Van Kamp/Jr. Data that will be translated as Name
Parse is displayed in a magenta color.
Name Parse uses a DEFAULT.DIC file to scan for all included prefixes,
suffixes and beginning of last names. You can edit this file or create your
own dictionary. See Appendix H: Customizing the Dictionary File for
more information.
Address Parse
This type instructs DataImport to translate parts of an address. Addresses
can be parsed into City, State, and Zip/Postal code, i.e.
Atlanta/Georgia/30301. This data type can also be customized, and one
or all of the address elements can be selected. Address Parse uses a
DEFAULT.DIC file to scan for all state abbreviations. You can edit this
file or create your own dictionary. See Appendix H: Customizing the
Dictionary File for more information.
Signed Overpunch Numbers
Some computer systems use special notation to indicate positive and
negative numbers. By assigning special characters to either the first or
last digit of a number, a program can indicate whether a number is
positive or negative. This helps conserve file space; rather than outputting
the minus sign, it is “coded” into the number as a signed overpunch
technique.
To specify the characters used to indicate the sign of the number, choose
Options Signed Overpunch... DataImport provides three options for
designating the characters that are used to indicate that a number is
positive or negative:
0-9, }-R
0 → 9 as positive, } → R as negative
{-I, }-R
{ → I as positive, } → R as negative
Custom
(user-defined)
One of the first two options translates the majority of Input Files using
signed overpunch correctly. Selecting the Custom option displays all 20
DataImport
Chapter 4: Fitting DataImport to Your Needs • 65
possible digits and the current character assignment. To create a custom
format, choose the Custom option under Character Set and then in the
Characters field, change the characters to match those used in the Input
File. To save your custom Signed Overpunch definitions as the default for
all new masks, press the Save as defaults button. If you want to use this
saved character set at later date, simply choose Options Signed
Overpunch... and press the Load defaults button. The custom character
set will also be saved when you save the Mask.
DataImport can use either the leading (first position) or trailing (last
position) digit of a number as the signed overpunch. To check or change
the setting, choose Options Signed Overpunch... and mark either the
Trailing or Leading options in the Position field.
Code Page Settings
ASCII stands for American Standard Code for Information Interchange.
It is a specification that determines how bytes that are numbers are
converted to characters. The ASCII specification specifies characters 0
through 127. The characters are control codes, numbers (0-9), lowercase
letters (a-z), uppercase letters (A-Z), and punctuation common to the
English language. Character Numbers 128 through 255 are not defined.
When IBM and Microsoft developed MS/PC-DOS for the IBM PC they
developed extensions to the standard ASCII characters that define
characters numbered from 128 to 255. The Extended ASCII character set
contains line-drawing characters, symbols, and a small set of punctuated
letters used in non-English languages. Punctuated letters are those that are
made up of a letter and a diacritical mark, for example, á, Ç, ú, Ü, and Ä.
In version 3.3, IBM and Microsoft added National Language Support to
DOS because the original Extended ASCII character set did not contain
all the punctuated letters that would be necessary to support other
languages. They developed a series of Code Pages to support the other
languages. Code Pages are essentially a specification of what character to
display for a given byte. All Code Pages share the first 128 characters
(the original ASCII specification), but have different characters for the
range of 128-255. Most of the Code Pages kept the same line-drawing
characters. You can look in the back of your MS-DOS User's Guide to
see the characters that are defined in each Code Page. The Code Pages
are:
437 - US (Extended ASCII)
850 - Multi-Lingual (Latin 1)
860 - Portugal
863 - Canadian-French
865 - Nordic
Microsoft Windows does not use Code Pages, instead it uses fonts. Most
fonts use the ANSI character set, which is not the same as any of the
previous DOS Code Pages. The ANSI character set uses the ASCII codes
for the first 128 characters. The last 128 characters contain symbols and a
full set of punctuated letters, both uppercase and lowercase. Courier and
DataImport
Chapter 4: Fitting DataImport to Your Needs • 66
FixedSys are examples of fonts that use the ANSI character set. The
Terminal font supplied with most versions of Windows does not use the
ANSI character set, it uses the Code Page 437 character set.
To assist in reading files created on systems using a different Code Page
than the standard US (Code Page 437), you can set what Code Page rules
will work correctly. Also the Code Page defines how translation to Lotus
products will be conducted. Lotus products use either the Lotus
International Character Set (LICS) or Lotus Multi-Byte Character Set
(LMBCS). With the Code Page set correctly in the mask, DataImport will
do the necessary code Page translations to ensure that the output file has
the correct characters.
Performing Calculations
Depending on the type of analysis or report you are creating, you may
need to perform calculations on the data you extract from a report.
DataImport provides functions to automatically output rows with Sum,
Average or Count formulas.
DataImport can include formulas only in spreadsheet Output File types.
Formulas are output as rows that can replace existing rows in the Input
File, or they can be output as additional rows. These Formula Rows can
be output either when the information in a specific column changes, or
when a specific character match string is found.
Formulas in Columns
In order to properly insert Formulas in a spreadsheet, DataImport needs
to know what type of calculation should be performed for each column.
You define the type of calculation you want in the settings of a column.
To define the type of calculation to perform on a column, click in the
column, choose Column Settings... and choose a formula type from the
@Function pull-down menu.
Inserting Formula Rows
After you have defined the formulas you want in each column, you must
then specify when DataImport should output a Formula Row. A Formula
Row is a row DataImport inserts in an Output file which contains formula
cells that calculate a Sum, Average or Count of the cells above.
Formula Rows can be inserted when the data in one column changes or
when a match string is found. DataImport can also replace a line in the
Input File with a Formula row.
Inserting Formulas at a Column Change
You may want to insert a Formula Row every time the data in a particular
column changes. DataImport allows you to insert a Formula Row into the
Output File each time the character contents of a non-blank cell in a
DataImport
Chapter 4: Fitting DataImport to Your Needs • 67
specified column changes. This option is useful when the Input File is a
list of records in a sorted order without subtotals.
For example, lets say you have a report that lists all of the data from the
Southwestern region on consecutive lines and the first column (A) lists
SOUTHWEST for each entry. The first column then changes to
NORTHWEST and lists all the data from the Northwest region. You
want to get the totals for each region—SOUTHWEST, NORTHWEST,
etc.—so you need to insert a Formula Row each time the name in the first
column changes.
To insert a Formula Row based on a change in the column, choose
Options Formula Rows Column Change..., type in the Column
Letter—in this case, “A”—and press OK. DataImport will now insert a
formula each time the data changes in the column you specified (in the
example above, when SOUTHWEST changes to NORTHWEST and
when NORTHWEST ends or changes to something else).
The column to be tested for a change in contents can be a normally
defined column or a Line Tag column. A dashed line is output before, and
a blank line is output after, the formula line. This formatting makes it
easy to determine where DataImport has inserted formulas.
Inserting Formula Rows with Match Strings
DataImport allows you to output a Formula Row each time a specified
match string is encountered during translation. The match string can be
defined to require an exact match, or a pattern match using wildcard
characters.
This option is useful when a report has groups of information without
subtotals that is either on different pages, or is separated by headings.
DataImport can be instructed to insert formula cells in rows before each
new page or heading.
To insert a Formula Row based on a match string, select the text to be
used as a match string and choose Options Formula Rows Insert on
Match... If the match string is always the same character sequence, press
OK. To define a pattern of characters, edit the Original String by
including the appropriate wildcard characters. If the string must occur at
the same line position as the original string, then in the Position on line
field, mark the At Position option, otherwise, choose Anywhere.
Replacing Lines with Formula Rows
A Formula Row can replace the cell contents of an Input File line each
time a specified match string on the line is encountered during translation.
The match string can be defined to require an exact match, or allow for a
pattern match using wildcard characters.
Many reports already contain totals. The Options Formula Rows
Replace on Match... command can be used to replace the literal totals in
an Input File with the formulas for the totals. This change can facilitate
“what if” analysis in spreadsheets by showing the new total after a change
is made to a detail line.
DataImport
Chapter 4: Fitting DataImport to Your Needs • 68
To replace a line with a Formula Row based on a match string, select the
text to be used as a match string and choose Options Formula Rows
Replace on Match... If the match string is the exact same character
sequence occurring at the same line position, press OK. To define a
pattern of characters, edit the Original String by including the appropriate
wildcard characters. If the string must occur at the same line position as
the original string, then in the Position on line field, mark the At Position
option, otherwise, choose Anywhere.
Working with Database Files
Relationship Between Columns and Fields
A field serves much the same function in a database that a column does in
DataImport. The information in a defined column will be sent to the
corresponding field in the database file. For example, data in column A
will go to the first field, column B’s data will go to the second, etc.
Assigning Columns to Database Fields
When creating a new database or mail merge Output File, the DataImport
column names are used as the field names. The column names initially
default to be the column letters. The column names can be changed by
clicking the mouse button anywhere in the column, selecting the Column
Settings... command and typing a new name in the Field Name field.
After the column name is entered, the column indicator bar above the
Input File display window will include the column letter and the column
name. For example, if column B is named “CITY”, the column indicator
bar will display “B:CITY” above the column.
If the output database already exists, then you can only select from the
available field names in the existing output file. This feature prevents
existing database files from being corrupted with conflicting fields and
data. To create a database with a new structure, choose File Define
Output File... type in a different name for the new database and press
OK, or delete the existing database file.
Displaying the Database Structure
DataImport offers two ways of displaying the structure of an existing
database file. Both methods show field name, length, type, and the
column letter that corresponds to the field in the mask.
When outputting to an existing database file in the Mask application, you
can display the database structure of the existing file by choosing the
File Show Database Fields... command. A dialog box will appear
showing the current field names, field types, field lengths and their
relationship to the existing column definitions:
DataImport
Chapter 4: Fitting DataImport to Your Needs • 69
Figure 4-17 Database structure displayed with the File Show Database Fields...
command in the Mask application.
The DataImport Utilities application can also extract the structure of a
dBase format database file from the header information. To output the
structure of the database to a file, use the dBase header function.
Specifying Table Names Access (MDB) format databases use
Tables within files. You can specify an existing table from a file or
specify a table name. If no table name is specified, DataImport will use
“Table1”. To control the table name for an Access Output File, choose
File Define Output File..., make sure a Microsoft Access output type is
defined and specify a table name in the Table Name field.
Translating to an Existing Database
Caution: Except for Microsoft Access, any indexes associated with an
existing database must be regenerated following output to the file.
DataImport does not update indexes when it performs a database
translation. DataImport does update Access indices.
DataImport retains all characteristics of a database structure during a
translation and only outputs information that is associated with a field. If
more columns have been defined than existing fields in the database, then
the information in the columns not associated with fields is not output. If
fewer columns have been defined than fields in the database, some fields
will remain blank.
DataImport never changes
the structure of an existing
database, even if the
Replace option is specified.
When instructed to perform a translation into a database file, DataImport
verifies that the Output File exists. If the file exists, you can specify that
DataImport either append to the file by keeping the current records and
adding new records, or completely replace the records already in the file.
You can set DataImport to automatically Append or Replace by choosing
File Define Output File... and selecting one of these options from the
Action when output exists menu.
DataImport
Chapter 4: Fitting DataImport to Your Needs • 70
Translating to a New Database
If a database file does not exist when a file is translated to a database
Output File type, then DataImport creates the database structure by
setting the field names, field length and field type according to the current
definitions in the mask.
The default database field names written into the new database structure
are the Mask’s column letters (i.e., A, B, C, D,...). You can specify the
Field Name of a column (data fields) as any valid field name (i.e.,
NAME, ADDRESS, etc.) by clicking in a column, choosing Column
Settings... and typing in a field name in the Field Name text field.
IMPORTANT!: If you are using DataImport to create the structure
of the database and you redefine the mask to include more or fewer
columns, change a field type or column width after translating, delete
the database file and associated structure created by DataImport
before proceeding. If you do not delete the first database, the
structure will remain intact and DataImport will not alter the
structure even if you change the mask. Alternately, you can change
the name of the output file to a new name.
Creating Records from Report Files
Some reports contain information in a heading at the top of the page that
needs to be included on each line. Columns containing this heading
information can be added to each line using the Mask application’s Line
Tag feature.
Some reports leave the column blank if it contains the same information
as the preceding line. Information from previous lines can be
automatically copied into the blank cells on each line in a column by
choosing Column Settings... and marking the Fill-down option for each
column.
DataImport
Chapter 4: Fitting DataImport to Your Needs • 71
Chapter 5: DataImport Mask
Reference
This section details the commands and options for the DataImport Mask.
DataImport Mask
This section of the User Reference describes operations performed using
the menu commands in the Mask application. The Mask window displays
the Input File, defines masks and translates data.
File
File
³
ÃÄ Load Input File...
ÃÄ Close Input File
ÃÄ Input File Statistics
ÃÄ Print Input File
³
ÃÄ New Mask
ÃÄ Open Mask...
ÃÄ Save Mask
ÃÄ Save Mask As...
ÃÄ Summary Info...
ÃÄ Print Mask Settings...
³
ÃÄ Define Output File...
ÃÄ Translate...
ÃÄ Show Database Fields...
³
ÀÄ Exit
DataImport
Chapter 5: DataImport Mask Reference•• 72
File Load Input File...
Selects and then loads an input file to be translated.
By default the first 1,000
lines of the input file are
loaded into the Mask
window. The number of
lines to be loaded (up to
16,384) is specified by
selecting Preferences from
the Options menu. The fewer
lines loaded the faster the
Mask window is updated.
Procedure:
1.
From the File menu, choose Load Input File...
2.
Choose a file from the File Name list box or type
the name of the file to be loaded including the full
path under File Name.
3.
Press OK to load the file.
After an input file is chosen, it is displayed in the Mask window.
Usually, the file search is set to the default working directory or the last
directory that was searched. Drive specifications must end with a colon
(:), and directory specifications with a backslash (\).
File Close Input File
Closes the input file and removes it from the Mask screen.
Procedure:
1.
From the File menu, choose Close Input File.
File Input File Statistics
Displays information about the currently loaded input file.
Procedure:
1.
From the File menu, choose Input File Statistics.
A pop-up window appears with the number of bytes, number of lines and
the maximum character line width of the file.
File Print Input File
Prints the currently loaded input file.
Procedure:
1.
From the File menu, choose Print Input File.
File New Mask
Clears memory of all mask columns, line treatments, settings and options.
Procedure:
1.
From the File menu, choose New Mask.
A pop-up window appears as the program initializes a new mask, the
previously loaded mask is removed and a new mask becomes active.
File New Mask deletes the current mask from memory and restores all
mask selections to the default settings. It does not delete or change any
Mask Files saved on disk.
File Open Mask
Loads a previously saved Mask File onto the current Input File.
DataImport
Chapter 5: DataImport Mask Reference•• 73
Procedure:
1.
From the File menu, choose Open Mask.
2.
Choose a mask file from the File Name list box or type the name
of the file to be loaded including the full path under File Name.
3.
Press OK to load the file.
File Save Mask
Saves the current mask in memory to a Mask File.
Procedure:
1.
From the File menu, choose Save Mask.
The Mask File is saved in the current mask directory. If the current mask
has not been saved previously, you will be prompted to name the Mask
File and choose a directory.
File Save Mask As...
Saves the current mask to a Mask File with a new name and/or directory
location.
Procedure:
1.
From the File menu, choose Save Mask As....
2.
Type the mask file name, choose a directory for the file and
press OK to save the file.
File Save Mask As... is used when saving a Mask File for the first time,
when naming a new version of an existing mask or for saving the current
mask to a different directory. It also prompts the user for a description
and an author. An extension of .MSK is automatically added to the Mask
File name if no extension is provided.
File Summary Info
Displays a brief description and the author of the current mask and allows
changing this information.
Procedure:
1.
From the File menu, choose File Summary Info.
File Print Mask Settings...
If your Mask is not selecting
the information that you
expected, try printing the
mask settings and reviewing
the listing.
Lists settings defined in the current mask on screen and/or on a printer.
Procedure:
1.
From the Files menu, choose Print Mask Settings....
2. The current mask settings will be listed on screen. Press Print
to output the settings on the current printer or press Cancel to
return to the Mask application.
This option is very useful, particularly when the mask contains a lot of
Include Lines, Exclude Lines and other settings. The report lists all
settings, file names and column definitions.
DataImport
Chapter 5: DataImport Mask Reference•• 74
File Define Output File...
If your output file type is a
database like Access, dBase
or Paradox, please be sure
to read the section titled
Working with Database
Files on page 70.
Selects a name and file format for an output file
Procedure:
1. From the File menu, choose Define Output File....
2. Type a path and file name for the Output File name or press the
[...] button at the end of the field to select a name and directory
location.
3. Select an Output File Type.
4. Select an option from the Action when output exists menu.
5. Press OK to accept the current output settings.
The Action when output exists option controls the procedure for saving
output to a file that exists. The default is Warning, which allows the user
to decide each time a file is translated.
For more information about output formats, see the Input and Output
section in Chapter 4: Fitting DataImport to Your Needs.
File Translate...
Translates the input file using the current mask and output settings.
Procedure:
1.
From the File menu, choose Translate...
2.
The Translation Parameters window appears with the current
output settings. Press Translate to begin the translation or press
Settings to change the output parameters.
File Translate is usually used at the conclusion of a masking session to
generate output for a spreadsheet or database.
File Show Database Fields...
Displays the database record structure along with a comparison to the
columns in DataImport.
Procedure:
1.
From the Files menu, choose Show Database Fields...
2.
The Database Fields window appears with field information.
Press OK to return to the Mask screen.
This option is available only when the type of translation is a database
and the Output File exists. File Show Database Fields... displays
information about the existing output database file that can help match
fields in the records with the proper columns in DataImport. The example
below illustrates how the database record structure is displayed.
DataImport
Chapter 5: DataImport Mask Reference•• 75
Figure 5-1 View of database structure.
The number in the first column indicates the sequence of the fields in the
output file. The first field in the database is column A, the second field is
column B, etc. Change the sequence of fields by changing the lettering of
existing columns.
Field Name lists the names of the fields in the existing database.
Field names in an existing database file cannot be changed.
Field Type indicates the type of data contained in the field in the
existing database. Field types in an existing database file cannot
be changed.
Width indicates the field widths in the existing database.
Column lists the letter setting for each column in the mask.
Column Type shows the data format setting for the column in the
mask. Column types should be set to match the existing database
field type. Edit this setting by selecting the Type option with the
Column Settings menu option.
Length indicates the current width of the column defined in the
Mask. This is not the output width.
If the output file already exists, order the columns by changing the
column letters. Remember that columns in a mask can be skipped and do
not need to be in sequence. The column width defined in DataImport is
not used. The output width is the same as the database’s field length.
File Exit
Closes current mask, input file and the application.
Procedure:
1.
From the File menu, choose Exit.
If the current mask has not been saved, the application will ask if you
want to save it. You do not need to restart the mask application to create
a new mask; use File New Mask to initialize a mask with default settings.
DataImport
Chapter 5: DataImport Mask Reference•• 76
Search
Search
³
ÃÄ Find Text...
ÃÄ Find Control Codes
³
ÃÄ Find Next
ÃÄ Find Previous
ÃÄ Find First
ÃÄ Find Last
³
ÃÄ Go Top
ÀÄ Go Bottom
Search Find Text...
Searches for a specified text string within the current input file.
Procedure:
1.
From the Search menu, choose Find Text...
2.
Type the text string to search for under Find.
3.
If you want the search to be case sensitive make sure the Case
Sensitive Search option is marked.
4.
Press OK to begin the search.
The Find Text... command is useful for locating specific text within a
large input file. The search will find the specified text as a single word or
within a word. For example, a search for “on” will find “on”, “iron” and
“control.”
Search Find Control Codes
Searches for a control code within the current input file.
Procedure:
1.
From the Search menu, choose Find Control Codes.
The Find Control Codes command locates any characters that have an
ASCII value less than 32. These codes are typically used to control
printer functions. If the Input File you have loaded contains a high
percentage of control codes (25% or more), the file is probably not in
ASCII format. For more information about supported input formats, see
Input and Output in Chapter 4: Fitting DataImport to your Needs.
To find a series of control codes, use the Find Next command to proceed
through a number of these codes. Exclude the display and translation of
these characters by using the Exclude Characters All Special
Characters command. To exclude a specific control code, highlight the
character and use the Exclude Characters Define... command.
Search Find Next
Searches for next instance of current Find match string.
DataImport
Chapter 5: DataImport Mask Reference•• 77
Procedure:
1.
From the Search menu, choose Find Next.
This command is useful for locating multiple instances of a text string in
a large input file. The shortcut key for this command is <F3>.
Search Find Previous
Searches for previous instance of the Find match string.
Procedure:
1.
From the Search menu, choose Previous.
This command uses the currently defined criteria for the search. Change
text search parameters using the Search Find Text... command.
Search Find First
Searches for instance of the Find match string closest to the beginning of
the Input File.
Procedure:
1.
From the Search menu, choose Find First.
This command uses the currently defined criteria for the search. Change
text search parameters using the Search Find Text... command.
Search Find Last
Searches for instance of Find match string closest to the end of the Input
File.
Procedure:
1.
From the Search menu, choose Find Last.
This command uses the currently defined criteria for the search. Change
text search parameters using the Search Find Text... command.
Search Go Top
Searches for the beginning of the input file.
Procedure:
1.
From the Search menu, choose Go Top.
Search Go Bottom
Searches for the end of the input file.
Procedure:
1.
DataImport
From the Search menu, choose Go Bottom.
Chapter 5: DataImport Mask Reference•• 78
Column
Column
³
ÃÄ Define...
ÃÄ Settings...
ÃÄ Undo
ÃÄ Undo All
³
ÃÄ Auto Define All
ÀÄ Push/Pull...
Column Define...
Defines a new column based on the currently highlighted or selected
character positions
Procedure:
1.
Highlight a horizontal range of character positions to be
included in the column.
2.
From the Column menu, choose Define...
3.
The Column Settings dialog box appears. From the Type option
menu, choose a data type.
Figure 5-2 Column Settings Dialog Box
Note that each column type has different configurable options.
These are explained below.
DataImport
4.
If the file is to be output to an existing database, map it to the
proper field from the Field Name option menu. If the database
does not yet exist, type in the Name of the field to be associated
with this column. For other output file types, an optional column
name can be entered.
5.
Press OK to finish defining the column.
Chapter 5: DataImport Mask Reference•• 79
This command defines the left and right boundaries of a column.
Columns cannot overlap. Each line of text within the defined column is
extracted to the same column in a spreadsheet, or the same field in all
records of a database.
After a column is defined, you can change the parameters controlling the
translation of the column by pressing the column control button at the top
of the column. The Column Settings dialog box appears.
Type indicates the kind and/or format of data to be extracted. When a
column is initially defined, the column’s type defaults to the column type
specified in the Preferences menu.
Numeric attempts to format data as numbers. In addition to
numeric digits, it also recognizes symbols used to format numbers,
such as decimal points, thousands separators, currency symbols,
and negative indicators. To change these symbols, select Options
International... and choose the appropriate symbols. If nonnumeric data is encountered in the cell, DataImport formats the
data as Text.
Text (Character/Label) formats the data as alphanumeric text.
Text Left Justified is the same as Text Character/Label except that
it removes blank spaces from the left of the text.
Text Block formats multiple lines of data into the same cell. Text
Block keeps adding data from multiple lines within the same
column into the same cell (or field) during translation until the next
line is to be output or a blank cell in the column is encountered.
You can also specify the Block to be a specified number of lines.
Date (Month-day-yr) attempts to recognize data as a date that is
printed in month day year order with separators into the date
format of spreadsheets and databases. Date settings can be
modified under Options International and Options Dates.
DataImport will attempt to format this data as dates first, then text.
Date (Day-month-yr) Similar to Date Month-day-yr.
Date (Yr-month-day) Similar to Date Month-day-yr.
Date (Month-yr) Similar to Date Month-day-yr.
Date (Yr-month) Similar to Date Month-day-yr.
Date (Yr-day) Similar to Date Month-day-yr.
Date (Day-yr) Similar to Date Month-day-yr.
Date Custom will format data as a custom date defined by the user
in the Options Dates dialog box as a format without separators.
Time attempts to format data as time, then numeric, and text last.
Signed Overpunch attempts to recognize data in the input file that
is signed overpunch and translate the data as numeric. The signed
overpunch strings are determined by Options Signed Overpunch.
Name Parse (Last, First) attempts to recognize the individual parts
of a name that consists of a last name followed by a comma and the
DataImport
Chapter 5: DataImport Mask Reference•• 80
remaining parts of the name. During translation it outputs the data
into separate columns for the Prefix, Last Name, Middle Name,
First Name, and Suffix. You can have one, several, or all of these
fields defined as separate columns.
Name Parse (First Last) attempts to recognize the parts of the
name in their natural order, such as a name would appear in an
address. It outputs the data into separate columns as described
above.
Address Parse outputs data into separate columns for the City,
State, and Zip/Postal Code.
User Definable settings within the Column Define dialog
box
Many of the above mentioned column types have their own set of
definable settings. These are listed below.
Case determines how text data will be capitalized. There are four options;
As-is, Lower, Upper, and Proper (which capitalizes the first encountered
character and the first character after each blank space).
Implied Decimals is a specified number of decimal places that can be
applied to numeric data in the input file. For example the number 34596
with Implied Decimals set to 2 would be translated as 345.96. If the
number already has a decimal point, it is not changed.
Letter indicates the sequence in which the columns will be output,
regardless of their actual position in the Input File. Data can be output to
any column in a spreadsheet. Columns can be skipped. The column’s
sequence defaults to the order in which they are defined or selected. For
example, if a new column is defined between existing column A and
existing column B, it will default to column C.
Name indicates the name of the database field to which the column will
be output. If the output database file exists, an option menu lists the field
names in the existing database. If the database does not exist, the user can
type in the name of the new field or let it default to the letter of the
column. A name can also be specified when outputting to other file types.
Output Width determines the character width of the translated column in
the output file.
When Blank controls how DataImport deals with blank cells or records
in existing files.
No-Fill does not write anything into the cell.
Fill writes blank data into the cell.
Fill-down writes the same data from the last filled cell above it.
Some reports do not duplicate information from line to line if the
information stays the same. Only the first occurrence of the
information is included; successive cells contain blanks until the
contents change. The following is an example of this type of report:
DataImport
Chapter 5: DataImport Mask Reference•• 81
W E E K L Y
S A L E
CITY
SALES PERSON
------- -----------------ATLANTA JOHN DOE
BOSTON
SAM JONES
MARY SMITH
S
R E P O R T
CUSTOMER
AMOUNT
---------- ------18321
10,245
24356
6,322
17623
28,995
16590
2,056
08842
18,545
Figure 5-3 Input File with blank cells
If the columns including the city and salesperson are defined with a Filldown option, the data will be translated with the following format:
W E E K L Y
S A L E
CITY
SALES PERSON
------- -----------------ATLANTA JOHN DOE
ATLANTA JOHN DOE
ATLANTA SAM JONES
BOSTON
MARY SMITH
BOSTON
MARY SMITH
S
R E P O R T
CUSTOMER
AMOUNT
---------- ------18321
10,245
24356
6,322
17623
28,995
16590
2,056
08842
18,545
Figure 5-4 Output File with blank cells filled-down
@Function defines the mathematical formula to be calculated with the
column data. The inclusion of formulas is controlled with the Options
Formula Rows commands.
Limit defines a range of data to be extracted. For example, a range of
dates from March 15, 1991 to December 30, 1998 or a range of dollar
amounts between 1 million and 10 million. Limit also works with labels
by allowing you to select alphabetical ranges. For example, part numbers
starting with DX to parts starting with DZ.
Column Settings...
Changes parameters of an existing column.
Procedure:
1.
Click in the column to be redefined.
2.
From the Column menu, choose Define...
3.
Edit the options you want to change and press OK to apply the
changes.
Column settings can also be changed by pressing the column control
button at the top of the column or by double clicking in the column. The
width of a column can be changed by dragging the left or right edge of a
column control button.
Column Undo
Removes one column.
DataImport
Chapter 5: DataImport Mask Reference•• 82
Procedure:
1.
Click in the column to be deleted.
2.
From the Column menu, choose Undo.
Use this command to remove misplaced or incorrect columns.
Column Undo All
Removes all defined columns.
Procedure:
1.
From the Column menu, choose Undo All.
Use this command to clear all columns from a mask without removing
other mask definitions. Use the File New Mask to remove all mask
settings.
Column Auto Define All
Defines columns automatically based on the patterns found in the current
line that the cursor is positioned on.
Procedure:
1.
Click on the line to use as the sample pattern for defining
columns.
2.
From the Column menu, choose Auto Define All.
The Input File is re-displayed with the new column positions. All
previously defined column positions are disregarded. New columns are
defined for the entire length of the line used as the pattern.
DataImport can be set to automatically define columns when an Input File
is loaded. Turn AutoColumn function on or off by choosing Options
Preferences... and changing the Automatically define columns option.
To remove all column definitions, select the Column Undo All option. If
needed, columns can be manually defined by selecting Column Define...
option.
Column Push/Pull
Moves all columns to the right of the cursor a specified number of
character positions in either horizontal direction.
Procedure:
1.
From the Column menu, choose Push/Pull.
2.
Select either the Push or Pull radio button.
3.
Enter the number of character positions to push/pull.
4.
Press OK to perform the push/pull.
Use this command to ‘push or pull’ some or all of the mask columns to
the left or right.
DataImport
Chapter 5: DataImport Mask Reference•• 83
Tag
Tag
³
ÃÄ Define Match String Reference Point...
ÃÄ Edit Match String Reference Points...
³
ÃÄ Top of Form Reference Point
ÃÄ Bottom of Form Reference Point
³
ÃÄ Line-Tag Define...
ÀÄ Undo Line-Tag
Tag Define Match String Reference Point...
Creates a Reference Point for Line Tags based on selected text.
Procedure
1.
Highlight text on a line to be used as a Reference Point.
2.
From the Tag menu, choose Define Match String Reference
Point...
3.
The Define Match String Reference Point dialog box appears. If
necessary, type in any pattern match characters or change the
selection text.
4.
If the line tags associated with this reference point should only
be output one time, then select the check box for clearing all
associated line tags after outputting.
5.
Press OK to create the Match String Reference Point.
Match String Reference Points are used in conjunction with Line Tags to
extract information from forms and other reports where information is
located at specific positions on each page. They are also used to output
information from page headings to each detail line.
Reference Points serve as starting points which DataImport uses to find
information that is located in relation to the Reference Point. For
example, on a form that prints the text LAST NAME at a certain position
on each page that is followed by a name such as JENKINS, the text
LAST NAME would serve as the Reference Point.
During translation, the occurrence of a Reference Point causes the Line
Tags associated with it to be refreshed. The Reference Point match string
can be defined to require an exact match, or a pattern match using
wildcard characters.
Reference Points are displayed as a red foreground on a gray background.
Up to one hundred Reference Point match strings can be defined for a
mask. Only one Reference Point is allowed on a line.
A Reference Point must be defined before any tags to be associated with
it can be defined. When a Line Tag is defined, it is associated with the
closest Reference Point occurring before the tag.
DataImport
Chapter 5: DataImport Mask Reference•• 84
Edit Match String Reference Point...
Allows deleting existing Reference Points and editing of the match
strings.
Procedure
1.
From the Tag menu, choose Edit Match String Reference
Point...
2.
The Reference Points dialog box appears. Choose one of the
defined Reference Points and press either Delete All, Delete
Marked, or Edit.
3.
Press OK to return to the Mask window.
Top of Form Reference Point
Creates a Reference Point at the top of each page. This is useful when
your input file has one form per page.
Form Length Reference Point
Creates a Reference point every specified number of lines. This is useful
when you have a set number of lines per form.
Tag Line-Tag Define...
Creates a Line Tag based on the current selection or changes an existing
Line Tag’s settings.
Define a New Line Tag
Procedure:
1.
Highlight the text to be output as a Line Tag.
2.
From the Tag menu, choose Line-Tag Define...
3.
The Tag Settings dialog box appears. Set the type of data for the
Line Tag column using the Type options menu.
4.
Press OK to accept the Line Tag settings.
The window's title bar indicates which Reference Point is being used to
locate the Tag.
At least one Reference Point must be defined before a line Tag can be
defined. Line Tags can only be defined to appear on or after the line that
contains the first occurrence of the Reference Point.
See Column Define on page 80 for explanation of the options in the tags
setting dialog box.
The Line Tag function inserts a new column that duplicates information
that appears at certain points in the Input File. Line Tags repeat the same
information on each output line until an associated Reference Point is
encountered, at which point the Line Tag information is updated. At each
occurrence of a Reference Point, only the information for the Line Tags
associated with that Reference Point is updated.
DataImport
Chapter 5: DataImport Mask Reference•• 85
NOTE Line Tags are associated with the closest Reference Point
occurring before the tag when it is defined. Therefore, a Reference Point
should be defined with the Tag Define Reference Point... option, then
the Line Tags associated with that Reference Point should be defined
immediately afterwards. Do not define a new Reference Point until all
Line Tags are defined for the current Reference Point.
Line Tags are displayed with a gray background and a foreground color
that indicates the type of data defined, with blue for values, magenta for
labels, green for dates and yellow for times. On a monochrome monitor,
data defined as a tag is highlighted.
Edit an Existing Line Tag
When a Line Tag has been defined, you can redefine the Tag’s settings:
Procedure:
DataImport
1.
Click in the existing Tag.
2.
From the Tag menu, choose Line-Tag Define...
3.
The Tag Settings dialog box appears. Reset the type of data or
other options for the Line Tag column. See Column Define for
more information about the option in this dialog box.
4.
Press OK to accept the new Line Tag settings.
Chapter 5: DataImport Mask Reference•• 86
Include
Include
ÃÄ Lines
³
ÃÄDefine...
³
ÀÄEdit...
ÀÄ Resume
ÃÄDefine...
ÀÄUndo...
Include Lines Define...
Defines a specified number of lines to be included in the output file based
on the occurrence of a specified character match string.
Procedure:
1.
Highlight the match string to cause the line to be included in
translation.
2.
From the Include menu, choose Lines and then Define...
3.
The Define Include Line dialog box appears. If necessary, type
in new characters or pattern match characters under the Original
String field.
4.
In the Position on line field, choose At position or Anywhere.
5.
In the Lines to Include field enter the number of lines to be
output when the match string is encountered.
6.
Press OK to apply the Include command.
Use this command to include specific data rows in an output file. For
example, Include Lines Define... can be used to include all lines in a
report that contain MIAMI. Wildcard search characters can be used to
make the Inclusion definition more flexible.
The text string field under Original String defines what characters must
be present on a line in order for a line to be included. Use the special
pattern matching characters as wildcards for searches:
^
single numeric character (0–9)
!
single non-numeric character (AaZz$%^&*” “)
~
any single character excluding a blank space (AaZz$%^&*””)
_
any single character or blank space (0–9,AaZz$%^&*””)
Position on line controls where the text string can occur on a line.
At position indicates the text string must occur at the same line
position as the original text string.
Anywhere indicates the text string can occur at any position on a line.
Lines to include controls how many lines are included for each
occurrence of the Include match string. For values greater than one,
additional lines are included immediately below the line where the
Include text string occurs.
DataImport
Chapter 5: DataImport Mask Reference•• 87
The lines to be included are displayed with background colors indicating
how the cells will be translated. The line containing the Include match
string is displayed with an uppercase “I” in the left margin. All additional
lines in the associated range are displayed with a lowercase “i” in the left
margin.
Lines that are specifically set as Skip, as indicated by an uppercase “S” in
the left margin, will not be included during translation. Output, Title and
Heading Lines will be translated.
In Global Output Lines Mode, Include Lines have precedence over
Exclude Lines. That is, if an Include match string occurs in an Exclude
Lines’ range, the Include Lines will be translated. In Global Skip Lines
Mode, Exclude Lines have precedence over Include Lines.
Include Lines are usually used with the Global Skip Lines Mode option to
select lines that have common information. Therefore, Global Skip Lines
Mode is automatically activated when the first include line is defined.
Include Lines Edit...
Removes specified Include Line definitions and allows editing of the
match strings.
Procedure:
1.
From the Include menu, choose Lines and then Undo.
2.
The Include Line Strings dialog box appears. Select one of the
Include Line operations from the list.
3.
Select either Delete Marked or Delete All or Edit.
4.
Press OK to return to the mask screen.
Include Resume Define...
Restarts translation of rows after a Pause command when a specified
match string is encountered.
Procedure:
1.
Highlight a text string that should restart row translation.
2.
From the Include menu, choose Resume and then Define...
3.
The Define Resume String dialog box appears. If necessary, type
in new characters or pattern match characters under the Original
String field.
4.
In the Position on line field, choose At position or Anywhere.
5.
Press OK to apply the Resume definition.
Use the Include Resume command in conjunction with Exclude Pause
Define... to extract blocks of information that occur over an
indeterminate number of lines. Use the Include Line Define... command
to specify translation blocks with a fixed number of lines.
The text string field under Original String defines what characters must
be present on a line in order for translation to be restarted. Use the special
DataImport
Chapter 5: DataImport Mask Reference•• 88
pattern matching characters as wildcards for searches: See Appendix F:
Match String Wildcard Characters for more information about pattern
matching characters.
Position on line controls where the text string can occur on a line.
At position indicates the text string must occur at the same line
position as the original text string.
Anywhere indicates the text string can occur at any position on a
line.
Begin in Pause Mode controls whether or not the translation is assumed
to be in pause at the beginning of a file. Marking this option essentially
puts a Pause command at the beginning of the input file.
The Resume command restarts translation of rows of data after a Pause
command has been defined in a previous row. Resume definitions are
based on the occurrence of a text string in the Input File. For more
information about the Pause command, see “Exclude Pause Define” on
page 93.
Include Resume Undo...
Removes the current Resume definition.
Procedure:
1.
From the Include menu, choose Resume and then Undo.
Use this command to remove a previously applied Resume definition.
DataImport
Chapter 5: DataImport Mask Reference•• 89
Exclude
Exclude
ÃÄ Lines
³
ÃÄ Define...
³
ÀÄ Edit...
ÃÄ Characters
³
ÃÄ Define...
³
ÃÄ All Special Characters
³
ÃÄ Edit...
³
ÀÄ Undo All Special
ÃÄ Pause
³
ÃÄ Define...
³
ÀÄ Undo...
³
ÃÄ Blank Lines
ÃÄ Page Ejects
ÀÄ Duplicate Lines
Exclude Lines Define...
Defines a specified number of lines to be excluded in the output file
based on the occurrence of a specified character match string.
Procedure:
1.
Highlight the match string that will cause the line to be excluded
from translation.
2.
From the Exclude menu, choose Lines and then Define.
3.
The Define Exclude Line dialog box appears. If necessary, type
in new characters or pattern match characters under the Original
String field.
4.
In the Position on line field, choose At position or Anywhere.
5.
In the Lines to Exclude field enter the number of lines to
exclude when the match string is encountered.
6.
Press OK to apply the Exclude command.
Use this command to exclude lines from translation. The Exclude Lines
command uses a text string to define which lines are to be excluded from
translation into the output file. Wildcard search characters can be used to
make the Exclusion definition more flexible.
The lines to be excluded are displayed with a white background. The first
line in an Exclude Line range is displayed with an uppercase “E” in the
left margin. All additional lines in the range are displayed with a
lowercase “e” in the left margin.
The text string field under Original String defines what characters must
be present on a line in order for a line to be included. Use the special
pattern matching characters as wildcards for searches. See Appendix F:
Match String Wildcard Characters for more information about pattern
matching characters.
Position on line controls where the text string can occur on a line.
DataImport
Chapter 5: DataImport Mask Reference•• 90
At position indicates the text string must occur at the same line
position as the original text string.
Anywhere indicates the text string can occur at any position on a
line.
Lines to exclude controls how many lines are excluded for each
occurrence of the Exclude text string. For values greater than one,
additional lines are excluded below the line where the Exclude match
string occurs.
Exclude Lines are often used to eliminate the repetitive output of titles
and headings after the first page of a report. On the first page of the
report, the Line (T)itle and Line (H)eading commands can be used to
indicate the page titles and column headings. The Exclude Lines
Define... command can then be used to exclude all subsequent
occurrences of titles and headings.
Lines with a Heading or Title treatment will not be excluded during
translation. Lines set as Output Lines—indicated by an uppercase “O” in
the left margin—will not be excluded during translation.
In Global Skip Lines Mode, Exclude Lines have precedence over Include
Lines. If an Exclude match string occurs in an Include Line’s range, the
Exclude Lines will not be translated. In Global Output Lines Mode,
Include Lines have precedence over Exclude Lines.
Exclude Lines Edit...
Removes a specified Exclude Line definition and allows editing of the
match string.
Procedure:
1.
From the Exclude menu, choose Lines and then Edit.
2.
The Exclude Line Strings dialog box appears. Select one of the
Exclude Line operations from the list.
3.
Select Delete Marked, Delete All or Edit.
4.
Press OK to return to the mask screen.
Exclude Characters Define...
Excludes a specified character string from translation.
Procedure:
DataImport
1.
Highlight the character string to be excluded from translation.
2.
From the Exclude menu, choose Characters and then Define...
3.
The Define Exclude Character dialog box appears. If required,
type in a Replacement String.
4.
In the Position on line field, choose At position or Anywhere.
5.
Press OK to apply the Exclude Character definition.
Chapter 5: DataImport Mask Reference•• 91
The Input File will be re-displayed, omitting the Excluded characters
from all lines of the display. If defined, the replacement strings will be
displayed.
Use this command to exclude a specific string of characters any time they
are encountered during translation. Excluded characters can be optionally
replaced with a different string of characters. This command can be used
to remove or replace printer control codes and “escape sequences”. It can
also be used to search and replace.
Exclude Character String shows the originally selected character string
to be excluded from translation.
Replacement String controls what characters are put in place of the
excluded characters. The Replacement String is optional, but users may
want to type the number of spaces equal to the length of the character
string to preserve column and line spacing.
Position on line controls where the character string can occur on a line.
At position indicates the character string must occur at the same
line position as the originally selected character string.
Anywhere indicates the character string can occur at any position
on a line.
Exclude Characters All Special Characters
Excludes all control characters, except the escape character (ASCII 27).
Procedure:
1.
From the Exclude menu, choose Characters, and then All
Special Characters.
ASCII character codes 0 through 31 in an Input File are generally
formatting or control characters generated by the program that created the
file. Such special characters interfere with the display of the file in the
Mask window, causing misalignment of the columns.
Use this command to exclude all characters with ASCII codes 0 through
31. The escape character is not excluded automatically because many
times the escape character is used to signal that one or more of the
following characters are printer control codes. These are called “escape
sequences.” Undesired escape sequences in the Input File can be removed
by highlighting an occurrence of the characters in the escape sequence
and then choosing Exclude Characters Define...
Exclude Characters Edit
Removes a specified Exclude Characters definition and allows editing of
the replacement string.
Procedure:
1.
DataImport
From the Exclude menu, choose Characters and then Undo
From List...
Chapter 5: DataImport Mask Reference•• 92
2.
The Exclude Character Strings dialog box appears. Select one of
the Exclude operations from the list.
3.
Press either Delete Marked or Delete All or Edit.
4.
Press OK to return to the mask screen.
Exclude Characters Undo All Special
Removes a previous Exclude Characters All Special Characters
command.
Procedure:
1.
From the Exclude menu, choose Characters and then Undo All
Special.
Use this command to undo a previous Exclude Characters All Special
Characters command. Use Exclude Characters Edit to undo any other
previous Exclude Characters command.
Exclude Pause Define...
Suspends translation of any lines into the Output File when a match string
is encountered.
Procedure:
1.
Highlight the text string that will suspend line translation.
2.
From the Exclude menu, choose Pause and then Define...
3.
The Define Pause String dialog box appears. If necessary, type
in new characters or pattern match characters under the Original
String field.
4.
In the Position on line field, choose At position or Anywhere.
5.
Press OK to apply the Pause definition.
Use the Exclude Pause command in conjunction with Include Resume
Define... to extract blocks of information that occur over a variable
number of lines. Use the Include Line Define... command to specify
translation blocks with a fixed number of lines.
The text string field under Original String defines what characters must
be present on a line in order for translation to be suspended. Use the
special pattern matching characters as wildcards for searches: See
Appendix F: Match String Wildcard Characters for more information
about pattern matching characters.
Position on line controls where the text string can occur on a line.
At position indicates the text string must occur at the same line
position as the original text string.
Anywhere indicates the string can occur at any position on a line.
DataImport
Chapter 5: DataImport Mask Reference•• 93
Set the current mask to
begin in Pause mode by
choosing Options Global
and marking the Begin in
Pause mode option.
The Pause command stops translation of rows based on the occurrence of
a text string in the Input File. The Pause definition suspends translation of
the line on which the text string occurs and any line thereafter until a
Resume text string is encountered. Resume definitions are created using
the Include Resume Define... command. For more information about the
Resume command, see “Include Resume Define” on page 88.
Exclude Pause Undo...
Excludes the previous Pause definition.
Procedure:
1.
From the Exclude menu, choose Pause and then Undo.
Use this command to remove a previously applied Pause definition.
Exclude Blank Lines
Removes empty lines in an Input File from translation.
Procedure:
1.
From the Exclude menu, choose Blank Lines.
Use this command when the input file contains blank lines that you do not
want in the output file.
Exclude Page Ejects
Removes page ejects (form feed, ASCII character code 12) from data in
the Input File during translation.
Procedure:
1.
From the Exclude menu, choose Page Ejects.
The Input File will be re-displayed, omitting all form feed characters
from the display.
This option should be selected if form feeds are present in the Input File
and the translation is of spreadsheet, database, or interchange format.
When printing, some software programs insert a form feed character as a
page eject indicator and an end of line indicator. When DataImport
excludes a form feed, it replaces it with an end of line indicator.
Exclude Duplicate Lines
Removes lines that are exactly the same as the preceding line.
Procedure:
1.
From the Exclude menu, choose Duplicate Lines.
Some programs on mainframe computers print a line, perform a carriage
return without a line feed, and print the line again. This results in double
striking or “bold” print used for emphasizing titles and headings on
reports. This option removes the second line of print.
DataImport
Chapter 5: DataImport Mask Reference•• 94
Line
Line
ÃÄ Default
ÃÄ (S)kip
ÃÄ (H)eading
ÃÄ (O)utput
ÃÄ (T)itle
ÃÄ (A)bort
³
ÃÄ Push Pull Treatments...
ÀÄ Undo All Treatments
Line Default
Resets line treatment to the default mode.
Procedure:
1.
Highlight the line(s) to be defined.
2.
From the Line menu, choose Default.
The selected lines are set to the system default. The Line Control Bar will
display a small “o” for each line if the mask is set to Global Output Line
Mode or a small “s” if the mask is in Global Skip Line Mode. For more
information about Global modes, see “Options Global” on page 106.
To reset all line treatments
in the mask to the default
mode, choose Line Undo
All Treatments.
Use this command to remove treatments from a line that has been defined
as Output, Skip, Heading or Title. All lines in a new mask default to the
Global Mode setting. Line treatment defaults to the Global Mode setting
until another line treatment (Output, Skip, Heading, Title, etc.) is selected
or Include and Exclude Lines are defined.
Line (S)kip
Defines lines to be ignored during translation.
Procedure:
1.
Highlight the line(s) to be defined.
2.
From the Line menu, choose (S)kip.
An “S” appears in the Line Control Bar on the left margin to indicate that
the lines will be skipped.
The Mask window's Exclude
Lines Define... Command
also skips lines during
translation based on the
occurrence of a match
string.
Use the Line Skip command to exclude specific lines from being
included in the output file. Skip Lines are positional. For example, if line
5 is set to Skip, every translation using this mask will not output line 5 of
the input file, no matter what text is on the line.
Line (H)eading
Translates text within columns on the selected lines as column headings.
Procedure:
1.
DataImport
Highlight characters on the line(s) to be defined.
Chapter 5: DataImport Mask Reference•• 95
2.
From the Line menu, choose (H)eading.
An “H” appears in the Line Control Bar on the left margin to indicate that
the lines will be treated as Headers. The headings are displayed on the
screen with a magenta background.
Heading line treatment can
be used to make sure that
numbers that are in column
headings are not translated
as values.
Lines defined as Headings include only data within defined column
ranges, not data for the entire line. During translation, each intersection of
a Heading Line and a column results in a cell being output. The cell type
is always text.
When Unstacking data (Options Unstack), Heading Lines are duplicated
over the unstacked data.
Line (O)utput
Defines lines to be included in the translation.
Procedure:
1.
Highlight the line(s) to be defined.
2.
From the Line menu, choose (O)utput.
An “O” appears in the Line Control Bar on the left margin to indicate that
the lines will be treated as Output. Numeric values are displayed on the
screen with a blue background, labels with a magenta background, and
dates with a green background. Lines defined as Output Lines include
only data in defined column ranges, not data for the entire line. During
translation, each intersection of an Output Line and a column result in a
cell being output. The formatting assigned to the cell is based on each
column’s Type setting.
Output Lines are positional, not associated with a particular format or
character string. If lines 2 and 3 are marked as Output Lines, then lines 2
and 3 are always output during translation, no matter what data is on the
line.
Line (T)itle
Translates the entire line as text or a single long label.
Procedure:
1.
Highlight the line(s) to be defined.
2.
From the Line menu, choose (T)itle.
A “T” appears the Line Control Bar on the left margin to indicate that the
lines will be translated as Titles. Title Lines are displayed on the screen
with a red background. Use this command to define lines that should be
translated as a single long label in the first column of your spreadsheet.
Titles are not translated into database output files.
Titles are commonly used when the Input File is a report. Most reports
contain information at the top of each page such as the report name and
date of printing. Defining lines as Titles keeps this information intact.
Column selection does not affect the translation of Title Lines.
DataImport
Chapter 5: DataImport Mask Reference•• 96
The Exclude Line Define... command can be used to suppress the output
of page titles after the first page.
Line (A)bort
When you are defining a
new mask for a large Input
File, you can test your mask
by temporarily defining an
Abort line.
Defines an artificial end-of-file at the selected line.
Procedure:
1.
Highlight the line to be defined.
2.
From the Line menu, choose (A)bort.
An “A” appears the Line Control Bar on the left margin and all following
lines are marked with an “a” to indicate that these lines will not be
translated.
Defining a line as Abort causes DataImport to act as if it has reached the
end of the Input File. The information translated up to the Abort Line is
saved in the Output File. An Abort definition supersedes all other line
treatments on the initial Abort line and all lines following it. Remove an
abort line by selecting the line and then choosing Line Default.
Push/Pull Treatments...
Moves the selected line treatments further up or down in the mask.
Procedure:
1.
Highlight the line(s) where the line treatment is to be inserted.
2.
From the Push/Pull Treatments... dialog box, choose Insert
Default Line Treatments or Delete Line Treatments.
Insert Default Line Treatments is typically used to modify an existing
mask when additional lines are inserted into the body of a report.
Inserting line treatments into the mask moves all previously defined line
treatments down without changing them. The line treatments that are
inserted are set to the default line treatment.
Delete Line Treatments is typically used to modify an existing mask
when lines are removed from the body of a report. Deleting line
treatments from the mask moves all previously defined line treatments up
without changing them. Line treatments on the selected lines are
discarded.
Line Undo All Treatments
Resets all line treatments to the default line treatment.
1.
From the Line menu, choose Delete Treatments.
Use this command to reset all current line treatments to the default line
treatment. The default line treatment—Output or Skip—is controlled by
choosing Options Global... and marking either the Output lines or Skip
lines option under Default Line Treatment.
DataImport
Chapter 5: DataImport Mask Reference•• 97
Unstack
Unstack
ÃÄ Define...
ÀÄ Undo...
Unstack Define...
Turns sets of a specified number of stacked lines into single longer lines.
Procedure:
1.
Select a text match string which will identify sets of lines to
unstack.
2.
From the Unstack menu, choose Define...
3.
Modify the match string if necessary. Wildcard characters can
be used.
4.
In the Lines to unstack field, enter the number of lines to
unstack.
5.
To apply the unstacking function, press OK.
Only one unstack command is allowed per mask.
The following example illustrates how a report file with stacked lines
looks before and after it is converted.
Figure 5-5 Stacked Input File with columns and headings defined
In this example, the Unstack command was defined with 2 Lines to
unstack and with “MONTH” as the match string. The screen below shows
the results of the Unstack command.
DataImport
Chapter 5: DataImport Mask Reference•• 98
Figure 5-6 Unstacked lines
Notice that the yearly data has been moved into new columns to the right
of the monthly data and that the Heading information has been duplicated
over the new columns. To complete the mask definition, two new
columns should be defined for the new yearly PERIOD and SALES
columns.
If the Input File has a heading at the top of each page and a block of lines
starts at the bottom of one page and carries over to the next page, it is
necessary to perform two translations. The first translation is used to
remove all of the headings from the file so that they do not interfere with
unstacking. To do this, define columns for the desired data, exclude the
headings (or include the desired lines), and translate to a print image
(.PRN) file. The second translation uses the output of the first translation
as a new clean input file.
To unstack lines only within
a column, select the Text
Block column type in the
Column Dialog Box.
The DataImport Utilities application will also unstack lines. It is useful
when it is not possible to define a match string. This is often the case with
address labels.
Unstack Undo...
Removes the effects of an Unstack command.
Procedure:
1.
From the Unstack menu, choose Undo.
Use this command to remove an unwanted or incorrect Unstack
command.
DataImport
Chapter 5: DataImport Mask Reference•• 99
Options
Options
³
ÃÄ Formula Rows
³
ÃÄ Column Change...
³
ÃÄ Insert on Match...
³
ÃÄ Replace on Match...
³
ÃÄ Display Current Settings
³
ÀÄ Undo
ÃÄ Global...
ÃÄ International...
ÃÄ Dates...
ÃÄ Signed Overpunch...
³
ÀÄ Preferences...
Options Formula Rows Column Change...
Inserts a row of formulas based on a data change in a specified column.
Procedure:
Formula Rows are
calculated with the
@Formula definitions for
each column.
1.
From the Options menu, choose Formula Rows and then
Column Change...
2.
The @Formula dialog box appears. Type in the letter of the
column to be checked for a data change.
3.
Press OK to apply the Formula Row definition.
Use this command to insert formula subtotals into the output file when the
data in one column changes. For example, the data in column A in the
sample report below lists ATLANTA 4 times and then changes to SAN
FRANCISCO. By defining a Formula Row Column Change based on
column A, a subtotal formula line is inserted after the last ATLANTA for
the ATLANTA data. The formulas are inserted and calculated again after
the last SAN FRANCISCO for that group of data.
On the following report, sales are listed in city sequence.
Figure 5-7 Input File without subtotals
DataImport
Chapter 5: DataImport Mask Reference•• 100
If all columns on this report are defined, and the CITY column (column
A) is declared for the Formula Rows Column Change option, subtotals
are inserted at the end of each CITY’s listing. Below is the resulting
report, in spreadsheet form. The spreadsheet actually contains the
formulas, as indicated in cell B16.
Figure 5-8 Output File with formulas for subtotals inserted
Notice that a solid dashed line is output before the formula row. After the
formula row, a blank row is output. This formatting makes it easy to
determine where DataImport has inserted formulas.
If no formula is defined for a column, its cell in the formula row is blank.
To define or change an @Formula for a column, use the Column
Define... command.
The column to be tested for a change in contents can be a normally
defined column or a Line Tag column. DataImport calculates a Formula
Row Column Change only if the Output File type is a spreadsheet.
Applying this function replaces a previous Formula Row definition. To
check which (or if a) formula row definition has been set, look for a
check mark next to an option on the Option Formula Row submenu.
Options Formula Rows Insert on Match
Inserts a row of formulas based on the occurrence of a specified text
string.
Procedure:
DataImport
1.
Highlight a text string to identify the end of a data set.
2.
From the Options menu, choose Formula Rows and then
Insert on Match.
Chapter 5: DataImport Mask Reference•• 101
3.
The Define @Formula Match String dialog box appears. If
necessary, type in new characters or pattern match characters
under the Original String field.
4.
In the Position on line field, choose At position or Anywhere.
5.
Press OK to apply the Formula Row definition.
Use this function to insert formula lines at the occurrence of a specific
text string. For example, the report below lists sales by region and then
prints END REGION: after each region. By defining END REGION: as a
match string, you can use the Formula Rows Insert on Match function
to insert @Formula subtotals before each occurrence of that text string.
On the following report, the region name appears after the list of cities in
the region.
Figure 5-9 Input File without subtotals by region
If all columns on this report are defined, and the match string is defined
as “END REGION:” for the Formula Rows Insert on Match command,
subtotals are inserted before the match string. Following is the resulting
report, in spreadsheet form. The spreadsheet actually contains the
formulas, as shown in cell B18.
DataImport
Chapter 5: DataImport Mask Reference•• 102
Figure 5-10 Output File with formulas inserted for each region
Notice that a solid dashed line is output before the formula row. After the
formula row, a blank row is output. This formatting makes it easy to
determine where DataImport has inserted formulas.
In the Define @Formula Match String dialog box, the text string field
under Original String defines what characters must be present on a line in
order for a formula row to be inserted. Use the special pattern matching
characters as wildcards for searches: See Appendix F: Match String
Wildcard Characters for more information about pattern matching
characters.
Position on line controls where the text string can occur on a line.
At position indicates the text string must occur at the same line
position as the original text string.
Anywhere indicates the text string can occur at any position on a
line.
DataImport inserts formulas during translation only if the Output File
type is a spreadsheet. This command replaces the selection of any other
Row Formula option.
The type of formula that is output is dependent upon each column
@Formula setting. If no formula is defined for a column, its cell in the
formula row is blank. To define or change an @Formula for a column,
use the Column Define... command.
Options Formula Rows Replace on Match
Replaces a line where a specified text string occurs with a row of
formulas.
Procedure:
DataImport
Chapter 5: DataImport Mask Reference•• 103
1.
Highlight a text string that identifies lines to be replaced.
2.
From the Options menu, choose Formula Rows and then
Replace on Match.
3.
The Define @Formula Match String dialog box appears. If
necessary, type in new characters or pattern match characters
under the Original String field.
4.
In the Position on line field, choose At position or Anywhere.
5.
Press OK to apply the Pause definition.
Use this function to overwrite lines where a text string occurs with a
formula line. For example, the report below lists sales by region and then
prints END REGION: after each region. By defining END REGION: as a
match string, you can use the Formula Rows Replace on Match
function to insert @Formula subtotals that will replace the lines where the
text string occurs.
Figure 5-11 Input File without subtotals by region
If all columns on this report are defined, and the match string is defined
as “END REGION:” for the Formula Rows Replace on Match
command, subtotals are written on the line where the match string occurs.
Following is the resulting report, in spreadsheet form. The spreadsheet
actually contains the formulas, as shown in cell B16.
DataImport
Chapter 5: DataImport Mask Reference•• 104
Figure 5-12 Output file with formulas replacing the end region line
In the Define @Formula Match String dialog box, the text string field
under Original String defines what characters must be present on a line in
order for it to be replaced by a formula row. Use the special pattern
matching characters as wildcards for searches: See Appendix F: Match
String Wildcard Characters for more information about pattern matching
characters.
Position on line controls where the text string can occur on a line.
At position indicates the text string must occur at the same line
position as the original text string.
Anywhere indicates the text string can occur at any position on a
line.
DataImport inserts formulas during translation only if the Output File
type is a spreadsheet. This command replaces the selection of any other
Formula Row option.
The type of formula that is output is dependent upon each column
@Formula setting. If no formula is defined for a column, its cell in the
formula row is blank. To define or change an @Formula for a column,
use the Column Define... command.
Options Formula Rows Display Current Settings
Shows current settings for insertion of Formula Rows.
Procedure:
1.
From the Options menu, choose Formula Rows and then
Display Current Settings.
Use this command to quickly check the status of the Formula Row
functions. A check mark on the Formula Rows submenu indicates which
of the Formula Row functions is in use (if any).
DataImport
Chapter 5: DataImport Mask Reference•• 105
Options Formula Rows Undo
Removes Formula Row definitions.
Procedure:
1.
From the Options menu, choose Formula Rows and then
Undo.
Use this command to remove unwanted or incorrect Formula Row
definitions.
Options Global...
Controls global settings for the current mask.
Procedure:
1.
From the Options menu, choose Global...
2.
The Global Settings dialog box appears. Change or edit the
appropriate options.
3.
Press OK to apply the new global mask definitions.
Use this command to control special settings in the mask.
Default Line Treatment controls the default starting point for translation
of data.
Output lines option or Global Output Lines Mode assumes that—
by default—all data within columns of all lines will be translated,
so the user must specify what lines of data should not be translated.
This option is appropriate if most of the lines in an Input File are to
be included in the translation, or if you are using the Exclude and
Line Skip commands to control data selection.
In Global Output Line Mode, Include Lines have precedence over
Exclude Lines. That is, if an Include match string occurs in an
Exclude Lines’ range, the Include Lines will be translated.
Skip lines option or Global Skip Line Mode assumes that—by
default—no data within columns on any line will be translated, so
the user must specify what lines of data should be translated.
This option is appropriate if more of the lines in an Input File are
not included in translation or if you are using the Include or Line
Output commands to control data selection.
In Global Skip Lines Mode, Exclude Lines have precedence over
Include Lines. That is, if an Exclude match string occurs in an
Include Lines’ range, the Exclude Lines will be not be translated.
Transpose rows and columns translates rows as columns and columns as
rows. Selecting this option only changes spreadsheet format output files;
no changes are made to the Input File or the display in the Mask window.
Begin in Pause mode automatically inserts a Pause command at the
beginning of the Input File. Use this option if you plan to use a Resume
and Pause command combination to select lines of data for translation.
DataImport
Chapter 5: DataImport Mask Reference•• 106
For more information about Pause and Resume, see “Include Resume
Define” on page 88 and “Exclude Pause Define” on page 93.
Output column names to spreadsheet and delimited types will output the
column names. With spreadsheet data types, the column names are output
into the cells on the first row of the output file. With comma separated
variable data types, the column names are output as the first record with
separators surrounding each column name
Dictionary file for names and addresses selects the dictionary file to use
when parsing names and addresses. The default dictionary file is
DEFAULT.DIC. You can create your own custom dictionary file to
handle different prefixes, suffixes, etc.
Starting Cell Address starts the output of a spreadsheet translation at a
cell address other than A1. This option is useful when combining the
output of a translation into an existing spreadsheet; when the output file is
combined with another file, DataImport writes data into the existing file
starting with the Starting Cell address.
The starting cell address is used as an offset. For example, if A1 is the
starting cell and columns C, D and E are defined, and the starting cell is
changed to B1, the existing columns will be redefined as D, E and F.
First positions to exclude removes a specified number of character
positions at the beginning of each line. This option is typically used to
remove carriage control characters.
Beginning of line carriage control characters are included in reports
created by some programming languages on certain computers.
FORTRAN, for example, uses the first character of each line to indicate
carriage control.
Beginning of line carriage control is used on some types of mini and
mainframe computers to tell the printer when to perform line feeds and
page ejects. This type of carriage control is not used on personal
computers.
Options International...
Defines settings for recognition and translation of currency, dates,
decimals and ASCII code pages.
Procedure:
DataImport
1.
From the Options menu, choose International...
2.
The International Settings dialog box appears. If you wish to use
the previously saved system default settings, press the Load
defaults button.
3.
Change or edit options as necessary.
4.
If you wish to save these settings for future use in other masks,
press the Save as defaults button.
5.
Press OK to apply the new International Settings.
Chapter 5: DataImport Mask Reference•• 107
Use this command to control how DataImport translates currency, dates,
thousands notation, decimals, months and ASCII code pages.
Any changes made to the International settings are saved in the definition
of the current Mask. Settings saved using the Save as defaults button in
the International Settings dialog box become the new system defaults. To
load the system defaults into the current mask, press the Load defaults
button.
Number Format options control how Numeric format data is translated
to an output file by DataImport.
Currency defines the character(s) DataImport recognizes as the
currency symbol. The default is “$” (U.S. dollar). The selected
currency symbol is used in all translations until changed.
Thousands defines the character DataImport recognizes as the
symbol used to separate thousands. The default is “,” (comma).
Decimal defines the character DataImport recognizes as the
symbol that separates the fractional or decimal part of a number
from the integer part of the number. The default is “.” (period).
Code Page changes the code page that is used for interpreting ASCII
characters whose values are above 127. By default, MS-DOS and
DataImport use the U.S. Code page (437) to display and interpret the
ASCII characters above 127.
If your computer uses a different code page than the default, or if your
Input File was created on a computer that uses a different code page, you
may have to change this setting for DataImport to translate correctly. The
selected code page is used for all translations until another is selected.
Month Names changes the spellings of names DataImport recognizes as
months. The spelling of one or more months can be changed. The default
setting is U.S. English spellings.
DataImport recognizes the entire month-name or only the first part and is
not upper/lower case sensitive. For example, the text September, Sept and
SEP are all recognized as the month “September”.
Options Dates...
Defines Custom date format and two digit year translation.
Procedure:
DataImport
1.
From the Options menu, choose Dates...
2.
The Date Settings dialog box appears. If you wish to use the
previously saved settings, press the Load defaults button.
3.
Change or edit options as necessary.
4.
If you wish to save these settings for future use in other masks,
press the Save as defaults button.
5.
Press OK to apply the new Date settings.
Chapter 5: DataImport Mask Reference•• 108
Custom Date Format defines a non delimited custom date for use in
Column Definitions. The date format defined here will appear in the
Column Settings dialog box in the Type option menu.
To define a custom date, type in Y for year, M for month and D for day.
Each letter represents one digit of a date number. The default custom date
is “YYMMDD”.
Year for 19XX defines how a two-digit year is interpreted by DataImport.
If the two digits (XX) are a number equal to or greater than the number
defined here, the year is translated as 19XX. If the digits are less than the
number defined here, the year is translated as 20XX. For example, with
the Year for 19XX option set to 50, “51” would be interpreted as 1951
and “12” would be interpreted as 2012.
Options Signed Overpunch...
Defines how signed overpunch characters that occur in some raw data
files are translated.
Procedure:
1.
From the Options menu, choose Signed Overpunch...
2.
The Signed Overpunch Settings dialog box appears. Choose the
appropriate Character Set.
3.
Choose the position of the signed overpunch characters from the
Position options.
4.
Press OK to apply the Signed Overpunch definition.
Use the Signed Overpunch Settings dialog box to control the automatic
translation of signed overpunch characters.
Any changes made to the Signed Overpunch Settings are always saved
when the current Mask is saved. Settings saved using the Save as defaults
button in the Signed Overpunch Settings dialog box become the system
defaults. To load the system defaults into the current mask, press the
Load defaults button.
Characters shows the current interpretation of ASCII characters for
signed overpunch data.
Value indicates the output value of overpunch characters.
Char shows which characters are interpreted as overpunch
characters. Choosing Custom from the Character Set options makes
the Char characters editable.
ASCII shows the ASCII value of the characters in the Char field.
Character Set defines the set of characters that are translated as signed
overpunch characters. Three options are displayed; 0-9,}-R and {-I,}-R
and Custom. One of the first two options will translate most Input Files
correctly. If the Input File uses a scheme other than these two, select
Custom. Choosing Custom makes the Characters Char field editable.
Change the characters as appropriate and press the Save as defaults to
save the custom translation set for use in future mask definitions.
DataImport
Chapter 5: DataImport Mask Reference•• 109
Translation tables will vary depending on the application and system that
created the file containing the signed overpunched numbers. Almost all
use the characters “}” through “R” to indicate the negative digits. Most
systems use “{“ through “I” for the positive digits, but some systems
(primarily IBM System 38, 36, and AS400) use “0” through “9”.
Position defines where DataImport looks for signed overpunch characters
in a number.
Options Preferences...
Defines the system default settings for masks and application settings for
DataImport.
Procedure:
1.
From the Options menu, choose Preferences...
2.
Change or edit options as necessary.
3.
Press OK to set the new Preferences.
Use this command to control system defaults for Output/Skip Lines
mode, current Display Font, Custom input file filter and other settings.
Default Line Treatment controls the Output/Skip Lines Mode system
default for translation of data. Default is Output Lines. This setting does
not change the setting for the current mask. It is used as the default when
starting a new mask.
Output lines option or Global Output Lines Mode assumes that—
by default—all data within columns of all lines will be translated,
so the user must specify what lines of data should not be translated.
This option is appropriate if most of the lines in an Input File are to
be included in the translation or if you typically use the Exclude
and Line Skip commands to control data selection.
In Global Output Lines Mode, Include Lines have precedence over
Exclude Lines. That is, if an Include match string occurs in an
Exclude Lines’ range, the Include Lines will be translated.
Skip lines option or Global Skip Lines Mode assumes that—by
default—no data within columns on any line will be translated, so
the user must specify what lines of data should be translated.
This option is appropriate if more of the lines in an Input File are
not included in translation, or if you typically use the Include
commands to control data selection.
In Global Skip Lines Mode, Exclude Lines have precedence over
Include Lines. That is, if an Exclude match string occurs in an
Include Lines’ range, the Exclude Lines will be not be translated.
Default Column and Tag Type sets the default column and tag types that
will appear when defining a Column or a Line Tag.
Font determines the default display font and font size used to display the
input file.
DataImport
Chapter 5: DataImport Mask Reference•• 110
Name sets the display font for the Input File window. The display
font can only be a monospaced font and the option menu will only
display the available fonts of this type. Default is Fixedsys.
Size sets the size of the current display font. The available fonts
have a fixed number of sizes and the option menu will only display
the available sizes of the selected font.
Number of Lines to Load sets the number of lines to load into the Mask
screen when opening an input file. This number can be from 100 to
16,384. The fewer lines loaded, the faster the screen is updated after
Include/Exclude Line selections.
Input File Filter sets a custom Input Filter. Use the *.XXX format and a
“;” (semicolon) as a separator, example: *.PRN;*.TXT;*.DOC.
Once the filter is defined, it is available in the Load Input File dialog box
in the List Files of Type option menu. Default is none.
Automatically define columns applies the Column Auto Define All
command automatically if there are no columns defined in the current
Mask when an Input File is loaded. Default is off (unmarked).
Expert Mode eliminates all confirmation prompts when executing
commands. For example, when Expert mode is on, DataImport will not
ask for confirmation when deleting a column. Default is off (unmarked).
Display dialog when defining a column displays the Column Settings
dialog box when defining a column. Default is on (marked).
DataImport
Chapter 5: DataImport Mask Reference•• 111
Chapter 6: DataImport Translate
Reference
This section details the commands and options for the DataImport
Translate program.
DataImport Translate
The DataImport Translate application is used to quickly translate files by
applying existing masks. The application can be used to apply one mask
to multiple input files, output a single Input File to multiple formats, or to
make input/output definition changes to a mask.
Translate Application Window
Figure 6-1 DataImport Translate application window
Mask File Name controls which mask is used to translate the Input File.
Input File Name controls which file is the source of data to be translated.
DataImport
Chapter 6: DataImport Translate Reference•• 112
Output File Name defines the name of the file to receive the translated
data.
Output File Type defines the type of the file to receive the translated
data.
Action when output exists specifies what action to take when an Output
File of the same name as the Output File Name exists.
Translate performs a translation with the current settings.
Save Mask saves the current mask with the defined output parameters.
Exit closes the Translate application.
Display During Translation displays translated data during translation.
Confirm Includes and Excludes prompts for manual confirmation of
each Include and Exclude line as they are encountered during translation.
Close screen before translation begins closes the DataImport Translate
application window when translation starts.
File
File
³
ÃÄ Translate
ÃÄ Save Mask...
³
ÀÄ Exit
File Translate
Translates the input file using the current displayed settings.
Procedure:
1.
From the File menu, choose Translate.
2.
If the Output File exists and the action when output selection is
'Warning', the Output File action dialog box appears. Press
Cancel to abort the operation or choose an action to proceed.
3.
The Translating dialog box appears and shows the progress of
the translation.
4.
When the translation is complete, press Exit to return to the
Translate window.
Use this command to perform a translation with the current settings. For
more information about output formats and settings, see “File Define
Output File...” on page 74.
File Save Mask...
Saves the current displayed settings to a Mask File.
Procedure:
1.
DataImport
From the File menu, choose Save Mask....
Chapter 6: DataImport Translate Reference•• 113
2.
Type or select the mask file name, choose a directory for the file
and press OK to save the file.
File Save Mask... is used when saving a Mask File you have changed in
the Translate application, when naming a new version of an existing mask
or for saving the current mask to a different directory.
An extension of .MSK is automatically added to the Mask File name if no
extension is provided.
File Exit
Closes the DataImport Translate application.
Procedure:
1.
From the File menu, choose Exit.
Options
Options
³
ÃÄ Display During Translation
ÃÄ Confirm Includes and Excludes
ÀÄ Close Screen before Translation Begins
Options Display During Translation
Displays translated data during translation.
Procedure:
1.
From the Options menu, choose Display During Translation.
When this option is active, the Translating dialog box displays the
translated data in a window as it is output. Turning off this option can
increase translation speed, especially for large Input Files.
The default for Display During Translation is on (marked). When this
option is active, the Display During Translation option has a check mark
next to it in the Option menu.
Turn this option off (or on) by repeating the Procedure above or by
clicking on the Display During Translation option on the DataImport
Translate window.
Options Confirm Includes and Excludes
Confirms Include and Exclude definitions line by line during translation.
Procedure:
1.
From the Options menu, choose Confirm Includes and
Excludes.
Use this option when you are unsure if the mask will include or exclude
the correct lines.
DataImport
Chapter 6: DataImport Translate Reference•• 114
The default for Confirm Includes and Excludes is off (unmarked). When
this option is active, the Confirm Includes and Excludes option has a
check mark next to it in the Option menu.
Turn this option on (or off) by repeating the Procedure above or by
clicking on the Confirm Includes and Excludes option on the DataImport
Translate window.
Options Close Screen before Translation Begins
Closes the Translate application window when translation starts.
Procedure:
1.
From the Options menu, choose Close Screen before
Translation Begins.
Use this option to make the DataImport Translate application close
automatically after starting a translation.
DataImport
Chapter 6: DataImport Translate Reference•• 115
Chapter 7: DataImport Utilities
Reference
This section details the commands and options for the DataImport
Utilities program.
DataImport Utilities
The DataImport Utilities application provides many useful tools for
creating files that the Mask program can read and for reformatting data
for use in other applications.
Utilities Application Window
Figure 7-1 DataImport Utilities application window
Input File Name controls which data file is processed. Change the Input
File by pressing the [...] button at the end of the field, selecting a new file
and pressing the OK button.
DataImport
Chapter 7: DataImport Utilities Reference•• 116
Output File Name defines the name of the file output from the process.
Change the Output File by pressing the [...] button at the end of the field,
selecting a new file and pressing the OK button. The extension of the
Output file is automatically set by the Utilities application. The extension
is in the form Axx, where xx is a number beginning with 1. If one file is
output the extension is A1. If three files are output the extensions are A1,
A2, and A3.
Process Type specifies what type of process to perform on the Input File.
For more information about available process types, see the next section.
Action when output exists specifies what action to take when an Output
File of the same name as the Output File Name exists.
Process runs the utility process with the current settings.
Save Mask saves the current mask with the defined output parameters.
Exit closes the Utilities application.
Close screen when process begins closes the DataImport Utilities
application window when the process starts.
Processing Types
The DataImport Utilities application can process Input Files for use in the
Mask application and reorganize data in many ways. The following
options are available in the Process Type option menu of the Utilities
application:
ASCII -> EBCDIC
Comma Separated Values
dBase convert
dBase header
EBCDIC -> ASCII
Fixed length
Line split by length
Parse spaces
Records per File Split
Statistics
Tab expansion
Unstack
ASCII -> EBCDIC
Converts a file that is encoded in ASCII to a file that is encoded in
EBCDIC. Some mini and mainframe computers encode their characters
using EBCDIC. PCs encode their characters using ASCII. To upload a
DataImport
Chapter 7: DataImport Utilities Reference•• 117
file that is encoded in ASCII to a computer that encodes its files in
EBCDIC use this process.
Comma Separated Values
This option can also be used
to convert files that use tabs
or any other character to
separate fields in a record.
Converts a comma separated value file into a file with fixed length fields.
The default field separator is a comma (ASCII 44) and the default string
delimiter is quotation marks (ASCII 34). Different field separators and
string delimiters can be selected.
Before actually creating the Output File, DataImport Utilities reads the
entire Input File to determine the column widths necessary in the Output
File. Each column is defined one character position wider than the widest
data string in that column.
Files formatted with commas between fields and quotation marks around
numbers should be converted to a column oriented file using this option
before the mask is defined.
Comma Separated Value Input File
"NEW YORK",1034,968,23653
"LONDON",576,2349,9413
"ROME",1439,2008,12537
Output File
NEW YORK
LONDON
ROME
1034
576
1439
968
2349
2008
23653
9413
12537
Figure 7-2 Comma delimited to columnar conversion
The numbers in this example are left justified within columns. The
numbers will be right justified if the Input File is translated into a
spreadsheet or database file.
dBase convert
Creates an ASCII columnar file usable by DataImport from a dBase II,
III, or IV database file.
At the top of each column is the dBase field name; space limitations may
prevent the entire field name from being displayed. Use the Function
Header process type to output the file structure to review the truncated
field names.
dBase header
Outputs the dBase II, III, or IV file structure contained in the database
file’s header record.
When the Go option is selected, the file structure is written to the Output
File. This file can be viewed using the Mask application. The file
DataImport
Chapter 7: DataImport Utilities Reference•• 118
structure can also be output directly to a printer by specifying the Output
File as either LPT1, LPT2 or LPT3.
The dBase III file: SALES.DBF contains 137 records.
Each record is 43 bytes long.
# Field name Field type Length Decimals DI Column
- ---------- ---------- ------ -------- --------1 BRANCH
Character
15
0
A
2 WEEKSALES
Numeric
10
2
B
3 YEARSALES
Numeric
10
2
C
8
0
D
4 UPDATED
Date
Figure 7-3 dBase file header
EBCDIC -> ASCII
Converts a file that is encoded in EBCDIC to a file that is encoded in
ASCII.
Some mini and mainframe computers encode their characters using
EBCDIC. PCs encode their characters using ASCII. To use a file that is
encoded in EBCDIC use this process.
NOTE Most PC to Host emulation and file transfer software handles the
translation between ASCII and EBCDIC automatically.
Fixed length
Breaks up a fixed length record file that does not have record separators
into a sequential file with record separators.
Report files, such as those downloaded from a mainframe, utilize a
carriage return and/or a line feed character (ASCII codes 13 and 10,
respectively) to indicate the end of each line or record in the file.
DataImport requires these record separator characters to function
properly.
Most database management systems and many other software programs
use data files with fixed length records without record separators. These
files are called random or direct access files. These programs recognize
the length of each field in the record and do not include record separator
characters to save file space. Frequently, the first information in the file
describes the fields in the file, their length and type. Users can skip this
information by specifying a number of characters, and thereby eliminate
the header from the Output File.
The following files illustrate how a data file without record separators
looks before and after conversion. In this example, the record length is 18
and the number of characters to skip at the beginning of the file is 29.
DataImport
Chapter 7: DataImport Utilities Reference•• 119
Input File Without Record Separators
002OFFICE C 10SALES N 8.2NEW YORK
12935.45LONDON
9264.32ROME
7194.39TOKYO
15778.56
Output File
NEW YORK
LONDON
ROME
TOKYO
12935.45
9264.32
7194.39
15778.56
Figure 7-4 Adding record separators
Line split by length
Splits the Input File vertically by producing two or more Output Files
with shorter record lengths. The records in the Input File are divided into
shorter records, using the length specified, then written to the Output
Files.
This utility is useful when an Input File contains records whose length is
greater than 2048 characters; DataImport can display and translate files
whose record lengths are shorter than 2048 characters. This utility can
facilitate translation of extremely wide files.
For example, if the Input File SALES.DAT, containing records 5,000
characters wide, is split into files whose record length is 2,000, three
Output Files are created. The first Output File created is named
SALES.A1 and contains the first 2,000 characters of each record from the
SALES.DAT Input File. The second file created is named SALES.A2 and
contains the next 2,000 characters of each record of the Input File, and
the third named SALES.A3 contains the remaining 1,000 characters of
each record of the Input File.
Parse spaces
Converts a space separated variable file into a file with fixed length
fields. Test and sampling instrumentation and software often create files
of this format. There are two parameters that can be specified:
Column width is the width of columns to use for the parsed fields.
Skip Characters is the number of character positions at the beginning of
each line to output without parsing. This parameter is optional.
In the following example, the width of the columns is set to 6 positions
each, and the number of characters to not parse at the beginning of each
line is 19 positions.
DataImport
Chapter 7: DataImport Utilities Reference•• 120
Space Separated Variable Input File
001
002
001
002
08/13/92
08/13/92
08/14/92
08/14/92
12:32
13:10
12:40
13:12
12 14 23 12 9.876
5 14.6 7
5 34 9.987 12 98
9 12 6.875
12:32
13:10
12:40
13:12
12
5
5
9
Output File
001
002
001
002
08/13/92
08/13/92
08/14/92
08/14/92
14
14.6
34
12
23
7
9.987
6.875
12
9.876
12
98
Figure 7-5 Space delimited to columnar conversion
Records per File Split
Splits the Input File horizontally by producing two or more Output Files
with fewer records per file.
This function has two useful applications:
DataImport can translate a
file with any number of
lines.
•
Only the first 16,384 records (lines) of a file can be displayed in
the Mask application. By splitting extremely long files, all
records can be displayed. Remember, there is no limit to the
number of lines that can be translated using a mask.
•
Spreadsheets have limitations on the number of lines allowed in
a worksheet. By splitting a long file, the shorter files can be can
be translated into several usable worksheets.
For example, if the Input File ORDER.DAT, contains 7,000 records and
the file is record-split into files with 3,000 records per file, DataImport
creates three Output Files. The first Output File created is named
ORDER.A1 and contains the first 3,000 records from the ORDER.DAT
Input File. The second file created is named ORDER.A2 and contains the
next 3,000 records, and the third file created is named ORDER.A3 and
contains the remaining 1,000 records.
Statistics
Displays statistics about the current Input File. The statistics displayed by
this process include the length of the longest line, the number of lines,
and whether the file contains tab characters.
This option is often selected to determine if the use of any of the other
utility functions are necessary prior to opening the Input File in the Mask
application.
DataImport
Chapter 7: DataImport Utilities Reference•• 121
Tab expansion
Expands tab characters (ASCII character 9).
For example, if a user defines a tab stop as 8, numbers preceded by a tab
character will be aligned in columns on the 9th, 17th, 25th, etc. character
positions. The two files below illustrate how this utility works. The first
file is shown with tabs displayed as a “→” character. The second file
shows how the file looks when the tabs are expanded.
Input File Before Tabs Are Expanded
NEW YORK→1,034→968→23,653
LONDON→576→2,349→9,413
ROME→1,439→2,008→12,537
Output File After Tabs Are Expanded
NEW YORK
LONDON
ROME
1,034
576
1,439
968
2,349
2,008
23,653
9,413
12,537
Figure 7-6 Expanding tabs with the Tab expansion process
The numbers in this example are left justified within the columns. The
numbers will be right justified when DataImport translates this file as a
spreadsheet or database file.
Unstack
Reorganizes data blocks where two or more sets of data are mixed in a
single column.
Unstacking can also be
done with the Options
Unstack command in the
Mask application.
Use this command to separate columns with multiple data sets—for
instance, yearly, monthly and daily sales—into multiple columns with one
data set each.
Lines to unstack is the number of lines in each group of data lines.
Lines to Skip is the number of lines to ignore at the beginning of the file.
In the following example, the number of Lines to unstack is 2 and the
number of Lines to Skip at the beginning of the file is 4.
Stacked Input File
SALES REPORT
MONTH: MARCH
BRANCH
----------NEW YORK
LONDON
DataImport
XYZ CORPORATION
PERIOD SALES
------ ------MONTH 12,935
YEAR
31,221
MONTH
9,264
YEAR
24,786
Chapter 7: DataImport Utilities Reference•• 122
Unstacked Output File
NEW YORK
MONTH
LONDON
MONTH
12,935
9,264
YEAR
YEAR
31,221
24,786
Figure 7-7 Unstacking records
If the Input File is a report with a heading at the top of each page, it may
be necessary to define a mask and perform a translation to remove the
headings before unstacking the file.
Unstacking is also very useful for preparing a text file of names and
addresses created with a word processor for translation into a spreadsheet
or database file. Unstacking such a file can produce separate columns for
name, street address, and city/state/zip code.
File
File
³
ÃÄ Process
ÀÄ Exit
File Process
Processes the Input File and writes the results to the current Output File
name.
Procedure:
1.
Choose an Input File by pressing the [...] button at the end of the
Input File field.
2.
Choose an Output File by pressing the [...] button at the end of
the Output File field.
3.
Choose a Process from the Process Type options menu.
4.
From the File menu, choose Process.
Use this command to initiate Input File processing.
File Exit
Closes the DataImport Utilities application.
Procedure:
1.
From the File menu, choose Exit.
Use this command to close the Utilities application. To automatically
close the application upon completion of a process, mark the Close screen
when process begins option.
DataImport
Chapter 7: DataImport Utilities Reference•• 123
Chapter 8: DataImport Task
Commander Reference
This section details the commands and options for the DataImport Task
Commander application.
DataImport Task Commander
This section of the User Reference describes operations available in the
Task Commander application. Task Commander automates a series of
translations and/or utilities within DataImport and saves this information
in a Task file (.TSK). Task files can be run, created and edited from the
Task Commander screen. Below is the main Task Commander Screen.
Figure 8-1 The Task Commander Main Window
DataImport
Chapter 8: DataImport Task Commander Reference•• 124
The Task File list box lists all task files in the specified directory. This
includes the file name, and the Author and Summary information, if
given. There are several buttons on the right of the screen that control the
Task Commander as shown below.
Run executes the task file(s) selected in the Task File list box.
New creates a new task file. This opens the Task File dialog box.
Edit changes an existing task file. This opens the Task File dialog box.
Exit closes Task Commander.
Task File Dialog Box
The Task Commander dialog box is where you create and edit task files.
This is shown below.
Figure 8-2 Task File dialog box
Task Description: This is where a description of the task file can be
entered.
Author: This is where the Author can be entered.
Actions: Contains the list of actions that can be performed in a task. The
possible actions consist of the Translate command and all of the Utilities
process types (except Statistics), and running other non DataImport
applications that support command line execution.
Processes: The Processes list box is where the 'script' of the task file is
displayed. Multiple actions can be added to the Processes box.
Add Add copies an action from the Actions box to the Processes box.
Insert Inserts the selected Action before the selected Process.
Up Moves the selected Process up one step.
Down Moves the selected Process down one step.
Remove Removes an action or actions from the Processes box.
DataImport
Chapter 8: DataImport Task Commander Reference•• 125
Edit Edits an action within the Processes box.
Ok Returns to the main Task Commander window. If you have not
saved changes to the mask, you will be prompted to save it.
Save Saves the current task file.
Run Executes the task file.
Cancel Returns you to the main Task Commander window.
Based on the action that you select to add or edit, either the Translate
parameter or the Utilities parameter window will be displayed. For more
information on the Translate and Utilities commands, see Chapter 6;
DataImport Translate Reference and Chapter 7: DataImport Utilities
Reference.
Note that you can also run a task from a command line or create an Icon
for running a task. For more information refer to Appendix G: Command
Line Use.
DataImport
Chapter 8: DataImport Task Commander Reference•• 126
Appendix A: Supported Input File
Formats
Input File Formats
The Input File contains the data you want to translate. The file can be any
ASCII text file and is typically a print file or output from another
computer, such as a mainframe or a PC. DataImport can be used with any
text file, including computerized reports from mainframes and midrange
computers, word processor text files, saved e-mail messages, recorded
online communications, print to disk files and many other files.
If you are having difficulty generating a text output file from your
application to use with DataImport, refer to Appendix C: Getting Data
out of Other Applications.
Input File Formats
Any ASCII Text File (TXT, ASC..)
Mainframe text reports
Minicomputer text reports
DOS Print to Disk file
Generic/Text Only file (Windows)
Word Processor Text Only file
Text only accounting reports
E-mail reports
Online communications text capture
Print to File (PRN)
Tab Separated Values
Comma Separated Values
Character Separated Values
Fixed Length Record
dBase
EBCDIC
Standard Data Format
DataImport
Appendix A: Supported Input File Formats • 127
Appendix B: Supported Output File
Formats
Output Formats
DataImport can create output files for most standard spreadsheet and
database programs including Excel, Lotus 1-2-3, Quattro Pro, Access and
dBase compatible applications. The next section in this appendix lists the
types of formats DataImport can read and write. Check the README file
for output format additions, if you do not see the format you need.
Keep in mind that most programs can read earlier versions of their file
formats. In most cases, a file format with a version number equal to or
less than your software version will work, unless you are combining or
appending files. In this case, you must output your data in the same
format as the existing output file.
If the application you want to get data into is not on the list of supported
output types, check your application's help system or manual for an
import feature. Then use DataImport to create a file of the type your
application can import. For example, WinFax Pro will import dBase files
(DBF) and FedEx Ship will import comma separated ASCII (CSV) files.
The most common types of files that applications can import are comma
separated values (CSV - sometimes referred to as ASCII or text), tab
separated values (TSV), dBASE (DBF) and Lotus version 1A (WKS).
Many database management software products use the dBase format as
their native format. These products are often referred to as an xBase
product and include FoxPro, Clipper and Alpha.
Output File Types
There are five main types of formats that DataImport supports:
spreadsheets, databases, word processing merge data formats, text
formats and interchange formats. Some formats may not support features
and formats provided by DataImport. For example, formulas are only
supported by the spreadsheet output types and field names can only be
written to database files. If you are using advanced features of
DataImport, read the documentation carefully to make sure that your
chosen output format will support it. DataImport will not write anything
to the output file that is not supported by the selected output format
DataImport
Appendix B: Supported Output File Formats • 128
Output File List
Product
DataImport
Type File ComExt. bine
Append
Field Table
Name Name
Multisheet
ASCII
T
ASC
X
Clarion
D
DAT
X
Columnwise
DIF
I
DIF
Comma
Separated
Value
T
CSV
X
dBase II
D
DBF
X
X
dBase III
D
DBF
X
X
dBase IV
D
DBF
X
X
Excel 2.1
S
XLS
X
X
Excel 3.0
S
XLS
X
X
Excel 4.0
S
XLS
X
X
Excel 5.0
S
XLS
X
X
X
Excel 7.0
S
XLS
X
X
X
Fixed length
file
T
FXD
HTML Table
T
HTM
Lotus 1-2-3
1A
S
WKS
X
X
Lotus 1-2-3
2.0
S
WK1
X
X
Lotus 1-2-3
3.0
S
WK3
X
X
X
Lotus 1-2-3
4.0
S
WK4
X
X
X
Lotus 1-2-3
5.0
S
WK4
X
X
X
Mailing Label
T
LBL
X
Microsoft
Access 1.1
D
MDB
X
X
X
Microsoft
Access 2.0
D
MDB
X
X
X
Microsoft
Word Merge
W
WRD
X
X
Paradox 3.5
D
DB
X
X
X
X
Appendix B: Supported Output File Formats • 129
Paradox 4.0
D
DB
X
X
Print Image
T
PRN
X
Quattro
S
WKQ
X
X
Quattro Pro
S
WQ1
X
X
Quattro Pro
5.0 for
Windows
S
WB1
X
X
Standard Data
Format
T
SDF
Sylk
I
SLK
Symphony
1.0
S
WRK
X
X
Symphony
1.1
S
WR1
X
X
Tab
Separated
Variable
T
TSV
X
User-Defined
Delimited
T
UDD
X
WordPerfect
5.0 Merge
W
W50
X
X
WordPerfect
5.1 Merge
W
W51
X
X
X
X
Figure A-2 Output File formats and capabilities
Type Indicates the file type of the format: S=Spreadsheet,
D=Database, T=Text, W=Word processing merge data documents,
I=Interchange
File Ext. File name extension for output type.
Combine A mark in this column indicates DataImport can combine
files of this format. Only spreadsheet formats allow this function.
Append A mark in this column indicates DataImport can append to
files of this type.
Field Name A mark in this column indicates this format uses field
names in its files. Databases and word processing merge files typically
use these names.
Table Name A mark in this column indicates this format uses Table
Names in the file. Microsoft Access formats 1.1 and 2.0 are currently the
only formats that manage Table Names in this way.
Multi-sheet A mark in this column indicates this spreadsheet program
can have multiple sheets per file. DataImport allows you to place data on
a specific sheet using the Starting Cell Address field in the Options
Global... dialog box.
DataImport
Appendix B: Supported Output File Formats • 130
ASCII (ASC)
This text output format is an ASCII file, delimited with commas between
fields (DataImport columns cells) and quotation marks surrounding
non-numeric fields. This type of file is used with some languages like
BASIC for data files. Most database management systems like dBase II
or dBase III will read or import this type of file. This format is similar to
the Comma Separated Value (CSV) format detailed below.
Alpha (DBF)
This database program uses a version of dBase as its file format. Check
your documentation for details.
Clarion (DAT)
This database output format is a the file type used by the Clarion database
management program.
Clipper (DBF)
This database program uses a version of dBase as its file format. Check
your documentation for details.
Columnwise DIF (DIF)
This data interchange output format arranges data in column-wise order.
This file is used to transfer data between spreadsheet programs and other
software.
Comma Separated Value (CSV)
This text output format separates items of data with a comma and encases
text data with quotation marks. To output files with different separators,
see Tab Separated Variable and User Defined Delimited formats below.
dBase II, III, IV (DBF)
These database output formats are standard database formats for dBase
compatible programs. The following database translation types can be
selected:
dBase II dBase II database file, file extension: DBF
dBase III dBase III and dBase III Plus database file, file extension:
DBF This file can be read by many other dBase compatible
software products including FoxPro and Clipper.
dBase IV dBase IV database file, file extension: DBF
Excel 2.1, 3.0, 4.0, 5.0 7.0 (XLS)
These spreadsheet output formats are used by the Microsoft Excel
application. Lower versions of Excel will not load higher version
DataImport
Appendix B: Supported Output File Formats • 131
worksheet files. Higher versions of Excel will load lower version
worksheet files. The following spreadsheet translation types can be
selected, the XLS file extension used for all versions of Excel.
Excel 2.1 Microsoft Excel version 2.1 worksheet file.
Excel 3.0 Microsoft Excel version 3.0 worksheet file.
Excel 4.0 Microsoft Excel version 4.0 worksheet file.
Excel 5.0, 7.0 Microsoft Excel version 5.0 and 7.0 worksheet files.
(7.0 is Windows 95)
Fixed length file (FXD)
This text output format is a fixed record format file. All fields are fixed
width and all records are a fixed length. Records are not separated. This
output type is useful for uploading to mainframes that do not use record
separators.
FoxPro (DBF)
This database program uses a version of dBase as its file format. Check
your documentation for details.
HTML Tables (HTM)
This format option allows you to create HTML Tables in accordance with
HTML 2 standards.
Lotus 1-2-3 1A, 2.0, 3.0, 4.0, 5.0 (WK*)
This spreadsheet output format is used by the Lotus 1-2-3 spreadsheet
program. The following spreadsheet translation types can be selected; the
indicated file extension is used for each output option.
Lotus 123 1A
Lotus 1-2-3 release 1 and 1A worksheet file, file
extension: WKS This file can be read by all releases of Lotus 12-3 and by the Symphony spreadsheet program. This format is a
commonly supported by spreadsheet programs and other
software packages.
Lotus 123 2.0
Lotus 1-2-3 release 2.x worksheet file, file
extension: WK1
Lotus 123 3.0
Lotus 1-2-3 release 3.x worksheet file, file
extension: WK3
Lotus 123 4.0
Lotus 1-2-3 release 4.x worksheet file, file
extension: WK4
Lotus 123 5.0
Lotus 1-2-3 release 5.x worksheet file, file
extension: WK4
DataImport
Appendix B: Supported Output File Formats • 132
Mailing Label (LBL)
This text output format produces a mailing label style file. Each line of a
column (cell) is output as a separate line in the Output File.
Label output type is useful for translating an Input File that contains
names in one column and addresses in another column into a file that has
the name on the first line, address on the next line, etc. If there are five
columns defined, the data in column A will appear on every fifth line. To
add blank lines between labels to control spacing, define columns on the
right side of the mask at a location that does not contain data.
Microsoft Access 1.1, 2.0 (MDB)
These database output formats are used by the Microsoft Access
application. Lower versions of Access will not load higher version
database files. Higher versions of Access will load lower version database
files. The following database translation types can be selected; the MDB
file extension used for all versions of Access.
Microsoft Access 1.1
Access version 1.1 database file.
Microsoft Access 2.0
Access version 2.0 database file.
Microsoft Word Merge File(WRD)
This word processor output format is the data document file format used
by Microsoft Word for DOS for print merges. This file format can also be
used by Microsoft Word for Windows.
Paradox 3.5, 4.0 (DB)
This database output format is used by the Paradox database management
application. The following database translation types can be selected; the
DB file extension used for these versions of Paradox.
Paradox 3.5
Paradox version 3.5 database file.
Paradox 4.0
Paradox version 4.0 database file.
Print Image (PRN)
This text output file format is a DOS print image file. This file type
contains no special formatting and can be read by word processing
software. Text in the file is arranged in columns without use of tabs.
Quattro (WKQ)
This spreadsheet output format is used by the Quattro spreadsheet
program.
Quattro Pro (WQ1)
This spreadsheet output format is used by the Quattro Pro spreadsheet
program.
DataImport
Appendix B: Supported Output File Formats • 133
Quattro Pro 5.0 for Windows (WB1)
This spreadsheet output format is used by the Quattro Pro 5.0 for
Windows spreadsheet program.
Standard Data Format (SDF)
This text output format produces a Standard Data Format file. All fields
are a fixed width and all records are a fixed length. Each record is
separated by a carriage return and line feed (ASCII codes 13 and 10).
Sylk (SLK)
This interchange output format produces a Symbolic Link file. Many of
Microsoft's products read SYLK files, including MultiPlan and Microsoft
Chart.
Symphony 1.0, 1.1 (WRK, WR1)
This spreadsheet file format is used by the Symphony spreadsheet
program. The following database translation types can be selected:
Symphony 1.0 Symphony release 1.0 worksheet file, file
extension: WRK
Symphony 1.1 Symphony release 1.1, 1.2 and 2.x worksheet
file, file extension: WR1
Tab Separated Variable (TSV)
This text output format separates variable fields or cells with the tab
character (ASCII code 9). Records are separated by a carriage return and
line feed (ASCII codes 13 and 10). This output type is used by many
Apple Macintosh applications. It is also useful for preparing tables to be
loaded into word processors.
User-Defined Delimited (UDD)
This text output file type separates records or cells with one or more user
selected ASCII characters. Non-numeric fields, or labels, are also
surrounded by one or more user selected ASCII characters. Records are
separated by a carriage return and line feed (ASCII codes 13 and 10).
To define the delimiter character(s) for UDD format, choose File Define
Output Format. From the Output File Type pull-down menu and choose
User-Defined Delimited. The Field Separator and String Delimiter
options appear. In the Field Separator field, type the character to indicate
the end of a cell or record data and the beginning of the next cell or
record. In the String Delimiter field, type the character to use to set off
text or alphanumeric strings in data cells or records.
DataImport
Appendix B: Supported Output File Formats • 134
Figure A-2 Defining the Field Separators and String Delimiters
for the User-defined Delimited output format.
WordPerfect 5.0, 5.1 (W5*)
This text output format is a secondary merge file for WordPerfect. The
following database translation types can be selected:
WordPerfect 5.0 WordPerfect 5.0 secondary merge document, file
extension: W50
WordPerfect 5.1 WordPerfect 5.1 secondary merge document, file
extension: W51
xBase applications (DBF)
These database programs uses versions of dBase as their file formats.
Check your documentation for details.
DataImport
Appendix B: Supported Output File Formats • 135
Appendix C: Getting Data out of
Other Applications
Generating an Input File
If you do not have an ASCII text Input File already, this section offers
some solutions for generating a file that DataImport can use. DataImport
will read almost any file, but some file types have so many “garbage
characters” or binary information that make extracting data arduous if not
impossible.
Most DOS, minicomputer and mainframe applications have an output
option for ASCII text. These options may have different names such as
“Text”, “ASCII”, “Text Only”, “DOS Text” or “Generic Text.” You can
also use formats such as CSV (Comma Separated Variable) or TSV (Tab
Separated Variable). Separated formats should be processed into
columnar format using the Comma Separated Values process in the
Utilities application.
Finding the right output option may require some initial experimentation.
If you find an option with names similar to those listed above, try the
output option and load the resulting file into DataImport. If you are
unfamiliar with the operation of the source program, consult your
documentation or contact your system administrator.
Generating Output
There are two main ways to obtain output from a program. The safest
way—from a data integrity standpoint—is called “printing to file” or
“print to disk”. These functions send the text of a printout to a file on a
floppy or hard disk. This print file can then be read into DataImport.
Printing to file options are usually controlled through print options or
printing commands in your application. Printing to file can be as easy as
choosing an option and executing the print command. Other systems may
require you to install a special print driver. A print driver is a small
software program that lets an application communicate with a printer to
generate output. If you use Microsoft Windows, you can install the
Generic / Text Only printer driver to generate a print image file from any
Windows application. See “Printing to a File in Windows” on page
137.
DataImport
Appendix C: Getting Data out of Other Applications • 136
Be sure to check with your
system administrator before
saving files from a database
management application.
The second—and less safe—way to generate an ASCII text file is to save
data to a text file using a save file function in the source application. This
method is less safe from a data integrity point of view because saving a
file—especially from a database program—can potentially overwrite an
existing source file. If you receive your source data through e-mail or a
communications program, saving the information in a text format file is
probably the best choice for generating an Input File.
Most database management programs have safeguards to protect data
from being overwritten, but you should not assume they are absolutely
foolproof. In most cases, it is better to generate a report from the database
and print it to disk or save it, rather than extract data by saving a piece of
a larger database file.
Printing to a File in Windows
Microsoft Windows provides a printer driver that will allow you to
generate a text print image file usable with DataImport. You can use this
driver with any application that has a File Print command. The driver is
called the Windows Generic / Text Only print driver. The driver is
installed from the Printer application in the Control Panel. Select FILE:
as the port.
To print a report to file in your application, select the Generic/Text Only
printer using the Print Setup command. Then select your application's
Print command.
Windows will automatically prompt you to give a file name for the print
output. Type in the path and name of the print file and press OK. The
print output will be saved to the file you specified. Load the file into
DataImport as you would any other Input File. For best results, select a
monospaced font—like Courier, Terminal or Fixedsys—in your source
application before printing with the Generic/Text Only driver.
Printing to a File in DOS Applications
Most DOS applications have the ability to print to a file. Check your
program’s documentation or contact your system administrator for more
information.
Some applications cannot print their output to a disk file. DataImport
comes with a program called Printer Interceptor that can intercept the
output of a DOS application.
Printer Interceptor is a Terminate and Stay Resident (TAR) program that
intercepts output sent to a printer port and writes it to a Capture File.
Using Printer Interceptor
The Printer Interceptor terminate and stay resident (TSR) program
intercepts output going to a printer port and redirects the output to a file.
It is installed in memory from a DOS command line. Additionally, the
current installation in memory can be modified from the DOS command
line.
DataImport
Appendix C: Getting Data out of Other Applications • 137
Printer Interceptor stays in memory until it is uninstalled or until the
computer is rebooted.
Syntax:
PI printer filename [/A][/Bv][/N][/P][/Q][/Tv][/R][/S][/U]
The printer and file name parameters are positional and separated by
spaces. The switches are not separated by spaces, and can be in any
order.
printer Printer port to be intercepted. Valid printer ports are PRN,
LPT1, LPT2, and LPT3. To intercept a serial port, the DOS
MODE command must be used to redirect output to one of the
parallel ports before starting Printer Interceptor.
filename Capture File name, including the drive, path and extension
if necessary. This file will receive the information intercepted
from the printer port. If no drive or path is specified, the Capture
File is placed in the current directory. If no extension is
provided, PRN will be used.
/A Appends the intercepted data to the end of the Capture File. The
default is to overwrite the file if it exists.
/Bv Specifies the size of the memory buffer with "v" that Printer
Interceptor uses in writing to the Capture File. The larger the
buffer, the faster Printer Interceptor operates. The default buffer
size is 5,120 bytes. The buffer can be no larger than 62,000
bytes.
The larger the buffer size, the more memory that is required to
install printer interceptor, and the less memory that is available
for other applications. With a larger buffer size, Printer
Interceptor physically writes to the disk less often.
NOTE If the buffer size is not adequate, some applications on fast
computers may overflow the buffer before Printer Interceptor can write
its contents to disk. If this occurs, Printer Interceptor beeps and some data
will be missing from the Capture File.
/N Disables the hot-key combination of <Alt-Shift-P> that toggles
interception on and off.
NOTE The /N switch should be specified if another TSR is using the
same hot-key combination of <Alt-Shift-P>.
/P Prints the data while intercepting to a file. The default mode
only captures the data to the file and does not print it. The /P
option should only be used if a printer is connected to the port
from which output is being intercepted.
/Q Selects quiet operation. To confirm that it is working, Printer
Interceptor defaults to audible operation (speaker buzzes during
interception).
/Tv Times out after the number of seconds specified with "v" after
interception of the last character. When time out occurs, the
DataImport
Appendix C: Getting Data out of Other Applications • 138
capture buffer is flushed and the Capture File is closed. Printer
Interceptor writes from its buffer to the Capture File if the buffer
fills, if time out occurs, or under certain other conditions. The
time out can be set to any number of seconds between 0 and
3600 (1 hour). The default is 30 seconds.
Time out does not stop printer interception. Time out has two
uses. It can be used to verify that the intercepted data is
physically written to the disk for protection from loss of
electrical power. It is also used with interception of date and
time stamped files (discussed later in this section).
/S Temporarily suspends interception by deactivating Printer
Interceptor.
/R Resumes interception after suspension with the PI /S command
or by pressing the hot-key combination.
/U Uninstalls or removes Printer Interceptor from memory.
Example
Following is an example of a command line for intercepting output
normally routed to LPT1. This line sends the data to the file named
CAPTURE.DAT in the directory MYDIR, as well as sending it to the
printer.
PI LPT1 \MYDIR\CAPTURE.DAT /P
Changing Printer Interceptor's Settings
Printer Interceptor does not have to be stopped in order to change the
port from which data is being intercepted or the file that should receive
the data. Simply, reissue the PI command with the printer and file name
parameters, and any desired switches.
Displaying the Current Settings
To see the current settings for Printer Interceptor after it is installed in
memory, issue the PI command with no parameters.
Temporarily Stopping Printer Interceptor
After Printer Interceptor is installed, it can be temporarily deactivated
from the DOS command line by issuing the PI /S command. All
interception stops. To restart Printer Interceptor from the DOS command
line, simply re-issue the Printer Interceptor command with the desired
parameters.
To temporarily disable Printer Interceptor by using the hot-key, press
<Alt-Shift-P>. To re-enable Printer Interceptor, press <Alt-Shift-P>
again. Two beeps indicate when Printer Interceptor is disabled; one beep
indicates when Printer Interceptor is re-enabled.
DataImport
Appendix C: Getting Data out of Other Applications • 139
Date and Time Stamped Files
Printer Interceptor can create Capture Files that have the date and time of
interception as part of the file name. A new date and time stamped file is
started after each "time out" as determined by the value of the /T switch,
which defaults to 30 seconds.
To activate the date and time stamp feature replace the file name on the
command line with "D*". Examples:
PI PRN D*
PI LPT2 A:\D*.DAT
PI LPT1 D*. /T5
The first example places the intercepted output into date and time
stamped files in your current directory with a ".PRN" extension. The
second example captures the output going to LPT2 and puts it into files
on the A: drive with an extension of ".DAT". The third example
intercepts LPT1 and puts the output into date and time stamped files in
the current directory without an extension; the interception "times out" 5
seconds after the last character is received.
The name of the Capture File is in the form of MMDDhhmm, where the
first 2 characters are the month number. The next 2 characters are the day
number, followed by the hour and the minutes. If the extension is not
provided, it will default to ".PRN". For example, a date and time stamped
file created on October 15, 1996 at 1:30 PM would be 10151330.PRN.
Printer Interceptor creates a new file with a new date and time stamp if it
times out after the last character is intercepted or if Printer Interceptor is
temporarily disabled with the <Alt-Shift-P> key combination.
Uninstalling Printer Interceptor
After Printer Interceptor is installed, it can be uninstalled from the DOS
command line by issuing the PI /U command. This removes Printer
Interceptor from memory and normal operation of the printer will be
resumed.
DataImport
Appendix C: Getting Data out of Other Applications • 140
Appendix D: Data Type Colors and
Indicators
How Cell Types are Indicated
DataImport makes extensive use of color to indicate how information in
each cell will be recognized and formatted during translation. The Line
Control Bar also displays line treatment for each line. The following table
shows the meaning of colors in the Mask application’s Input File
window:
Cell Type
Display Color
Line Control Bar
Background:
Numeric Column
Blue
---
Text Column
Magenta
---
Date Column
Green
---
Time Column
Yellow
---
Title Line
Red
T
Heading Line
Magenta
H
Foreground:
Numeric Line Tag
Blue
---
Text Line Tag
Magenta
---
Date Line Tag
Green
---
Time Line Tag
Yellow
---
Signed Overpunch Tag
Blue
---
Reference Point
Red
---
Figure D-1 Colors displayed for various Cell Types
DataImport
Appendix D: Data Type Colors and Indicators • 141
Appendix E: Shortcut Keys
Cursor Key Operations
The cursor keys provide an easy way to move around the Mask Screen
when in the Input File window. These keys are also used to define the
ranges of lines and columns when in the Point mode.
Keystroke
Result
↓
Moves the cursor down one line
↑
Moves the cursor up one line
→
Moves the cursor to the right one position
←
Moves the cursor to the left one position
Page Up
Moves display up one full window
Page Down
Moves display down one full window
Home
Moves cursor to top left corner of the window
Control Home
Displays the first 20 lines of the Input File and moves the
cursor to line 1 position 1
End
Moves cursor to the bottom right corner of the window
Control End
Displays the last lines of the Input File and moves to
character position 1
Tab
Moves cursor 8 characters to the right
Shift
Starts/Ends a selection in the Input File window
Control →
Moves cursor one full screen to the right
Control ←
Moves cursor one full screen to the left
Figure E-1 DataImport Mask cursor movement keys
DataImport
Appendix E: Shortcut Keys • 142
Shortcut Function Key Operations
The function keys labeled F1 to F10 are used for frequently performed
operations and menu selections in the Mask window. Using these shortcut
keys saves time in defining a mask.
Pressing the following function keys in the Mask window performs the
described operations:
Key
Result
F1
Opens the Help file to the section covering the current function
F2
The same as Column Define...
F3
The same as Search Find Next...
Ctrl+F
The same as Search Find Text...
Shift+F3
The same as Search Find Previous...
F4
The same as Column Undo
F5
The same as Line Skip
F6
The same as Line Heading
F7
The same as Line Value
F8
The same as Line Title
Figure E-2 DataImport Mask function keys
DataImport
Appendix E: Shortcut Keys • 143
Appendix F: Match String Wildcard
Characters
Pattern Match Characters
allowed in each position for Include, Exclude, Resume, Pause, Reference
pattern match string require that specific character at that position.
(caret)
!
Any character except 0 through 9
(tilde)
_
Any character including blank
Figure F-1 Wildcard characters used for pattern match strings
Appendix F: Match String Wildcard Characters • 144
Appendix G: Command Line Use
DataImport Translate, Utilities, and Task Commander programs can be
run as batch operations, allowing you to further automate your
translations.
The DataImport Task Commander allows the execution of a series of
DataImport Translate, DataImport Utilities and non-DataImport
applications that can be run from a command line. With the DataImport
Task Commander, you can run batch processes without knowledge of the
command line. Task Commander automatically creates the command
lines for you.
You can also achieve some batch-like functionality by creating an icon or
a shortcut for a DataImport translation or utilities process. To achieve
more extensive batch processing functionality in Windows, you will need
to use an add-on utility like WinBatch by Wilson WindowWare (800762-8383) or another third-party utility.
Translate Command Line
Once a Mask has been defined and saved to disk, the translation can be
performed using command line controls.
Syntax:
DIW mask[,[input],[output],[type],[display],[confirm]][/A]
[/C]
The command line parameters that follow the DIW command are
positional and separated by commas. If a parameter is skipped, a comma
must be used to hold its place. The switches, /A and /C, are not positional
and are not separated by commas.
mask
Mask File name, including the path if necessary. This is
the only required parameter. If no other parameters are
specified, the parameters specified when the mask was created
(or last saved) will be used in the translation.
input
Input File name, including the path and extension if
necessary.
output Output File name, including the path if necessary. If an
extension is specified, it will be used rather than the file
DataImport
Appendix G: Command Line Use • 145
extension DataImport normally uses based on the type of
translation.
type Type of translation to be performed. Any of the following
types can be specified:
WKS Lotus 1-2-3 release 1 and 1A
WK1 Lotus 1-2-3 release 2.x
WK3 Lotus 1-2-3 release 3.x
WK4 Lotus 1-2-3 release 4.x and 5.x
WRK Symphony release 1.0
WR1 Symphony release 1.1, 1.2 and 2.x
WKQ Borland Quattro
WQ1 Borland Quattro Pro
WB1 Borland Quattro Pro 5.0 for Windows
XLS Microsoft Excel version 2.1
XLS3 Microsoft Excel version 3.0
XLS4 Microsoft Excel version 4.0
XLS5 Microsoft Excel version 5.0 and 7.0.
DBF dBase III
DBF2 dBase II
DBF3 dBase III
DBF4 dBase IV
MDB1 Microsoft Access 1.1
MDB Microsoft Access 2.0
DB35 Paradox 3.5
DB Paradox 4.0
DAT Clarion
DIF Columnwise DIF
CDIF Columnwise DIF
SLK SYLK or Symbolic Link
PRN Print Image
HTM HTML Table
ASC Comma separated with quotes around strings
CSV Comma Separated Variable
SDF Standard Data Format
FXD Fixed record format without delimiters
TSV Tab separated variables
UDD User-defined delimited
TXT ASCII text file
LBL Mailing label format
WRD Microsoft Word data document
W50 Word Perfect 5.0 secondary merge file
W51 Word Perfect 5.1 secondary merge file
display Specifies whether the output is to be displayed on screen
during translation: Y for yes, N for no. The default is Yes.
DataImport
Appendix G: Command Line Use • 146
confirm Specifies whether Include Line and Exclude Line
treatments must be confirmed manually during the translation. Y
for yes, N for no. The default is No.
/A Appends the output of the translation to the end of an existing
Output File. See the description of the Mask command Files
Define Output File... for more information.
/C combines the output of the translation into an existing
spreadsheet Output File. See the description of the Mask
command Files Define Output File... for more information.
The only required parameter is the Mask File name. If no other
parameters are specified, the parameters defined when the mask was
created or last saved are used.
To specify some parameters and not others, include the intervening
commas as place holders. This is necessary to indicate to DataImport
which of the options you want to use. For example, if you want to use the
name of the Input File stored with the mask, but want to change the name
of the Output File, you would place two commas before the name of the
new Output File. Otherwise, DataImport would interpret the file name as
an Input File. Commas, however, are unnecessary as place holders before
the /A and /C parameters.
If a parameter is not specified on the command line and the parameter has
not been specified in the mask, the translation cannot proceed. In such
cases when DataImport aborts the translation, a message is displayed on
the screen to indicate the missing or invalid parameter(s).
The following four examples illustrate the ways translations can be
initiated using a command line.
Translate Command Line Example 1
To perform a translation from the command line using the following
parameters:
Mask File name
Input File name
Output File name
Translation type
Display on
Y (Yes)
Confirm include/exclude
Append to existing file /A
MYMASK
DIDEMO.TXT
SALESDAT
XLS
Y (Yes)
The command line should read:
DIW MYMASK,DIDEMO.TXT,SALESDAT,XLS,Y,Y/A
Translate Command Line Example 2
To perform a translation from the command line, use the following
parameters:
DataImport
Appendix G: Command Line Use • 147
Mask File name
Input File name
Output File name
Translation type
Display on
Confirm include/exclude
MYMASK
as specified in the mask
as specified in the mask
XLS
default to yes
default to no
The command line should read:
DIW MYMASK,,,XLS
Translate Command Line Example 3
To perform a translation from the command line, use the following
parameters:
Mask File name
Input File name
Output File name
Translation type
Display on
Confirm include/exclude
MYMASK
as specified in the mask
as specified in the mask
as specified in the mask
default to yes
default to no
The command line should read:
DIW MYMASK
Translate Command Line Example 4
To perform a translation from the command line, use the following
parameters:
Mask File name
Input File name
Output File name
Translation type
Display on
Confirm include/exclude
File-combine
MYMASK
ORIGINAL.DAT
GOOD
as specified in the mask
default to yes
default to no
/C
The command line should read:
DIW MYMASK,ORIGINAL.DAT,GOOD/C
Utilities Command Line
The running of a utility can be initiated from a command line.
Syntax:
DIUTILW option[=v1[,v2]] input [output] [/W]
The option, input file name and output file name parameters are
positional and separated by spaces.
option Option or process to be performed. DataImport offers
eleven options or utilities.
DataImport
Appendix G: Command Line Use • 148
L
Line Split by Length
R
Records per File Split
T
Tab expansion to ASCII columnar
C
CSV (Comma Separated Variable) to columnar
F
Fixed length records
S
Statistics
U
Unstack
D
dBase to ASCII columnar
H
Header of dBase to ASCII file
AASCII to EBCDIC
E
EBCDIC to ASCII
P
Parse space delimited to columnar
The options and examples of their uses are described below.
v1 & v2 Required and/or optional values. Whether these values are
used depends on the utility option specified.
input
Input File name, including the path and extension if
necessary.
output Output File name, without an extension, but including any
drive and path specifications necessary to tell DataImport where
to find the existing file or where to place the new file. If an
Output File name is not specified, the Output Files will have the
same path and name as the Input File. DataImport provides
unique, sequential file extensions (A1 through A99), as some
options produce more than one Output File.
/W Includes a Warning if DataImport detects that the Output File
name specified already exists. Stops the program and prompts
whether to proceed. If not specified, any file(s) having the same
name as the Output File will be overwritten.
DataImport offers twelve options or utilities. Descriptions of these
options and examples of their use are provided below:
L=v1
Line Split by Length Splits the Input File vertically by
producing two or more Output Files with shorter record lengths.
The value v1 is the maximum record length in the Output Files.
See the description of the DataImport Utilities process Line Split
by Length for more information.
For example, to split the file INFILE.DAT into files with a
record length of 80 and output the data into files with the name
of OUTFILE, the command line would read as follows:
DIUTILW L=80 INFILE.DAT OUTFILE
The number of files created depends on the length of the Input
File and the number of characters specified as the maximum
length for each Output File. The first Output File is named
OUTFILE.A1, the second OUTFILE.A2, etc.
R=v1
Records per File Split Splits the Input File into two
or more files with fewer records in each Output File. The value
DataImport
Appendix G: Command Line Use • 149
v1 is the maximum number of records in the Output Files. See
the description of the Utilities process Records per File Split in
the Utilities Reference for more information.
For example, to split the file INFILE.DAT into files with no
more than 8192 records per file, the command line would read
as follows:
DIUTILW R=8192 INFILE.DAT
The number of files created depends on the length of the Input
File and the number of records specified as the maximum for
each Output File. The first Output File is named INFILE.A1, the
second INFILE.A2, etc.
T=v1
Tabs Expands tab characters by the value indicated by
v1. This value sets the number of spaces to use as tab stops. See
the description of the Utilities Screen option Function Tabs for
more information.
For example, to expand the tabs in the file INFILE.DAT with
tab stops of 8, the command line would read as follows:
DIUTILW T=8 INFILE.DAT
C[=v1[,v2]] Comma Separated Converts a comma separated
(or user-defined separated) file into an ASCII columnar text file.
The value v1 specifies the field separator. The value v2
specifies the string delimiter. If no optional values are supplied,
the comma character (ASCII: 44) will be used as the field
separator, and the quote character (ASCII: 34) will be used as
the string delimiter.
See the description of the Utilities Screen option Comma
Separated Values for more information.
For example, to convert the semicolon and quote delimited file
INFILE.DAT, the command line would read:
DIUTILW C=59,34 INFILE.DAT
F=v1[,v2] Fixed Converts a fixed length record file that does not
have record separators into a sequential file with record
separators. The value v1 is the length of each record in
characters. The optional value v2 is the number of characters to
skip at the beginning of the Input File before outputting records.
This option is useful when the first part of the file contains
header information or other data that should not be translated.
See the description of the Utilities process Fixed Length in the
Utilities Reference for more information.
For example, to convert the file INFILE.DAT into sequential
records with a length of 16 and to skip the first 18 bytes in the
file, the command line would read as follows:
DIUTILW F=16,18 INFILE.DAT
DataImport
Appendix G: Command Line Use • 150
S
Displays statistics about the Input File. The
statistics include the length of the longest line, the number of
description of the Utilities process Statistics
Reference for more information.
For example, to display statistics about the file INFILE.DAT,
DIUTILW S INFILE.DAT
U=v1[,v2] Unstack
logically go together, but are on separate lines. The value v1
specifies the number of lines to be combined into a single line.
beginning of the file before combining lines. This option is
useful if the first part of the file contains header information or
the Utilities process Unstack
Reference for more information.
For example, to unstack the file INFILE.DAT by combining
command line would read:
DIUTILW U=2,5 INFILE.DAT
dBase Creates a sequential file that is usable by DataImport
Utilities process dBase Convert
Reference for more information.
For example, to convert the dBase file INFILE.DBF to a
DIUTILW D INFILE.DBF
H
Outputs the dBase file structure contained in the
database file’s header record. See the description of the Utilities
dBase Header in the DataImport Utilities Reference for
For example, to output the structure of the dBase file
INFILE.DBF, the command line would read as follows:
A
ASCII TO EBCDIC
encoded in ASCII (used by PC’s) into a file encoded in
EBCDIC (used by IBM midrange and mainframe computers).
ASCII->EBCDIC
the DataImport Utilities Reference for more information.
For example, to convert the ASCII file INFILE.DAT to an
DIUTILW A INFILE.DAT
DataImport
Appendix G: Command Line Use • 151
E
EBCDIC TO ASCII Converts a file whose characters are
encoded in EBCDIC into a file encoded in ASCII, that is usable
by DataImport. See the description of the Utilities process
EBCDIC->ASCII in the DataImport Utilities Reference for
more information.
For example, to convert the EBCDIC file INFILE.DAT to an
ASCII file, the command line would read as follows:
DIUTILW E INFILE.DAT
P=v1[,v2]
Parse space delimited converts a space
separated variable file into a file with fixed length fields. The
value v1 specifies the width of columns to use for the parsed
fields. The optional value v2 specifies the number of character
positions at the beginning of each line to write to the Output File
without parsing.
For example, to convert the space separated file INFILE.DAT
into a columnar file with the first 20 characters exactly as in the
in the Input File and the remaining characters in columns that
are 10 wide, the command line would read as follows:
DIUTILW P=10,20 INFILE.DAT
Task Commander Command Line
The DataImport Task commander can be run from the command line.
Taskfile Taskfile is the name of the file created and saved in Task
Commander. Taskfiles always have an extension of TSK.
Syntax:
DITASK taskfile
DataImport
Appendix G: Command Line Use • 152
Appendix H: Customizing the
Dictionary File
Default Dictionary
DataImport comes with a default dictionary file (DEFAULT.DIC) which
is used when defining columns and line tags with a type of Name Parse
and/or Address Parse. The dictionary file contains common prefixes,
suffixes and beginnings of last names. It also contains the names and
abbreviations for all of the states of the United States, the provinces of
Canada, and several countries. If the data you are working with uses
different or additional prefixes, provinces, etc., you can edit the
default.dic file or a copy of the default.dic file. The name of the
dictionary file to be used in a mask is specified from the mask's Options
Global dialog box.
Editing the Default.dic file
Using an editor such as Windows Notepad or DOS Edit, open the
default.dic or other .dic file.
Make the changes to the appropriate section. For example, if you wanted
to include the Provinces of Australia and their abbreviations, you would
locate the section of the file named [State/Province] and enter the
following data:
Queensland
Qld.
New South Wales
N.S.W.
Western Australia
W.A.
Southern Australia
S.A.
Northern Territory
N.T.
Example
DataImport
Appendix H: Customizing the Dictionary File • 153
Following is an example of the sections and contents of a dictionary file.
The section names must be exactly as shown.
[prefix]
Mr. & Mrs.
Mr.
Mr
Ms.
[suffix]
Jr.
Jr
M.D.
M. D.
[begin_last_name]
Van Der
Von
St.
[begin_cities]
St.
Los
Las
New
[State/Province]
Alabama
AL
Alaska
AK
Alberta
AB
DataImport
Appendix H: Customizing the Dictionary File • 154
Appendix I: Frequently Asked
Questions
DataImport Questions
I'm translating into a database and I've changed the column type in
the mask from numeric to character (text). I open the file in my
database management software and the field type has not changed!
What's wrong?
You have already translated the file, the database exists. Database files
contain both the data records and a structure that defines the layout of the
fields in the records. This structure includes field names, types, and
widths. As a safety precaution, DataImport never changes this structure.
Therefore even if DataImport created the structure, changing column
types and widths in the mask will not change the structure, even if the
replace option is selected. Replace will only replace the data records, not
the structure. To solve this problem, either change the output file name to
a new name, or delete the existing database file. See the section in
Chapter 4 titled "Working with Database Files".
I've translated my data and nothing came out. Why?
There are several possible reasons. You must have at least one column or
Line Tag defined. You must also be in Global Output Line Mode, or have
at least one line whose type is indicated in the mask application as either
Output or Include
Why is DIW removing leading 0's from numeric data?
You have selected numeric as the column's type. Leading 0's (zeros) are
stripped when translating to a number. To keep the leading 0's in numbers
like zip codes and social security numbers, select text as the column type.
How big of a file can DataImport translate?
DataImport can translate files of unlimited lengths. DataImport can
extract data from the first 2,048 characters of each line or record.
Appendix I: Frequently Asked Questions • 155
Is there some way to automate a series of translations and/or utility
processes?
Sure, see Chapter 8: Task Commander.
Why don't I see all of my file in the Mask window. What will happen
when I translate?
DataImport by default loads 1000 lines of the file. This can be changed
under the Options Preferences menu. The Mask screen can load up to
16,384 lines to be displayed. Regardless of how many lines are loaded
into the mask screen, DataImport will translate the entire file.
Why do I get an error message when I translate my 70,000 line file to
Excel?
The Excel format is limited to 16,384 lines. If your files are larger than
this, you should probably be using a database. You could also use the
Utilities to split the file by length to create a series of input files that
contain fewer lines per file.
I have Line Tags defined. They are coming out repeatedly on
multiple lines when I translate. I only want them to come out one
time for each set of data.
You are probably in Global Output Line Mode. Try including just one
line for each set of data in your file while in Global Skip Mode. See the
"Include Lines Define" option in Chapter 5.
I'm trying to unstack sets of 3 lines to make one line that contains all
of the information from these lines. Some times one or two of these
lines appear at the bottom of a page and the remaining lines appear
at the top of the next page under the page heading. The headings are
getting in the way.
This will require two masks and two translations. First, define a mask that
selects all of the columns of information that you need. You can use
Column Auto Define All to do this very quickly. In this mask, use the
Exclude Lines feature to exclude the page headings. Select the Output file
type as print image (.PRN) and translate. Start a new mask and load the
print image file that you just created as the Input file. This new Input file
will not include the interrupting page headings. Now you are ready to
apply the unstack feature and select the columns of information that you
want. Remember, that you can automate this two step process by using
DataImport's Task Commander.
DataImport
Appendix I: Frequently Asked Questions • 156
Index
Symbols
$ (dollar) 62
¢ (centavo) 62
£ (pound) 62
¥ (yen) 62
A
A$ (Australian dollar) 62
Abort
translation at a line 51
Access
output format 133
Table Names 70
Address parse
columns 65
Alpha 4
output format 131
Appending to an existing file 44
Applications
generating input files 136
ASC 131
ASCII
output format 131
ASCII -> EBCDIC
process 117
ASCII characters
removing 45
ASCII files
input 127
ASCII text
saving to file 137
AutoColumn
applying automatically 111
Automating DataImport 145
Translate application 145
Utilities application 148
B
Batch programming 145
DataImport
Blank cells
filling 60, 81
Blank lines
removing 45
C
C$ (Canadian dollar) 62
Calculations 67
defining 67
inserting 67
inserting on change 100
inserting on match 101
replacing numbers with formulas 100
replacing on match 103
Capture file 137
Cell type indication 141
Cells
Blank, filling 81
Character delimited files
user-defined 134
Characters
excluding first position 46
special use 144
Clarion
output format 131
Clipper 131
output format 131
Code page
control 108
Colors
meaning 141
on Input File window 141
Column
Auto Define All 83
Define... 79
menu 79
Push/Pull 83
Settings... 82
turning dialog box off 111
Undo 82
Undo All 83
Column Control Bar 18
Index • 157
using 25
Column Define
dialog box settings 81
Column settings
dialog box 23
Columnar data
extracting 46
Columns
Address parse 65
and fields 69
blank cells 60
calculations 67
database field names 69
date 64
defining 22, 47, 80
defining automatically 47
defining manually 47
defining type 27
defining with Column Control Bar 25
defining with menu bar 22
defining with popup menu 24
Fill down 60
format options 80
formulas 67
from non-columnar data 59
limits, excluding lines 51
maximum 47
Name Parse 65
names 71
numeric 62
removing 47
resequencing 53
text 63
time 65
transposing with rows 61
Columnwise DIF
output format 131
Combining files 44
starting cell 107
Comma Separated Variables
output format 131
Command line
Printer Interceptor 137
translation 145
translation, example 147
utilities 148
Command line controls 145
Commands
Mask application 72
Translate application 112
Utilities application 116
Confirmation
turning off 111
DataImport
CSV 131
Currency symbol 62
Cursor movement 142
Custom date
control 109
D
DAT 131
Data
extracting 46
reorganizing 52
selecting for translation 21
unstacking 53
Data columns
extracting 22
Data formatting 27
Data Interchange Format
Columnwise 131
Data sets
arranging 53
Data types
numeric 62
recognizing 61
setting 62
time 65
Database fields
showing 75
Databases
Alpha 4 131
appending 70
changing structure 45
Clarion 131
Clipper 131
considerations for output 44
creating 70
dBase 131
existing 70
field names 69, 71
fields 69
FoxPro 131, 132
indexes 70
Microsoft Access 133
new 70
Paradox 133
showing structure 69
structure 70, 118
example 75
XBase 135
DataImport
input formats list 15
output formats list 15
programs 17
Index • 158
purpose 13
running 19
uses 13
DataImport Mask
Basics 19
commands 72
DataImport Mask window
explained 18
DataImport Program Group 17
DataImport Task Commander 124
DataImport Translate
controls 112
DataImport Utilities
controls 116
using 42
Date
column 64
month names 64
two digit years 64
without separators 64
Date format
applying to columns 27
DB 133
dBase
convert process 118
header process 118
output format 131
DBF 131
Decimal separator 63
Defining
columns, example 22, 24, 25
Defining Line Tags 30
Defining Reference Points 30
Deleting
characters 45
Dialog boxes
turning off extra 111
Dictionary file
names and addresses 107
DIF
Columnwise 131
Displaying
database structure 69, 75
input files 41
DKr (Danish Krone) 62
DM (German mark) 62
DOS applications
generating input files136
printing to file 137
Duplicate lines
removing 46
DataImport
E
EBCDIC -> ASCII
process 119
End translation at line 51
Escape sequences
excluding 46
Excel
output format 131
Exclude
Blank Lines 94
Characters All Special Characters 92
Characters Define... 91
Characters Undo All Special 93
Duplicate Lines 94
Edit 92
Lines Undo... 91
menu 90
Page Ejects 94
Pause Define... 93
Pause Undo... 94
Excluding
blank lines 45
character sequences 46
characters 91
control characters 92
control codes 45
duplicate lines 46
escape sequences 46
line groups 49
page ejects 45, 94
printer carriage control 46, 107
special characters 45
Excluding lines 50
exact match 50
limits 51
pattern match 50
pattern match characters 50
Extracting data 21, 46
columnar 22, 46
form based data 58
example 58
groups of lines 49
lines 28
F
Fields
and columns 69
File
Define Output File... 75
Exit 76
Input File Statistics 73
Load Input File... 73
Mask Summary Info 74
Index • 159
menu, Mask application 72
menu, Translate application 113
menu, Utilities application 123
New Mask 73
Open Mask 73
Print Input File 73
Print Mask Settings... 74
Save Mask 74
Save Mask As... 74
Show Database Fields 75
Translate 75
File Filter
custom 111
File format
choosing 43
Files
adding record separators 119
example 119
input 127
output 128
splitting 121
Fixed length
output format 132
process 119
Font
controls 111
Foreign
currency 62
month names 64
number formats 63
Formatting data 27
Forms 58
Formula Row
defined 67
inserting 67
Formulas 67
column change 100
example 100
defining 67
inserting at column change 67
inserting on match 68, 101
inserting on match, example 102
replacing numbers 68
replacing on match 68, 103
FoxPro 131
output format 132
Fr. (French Franc) 62
Frequently Asked Questions 155
Function keys, definition 143
Fx keys 143
FXD 132
DataImport
G
garbage characters
in input files 42
Gld (Guilder) 62
global settings 106
line treatment 106
H
Headers
inserting into column 55
Heading lines
defining 32
Headings 52
I
Icons
DataImport 17
Include
Lines Define... 87, 90
Lines Undo... 88
menu 87
Resume Define... 88
Resume Undo... 89
Including lines 48
exact match 48
individually 49
pattern match 48
Information Bar 18
Input File window 18
Input files 40, 41, 127
adding record separators 119
example 119
cleaning up 45
comma delimited 118
dBase 118
expanding tabs 122
example 122
garbage characters 42
generating 136
loading 19, 42
number of records 41
record size 41
space delimited 152
splitting files 121
splitting lines 120
statistics 121
test & sampling instruments 152
unstacking 53, 122
example 122
unstacking, example 53, 98, 122
Installation 7
Index • 160
instructions 7
LAN version 9
K
keyboard shortcuts 142
L
L (Lira) 62
LAN installation 9
client users 9
LAN version 9
checking users 10
LBL 133
Learning
DataImport 19
Letter
on Line Control Bar 141
Limits
to exclude data 51
Line
(A)bort 97
(H)eading 95
(O)utput 96
(S)kip 95
(T)itle 96
Default 95
Insert Treatments 97
menu 95
Undo All Treatments 97
Line Control Bar 18
letters 141
using 34
Line split by length
process 120
Line Tags
column definition 58, 60
defined 56
defining 30, 57, 59, 85
how they work 56
reference points 57
relation to included lines 60
using 58, 85
Line treatments 52
abort 51
default 52
global setting 106
inserting 97
output 50
resetting 97
restoring default 95
skip 51
Lines
DataImport
(A)bort-ing 51
abort at line 97
blank, filling 81
blank, removing 45
column heading 52, 95
Default number of lines to load 111
default treatment 29, 95
excluding 50
excluding blank 45
excluding duplicate 46, 94
excluding first characters 46, 107
excluding groups 49
extracting 28
global output lines mode 52
global skip lines mode 52
heading 34
including 28, 48, 51, 87, 90
including individually 49
inserting treatments 97
resetting treatments 97
skipping 95
skipping individual 51
splitting 120
title 32, 52, 96
unstacking 53, 122
Loading input files
custom filter 111
example 19
Lotus 1-2-3
output format 132
M
Mailing Label
output format 133
Mainframe applications
generating input files 136
Mask application 17
commands 72
running 19
Mask files
printing settings 74
saving 38
Mask window
explained 18
Masking
example 21
Masks
applying to files 35
Match Strings
defined 50
for excluding lines 50
special characters 144
to include lines 48
Index • 161
Maximum users
error 10
MDB 133
Memory requirements 7
Menu Bar 18
Microsoft Access
output format 133
Table Names 70
Microsoft Word
output format 133
Midrange applications
generating input files 136
Minicomputer applications
generating input files 136
Missing text
large files 41
Month names
control 108
spellings 64
moving cursor
shortcuts 142
N
Name Parse
column 65
naming
output files 44
Negative notation
signed overpunch 65
Network (LAN) 9
NKr (Norwegian Krone) 62
Notation
currency 62
Date 64
decimals 63
signed overpunch 65
thousands 63
Numbers
credits 62
debits 62
formats 62
negative 62
replacing with formulas 68
scientific notation 62
signed overpunch 65
Numeric
column 62
Numeric formats 62
O
Options
Dates... 108
DataImport
Default Line Treatment 110
Formula Rows Column Change... 100
Formula Rows Display Current Settings 105
Formula Rows Insert on Match 101
Formula Rows Replace on Match 103
Formula Rows Undo 106
Global... 106
International... 107
menu, Mask application 100
menu, Translate application 114
Preferences... 110
Signed Overpunch... 109
Order
columns 53
Output files 40, 43, 128
Alpha 4 131
appending 44
ASCII delimited 131
choosing file name 44
choosing file type 43
choosing type 35
Clarion 131
Clipper 131
combining 44
database 70, 131
databases 44
Excel 131
existing 44
fixed length 132
FoxPro 131, 132
interchange 131
list 129
Lotus 1-2-3 132
mailing labels 133
Microsoft Access 133
Microsoft Word 133
Paradox 133
Print image 133
Quattro 133
Quattro Pro 133
Quattro Pro 5.0 134
replacing 44
Standard Data Format 134
starting cell 107
Sylk 134
Symphony 134
tab separated variables 134
text 134
types 128
user-defined delimited 134
using 39
WordPerfect 135
XBase 135
output formats
Index • 162
versions 40
P
p (peseta) 62
Page ejects
excluding 45
Pages
blank, removing 45
Paradox
output format 133
Parse spaces
process 120
Pattern match characters 144
Pause
starting in 106
Pause translation 49
PI.EXE 137
popup menus
using 24, 34
Positive notation
signed overpunch 65
Precedence, line types 88, 91
Preference
controls 110
Print image
output format 133
print to disk 136
Printer
intercepting output 137
Printer Interceptor
command line 137
Printing
mask settings 74
printing to disk
Windows applications 137
PRN 133
Processes
ASCII -> EBCDIC 117
Comma Separated Value 118
dBase convert 118
dBase header 118
EBCDIC -> ASCII 119
Fixed length 119
Line split by length 120
Parse spaces 120
Records per File Split 121
Statistics 121
Tab expansion 122
Unstack 122
Programs
DataImport 17
Prompt Line 18
DataImport
Q
Quattro
output format 133
Quattro Pro
output format 133, 134
R
README.TXT 10
Recognizing data types 61
Records per File Split
process 121
Reference Point
Form Length 85
Top of Form 85
Reference Points
defined 56
defining 30
using 58
removing
characters 45
columns 47
reorganizing data 52
Replacing lines
with formulas 68
Reports
form based 58
Requirements
system 7
Resequencing
columns 53
Rows
transposing with columns 61
S
SDF 134
Search
Find Control Codes 77
Find First 78
Find Last 78
Find Next 77
Find Previous 78
Find Text... 77
Go Bottom 78
Go Top 78
menu 77
Sequence
columns 53
Serial number
location 9
SETUP.EXE 7
SFr (Swiss Franc) 63
Index • 163
shortcuts
function keys 143
moving cursor 142
Showing database structure 75
Signed overpunch
characters 65, 109
controls 109
custom 66
explained 65
position 66
Skipping lines
groups 49
individually 51
SKr (Swedish Krona) 63
SLK 134
Special characters
defined 45
excluding 45
removing 45
Spreadsheets
Excel worksheet 131
formulas 67
headings 52
Lotus worksheets 132
Quattro 133
Quattro Pro 133, 134
starting cell 107
Symphony 134
titles 52
Standard Data Format
output format 134
Statistics 121
process 121
styles
recognizing 61
Support 12
suppressing
characters 45
Sylk
output format 134
Symbolic Link
output format 134
System requirements 7
example 122
Tag
Define Match String Reference Point... 84
Line-Tag Define 85
menu 84
Undo Reference Point... 85
Task Commander 124
Task Commander Screen 124
Task File Dialog Box 125
Technical Support 12
Text
column 63
Text block 55
Thousands separator 63
Time
column 65
Time format 65
Title lines 52
defining 32
Titles 52
inserting into column 55
Tools
highlighters 21
Translate
File Exit 114
File Save Mask 113
File Translate 113
Translate application 17
automating 145
command line 145
examples 147
window 112
Translating data 35
Translations
pausing 49
running 36
Transpose
rows and columns 106
Transposing rows/columns 61
TSV 134
Tutorial 19
two-digit year
control 109
T
U
Tab expansion
process 122
Tab Separated Variables
output format 134
Table Names
Microsoft Access 70
Tabs
expanding 122
UDD 134
Undo
columns 47
Unstack
Define 98
menu, Mask application 98
process 122
Undo 99
DataImport
Index • 164
Upgrading to DataImport 5 12
User-Defined Delimited
output format 134
Users
checking maximum 10
Utilities 118
adding record separators 119
example 119
application 17
converting comma delimited files 120
converting dBase files 118
EBCDIC to ASCII 119
expanding tabs 122
example 122
file statistics 121
splitting files 121
splitting lines 120
unstacking
example 98, 122
using 42
Utilities application 116
automating 148
processes 117
window 116
X
XBase
output format 135
XLS 131
Y
Years
two digit 64
W
W50 135
W51 135
WB1 134
What's new in DataImport 5 11
wildcard characters 144
Windows 7
batch programming 145
printing to file 137
Windows applications
generating input files 136
WK1 132
WK3 132
WK4 132
WKQ 133
WKS 132
Word processors
Microsoft Word 133
WordPerfect 135
WordPerfect
output format 135
WQ1 133
WR1 134
WRD 133
WRK 134
DataImport
Index • 165