1
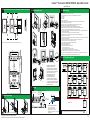
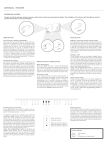
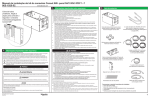
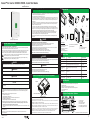
Conext™ CL Inverter 20000E/ 25000E - Quick Start Guide www.SEsolar.com A 3. 6. 7. 8. 9. 10. DANGER Three-phase grid-tie Inverter Important Safety Information Read and Save These Instructions - Do Not Discard This guide contains important safety instructions for the Conext CL Inverter that must be followed during installation procedures. Read and keep this Quick Start Guide for future reference. Read these instructions carefully and look at the equipment to become familiar with the device before trying to install, operate, service or maintain it. The following special messages may appear throughout this bulletin or on the equipment to warn of potential hazards or to call attention to information that clarifies or simplifies a procedure. DANGER DANGER WARNING indicates a hazardous situation which, if not avoided, can result in death or serious injury. CAUTION Inverter No responsibility is assumed by Schneider Electric for any consequences arising out of the use of this material. 1. Before using the Conext CL Inverter, read all instructions and cautionary markings on the unit and all appropriate sections of the Installation and Operation manual. 2. Use of accessories not recommended or sold by the manufacturer may result in a risk of fire, electric shock, or injury to persons. Contact Information www.SEsolar.com Please contact your local Schneider Electric Sales Representative or visit the Schneider Electric website at: http://www.SEsolar.com 990-5394 Revision A 10-2014 D I E J K Inverter (G) Installation and Operation Manual (H) Quick Start Guide (I) Inverter (J) Inverter mounting bracket (K) Routine test report Torque Table Description Torque Nm/in-lbf M4 Wiring box front cover screw (Fig: (e)) 2.1/ 18.6 M4 Wiring box and wall mount screw (Fig: (d)) 6/ 53.1 M8 Inverter and Wiring box bracket screws (Fig: (a), (b)) 6/ 53.1 Guide Bushing screw Inverter and Wiring box guide bushing locking (Fig: (j), (k)) screw 10/ 88.5 Thumb screw Inverter and Wiring box power connector (Fig: (i)) thumb screw 5/ 44.3 M6 Nut Second protective earth connection 5/ 44.3 Phillips head (#2) Fuse holder screws 3/ 26.6 Tools Required 2.1/18.6 #2 Phillips screwdrivers or power screwdriver for mounting the bracket NOTICE is used to address practices not related to physical injury. The safety alert symbol shall not be used with this signal word. This Guide is intended for anyone who needs to operate, configure, and troubleshoot the Conext CL Inverter. Certain configuration tasks should only be performed by qualified personnel in consultation with your local utility and/or an authorized dealer. Electrical equipment should be installed, operated, serviced, and maintained only by qualified personnel. Qualified personnel have training, knowledge, and experience in: • Installing electrical equipment • Applying applicable installation codes • Analyzing and reducing the hazards involved in performing electrical work • Installing and configuring batteries • Selecting and using Personal Protective Equipment (PPE) Wiring box Wiring box mounting bracket RPO Connector RJ45 Bus End Terminator M8 screws (4x) MPPT shorting jumper (2x) E Wiring box H Fastener type Location of Important Physical Features (Optimum+ ) LCD display G D HAZARD OF ELECTRIC SHOCK, EXPLOSION, OR ARC FLASH • Disconnect all the power sources before making any connection. • Connect the communication ports to SELV circuits only. Failure to follow these instructions will result in death or serious injury. CAUTION indicates a hazardous situation which, if not avoided, can result in minor or moderate injury. NOTICE (A) (B) (C) (D) (E) (F) WARNING B C B Wiring box HAZARD OF ELECTRIC SHOCK, EXPLOSION, OR ARC FLASH The inverter is not user serviceable. To be installed and serviced by qualified personnel, equipped with appropriate personal protective equipment and following safe electrical work practices. Failure to follow these instructions can result in death or serious injury. DANGER indicates a hazardous situation which, if not avoided, will result in death or serious injury. WARNING A F HAZARD OF ELECTRIC SHOCK, EXPLOSION, OR ARC FLASH • Apply appropriate personal protective equipment (PPE) and follow safe electrical work practices. • This equipment must only be installed and serviced by qualified electrical personnel. • Never operate energized with covers removed. • The Conext Inverter is energized from two sources. Before opening cover disconnect all sources of power, and then wait atleast five minutes for internnal capacitors to discharge. • Always use a properly rated voltage sensing device to confirm power is off. • Replace all devices, doors and covers,before turning on power to this equipment. Failure to follow these instructions will result in death or serious injury. The addition of either symbol to a “Danger” or “Warning” safety label indicates that an electrical hazard exists which will result in personal injury if the instructions are not followed. This is the safety alert symbol. It is used to alert you to potential personal injury hazards. Obey all safety messages that follow this symbol to avoid possible injury or death. Materials List The inverter is designed to be permanently connected to your AC and DC electrical systems. The manufacturer recommends that all wiring be done by a certified technician or electrician to ensure adherence to the local and national electrical codes applicable in your jurisdiction. Do not operate the inverter if it is damaged in any way. The inverter does not have any user-serviceable parts. Do not disassemble the inverter except where noted for connecting wiring and cabling. See your warranty for instructions on obtaining service. Attempting to service the unit yourself may result in a risk of electrical shock or fire. Internal capacitors remain charged after all power is disconnected. To reduce the risk of electrical shock, isolate both the AC and the DC power from the inverter before attempting any maintenance or cleaning or working on any components connected to the inverter. Putting the unit in the standby mode will not reduce this risk. The inverter must be provided with an equipment-grounding conductor connected to the AC input ground. The Conext CL inverter is energized from two sources: PV array while exposed to sunlight and AC grid. Before opening the cover for servicing, check the system diagram to identify all the sources, de-energize, lock-out and tag-out, and wait for at least five minutes for the internal capacitors to discharge to safe voltages. The Conext CL inverter employs field adjustable voltage and frequency set points and time delays that are factory set in compliance with local utility and safety requirements. This can be changed only by qualified personnel with approval by both the local utility and equipment owner. Remove personal metal items such as rings, bracelets, necklaces, and watches when working with electrical equipment. 4. 5. A C Important Safety Information Slotted screw driver Stripper and crimping tool for both AC and DC wiring Spirit level to ensure the straight installation of the mounting bracket Torque adjustable wrench Allen key set Louvers Communication cable gland 2 Lifting handle F Wiring box Configuration- Optimum+ DC disconnect switch Exclusion for Documentation UNLESS SPECIFICALLY AGREED TO IN WRITING, SELLER (A) MAKES NO WARRANTY AS TO THE ACCURACY, SUFFICIENCY OR SUITABILITY OF ANY TECHNICAL OR OTHER INFORMATION PROVIDED IN ITS MANUALS OR OTHER DOCUMENTATION; (B) ASSUMES NO RESPONSIBILITY OR LIABILITY FOR LOSSES, DAMAGES, COSTS, OR EXPENSES, WHETHER SPECIAL, DIRECT, INDIRECT, CONSEQUENTIAL OR INCIDENTAL, WHICH MIGHT ARISE OUT OF THE USE OF SUCH INFORMATION. THE USE OF ANY SUCH INFORMATION WILL BE ENTIRELY AT THE USER’S RISK, AND (C) REMINDS YOU THAT IF THIS MANUAL IS IN ANY LANGUAGE OTHER THAN ENGLISH, ALTHOUGH STEPS HAVE BEEN TAKEN TO MAINTAIN THE ACCURACY OF THE TRANSLATION, THE ACCURACY CANNOT BE GUARANTEED, APPROVED CONTENT IS CONTAINED WITH THE ENGLISH LANGUAGE VERSION WHICH IS POSTED AT WWW.SCHNEIDER-ELECTRIC.COM. (D) THIS DOCUMENT IS NOT A REPLACEMENT FOR THE INSTALLATION AND OPERATION MANUAL. 3 5 6 2 1 1. 2. 3. 4. 5. 6. AC terminal block DC fuse holders MPPT shorting terminal DC disconnect switch DC SPD-Surge protection device AC SPD-Surge protection device 4 Refer User manual for all other model configurations. 1 Conext™ CL Inverter 20000E/ 25000E - Quick Start Guide www.SESolar.com Correct Installation Distances, Mounting Positions, Dimensions H J Mounting Sequence 23.6in (600mm) 23.6in (600mm) A (e) (f) 36in (914.4mm) (d) Note: It is recommended to install the inverter away from direct exposure to sunlight. (g) (i) 3.9in (99mm) 4.7in (119.3mm) 15.8in (401.3mm) There are three indicator lights (LED) below the LCD. The left and middle indicator lights are green and the right indicator light is red. The three indicator lights together indicate the inverter status. K (j) a. Mounting the wiring box bracket b. Mounting the Inverter bracket c. Mouting the wiring box on the bracket d. Fastening the wiring box to the bracket e. Opening the front cover of the wiring box f. Removing the connector cover g. Anchoring the connector cover h. Inverter assembly- side view i. Inverter assembly- front view j. Locking the inverter to the wiring box k. Inverter and wiring box- exploded view l. Locking inverter and wiring box connector m.Inverter rear view with mounting bracket n. Closing the wiring box 16.3in (414mm) (m) H 0.9in ~ 36in (22.8mm) (914.4mm) 7.8in 5in (198.1mm) 15.7in (398.7mm) (127mm) 25.7in (652.7mm) Mounting Sequence I (n) PV input: PV connector Français Startup... ESC Communication: [1x] M25 cable gland [1x] RJ45 Ethernet [2x] RJ45 Modbus [1x] Dry contact [1x] RPO connector Select Time Zone TimeZone Setting 4 OK Date & Time 25/06/2014 13:54 <selected language > Español 75% Date & Time OK Confirm language Done ESC Press OK to confrm, ESC to cancel OK Australia Perth Australia Adelaide Australia Darwin Australia Canberra Australia Melbourne ESC 1 Date & Time 4 OK OK 0 25/06/2014 13:54 0 0 0 Done Select Done, Press OK to move next ESC Confirm Country Select Country Password Date & Time Select Time Zone Italy LV India LV North America OK <Country> Germany LV Press OK to submit ESC ESC OK Confirm Country Press OK to confrm, ESC to cancel ESC 1 2 Confirm W-box Select Wiring box 100mm OK ESC Modbus Address 10 OK Press OK to Confirm <Modbus settings> Done Press OK to confrm, ESC to cancel ESC Confirm Modbus Modbus Settings OK Confirm Wiring box <selected Wiring Box> ESC Press OK to confrm, ESC to cancel OK ESC 2 (2x) M8 screws* FIRST TIME POWER UP SETTINGS Password: ‘1234’ Rebooting Syatem Please wait... Minimum cable requirement Earthing terminal (2x) Locating pins* *(not included in the package) Language OK PVSCL1825NA100 PVSCL1825NA200 PVSCL1825NA201 PVSCL1825NA300 PVSCL1825NA301 20mm (5x) M8 screws* Language English Wiring AC output: [1x] M32 cable gland (a) First Time Power Up Screen (l) (k) 12.5in (317.5mm) 37.1in (942.3mm) 4.1in 15.7in (398.7mm) 20.4in (518.1mm) 23.9in (607mm) 3.2in (81.2mm) 23.6in (599.4mm) (104.1mm) (h) Commissioning Start up procedure: 1. Ensure that the DC and AC breaker are turned OFF. 2. Complete the wiring as per the instructions in the Installation and Operation Manual. AC wiring DC wiring Earthing Communication Interface 3. Check the polarity of the DC wires and ensure that the maximum DC voltage is not more than 1000 V. 4. Ensure to place the string protection fuses*. 5. Ensure proper insertion of communication interface cables to the appropriate connectors. 6. Ensure the dry contact and RPO connections are wired properly. 7. Ensure all the cable glands are sealed properly after completing the terminations. 8. Check the http://solar.schneider-electric.com/product/conext-cl/ for the latest firmware version. If the version on the inverter and website matches, follow step 10 or else step 9. 9. Turn on AC or DC and then connect the USB drive with the latest fimware version, to the appropriate USB device socket and press the OK button. The inverter now starts upgrading the new firmware available in the USB drive. 10. Ensure all the conduit entry provisions are sealed properly after completing the terminations. 11. Replace the cover on the wiring box. 12. Turn ON the AC breaker (external) and ensure that the grid is connected to the inverter. The inverter will boot up and complete the Power on Self test. 13. On successful completion of the Power on Self test, follow the first time power up settings. 14. After the first time power up, turn ON the DC disconnect switch. If there is sufficient sunlight, the inverter will start producing power. 15. Check the status of the indicator light. The PV status LED should be green. 16. If the PV status LED is not green, check whether: All the connections are correct. All the external disconnect switches are closed. The DC disconnect switch* on the inverter is in the “ON” position. *The DC disconnect switch and string protection fuse are not part of the Base model. 7.8in (200mm) G (b) (c) Copyright © 2014 Schneider Electric. All Rights Reserved. All trademarks are owned by Schneider Electric Industries SAS or its affiliated companies. AC : 400 V, 33 A (25 KVA) DC : 1000 VDC, 40 A/ MPPT Earthing: 6 to 10 mm2, Cu, 900 C Remote Power Off : 0.33 mm2, 2 wires, 30 m distance (max) System Reboot For more information about the Conext CL Inverter, see the Installation and Operation Manual. 2