1
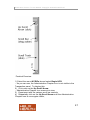
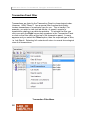
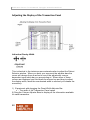
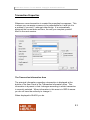
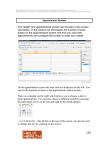
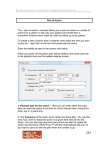
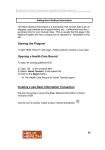
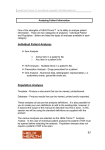
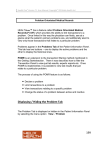
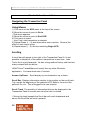
Health One Version 7.1 User Manual. Copyright 2011Helix Health Ltd The Health Care Record Window Navigating the Transaction Panel Using Menus 1) Click once on the HCR menu at the top of the screen 2) Move the mouse to point to Go to Sub menu appears 3) Move the mouse to point to End HCR 4) Click once to select. John Test’s last transaction is selected. 5) Repeat Steps 1) – 4) and select other menu options. Observe the effect of each menu option. 6) Repeat steps 1) – 4) this time selecting Begin HCR. Scrolling A scroll bar will appear to the right of the Transaction Panel if it is not possible to display all of the patient’s transactions at one time. John Test’s file is a good example. He has a long medical history and has had many contacts with his doctor. HEALTHone™ scroll bars act exactly like any other Window’s application. You have three sets of controls: Arrows Up/Down: Scroll display by one transaction up or down. Scroll Bar: Displays information relative to its position on the scroll track. Top, equals the beginning of the patients HCR, Bottom, the end of the patient’s file, etc. This is dragged to its new location. Scroll Track: The quantity of information that can be displayed in the Transaction Panel is moved each time the track is clicked. Clicking the track beneath the Scroll bar will scroll downwards and above the Scroll Bar will scroll upwards. 36 Health One Version 7.1 User Manual. Copyright 2011Helix Health Ltd Practical Exercise: 1) Select the menu HCR/Go to and select Begin HCR. As you can see, the Administrative Chapter icon is not visible in the Transaction panel. To display this: 2) Click once on the Up Scroll Arrow. Administrative Chapter Icon comes into view 3) Experiment with the various scroll bar controls 4) Repeatedly click on the Up Scroll Arrow until the Administrative Chapter Icon is once again visible, 37 Health One Version 7.1 User Manual. Copyright 2011Helix Health Ltd Transaction Panel Filter Transactions are listed in the Transaction Panel in chronological order. However, HEALTHone™ has a special filter function that quickly locates transactions of a particular type for you. This is handy if, for example, you wish to view just lab results, or expert’s reports or transactions relating to a particular problem. To activate the filter you click once with the Right mouse key anywhere in the Transaction Panel or click on the filter menu at the top of the transaction panel. A menu appears and you select the Filters option, then the required type of filter, i.e. Lab Result. Selecting full contents will return to normal chronological view of all transactions. Transaction Filter Menu 38 Health One Version 7.1 User Manual. Copyright 2011Helix Health Ltd 1) Right mouse click anywhere in the Transaction Panel or click on the Filters menuMenu Appears 2) Select the Filters option in the menu. Select Lab Results Just Lab Result type transactions are displayed 3) Repeat steps 1) and 2) and experiment with different selections of the Transaction panel filter. 4) Set back to Full contents Filtering Transactions by Problem John Test’s file has been set up to illustrate this point 1) Right mouse click anywhere in the Transaction Panel Menu Appears 2) Select the Filtered on problems option in the menu. 3) Now select a problem in the Problem Panel Only those transactions that relate to the problem are displayed 4) Repeat step 3) for the other problems 5) Right mouse click anywhere in the Transaction Panel. Menu Appears 6) Select the Filtered on problems option in the menu. Display returns to all transactions. 39 Health One Version 7.1 User Manual. Copyright 2011Helix Health Ltd Adjusting the Display of the Transaction Panel Adjusting Display Width This is identical to the technique encountered earlier to adjust the Patient Selector window. When you point your mouse at the adjuster bars the cursor will change from an arrow to one of the adjustment cursors, dependent upon which bar you are pointing at. When either of these cursors are displayed you hold down the mouse key and drag to adjust the display width, when the new desired width is reached you release the mouse key. 1) Experiment with dragging the Panel Width Adjuster Bar. The width of the Transaction Panel varies 2) Drag the Column Adjuster Bars to display all the information available for each transaction. 40 Health One Version 7.1 User Manual. Copyright 2011Helix Health Ltd Transaction Properties Whenever a new transaction is created its properties box appears. This is where you can assign a person to be responsible for it and link it to a problem if you wish – amongst other things. It is automatically assigned the current date and time, the rest you complete yourself. More in the next session. The Transaction Information Area The principal information regarding a transaction is displayed at the bottom of the Item Panel in the Transaction Information Area. This information is dynamic in that it changes according to which transaction is currently selected. When information in this area is in RED it means you do not have the authority to change it – When displayed in BLACK you do. 41 Health One Version 7.1 User Manual. Copyright 2011Helix Health Ltd Viewing Transaction Attributes 1) Select any transaction 2) Click on the Attributes Button Selected transaction’s attributes displayed in the Transaction Properties dialogue box. 3) Click the Cancel button to close the dialogue box. 42 Health One Version 7.1 User Manual. Copyright 2011Helix Health Ltd The Health Care Record Window The Item Panel As you now know, transactions form the pages in the patient’s file. Items are effectively the writing on each page. These are displayed in the Item Panel on your screen. Once again, only the items that belong to the currently selected transaction will be displayed. Normal Items In the Introduction session Items were described as being containers and this is evident when you look at some of John Test’s transactions: 1) Select the General Practice transaction that occurred on the 19th of January 1994. 2) Observe the item liver function tests:. This item contains the result normal. 3) Normally, you can open the container by clicking on it once to select it and pressing the Return key. Alternatively you can click on it twice with the mouse. Try it. If you have permission to edit this item it will open – otherwise a warning box appears! 4) Click on OK to close the Item window or warning box. Aggregate Items These are items that have more than one container. To see an example 43 Health One Version 7.1 User Manual. Copyright 2011Helix Health Ltd of these : 5) Select the consultation transaction that occurred on the 23rd of February 1997. 6) Observe the aggregate item blood pressure:. This item contains multiple results, systolic blood, diastolic blood. Adjusting the Item Panel Display Notice that the Item Panel also has Column Adjuster bars : 1) Point your mouse at the item column adjuster bars and drag to resize. Item information is hidden when the column width is made too small. 2) Drag the item column adjuster bars back to approximately where they were. That concludes our look at the HCR window. Lastly we will look at the last line of the screen. This is part of the HEALTHone™ screen and contains the Prompt Area – you have observed this earlier – and the Session Information Area. Session Information Area This area of the screen displays information about the current source reminds you how you logged on : 44 Health One Version 7.1 User Manual. Copyright 2011Helix Health Ltd Closing a Patients File To close a patient’s file you select CLOSE HCR from the File Menu. If you had made any changes that had not been saved HEALTHone™ would prompt you to do so now. We have not, or least should not have, made any changes to his file. Select CloseHCR from the File Menu John Test’s file is closed. To close the HEALTHone™ program you simply select Exit from the File Menu. 1) Select Exit on the File menu Close dialogue box appears. 2) Click on the Yes button or simply press the RETURN key. HEALTHone™ program closes and you are returned to the desktop. 45 Health One Version 7.1 User Manual. Copyright 2011Helix Health Ltd Summary Guide Start HEALTHone™ Double click this icon on your desktop : or select the menu sequence : Start / Programs / HEALTHone™ / HEALTHone™ for Windows Open the patient selector window Click on the ‘open’ button on the HEALTHone™ Toolbar and select HCR. Note : The patient selector is normally open at all times. Select a patient in the patient selector window Click once on the filter above the column to be searched to activate it. Type the text to be matched Click twice quickly on the name of the patient in the patient list. To add/remove a column to/from the patient selector Click once on the Configure button at the bottom of the selector window. Click on the column select box required to add/remove the tick mark. To sort the patient selector window Click on the column heading to be sorted – ascending sort will occur. Click again for descending sort. Click again to cancel sorting. To adjust the patient selector column widths Place the mouse cursor on the column adjuster bar required and drag to adjust. To minimise / maximise patient HCR display Use the left most button of the HCR window controls to minimise the display and the centre button to maximise. To select a menu option Point to the menu required, click once, point to the menu option, click once again To quickly navigate through transactions in a patients file. Select any transaction in the Transaction Panel. Now use these short cut keys : To go to the first Admin page – Ctrl + Home To go to the Last Transaction – Ctrl + End To change chapters Ctrl + Page Up, Ctrl + Page Down 46 Health One Version 7.1 User Manual. Copyright 2011Helix Health Ltd To go to the next transaction – Ctrl + Down Arrow To go to the previous transaction – Ctrl + Up Arrow To go to the first transaction in a chapter – Ctrl + B To select which information is displayed in the transaction panel Right click anywhere in the transaction panel; select the filters option then select the display option required. To display only those transactions relating to a problem In the Problem Panel select the problem to be filtered on. Click anywhere in the Transaction Panel to activate it and press Ctrl + E To adjust the width of the Transaction Panel Drag the panel width adjuster bar. To view the attributes of a transaction Select the transaction required. Now click on the transaction Attributes button on the Transaction Panel toolbar. To close a patients file Select the menu option File / Close HCR To close HEALTHone™ Select the menu option File / Exit 47 Health One Version 7.1 User Manual. Copyright 2011Helix Health Ltd Own Notes 48 Health One Version 7.1 User Manual. Copyright 2011Helix Health Ltd 49