1
BatchSync Secure FTPS/SFTP
User Manual
© SiteDesigner Technologies, Inc.
BatchSync Secure FTPS/SFTP
© SiteDesigner Technologies, Inc.
All rights reserved. No parts of this work may be reproduced in any form or by any means - graphic, electronic, or
mechanical, including photocopying, recording, taping, or information storage and retrieval systems - without the
written permission of the publisher.
Products that are referred to in this document may be either trademarks and/or registered trademarks of the
respective owners. The publisher and the author make no claim to these trademarks.
While every precaution has been taken in the preparation of this document, the publisher and the author assume no
responsibility for errors or omissions, or for damages resulting from the use of information contained in this
document or from the use of programs and source code that may accompany it. In no event shall the publisher and
the author be liable for any loss of profit or any other commercial damage caused or alleged to have been caused
directly or indirectly by this document.
Contents
I
Table of Contents
Foreword
0
Part I Introducing BatchSync Secure FTPS/SFTP
4
Part II BatchSync vs. InstantSync
7
Part III System Requirements, Installation, and
Uninstallation
10
1 System
...................................................................................................................................
Requirements
10
2 Installation
................................................................................................................................... 10
3 Upgrading
...................................................................................................................................
from 2.x
10
4 Upgrading
...................................................................................................................................
from 3.x
11
5 Uninstallation
................................................................................................................................... 12
Part IV Getting Started
14
1 Overview
................................................................................................................................... 14
2 Getting
...................................................................................................................................
started in 5 minutes
16
3 Step-by-step
...................................................................................................................................
instructions
21
Creating a new
..........................................................................................................................................................
sync task
21
Start Task Editor
.......................................................................................................................................................... 22
Task Editor user
..........................................................................................................................................................
interface
23
Entering task..........................................................................................................................................................
parameters
23
Previewing task
..........................................................................................................................................................
results
26
Editing a task,..........................................................................................................................................................
adding filters
28
Previewing again
..........................................................................................................................................................
to check the results
32
Running the task
..........................................................................................................................................................
in the Task Editor
33
Viewing history
..........................................................................................................................................................
log
33
Part V Reference Manual
36
1 Sync vs.
...................................................................................................................................
Copy vs. Move files
36
2 Scheduling
...................................................................................................................................
a task
39
3 Command
...................................................................................................................................
line, batch files and scheduling
44
4 Sync.exe
...................................................................................................................................
command line parameters
46
5 Windows
...................................................................................................................................
Event Log
54
6 Server...................................................................................................................................
folders
55
7 Date variables
...................................................................................................................................
in folder names and filters
57
8 History
...................................................................................................................................
and Log Files
60
9 Filters...................................................................................................................................
and wildcard characters
63
10 Filter sample
...................................................................................................................................
- Include Folders
66
11 Filter sample
...................................................................................................................................
- Exclude Files and Folders
72
© SiteDesigner Technologies, Inc.
II
BatchSync Secure FTPS/SFTP
12 SyncDB
................................................................................................................................... 75
13 Options
................................................................................................................................... 78
14 SSH public
...................................................................................................................................
key authentication
80
15 Task Optimizer
................................................................................................................................... 82
16 Volume
...................................................................................................................................
Shadow Copy Service (VSS)
83
17 Edit Task-window
................................................................................................................................... 88
Sync-tab
.......................................................................................................................................................... 88
Options-tab .......................................................................................................................................................... 90
Include-tab .......................................................................................................................................................... 93
Exclude-tab .......................................................................................................................................................... 94
Comparison-tab
.......................................................................................................................................................... 96
Conflicts-tab .......................................................................................................................................................... 97
Logs-tab
.......................................................................................................................................................... 98
Email-tab
.......................................................................................................................................................... 99
Verification-tab
.......................................................................................................................................................... 105
18 Edit ...................................................................................................................................
Server-window
105
General-tab .......................................................................................................................................................... 105
Firewall-tab .......................................................................................................................................................... 109
Timeouts-tab
.......................................................................................................................................................... 109
Options-tab .......................................................................................................................................................... 110
Options 2-tab.......................................................................................................................................................... 111
SFTP-tab
.......................................................................................................................................................... 112
FTPS-tab
.......................................................................................................................................................... 113
Part VI Ordering, Support and License Agreement
119
1 Ordering
...................................................................................................................................
Information
119
2 Support
................................................................................................................................... 120
3 License
...................................................................................................................................
Agreement
121
Index
0
© SiteDesigner Technologies, Inc.
Part I
Introducing BatchSync
Secure FTPS/SFTP
I
4
1
BatchSync Secure FTPS/SFTP
Introducing BatchSync Secure FTPS/SFTP
BatchSync Secure FTPS/SFTP is a fast and smart tool for synchronizing folders. Folder
synchronization, or sync for short, is a method to make the source and target folders identical.
BatchSync makes folders identical by transferring only files that have changed since the last sync,
minimizing the time and bandwidth required for the sync. The folders being synchronized can be local
folders or reside at a network share (UNC filenames and paths are supported). The other side of the sync
set can reside on an FTP server running any common FTP server software. The secure edition adds
support for FTPS servers and SSH2 servers running SFTP service.
Creating backups: One-way sync
One-way sync is most commonly used to create backups. In one-way sync, all of the new and changed
files found on the source are transferred to the target. You can optionally enable the deletion of any extra
files in the target. With this option enabled, the files that do not exist on the source are also deleted on
the target. In this way, the target is an exact copy of the source.
True bi-directional synchronization: Two-way sync
Two-way sync ensures that two folders (and their subfolders) remain in sync when files are changed on
both sides. BatchSync does this by scanning all of the files in the source and target folders, and
locating the new and changed files on both sides. It then transfers all of the files that are newer than the
corresponding files on the other side.
You can optionally enable propagated deletions for two-way syncs. With this option enabled, if you
delete a file on one side, BatchSync will propagate this deletion to the other side by deleting this same
file on the other side. This results in both sides containing exactly the same set of files.
Chained Synchronization
You can create a chain of sync tasks to keep computers at several locations in sync, even when they
are not directly connected to each other. For example, sync computer A and B, which results in all of
the changes in A propagating to B. Then, sync B and C, making these two identical. As result, A, B, and
C all contain exactly the same set of files.
Sync vs. Copy vs. Move files
The default file transfer action in BatchSync is a sync. It is same as copy, but transfers only files that
have changed since the last sync, minimizing the time and bandwidth required for the file transfer. But
sometimes you might just want to copy or move files, not sync, and BatchSync can do that easily by
changing few task options.
SyncDBTM - Advanced tracking for all file additions, changes and deletions
It's usually difficult to compare files and track changes on a remote FTP server, because the file sizes
© SiteDesigner Technologies, Inc.
Introducing BatchSync Secure FTPS/SFTP
5
and dates are usually modified when the files are uploaded to the FTP server. BatchSync uses the smart
SyncDBTM feature to track changes to files, allowing it to automatically know which files need to be
transferred. SyncDB also allows software to properly track file deletions in two-way syncs, and propagate
these deletions to the other side. Combined with multithreaded file transfers and on-the-fly compression;
this results in the fastest way to keep folders in sync.
Features
· Save sync source and target folders - with options - as a sync task
· Run sync tasks with a single mouse click
· Sync Preview - Display files that will be transferred, in tree view, without actually transferring
anything
· SyncDB tracks changes to files automatically
· Multithreaded transfers to speed up the sync
· On-the-fly file compression to accelerate transfers
· One-way and Two-way syncs
· Recursively sync folders and their sub-folders (optionally exclude sub-folders with filters)
· Filter files to include by file/folder name, size, date changed, and attributes
· Filter files to exclude by file/folder name, size, date changed, and attributes
· Set up rules to handle conflicts (same file changed on both source and destination)
· Automatically resume interrupted transfers
· Automatically reconnect and resume an unlimited number of times (user defined max retries,
timeouts etc.)
· Optionally delete files on destination that do not exist on source
· Extensive logging options with automatic log file rotation schemes
· Sync local, network, and FTP folders
· Secure edition adds support for FTPS and SFTP over SSH2 protocols
Full list of features
Click here to see a full list of features and learn about the differences between the BatchSync and
InstantSync editions.
Getting Started
Please read the overview and step-by-step tutorial to get started using BatchSync.
© SiteDesigner Technologies, Inc.
Part II
BatchSync vs. InstantSync
II
BatchSync vs. InstantSync
2
7
BatchSync vs. InstantSync
BatchSync and InstantSync are smart and fast tools for folder synchronization. InstantSync is the
perfect solution for webmasters and system administrators who need to sync folders with a few mouse
clicks. BatchSync contains all the features of InstantSync and adds the possibility of running sync tasks
as scheduled batch runs. Both pieces of software come in two different flavors, FTP and Secure
FTPS/SFTP editions. The FTP edition supports the de-facto standard for internet file transfers - FTP. The
Secure FTPS/SFTP edition adds support for secure FTP transfers using SSL encryption, known as
FTPS, FTP/SSL, or FTP over SSL. It also supports folder synchronization using SFTP service over the
SSH2 protocol.
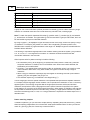
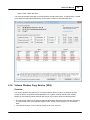
Here is a table that summarizes the features of the different versions and editions:
© SiteDesigner Technologies, Inc.
8
BatchSync Secure FTPS/SFTP
© SiteDesigner Technologies, Inc.
Part III
System Requirements,
Installation, and
Uninstallation
III
10
BatchSync Secure FTPS/SFTP
3
System Requirements, Installation, and Uninstallation
3.1
System Requirements
BatchSync requires Windows 8.x, 7, Vista, XP, or 2000, or Windows Server 2012, 2008, 2008 R2 or
2003.
3.2
Installation
· Download the BatchSync executable install file.
· Run the executable to start the installer program. This installer will configure BatchSync to run on your
computer.
· Follow the instructions on the screen to complete the installation.
· After the installation is complete, you will find the BatchSync Task Editor-item in the Windows Startmenu at the Start > All Programs > BatchSync sub-menu.
Related
· Upgrading from 2.x
· Getting started in 5 minutes
· Getting Started
3.3
Upgrading from 2.x
Installation
You can install the new 4.0 version over an existing 2.x version without uninstalling 2.x first. But before
you do that, make a backup of existing sync tasks. To make a backup, copy all *.STF and *.SDB files
from your current sync task folder to a safe place. Like this:
· Copy C:\ProgramData\Sync\*.* C:\Safe
Old sync tasks can be used as-is, and further edited with 4.0. But after editing, you CANNOT use the
same sync tasks with an older version. Rather, you need to restore them from the backup.
Notice! If you get an error message when trying to edit a 2.x sync task, or after completing a
sync run, this is due to changes in the permission settings for sync task files. Please read
more about this below.
The new 4.0 version cannot be installed in parallel with an older 2.x version, as the new version replaces
the existing installation. So if you want to test the 4.0 version, and keep your existing 2.x installation
intact, you need to install 3.0 on a separate computer.
Upgrade pricing - Get 50% Off
© SiteDesigner Technologies, Inc.
System Requirements, Installation, and Uninstallation
11
If you are a licensed user of the 2.x version of BatchSync or InstantSync, you are entitled to special
upgrade pricing. Please read more about this on our web site.
Errors when using old 2.x sync task
If you get the error message "Path/File access error" when trying to save a sync task after editing, or
after completing a sync run, you need to manually change the permission settings for the sync task
(*.STF) and SyncDB files (*.SDB). To change the permissions for multiple files, you need an elevated
command prompt.
1.
2.
3.
4.
5.
6.
Click Start-menu
Type: cmd
Right-click cmd.exe when it shows up under programs
Select Run as administrator
Change to the folder where your sync tasks are located, like CD C:\ProgramData\Sync
Now enter the following command:
icalcs *.* /inheritance:e
Now all of the files should inherit their security settings from the parent folder.
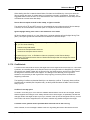
Known problem with Windows Vista Task Scheduler
We have received numerous error reports about Windows Vista Task Scheduler not working the way it
should. The scheduler history displays an error message like this:
Task Scheduler failed to start "\Sync UploadFiles" task for user "SysServer\Alan".
Additional Data: Error Value: 2147943726.
This error message means that Task Scheduler has lost the user credentials for the task, and therefore it
cannot start the task. Mostly this occurs after system reboot or when updating the system with security
patches. The fix is to open task for editing, save changes and enter username and password again when
prompted. This way username and password is properly saved with the task again. This is a known
problem with Windows Vista.
3.4
Upgrading from 3.x
Installation
You can install the new 4.0 version over an existing 3.x version without uninstalling 3.x first. But before
you do that, make a backup of existing sync tasks. To make a backup, copy all *.STF and *.SDB files
from your current sync task folder to a safe place. Like this:
· Copy C:\ProgramData\Sync\*.* C:\Safe
Old sync tasks can be used as-is, and further edited with 4.0. But after editing, you CANNOT use the
same sync tasks with an older version. Rather, you need to restore them from the backup.
The new 4.0 version cannot be installed in parallel with an older 3.x version, as the new version replaces
the existing installation. So if you want to test the 4.0 version, and keep your existing 3.x installation
© SiteDesigner Technologies, Inc.
12
BatchSync Secure FTPS/SFTP
intact, you need to install 4.0 on a separate computer.
Upgrade pricing - Get 50% Off
If you are a licensed user of the 3.x version of BatchSync or InstantSync, you are entitled to special
upgrade pricing. Please read more about this on our web site.
3.5
Uninstallation
Click Windows Start-menu > All Programs > BatchSync > Uninstall.
© SiteDesigner Technologies, Inc.
Part IV
Getting Started
IV
14
BatchSync Secure FTPS/SFTP
4
Getting Started
4.1
Overview
This short introduction gives you a general overview of the BatchSync components and terms. Please
read this first, and then continue with the Getting started in 5 minutes, or the more detailed Step-bystep instructions for creating and fine tuning a new sync task.
Synchronizing Folders
BatchSync is designed to make folder sync as fast and simple as possible. Synchronizing folders is a
matter of selecting the sync task and clicking the Sync-button. But before this, you need to create the
sync task.
Sync Task
BatchSync stores all of the information needed to run a sync in a sync task file. This file contains the
source and target folders, the server address, login username, password, and all of the other options for
the sync task. Each task is saved to a separate file with an .STF extension, e.g., UploadWebSite.STF
and BackupLogFiles.STF.
Creating sync tasks with Task Editor
Sync tasks are created with the Task Editor software. It allows you to set up the folder names, server
address, username, password, filters, and other options via an easy to use interface. You also use Task
Editor for managing the tasks (edit, delete, duplicate) and previewing and running them. The easiest way
to create a new sync task is by using the Task Wizard.
Sync Preview
You can test the sync task with Sync Preview. Sync preview displays the files that would be transferred,
in a tree view format, without actually transferring anything. This helps you to test sync tasks and their
options, like filters. You can also directly access and modify task options via a right-click popup menu in
the Sync Preview-window.
Running sync tasks with Task Editor
Task Editor displays a list of the task files in the selected folder. You can run a sync task by selecting
its icon and clicking the Sync-button. Thanks to the SyncDB smart file tracking feature, the software
knows which files have changed and transfers only the necessary files. The Sync window displays the
progress of the transfer and provides a report on all the files transferred and statistics about the transfer.
History log
The global run history log contains run info and statistics about all of the sync tasks that were run on
© SiteDesigner Technologies, Inc.
Getting Started
15
that computer. You can view this history log by clicking the History button on the left hand side of the
main window. This log is shared by all tasks.
Running sync tasks in batch mode
Notice! Batch mode and task scheduling is ONLY available in the BatchSync product. It is not
possible to schedule tasks with InstantSync.
As its name implies, BatchSync was designed to be run as a batch run, in the unattended mode. Most
often this means running it automatically as a scheduled task, at predefined times or intervals.
BatchSync includes multithreaded command line software (Sync.exe), which is used to run sync tasks
in the unattended mode. Sync.exe does not have any user interface, but it updates the History log in
Task Editor that you can use to track the files it transfers, and can optionally send reports and error logs
via email. To run the sync task in the command line, change to the BatchSync install folder and enter:
Sync C:\Tasks\UploadWebSite.STF
This command loads the UploadWebSite.STF task file and performs the sync process using the
parameters and options defined in the task file.
Scheduling a sync task
Sync tasks are scheduled using Windows Task Scheduler. You can run Task Scheduler via Control
Panel, by double-clicking the Task Scheduler-icon. The sync task is set up to run in the same way as
running it on the command line (see example above). You can have multiple schedules for a single task,
like running it daily at 2pm and weekly on Friday at 8pm. Or setting it up to run once every 5 minutes on
Monday-Friday between 7am-5pm.
The scheduled tasks are run by the Task Scheduler service, so they are executed even when nobody is
logged in to the computer. Therefore you need to enter the user account and password that is used to
run the sync process when setting up the schedule.
Scheduling multiple tasks simultaneously
You can schedule multiple separate sync tasks to be run simultaneously. Each of these tasks can
make multiple simultaneous connections to the server (multithreaded). The number of simultaneous
tasks is limited by the available computer memory (RAM). Task Scheduler makes sure that it does not
start the next instance of the same task before an earlier one is completed. Therefore you can schedule
a task to be executed every 5 mins, even if it sometimes takes 12 mins to run. Task Scheduler then runs
it when the earlier instance has finished.
Related:
·
·
·
·
Getting started in 5 minutes
Step-by-step instructions - creating a new sync task.
Step-by-step instructions - scheduling a task
Scheduling and batch files
© SiteDesigner Technologies, Inc.
16
4.2
BatchSync Secure FTPS/SFTP
Getting started in 5 minutes
In this short tutorial, we create a new sync task for uploading the content of a local folder to an FTP
server. Usually, this kind of sync task is used to update a website or create off-line backups. This sync
task will upload all new and changed files to the FTP server, making the source and target folders
identical.
About Sync Tasks
BatchSync stores all of the information needed to run a sync in a sync task file. This file contains the
source and target folders, the server address, login username, password, and all of the other options for
the sync task. Each task is saved to a separate file with an .STF extension, e.g., UploadFiles.STF and
BackupLogFiles.STF.
The sync task details are:
Source
· Local Folder: C:\WebRoot
Target
The /httpdocs is the target folder on the server. In addition to this, we need the server address and login
parameters.
·
·
·
·
Remote server address: ftp.mysite.com
Remote server folder: /httpdocs
Login Username: userxyz
Login Password: secret
Notice! When you create a new sync task with Task Wizard, you can edit any of the sync task
settings later, after the wizard is through.
Step 1. To create a new sync task, start the Task Wizard by clicking the Wizard button on the toolbar,
or select the button in Welcome-pane.
© SiteDesigner Technologies, Inc.
Getting Started
17
Step 2. Enter the sync task name and select an icon for it. The name can be any free form text you
choose. Then click the Next button.
Step 3. We want files to be uploaded from the local folder to the server, so select the Upload files to
the server (one-way sync)-option. This creates a one-way sync, where all of the new and changed files
© SiteDesigner Technologies, Inc.
18
BatchSync Secure FTPS/SFTP
found on the local source folder are transferred to the remote target folder. Click the Next button.
Step 4. Select the source folder, in this example it is C:\WebRoot. Optionally, you can use date
variables as part of the folder name. You can find more information about date variables here. Then click
the Next button.
Step 5. To make a connection to the server, enter the server address and login credentials and click the
Next button.
Step 6. Task wizard will now make a connection to the server. When you are connected, simply click
the Next button.
Step 7. Select the target folder on the server by double-clicking the folder name. After double-clicking,
the selected folder name is show at the top. Click the Next button.
© SiteDesigner Technologies, Inc.
Getting Started
19
Step 8. You have now completed the wizard. Simply click the Finish button to save the new task.
Step 9. The new sync task has now been created, and is shown in the Task Editor. Select it, and start
Sync Preview to make sure that the new sync task performs the way it should. No files are transferred
when doing a sync preview.
© SiteDesigner Technologies, Inc.
20
BatchSync Secure FTPS/SFTP
Step 10. A list of the files that will be transferred is shown after the preview is done. You can see the
transfer statistics in the Log pane. To perform the actual sync, and upload files, click the Sync button on
the toolbar.
Step 11. The sync is now complete, and all of files from the local C:\WebRoot have been uploaded to the
remote /httproot folder.
© SiteDesigner Technologies, Inc.
Getting Started
21
Step 12. This is the end of the Getting Started in 5 minutes tutorial
Now you have created the new sync task "Upload Files.stf". This sync task contains all of the necessary
details for performing a local -> remote file synchronization. So after editing local files in C:\WebRoot,
you simply repeat steps 9 and 10 to upload all of the changes to the server.
When you need to further fine tune the sync options, select the sync task in the Task Editor window,
and click the Edit Task button. You can find more information about editing a task and setting up file
filtering in the Step-by-step instructions tutorial.
4.3
Step-by-step instructions
4.3.1
Creating a new sync task
If you are just getting started with BatchSync, we recommend that you create your first sync task with
the Task Wizard. You can find more information about it here.
In this step-by-step tutorial we create a new sync task for uploading a local web site to an FTP server. In
this scenario we are building and editing a web site locally in the C:\WebRoot folder. All additions and
changes we want to make to the web site are made to this local copy, and then we use the BatchSync
sync task to upload changes to the FTP server, to the web site root folder. In this way we can test the
changes locally before actually publishing them to the Internet. BatchSync makes sure that all new and
modified files are successfully uploaded when it's time to publish new info to the net.
© SiteDesigner Technologies, Inc.
22
BatchSync Secure FTPS/SFTP
Task Details
First we need to collect some background information about files, folders and server connection
parameters. All source files are under the local folder C:\WebRoot. It contains numerous subfolders that
we want to be included in the sync.
Source
· Local Folder: C:\WebRoot
Target
The web site root directory on the server is the /httpdocs folder. In addition to this, we need the server
address and login parameters.
·
·
·
·
Remote server address: ftp.mysite.com
Login Username: userxyz
Login Password: secret
Remote server folder: /httpdocs
As we are making all of our modifications to the local folder, we want the target to be an exact copy of it,
so we want a One-way sync.
Extra details
We have almost all we need, only some extra info is needed: We use popular DreamWeaver software for
creating and editing web pages in C:\WebRoot. It creates some extra files and folders that we do not
want to upload to the web site. So we need to exclude some files and folders:
· Exclude all folders that start with the _ character (folders like _Notes).
· Exclude folders with the names Library and Templates. These are DreamWeaver generated folders
that we don't want to upload
· Exclude the file Thumbs.db as this is a file that Windows automatically generates for showing preview
thumbnails in Explorer and we don't want to upload that.
Now we have all the information we need. So let's start creating the sync task to make uploading easy.
Next Step
Start Task Editor
4.3.2
Start Task Editor
All task editing is done with the BatchSync Task Editor software. To create a new task, first start Task
Editor. By default it can be found in the Windows Start-menu:
Windows 7 or newer:
Start-menu > All Programs > BatchSync > BatchSync Task Editor
Older:
© SiteDesigner Technologies, Inc.
Getting Started
23
Start-menu > Programs > BatchSync > BatchSync Task Editor
Next Step
Task Editor user interface
4.3.3
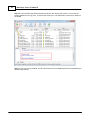
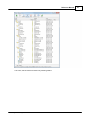
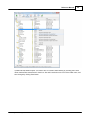
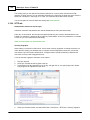
Task Editor user interface
When you start BatchSync, the screen will look like this (Note: this screen shot displays multiple task
icons, but when running Task Editor for the first time, no icons are shown, as there are no tasks yet to
display):
To create a new task, click the New-button.
Next Step
Entering task parameters
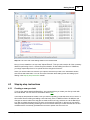
4.3.4
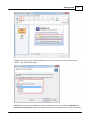
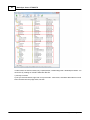
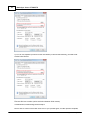
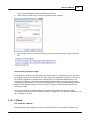
Entering task parameters
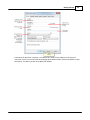
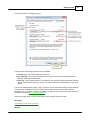
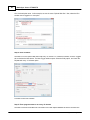
The New Task-window opens. This window has multiple tabs in the top row, but at this stage you do not
need to know them all, just look at the fields highlighted in the screenshot.
© SiteDesigner Technologies, Inc.
24
BatchSync Secure FTPS/SFTP
Make selections and enter the values as indicated above. Here we have selected that we want to upload
files from a local folder to the FTP server, and entered the source and target folders. Next click the
button to enter the target server connection parameters (like server address, username and
password). The following screen opens:
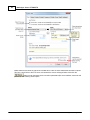
© SiteDesigner Technologies, Inc.
Getting Started
25
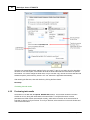
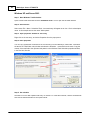
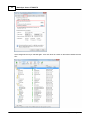
Enter values for the server connection. The Options-tab contains more settings for fine tuning the
connection, but for now we can leave those settings at the default values. Click the OK-button to close
this window. This takes you back to the New Task-window:
© SiteDesigner Technologies, Inc.
26
BatchSync Secure FTPS/SFTP
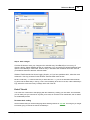
We have now entered all the basic settings for the sync task. To save it, we need to give it a descriptive
filename. Do not enter a path, as the task is saved to the same folder that was active when we opened
this window. You cannot change the folder here, but you can later copy, rename and move task files with
Windows Explorer just as with any text file. The .STF extension is appended automatically.
After entering the filename, close this window by clicking the Save-button.
Next Step
Previewing the task results
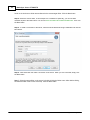
4.3.5
Previewing task results
We saved our new task with the Upload WebSite.Stf filename. This new task is listed in the main
window as an icon, along with other tasks in the same folder. To verify that the server connect
parameters and folder names were entered correctly, and that the connection to the server works as
intended, it's best to run Sync Preview. To run Sync Preview, select a task icon in the main window and
click the Preview-button.
© SiteDesigner Technologies, Inc.
Getting Started
27
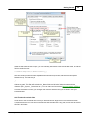
Sync Preview works exactly like the normal Sync, but no actual files are transferred, and no folders
are created neither source nor target. Sync Preview makes a connection to the server, processes
local files and compares them to the remote ones, and shows a list of files that will be transferred in
Sync. Sync Preview is the perfect tool for fine tuning sync parameters, editing filters, and seeing filters
and other options in action. In our example case here, the server does not yet contain any files, so all
the files would be transferred and are shown in Preview window. The screen looks like this:
© SiteDesigner Technologies, Inc.
28
BatchSync Secure FTPS/SFTP
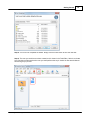
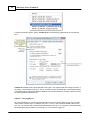
Everything looks quite good. All the files are there, but there are some extra ones. In the start of this
tutorial we listed some folders that we don't want to transfer. So we want to filter out the _notes, Library
and Templates folders and the Thumbs.db file from all folders.
To filter out files and folders, we need to add an Exclude-filter to this task.
Next Step
Editing a task, adding filters
4.3.6
Editing a task, adding filters
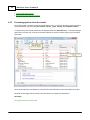
To add a filter to the task while the Sync Preview window is open, right-click the mouse on top of
Templates folder. The following popup menu is displayed:
In the popup menu you can choose to add include and exclude filters with or without a path appended.
As we want to exclude a selected folder, with a specific path, select the highlighted entry in the menu.
The Edit Task-window opens and the C:\WebRoot\Templates text is automatically appended to the
exclude folder text field:
© SiteDesigner Technologies, Inc.
Getting Started
29
While the Edit Task-window is open, you can manually add entries to the exclude text fields, so edit the
field to contain the text:
C:\WebRoot\Templates;C:\WebRoot\Library;_*
Here we combine 3 filters that are separated with semicolons (and note, that there are NO spaces
between them). The last entry is
_*
without any path. This filter will exclude the _Notes folder and all other folders that start with the _
character (like _System, _Comments etc.). You can later read more about filters and pattern matching.
Click the Save-button to save your changes and close this window. Now you are back in the Sync
Preview-window.
Add Thumbs.db exclude filter
Scroll down to the Thumbs.db file in the Sync Preview-window. Right-click on it and select Exclude:
Thumbs.db from the list. This time we selected the filename WITHOUT any path, as we want to exclude
this file in all folders.
© SiteDesigner Technologies, Inc.
30
BatchSync Secure FTPS/SFTP
The Edit Task-window opens, and the Thumbs.db text is automatically appended to the exclude textfield:
Thumbs.db is added to the exclude filter without any path. This means that all files having this name, in
any folder, are excluded from the sync. This is convenient, as the Thumbs.db file is automatically added
to all folders that are viewed with Windows Explorer in the thumbnails-mode. This filter ensures that they
are never uploaded to the web server.
Optional - Turn Logging On
All of the performed sync runs are automatically listed in the main window History pane. The sync task
history entries contains sync run statuses, like "OK" or "Errors," plus numerous statistics about each
sync run. You can also view a list of the files transferred for each sync run. However, if this automatically
generated history log information is not enough, you can turn Extra Logging on.
© SiteDesigner Technologies, Inc.
Getting Started
31
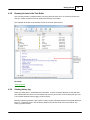
Click the Logs-tab to see logging options:
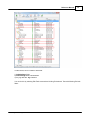
There are three different log types that can be generated:
· Transfer Log - List of files transferred for each run
· FTP Cmd Log - List of client commands to FTP server, and the server's responses to them.
Normally needed for troubleshooting.
· Error Log - List of all files that were not transferred. Also includes warnings about files that were
retried (=not transferred properly in first try, but finally transferred successfully after one or more
retries).
You can see that filenames include % signs. These are for macros that are used in the log filenames.
The macros are evaluated at run time, and are used to add information such as date stamps to
filenames. You can click the T-button to see what a log filename will look like after all the macros are
evaluated (more about macros and log files here).
Now we are finally ready, click the Save-button to save changes made to the task.
Next Step
Previewing again to check the results
Related
© SiteDesigner Technologies, Inc.
32
BatchSync Secure FTPS/SFTP
· Include folders filter sample
· Exclude files and folders filter sample
4.3.7
Previewing again to check the results
Run Preview again, but this time with the exclude filters in use. You will see the files in the tree view that
will be transferred, and notice that you will NOT see the _notes, Library, and Templates folders!
To see that they were actually filtered out as expected, select the Show All-button. This option displays
all the files in the tree view, even the ones that are filtered out, with the reason why they were excluded.
See below:
Since those folders are now filtered out, all of their files and subfolders are also excluded from the sync.
Now that we are happy with the results, close the window by clicking the Close-button.
Next Step
Running the task in the Task Editor
© SiteDesigner Technologies, Inc.
Getting Started
4.3.8
33
Running the task in the Task Editor
Sync Preview proved to us that the task is now doing what we want it to do, so it's time to perform the
real sync. Select the task in the main window and click the Sync-button.
Sync uploads all the files to the web site and the final screen looks like this:
Next Step
Viewing log files
4.3.9
Viewing history log
When sync tasks are run unattended by the scheduler, it's often necessary afterward to see what files
were transferred and to where. It's also important to see if any errors have occurred during the sync runs.
This is where automatic history logging comes into play.
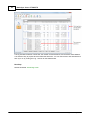
BatchSync always generates a sync task run history log with information about all of the tasks that have
been run. To see this log file, click the History button on the left hand side of the main window. The
history log looks like this:
© SiteDesigner Technologies, Inc.
34
BatchSync Secure FTPS/SFTP
This log includes the status of each task, the number of files transferred, and numerous other statistics.
This makes it easy to pinpoint all of the tasks that had errors. You can view the list of files transferred for
each sync run by clicking the Log - text link for the selected task.
Next Step
Reference Manual: Scheduling a task
© SiteDesigner Technologies, Inc.
Part V
Reference Manual
V
36
BatchSync Secure FTPS/SFTP
5
Reference Manual
5.1
Sync vs. Copy vs. Move files
The default file transfer action in BatchSync is a sync. It is same as copy, but transfers only files that
have changed since the last sync, minimizing the time and bandwidth required for the file transfer. But
sometimes you might want to just copy files, not sync, and BatchSync can do that easily by changing
few task options.
Convert a sync task into a copy task
Start by creating a sync task with Task Wizard. After wizard completes. Then
1.
2.
3.
4.
Select task you just created, and then Edit Task > Comparison-tab.
Uncheck Use SyncDB file check box.
Uncheck Compare dates and Compare size check boxes.
Save changes and you are done.
The sync task is now a copy task, as there is no date/size comparison when transferring files, but all
files are transferred.
Convert a copy task into a move task
You can convert a file copy task into a file move task by editing single option in task settings.
1.
2.
Select Edit Task > Options-tab.
Check One-way sync, delete source files after successful transfer check box
© SiteDesigner Technologies, Inc.
Reference Manual
3.
37
Save changes and you are done
Source files are deleted only if transfer is 100% successful. So if file transfer is cut in the middle, and file
is not transferred in full, file is not deleted on the source. Each source file is deleted right after successful
transfer, so if sync run is interrupted in the middle by any reason, all files that were already deleted, were
also already fully transferred.
Archive files after transfer
You can create archive or backup copies of the source files on the source like this:
1.
2.
3.
Select Edit Task > Options-tab.
Check One-way sync, move source files to archive folder after successful transfer check box.
Enter Archive folder where files are moved after transfer. You can and should use date variables in
the archive folder name.
Let's say you have a download task like this:
Source: ftp.server.com/OutBox -> Target: C:\InBox
And you enter Archive folder: /Archive/%TODAY[yyyy-mm-dd]
© SiteDesigner Technologies, Inc.
38
BatchSync Secure FTPS/SFTP
And as an example, the following files are copied to the ftp.server.com/OutBox:
Source ftp.server.com/OutBox
Target C:\InBox
/SalesData.zip
/Readme.txt
/SalesByArea/SalesNY.doc
/SalesByArea/SalesCA.doc
Sync task is run, and here are the results after the sync run:
Source ftp.server.com/OutBox
Target C:\InBox
/SalesByArea (empty folder is not deleted)
\SalesData.zip
\Readme.txt
\SalesByArea\SalesNY.doc
\SalesByArea\SalesCA.doc
Source ftp.server.com/Archive/2014-04-15
/SalesData.zip
/Readme.txt
/SalesByArea/SalesNY.doc
/SalesByArea/SalesCA.doc
Source files are moved to archive folder only if transfer is 100% successful. So if the file transfer is cut in
the middle, and file is not transferred in full, file is not moved, but it says on the original source folder.
Each source file is moved right after successful transfer, so if sync run is interrupted in the middle by any
reason, all files that were already moved to archive folder, were also already fully transferred.
© SiteDesigner Technologies, Inc.
Reference Manual
5.2
39
Scheduling a task
Notice! Task scheduling is ONLY available in the BatchSync product. It is not possible to
schedule tasks with InstantSync.
BatchSync uses the Windows Task Scheduler to run tasks at regular intervals. The Windows Task
Scheduler is installed on all Windows Server 2012, 2008 and 2003, Windows 8.x, 7, Vista, XP, and
Windows 2000 platforms. Here are the steps to schedule a sync task with the Windows Task Scheduler.
Windows 8.x, 7, Vista and Server 2012 and 2008
Step 1. Start Windows Task Scheduler
Click Start-menu > All Programs > Accessories > System Tools > Task Scheduler. This launches the
scheduler program. You can also simply click the Start menu and type Task Scheduler into the search
field.
Step 2. Create a new task
Click the Task Scheduler Library on the left, and then Create Task... on the right.
Step 3. Enter task name
© SiteDesigner Technologies, Inc.
40
BatchSync Secure FTPS/SFTP
Give it a descriptive name. In this example, we use the name "Upload Web Site." Also, select the Run
whether user is logged on or not option.
Step 4. Enter schedule
We want to run the "Upload Web Site" task every 15 minutes. To create this schedule, click the Triggers
tab, and select the New button. The New Trigger window opens. Select the Daily option, and check the
Repeat task every: 15 minutes option.
Click OK to save this schedule.
Step 5. Enter program name to run every 15 minutes
We want to execute the SYNC.EXE command line tool with Upload WebSite.Stf as the command line
© SiteDesigner Technologies, Inc.
Reference Manual
41
parameter every 15 minutes. So click the Actions tab, and select the New button. The New Action
window opens.
You can copy & paste the New Action window's Program/script and Add Arguments fields from the
BatchSync Task Editor. First, select the task in the Task Editor main window and select the Schedule
command from the menu. Copy the content of the text fields to the clipboard and paste them to the
Windows Task Scheduler, like this:
Click OK to save the changes.
Step 6. Save changes
Click the OK button to save your changes to the schedule entry. Windows will now prompt you to enter
account information for running this task.
Now BatchSync is run every 15 minutes, with the Upload WebSite.stf as a parameter. You can modify
the Upload WebSite.stf task options in the BatchSync Task Editor, while its entry in the Windows Task
Scheduler will remain set until you delete the task from the Windows Task Scheduler.
You can monitor the scheduled sync task execution in the BatchSync Task Editor > History pane. This
pane is automatically updated every time a scheduled sync run completes.
Windows Task Scheduler has its own logging function, so if you have problems with it, select the task
and click the History tab in the Windows Task Scheduler's main window.
© SiteDesigner Technologies, Inc.
42
BatchSync Secure FTPS/SFTP
Windows XP and Server 2003
Step 1. Start Windows Task Scheduler
Open Control Panel and double-click the Scheduled Tasks - icon to open the scheduler window.
Step 2. Add new task
Select menu File > New > Scheduled Task. A new task entry will appear as an icon. Give it a descriptive
name. In this example we use the name "Web update"
Step 3. Open properties window for new entry
Right click on the new entry, and select Properties from the popup menu.
Step 4. Enter properties
You can copy & paste the command line of the new entry from the BatchSync Task Editor. First select
the task in the Task Editor main window and select the Schedule... command from the menu. Copy the
content of the text field to the clipboard and paste it to the Windows Task Scheduler properties window,
in the Run-field, like this:
Step 5. Set schedule
We want to run the "Web update" task every 15 minutes. To create this schedule, click the Schedule-tab
and click the Advanced-button to set up the interval:
© SiteDesigner Technologies, Inc.
Reference Manual
43
Step 6. Save changes
Click the OK-button to save your changes to the schedule entry. Now BatchSync is run every 15
minutes, with the Upload WebSite.stf task as a parameter. You can modify the Upload WebSite.stf task
options in the BatchSync Task Editor, while its entry in Windows Task Scheduler will remain set until
you delete the task from Windows Task Scheduler.
Windows Task Scheduler has its own logging function, so if you have problems with it, select the menu
Advanced > View Log-command in the Windows Task Scheduler main window.
NOTE! Locate the [ ***** Most recent entry is above this line ***** ] line in the Windows task scheduler
log file to find the latest entry in the log. This is not necessarily at the end of the file, unlike in BatchSync
logs, where the most recent entry is always at the end of the file.
End of Tutorial
This is the end of the tutorial. Start playing with the software by creating you own tasks. And remember,
you can safely run Sync Preview for any task you choose, as no files are ever transferred, and no folders
are created with preview.
Recommended reading
We recommend that you read the help page about tracking features of SyncDB. This will give you insight
into what's going on behind the scenes in BatchSync.
© SiteDesigner Technologies, Inc.
44
BatchSync Secure FTPS/SFTP
Related
· Batch files and scheduling
· Sync.exe command line parameters
5.3
Command line, batch files and scheduling
See the page Scheduling a task for step-by-step instructions on how to schedule a sync task using
Windows Task Scheduler.
Running a sync from the command line
BatchSync includes multithreaded command line software (Sync.exe) that is used to run sync tasks in
the unattended mode. Sync.exe does not have any user interface, but it updates history log, and creates
extra log files that you can use to track the files it transfers, and it can optionally send reports and error
logs via email. To run a sync task from the command line, change to the BatchSync install folder and
enter:
Sync C:\Tasks\UploadWebSite.STF
This command loads the UploadWebSite.STF task file and performs the sync process using the
parameters and options defined in the task file. It then terminates.
You can override many sync task settings by passing them as command line parameters, like this
Sync C:\Tasks\UploadWebSite.STF /S:"C:\Upload" /T:"/var/upload" /N:8
/B:"c:\temp\set1.sdb"
You can learn more about command line parameters here.
Batch Files
Sometimes it's most convenient to run a sync task by double-clicking an icon on the desktop. This can
be done with a one-line batch file that runs sync.exe with a sync task filename as a parameter. You
need to supply the full path to both the executable and sync task files, and add quotes around the
executable filename if the path to it contains any spaces, like this:
"c:\Program Files\BatchSync\Sync" C:\Tasks\Sync CA office.STF
Create a SYNC.BAT file with Notepad, add the line shown above, and save it to the desktop. Now
running this sync task is a matter of double-clicking the icon on the desktop.
Notice! The most common source of errors when running a sync task from the command line is
forgetting to add quotation marks around an executable path name. This is required if the path
name contains any spaces.
© SiteDesigner Technologies, Inc.
Reference Manual
45
Running a sequence of sync tasks in succession
When you need to run a sequence of task files in succession, place multiple commands one after
another in a batch file, like this:
"c:\Program Files\BatchSync\Sync" C:\Tasks\Sync CA office.STF
"c:\Program Files\BatchSync\Sync" C:\Tasks\Sync IL office.STF
"c:\Program Files\BatchSync\Sync" C:\Tasks\Sync NY office.STF
Errorlevel
Sync.exe sets the ERRORLEVEL when it exits to signal whether there were any errors during the sync.
Errorlevel=0 means that the sync was successful and errorlevel=1 means that there were one or more
errors. You can use this in batch files by conditionally running sync tasks in sequence. The following
.bat file runs two sync tasks, but it runs the second task only if the first is successful. The code looks
like this:
cd "c:\Program Files\BatchSync"
Sync d:\Tasks\Backup Dev Source.stf
IF ERRORLEVEL 1 GOTO Sync1_Errors
IF ERRORLEVEL 0 GOTO Sync1_OK
GOTO Exit
:Sync1_OK
ECHO First sync OK, running second sync
Sync d:\Tasks\Upload2SSH.stf
IF ERRORLEVEL 1 GOTO Sync2_Errors
IF ERRORLEVEL 0 GOTO Sync2_OK
:Sync1_Errors
ECHO Sync1 errors, exiting batch file
GOTO Exit
:Sync2_Errors
ECHO Sync2 errors
GOTO Exit
:Sync2_OK
ECHO Second sync OK
:Exit
Notice! The IF ERRORLEVEL testing in batch files must be done in the order shown above (testing for
larger numbers first), because the IF ERRORLEVEL 0 test also evaluates as true for error level 1. In the
other words, the IF ERRORLEVEL 0 test is really IF ERRORLEVEL>=0, not IF ERRORLEVEL=0 as one
might think.
Monitoring tasks
You can monitor sync task execution in the History pane of the main window. This history is updated
after a sync task completes, with information like the status code and statistics for the sync run.
© SiteDesigner Technologies, Inc.
46
BatchSync Secure FTPS/SFTP
Scheduling a Batch File
When you need to run a sequence of tasks on a schedule, first create a batch (.bat) file as shown above,
and then schedule the execution of this batch file with Windows task scheduler, as shown on the
Scheduling a task page.
Related
· Scheduling a task
· Sync.exe command line parameters
5.4
Sync.exe command line parameters
Syntax
Here is a list of all available command line parameters. You can also see this list by running SYNC.EXE
without any parameters. Output looks like this:
-----------------------------------------------------------------------------BatchSync Secure FTPS/SFTP
Run sync task to synchronize files and folders.
SYNC C:\Path\SyncTask.Stf [/D:Direction] [/P:Protocol] [/H:Host:Port]
[/U:Username] [/W:Password] [/S:"SourceFolder"] [/T:"TargetFolder"]
[/R:Recursive] [/L:Symlinks] [/X:Deletion] [/N:NumThreads]
[/B:"C:\Path\SyncDB.sdb"] [/G:"C:\Logs"]
C:\Path\SyncTask.Stf
Required. Specify task filename with full path. All task
settings are read in from this file. Other params passed
on the command line override this task settings. If no
override params are passed on command line, then this
sync task is run as-is.
/D:Direction
Sync direction, like /D:TwoWay. Direction is:
OneWayUpload
One-way sync, upload files
OneWayDownload
One-way sync, download files
TwoWay
Two-way bidirectional sync
/P:Protocol
Protocol used for transfers, like /P:SFTP
FTP
Standard FTP
SFTP
SFTP over SSH2
FTPSimplicit
Secure FTP/SSL implicit (usually using port 990)
FTPSexplicit_nodata Secure FTP/SSL explicit (no data channel encryption)
FTPSexplicit
Secure FTP/SSL explicit (both cmd and data encrypted)
/H:Host:Port
Server address and port, like /H:ftp.server.com:21
/U:Username
Login username, like /U:jack
/W:Password
Login password, like /W:secret
/S:"SourceFolder"
Source folder, quotes are required, like /S:"c:\path"
/T:"TargetFolder"
Target folder, quotes are required, like /S:"/upload"
/R:Recursive
Recurse subfolders, like /R:Recursive
Recursive
Include subfolders (same as /R:1)
NotRecursive
Do not include subfolders (same as /R:0)
/L:Symlinks
Resolves symbolic links and processes them, like /L:Yes
Yes
Process symbolic links (same as /L:1)
© SiteDesigner Technologies, Inc.
Reference Manual
47
No
Skip symbolic links (same as /L:0)
/X:Deletion
Deletion options, like /X:DelExtra
DelExtra
Delete extra files on the target (same as /X:1)
DelAfterTransfer
Delete source files after successful transfer
DelPropagate
Two-way sync: Propagate deletions
None
Turn all deletions off (same as /X:0)
/N:NumThreads
Number of threads (1...25), like /N:4
/B:"C:\Path\SyncDB.sdb" SyncDB file w/ full path. NOTE! Do NOT use same SyncDB
file for two sync folder pairs. I.e. always pass unique
filename. You can turn SyncDB off with /B:0 (or turn it
off in the sync task settings in Task Editor)
/G:"C:\Logs"
Path for extra logging files, quotes are required
/V
Verbose mode (outputs file actions)
/V2
Verbose more (as above, plus FTP cmds/responses)
EXAMPLES
SYNC c:\sync\MySyncTask.Stf
SYNC c:\sync\Defaults.Stf /D:OneWayDownload /H:ftp.me.com:21 /U:root /W:secret
/S:"/pub/apache" /T:"c:\apache" /X:DelExtra /N:8 /B:"c:\sync\sync1.sdb"
SYNC c:\sync\Backup.Stf /S:"/webserver" /T:"c:\backup" /B:"c:\sync\sync2.sdb"
Like in the last example, you can override only certain parameters on the
command line, and rest of the parameters are read from the sync task file.
------------------------------------------------------------------------------
Basic syntax
In the simplest form you can execute a sync task by passing a sync task filename as command line
parameter like this:
Sync C:\Tasks\DownloadFiles.stf
NOTE! To run Sync.exe without path, first change to folder where it is installed (default folder is
\BatchSync\ or \BatchSync Secure\ folder under Program Files).
This command runs the sync, and output on the console looks something like this:
D:\Program Files\BatchSync>sync C:\Tasks\DownloadFiles.stf
Sync task : C:\Tasks\DownloadFiles.stf
Direction : OneWayDownload
Source
: /pub/logs
Target
: d:\backup\logs
Recursive : Yes
Symlinks : No
Sync task loaded. Running...
-----------------------------------------------------------------------------STATISTICS
No action: 25
Errors: 0
© SiteDesigner Technologies, Inc.
48
BatchSync Secure FTPS/SFTP
Average transfer speed: 5 899.2 KB/s
Average transfer bandwidth usage (w/ 12% packet+protocol overhead): 53093.1 Kbps
Total time: 39 secs
Transfer time: 38 secs
Total bytes transferred: 220.71 MB (231435723 bytes)
Transferred: 3 files
-----------------------------------------------------------------------------Sync completed OK.
-----------------------------------------------------------------------------Sync OK (Exit code=0)
D:\sync>_
Overriding sync task settings with command line parameters
Sync.exe initially loads the sync task settings from the task filename that is passed on the command
line. You can override these settings by passing optional command line parameters (see the list of the
available parameters above). This is handy if you need to synchronize multiple folder pairs, and sync
task settings would only differ slightly. So instead of creating a separate sync task for each folder pair in
Task Editor, you pass overriding parameters on the command line.
Example 1
For example, you need to sync web site content to 10 web servers. Each server contains identical folder
structure, so you need to upload same source folder to 10 separate hosts, and target folder (and other
sync settings) remain the same for all servers.
1) First create a UploadWeb.Stf sync task in Task Editor. Set up this task with:
· Source Folder: C:\Website
· Target Host: www1.company.com
· Target Folder: /www/html
2) Test sync task in Task Editor. After everything works OK, create UploadWebSites.bat file like this:
"C:\Program Files\BatchSync\Sync" C:\ProgramData\Sync\UploadWeb.Stf
/H:www1.company.com /B:"c:\ProgramData\Sync\www1.sdb"
"C:\Program Files\BatchSync\Sync" C:\ProgramData\Sync\UploadWeb.Stf
/H:www2.company.com /B:"c:\ProgramData\Sync\www2.sdb"
"C:\Program Files\BatchSync\Sync" C:\ProgramData\Sync\UploadWeb.Stf
/H:www3.company.com /B:"c:\ProgramData\Sync\www3.sdb"
"C:\Program Files\BatchSync\Sync" C:\ProgramData\Sync\UploadWeb.Stf
/H:www4.company.com /B:"c:\ProgramData\Sync\www4.sdb"
"C:\Program Files\BatchSync\Sync" C:\ProgramData\Sync\UploadWeb.Stf
/H:www5.company.com /B:"c:\ProgramData\Sync\www5.sdb"
"C:\Program Files\BatchSync\Sync" C:\ProgramData\Sync\UploadWeb.Stf
/H:www6.company.com /B:"c:\ProgramData\Sync\www6.sdb"
"C:\Program Files\BatchSync\Sync" C:\ProgramData\Sync\UploadWeb.Stf
/H:www7.company.com /B:"c:\ProgramData\Sync\www7.sdb"
"C:\Program Files\BatchSync\Sync" C:\ProgramData\Sync\UploadWeb.Stf
/H:www8.company.com /B:"c:\ProgramData\Sync\www8.sdb"
"C:\Program Files\BatchSync\Sync" C:\ProgramData\Sync\UploadWeb.Stf
© SiteDesigner Technologies, Inc.
Reference Manual
49
/H:www9.company.com /B:"c:\ProgramData\Sync\www9.sdb"
"C:\Program Files\BatchSync\Sync" C:\ProgramData\Sync\UploadWeb.Stf
/H:www10.company.com /B:"c:\ProgramData\Sync\www10.sdb"
Here we pass two overriding command line parameters:
/H:www8.company.com
the server.
/B:"c:\ProgramData\Sync\www10.sdb"
filename. Quotes are required!
This /H parameter overrides host address of
This /B parameter overrides the SyncDB
The /B parameter is required for all command line calls if any of the sync task settings are
overridden by command line parameters. This parameter tells where SyncDB tracking file
info is written to, and where it is loaded from.
Now you can sync all 10 servers by running UploadWebSites.bat or by scheduling the executions of this
.bat file in Windows Task Scheduler. If you later need to modify any task settings, you only need to
make a single change to UploadWeb.Stf file, and same change is used for all servers.
Example 2
You need to download multiple folders from the server. And then upload some folders to the same server.
1) First create a Transfer.Stf sync task in Task Editor. Set up this one-way download sync task with:
· Source Host: server.company.com
· Source Folder: /var/temp
· Target Folder: C:\temp
2) Test sync task in Task Editor. After everything works OK, create Transfer.bat file like this:
CD "C:\Program Files\BatchSync"
Sync C:\ProgramData\Sync\Transfer.Stf /S:"/var/database" /T:"c:\backup\db"
/B:"c:\SyncDB\Set1.sdb"
Sync C:\ProgramData\Sync\Transfer.Stf /S:"/var/www/logs" /T:"c:\backup\logs"
/B:"c:\SyncDB\Set2.sdb"
Sync C:\ProgramData\Sync\Transfer.Stf /S:"/etc/init.d"
/T:"c:\backup\conf\%TODAY[yymmdd]" /B:"c:\SyncDB\Set3.sdb"
Sync C:\ProgramData\Sync\Transfer.Stf /D:OneWayUpload /S:"c:\website" /T:"/htdocs"
/B:"c:\SyncDB\Set4.sdb"
Sync C:\ProgramData\Sync\Transfer.Stf /D:OneWayUpload /S:"\\sys1\projects"
/T:"/htdocs/prj" /B:"c:\SyncDB\Set5.sdb"
Here we pass following overriding command line parameters:
/S:"/var/database"
/T:"c:\backup\db"
/D:OneWayUpload
/B:"c:\SyncDB\Set1.sdb"
/S
/T
/D
/B
parameter
parameter
parameter
parameter
overrides
overrides
overrides
overrides
source folder.
target folder.
sync task direction.
SyncDB filename.
Note again: Remember to pass unique SyncDB filename with /B switch to all Sync.exe calls that
override any sync task settings!
© SiteDesigner Technologies, Inc.
50
BatchSync Secure FTPS/SFTP
Command line parameter /D - Direction
This parameter overrides Edit Task > Sync-tab > Sync Direction option button.
/D:OneWayUpload
/D:OneWayDownload
/D:TwoWayUpload
Upload local folder to remote server folder
Download remote server folder to local folder
Perform two-way bidirectional sync
Command line parameter /P - Protocol
This parameter overrides Edit Task > Sync-tab > Edit Server > Protocol combo box value.
/P:FTP
/P:FTPSexplicit
/P:FTPSexplicit_nodata
/P:FTPSimplicit
/P:SFTP
FTP
FTPS
FTPS
FTPS
SFTP
with SSL (Explicit with data)
with SSL (Explicit without data)
with SSL (Implicit)
using SSH2
Command line parameter /H - Host address:Port
This parameter overrides Edit Task > Sync-tab > Edit Server > Host address and Port - field values.
/H:www.server.com:21
Specify host address and port values. The port value is optional.
Command line parameter /U - Username
This parameter overrides Edit Task > Sync-tab > Edit Server > Username - field value.
/U:admin
Specify username
Command line parameter /W - PassWord
This parameter overrides Edit Task > Sync-tab > Edit Server > Password - field value.
/W:secret
Specify password
Command line parameter /S - Source folder name
This parameter overrides Edit Task > Sync-tab > Source folder field value. Quotes around the folder
name are required.
/S:"c:\backup"
/S:"/www/logs"
Local source folder name. Use quotes.
Remote source folder name.
© SiteDesigner Technologies, Inc.
Reference Manual
51
NOTE! You can use date variables in this parameter.
Command line parameter /T - Target folder name
This parameter overrides Edit Task > Sync-tab > Target folder field value. Quotes around the folder name
are required.
/T:"/htdocs"
Remote target folder name. Use quotes.
/T:"C:\Backup\%TODAY[mm-dd-yyyy]" Local target folder name. You can use date variables here.
Command line parameter /R - Recursive
This parameter overrides Edit Task > Options-tab > Include subfolders recursively check box value.
/R:Recursive
/R:1
/R:NotRecursive
/R:0
Recurse subfolders
Recurse subfolders (alternative syntax)
Do not recurse subfolders
Do not recurse subfolders (alternative syntax)
Command line parameter /L - SymLinks
This parameter overrides Edit Task > Options-tab > Include symbolic links check box value.
/L:Yes
/L:1
/L:No
/L:0
Process symbolic links
Process symbolic links (alternative syntax)
Skip symbolic links
Skip symbolic links (alternative syntax)
Command line parameter /X - Deletion options
This parameter overrides Edit Task > Options-tab > deletion options.
/X:None
/X:0
/X:DelExtra
/L:DelAfterTransfer
transfer, i.e. move files
/L:DelPropagate
side to the other side
Turn all deletion options off.
Turn all deletion options off (alternative syntax).
Edit Task > Options-tab > One-way sync, delete extra files/folders on target
Edit Task > Options-tab > One-way sync, delete source files after successful
Edit Task > Options-tab > Two-way sync, propagate file/folder deletions on one
Command line parameter /N - Number of threads
This parameter overrides Edit Task > Options-tab > Number of threads setting.
© SiteDesigner Technologies, Inc.
52
BatchSync Secure FTPS/SFTP
/N:12
Use 12 simultaneous threads.
Command line parameter /B - SyncDB filename
This parameter overrides default SyncDB filename. By default SyncDB filename is same as sync task
filename, with extension .STF replaced with .SDB.
It is very important that you pass unique filename for each folder pair you sync. The SyncDB file stores
file change tracking data, and if same filename is used for multiple folder pairs, file change tracking no
longer works properly.
You need to use quotes around filename, and make sure that folder name you specify here already
exists.
/B:"c:\ProgramData\Sync\set1.sdb"
Save SyncDB file with this unique filename.
Command line parameter /V - Verbose mode
When you pass the /V command line parameter, the output on the console looks like this:
D:\sync>sync /V DownloadFiles.stf
BatchSync Secure FTPS/SFTP 3.0.0
Verbose mode.
Task name: DownloadFiles.stf
D:\sync\DownloadFiles.stf loaded. Running...
Connecting to localhost (21)
Get directory listing: /LogFiles
Download file /LogFiles/database.dat
Download file /LogFiles/database.db
Download file /LogFiles/dbsysadmin.dat
-----------------------------------------------------------------------------STATISTICS
No action: 25
Errors: 0
Average transfer speed: 6 240.3 KB/s
Average transfer bandwidth usage (w/ 12% packet+protocol overhead): 56162.8 Kbps
Total time: 37 secs
Transfer time: 36 secs
Total bytes transferred: 220.71 MB (231435723 bytes)
Transferred: 3 files
-----------------------------------------------------------------------------Sync completed OK.
-----------------------------------------------------------------------------Sync OK (Exit code=0)
D:\sync>_
© SiteDesigner Technologies, Inc.
Reference Manual
53
Command line parameter /V2 - Extended verbose mode
When you pass the /V2 command line parameter, you will see the client -> server communication in
more detail. So output on the console looks like this:
D:\sync>sync /V2 DownloadFiles.stf
D:\sync\DownloadFiles.stf loaded. Running...
Connecting to localhost (21)
SERVER: 220 FileZilla Server version 0.9.34 beta written by Tim Kosse (Tim.Kosse
@gmx.de) Please visit http://sourceforge.
CLIENT: USER dbadmin
SERVER: 331 Password required for dbadmin
CLIENT: PASS ******
SERVER: 230 Logged on
CLIENT: FEAT
SERVER: 211-Features:
MDTM
REST STREAM
SIZE
MLST type*;size*;modify*;
MLSD
AUTH SSL
AUTH TLS
UTF8
CLNT
MFMT
211 End
CLIENT: CLNT Sync
SERVER: 200 Don't care
CLIENT: OPTS UTF8 ON
SERVER: 200 UTF8 mode enabled
CLIENT: PWD
SERVER: 257 "/" is current directory.
Get directory listing: /LogFiles
CLIENT:
SERVER:
:
:
:
CLIENT:
SERVER:
TYPE A
200 Type set to A
CWD /LogFiles
250 CWD successful. "/LogFiles" is current directory.
CLIENT: SIZE k9410enx.exe
SERVER: 213 69711200
CLIENT: PASV
SERVER: 227 Entering Passive Mode (127,0,0,1,13,178)
© SiteDesigner Technologies, Inc.
54
BatchSync Secure FTPS/SFTP
CLIENT: RETR dbsysadmin.dat
SERVER: 150 Connection accepted
SERVER: 226 Transfer OK
-----------------------------------------------------------------------------STATISTICS
No action: 25
Errors: 0
Average transfer speed: 6 369.2 KB/s
Average transfer bandwidth usage (w/ 12% packet+protocol overhead): 57322.9 Kbps
Total time: 36 secs
Transfer time: 35 secs
Total bytes transferred: 220.71 MB (231435723 bytes)
Transferred: 3 files
-----------------------------------------------------------------------------Sync completed OK.
-----------------------------------------------------------------------------Sync OK (Exit code=0)
D:\sync>_
Related
· Scheduling a task
· Batch files and scheduling
5.5
Windows Event Log
Windows event logs are special files that record significant events on your computer, such as when a
user logs on to the computer or when a program encounters an error. Whenever these types of events
occur, Windows records the event in an event log that you can read by using Event Viewer.
BatchSync writes all sync run results to the Windows event log. Events contain following information:
1.
2
Sync OK - Level=Information, Source=BatchSync, EventID=101, Task Category=1
Sync Errors - Level=Error, Source=BatchSync, EventID=102, Task Category=1
You can create a task in Windows Task Scheduler, that monitors these events, and execute other
programs or actions based on BatchSync sync task results. Or you can utilize various third party log
monitoring tools to integrate BatchSync with external systems.
You can view event log with Windows Event Viewer. It looks like this:
© SiteDesigner Technologies, Inc.
Reference Manual
5.6
55
Server folders
The vast majority of FTP servers out there use UNIX style path names. This is the default syntax
BatchSync expects to see in the Server Settings > Server Folder-field. If an entered value does not
comply with UNIX syntax, then the Server Folder Warning-window is shown. This window makes a
suggestion about how to automatically fix the entered folder value, and most of the time this suggestion
is correct and should be used. It should be noted, though, that some servers use a different syntax for
their folders. In this case, the correct syntax is different from UNIX syntax, and the BatchSync
suggestion might be wrong. In these cases, you should use the current value entered, and ignore the
software suggested value.
UNIX-style path names
Some 95% of all FTP servers out there use UNIX-style path names. This means that if you do not know
how your server is configured, it is the safest to assume that it is using UNIX syntax for all path names.
This syntax denotes that all sub-folders are separated by the forward slash '/' character, like this:
·
·
·
·
/pub/html
/pub/http-docs
/bin/etc/httpd
/this/is/long/path/with/multiple/sub/folders
Windows/DOS-style path names
© SiteDesigner Technologies, Inc.
56
BatchSync Secure FTPS/SFTP
All Windows computers use DOS-style path names for local and network operations. This syntax
denotes that all sub-folders are separated by the backslash '\' character, the network shares (UNC paths)
start with two backslashes, \\, and local path names start with a drive letter and a ':' character like this:
·
·
·
·
\\pub\html
\\server\pub\http-docs
c:\bin\etc\httpd
z:\this\is\long\path\with\multiple\sub\folders
Even though an FTP server might be running on Windows (and the server is, for example, a Microsoft IIS
FTP server), it most likely DOES NOT use DOS-syntax for FTP commands. Instead, most IIS servers
mimic UNIX servers and use UNIX-style path names for all FTP operations.
You can check the syntax that a specific server uses for folder names by connecting to it with an FTP
client. Browse to the server folder you will use in the sync task, and look at how the FTP client displays
the current folder name, whether it is the "c:\bin\etc\httpd" or "/bin/etc/httpd" style. You can directly copy
& paste this server folder value to the sync task settings.
UNIX Absolute vs. Relative path names
BatchSync supports ONLY absolute path names! So relative paths are not supported. The UNIX-style
absolute path names start with a forward slash '/' character, like this:
·
·
·
·
/pub/html
/pub/http-docs
/
/bin/etc/httpd
The relative paths do not start with the forward slash character. The relative paths are not supported
because actual absolute path might be dependent on user default login home folder and this causes lot
of confusion. Samples of relative paths (note the missing / char in the beginning):
· pub/html
· pub/http-docs
If a user's home folder is /home/mike, then these translate to the actual paths:
· /home/mike/pub/html
· /home/mike/pub/http-docs
or if a user's home folder is /usr, then these translate to the actual paths:
· /usr/pub/html
· /usr/pub/http-docs
As the samples above show, the actual path is not the same for different users, so relative path names
are not supported. Use absolute path names instead.
© SiteDesigner Technologies, Inc.
Reference Manual
5.7
57
Date variables in folder names and filters
Date variables can be used in the source and target folders names to create dynamically changing folder
names. Usually these are needed when creating a backup sync task, where part of the target folder
name is evaluated to current date values. For example:
Target Folder: C:\Backup\%TODAY[yyyy-mm-dd]
is evaluated at run time to the folder name (if run on 15/6/2014):
C:\Backup\2014-06-15
In this case, target folder C:\Backup\2014-06-15 is automatically created when the sync task is run. You
can use multiple variables in the folder name, like
Target Folder: C:\Backup\Year %YEAR\Month %MONTH
would evaluate to
C:\Backup\Year 2014\Month 06
at run time. The [yymmdd] portion of the date variable can be used to format the date in various ways,
see the table below for more information.
Available Date Variables
The following table shows a list of date variables that can be used in folder names:
Date Variable
Evaluates to
%YEAR
Evaluates to current year, like 2014
%MONTH
Evaluates to current month, like 06
%DAY
Evaluates to current day, like 31
%TODAY[yymmdd]
Evaluates to current date with formatting
%PREV_BUSDAY[yymmdd]
Evaluates to previous business day with formatting
%BUSDAY[yymmdd]
Evaluates to current business day with formatting
%NEXT_BUSDAY[yymmdd]
Evaluates to next business day with formatting
The %PREV_BUSDAY, %BUSDAY, and %NEXT_BUSDAY variables always evaluate to the business
days Mon-Fri. For example, if today was 6/21/2014 (Monday), these variables would be evaluated to:
· %PREV_BUSDAY - 6/18/2014 (the previous business day before Monday is Friday)
· %BUSDAY - 6/21/2014 (the current business day, it's Monday)
· %NEXT_BUSDAY - 6/22/2014 (the next business day after Monday is Tuesday)
and if today was 6/26/2014 (Saturday), these variables would be evaluated to:
· %PREV_BUSDAY - 6/25/2014 (the previous business day before Saturday is Friday)
· %BUSDAY - 6/25/2014 (the current day is not a business day, so this evaluates to the previous
© SiteDesigner Technologies, Inc.
58
BatchSync Secure FTPS/SFTP
business day, Friday)
· %NEXT_BUSDAY - 6/28/2014 (the next business day after Saturday is Monday)
Formatting
The variables with formatting are very versatile, and you can use them to create dates and times in a
variety of formats. The following table shows how the yymmdd portion of the %TODAY[yymmdd] string
can be used to create custom date strings:
© SiteDesigner Technologies, Inc.
Reference Manual
59
Format
Description
(:)
Time separator. In some locales, other characters may be used to represent the
time separator. The time separator separates hours, minutes, and seconds when
time values are formatted. The actual character used as the time separator in
formatted output is determined by your system settings.
(/)
Date separator. In some locales, other characters may be used to represent the
date separator. The date separator separates the day, month, and year when
date values are formatted. The actual character used as the date separator in
formatted output is determined by your system settings.
c
Display the date as ddddd and display the time as
ttttt, in that order. Display only date information if there is no fractional part to the
date serial number; display only time information if there is no integer portion.
d
Display the day as a number without a leading zero (1 – 31).
dd
Display the day as a number with a leading zero (01 – 31).
ddd
Display the day as an abbreviation (Sun – Sat).
dddd
Display the day as a full name (Sunday – Saturday).
ddddd
Display the date as a complete date (including day, month, and year), formatted
according to your system's short date format setting. The default short date
format is m/d/yy.
dddddd
Display a date serial number as a complete date (including day, month, and
year) formatted according to the long date setting recognized by your system.
The default long date format is mmmm dd, yyyy.
w
Display the day of the week as a number (1 for Sunday through 7 for Saturday).
ww
Display the week of the year as a number (1 – 54).
m
Display the month as a number without a leading zero (1 – 12). If m immediately
follows h or hh, the minute rather than the month is displayed.
mm
Display the month as a number with a leading zero (01 – 12). If m immediately
follows h or hh, the minute rather than the month is displayed.
mmm
Display the month as an abbreviation (Jan – Dec).
mmmm
Display the month as a full month name (January – December).
q
Display the quarter of the year as a number (1 – 4).
y
Display the day of the year as a number (1 – 366).
yy
Display the year as a 2-digit number (00 – 99).
yyyy
Display the year as a 4-digit number (1000 – 9999).
© SiteDesigner Technologies, Inc.
60
BatchSync Secure FTPS/SFTP
Samples of date variables in folder names. Sync is run on 6/15/2014 at 11:45:59
Folder with date variable
Evaluated to folder name
C:\Backup\%TODAY[mm_dd_yy]
C:\Backup\06_15_10
C:\Backup\%TODAY[mmm]\%DAY
C:\Backup\Jan\15
C:\Daily Backups\%TODAY[dddd]
C:\Daily Backups\Tuesday
/upload/Month_%MONTH_Day_%DAY
/upload/Month_06_Day_15
/backup/%TODAY[mm-dd-yyyy]_at_%TODAY[Hh-Nn-Ss]
/backup/06-15-2014_at_11-45-59
Using date variables in filters
You can also use date variables in include and exclude filters. All of the date variables described above
are also available in filters. For example, this makes it possible to create the following Include filter:
Include Filename Filter: %TODAY[mm_dd_yyyy].*
which would include only files containing the current date 06_15_2014.* in the beginning of the filename.
5.8
History and Log Files
History log
The global run history log contains run info and statistics about all of the sync tasks that were run on this
computer. You can view this history log by clicking the History button on the left hand side of the main
window. This log is shared by all tasks, and it's always enabled, so you cannot disable it. The history log
files are written to the folder specified in the global options in the menu Tools > Options > History log
folder field. The same tab also has a Max number of history items field, which specifies the maximum
number of history entries available in the History pane. The older entries over this max limit are
automatically deleted.
Extra Log Folders
In addition to the always enabled History log, you might need extra logging on a per task basis. All of the
task specific log files are stored in the folder that is specified in the sync task settings (Edit Task > Logtab). Sometimes, it's best to write single sync task log files to separate folders. And sometimes it's more
convenient to store them all in the same folder. You must decide what best suits your needs.
Log file types
There are three types of log files:
1.
2.
Transfer logs: Contain a list of files transferred, and errors if they occur during the sync
FTP Cmd logs: Contain a list of FTP protocol commands and responses between BatchSync and
an FTP server. Also contains any errors that might occur.
© SiteDesigner Technologies, Inc.
Reference Manual
3.
61
Error logs: List of warnings and errors that occur on the sync run. Warnings are about files that
were retried, i.e. there were errors during the transfer, but after one or more retries, the file was
transferred successfully. An error means that file was not transferred successfully, even after retries.
The number of retries are specified in Edit Task > Edit Server > Options-tab > Timeouts > Retry
count max. There you can also specify the time between retries.
Log file rotation schemes
There are seven different rotation schemes to choose from (macros are explained in detail below):
1.
2.
3.
4.
5.
6.
7.
No Rotation. Always write to the same file. File size increases until disk is full.
Rotate w/ Max Size. Write to the same file until file size reaches Max Size. Then rename to
.bak.log and create new file.
Auto Rotate Daily. Macros in the filename evaluate to a different filename each day, so a new file is
started every day.
Auto Rotate Weekly. Macros in the filename evaluate to a different filename each week, so a new
file is started every week.
Auto Rotate Monthly. Macros in the filename evaluate to a different filename each month, so a
new file is started every month.
Auto Rotate Custom. Creates a custom filename using macros (see samples below).
New log for each run. Creates a new log file each time sync task is run.
Log file deletion
BatchSync ONLY deletes log files when Rotate w/ Max Size is selected. In all other cases, log files are
never deleted, so they eat up the disk space until the disk is full. Therefore it's recommended that you
select the Rotate w/ Max Size option, or make sure that you delete log files manually every now and
then.
You can manually delete any of the log files when you feel like they need to be deleted.
Macros in log filenames
Log filenames can contain macros. The macros start with the % sign, and they are evaluated (i.e.
converted to values) when sync task is run. BatchSync recognizes the following macros:
%DAY
Evaluates to current day 1...31
%MONTH
Evaluates to current month 1...12
%YEAR
Evaluates to current year 2014...2099
%DATE[Format]
Evaluates to custom date and time format, more below.
%FILENAME
Task filename without .STF extension
The %DATE[Format] macro is very versatile, and you can use it to create dates and times in a variety of
formats. The following table shows how the Format string can be used to create custom date strings:
© SiteDesigner Technologies, Inc.
62
BatchSync Secure FTPS/SFTP
Format
Description
(:)
Time separator. In some locales, other characters may be used to represent the
time separator. The time separator separates hours, minutes, and seconds when
time values are formatted. The actual character used as the time separator in
formatted output is determined by your system settings.
(/)
Date separator. In some locales, other characters may be used to represent the
date separator. The date separator separates the day, month, and year when
date values are formatted. The actual character used as the date separator in
formatted output is determined by your system settings.
c
Display the date as ddddd and display the time as
ttttt, in that order. Display only date information if there is no fractional part to the
date serial number; display only time information if there is no integer portion.
d
Display the day as a number without a leading zero (1 – 31).
dd
Display the day as a number with a leading zero (01 – 31).
ddd
Display the day as an abbreviation (Sun – Sat).
dddd
Display the day as a full name (Sunday – Saturday).
ddddd
Display the date as a complete date (including day, month, and year), formatted
according to your system's short date format setting. The default short date
format is m/d/yy.
dddddd
Display a date serial number as a complete date (including day, month, and
year) formatted according to the long date setting recognized by your system.
The default long date format is mmmm dd, yyyy.
w
Display the day of the week as a number (1 for Sunday through 7 for Saturday).
ww
Display the week of the year as a number (1 – 54).
m
Display the month as a number without a leading zero (1 – 12). If m immediately
follows h or hh, the minute rather than the month is displayed.
mm
Display the month as a number with a leading zero (01 – 12). If m immediately
follows h or hh, the minute rather than the month is displayed.
mmm
Display the month as an abbreviation (Jan – Dec).
mmmm
Display the month as a full month name (January – December).
q
Display the quarter of the year as a number (1 – 4).
y
Display the day of the year as a number (1 – 366).
yy
Display the year as a 2-digit number (00 – 99).
yyyy
Display the year as a 4-digit number (1000 – 9999).
© SiteDesigner Technologies, Inc.
Reference Manual
63
Samples of macros in filenames (task filename is WebUpload.STF, and date sync is run 2/15/2014 at
11:45:59):
Format
Evaluated to filename
%YEAR_%MONTH_%DAY_%FILENAME.log
2014_02_15_WebUpload.log
%DATE[yyyy_mm_dd]_%FILENAME.log
2014_02_15_WebUpload.log
%FILENAME Month %MONTH Date %DAY.logfile
WebUpload Month 02 Date 15.logfile
%DATE[mm-dd-yyyy] %FILENAME at %DATE[Hh-Nn-Ss].txt
2014-02-15 WebUpload at 11-4559.txt
ERROR: Filename cannot contain /
or : characters
%DATE[mm/dd/yyyy] %FILENAME at %DATE[Hh:Nn:Ss].txt
When entering a filename with macros, you can test it by pressing the
the macro and shows it in a message box.
5.9
button. This button evaluates
Filters and wildcard characters
General
File and folder name filters are used to either select a subset of files to be included (by default all files
are included), or remove a subset of files from the sync file set (by default no files are excluded). When a
filename matches the include filter, it is included. Similarly, when a filename matches the exclude filter, it
is excluded. If a filename matches both the include and exclude filters, then it's excluded.
Samples of filter use
You can find samples about filtering here:
· Include folders filter sample
· Exclude files and folders filter sample
Pattern matching, wildcard characters
You can use pattern matching to create include and exclude filters that match multiple file or folder
names. Built-in pattern matching provides a versatile tool for file and folder name matching. The patternmatching feature allows you to use wildcard characters, character lists, or character ranges, in any
combination, to match file and folder names. The pattern matching syntax resembles the regular
expressions used on many systems.
The following table shows the characters allowed in a pattern and what they match:
© SiteDesigner Technologies, Inc.
64
BatchSync Secure FTPS/SFTP
Characters in pattern
Matches in file or folder name
?
Any single character.
*
Zero or more characters.
#
Any single digit (0–9).
[charlist]
Any single character in charlist
[!charlist]
Any single character not in charlist.
A group of one or more characters (charlist) enclosed in brackets ([ ]) can be used to match any single
character in a file/folder name and can include almost any character code, including digits.
Note: To match the special characters left bracket ([), question mark (?), number sign (#), and asterisk
(*), enclose them in brackets. The right bracket (]) can't be used within a group to match itself, but it can
be used outside a group as an individual character.
By using a hyphen (–) to separate the upper and lower bounds of the range, charlist can specify a range
of characters. For example, [A-Z] results in a match if the corresponding character position in the
file/folder name contains any uppercase letters in the range A–Z. Multiple ranges are included within the
brackets without delimiters.
The meaning of a specified range depends on the character ordering valid at the system, [A–E] matches
A, a, À, à, B, b, E, e. The range does not match Ê or ê because accented characters fall after
unaccented characters in the sort order.
Other important rules for pattern matching include the following:
· An exclamation point (!) at the beginning of charlist means that a match is made if any character
except the characters in charlist is found in a file/folder name. When used outside brackets, the
exclamation point matches itself.
· A hyphen (–) can appear either at the beginning (after an exclamation point if one is used) or at the
end of charlist to match itself. In any other location, the hyphen is used to identify a range of
characters.
· When a range of characters is specified, they must appear in ascending sort order (from lowest to
highest). [A-Z] is a valid pattern, but [Z-A] is not.
· The character sequence [] is considered a zero-length string ("").
In some languages, there are special characters in the alphabet that represent two separate characters.
For example, several languages use the character "æ" to represent the characters "a" and "e" when they
appear together. The matching recognizes that the single special character and the two individual
characters are equivalent. When a language that uses a special character is specified in the system
locale settings, an occurrence of the single special character in either pattern or file/folder name matches
the equivalent 2-character sequence in the other string. Similarly, a single special character in a pattern
enclosed in brackets (by itself, in a list, or in a range) matches the equivalent 2-character sequence in a
file/folder name.
Pattern matching samples
In addition to patterns, you can also enter multiple filters by separating them with semicolons (;). Notice,
that when entering multiple filters, do not leave ANY extra spaces between filters. So when you want to
match for .gif and .jpg files, the correct way to enter the filter is:
© SiteDesigner Technologies, Inc.
Reference Manual
65
· *.gif;*.jpg
And the incorrect way to enter it is:
· *.gif ; *.jpg
Examples of pattern matching and multiple filters:
Filter
Matches
*.log
All filenames that have the .log extension
*.*htm*
Filenames with extensions like .htm .html .shtml
*.jpg;*.jpeg;*.gif;*.png
All files with .jpg .jpeg .gif .png extensions
index.*
[KM]iss.txt
Files starting with index, like index.htm, index.html, index.txt,
index.php
Kiss.txt and Miss.txt
Picture##.jpg
Picture01.jpg, Picture02.jpg, Picture03.jpg, etc.
2014-01-*.log
2014-01-01.log, 2014-01-02.log, 2014-01-.log, 2014-01-Month.log, etc.
*.php;*.asp;*.aspx
Forum.php, Calc.asp, SaveToDB.aspx
Similarly you can use wildcard characters in folder name filters.
Entering full, partial, and no paths
File and folder names are most commonly entered without a path. This way they can match file/folder
names in all folders. Sometimes it is necessary to limit a filter to certain folders, like in the following
case:
Sync task is to from C:\WebRoot -> /pub/public
Case 1: Almost all folders contain the Thumbs.db file, which we do not want to include in the sync
Case 2: C:\WebRoot\Scripts contains PHP script files that we do not want to include in the sync
Case 3: C:\WebRoot\usr\db contains .db files that we do not want to include the sync
Case 4: C:\WebRoot\system\logs folder contains files and subfolders that we do not want to include in
the sync at all
To exclude these files and folders, we need to create the following exclude filter:
File name matches: Thumbs.db;C:\WebRoot\Scripts\*.php;C:\WebRoot\usr\db\*.db
Folder name matches: C:\WebRoot\system\logs
Here we used full paths in the filters. We could also have used partial filters (paths with * characters) like
this:
File name matches: Thumbs.db;*\Scripts\*.php;*\db\*.db
Folder name matches: *\system\logs
But here the folder name filter could also match a folder like C:\WebRoot\html\system\logs, so be extra
careful when using partial paths in filters.
© SiteDesigner Technologies, Inc.
66
BatchSync Secure FTPS/SFTP
Using source or target paths in filters
You can use either source or target folder names in full/partial paths, so, using the previous example, we
could also have entered the same filters like this:
File name matches: Thumbs.db;/pub/public/Scripts/*.php;/pub/public/usr/db/*.db
Folder name matches: /pub/public/system/logs
It's up to you to choose which method to use.
Related
· Include folders filter sample
· Exclude files and folders filter sample
5.10
Filter sample - Include Folders
We have a sync task that uploads web site files from the local folder to the remote server folder. The
sync task set up looks like this:
Source: D:\webroot
Target: /Upload/webroot
When this sync task is run without any filters, by default all folders are included, and results look like
this:
© SiteDesigner Technologies, Inc.
Reference Manual
This is fine, but we'd want to transfer only following folders:
© SiteDesigner Technologies, Inc.
67
68
BatchSync Secure FTPS/SFTP
In other words, we want to transfer only c:\webroot\html, c:\webroot\logs and c:\webroot\pics folders. You
can do this by creating an Include Folders-filter like this:
1) Run Sync Preview
2) On Sync Preview-window, right-click on top of the html - folder name, and select Add Folder to Include
Filter-command from the popup menu, like this:
© SiteDesigner Technologies, Inc.
Reference Manual
69
3) Now Edit Task-window opens. You need to turn on Include Folders-filtering by checking the "Folder
name matches filter entered below" check box. Also add a semicolon to the end of the folder name, and
save changes by clicking Save-button.
© SiteDesigner Technologies, Inc.
70
BatchSync Secure FTPS/SFTP
4) You can now repeat the process for other two folders (or edit text field manually), until Edit Taskwindow looks like this:
Filter text field now contains (notice semicolons between folder names):
d:\webroot\html;d:\webroot\logs;d:\webroot\pics
Now it's time to check how this filter works. So run sync preview again, and after preview completes,
© SiteDesigner Technologies, Inc.
Reference Manual
71
click Show All - button on the Sync Preview - window toolbar:
This looks almost correct, but subfolders of the c:\webroot\pics and c:\webroot\logs were not included.
"Why is that?" you might ask. The answer is that only exactly matching folder names were included in
the sync. To extend matching, you need to match c:\webroot\pics folder PLUS all its subfolders, by
adding a * character to the end of the folder name, like this:
d:\webroot\html;d:\webroot\logs*;d:\webroot\pics*
In other words:
d:\webroot\pics
c:\webroot\pics*
<- Matches only this folder, but not its subfolders
<- Matches this folder AND its subfolders
Now save changes to task, and run Sync Preview again (and click Show All-button on the toolbar):
© SiteDesigner Technologies, Inc.
72
BatchSync Secure FTPS/SFTP
Now results look correct, and only d:\webroot\html, d:\webroot\logs and d:\webroot\pics folders with their
subfolders were transferred.
Related
· Exclude files and folders filter sample
5.11
Filter sample - Exclude Files and Folders
We have a backup sync task that downloads files from the remote server folder to the local folder. The
sync task set up looks like this:
Source: /website
Target: C:\Backup\website
When this sync task is run without any filters, by default all files and folders are included, and nothing is
excluded. But with this backup sync task we do not want to download following files and folders:
© SiteDesigner Technologies, Inc.
Reference Manual
73
In other words, we do not want to download:
1) /website/htsys folder
2) /website/logs folder and subfolders
3) Any log files with .log extension
You can do this by selecting Edit Task-command and clicking Exclude-tab. Then add following Exclude
filters:
© SiteDesigner Technologies, Inc.
74
BatchSync Secure FTPS/SFTP
Save changes and run Sync Preview again. Then click Show All - button on the toolbar. Results look like
this:
© SiteDesigner Technologies, Inc.
Reference Manual
75
Now this backup sync task downloads only relevant files and folders.
Related
· Include folders filter sample
5.12
SyncDB
SyncDB is a very important feature of the BatchSync software. SyncDB is a special log file that tracks
changes to the source and target files. It records the file size and date for all files in the sync. On the
next run, this recorded info is compared to the present size and date values. If these values are different,
then the file has changed since the last sync and will be transferred. But why use a separate log file to
record and compare date and size values? Why not just the compare the current date and size values of
the source and target files? The answers to these questions will follow, please read on.
Copying files between folders in the local or network folders
When you copy a file from the local folder to another local or network folder, all its current attributes, like
date modified and size, stay intact in the copy process.
If later either of these copies is changed, it's easy to see this by simply comparing the file date and size
attributes.
In the above scenario, there would be no need to track changes with the separate SyncDB file, as we
can clearly see that the network copy of the file has changed. This fact applies to all cases when
copying files between local and network folders: no SyncDB file would really be needed to detect
changes in the files. But things are quite different when dealing with files that are uploaded to FTP,
FTPS, or SFTP Servers.
Uploading files from a local folder to an FTP server
© SiteDesigner Technologies, Inc.
76
BatchSync Secure FTPS/SFTP
When you copy, i.e. upload, a file from a local folder to an FTP server, none of its current attributes, like
date modified and size, are preserved. This is what happens:
What actually happened here? Two things: First, the file date changed due to shortcomings in the FTP
protocol, with the result that the uploaded file date will be set to the current date/time of the FTP server's
clock. So the date is the same as the upload date/time, but notice, this is not the same as your local
computer date/time. We cannot tell the actual time difference between your local computer and the FTP
server's clock. But it is some seconds, some minutes or even some hours (if the server is in a different
time zone). Then you ask, why not set the uploaded file date/time to the same value as the local file?
Good question. And the answer is simply that this is not part of the FTP standard specification. In other
words, there is no way in the FTP protocol to set the file date stamp. This sounds unbelievable, but it is
a fact. There have been numerous attempts to add this feature to the FTP protocol, but none of these
has really succeeded and it's not part of the standard. There are actually some non-standard ways to set
the uploaded file date, but very few FTP servers support them (but if server supports these non-standard
ways to set date, BatchSync uses them).
Second, the file size was changed too. It should be noted that this happens only for FTP servers running
Linux, Solaris, HP/UX, or some other unix variant. But some 95% of internet ftp servers ARE running one
of these unix variants, so actually this happens on almost all FTP servers. Also, it should be noted that
this happens only when uploading ASCII files, like text files, HTML pages, log files, PHP scripts, etc. But
since they are very common file types, this happens on almost all file transfers. Read more about this in
the info box below.
ASCII File size differences in Windows and Unix machines
The file sizes are different, because Windows and FTP servers use different methods for separating text
lines in ASCII files, like in HTML web pages. The FTP servers are most commonly unix boxes, which
use a single linefeed (LF) character to separate lines. Windows computers use two characters (CR +
LF) to do the same thing. Therefore, text files are smaller on the server than on the disk of the Windows
machine. This is normal behavior, not a bug or an error; these two operating systems were simply
designed to be different.
This difference applies only to text files that are transferred in ASCII mode. BatchSync uses global
options (see menu Tools > Options) to determine which files are transferred in ASCII mode. You can
change the list of file types there. This list is used only when the "Auto" file transfer mode is selected
for the site (see Edit Task > Edit Site > File Transfer Mode-drop down list).
The bottom line is that both the file date and size change when a file is uploaded. So we cannot
use file attributes to track changes and see whether a file has changed on the server. If you compare
© SiteDesigner Technologies, Inc.
Reference Manual
77
these two files later, it looks like the file on the server is newer, because its date stamp says so. And its
size is different, so its contents must have been modified since it was uploaded. Yet, neither is true, the
file is the same as the local source file, and it has not been changed in any way. And here is the
problem, how do you tell when a file has really changed, and how can you successfully compare local
and remote files?
The solution is the SyncDB tracking file.
SyncDB file
The SyncDB file records the source and target file attributes like date & size for later use, AFTER
successful transfer. So we record the new size and date of the file on the server. Notice that we do
not care if and when these attributes are different than the values on the local file, but we simply record
the new attribute values. This information is saved to the SyncDB file, and used the next time when the
sync is run.
The next time the sync task is run, the saved SyncDB info is compared to the current source and target
file attributes. If the current local file attributes are same as values in the SyncDB file, then the local file
has not been modified since the last run. Similarly, if the current remote file attributes are the same as
the values in the SyncDB file, then the remote file has not been modified since the last sync either. If
neither file's attributes have changed, then there is no need to transfer the file.
Solution to the problem: Both the file's date and size were changed when the file was
uploaded
As we just record the new date value the file gets on the server, it does not matter what the time
difference is between the local and server computer clocks, we can always detect when the date has
changed since the last run. Similarly, as we just record the new size the file gets on the server, it does
not matter how the remote server stores ASCII files, and how much different these file sizes are when
uploaded; we can always detect when the size has changed since the last run.
The above logic relies on the fact that we know when a file was uploaded successfully, so a size
difference is not due to a transfer error where only part of the file was transferred. Therefore, if a file has
transfer errors (even after multiple retries), we do not record its date and size in the SyncDB file, and
therefore the next time the sync is run, the file is forced to be transferred.
Syncing folders for the first time when they are already in sync
When running a sync for the first time between two folders that are already in sync, all of the files might
be flagged for transfer. This is because the file sizes and/or dates are different in the source and target,
and there is no SyncDB file yet available to assist in the file comparison. This is a problem if there are
gigabytes of data to transfer. Fortunately, there is an option on the Edit Task > Comparison tab that
helps in these situations. This option is "Only reset SyncDB file on the next sync run, do not transfer
any files."
When checked, the software rebuilds the SyncDB tracking file by scanning through all of the files on the
source and target. All of the files found on both sides are considered to be in sync, and are not
transferred after this reset. This reset sets a starting point for tracking changes to the files, and only
changes occurring after this reset will be considered for transfer. This check box clears itself
automatically after rebuilding the SyncDB tracking file.
© SiteDesigner Technologies, Inc.
78
BatchSync Secure FTPS/SFTP
SyncDB file details
The SyncDB file is created after each sync by recording the file attributes of all the successfully
transferred files. The SyncDB file is saved to the same folder as the task file, with the same file name,
but using the .SDB extension. So if the task file is
C:\SyncTasks\Upload Web Site.STF
then the SyncDB file is saved as
C:\SyncTasks\Upload Web Site.SDB
The following attributes are saved to the SyncDB file:
·
·
·
·
Local file date & time
Local file size
Remote file date & time
Remote file size
When running the sync, BatchSync checks whether the SyncDB file exists for the sync task. If it does,
the file attributes are loaded and then compared to both the local and remote files to see whether the
current attributes are the same as those recorded in the SyncDB file. The following comparisons are
made:
·
·
·
·
If Current Local file date & time <> SyncDB Local file date & time => Local file has changed
If Current Local file size <> SyncDB Local file size => Local file has changed
If Current Remote file date & time <> SyncDB Remote file date & time => Remote file has changed
If Current Remote file size <> SyncDB Remote file size => Remote file has changed
These comparisons are used when deciding whether the file should be transferred, and in what direction:
· One-way sync from local -> remote, upload file if either local or remote file changed
· One-way sync from local <- remote, download file if either local or remote file changed
· Two-way sync local <-> remote, transfer file if either local or remote file changed, transfer newer file
(either local or remote)
When SyncDB is not used
You can disable SyncDB via Task options. If SyncDB is disabled, then files are compared using the
rules set in the Comparison-tab of Task options. In this case, BatchSync cannot track changes to files,
so it does not know when conflicts occur. Also it is possible for file size differences, system clock
differences, and time zone differences to cause problems when BatchSync tries to determine what files
need to be transferred.
Normally it is highly recommended to keep SyncDB enabled.
5.13
Options
General
© SiteDesigner Technologies, Inc.
Reference Manual
79
Files transferred in ASCII mode when Auto-transfer mode is selected in Server Options
This field contains a list of filenames that will be transferred in ASCII mode. Use semicolons to separate
entries. The ASCII mode is automatically used for all files matching the entries in this list, if Edit Task >
Edit Server > File transfer mode > Auto is selected.
Mouse double-click action in main window
Selected action is taken when you double-click a sync task in the main window task list.
Generate a warning message in logs if file transfer is retried
When checked, software adds a warning message to the transfer and error logs (if extra logging is
enabled for the sync task in Edit Task > Logs-tab > Enable transfer/error logging). The warning message
is generated only if file transfer succeeds, but it's interrupted and retried during the transfer. If file transfer
does not succeed, error message is always generated, regardless of this setting. So with this setting
enabled, message shown in the error log looks like this:
WARNING: RetryCount:2 Transferred 480 MB C:\backup\bigfile.dat ->
/Upload/backup/bigfile.dat
This message means that bigfile.dat was successfully transferred, but it was interrupted (for some
reason) during the transfer two (2) times, so there were 2 retries during the transfer. But with retries, file
was transferred in full. This is different to error message, that looks like this:
ERROR: Connection timeout (40421) RetryCount: 5 None C:\backup\bigfile.dat ->
/Upload/backup/bigfile.dat
This message means that bigfile.dat was not successfully transferred, but it was interrupted during the
transfer 5 times (and sync task has max limit 5 for retries in Edit Task > Edit Server > Timeouts-tab >
Retry count max). This error message is always added to the logs, regardless of this check box setting.
History Log
The history log contains run info and statistics about all of the sync tasks that were run on this
computer. You can view this history log by clicking the History button on the left hand side of the main
window. This log is shared by all tasks, and it's always enabled, so you cannot disable it.
History log folder
The history log files are written to the folder specified in this field.
Max number of history items
This setting specifies the maximum number of history entries available in the History pane. The older
entries over this max limit are automatically deleted. We recommend that you keep this setting below
1000, as a larger setting will slow down the program startup.
Fonts
The Sync/Sync Preview window uses these fonts and colors to display the list of files to download,
upload and delete. The files that won't be transferred are the ones that are already in sync.
© SiteDesigner Technologies, Inc.
80
BatchSync Secure FTPS/SFTP
Messages
Show message box window
The software displays a message box window before or after certain actions are taken. You can control
what messages you want to see, and what messages you think are not necessary and maybe just slow
down your work.
Show notification popup message
Notification popup messages are shown in the lower right hand corner of the computer screen, in the
notification area above the task bar. These messages alert you to the completion of a sync preview or
sync run. Popups are handy in cases like when a sync is run in the background, and you want to be
notified when the sync run is complete.
Note! Notification popup messages are only shown when running a sync task in Task Editor. They are
not shown when running syncs with the command line SYNC.EXE tool.
5.14
SSH public key authentication
BatchSync can use a public key authentication method for SSH logins. In this method, the public/private
key pair is used to authenticate the user instead of a password. This method provides better safety by
preventing brute force SSH attacks when password-based authentication methods are disabled on the
server.
NOTE! The term "public key authentication" is somewhat misleading, as this authentication method uses
a public & private key pair to perform authentication:
· Public key: This stays always on the SSH server
· Private key: This stays always on the client, i.e. BatchSync holds the private key
1. Generate new public/private key pair
First, you need to generate a new public/private key pair, like this:
Go to Options > SSH Security tab
· Click the Generate new key pair button
· Key generation window opens
· Select options for new key pair (the default values usually work fine)
· Enter passphrase to encrypt private key locally
· Enter filenames for both private and public key (or use default values)
· Select key format: openssh or ssh.com
· Click the Generate button
· Now the new key pair is ready for use
Alternatively you can generate the key pair on your ssh server
© SiteDesigner Technologies, Inc.
Reference Manual
81
2. Upload new PUBLIC key to the server
Upload the just-generated public key to the server. You can see the path for the file in the text field. The
default filename for the generated public key is Identity.pub. Do NOT upload the PRIVATE key.
3. Add key to the server's list of authorized keys
Before the key pair can be used, the public key must be added to the SSH server's list of approved keys.
Usually this can be done by adding the public key to the authorized_keys file. This file contains all of
the public keys for the user. You can usually find this file at $HOME/.ssh/authorized_keys.
NOTE: The location of the file is system dependent. Please consult your SSH server user manual for
settings needed to turn on the public key authentication.
You can add the uploaded Identity.pub file to the authorized_keys file with the command:
cat Identity.pub >> authorized_keys
4. Make sure that server uses public key authentication
The SSH server must be configured to use public key authentication on SSH logins. Usually, this means
editing the
/etc/ssh/sshd_config file to turn on the public key authentication. For example, the settings can be:
PasswordAuthentication
PubkeyAuthentication
AuthorizedKeysFile
no
yes
%h/.ssh/authorized_keys
After editing, restart the sshd server to re-read the configuration sshd_config file, something like:
sudo /etc/init.d/sshd restart
or
sudo service ssh restart
NOTE! The settings above are examples, and the settings you need are SSHD server specific. Please
consult the SSH server documentation for more info.
5. Turn on public key authentication at the sync task level
· Select the sync task that should use public key authentication from the task list. Then, select the Edit
Task > Edit server > SFTP-tab > Authentication method for SFTP logins: Public Key.
· Select PRIVATE key file you generated in step 1.
· Enter same passphrase that you entered when you generated the key pair in step 1.
NOTE! Click Load private key button to verify that the private key can be loaded successfully.
NOTE! A login password in General-tab is not used or needed on logins when public key authentication
is enabled.
© SiteDesigner Technologies, Inc.
82
BatchSync Secure FTPS/SFTP
6. Ready
Test sync task by running the sync preview to verify that login works properly.
Alternatively you can generate the key pair on your ssh server
You can also use public/private key pair that was generated on your ssh server. Following instructions
are for linux mint, but quite similar steps can be followed on other linux servers to generate key pair.
Create .ssh directory under your home directory if it does not already exist
mkdir ~/.ssh
chmod 700 ~/.ssh
cd .ssh
Generate key pair
ssh-keygen -t rsa
Add public key to authorized_keys file
cat id_rsa.pub >> authorized_keys
Download private key
Download private key to the computer running BatchSync, and save it to C:\ProgramData\Sync\SSH2
folder. After that, you should delete private key on the server.
Load it to the sync task for use
Edit sync task to use public key authentication as shown above in step 5.
5.15
Task Optimizer
File transfer speed is dependent on many factors, like network connection speed, round-trip latency,
server load and client load to name a few. BatchSync has a Buffer Size - setting, that can greatly affect
the transfer speed. Task Optimizer helps you to find optimum Buffer Size-setting for your network
configuration. It does this by uploading and downloading a set of files with different sizes, with different
Buffer Size settings, and measures the transfer speed. Results are shown in a table where you can find
the best setting for your needs.
To run the test
1.
2.
3.
4.
5.
Select a set of buffer sizes to try by checking check boxes.
Select the file sizes that most closely resembles your common file sizes.
Click Run Optimizer to start the test
After test run completes, find the optimal Buffer Size setting from the table
Close Task Optimizer, and set new Buffer Size setting for the task in Edit Task > Edit Server >
© SiteDesigner Technologies, Inc.
Reference Manual
83
Options 2-tab > Buffer Size-field.
The screen shot below shows test run results against Linux Mint SSH server. The Buffer Size = 128KB
gives clearly the fastest download speeds, so this value is chosen for the task Buffer Size.
5.16
Volume Shadow Copy Service (VSS)
Overview
The Volume Shadow Copy Service (a.k.a Volume Snapshot Service, VSS) is a framework to allow
volume backups to be performed while applications on a system continue to write to the volumes.
Backing up and restoring critical business data can be very complex due to the following issues:
· The data usually needs to be backed up while the applications that produce the data are still running.
This means that some of the data files might be open, locked or they might be in an inconsistent
state.
· If the data set is large, it can be difficult to back up all of it at one time.
© SiteDesigner Technologies, Inc.
84
BatchSync Secure FTPS/SFTP
Correctly performing backup and restore operations requires close coordination between the backup
applications, the line-of-business applications that are being backed up, and the storage management
hardware and software. The Volume Shadow Copy Service (VSS), which was introduced in Windows
Server® 2003, facilitates the conversation between these components to allow them to work better
together. When all the components support VSS, you can use them to back up your application data
without taking the applications offline.
VSS coordinates the actions that are required to create a consistent shadow copy (also known as a
snapshot or a point-in-time copy) of the data that is to be backed up.
Summary: VSS makes it possible to copy/backup all files in the system, even if they are locked and inuse.
Please read more about VSS:
· Wikipedia: Shadow Copy
· Microsoft TechNet
VERY IMPORTANT! The VSS is part of the operating system, not BatchSync, so we do not
provide any technical support for using VSS or methods described here. But we try to
demonstrate here how to use VSS together with SYNC.EXE to backup/transfer in-use/locked
files in the system.
Using on Windows XP and Windows Server 2003
The Volume Snapshot Service was first added to Microsoft Windows in Windows XP; this version of VSS
is used by NTBackup, however it can only create non-persistent snapshots (a temporary snapshot,
usually used for creating a file-based backup or more generally, accessing copies of files that have been
locked by applications for editing). Due to this limitation, using VSS on these systems is not described
here, while it is possible.
Windows Vista, Server 2008/2012, Windows 7, 8.x and later
These operating systems fully support creating persistent snapshots. But supporting tools are badly
lacking, so we use VSHADOW.EXE utility for using and creating snapshots (you can also use
DISKSHADOW.EXE on Server 2008). VSHADOW.EXE utility is from the VSS SDK from Microsoft. There
is a specific version for each windows version (and 32bit/64bit editions), and we have created a zip file
containing different versions. This ZIP file also contains a documentation for this utility. Download it from
here
· http://sitedesigner.com/dnl/vshadow.zip
Get the copy from the zip for your system and rename it as VSHADOW.EXE. To make examples
simple, copy VSHADOW.EXE to same folder containing SYNC.EXE (path is C:\Program
Files\BatchSync\ or C:\Program Files\BatchSync Secure\).
Creating a snapshot
For example, lets say that we want to transfer all files under c:\Windows\System32 folder. This folder
© SiteDesigner Technologies, Inc.
Reference Manual
85
contains lot of files that are in use and locked, so they cannot be copied normally. To make all files
under this path readable, we need to create a snapshot (=shadow copy) of the C: volume. So even if we
want to access only single subfolder, we need to create a permanent snapshot for a whole volume. To
make this happen, open a command prompt with administrator privileges. Then enter command:
C:\Program Files\BatchSync Secure>vshadow -p -script=setvar.cmd C:
VSHADOW.EXE 2.2 - Volume Shadow Copy sample client
Copyright (C) 2005 Microsoft Corporation. All rights reserved.
(Option: Persistent shadow copy)
(Option: Generate SETVAR script 'setvar.cmd')
(Option: Create shadow copy set)
- Setting the VSS context to: 0x00000009
(Gathering writer metadata...)
(Waiting for the asynchronous operation to finish...)
Initialize writer metadata ...
Discover directly excluded components ...
- Excluding writer 'BITS Writer' since it has no selected components for restore
.
- Excluding writer 'MSSearch Service Writer' since it has no selected components
for restore.
- Excluding writer 'Shadow Copy Optimization Writer' since it has no selected co
mponents for restore.
Discover components that reside outside the shadow set ...
Discover all excluded components ...
Discover excluded writers ...
Discover explicitly included components ...
Verifying explicitly specified writers/components ...
Select explicitly included components ...
* Writer 'System Writer':
- Add component \System Files
* Writer 'ASR Writer':
- Add component \ASR\ASR
- Add component \Volumes\Volume{341603ab-9a4f-11dc-9040-806e6f6e6963}
- Add component \Volumes\Volume{341603aa-9a4f-11dc-9040-806e6f6e6963}
- Add component \BCD\BCD
- Add component \Disks\harddisk0
* Writer 'WMI Writer':
- Add component \WMI
* Writer 'COM+ REGDB Writer':
- Add component \COM+ REGDB
* Writer 'Registry Writer':
- Add component \Registry
Creating shadow set {e6b9617c-6e02-461b-8b76-a164e399beaa} ...
- Adding volume \\?\Volume{341603aa-9a4f-11dc-9040-806e6f6e6963}\ [C:\] to the s
hadow set...
Preparing for backup ...
(Waiting for the asynchronous operation to finish...)
(Waiting for the asynchronous operation to finish...)
Creating the shadow (DoSnapshotSet) ...
(Waiting for the asynchronous operation to finish...)
(Waiting for the asynchronous operation to finish...)
Shadow copy set successfully created.
List of created shadow copies:
© SiteDesigner Technologies, Inc.
86
BatchSync Secure FTPS/SFTP
Querying all shadow copies with the SnapshotSetID {e6b9617c-6e02-461b-8b76-a164e
399beaa} ...
* SNAPSHOT ID = {f50514b6-1208-4d42-88a4-e822311f2d2f} ...
- Shadow copy Set: {e6b9617c-6e02-461b-8b76-a164e399beaa}
- Original count of shadow copies = 1
- Original Volume name: \\?\Volume{341603aa-9a4f-11dc-9040-806e6f6e6963}\ [C:
\]
- Creation Time: 20.1.2011 12:19:49
- Shadow copy device name: \\?\GLOBALROOT\Device\HarddiskVolumeShadowCopy23
- Originating machine: Kannettava
- Service machine: Kannettava
- Not Exposed
- Provider id: {b5946137-7b9f-4925-af80-51abd60b20d5}
- Attributes: No_Auto_Release Persistent Differential
Generating the SETVAR script (setvar.cmd) ...
- Mark all writers as successfully backed up...
Completing the backup (BackupComplete) ...
(Waiting for the asynchronous operation to finish...)
(Waiting for the asynchronous operation to finish...)
Snapshot creation done.
Now snapshot for C: is created.
Execute setvar.cmd
The previous call to VSHADOW.EXE also created a setvar.cmd file (look at the command line scriptparameter), execute it like this:
C:\Program Files\BatchSync Secure>setvar
[This script is generated by VSHADOW.EXE for the shadow set {e6b9617c-6e02-461b-8b76a164e399beaa}]
C:\Program Files\BatchSync Secure>SET SHADOW_SET_ID={e6b9617c-6e02-461b-8b76a164e399beaa}
C:\Program Files\BatchSync Secure>SET SHADOW_ID_1={f50514b6-1208-4d42-88a4e822311f2d2f}
C:\Program Files\BatchSync Secure>SET
SHADOW_DEVICE_1=\\?\GLOBALROOT\Device\HarddiskVolumeShadowCopy23
Now we can access created snapshot using %SHADOW_ID_1% environment variable (we need this on
the next step).
Map snapshot to drive letter
Then map new snapshot to available drive letter, like in this example we map it to X:
C:\Program Files\BatchSync Secure>vshadow -el=%SHADOW_ID_1%,X:
© SiteDesigner Technologies, Inc.
Reference Manual
87
VSHADOW.EXE 2.2 - Volume Shadow Copy sample client
Copyright (C) 2005 Microsoft Corporation. All rights reserved.
(Option: Expose a shadow copy)
- Setting the VSS context to: 0xffffffff
- Exposing shadow copy {f50514b6-1208-4d42-88a4-e822311f2d2f} under the path 'X:
'
- Checking if 'X:' is a valid drive letter ...
- Shadow copy exposed as 'X:\'
C:\Program Files\BatchSync Secure>
We can now access the snapshot of the C: drive under X: drive. The X: drive contains static files that can
be copied and backed up even system continues to write to C: drive, and files continue to change. This
is sort of magic that happens behind the scenes.
Run sync task to create an offline backup
Now create Upload.Stf sync task in Task Editor that uploads X:\Windows\System32 to remote server for
offline backup (NOTE: We are using X: drive, not C: drive). Then run it with SYNC.EXE (notice that we are
still using the same command prompt with administrator privileges):
C:\Program Files\BatchSync Secure>sync c:\ProgramData\Sync\Upload.Stf
-----------------------------------------------------------------------------BatchSync Secure FTPS/SFTP 3.0.8
Sync task : C:\ProgramData\Sync\Upload.stf
Direction : OneWayUpload
Source
: X:\windows\system32
Target
: /home/admin/upload/system32
Recursive : Yes
Symlinks : No
Sync task loaded. Running...
-----------------------------------------------------------------------------STATISTICS
No action: 0
Errors: 0
Average transfer speed: 1 855,1 KB/s
Average transfer bandwidth usage (w/ 12% packet+protocol overhead): 16695,6 Kbps
Total time: 20 m 7 secs
Transfer time: 19 m 29 secs
Total bytes transferred: 2117,31 MB (2220156007 bytes)
Folders created:1351
Transferred: 13432 files
-----------------------------------------------------------------------------Sync completed OK
------------------------------------------------------------------------------
After SYNC.EXE completes, all files have been backed up to remote offline storage.
© SiteDesigner Technologies, Inc.
88
BatchSync Secure FTPS/SFTP
Delete snapshot
So snapshot is no longer needed, and we can delete it:
C:\Program Files\BatchSync Secure>vshadow -dx=%SHADOW_SET_ID%
VSHADOW.EXE 2.2 - Volume Shadow Copy sample client
Copyright (C) 2005 Microsoft Corporation. All rights reserved.
(Option: Delete a shadow copy set)
- Setting the VSS context to: 0xffffffff
- Deleting shadow copy set {e6b9617c-6e02-461b-8b76-a164e399beaa} ...
C:\Program Files\BatchSync Secure>
How to automate all this
You can automate all these steps by creating the Upload.cmd file that runs all commands in a
sequence. Upload.cmd looks like this:
CD "C:\Program Files\BatchSync Secure"
vshadow -p -script=setvar.cmd C:
setvar
vshadow -el=%SHADOW_ID_1%,X:
sync c:\ProgramData\Sync\Upload.Stf
vshadow -ds=%SHADOW_SET_ID%
Now you can run it on the command line (remember to have proper access rights, like administrator), or
schedule it with Windows Task Scheduler. When scheduling, again, remember proper access rights, run
it with admin rights, or under LOCALSYSTEM.
Windows Server 2008
Windows Server 2008 ships with official DISKSHADOW.EXE tool that exposes the functionality offered
by the Volume Shadow Copy Service (VSS). So instead of using VSHADOW.EXE shown in this
example, you can use DISKSHADOW.EXE. Highly recommended!
Problems?
The VSS is a very complex system, and there are many things that can go wrong. We do not provide
any technical support for VSS or any methods described here. Google is your best friend when
trying to find more information on this subject.
5.17
Edit Task-window
5.17.1 Sync-tab
One-way sync
One-way sync is most commonly used to create backups. In one-way sync, all of the new and changed
files found on the source are transferred to the target. No changes on the target are transferred to the
source.
© SiteDesigner Technologies, Inc.
Reference Manual
89
You can optionally enable the deletion of any extra files (see the Options tab) found on the target. With
this option enabled, the files that do not exist on the source are also deleted on the target. In this way,
the target is an exact copy of the source.
Notice! You can easily convert a sync task into a file copy task or file move task.
Learn more here.
Two-way sync
Two-way sync ensures that two folders (and their subfolders) remain in sync when files are changed on
both sides. BatchSync does this by scanning all of the files in the source and target folders, and locating
the new and changed files on both sides. It then transfers all of the files that are newer than the
corresponding files on the other side.
You can optionally enable propagated deletions (see the Options tab). With this option enabled, if you
delete a file on one side, BatchSync will propagate this deletion to the other side by deleting this same
file on the other side. In this way, both sides contain exactly the same set of files.
Source and Target
The available source and target types are:
· Local or Network folder. The folder is accessible via a local or network path, like C:\WebRoot or
\\Server\SharedFolder
· FTP, FTPS, and SFTP Server. The folder is accessible via an FTP server (FTP), FTP server with
SSL encryption (FTPS), or SSH2 server using the SFTP protocol.
The following transfer combinations are possible:
· Local or Network folder <-> FTP, FTPS or SFTP Server
· FTP, FTPS, or SFTP Server <-> Local or Network folder
Notice! The support for FTPS and SFTP servers requires the Secure edition.
FTP, FTPS, or SFTP Server <-> FTP, FTPS or SFTP Server transfers are not possible (aka FXP
transfers).
When the Local or Network folder - option is selected, click the
enter the name of the folder in the Folder name-field.
button to browse to the folder or
When the FTP, FTPS, or FTPS Server - option is selected, click the
button to enter server
connection parameters like the server address, username, passwords, etc. In the same window you can
also select the protocol used to make a connection (FTP/FTPS/SFTP). After entering the server
connection parameters, enter the folder name, like /httpdocs or /pub/html, in the Server Folder-field.
You can swap the source and target by clicking the
Edit Server button
© SiteDesigner Technologies, Inc.
button.
90
BatchSync Secure FTPS/SFTP
Each sync task has its own Server Settings. So modifying the server settings in one task does not alter
the server settings in other tasks. You can access server settings via clicking Edit Server button. Server
settings contains following tabs:
·
·
·
·
·
·
·
General-tab
Firewall-tab
Timeouts-tab
Options-tab
Options 2-tab
SFTP-tab
FTPS-tab
Date Variables
Click the Date variables link to add a date variable to the folder name. These date variables can be used
in the source and target folder names to create dynamically changing folder names. Usually, these are
needed when creating a backup sync task, where part of the target folder name is evaluated to current
date values. Read more about date variables here.
Save As
Task files are saved as text files, one task per file. Tasks are saved to the folder indicated in the Save
Task to Folder-field. Enter the filename for the task without the path. You likewise don't need to enter the
.STF extension, it's added automatically.
If you later edit the task, and change its filename here, then the task is saved with a new filename and
the original task file is left intact. In this way you can create multiple tasks by using one task as a
starting point, and saving a copy under a new name.
Description
Enter a free form description for the task. This description is shown in the Details-mode in the main
window.
5.17.2 Options-tab
Include subfolders
If checked, all subfolders are processed in the sync recursively. If you want only a subset of folders to be
included, you can use Exclude filtering (see the Exclude-tab).
Include symbolic links
If checked, processes the symbolic links in unix type machines. The symbolic links are resolved to
either files or folders, and then processed accordingly.
One-way sync, delete extra files/folders on target
© SiteDesigner Technologies, Inc.
Reference Manual
91
This option is used only on one-way syncs. When checked, deletes files and folders from the target that
do not exist on the source. A list of the deleted items is added to the history and transfer logs.
This option cannot be used together with Delete source files after transfer or Move source files to archive
folder options.
One-way sync, delete source files after successful transfer
When checked, it deletes files on the source after they have been 100% successfully transferred to the
target. In other words, it moves files from the source to the target. Files are not deleted on the source if
they are not 100% fully transferred to the target. This feature can be used to create a hot-folder sync
task that will transfer all of the files in the source hot-folder to the destination folder, like this:
C:\OutBox -> ftp.server.com/InBox
As an example, the following files are copied to the C:\OutBox:
Source C:\OutBox
Target ftp.server.com/InBox
\Backup.zip
\Notes.txt
\Doc\ProjectPlan.doc
\Doc\Version.doc
Sync task is run, and here are the results after the sync run:
Source C:\OutBox
Target ftp.server.com/InBox
\Doc (empty folder is not deleted)
/Backup.zip
/Notes.txt
/Doc/ProjectPlan.doc
/Doc/Version.doc
Notice! All of the files in the source subfolders are included in the operation, and corresponding
folders are created on the target, but folders are not deleted on the source after the sync
run. Only the source files are deleted.
Notice! If exactly the same file is copied again to the source, and then the sync task is run, the
file is NOT transferred, nor deleted, if the same file still exists on the target. This is because the
software by default synchronizes files, i.e., transfers them ONLY if identical files do not already
exist on the target. If this is not what you want, but instead, you want to transfer and delete files
on every sync run, then you can go to:
Edit Task > Comparison tab
> Uncheck Use SyncDB check box
> Uncheck Compare Dates check box
With these changes, no comparisons are made, and all of the files that show up in the
C:\OutBox are always moved to the /InBox.
© SiteDesigner Technologies, Inc.
92
BatchSync Secure FTPS/SFTP
To automate this hot-folder synchronization, you need to schedule the sync task to be run by the
Windows Task Scheduler every Nth minute. With this kind of schedule, the sync task is run even when
no new files are found in the source folder. However, this does not matter, since in that case no transfers
or deletions are performed.
This option cannot be used together with Delete extra files on the target or Move source files to archive
folder options.
One-way sync, move source files to archive folder after successful transfer
When checked, it moves files on the source after they have been 100% successfully transferred to the
archive folder. Files are not moved on the source if they are not 100% fully transferred to the target. You
can use date variables in archive folder name to make it easier to identify archives. This feature can be
used to create a sync task that will transfer all of the files in the source, and creates a backup copy of
the source files on source, like this:
ftp.server.com/OutBox -> C:\InBox
And having Archive folder: /Archive/%TODAY[yyyy-mm-dd]
As an example, the following files are copied to the ftp.server.com/OutBox:
Source ftp.server.com/OutBox
Target C:\InBox
/SalesData.zip
/Readme.txt
/SalesByArea/SalesNY.doc
/SalesByArea/SalesCA.doc
Sync task is run, and here are the results after the sync run:
Source ftp.server.com/OutBox
Target C:\InBox
/SalesByArea (empty folder is not deleted)
\SalesData.zip
\Readme.txt
\SalesByArea\SalesNY.doc
\SalesByArea\SalesCA.doc
Source ftp.server.com/Archive/2014-04-15
/SalesData.zip
/Readme.txt
/SalesByArea/SalesNY.doc
/SalesByArea/SalesCA.doc
This option cannot be used together with Delete extra files or Delete source files after transfer options.
Notice! Source files are moved to archive folder after transfer, and this move will fail if file with
same filename already exists in the archive folder. Therefore it's usually best to use date
variables in the archive folder name to create new archive for each transfer. If you run same task
multiple times per day, you can add time component to the date variable, like this:
Archive folder name: /Archive/%TODAY[yyyy-mm-dd Hh-Nn-Ss]
© SiteDesigner Technologies, Inc.
Reference Manual
93
Two-way sync, propagate file/folder deletions on one side to the other side
This option can be used to enable true bi-directional syncs. When enabled, BatchSync tracks the
deletions on both sides, and repeats any deletion made on one side on the other side.
Number of threads
BatchSync is multithreaded software. This means that it can make multiple simultaneous connections to
the server to transfer multiple files in parallel. This normally greatly increases the speed of transfers and
reduces the time needed to run a sync task. Normally 4 to 6 threads give the best performance, but you
can experiment with different values to find the optimum setting for your case. The optimum value is
dependent on various factors, like network speed, server load, server configuration, network roundtrip
latencies, etc.
· In InstantSync, the maximum number of threads is 10.
· In BatchSync, the maximum number of threads is 25 (read note below).
Notice! In BatchSync, the max number of threads is 25. But when running sync task in Task
Editor, the number of threads is limited to 10. Therefore, to utilize the maximum number of
threads, use the command line SYNC.EXE tool to run sync tasks.
Notice! Some servers do not allow more than one connection from one computer (=single IP
address). In that case set this value to 1.
5.17.3 Include-tab
Include filtering by file/folder name
Match case in file/folder name filters
When checked, compares file and folder names in a case sensitive manner. So INDEX.HTML is not
considered the same as index.html. When not checked, the filename INDEX.HTML = index.html =
Index.Html = InDeX.HtMl
File name matches filter entered below
By default, all files are included in the sync. If you want to select a subset of files, select this check box
and enter a list of filenames to be included in the sync. Separate multiple filenames with semicolons (;).
You can use wildcard characters in filters, use full, partial, or no path, etc. Read more here.
Folder name matches filter entered below
By default, all folders are included in the sync. If you want to select a subset of folders, select this check
box and enter a list of folder names to be included in the sync. Separate multiple folder names with
semicolons (;). You can use wildcard characters in the filters, use full, partial, or no path, etc.
Read more here.
Include filtering by file size, date & attributes
© SiteDesigner Technologies, Inc.
94
BatchSync Secure FTPS/SFTP
All filters in this tab are ANDed together, so in order for a file to be included in the sync, it must match all
the filters that are active (=checked). The full formula is
INCLUDE = FILENAME AND SIZE AND DATE AND (FILE ATTRIBUTES ORed together)
File size is
When checked, the file size is compared to this filter value. Enter the size as bytes.
1024 Bytes = 1 Kilobyte (KB)
1048576 Bytes = 1 Megabyte (MB)
1073741824 Bytes = 1 Gigabyte (GB)
File changed
When checked, the file time stamp is compared to this filter value. Use the "day(s) ago" option to enter
longer periods of time, like
7 Days = 1 Week
14 Days = 2 Weeks
21 Days = 3 Weeks
30 Days = 4 Weeks or 1 Month
60 Days = 2 Months
90 Days = 3 Months or 1 Quarter
365 Days = 1 Year
730 Days = 2 Years
1095 Days = 3 Years
File date is between
When checked, the file time stamp must be between these two values.
File attributes
When checked, the file's attributes must contain all the selected attributes, but it can also have other
extra attributes. So if the Read-Only check box is selected, a file that has Archive and Read-Only
attributes set will be included in the sync.
5.17.4 Exclude-tab
Exclude filtering by file/folder name
Match case in file/folder name filters
When checked, compares file and folder names in a case sensitive manner. So INDEX.HTML is not
considered the same as index.html. When not checked, the filename INDEX.HTML = index.html =
Index.Html = InDeX.HtMl
© SiteDesigner Technologies, Inc.
Reference Manual
95
File name matches filter entered below
By default, no files are excluded from the sync. If you want to exclude one or more files or folders, select
this check box and enter a list of filenames to be excluded from the sync. Separate multiple filenames
with semicolons (;). You can use wildcard characters in the filters, use full, partial, or no path, etc.
Read more here.
Folder name matches filter entered below
By default, no folders are excluded from the sync. If you want to exclude one or more folders, select this
check box and enter a list of folder names to be excluded from the sync. Separate multiple folder names
with semicolons (;). You can use wildcard characters in the filters, use full, partial, or no path, etc.
Read more here.
Exclude filtering by file size, date & attributes
All filters in this tab are ANDed together, so in order for a file to be excluded from the sync, it must
match all the filters that are active (=checked). The full formula is
EXCLUDE = FILENAME AND SIZE AND DATE AND (FILE ATTRIBUTES ORed together)
File size is
When checked, the file size is compared to this filter value. Enter the size as bytes.
1024 Bytes = 1 Kilobyte (KB)
1048576 Bytes = 1 Megabyte (MB)
1073741824 Bytes = 1 Gigabyte (GB)
File changed
When checked, the file time stamp is compared to this filter value. Use the "day(s) ago" option to enter
longer periods of time, like
7 Days = 1 Week
14 Days = 2 Weeks
21 Days = 3 Weeks
30 Days = 4 Weeks or 1 Month
60 Days = 2 Months
90 Days = 3 Months or 1 Quarter
365 Days = 1 Year
730 Days = 2 Years
1095 Days = 3 Years
File date is between
When checked, the file time stamp must be between these two values.
© SiteDesigner Technologies, Inc.
96
BatchSync Secure FTPS/SFTP
File attributes
When checked, the file's attributes must contain all the selected attributes, but it can also have other
extra attributes. So if the Read-Only check box is selected, a file that has the Archive and Read-Only
attributes set will be included in the sync.
5.17.5 Comparison-tab
Use SyncDB
SyncDB is a special tracking file that records the file size and date for all files in the sync. On the next
run, this recorded info is compared to the present size and date values. If the values are different, then a
file has changed since the last sync and will be transferred. Read more here.
Only reset SyncDB file on the next sync run, do not transfer any files
When running a sync first time between two folders where folders are already in sync, possibly all files
are flagged for transfer. This is because file sizes and/or dates are different in the source and target, and
there is no SyncDB yet available to assist in the file comparison. This is a problem if there are gigabytes
of data to transfer.
When this option is checked, software rebuilds the SyncDB tracking file by scanning through all files on
source and target. All files found on both sides are considered being in sync, and are not transferred after
this reset. This reset sets a starting point for tracking changes to the files, and only changes occurring
after this reset will be considered for transfer. This check box clears itself automatically after building the
SyncDB tracking file.
Rules if file is not in SyncDB
These rules are used if the SyncDB feature is disabled, when running a sync for the first time or when a
file cannot be found in SyncDB, i.e. if a file is new. If you disable SyncDB, then these rules are always
used when running the sync task.
Rules for one-way sync
Compare dates. Transfer if source date is newer/the same/older/different than target
When checked, compares the date/time of the source and target files. The default is newer, which
means that if the source file is newer than the target the file is transferred.
Compare sizes. Transfer if source size is smaller/the same/bigger/different than target
When checked, compares the size of the source and target files. By default it is not checked, so file
sizes are not compared.
Time Comparison
These extra rules are used to compare file and folder time stamps.
Consider time to be equal when there is a max NN secs difference
© SiteDesigner Technologies, Inc.
Reference Manual
97
When dealing with files in network shared folders, file dates can be different by 2 secs even when the
files are exactly the same. So a date stamp is not perfectly accurate in all situations. Therefore, it is
suggested that this value be set to 2, so that files with a max 2 second difference in time stamp are still
considered to have the same date stamp.
Server does not report seconds in time stamp, so ignore seconds
The majority of the FTP and SFTP servers in use worldwide do not include seconds in file time stamps.
Therefore, it's recommended to check this option to compare file times without seconds.
Ignore Daylight Saving Time exact 1 hour difference in file times
All file time stamps change by a 1 hour offset when a computer switches to/from Daylight Saving Time
(DST). This option ignores this exact 3600 second difference in file time stamps.
Notice! If you want to always copy all files, making the task a copy task, instead of a sync
task, you can do the following:
1.
2.
3.
Disable the SyncDB feature
Uncheck the Compare dates check box
Uncheck the Compare sizes check box
Now when the sync is run, no file dates or sizes are compared, so the files are always
transferred. This means that even when an identical file already exists on the target, the source
file is still transferred.
5.17.6 Conflicts-tab
A conflict occurs when both the source and target files have changed since the last sync run. This raises
a problem, as overwriting either of the files will result in the changes made to it disappearing. In general,
this should never happen. Better still, the file work flow, the folder structure, and the sync tasks should
be designed to ensure that this never happens. The settings on this tab help you to log conflict
situations. This provides you with a good tool to help in figuring out how to prevent conflicts from
happening in the future.
The handling of conflicts requires that BatchSync can detect the conflicts. To properly detect conflicts,
SyncDB must be enabled (see Comparison-tab), as the SyncDB file stores the state of each file after
every sync run.
Conflicts in one-way syncs
Conflicts in a one-way sync occur when the software detects that the source file has changed, but also
that the target file has changed. If we "Always transfer source file to target", we potentially overwrite the
changes made to the target file. But if your sync scenario is set up so that changes should only occur to
source files, and never to target files, then it's safe to overwrite any possible changes in the target.
If conflict occurs, perform action specified above and write line to the error log
When checked, an error message is written to the error log stating the name of the folder and of the
© SiteDesigner Technologies, Inc.
98
BatchSync Secure FTPS/SFTP
conflicting file.
Conflicts in two-way syncs
Conflicts in two-way syncs occur when the software detects that a file exists on both the source and
target, and that both files have changed since the last sync. If the "Transfer newer file" option is selected,
it overwrites the changes made to the older file. If you want to ensure that no changes are ever
overwritten, select the "Skip file" option. But this then means that folders are not in sync after the task is
run (=all files are NOT identical).
If conflict occurs, perform action specified above and write line to the error log
When checked, an error message is written to the error log stating the name of the folder and of the
conflicting file.
Locked files
Locked files are files that are currently open and in use by some other program or by operating system.
Therefore they cannot be opened and uploaded. With this setting you can control how locked files are
handled.
Report locked files as an error
Software tries to upload a file, and if it is locked, it will flag this file having an error. You will see the task
run in the history pane with ERROR flagging.
Do not report locked files as an error, just skip them
Software tries to upload a file, and if it is locked, it will not flag this file with an error, but instead, it will
skip it and write a warning message to the transfer log. You will see the task run in the history pane with
OK flagging.
NOTE! Both options will try to open locked file as many times as specified in Edit Task > Edit Server >
Timeouts > Retry count max -value. And it will have Edit Task > Edit Server > Timeouts > Transfer retry
delay (secs) between each retry.
Read-only and hidden files
When checked, BatchSync will reset read-only and hidden file attributes to allow file to be downloaded.
Otherwise file download will result in an error to be generated.
5.17.7 Logs-tab
BatchSync tasks are often run unattended by the Windows Task Scheduler. Therefore, it's often
necessary to be able to track which files were transferred, in what direction, and what errors, if any,
occurred during the sync runs. The settings on this tab control what log files are written during the sync
runs.
Notice: BatchSync always updates the global run history log file, which contains run info and statistics
© SiteDesigner Technologies, Inc.
Reference Manual
99
about all of the sync tasks that were run on this computer. You can view this history log by clicking the
History button on the left hand side of the main window.
More information about log files can be found here.
Write log files to folder:
The folder where all log files are written. Sometimes it is most convenient to create separate subfolders
for the log files for each task, and sometimes it is more appropriate to write them all to the same folder.
Enable transfer logging
When checked, a transfer log is created. This log file contains a list of all the files transferred, and any
errors that occurred during the transfer.
Filename
Filename for the transfer log without the path. This filename can contain macros. Read more here.
Max size (KB)
If "Rotate w/ Max Size" is selected, a log file is renamed to Filename.bak.log and a new log file is
created when the file size reaches this limit. So Filename.log contains the most recent log entries, and
Filename.bak.log contains older info.
Enable FTP cmd logging
The FTP cmd log contains FTP protocol commands sent to the server by BatchSync and responses
from the FTP server. This log is mostly needed when troubleshooting the sync tasks.
Enable error logging
The error log contains all file transfer warnings and errors. If no warnings or errors occur during the sync
run, then this file is not created. In other words, if this file is created, then there are one or more
warnings/error messages in the file.
5.17.8 Email-tab
Notice! Email notifications are ONLY available in the BatchSync product. It is not possible to
send email notifications with InstantSync.
BatchSync can send an email notification after a sync run completes. In order to receive notifications,
you must enter the proper values in these fields. If you cannot remember the correct values for an SMTP
server, take a look at the settings for your email client (Outlook, Thunderbird, Eudora etc.). The proper
values for the SMTP server can be found there.
© SiteDesigner Technologies, Inc.
100
BatchSync Secure FTPS/SFTP
You can also use SMTP server of many free email providers, like Gmail and Yahoo, for sending emails.
In cases where sync tasks are run unattended as scheduled, it is often necessary to be notified if a sync
task fails. You can get this kind of notification by enabling the "Send email after sync run completes with
errors" option.
Send email after successfully completed sync run: Always
BatchSync sends a "Sync OK" email message after a sync completes with no errors. This email
message contains task statistics, like the number of files transferred, the time taken, and the average
transfer speed. You can modify the email subject and content with the options described below. An
email is sent whether files were transferred or not.
Send email after successfully completed sync run: Only if files were transferred
The same as above, but an email is sent only if one or more files were transferred.
Send email after sync run completes with errors
BatchSync sends a "Sync Errors" email message after a sync completes with errors. The email
message contains task statistics, like the number of files transferred, the time taken, and the average
transfer speed.
SMTP Host address
Enter the SMTP server name or IP address. E.g. "smtp.my_isp.com" or "smtp.gmail.com"
SMTP Port
Enter the SMTP server port for connection. Default values are:
· Connection security: None, default port: 25
· Connection security: SSL, default port: 465
· Connection security: STARTTLS, default port: 587
Timeout
Time in seconds BatchSync tries to send an email before giving up. The default value is 15 seconds. You
can disable timeout by setting this value to 0. BatchSync will then wait forever, so this value is not really
recommended. Instead, use a larger timeout if the server is very heavily loaded, like 600 seconds.
Use authentication
Enable this if your SMTP server requires authentication (ESMTP).
© SiteDesigner Technologies, Inc.
Reference Manual
101
Login username and password
SMTP login username and password, only needed when a server requires authentication.
Connection security:
· Connection security: None, email messages are sent as plain text, without any encryption
· Connection security: SSL, (sometimes called SSL/TLS), communication with SMTP server is
encrypted
· Connection security: STARTTLS, communication with SMTP server is encrypted
Please consult your network admin for correct option. If you know what SMTP port is used for sending
emails, this will hint what security settings should be selected. If port 25 is used, select None. If port 465
is used, select SSL. If port 587 is used, select STARTTLS.
For example with Gmail, you can send email with two different sets of settings:
· SMTP host address: smtp.gmail.com, Port: 465, Connection security: SSL
· SMTP host address: smtp.gmail.com, Port: 587, Connection security: STARTTLS
In order to use Gmail as your SMTP server, you need to check Use authentication check box, and enter
your google account username and password.
From email address
Enter valid email address. This appears in the sender field of the email message that you receive. You
can add the display name "Sync Task" like this:
Sync Task <[email protected]>
where Sync Task is shown as the sender in your email client (Outlook, Thunderbird, etc.) instead of the
actual email address.
To email address
The notification email is sent to this email address. You can enter multiple addresses by separating
them with commas. Examples:
[email protected]
[email protected]
[email protected], [email protected], [email protected]
Subject
This field is used as an email subject-line. You can use the following variables to create a subject-line
that best fits your needs:
© SiteDesigner Technologies, Inc.
102
BatchSync Secure FTPS/SFTP
Variable
Description
%STAT_TASK_FILENAME
Sync task filename without path, like "Backup.stf"
%STAT_TASK_FILENAME_WITHPATH
%STAT_STATUS
Sync task filename with full path, like
"C:\tasks\Backup.stf"
Sync status "OK" or "Errors"
%STAT_STATUS_MSG
Sync status "Sync OK" or Sync Errors"
%STAT_NO_ACTION
%STAT_FILES_TRANSFERRED
Number of files or folder with no action, they were already
in sync, like "123"
Number of errors, like error connecting, transferring,
creating a folder, etc.
Number of files transferred, like "123"
%STAT_FILES_DELETED
Number of files deleted, like "123"
%STAT_FOLDERS_CREATED
Number of folders created, like "123"
%STAT_FOLDERS_DELETED
Number of folders deleted, like "123"
%STAT_ALL_OPERATIONS
Total number of all operations, like "123"
%STAT_TRANSFER_TIME
File transfer time (not including the time taken by sync
preview), like "35 secs"
Total sync run time, like "59 secs"
%STAT_ERRORS
%STAT_TOTAL_TIME
%STAT_BYTES_TRANSFERRED
%STAT_AVG_SPEED
Total number of bytes transferred, like "2.57 MB
(2697819 bytes)"
Average transfer speed, like "756.4 KB/s"
%STAT_AVG_BANDWIDTH
Average bandwidth usage, like "5807.5 Kbps"
%STAT_VERIFY_RESULT
Verification-tab results: "Transfer results OK",
"ERROR:..."
List of all files transferred, and list of all files with error
message.
%STAT_LIST_OF_FILES
The default subject line is:
%STAT_STATUS_MSG - %STAT_TASK_FILENAME - %STAT_FILES_TRANSFERRED files transferred
and this results in email subjects like this:
Sync OK - UploadWebServer.stf - 18 files transferred
Sync OK - Backup NY Server - 5214 files transferred
Sync Errors - Logfile Download.stf - 0 files transferred
For example, if you are only running a single sync task, you could change this field to:
Transfer %STAT_STATUS, %STAT_FILES_TRANSFERRED files of total %STAT_BYTES_TRANSFERRED
in %STAT_TOTAL_TIME
and this would result in an email subject like this:
Transfer OK, 552 files of total 2.57 MB (2697819 bytes) in 59 secs
Send text/html email
© SiteDesigner Technologies, Inc.
Reference Manual
103
BatchSync uses email template files for text and html notification email messages. These are text files
that can be edited with any text editor, like Notepad. Email templates are by default installed to:
· C:\ProgramData\Sync\Email Templates\text_email.txt
· C:\ProgramData\Sync\Email Templates\html_email.txt
These email templates utilizes same variables as listed above, under Subject heading. Emails are sent
as html mail by default, but if you prefer, you can choose to send them as text only.
You can see a sample of a notification email message below (html formatted email).
Include a list of files transferred in the email message
When checked, a list of all of the file and folder actions are included in the email message body,
replacing %STAT_LIST_OF_FILES variable. Below is a sample of an email message. The grayed text is
part of the email message body that is always included. And the rest of it is a "list of files transferred"
that is included only if this option is checked.
© SiteDesigner Technologies, Inc.
104
BatchSync Secure FTPS/SFTP
© SiteDesigner Technologies, Inc.
Reference Manual
105
5.17.9 Verification-tab
After file transfer completes successfully, BatchSync checks that transfer results are within set limits.
These checks are not made if sync run has other errors.
For example, your scheduled nightly file upload should always transfer exactly 5 files. To verify that
those 5 files are actually successfully uploaded, set up verification like this:
If anything but 5 files are transferred, sync task is flagged with an error, even though there were no actual
transfer errors in the sync run. This will trigger the automatic email notification to be sent, if Send email
after sync run completed with errors is enabled in Email-tab.
5.18
Edit Server-window
5.18.1 General-tab
© SiteDesigner Technologies, Inc.
106
BatchSync Secure FTPS/SFTP
The Edit Server window fields
Required fields are marked with an *
Site label
Free form label for the site, used only for display purposes. E.g. "Web server" or "Company backup
server"
Host name or address *
The server address as a name or IP number. When setting up a web site on a web hosting company's
server, you get this address from them. E.g. "ftp.myserver.com" or "82.108.11.151"
Do not enter prefixes like ftp:// or http://
If Use IPv6 is enabled, you can use IPv6 addresses like "fe80::9981:9452:fea5:bf7c", or host name that
translates to IPv6 address.
Use IPv6
When checked, BatchSync makes connection over IPv6. NOTE! Your internet connection and server
must be IPv6 enabled in order to utilize this feature.
Username *
© SiteDesigner Technologies, Inc.
Reference Manual
107
Login username. When setting up a web site on a web hosting company's server, you get a username
from them. E.g. "80usr5223" or "johndoe"
Password *
Login password. When setting up a web site on the web hosting company's server, you get this
password from them. E.g. "secret" or "5tzP7aK3"
For SFTP protocol you can also use Public Key Authentication for logins. Click SFTP-tab to enable this
setting.
Anonymous Login
When checked, the username "anonymous" and the password "[email protected]" are used to login to
the server.
Protocol
The following protocols are supported:
· FTP. File Transfer Protocol. The default and most widely used protocol. Default port is 21.
· FTPS with SSL (explicit with data). Same as FTP but uses SSL encryption (AUTH TLS) for both
command and data transfer connections. Default port is 21.
· FTPS with SSL (explicit without data). Same as FTP but uses SSL encryption (AUTH TLS) for
command connection only (secures login username and password, but not files transferred). So the
data channel is not encrypted. Default port is 21.
· FTPS with SSL (implicit with data). Same as FTP but uses SSL encryption for both command
and data transfer connections. Default port is 990.
· SFTP using SSH2. Totally different protocol from FTP. Makes connection using SSH protocol and
uses SFTP (Secure File Transfer Protocol) to transfer files. SSH1 servers are not supported, only
SSH2 servers. Default port is 22.
NOTE! All FTP servers do not support FTPS connections. In order to utilize encrypted transfers, the
server must be explicitly set up to support encrypted connections. And most FTP servers are not set up
that way. If your server is owned by a web hosting company, please consult them for the different options
available to you.
Notice! The support for FTPS and SFTP servers requires the Secure edition.
FTP/SSL Protocol - Implicit and explicit modes
In the implicit mode, the server is set up to listen to a specific port (most often 990), and it accepts only
SSL secured connections. This mode is not formally adopted in an RFC, but it is widely supported. Both
command and data channels are automatically secured.
In the explicit mode, the server is usually set up to use port 21, and the server can be configured to
accept both secure (FTPS) and non-secure (FTP) connections. BatchSync initiates a secure connection
with the AUTH TLS command. This mode is formally adopted by an RFC, so for strict compliance to
standards, use the explicit method.
© SiteDesigner Technologies, Inc.
108
BatchSync Secure FTPS/SFTP
Notice! The server configuration determines what modes can be used. So if a server is
configured to support only FTPS implicit on port 990, then you cannot use anything else.
Similarly, if a server only supports FTPS explicit on port 21, then you must select that option.
There is no automation or intelligence in selecting the proper mode, but as the user you need to
know what modes the server uses and supports. So please consult your server administrator for
help in selecting the correct mode and port to use.
Data connection mode
· Passive mode (PASV). Data connection is made from BatchSync to the server. Better option when
dealing with firewalls.
· Active mode (PORT). BatchSync waits for data connection to be made from the server to
BatchSync. Almost always blocked by firewalls.
Nowadays, firewalls are everywhere, and they usually block connections from the internet to a computer
behind a firewall. Therefore PORT mode does not work well in this kind of environment. Some servers are
set up so that they only support PORT mode. Or they only support PASSIVE mode. A majority of them
support either.
There is no performance penalty or any other difference when choosing one mode over the other. So
select the mode that works; most often passive mode works better.
Use following Active mode port range (min-max)
Defines port range in use when Data connection mode: Active mode (PORT) is selected. Most often you
need to set port range to allow FTP/S traffic pass through your firewall (you also need to configure your
firewall to allow inbound traffic for this port range). Enter minimum and maximum port numbers for data
connection. These port numbers are not used when Passive mode (PASV) is selected.
File transfer mode
The FTP protocol supports two different modes to transfers files: ASCII and Binary. The ASCII mode
makes automatic translations to text files and is the most appropriate mode to transfer text files, like
html, text, and log files. The Binary mode transfers files as-is, without any changes. This is for binary
files like executables, pictures, databases, etc. Now you might think, why not send everything as binary,
since then files are not altered at all during the transfer?
The reason for not doing this is that many web servers do not work correctly if, for example, HTML files
are uploaded in binary mode. This is why they must be transferred using ASCII mode. BatchSync
supports Auto-mode, where the transfer mode of the file is determined by its filename extension. The list
of extensions that are transferred in ASCII mode is editable in global settings via the Tools > Options >
Files transferred in ASCII mode-field. Most often it's best to leave this setting on Auto.
If you are transferring files to a server that is running Windows, then no ASCII mode changes are
necessary, so you can select Binary-mode. Also some web servers work fine if html files are transferred
in binary mode. But it does no harm to transfer these files using Auto-mode. So all in all, use Auto-mode
if you do not have a good reason not to use it.
Resume interrupted transfers
© SiteDesigner Technologies, Inc.
Reference Manual
109
The FTP protocol supports a Resume-feature to continue the file transfer in case of failure. For example,
when the connection is dropped in the middle of a big file transfer, BatchSync can reconnect and
continue (i.e. resume) the transfer from the exact position of the failure. The only drawback is that not all
FTP servers support this feature.
When this check box is selected, BatchSync tries to resume the transfer, and if this fails, it starts from
the beginning of the file. If unselected, the transfer is always restarted from the beginning of the file.
5.18.2 Firewall-tab
Most firewalls offer transparent connections, so even when making connections through a firewall, the
user does not need to create any special settings for it. In these cases, you do not need to set any
firewall related options in BatchSync. If your firewall requires special treatment, then the following firewall
types are supported:
· Settings from Internet Explorer. If firewall settings are defined for Internet Explorer, then BatchSync
can use those settings. Then no other settings are required. Settings in Internet Explorer are found
under Tools->Internet Options->Connections->LAN Settings. BatchSync will use anything specified
for "Socks", or for "FTP" if socks isn't specified.
· USER user@site. Connect by sending username and site to connect to in USER command.
· SITE site. Issue separate SITE command when connecting.
· OPEN site. Issue separate OPEN command when connecting.
· Simple relay. Connects to predefined site using simple relay.
· Web CONNECT. Typical WEB proxy (using web CONNECT command) is used.
· Socks 4. Connect using Socks4 proxy. No username or password is required.
· Socks 4a. Connect using Socks4a proxy. No username or password is required.
· Socks 5. Connect using Socks5 proxy. Requires username or password.
5.18.3 Timeouts-tab
All timeout and delay values are in seconds.
Connect timeout
Time to wait for connect to succeed before retrying connect.
Connect retry delay
Wait time between connect attempts.
Command timeout
Time to wait for response to command sent to server before retrying the command.
Transfer timeout
Max idle time (=no data is transferred) during the file transfer before trying to restart the transfer.
Transfer retry delay
When there is an error or timeout during the transfer, software waits this time in secs before attempting
© SiteDesigner Technologies, Inc.
110
BatchSync Secure FTPS/SFTP
to connect and transfer again.
Retry count max
Each file transfer is retried this many times before file is flagged with an error. Set this to 999 to retry
forever, but notice that then the task will be in a loop forever if, for example, the server does not respond.
So it is better to set this value to < 10 as transfer will normally succeed with 10 tries, and if it does not,
there are some real problems that need to be worked out.
Max errors per task
Sets the max limit for total number of errors per task run. When number of items with errors exceeds this
this limit, all remaining items in the transfer queue are flagged with the error and task is terminated. You
can set this to 9999 to disable this feature.
For example, lets say your sync task is about to upload 100 files, and you have Max errors per task: 20.
About 30 of these files are locked, so they cannot be uploaded. This is what will happen:
· BatchSync tries to upload each file. If file is locked and cannot be uploaded, task total error count is
incremented.
· If total error count is < Max, then next item is uploaded
· When total error count reaches limit of 20, software does not even try to upload remaining files, but
they are flagged with error message ""Max errors per task - limit exceeded (error code -1101)"
Why this settings is needed in the first place, you might ask. The answer is that if there is for example
100.000 files in the transfer queue, and server stops responding, it would take forever to try to transfer
each of 100.000 files. So instead, software gives up after Max-errors.
5.18.4 Options-tab
Server type
The default value "Auto detect" works in the vast majority of cases. If you have problems when running a
sync, and filenames are not shown correctly, select the server type from the list.
List command
BatchSync sends this command to the server to request a directory listing. The beginning of the
command must always be "LIST", but you can add parameters to this command. For instance, many
unix servers do not include hidden files in a bare "LIST" command. You can set it to "LIST -aL" to
command the server to resolve links and include hidden files. But note, list commands are server
specific, so not all servers support the same set of parameters for the LIST command.
Server time zone
If the server is running on a different time zone (like is usually the case when using web hosting
companies), select the appropriate time zone from this drop down list. In this way, directory listings, and
the file time stamps within them, are converted to the local time automatically.
Multiple network card settings
© SiteDesigner Technologies, Inc.
Reference Manual
111
Some computers are fitted with multiple network cards (NICs). In the typical scenario, one of them is
connected to the company's internal network or intranet, and the other is connected to the public
Internet. In this case, you can force software to use a specific NIC for connections. To do this, select the
Enter local IP address manually option and enter the IP address for this NIC. Now, all of the
connections are forwarded using the specified NIC and IP address.
UTF-8 unicode character support
UTF-8 encoding adds support for many European language foreign characters in file and folder names.
When checked, the software automatically detects if a server is sending encoded filenames. Thus, in
most cases, you can leave this field checked. But if filenames do not appear correctly in the Sync
window, it might be that the server is not reporting its UTF-8 support correctly, and you need to deselect
this option.
5.18.5 Options 2-tab
Timestamp - Set local file timestamp after downloading
After downloading a file, the software sets the file modification date and time to the same values as those
for the server.
Timestamp - Set remote file timestamp after uploading
After uploading a file, the software sets the file modification date and time to the same values as those
for the local file.
NOTE! All servers do not support the MDTM or MFMT commands that the software uses to set remote
file dates. In these cases, the file date is left at the server set value. This usually does not cause any
problems, and sync runs work correctly, due to the SyncDB feature. But in those cases, the remote file
date is not the same as the local one.
The combo box below this field is for servers that do not work in the standard way, and require the file
date to be sent as local time. You will see the need for this setting if remote file dates are off by one or
two hours, but the minutes and seconds are correct. This problem is related to some older FTP servers;
the newer ones do not usually need this special handling.
Compression
The software uses data compression automatically, if it is supported by the server. The default value
"Level 6" is a good compromise between compression efficiency and required computing power. In some
special cases, like when running a sync using the SFTP protocol on a fast network, you might want to
turn compression off, because compression requires a lot of computing power and might consume too
many CPU cycles (on both the client and server sides). Therefore, if you see that the CPU is peaking
when running the sync, you might try to turn compression off.
Buffer Size
By default, BatchSync uses a buffer size that is the same as the Windows network stack buffer size.
© SiteDesigner Technologies, Inc.
112
BatchSync Secure FTPS/SFTP
This usually gives you the optimum file transfer performance. In some cases, like with some ATM
networks or certain servers, you can get better performance by specifying the buffer size here. Enter the
buffer size in kilobytes, in the range of 1 to 1024. The maximum value 1024 means 1024 kB.
You can find optimum value for Buffer Size setting with Task Optimizer.
5.18.6 SFTP-tab
Authentication method for SFTP logins
Password: Username and password are used to authenticate the user (see General-tab).
Public key: In this method, the username and public/private key pair is used to authenticate the user,
instead of a username + password. When public key authentication is used, the password is not needed
or used, so you can leave password field empty.
Read more about public key authentication here.
Host key fingerprint
When making a connection to SSH server, server sends "host key fingerprint" to identify the server to a
client. With this setting you tell BatchSync to compare received fingerprint to saved one, and accept
connections only to the certain verified server. If fingerprint does not match, BatchSync will abort the
connection, and sync task is flagged with error.
To set up host key fingerprint verification, do as follows:
1.
2.
3.
Run Sync Preview
Scroll Sync Preview window log pane to the top
Locate Server host key fingerprint line in the log, and right-click on it to open popup menu. Select
Copy single line to clipboard from the menu:
4.
Close Sync Preview window, and select Edit Task > Edit Server > SFTP-tab > Host key fingerprint
© SiteDesigner Technologies, Inc.
Reference Manual
5.
6.
113
field, and paste fingerprint from the clipboard to the text field.
Check Accept connection only if host key fingerprint maches checkbox:
Save changes. Now you can test this setting by running Sync Preview again. Log pane looks like
this:
About host key fingerprint changes
The fingerprint is based on the Host's Public key, usually based on "/etc/ssh/ssh_host_rsa_key.pub". If
the fingerprint changes, the machine you are connecting to has changed their public key. This may not
be a bad thing (happens for example when re-installing ssh), but it could also indicate that you are
connecting to a different machine at the same domain/IP (happens when you are connecting through
something like load balancer) or that you are being targeted with a man-in-the-middle attack, where the
attacker is intercepting/rerouting your ssh connection to connect to a different host which could be
snooping your data.
So if you get warned of a changed fingerprint, we cautious and double check that your actually
connecting to the correct host over a secure connection. Though most of the time this is harmless, it can
be an indication of an issue.
5.18.7 FTPS-tab
SSL Certificate Validation
When BatchSync (client) makes a connection to the FTPS server, server sends its certificate to the
© SiteDesigner Technologies, Inc.
114
BatchSync Secure FTPS/SFTP
client. This SSL certificate is used to encrypt all data transferred between client and server, and it also
identifies the server.
When these certificates are signed by a trusted certificate authority, this provides assurance that the
client is connected to the requested server, avoiding a man-in-the-middle attack. If the certificate is not
signed by a trusted CA (called a self-signed certificate), the client cannot be sure about servers identity.
Following options control how BatchSync behaves when processing received server certificate.
It should be noted, that regardless what kind of certificate is presented to the client, FTPS connections
are always encrypted. So the level of encryption is not affected by status of the certificate (whether it's
signed by CA, self-signed, revoked etc.).
Accept any certificate, but display a warning
When this option is selected, BatchSync accepts any certificate, but displays a warning message when
running a sync. The certificate can be signed by CA, or self-signed, or expired, or revoked etc. This
option should NEVER be used in production.
Accept only certificate if its...
Server can be identified by a certificate checksum, called SHA1- or MD5-fingerprint. This fingerpring is
calculated from the private key of the servers SSL certificate. The fingerprint cannot be altered or
manufactured, and it is unique, so no two certificates can have same fingerprint. By comparing the
known (saved) fingerprint to the received fingerprint, you can be sure that you are connecting to the same
server as you did previously. This prevents main-in-the-middle attacks. The certificate itself can be CA- or
self-signed. This option can be used in production environment, if CA signed certificate cannot be used.
To set up fingerprint comparison, do as follows:
1. Run Sync Preview (with task that connects using FTPS protocol)
2. Scroll Sync Preview window log pane to the top
3. Locate SHA1 fingerprint line in the log, and right-click on it to open popup menu. Select Copy single
line to clipboard from the menu:
© SiteDesigner Technologies, Inc.
Reference Manual
115
4. Close sync preview, and select Edit Task > Edit Server > FTPS-tab, and paste fingerprint to Accept
only certificate it its SHA1 fingerprint matches text field:
5. Save changes. Now each time BatchSync connects to the server, it compares the received fingerprint
to saved one, and aborts connection with error if fingerprints do not match.
Accept only certificates that can be fully validated
CA signed certificate is the best way to secure FTPS data transfers. When this option is selected,
BatchSync validates the certificate and chain of certificates up to the root certificate. It also makes sure
that certificate has not expired, it's not revoked etc. In addition of making sure that certificate is valid, it
© SiteDesigner Technologies, Inc.
116
BatchSync Secure FTPS/SFTP
checks that certificate belongs to the server you expect.
To set this up, you need to select which field of the certificate is used to store server's identify. This
identity can be stored into:
1. Subject Common Name (CN) field
2. Subject Alternate Names (SAN) field
When you generate a certificate signing request (CSR) to apply for a certificate, you decide what final
certificate Subject CN- and SAN-field values are. The most common way to fill in these fields are:
1. Subject CN-field: Your server host name you want the certificate to protect, like
www.sitedesigner.com
2. Subject SAN-field: Alternate names for the server, like sitedesigner.com and
www.sitedesigner.com
Following illustrates the connection to the FTPS server that has valid CA signed certificate installed:
1. Run Sync Preview
2. Scroll Sync Preview window log pane to the top
3. In the log pane you can see that certificate has Subject CN = www.sitedesigner.com, so we will
use that for comparison.
4. Close Sync Preview, and select Edit Task > Edit Server > FTPS-tab
· Select Subject Common Name (CN) - field matches from the drop down combo list
· Enter www.sitedesigner.com to text field below it. The entered value must match exactly with
certificate Subject CN-field value.
© SiteDesigner Technologies, Inc.
Reference Manual
117
5. Save changes. Now every time BatchSync connects to the server, it validates the received server
certificate and certificate path up to the root, and checks that Subject CN-field is www.sitedesigner.com.
If any of these checks fail, connection is aborted and sync task is flagged with error.
© SiteDesigner Technologies, Inc.
Part VI
Ordering, Support and
License Agreement
VI
Ordering, Support and License Agreement
6
Ordering, Support and License Agreement
6.1
Ordering Information
119
Order BatchSync Now
To order BatchSync online with a credit card or PayPal, and download your order immediately, please go
to our web site at:
http://www.sitedesigner.com/purchase.htm
Other ordering options
The following ordering options are available:
·
·
·
·
·
·
·
Credit Card - Online
Credit Card - Phone
Credit Card - Fax
PayPal
Bank/Wire Transfer
Check/Money Order
Invoice
Complete pricing and ordering information is available on our web site:
Order info and price list
Where do I download the purchased software?
You will receive an unlock key via email after purchase is complete. This unlock key converts the
BatchSync trial version into the full version. If you have already downloaded and installed the trial version,
then all you need to do is enter the unlock key at the startup screen to get the full version. So there is no
separate full version to download.
The trial version download is available at: http://www.sitedesigner.com/download.htm
Where do I get the unlock key?
We will send you the unlock key via email. If you order with your credit card or PayPal account, we will
process the order in real-time, so you will receive the unlock key immediately after your purchase. If you
use another payment method, we will email you the unlock key immediately after your order is fully
processed.
How do I enter the unlock key?
1.
2.
3.
First download the trial version of the software here: http://www.sitedesigner.com/download.htm
Install it
Run it via the Start-menu
© SiteDesigner Technologies, Inc.
120
6.2
BatchSync Secure FTPS/SFTP
4.
Click the Enter Unlock Key-button on the startup screen. The following window opens:
5.
6.
7.
Enter the UNLOCK KEY in the text field
Click OK
Now the trial version is converted to the full version, with all evaluation version limitations removed
Support
Troubleshooting with Sync-Window Log-pane
When a sync task does not perform as you think it should, it's best to start troubleshooting from the
Sync window Log pane. The log pane displays the communication between the client and server. It often
tells the exact error message that the server is giving. So run Sync or Sync Preview, and view the log
pane, looking for possible error messages from the server. This log shows the last 2000 lines of client <> server communication.
The most common problems are in the server connection parameters, so double check the following
parameters in the Edit Site window:
· Host address. This should be in the form "ftp.myserver.com" or as an IP address such as
"187.102.4.14". No http:// or ftp:// or similar prefixes.
· Username. You get a username from your web hosting company, or your system/network admin.
Note that the username is usually case sensitive.
· Password. You get a password from your web hosting company, or your system/network admin. Note
that the password is usually case sensitive.
· Passive mode. If a connection does not work with passive mode, try port mode. Some servers do not
allow passive mode.
· Server folder. Check the folder name. The easiest way to ensure that the server folder is entered
correctly is to create a new sync task using the Task Wizard. With the wizard you can select the
server folder from a list.
Troubleshooting with extra log files
If Log-pane is not showing the source of the error, turn the FTP Cmd log file on in Edit Task > Log-tab >
Enable FTP cmd logging. Click OK to save changes.
Now sync again to repeat the error. After the error, look at the generated FTP Cmd log for the source of
the errors.
© SiteDesigner Technologies, Inc.
Ordering, Support and License Agreement
121
Troubleshooting with debug logging
If the logging discussed above does not reveal the source of the problem, you can use debug logging to
help solve the problem. BatchSync has a built-in debug logging feature that helps with troubleshooting
and solving problems you might encounter. This logging feature is available in the menu Tools > Options
> Support tab.
By default, this logging feature is turned off. You can turn it on by selecting the Debug Logging check
box.
When the debug logging check box is selected, the software writes technical information to a special log
file while it's running. You can see the name of the extra log file on the Support tab, so write it down.
Now repeat the problem.
After you see the problem again, look at this file to see whether it shows the source of the problem. If it
does not, please contact our technical support and attach this file to the email message.
Check for latest version
Please check the http://www.sitedesigner.com/download.htm page to ensure that you are running the
latest version of BatchSync.
Contacting support
When contacting support and reporting problems, please include the following information:
· Can you reproduce the problem? If so, how?
· What version of Windows are you running (Windows 7, Windows Server 2008, Vista, etc.)?
· What edition and version of BatchSync are you running? (To see this, choose About... from the Help
menu.)
· If a dialog box with an error message was displayed, please include the full text of the dialog box,
including the text in the title bar.
Note: You can press F1 at any time while running the software for context sensitive help.
Please send the above information to [email protected] for technical support.
6.3
License Agreement
BatchSync Secure FTPS/SFTP™ END-USER LICENSE AGREEMENT
IMPORTANT—READ CAREFULLY: This End-User License Agreement ("EULA") is a legal
agreement between you (either an individual or a single entity) and SiteDesigner
Technologies, Inc. ("SiteDesigner") for the SiteDesigner software product identified above,
which includes computer software and may include associated media, printed materials,
"online" or electronic documentation, and Internet-based services ("Software"). An amendment
or addendum to this EULA may accompany the Software.
YOU AGREE TO BE BOUND BY THE TERMS ("Terms") OF THIS EULA BY INSTALLING, COPYING,
OR OTHERWISE USING THE SOFTWARE. IF YOU DO NOT AGREE, DO NOT INSTALL, COPY OR
© SiteDesigner Technologies, Inc.
122
BatchSync Secure FTPS/SFTP
USE THE SOFTWARE.
EVALUATION LICENSE
An Evaluation License is applicable when you download an evaluation version of the Software or you are
granted a time limited license by SiteDesigner or its resellers for evaluation purposes. The Software is
licensed to you for the sole purpose of evaluating the Software and only for a specified evaluation period,
which will begin on the date that the Software is first downloaded by or delivered to you. After the
specified time period, you must either purchase the Software license from SiteDesigner or its reseller, or
destroy and stop using the Software. If you purchase the Software before the expiration of the evaluation
time and register the Software, you have a valid license and you do not need to destroy the Software.
SiteDesigner shall have no obligation to provide support or maintenance services for Evaluation Licenses.
COMMERCIAL LICENSE
Subject to the payment of the applicable license fees and subject to the following terms and conditions,
you have been granted a non-exclusive, non-transferable right to use the specified Software. SiteDesigner
reserves any and all rights not expressly granted to you.
You may:
A) Install and use one (1) copy of the Software on a single computer/virtual machine.
B) Create copies of the Software for installation and backup purposes only.
C) Extend the number of licenses by purchasing additional licenses.
You may not:
A) Install and use the Software against these Terms, the SiteDesigner License Certificate or other related
documentation.
B) Distribute copies of the Software to a third party, electronically transfer the Software to a computer
belonging to a third party, or permit a third party to copy the Software.
C) Modify, adapt, translate, rent, lease, resell, distribute or create derivative works based upon the
Software and/or related files or any part thereof.
D) Decompile, reverse engineer, disassemble, or otherwise reduce the Software and/or related files to
any human-perceivable form as the Software contains or may contain trade secrets of SiteDesigner.
E) Use the documentation for any purpose other than to support your use of the Software. Please
contact SiteDesigner directly if you are interested in any other rights to the Software other than those
granted in these Terms.
F) Disclose the license authorization code provided for the program installation (included but not limited
to serial key, subscription number and registration key) to any third party.
G) Use the Software or any portion thereof to implement any product or service to operate on or in
connection with the Software for any other purpose than granted herein.
TITLE
Title, ownership rights, and intellectual property rights in the Software shall remain those of SiteDesigner,
and/or its suppliers. The Software is protected by copyright laws and international copyright and other
intellectual property treaties.
LIMITED WARRANTY AND DISCLAIMERS
© SiteDesigner Technologies, Inc.
Ordering, Support and License Agreement
123
Limited Warranty on Media. SiteDesigner warrants the media on which the Software is recorded to be
free from defect in material and workmanship under normal use for 30 days from the date of delivery. Any
implied warranties on the media, including implied warranties of merchantability and fitness for a
particular purpose, are limited in duration to 30 days from the date of delivery. SiteDesigner will, at its
option, replace the media or refund the purchase price of the media. SiteDesigner shall have no
responsibility to replace or refund the purchase price of media, which is damaged by accident, abuse, or
misapplication.
Disclaimer of Warranty on Software. THE SOFTWARE IS PROVIDED "AS IS", WITHOUT
WARRANTY OF ANY KIND. SITEDESIGNER EXPRESSLY DISCLAIMS ALL IMPLIED WARRANTIES,
INCLUDING BUT NOT LIMITED TO IMPLIED WARRANTIES OF TITLE, NON-INFRINGEMENT,
MERCHANTABILITY OR FITNESS FOR A PARTICULAR PURPOSE. SiteDesigner does not guarantee
the Software or related documentation in terms of their correctness, accuracy, reliability, or otherwise.
You assume the entire risk as to the results and performance of the Software and related documentation.
Complete Statement of Warranty. The limited warranties provided in the preceding paragraphs are the
only warranties of any kind that are made by SiteDesigner on the Software. No oral or written information
or advice given by SiteDesigner, its dealers, distributors, agents, or employees shall create a warranty or
in any way increase the scope of the foregoing limited warranty, and you may not rely on any such
information or advice. Some states do not allow the exclusion of implied warranties, so the above
exclusion may not apply to you, and you may have other rights which may vary from state to state.
Limitation of Liability. IN NO EVENT SHALL SITEDESIGNER OR ITS SUPPLIERS BE LIABLE TO
YOU FOR ANY SPECIAL, CONSEQUENTIAL, INCIDENTAL, OR INDIRECT DAMAGES, INCLUDING,
BUT NOT LIMITED TO, LOSS OF REVENUE OR PROFIT, LOST OR DAMAGED DATA OR OTHER
COMMERCIAL OR ECONOMIC LOSS, ARISING OUT OF THE USE OF, OR INABILITY TO USE, THE
SOFTWARE OR RELATED DOCUMENTATION, EVEN IF SITEDESIGNER HAS BEEN ADVISED OF
THE POSSIBILITY OF SUCH DAMAGES. Some states do not allow the limitation or exclusion of liability
for incidental or consequential damages so the above limitation or exclusion may not apply to you.
SITEDESIGNER SHALL IN NO EVENT BE LIABLE FOR ANY DAMAGES ARISING FROM
PERFORMANCE OR NON-PERFORMANCE OF THE SOFTWARE. OUR MAXIMUM LIABILITY TO YOU
FOR ACTUAL DAMAGES FOR ANY CAUSE WHATSOEVER SHALL IN NO EVENT EXCEED THE
AMOUNT PAID BY YOU FOR THE SOFTWARE. Nothing contained in these License Terms shall
prejudice the statutory rights of any party dealing as a consumer. SiteDesigner is acting on behalf of its
employees and licensors or subsidiaries for the purpose of disclaiming, excluding, and/or restricting
obligations, warranties, and liability as provided in this clause, but in no other respects and for no other
purpose.
EXPORT RESTRICTIONS (EXCLUSIVELY FOR CRYPTOGRAPHIC SOFTWARE)
1. If the Software is shipped or otherwise distributed to you from the United States of America: You
acknowledge that the Software and the maintenance and support services including without limitation
technical services and technical data (e.g., manuals, blueprints, plans, diagrams, models, formulae,
tables, engineering designs and specifications and instructions written or recorded and any other such
technical services and technical data ("the Services") are of U.S. origin for purposes of U.S. export
control laws, regulations, administrative acts or Executive Orders, and any amendments thereof,
including without limitation the Export Administration Act of 1979, as amended (the "Act"), and the
regulations promulgated thereunder (the "U.S. Export Control Laws"). You agree to comply with all
applicable U.S. Export Control Laws and any applicable international laws and regulations that apply to
the Software and to the Services, including without limitation the Act as well as end-user, end-use and
destination restrictions issued by the U.S. and other governments.
2. If the Software is shipped or otherwise distributed to you from a country other than the United States
of America: You agree to comply with the local regulations regarding exporting and/or using
© SiteDesigner Technologies, Inc.
124
BatchSync Secure FTPS/SFTP
cryptographic software.
In all cases, SiteDesigner will not be liable for the illegal export and/or use of its cryptographic software
by you.
U.S. GOVERNMENT RIGHTS
If the Software is licensed for or on behalf of the United States of America, its agencies and/or
instrumentalities ("U.S. Government") pursuant to solicitations issued on or after December 1, 1995, the
Software is provided with the commercial rights and restrictions described elsewhere herein. If the
Software is licensed for or on behalf of the U.S. Government pursuant to solicitations issued prior to
December 1, 1995, the Software is provided with RESTRICTED RIGHTS as provided for in FAR, 48 CFR
52.227-14 (JUNE 1987) or DFAR, 48 CFR 252.227-7013 (OCT 1988), as applicable.
GENERAL
The license will terminate immediately without notice if you are in breach of any of its terms and
conditions. You shall not be entitled to a refund from SiteDesigner or any of its resellers as a result of
termination. The terms and conditions concerning confidentiality and restrictions on use shall continue in
force even after any termination.
SiteDesigner may revise these Terms at any time and the revised terms shall automatically apply to the
corresponding versions of the Software distributed with the revised terms. If any part of these Terms is
found void and unenforceable, it will not affect the validity of rest of the Terms, which shall remain valid
and enforceable according to its terms. In case of controversy or inconsistency between translations of
these Terms to other languages, the English version issued by SiteDesigner shall prevail.
These Terms shall be governed under the Laws of Finland without regard to conflict of laws rules and
principles and without regard to the United Nations Convention of Contracts for the International Sales of
Goods. The courts of Finland shall have the exclusive jurisdiction and venue to adjudicate any dispute
arising out of these Terms.
Version U2012.1
© SiteDesigner Technologies, Inc.