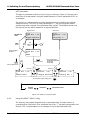
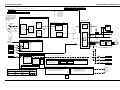
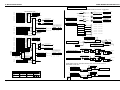
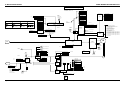
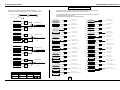
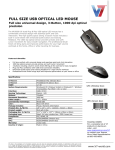
1
SAFETY INSTRUCTIONS
Care has been taken with the design of this product to ensure that it is safe. However, in
common with all products of this type, misuse can result in injury or death. Therefore, it
is very important that the instructions in this manual and on the product are observed
during transportation, commissioning, operation, maintenance and disposal.
This technical manual should be regarded as part of the product. It should be stored
with the product and passed on to any subsequent owner or user.
Local safety laws and regulations must always be observed.
ALSPA MV3000 Demonstration Case
User Manual
for all language models
MV3000 Case Demo/E,F,D
Publication No. T1691
Issue 2 (05/01)
Persons working on the product must be suitably skilled and should have been trained in
that work for these products.
The product is a component designed for incorporation in installations, apparatus and
machines.
The product must not be used as a single item safety system. In applications where
maloperation of the product could cause danger, additional means must be used to
prevent danger to persons.
Product approvals and certifications will be invalidated if the product is transported, used
or stored outside its ratings or if the instructions in this manual are not observed.
In the European Union:
•
Products within the scope of the Low Voltage Directive, 73/23/EEC as amended are
CE marked.
•
The product complies with the essential protection requirements of the EMC directive
89/336/EEC as amended, when installed and used as described in this manual. The
requirements of the EMC Directive should be established before any installation,
apparatus or machine which incorporates the product is taken into service.
•
A machine should not be taken into service until the machine has been declared in
conformity with the provisions of the Machinery (Safety) Directive, 98/37/EEC.
Publication No. T1691 Issue 2 (05/01)
See over for diagram identifying the main case items
❻
IDENTIFYING THE CASE PARTS
❶
Top Panel
❼
Finger Hole
Case Item No.
and panel
catch
Document &
cable store
❽∗
❷
❸
❹
DDM™ Harbour
❾∗
Perspex Cover
CDC Board
❿
Case DDM™
Bottom Panel
Mains Switch
and Mains Inlet
Case Locks and handle
DRIVE O/P
RUNNING
Plant Analogue
Inputs
Analogue DIP
Switches
TB3: DIGITAL INPUTS
STOP
INPUT 2
START
INPUT 3
REVERSE
INPUT 4
KEYPAD/
REMOTE
INPUT 5
REF1/REF2
INPUT 6
TRIP
RESET
Frame Simulator
INPUT
BRIDGE
D.B. Instantaneous
Over Current
PLANT
INTERLOCK
INPUT 1
Drive Power
D.B. Hardware
Over Temperature
OUTPUT 3
AUX. 24V
INPUT
TB4: SERIAL LINKS
Tx
Precharge
Complete
AT SPEED
DYNAMIC
BRAKE
D.B. Temperature
Feedback (P11.12)
DC Link
Feedback (P11.03)
DC Link
DC Hardware
Over Voltage
O/P Temperature
Feedback (P11.05)
⑧
OUTPUT
BRIDGE
O/P Hardware
Over Temperature
Over
Current
U
Rx
TB5: ENCODER and PTC
Motor Thermistor
I/P Temperature
Feedback (P11.08)
OUTPUT 2
Over
Current
V
PC to Case Serial
Link Connections
Over
Current
W
MOTOR
THERMISTOR
⑨
MOTOR
0V
CAN & RS485
ANALOGUE
I/P 1
TB6: ANALOGUE I/O
Plant Digital Inputs
⑦
HEALTHY
OUTPUT 1
TB2
Plant Interlock
Simulation
⑤
⑥
TB1: VOLTS FREE DIGITAL OUTPUTS
Plant Digital Outputs
-10V
4mA
4
3
2
1
20mA
TRIM
0
ANALOGUE
I/P 2
20mA
TRIM
+10V
-100%
AN I/P 1
AN I/P 2
AN O/P 1
AN O/P 2
+100%
-100%
+100%
4mA to 20mA
Loss
USE
USE THE
THE DIP
DIP SWITCHES
SWITCHES
TO
TO CONFIGURE
CONFIGURE
THE
THE ANALOGUE
ANALOGUE I/O
I/O
FOR
FOR CURRENT
CURRENT OR
OR VOLTAGE
VOLTAGE
Outputs
0
10V
D
C
B
C
Plant Analogue
ANALOGUE OUTPUT 1
ANALOGUE OUTPUT 2
⑩
4-20mA Loss
Switch
Specifications
❶
Top Panel
Gives a short overview of some of the menus held within the ALSPA MV3000
Drive. This panel is intended to act as an aid to the users memory during
demonstrations or training. The panel hinges forward to reveal a storage area,
see ❻ and ❼ below.
❷
❸
❹
❺
❻
❼
❽
❾
❿
Perspex Cover
Covers the CDC board up to allow annotation with text, which explains what the
areas of the CDC do, showing connections and enhancement areas.
CDC Board
The ALSPA MV3000 Common Drive Controller board. This board is the same
control PCB used in all the MV3000 drives, and runs the same firmware as the
drive.
Mains Switch &
Mains Inlet
The power lead plugs in here and the illuminated switch is used to switch on the
power. See section 2 for technical and fuse data.
Case Locks and
Handle
The case can be locked shut using the keys provided. The keys should be
attached to the handle on delivery.
Finger Hole and
panel catch
Rotate the catch a quarter turn to release then insert a finger to pull open the top
panel, once open the storage area ❼ is revealed. See Section 3.4.3
Document and
Cable Store
This area stores the following items when the case is shipped: User guide, power
lead, keypad lead, case to PC lead, various data sheets on the items in the case.
See Section 3.4 for a description of the case accessories.
Panel Item No.
BOTTOM PANEL ❿ DETAILS
CDC
①
②
③
④
∗ Drive Data Manager™
DIP
SWITCHES
❺
Case Item Name
①
②
③
④
⑤
⑥
⑦
⑧
⑨
⑩
DDM™ Harbour
Case DDM™
∗
∗
Bottom Panel
Panel Item Name
The harbour is the same item used on the ALSPA MV3000 drives and is used to
hold the keypad ❾. The harbour also has status LED’s within it, the meaning of
the LED’s is explained in Section 4.6 of this guide.
The case includes a fully functional ALSPA MV3000 Drive Data Manager™
(keypad). The function of the DDM is explained in section 4.6 of this guide.
The bottom panel is a fully functional plant and drive simulation area. It allows
the user to emulate plant I/O and drive responses for demonstrating and training
the ALSPA MV3000. Details of the bottom panel are shown below.
Specifications
Plant Digital
Outputs
3 configurable volts free relay outputs. Here shown with red and green LED’s. The
red LED is lit when the relay is open. The labels match the default settings as
shipped from !"#$. See Section 4.3.2 for more details.
Plant Interlock
The plant interlock must be made to allow the drive to run. Pressing the switch will
result in the CDC ③ tripping on “interlock”. See Section 4.3.2 for more details.
Plant Digital
Inputs
6 configurable digital inputs. Here connected to illuminated switches. The labels
match the settings as shipped from !"#$. See Section 4.3.2 for more details.
Motor Thermistor
Simulation
A true motor PTC input. Here simulated by a 5kΩ potentiometer. The control can
be used to simulate a motor overheating. See Section 4.3.2 for more details.
Plant Analogue
Inputs
2 configurable analogue inputs. Input 1 is -10V to +10V, input 2 is 4-20ma. Can
be used to simulate plant inputs. See ⑥ and ⑩ below and Section 4.3.2.
Analogue DIP
Switches
These DIP switches are used to configure the analogue I/O for current or voltage
operation. The small legend shows their use and their default settings as shipped
from !"#$. See Section 4.3.2 for more details.
Drive Power
Frame Simulator
This area is a collection of circuits designed to simulate the complete power frame
of the ALSPA MV3000 drives. These controls can be used to simulate internal
drive conditions and responses, as per their labels.
PC to case Serial
Link Connections
The connections at TB4 have been extended to here for ease. The lead included,
allows easy connection to a PC. Details are given in Section 3.4.5.
Plant Analogue
Outputs
2 configurable analogue outputs. Both -10V to +10V. They can be used to
simulate plant outputs. See ⑥ above and Section 4.3.2 for extra detail.
4-20mA Loss
This switch is used to switch off the 4-20ma reference from analogue input 2.
When the switch is illuminated the 4-20ma reference is healthy. See Section 4.3.2
ALSPA MV3000 Demonstration Case
THIS MANUAL
(T1691)
OVERVIEW AND
SALIENT POINTS IN
THIS MANUAL
(SECTIONS 1 & 2)
TECHNICAL DATA
(SECTION 2)
DEFAULT SET-UP
+
PROCEDURE FOR
SWITCHING ON AND
A DETAILED
EXPLANATION OF THE
KEYPAD
SIMPLE
APPLICATION
EXAMPLES
(SECTION 5)
USE OF
ON-LINE HELP
(SECTION 6)
BASIC SPARES
(SECTION 7)
+
DISPOSAL
INSTRUCTIONS
(SECTION 8)
Issue (05/01)
OPTIONAL
MANUALS
PLANNING
DEMONSTRATIONS
& TRAINING
HANDLING
AND
ACCESSORIES
HANDLING
INSTRUCTIONS
(SECTION 3)
FULL SYSTEM
SOFTWARE
DIAGRAMS
CASE
STAGES OF USE
Documentation Structure
EVERY ALSTOM
ACCESSORY IS
SUPPLIED WITH ITS
OWN DATA SHEET
DEMONSTRATING
USING THE CASE
PROGRAMMING
USING THE CASE,
TO PRACTICE AND
DEMONSTRATE
SOFTWARE MANUAL
(T1679EN)
DETAILED
DESCRIPTION OF
DRIVE PARAMETERS
USEFUL APPLICATION
PROGRAMMING
EXAMPLES
MAINTENANCE
+
DIAGNOSTICS
SPARES
&
DISPOSAL
SOFTWARE MANUAL
(T1679EN)
DRIVE DIAGNOSTIC
FLOWCHARTS
EXTRA DRIVE
DIAGNOSTIC
INFORMATION
HARDWARE MANUAL
(T1678EN)
FULL DRIVE
SPARES LIST
Demonstration Case User Manual (T1691)
Page i
Overview
ALSPA MV3000 Demonstration Case
OVERVIEW
Section
1.
Page
Introduction.......................................................................................... 1-1
Introduces the User Guide and the demonstration case itself, explaining the
uses for which it is intended.
2.
Technical Data for the Demonstration Case ......................................... 2-1
Provides electrical and mechanical data for the case, including fuse
information. Environmental and European standards are included here.
3.
Handling and Acessories...................................................................... 3-1
Expalains how to properly transport, carry and open the demonstration case.
A full description of the acessories supplied with the case and how to use
them, is also given.
4.
Switching on and Demonstrating ......................................................... 4-1
Explains how to switch the case on so that the case powers up healthy. All of
the controls in the case are described in full, including a complete section on
the Drive Data Manager™(❾). An example demonstration is also supplied to
allow confidence to be gained.
5.
Menus and Parameters ........................................................................ 5-1
An overview of the ALSPA MV3000 software environment is given here to
ensure the completeness of the guide. This section will allow more
complicated demonstrations to be undertaken and will also allow software to
be developed for working plant drives.
6.
Diagnostics........................................................................................... 6-1
What to do if the case displays a WARNING or if it TRIPS. Shows how to
display Warning and Trip codes, and tabulates the meaning of these codes.
Provides many diagnostic hints to help find possible faults, explains how to
reset the case and how to view a history of any previous incidents which may
help with diagnosis..
7.
Acessories and Spares .......................................................................... 7-1
List of accesories and spares to allow replacement or extra items to be
purchased, including manuals and the acessories supplied with the case.
8.
Disposal ............................................................................................... 9-1
Provides disposal instructions for the case, and advises of any toxic materials
and special procedures to dispose of them.
Page ii
Demonstration Case User Manual (T1691)
Issue (05/01)
ALSPA MV3000 Demonstration Case
Contents
CONTENTS
Section
Page
1.
1.1
1.2
1.3
1.4
1.5
1.6
1.7
Introduction........................................................................................................1-1
About this User Guide in General..........................................................................1-1
Labelling Conventions Used in this Guide ..............................................................1-1
About the ALSPA MV3000 Demonstration Case .....................................................1-1
Range of Cases Covered by this Manual...............................................................1-2
Use of IEC Standards...........................................................................................1-2
Customer Support and Training ...........................................................................1-2
Associated Publications .........................................................................................1-2
2.
2.1
2.2
2.2.1
2.2.2
Demo Case Technical Data.................................................................................2-1
Case Technical/Environmental Data ......................................................................2-1
Standards ............................................................................................................2-2
Standards which apply to the whole case...........................................................2-2
Standards which apply to the case power supply................................................2-2
3.
3.1
3.2
3.2.1
3.2.2
3.3
3.3.1
3.3.2
3.3.3
3.4
3.4.1
3.4.2
3.4.3
3.4.4
3.4.5
Handling & Accessories ......................................................................................3-1
Introduction .........................................................................................................3-1
Receipt of Equipment ............................................................................................3-1
Inspection........................................................................................................3-1
Storage ...........................................................................................................3-1
Handling the Case ...............................................................................................3-1
Transporting the case in a vehicle ....................................................................3-1
Carrying the Case............................................................................................3-2
Opening and closing the case ..........................................................................3-2
Identifying and Connecting the Case Accessories ...................................................3-2
List of Case Accessories ....................................................................................3-2
Opening the Document Wallet (❼)....................................................................3-3
Connecting the Drive Data Manager (DDM™ ) lead...........................................3-3
Connecting a PC to the demonstration case (⑧) ................................................3-3
Mains Lead......................................................................................................3-4
4.
4.1
4.2
4.3
4.3.1
4.3.2
4.3.3
4.3.4
4.4
4.4.1
4.4.2
4.5
4.5.1
4.5.2
4.5.3
4.5.4
Switching On and Demonstrating.......................................................................4-1
Introduction .........................................................................................................4-1
Switching the Case On .........................................................................................4-1
Uses and Features of the Bottom Panel (❿) ............................................................4-1
Introduction .....................................................................................................4-1
Using the Plant I/O Area (①②③④⑤⑥⑨⑩)........................................................4-2
Using the Power Frame Simulation Area (⑦)......................................................4-5
Using the Case Serial Link lead including Connections (⑧) .................................4-7
Demonstrating - a short example ..........................................................................4-8
Starting from the DDM™(❾) .............................................................................4-8
Starting from the Case I/O ...............................................................................4-9
Drive Data Manager™ (❾) Functions ...................................................................4-10
Navigation Key ..............................................................................................4-10
Navigating to Menus and Parameters ............................................................4-10
SHORTCUT Method of Entering a Parameter Number......................................4-11
Editing Parameters .........................................................................................4-11
Issue (05/01)
Demonstration Case User Manual (T1691)
Page iii
Contents
4.5.5
4.5.6
4.6
4.6.1
4.6.2
4.7
ALSPA MV3000 Demonstration Case
Using the DDM™ HELP (?) Key........................................................................4-12
DDM™ (keypad) Removal Checks ...................................................................4-13
DDM™ Harbour (❽) ...........................................................................................4-14
Harbour LED Indicators ..................................................................................4-14
Removing the DDM™ from the Harbour, and re-fitting. ....................................4-14
Limitations of this Demonstration Case ................................................................4-14
5.
Menus and Parameters.......................................................................................5-1
5.1
MV3000 Menus and Parameters Overview.............................................................5-1
5.1.1
Introduction .....................................................................................................5-1
5.1.2
What is a Parameter? .......................................................................................5-1
5.1.3
Parameter Attributes .........................................................................................5-1
5.1.4
Parameter Passwords........................................................................................5-1
5.1.5
A Complete Menu Listing..................................................................................5-2
5.1.6
User Configurable Menu 1 ...............................................................................5-3
5.1.7
Access to Other Menus (P1.31) .........................................................................5-3
5.1.8
Reviewing Parameter Edits Made.......................................................................5-4
5.1.9
Returning to Factory Default Settings..................................................................5-4
5.1.10
Default Configuration, as shipped by !"#$ ................................................5-5
5.2
Practise Application Programming .........................................................................5-7
5.2.1
Control Flags and Status Flags..........................................................................5-7
5.2.2
Rules for Using the Flags...................................................................................5-8
5.2.3
Programming Digital I/O..................................................................................5-9
5.2.4
Programming Analogue I/O .............................................................................5-9
5.3
Using the Control Block Diagrams .......................................................................5-10
6.
Diagnostics .........................................................................................................6-1
6.1
Describing the Diagnostic Philosophy.....................................................................6-1
6.2
LED Fault Indicators ..............................................................................................6-1
6.3
Diagnosing faults with the Case.............................................................................6-1
6.4
Warnings .............................................................................................................6-2
6.5
Trips ....................................................................................................................6-2
6.6
Viewing Warnings and Trips..................................................................................6-2
6.6.1
Action in the Event of a Warning .......................................................................6-3
6.6.2
Action in the event of a Trip ..............................................................................6-3
6.6.3
Resetting Trips..................................................................................................6-3
6.6.4
Fault Codes .....................................................................................................6-4
6.7
Using the HELP Key for diagnostics ........................................................................6-4
6.8
Diagnostic Hints ...................................................................................................6-5
6.9
Changing a Case Fuse .........................................................................................6-5
6.10
Failure of CDC Board (❸) Firmware ......................................................................6-6
6.10.1
General Description .........................................................................................6-6
6.10.2
Uploading the failed CDC Board (❸) firmware diagnostics.................................6-6
7.
7.1
7.1.1
7.1.2
7.2
Accessories and Spares ......................................................................................7-1
Accessories...........................................................................................................7-1
Accessory listing ...............................................................................................7-1
Fitting Communication Accessories after sale .....................................................7-1
Spares .................................................................................................................7-2
8.
Disposal .............................................................................................................8-1
Page iv
Demonstration Case User Manual (T1691)
Issue (05/01)
ALSPA MV3000 Demonstration Case
1. Introduction
1. Introduction
1.1
About this User Guide in General
This User Guide provides a competent user trained in electrical installation practice
with sufficient information to safely install, operate, maintain and dispose of this case.
The guide deals solely with the demonstration case and what it can be used for.
Detailed instructions on ALSPA MV3000 installations and programming are contained
in the ALSPA MV3000 Getting Started Manual (T1676), the ALSPA MV3000 Hardware
Technical Manual (T1678), and ALSPA MV3000 Software Technical Manual (T1679),
which are available from !"#$ as options.
Instructions for high power modular (DELTA) based ALSPA MV3000 drives are
provided in T1689, ALSPA MV DELTA, Supplementary Technical Manual to T1641, for
MV3000.
This manual should be regarded as part of the Demonstration Case unit. It should be
retained for the life of the case and passed on to any subsequent owner or user.
1.2
Labelling Conventions Used in this Guide
For ease of use, the main objects and areas contained within the demonstration case
have been labelled. The key to these labels can be found on the inside front cover of
this guide. The number labels which have been described on the front cover, appear
throughout the user guide to aid identification of the case parts.
For example: Mains switch (❹) and 4 - 20mA loss switch (⑩)
1.3
About the ALSPA MV3000 Demonstration Case
The ALSPA MV3000 Demonstration Case has
been developed as a portable and user
friendly demonstration unit to compliment the
range of ALSPA MV3000 variable speed AC
drives. The case allows the user to
demonstrate features and benefits of the
drive product, to train and instruct site
personnel in a safe and clean environment
and allows application programs to be
developed and tested in a safe manner for
later inclusion in plant operations. Technical
personnel can be trained in the use of the
drive and the Drive Data Manager, the
methods of fault finding and diagnosis can
be learned and refreshed and personnel can
become familiar with the general
Figure 1-1 ALSPA MV3000 Demonstration
Case - open
environment contained within the ALSPA
MV3000 without having to go any where
near to live working plant. This of course ensures that maintenance teams are fully
versed in the drive, and any maintenance activities can be carried out with a minimum
of down time. A typical ALSPA MV3000 Demonstration Case is shown in Figure 1-1,
shown with the case open.
Issue (05/01)
Demonstration Case User Manual (T1691)
Page 1-1
1. Introduction
1.4
ALSPA MV3000 Demonstration Case
Range of Cases Covered by this Manual
All language versions of the case are covered by this user guide, namely:
MV3000 CASE DEMO/E
The ENGLISH version
MV3000 CASE DEMO/F
The FRENCH version
MV3000 CASE DEMO/D
The GERMAN version
Dimensions and weights are provided in Section 2.1.
1.5
Use of IEC Standards
The ALSPA MV3000 Demonstration Case units have been designed to IEC standards
using SI units. In this manual approximate values for inches, lb and hp are also
included for convenience.
1.6
Customer Support and Training
!"#$ provides comprehensive telephone technical support, application planning,
service and customer training at the ALSPA Academy.
Contact !"#$ at the address and the telephone/fax numbers shown on the back
cover.
1.7
Associated Publications
T1676
ALSPA MV3000 Getting Started Manual
The manual explains how to install, commission and program an ALSPA
MV3000 drive unit for basic operation.
T1678
ALSPA MV3000 Hardware Technical Manual
The manual contains detailed technical information to enable a competent
user trained in drives to safely install, commission and operate, maintain
and dispose of ALSPA MV3000 drive units for specific applications.
T1679
ALSPA MV3000 Software Technical Manual
This manual contains detailed technical information to enable a competent
user trained in drives to safely configure the ALSPA MV3000 drives for
specific applications. It includes full descriptions of the menu structure and
parameters, also the serial communications systems.
T1689
ALSPA MV DELTA, Supplementary Technical Manual to T1641, for
MV3000
This manual includes specifications and instructions to allow a competent
user trained in drives to safely install the components of ALSPA MV3000
DELTA systems to construct DELTA drive units.
DELTA drives are a unique system of modular based drive units,150 kW to
1.8 MW in air-cooled versions, 600kW to 3.6 MW in liquid cooled versions.
Page 1-2
Demonstration Case User Manual (T1691)
Issue (05/01)
ALSPA MV3000 Demonstration Case
2. Demo Case Technical Data
2. Demo Case Technical Data
2.1
Case Technical/Environmental Data
Table 2-1 Case data
Environment
Storage
Transport
Operating
Temperature range
–25o C to +55o C
Relative humidity
5% to 95%, non-condensing
Temperature range
–25o C to +70o C
Relative humidity
≤ 95%, non-condensing
Altitude (max.)
1000 m
Temperature range
0o C to 40o C Absolute MAX
Note: If the case is taken from a vehicle into a
building, care MUST be taken to allow time for the
case temperature to stabilise, this will of course
reduce the risk of failure due to condensation
build-ups and stress caused to the power supply in
the case.
Electrical
Supply
Fuses
Relative humidity
5% to 95%, non-condensing
Cooling air
Clean, free from dust, condensation and conductive
or corrosive vapours (i.e. pollution degree 2
according to IEC 60664-1 and UL840).
Ingress protection
IP20, (NEMA 1). Indoor use only
Voltage range
90Vac to 264Vac single phase. The power supply
then provides a regulated 24Vdc supply
Voltage variation (on voltage
range)
The voltage range above is the absolute limit to the
range that the case power supply can operate.
Frequency variation
47 Hz, 63 Hz, as per power supply specification
Power Lead to fit IEC 3 pin
mains socket.
The case MUST be used with the EARTHED power
lead provided and connected to an EARTHED outlet
to properly protect the user from electric shock.
Network type
Single phase with earthed/grounded neutral (i.e. TN
or TT)
Case Fuse
2 Amp 20mm anti-surge glass fuse to IEC ‘EBC’
127.
A spare fuse is supplied inside the case fuse holder
which is located underneath the mains input (❹)
Plug Fuse
The fuse supplied in the plug is a standard 5Amp.
(UK only, to BS1362)
Physical
Attributes
Issue (05/01)
Dimensions
Case dimensions, when the
case is closed and flat on a
table.
H = 165mm (6.5”), W = 490mm (19.25”),
D = 400mm (15.75”)
Weights
When the case contains all
the cables and manuals
supplied.
Max weight of loaded case 7kg (15.4lb)
Demonstration Case User Manual (T1691)
Page 2-1
2. Demo Case Technical Data
ALSPA MV3000 Demonstration Case
2.2
Standards
2.2.1
Standards which apply to the whole case
The ALSPA MV3000 Demonstration Case complies with the standards listed below, and
has been tested in accordance with the standards listed.
EMI filter
EN55022 Class B
Specification for limits and methods of
measurement of radio interference characteristics of
information technology equipment.
Electromagnetic Compatibility
2.2.2
EN50081-1
Electromagnetic Compatibility. Generic emissions
standard. Residential, commercial and light
industry.
EN50082-1
Electromagnetic Compatibility. Generic immunity
standard. Residential, commercial and light
industry.
Standards which apply to the case power supply
These standards were claimed by the proprietary power supply manufacturer.
!"#$ have not attempted to verify these claims but merely give the data as
information:
EMI filter
FCC 20780 Part 15, class B
-
EN55022 Class B
Specification for limits and methods of
measurement of radio interference characteristics of
information technology equipment.
VDE 0878 PT3 Class B
-
Electromagnetic Compatibility
Page 2-2
EN50081-1
Electromagnetic Compatibility. Generic emissions
standard. Residential, commercial and light
industry.
EN50082-1
Electromagnetic Compatibility. Generic immunity
standard. Residential, commercial and light
industry.
Demonstration Case User Manual (T1691)
Issue (05/01)
ALSPA MV3000 Demonstration Case
3. Handling & Accessories
3. Handling & Accessories
3.1
Introduction
This section covers everything from opening the case, through to the accessories
contained within the case and how to use the items supplied, to bring out the features
and benefits of the case. This section also briefly deals with the environmental items
that should be considered for the successful use of an ALSPA MV3000 Demonstration
Case.
3.2
Receipt of Equipment
3.2.1
Inspection
Check the contents of the complete consignment against the Delivery Note for any
damage, shortages or loss in transit. If any item is found to be damaged or missing,
contact !"#$ at the address/telephone number shown on the rear cover, quoting
the following details:
• List of damaged or missing items with names and part numbers.
• Description of damage.
• Delivery Note numbers and dates, and order and item numbers.
3.2.2
Storage
If the equipment is not to be used immediately:
• Re-pack it in its original packaging material. If this is not possible it should be
enclosed in polythene sheet to protect it from the ingress of dust.
• Store it in a clean, dry atmosphere, preferably at room temperature, ensuring that
the storage environment meets the requirements of Section 2.1.
• If the case is unpacked in a warm environment condensation may occur. Should
condensation be seen, the case should not be used until its temperature has stabilised
to that of the working environment.
3.3
Handling the Case
3.3.1
Transporting the case in a vehicle
It is likely that the case will be transported in a vehicle to allow mobile ALSPA MV3000
demonstrations to take place. When the case is removed from the vehicle then taken to
the area where the demonstration is to take place, the case should not be used until its
temperature has stabilised to that of the working environment.
Transportation by aeroplane may result in mishandling by baggage handling staff.
Inspect the case before applying power. If the case is visibly damaged, or if internal
damage is suspected, the case should not be powered up and should be returned to
%&'( for inspection and possible repair.
Issue (05/01)
Demonstration Case User Manual (T1691)
Page 3-1
3. Handling & Accessories
3.3.2
ALSPA MV3000 Demonstration Case
Carrying the Case
The case is housed in a strong ABS plastic briefcase. The weight of the case, including
the contents supplied by %&'(, is approximately 7kg, which is below the 10kg
recommended weight for a table top lift. It is therefore not recommended to put any
other items into the case other than those supplied by %&'(, to ensure that
maximum recommended lifting weights are not exceeded.
3.3.3
Opening and closing the case
The case has 2 locks positioned either side of the handle (❺). With the case flat on a
table, Insert a finger behind each lock, at the outer edge, then pull forward, the locks
will spring forward and release the case lid. Push the lid up and back until the lid is
fully upright, it may sometimes be necessary to support the top panel(❶) whilst
opening, as the magnetic catches holding it closed, may release.
To close the case, replace the %&'( items in the document wallet (❼), ensure the
document wallet is closed and the DDM™ (❾) is in its harbour (❽). Pull the case lid
forward and lower it carefully, press the outer edge of the case locks in, to fasten the
case closed. The case can be locked by using the 2 keys supplied (they should be tied
to the case handle on receipt).
3.4
Identifying and Connecting the Case Accessories
3.4.1
List of Case Accessories
The case contains a number of leads and accessories to allow effective demonstrations
to be undertaken, this section explains what the items are and how they can be used.
The accessories are stored in the document wallet (❼) area of the case. Various
accessories are included, a list is provided here:
1. ALSPA MV3000 Drive Data Manager (DDM™ ) lead
This is the standard lead used with the ALSPA MV3000
DDM™. The part number for this item can be found in
chapter 7, spares and accessories.
See Section 3.4.3 for an explanation of how to use and
connect the lead
Figure 3-1 DDM™ lead
2. PC to demonstration case lead
This lead comprises of an RS232 to 422 converter which is
wired to a connector which mates to the PC to case
connector (⑧).
See Section 3.4.4 for an explanation of how to use the lead
3. Mains lead
See section 3.4.5 for more information on the mains lead.
4. Data sheets for the Drive Data Manager - T1915.
5. Data sheets for the PC lead converter.
Page 3-2
Demonstration Case User Manual (T1691)
Figure 3-2 Case to PC
lead
Issue (05/01)
ALSPA MV3000 Demonstration Case
3.4.2
3. Handling & Accessories
Opening the Document Wallet (❼)
The top panel (❶) has a finger hole (❻) milled
into it. Next to the finger hole is a catch holding
the wallet closed, rotate the catch a quarter turn
to release it then insert a finger into the hole and
pull forward, the document wallet/cable store
area will be revealed.
The top panel has a strap to prevent it from
falling fully open.
The case user manual, data sheets, power lead
and accessories are housed here.
3.4.3
Figure 3-3 Case with Document
wallet (❼) open
Connecting the Drive Data Manager (DDM™)
lead
This lead is designed to be used with the ALSPA
MV3000 DDM™ . The lead allows the DDM™ to
be mounted on a cubicle door or allows the user
to hand hold the DDM™ .
Connect the special lead as shown in Figure 3-4,
looping the cable around the groove provided
then underneath the “ear” on the cable
connector. If done correctly, the DDM™ should
lie flat on its back on a table.
Figure 3-4 Showing how to connect
the lead to the DDM
The other end of the cable should be connected
to the 9 way “D” connector on the DDM™
Harbour (❽).
Figure 3-5 shows the DDM™ connected in this
way.
Figure 3-5 Showing the DDM connected
via the cable
3.4.4
Connecting a PC to the demonstration case (⑧)
The case can be connected to a PC using the
lead provided, simply plug the lead into the PC
to case connection (⑧) on the bottom panel, and
into the back of the PC.
This will allow interactive demonstrations with
other %&'( products, for example SCADA
tools and the drive configuration tool, ALSPA
Drive Coach.
Issue (05/01)
Figure 3-6 Showing the Case connected
to a PC
Demonstration Case User Manual (T1691)
Page 3-3
3. Handling & Accessories
ALSPA MV3000 Demonstration Case
The lead can also be separated, removing the RS232/422 converter, thus allowing
direct connection to the RS485 connections on TB4 of the control PCB. This will allow
the case to be connected to %&'( HMI products, again allowing the case to
perform interactive demonstrations. Section 4 of this guide will give an outline of how
to program the case to achieve these communications connections.
The following pin-out is provided to allow other items to be connected to the case
successfully:
TB4 on CDC
7 way CAN&RS485, PC to
case connector (⑧)
9 way “D” Type connector
TB4/1
(Tx+)
1
2
(RxA)
TB4/2
(Tx-)
2
7
(RxB)
TB4/3
(Rx+)
3
8
(TxA)
TB4/4
(Rx-)
4
3
(TxB)
(GND)
5
Not Connected
TB4/5
(connect to screen)
TB4/6
(CAN HI)
6
Not Connected
TB4/7
(CAN LO)
7
Not Connected
If the lead is separated, care must be taken when
re-assembling the lead for PC operation. The lead
must be plugged into the RS422 end of the
converter, leaving the RS232 end free to connect to
the PC, Figure 3-7 shows the connector assembled
correctly.
The end marked
RS422 connects to the
case lead.
3.4.5
Figure 3-7 The PC lead correctly
assembled
Mains Lead
The case is supplied with a 3 pin IEC style mains lead. The language version of the
case, determines the kind of plug connected to the mains lead supplied:
MV3000 CASE DEMO/E
MV3000 CASE DEMO/F
MV3000 CASE DEMO/D
ENGLISH version
FRENCH version
GERMAN version
UK style fused plug
Continental plug
Continental plug
The mains lead is earthed and MUST be connected to an earthed power outlet for
safety reasons.
Page 3-4
Demonstration Case User Manual (T1691)
Issue (05/01)
ALSPA MV3000 Demonstration Case
4. Switching On and Demonstrating
4. Switching On and Demonstrating
4.1
Introduction
This section will explain the case switch on procedure, the use of the DDM™ ,
connection of the case to a PC or other serial linked items, hints on how to use the case
to demonstrate and a brief explanation of the ALSPA MV3000 software environment to
allow effective demonstrations/simulations to be made.
When the case leaves the factory it is programmed with sensible default values for all
parameters, these defaults are of course exactly the same as the ALSPA MV3000 drive.
4.2
Switching the Case On
Before powering up, ensure that the case has been placed on a flat surface and
opened as per Section 3.3.3, and the case has been transported to the demonstration
place in accordance with the recommendations made in Section 3.3.1.
Power the case up by carrying out the following basic steps:
1. Open the case, see Section 3.3.3
2. Ensure all the potentiometers in the power frame simulator (⑦), are all in the 12
O’clock position.
3. Ensure the green switches in the power frame simulator (⑦), are all ON (pressed
in).
4. Ensure the green switch labelled 4-20mA loss (⑩), is switched ON (pressed in).
5. Ensure all the plant digital input switches (③) are all OPEN (up).
6. Ensure the Drive Data Manager (❾), is in its harbour (❽).
7. Connect the mains lead to the power inlet (❹) and a suitable supply.
8. Switch the mains power on using the illuminated switch (❹).
9. The case will power up, The yellow LED near to the plant digital outputs (①)
should be on, the DDM™ (❾) should power up and eventually display P1.00.
10.The CDC board (❸) should be healthy, and this can be determined by the green
healthy/standby LED on the DDM™ (❾), the rear cover of this guide has a picture
of the DDM™, so the healthy/standby LED can be identified.
11.If the case does not power up healthy, it is possible that the parameters stored in
the CDC board (❸) are not at their default settings. Carry out the procedure
described in Section 5.1.9, then repeat the power up procedure before referring
to the diagnostics section of this guide.
4.3
Uses and Features of the Bottom Panel (❿)
4.3.1
Introduction
The bottom panel is the part of the case where the “plant” and the ALSPA MV3000
power frame has been simulated, for demonstration purposes, this allows the case to
perform the function of a drive as fully as possible. The bottom panel is split into 3
main areas, they are briefly described below:
Issue (05/01)
Demonstration Case User Manual (T1691)
Page 4-1
4. Switching On and Demonstrating
1. Plant I/O
ALSPA MV3000 Demonstration Case
Areas ①②③④⑤⑥⑨⑩
Pre-wired plant connections.
LED’s , illuminated switches and potentiometers have been fitted to the case and
wired to the CDC board (❸) customer inputs. This “plant” wiring has been
connected to the CDC Board (❸) in exactly the same configuration as described for
the ALSPA MV3000 drive in its default configuration. The labels match this default
set-up. This default configuration is described for reference in Section 5.1.10.
2. Power frame simulation
Area ⑦
Takes the place of a real drive.
Key circuits on the drive have been reproduced to allow the monitoring and
diagnostic functions of the ALSPA MV3000 to be demonstrated. Illuminated
switches, LED’s and potentiometers are used to simulate feedbacks and trip signals.
3. PC to case connection Area ⑧
Connection to CAN & RS485
Via the lead, described in the accessories section of this guide, a PC can be
connected to the case.
4.3.2
Using the Plant I/O Area (①②③④⑤⑥⑨⑩)
The following section describes how these controls and switches can be used. The
labels on these controls match the default set-up for the CDC board (❸), which of
course matches that of the default ALSPA MV3000. For this explanation to work, the
CDC board (❸) needs to be at default, see Section 5.1.9 for the defaulting procedure.
Use this table to understand how the controls are connected, so that bespoke
programming and changes during demonstrations can go smoothly. Sections later in
this guide give a brief overview of how to use the case to develop new ALSPA MV3000
programs.
Note:
The case output is the simulated IGBT bridge represented by the 6 YELLOW
led’s which are mounted within the power frame simulation area (⑦).
Table 4-1 Details of the Plant I/O Area
Panel Item
No.
Panel Item
Area
①
Plant Digital
Outputs
OUTPUT 1
ON
- Green -
The case is healthy
healthy
OFF
- Red -
The case has tripped
(MENU 7)
OUTPUT 2
ON
- Green -
Output is running
Running
OFF
- Red -
Output is NOT running
OUTPUT 3
ON
- Green -
Output at speed
At Speed
OFF
- Red -
Output NOT at speed
Interlock
A normally closed push button which is wired to
the CDC board (❸) interlock input, when pressed
(opened) the case will trip on “interlock” trip, as
per a real plant Emergency stop. Releasing the
button re-closes the interlock input allowing the
case to be made healthy via a reset.
②
Plant
Interlock
(used for
emergency
stops )
Page 4-2
Specific panel
name
Function / Use in the case (@ default)
Demonstration Case User Manual (T1691)
Issue (05/01)
ALSPA MV3000 Demonstration Case
Panel Item
No.
Panel Item
Area
③
Plant Digital
Inputs
4. Switching On and Demonstrating
Specific panel
name
INPUT 1
Function / Use in the case (@ default)
ON
- lit Red -
When set to “remote”,
the stop circuit is
“made” and the case
output is able to start.
OFF
- not lit -
A remote stop is issued
ON
- lit Green -
When set to “remote”,
a start request is
issued, the case output
will start if the stop
circuit is made.
OFF
- not lit -
The output will remain
started (latched) if
pressed and released.
Stop
only works in
Remote, see
INPUT 4
SEE
CONTROL
BLOCK
DIAGRAMS
- SHEET 2 AND
CONTROL
FLAG DATA
IN SECTION
5
INPUT 2
Start
only works in
Remote, see
INPUT 4
Note: This input should be pulsed ON then OFF
to perform a start (if stop made).
INPUT 3
ON
- lit Yellow -
The speed reference
being used in the case
can be reversed,
depends on the setting
of P5.11 for its
function.
OFF
- not lit -
The reference will
remain unaffected.
ON
- lit Yellow -
OFF
- not lit -
The start/stop and speed
reference will come from
the DDM™ (❾).
ON
- lit Yellow -
When in remote, the
4-20mA reference is active
on Analogue input 2.
OFF
- not lit -
When in remote, the +/10V reference is active on
Analogue input 1.
ON
- lit Yellow -
A trip reset pulse is
issued.
OFF
- not lit -
No reset pulse is issued
Reverse
INPUT 4
Keypad
(DDM™)
/Remote
INPUT 5
The start/stop controls
and the speed
reference come from
“remote”, which, at
default, is the panel
plant I/O area.
Ref 1 /Ref 2
only works in
Remote, see
INPUT 4
INPUT 6
Trip Reset
Note: This input should be pulsed ON then OFF
to perform a reset.
Issue (05/01)
Demonstration Case User Manual (T1691)
Page 4-3
4. Switching On and Demonstrating
Panel Item
No.
④
Panel Item
Area
Specific panel
name
Function / Use in the case (@ default)
Motor
Thermistor (A
Positive
Temperature
Co-efficient
thermistor I/P)
Menu 2, P2.13, P2.14 and P2.15, set up the way
in which a PTC can be connected to the ALSPA
MV3000. The Motor thermistor simulation
potentiometer allows the case user, to simulate a
motor overheating and hence show how the
ALSPA MV3000 would react.
Plant
Analogue
Inputs
ANALOGUE
I/P 1
A -10V to +10V pot has been connected, to
simulate a voltage reference to the ALSPA
MV3000 . Menu 7 is used to set up the analogue
inputs. It is extremely important that the DIP
switches are set correctly for this to work.
(MENU 7)
ANALOGUE
I/P 2
Motor
Thermistor
(MENU 2)
⑤
ALSPA MV3000 Demonstration Case
only works in
Remote, see
INPUT 4
only works in
Remote, see
INPUT 4
A 4-20mA pot has been connected, to simulate a
current reference to the ALSPA MV3000 . Menu 7
is used to set up the analogue inputs. It is
extremely important that the DIP switches are set
correctly for this to work.
A 4-20mA loss switch is also available.
⑥
Analogue
DIP Switches
Analogue DIP
Switches
Ensure the switches are set as per the graphic on
the panel, to set the switches correctly for the
default analogue I/O. In reality these DIP switches
would be used to configure the analogue I/O for
current or voltage operation on the plant.
⑨
Plant
Analogue
outputs
ANALOGUE
O/P’s 1 and 2
2 bipolar +/-10V meters will allow the user to
“patch” signals to the outside world, as would be
done on plant. Once again it is extremely
important that the DIP switches are set correctly for
this to work.
4-20mA loss
switch
ON
- lit Green -
The 4-20mA generator
in the case is on.
OFF
- not lit -
The 4-20mA generator
in the case is off, the
drive will trip on
reference loss if this
reference is selected.
(MENU 7)
⑩
4-20mA loss
switch
(MENU 5)
Operating notes:
• Use digital input 4 to switch between keypad (DDM™ ) and remote (off = keypad).
• To achieve a remote start, press in the stop switch in, then pulse the start switch.
• To achieve a remote stop, open the stop switch.
• The Ref1/Ref2 switch is only active in remote.
• The trip reset (on digital input 6) is active in local or remote modes.
Page 4-4
Demonstration Case User Manual (T1691)
Issue (05/01)
ALSPA MV3000 Demonstration Case
4.3.3
4. Switching On and Demonstrating
Using the Power Frame Simulation Area (⑦)
The power frame simulation area is split into 4 main areas, they represent areas which
exist within a standard ALSPA MV3000 drive. Controls are placed within these areas to
allow signals to be adjusted for monitoring and diagnostic demonstrations.
Table 4-2 Details of the Power Frame Simulation Area
Simulator (⑦)
Name
Type of Panel
Control
Function of Panel Control
Trips, Warnings and Uses
I/P Temperature
Feedback
Potentiometer
Allows the user to vary the
simulated I/P bridge
heatsink temperature. The
value can be seen at P11.08
in oC.
HEALTHY when the pot is at the
12 o’clock position.
Indicates when The CDC
board (❸) has determined
that DC Link precharge is
complete.
Raise the DC link to greater than
400Vdc (see DC feedback
below) and approximately 1
second later the CDC will
determine that precharge is
complete.
INPUT AREA
Precharge
Complete
Red LED
Raising the DC link
feedback can initiate a
simulated precharge.
INPUT AREA
D.B. Hardware
Over
Temperature
Green
Illuminated
Switch
See Note 1 below.
DYNAMIC
BRAKE AREA
D.B.
Instantaneous
Overcurrent
Simulates a hardware circuit
which monitors the D.B.
temperature.
DYNAMIC
BRAKE AREA
Issue (05/01)
When the DC Link feedback is
reduced below 400V, an
undervoltage will be detected.
HEALTHY when the switch is
illuminated.
Trips case on “D.B. Hardware
O.Temp.” when the switch is
opened.
Green
Illuminated
Switch
Simulates the trip signal
returning from the D.B.
IGBT power device.
HEALTHY when the switch is
illuminated.
Potentiometer
Allows the user to vary the
simulated D.B. heatsink
temperature. The value can
be seen at P11.12 in oC.
HEALTHY when the pot is at the
12 o’clock position.
DYNAMIC
BRAKE AREA
D.B.
Temperature
Feedback
Increasing the temperature will
trip the case on “Over
Temperature”, reducing the
temperature will issue a “Low
Temperature” warning, then
eventually a trip on “Under
Temperature
Trips on case “DB O-Curr Trip.”
when the switch is opened.
Increasing the temperature will
trip the case on “Over
Temperature”, reducing the
temperature will not have any
effect, as the pot has not got the
range to initiate the
UnderTemperature messages.
Demonstration Case User Manual (T1691)
Page 4-5
4. Switching On and Demonstrating
Simulator (⑦)
Name
DC Link
Feedback
Type of Panel
Control
Function of Panel Control
Potentiometer
Allows the user to vary the
simulated DC Link voltage.
The value can be seen at
P11.03 in Volts.
Varying this value will also
be seen as a different PWM
pulsing on the YELLOW
activity LED’s, as the drive
compensates for the
differing DC link levels.
DC LINK AREA
DC Hardware
Over Voltage
Green
Illuminated
Switch
Potentiometer
OUTPUT AREA
O/P Hardware
Over
Temperature
Green
Illuminated
Switch
OUTPUT AREA
Overcurrent
U,V,W
OUTPUT AREA
Trips, Warnings and Uses
HEALTHY when the pot is at the
12 o’clock position.
Increasing the value will not trip
the case on overvoltage, as this
is left to a hardware detector.
If the output is running, a high
DC link will be interpreted as
voltage across the D.B. resistor
and associated “DB resistor”
warnings and trips will be seen.
HEALTHY when the switch is
illuminated.
Trips on “DC Over Voltage”
when the switch is opened.
Allows the user to vary the
simulated O/P bridge
heatsink temperature. The
value can be seen at P11.05
in oC.
HEALTHY when the pot is at 12
o’clock.
Simulates a hardware circuit
which monitors the O/P
bridge temperature.
HEALTHY when the switch is
illuminated.
See Note 1 below.
Increasing the temperature will
trip the case on “Over
Temperature”, detected by the
software.
Trips case on “ Hardware
O.Temp. U” when the switch is
opened.
Green
Illuminated
Switches
Simulates the Overcurrent
trip signals returning from
the O/P IGBT power
devices.
HEALTHY when the switch is
illuminated.
6 Yellow
LED’s
There is one LED connected
to where there would
normally be an IGBT in the
drive. the LED’s are
simulating the power bridge
of the drive.
When the O/P bridge is running
these LED’s light and flicker
once per IGBT ON signal. Their
flickering alters with speed and
DC link volts, showing the
interaction of Modulation depth
on the PWM signals.
OUTPUT AREA
Bridge Activity
LED’s
Simulates a hardware circuit
which monitors the DC link
Voltage.
See Note 1 below.
DC LINK AREA
O/P
Temperature
Feedback
ALSPA MV3000 Demonstration Case
Trips on “Inst. Overcurrent.”
when the switches are opened.
Note 1: For safety, the real ALSPA MV3000 drive monitors certain signals in hardware
and software. In the event that the software is not running properly at the time
of the problem, then the backup hardware circuit will protect the ALSPA
MV3000 against a failure which will damage the product. The case simulates
these hardware circuits with switches.
Page 4-6
Demonstration Case User Manual (T1691)
Issue (05/01)
ALSPA MV3000 Demonstration Case
4.3.4
4. Switching On and Demonstrating
Using the Case Serial Link lead including Connections (⑧)
Introduction
The 7 pin connector in area (⑧) extends the standard CDC board (➌) RS485 and
CAN connections to a convenient position on the case. This connector now allows
the case to be connected to an RS485 serial link or a CAN bus. Section 3.4 gives
details of the connector pin outs and details of the lead provided in the case. The
lead allows easy connection to a PC (via an RS232/422 converter) or other serial
device. Connection to !"#$ HMI devices, SCADA devices and PLC’s is now
possible. The case can now be used as a safe and convenient simulated ALSPA
MV3000, to develop plant programs on the other devices. Parameters edited in the
case to facilitate the completion of this simulated plant, can then be uploaded into
the ALSPA Drive Coach or into the DDM™ (via P99.16) and transferred to a fully
installed ALSPA MV3000.
1. Connecting to the ALSPA Drive Coach
The ALSPA drive coach is the PC tool available for the ALSPA MV3000 and allows
parameter editing and storage, and also allows graphical access to the drives
history record, all of which can be demonstrated using the case.
To gain communication, set the following values:
P32.50 = 6
Sets 38400 baud
P32.51 = 0
Sets an RS485 Address of 0
P32.52 = 1
Sets GEM80 ESP protocol
Interactive demonstrations, training or parameter uploading can now be undertaken
with the ALSPA Drive Coach. The help files on the ALSPA Drive Coach give all the
required detail to successfully run the software tool.
2. Connecting to other Serial Devices
Once suitable electrical connections have been made (see Section 3.4.4), the CDC
board (❸) RS485 port must be configured. This is done in menu 32, starting at
P32.50. Parameters for baud rate etc. must be set to gain communication to the
other device.
The user guide control block diagrams (Section 5.3) pictorially show an overview of
the parameters and how to access the other menus. The optional software technical
manual (T1679) gives a complete and comprehensive parameter listing, this data
will give full details for more comprehensive use of this serial port.
3. The CAN connections are currently not in use.
Issue (05/01)
Demonstration Case User Manual (T1691)
Page 4-7
4. Switching On and Demonstrating
4.4
ALSPA MV3000 Demonstration Case
Demonstrating - a short example
The following is a short example of how the case can be used in its default format.
Read Section 4.5 first to gain the necessary skills required to operate the DDM™(❾).
The example takes the form of a flow chart for ease.
START HERE
for this example to work the case must be switched on, following the procedure
described in Section 4.2, and at default, see Section 5.1.9 to achieve this.
OPENING THE OTHER MENUS
Navigate to P1.31 and edit its value to 2
RE-CONFIGURING ANALOGUE OUTPUT 2 to Show speed reference
An optional part of the demo, only makes the demo more visual.
Navigate to P7.22 and edit its value to 9.00,
This sends the speed reference out
Navigate to P7.24 and edit its value to 1,
Sets the output to bipolar
Navigate to P7.25 and edit its value to 100,
Sets the analogue scaling
4.4.1
Starting from the DDM™(❾)
STARTING FROM THE DDM™(❾)
Press the “esc” key twice until Menu 1 is displayed on the DDM™(❾), then press the ▼ arrow on the
navigation key to enter Menu 1. The DDM™(❾) will now display P1.00, the speed reference.
1. Press the GREEN Run button on the DDM™(❾).
2. The 6 yellow bridge activity LED’s will light (⑦) and digital output 2 (①) will show output running.
3. Edit P1.00 to 100%.
4. Analogue output 2 will read +10, and Analogue output 1 will ramp up to +10 (⑨).
5. The bridge activity LED’s will show PWM switching.
6. The “at speed signal” at digital output 3 (①) will go off then come back on.
7. Edit P1.00 to -100%.
8. Analogue output 2 will read -10, and Analogue output 1 will ramp up to -10 (⑨).
9. The “at speed signal” at digital output 3 (①) will go off then come back on.
10.Edit P1.00 to 0%.
11.Analogue output 2 will read 0, and Analogue output 1 will ramp up to 0 (⑨).
12.The “at speed signal” at digital output 3 (①) will go off then come back on.
13.Press the RED Stop button on the keypad (❾).
14.Digital output 2 (①) will show output not running (RED LED)
Parameters in Menu 6 can be adjusted to alter the ramp rates. Analogue output 1 will display the
new ramp rates set by the ramp rate parameters, as the speed reference is changed.
CONTINUE - FOR STARTING FROM THE CASE I/O
Page 4-8
Demonstration Case User Manual (T1691)
Issue (05/01)
ALSPA MV3000 Demonstration Case
4. Switching On and Demonstrating
CONTINUE - FOR STARTING FROM THE CASE I/O
4.4.2
Starting from the Case I/O
STARTING FROM THE CASE I/O
With the keypad still displaying P1.00, the speed reference:
1. Press the YELLOW digital input 4 switch (③), this selects remote control.
2. Pressing the Run button on the DDM™(❾), or attempting to edit P1.00 will result in the keypad
reporting that it has not got access to either control or reference.
3. Press the RED stop switch on the I/O panel, connected to digital input 1(③).
4. Pulse the GREEN start button, connected to digital input 2 (③).
5. The 6 yellow bridge activity LED’s will light (⑦) and digital output 2 (①) will show output running.
6. Adjust the pot labelled analogue input 1(⑤) ,the +/-10V reference, then leave it still.
7. Analogue output 2 (⑨) will follow the pot, and Analogue output 1 (⑨) will ramp up to it.
8. The bridge activity LED’s will show PWM switching (⑦).
9. The at speed signal at digital output 3 (①) will go off then come back on.
10.Press the YELLOW Ref1/Ref2 switch, connected to digital input 5 (③).
11.Analogue input 2 (⑤), the 4-20mA reference, will now be active.
12.Adjust the potentiometer labelled analogue input 2 (⑨), the 4-20mA reference, then leave it still.
13.Analogue output 2 (⑨) will follow the pot, and Analogue output 1 will ramp up to it.
14.The at speed signal at digital output 3 (①) will go off then come back on.
15.Set analogue input 2 (⑤), to 4mA
16.Analogue output 2 (⑨) will read 0, and Analogue output 1 (⑨) will ramp up to 0.
17.The at speed signal at digital output 3 (①) will go off then come back on.
18.Open the RED Stop switch on the I/O panel, connected to digital input 1 (③).
19.Digital output 2 will show output not running (RED LED) (①)
Parameters in Menu 6 can be adjusted to alter the ramp rates. Analogue output 1 will display the new
ramp rates set by the ramp rate parameters, as the speed reference is changed.
GETTING HELP WITH DIAGNOSTICS
With the I/O switches left as above, close the stop switch (illuminates RED) and pulse the start, to get
the output running:
1. Open the GREEN switch marked 4-20mA loss (⑩).
2. The case will trip (red flashing LED on the DDM™(❾).
3. Press the “?” key on the DDM™(❾). from the menu choose, view trips.
4. Close the 4-20mA loss switch (⑩) so that it illuminates GREEN.
5. Press the “?” key on the keypad, from the menu choose, reset trips, the case will become healthy
GETTING HELP WITH PARAMETERS
With the case healthy, navigate to P5.01. Use the “?” key to get parameter help. Repeatedly
pressing the “?” key or pressing ➨ arrow on the navigation key, gives the next piece of HELP.
STOP
Issue (05/01)
Demonstration Case User Manual (T1691)
Page 4-9
4. Switching On and Demonstrating
4.5
ALSPA MV3000 Demonstration Case
Drive Data Manager™ (❾) Functions
The Drive Data Manager™ provides Keypad functionality to configure the drive, in
addition to providing motor control, diagnostic functions and condition monitoring.
Note:
A diagram of the DDM™ is provided for reference inside the rear cover.
4.5.1
Navigation Key
The 4-way Navigation key is used to navigate menus and parameters, and to edit
parameter values. Operation of the Navigation key is shown inside the rear cover.
4.5.2
Navigating to Menus and Parameters
Figure 4-1 shows how to navigate the menus and parameters to find any parameter.
Menu 1 and its parameters are illustrated as an example, other menus are treated in
exactly the same way. To access menus other than Menu 1, edit parameter P1.31 as
shown in Section 5.1.7.
The start-up screen which is displayed when the case is first switched on, with the
DDM™ connected, is labelled below, this shows the default value for P1.00.
Keypad Removal Screen
1. REMOVAL CHECK
2. RETURN TO PARAMS.
(Parameter P35.01 can be
editited to prevent Keypad
removal)
ESC
from any menu to Menu 1
ESC
MENU LEVEL
Menu 1 :
User Config. Menu
(Edit P1.31 to
access other menus
99 : Config.
(Last Menu)
Menus 2 to 99
ESC
or
from
ANY MENU 1 PARAMETER
to the Menu 1 screen
PARAMETER LEVEL
P1.32
(Last Parameter in
(
Menu
1)
P1.00
Speed Reference
=0.00 % Top Speed
Parameters
P1.01 to P1.32
START-UP
SCREEN
Figure 4-1 Navigating menus and parameters
Page 4-10
Demonstration Case User Manual (T1691)
Issue (05/01)
ALSPA MV3000 Demonstration Case
4.5.3
4. Switching On and Demonstrating
SHORTCUT Method of Entering a Parameter Number
If the parameter number is known, it can be entered directly using a shortcut method.
From the parameter or menu level, proceed as follows :
For example, the key Sequence to shortcut to P1.00, the Speed Reference:
PQR
.
ABC
6
1
0
0
P1.00 <Enter>
4.5.4
Editing Parameters
Two types of parameter may be edited:
NUMERICAL parameters – to change the value
LIST parameters – to choose from a list
NUMERICAL parameter
As an example of editing numerical parameters, Figure 4-2 shows how to edit the
value of the Motor Base Frequency parameter P2.00.
Original value
New value
P2.00
Motor Base Freq.
=50.0 Hz
PARAMETER
LEVEL
P2.00
Motor Base Freq.
=100.0 Hz
EDIT Mode
P2.00
Motor Base Freq.
=50.0
NEW=_
ESC
Use HELP
or Enter new data
1
+
O
+
O
P2.00
Motor Base Freq.
=50.0
NEW=100_
ESC
ESC
ABC
(Accept new value)
?
from any
HELP screen
Previous
P2.00
Motor Base Freq.
=50.0 Hz
?MAX=200.0 MIN=5.0
(Shows Limits)
HELP
screens
Next
Previous
P2.00
Motor Base Freq.
=50.0 Hz
?Def 50.0 Hz
Next
.....
HELP
screens
P2.00
Motor Base Freq.
=50.0 Hz
?Information Ends
(Shows Parameter Attributes)
Figure 4-2 Editing a numerical parameter
Issue (05/01)
Demonstration Case User Manual (T1691)
Page 4-11
4. Switching On and Demonstrating
ALSPA MV3000 Demonstration Case
LIST parameter
This type of parameter contains a list of choices or items etc. Figure 4-3 shows how to
select from a list parameter, using the Speed Reference 1 Source parameter P5.01 as
an example.
The options in a list parameter can either be determined by consulting the optional
software manual (T1679) or by simply pressing the “?” key, this key gives context
sensitive help when required, here parameter help is given. The diagram shows how
the help key can be used to determine a required selection.
Original source
P5.01
Speed Ref. 1 Src
=1
Keypad Reference
PARAMETER
LEVEL
Go to
HELP
ESC
OR
Enter new
value
P5.01
Speed Ref. 1 Src
=3
Analog Ref. 2
+
GHI
3
*
P5.01
Speed Ref. 1 Src
=1
NEW=3
If drive is tripped,
see Sect. 6
ESC
New source
from lists in
* Choose
Control Block Diagrams
?
Accept new value
(Section5.3)
or use HELP
from any HELP screen
?
Previous
P5.01
Speed Ref. 1 Src
=1
?MAX=22 MIN=1
OR
HELP
screens
Next
Previous
P5.01
Speed Ref. 1 Src
=1
?1=Keypad Reference
?
OR
HELP
screens
Next
P5.01
Speed Ref. 1 Src
=1
?2=Analog Ref. 1
etc.
To selelect any option, simply press
Default
source
Attributes
Information ends
Figure 4-3 Editing a "List" parameter
4.5.5
Using the DDM™ HELP (?) Key
The help key can provide diagnostic help or parameter help, this help function is
context sensitive. See Section 6 for a detailed use of the “?” key during diagnostics and
Section 4.5.4, List parameters, for an example of how to get Parameter help.
Page 4-12
Demonstration Case User Manual (T1691)
Issue (05/01)
ALSPA MV3000 Demonstration Case
4. Switching On and Demonstrating
4.5.6
DDM™ (keypad) Removal Checks
Note:
To allow the drive to make the necessary safety checks, this removal procedure
should always be followed. A trip may result if this procedure is not followed.
The drive checks if DDM™ removal is allowed as the DDM™ may have Start/Stop
control, or the DDM™ Speed Reference may be active.
To remove the DDM™ , continue as shown in Table 4-3.
Table 4-3 How to remove the DDM™
1
Do What?
How?
Ensure the Keypad (DDM™) is neither
in control of the Start/Stop nor the
Keypad Speed Reference is active
AT DEFAULT:
Close DIGIN4, this will select Remote.
ELSE:
Gain the necessary authorisation
before continuing.
a) Make P4.09 = 1, to set CF116 ON, this
removes the Start/Stop Control from the
Keypad (DDM™).
b)
2
Access the Keypad removal screen
The Keypad (DDM™) must not be either
the active reference source or the backup
reference source. The reference sources
are held in P5.01 to P5.05 and are
made active by CF4 to CF7 (P5.07 to
P5.10) respectively. The backup
reference is P5.06.
Press the “esc” key repeatedly.
1. REMOVAL CHECK
2. RETURN TO PARAMS.
3
Select “REMOVAL CHECK”
4
Remove Keypad if the screen allows:
****KEYPAD READY****
****FOR REMOVAL****
Note:
Press the “1” key on the Keypad (DDM™).
The drive checks to see if the Keypad is
allowed to be removed. As well as the above
control and reference checks, P35.01 (Allow
Keypad Removal) is also checked.
A message may be flashed disallowing
removal because the Keypad is either still in
control, still has active/backup reference (see
step 1 above) or if it is simply disallowed (see
step 3 above).
If the DDM™ is neither in control or is a valid reference choice, the DDM™ can
be removed without a trip and without invoking the above procedure,
HOWEVER it is useful to make a habit of the above removal procedure so that
the ALSPA MV3000 is able to make the necessary checks.
Issue (05/01)
Demonstration Case User Manual (T1691)
Page 4-13
4. Switching On and Demonstrating
4.6
DDM™ Harbour (❽)
4.6.1
Harbour LED Indicators
ALSPA MV3000 Demonstration Case
If the DDM™ is not fitted, or the DDM™ is fitted via its lead and is being hand held,
four LED’s on the DDM™ Harbour indicate drive status as shown in Figure 4-4 below.
These LED’s are duplicated on the DDM™.
HEALTHY (STANDBY) (green)
Mains power is applied to the drive and
there are no faults or warnings.
RUNNING (green)
The drive is producing an output
WARNING (amber)
A warning condition exists, not sufficient to
cause the drive to trip
Depressions used
when removing
the keypad from
the harbour.
TRIPPED (red)
A fault condition has caused the drive to
trip. Refer to Section 6.6, Otherwise press
the “?” key for on-line parameter HELP.
Figure 4-4 DDM™ Harbour and
indicators
4.6.2
RS232 Serial link Connector
The DDM™ is connected here, however the
port can be used to connect to other serial
devices. Menu 32 configures the port and
the keypad auto-connects if the port is used
for other items.
Removing the DDM™ from the Harbour, and re-fitting.
The DDM™ (❾) is removed by first carrying out the correct removal checks, which is
detailed in Section 4.5.6, then, grasp the DDM™ (❾) at the bottom and press fingers
and thumbs into the depressions in the harbour (❽) moulding (as draw above in
Figure 4-4), the DDM™ (❾) will snap out.
Re-fitting the DDM™(❾) is described on the data sheet (T1915) which is supplied as an
accessory and is stored in the case document wallet.
4.7
Limitations of this Demonstration Case
As the output bridge of the ALSPA MV3000 is simulated here by 6 LED’s, and since
there is not a motor connected to the case, some of the monitoring and feedback
parameters in the menu structure will give a false reading. The parameters associated
with current and power are the ones which are effected.
Setting Vector control in P99.01 may also give a variety of faults for the same reasons.
Page 4-14
Demonstration Case User Manual (T1691)
Issue (05/01)
ALSPA MV3000 Demonstration Case
5. Menus and Parameters
5. Menus and Parameters
5.1
MV3000 Menus and Parameters Overview
5.1.1
Introduction
The purpose of this section is to introduce the user to the software environment of the
ALSPA MV3000. This will allow more effective demonstrations to be given and also
allow the case to be used to develop and practise software writing for the drive.
5.1.2
What is a Parameter?
The ALSPA MV3000 software uses system constants, scaling factors and other data,
collectively referred to as PARAMETERS, which are arranged into MENUS for ease of
use. Menus group parameters by like function e.g. Menu 6 contains Ramp Settings. The
complete menu listing is shown in Table 5-1. Some Parameters are duplicated into
more than one menu to make them easier to
locate.
Every parameter has a Parameter Number , which
includes the menu in which it is located. See
opposite for an example:
The parameters can be accessed by navigating or
shortcutting to them. Refer to section 4 for how to
use the DDM™.
5.1.3
P2.02
Parameter
designator
Menu 2
Parameter 02
Parameter Attributes
All parameters have attributes which specify how they may be accessed. Attributes are
determined by the parameter function, e.g. security or user level password
requirement, or the type of parameter, e.g. a List. The DDM™ will display these
attributes when the “?” is pressed. The types of attribute are described below.
Attribute
E
L
N
O
R
S
5.1.4
Security /User Level /Type
Engineer accessible - only accessible if the engineering password
has been entered into P99.06 or P1.32, see Section 5.1.4.
List parameter, value selected from a pre-defined list
(eNter) has to be pressed to update
Operator accessible - only accessible if the operator password
has been entered in P99.06 or P1.32, see Section 5.1.4.
Read only (monitoring parameters)
Stop to edit, the output must be stopped to allow editing
Parameter Passwords
A simple system of passwords allows control of access to parameters, the method of
entry is described below. Two levels of access are provided:
Access Level
Issue (05/01)
Default Password
Default Status
Operator
0
Unlocked
Engineer
0
Unlocked
Demonstration Case User Manual (T1691)
Page 5-1
5. Menus and Parameters
ALSPA MV3000 Demonstration Case
Using the passwords
1.
The Engineer’s password is stored in P99.08 (a 4 digit code).
2.
The Operator’s password is stored in P99.07(a 4 digit code).
3.
Enter the "key" code into P99.06 (or P1.32, its duplicate). If the key matches
either the Engineer’s or the Operator’s code, then that relevant level is unlocked,
and parameters with those attributes can be edited.
4.
Once unlocked, new passwords can be edited into P99.08 or P99.07.
5.1.5
A Complete Menu Listing
Table 5-1 Complete Menu listing
Menu
Page 5-2
Description
Menu
Description
1
User configured menu
27
History log playback settings
2
Basic motor settings
28
Auto-reset settings
3
Frequency control settings
29
Speed and torque monitor settings
4
Start and stop control
30
Logic block settings
5
Speed reference settings
31
Status flag generator settings
6
Ramp settings
32
Serial links settings
7
Plant I/O settings
33
Control flag 0 to 99 source settings
8
Torque limit settings
34
Control flag 100 to 126 source settings
9
Basic drive monitoring
35
Miscellaneous features settings
10
Trips and warnings
36
Position controller settings (encoder only)
11
Advanced drive monitoring
37
Position reference settings (encoder only)
12
Motor advanced settings (vector only)
38
Position controller monitor (encoder only)
13
Speed feedback settings (vector only)
39
User configurable menu (Menu 1)
settings
14
Speed loop settings (vector only)
40
Summing nodes settings
15
Torque reference settings (vector only)
41
Programmable status word settings
16
PID controller settings
42
Pointer source settings
17
Reference sequencer settings
43
Load fault detection window settings
18
Motorised potentiometer settings
44
Reference shaper settings
19
Trim reference settings
80
FIP - Configuration and status data
20
High speed digital I/O settings
83
FIP - Fast produced VCOMs
21
Fixed reference settings
84
FIP - Fast consumed VCOMs
22
Skip speed settings
85
FIP - Slow VCOMs and FIP refs.
23
Dynamic brake control settings
89
FIP - Data spy module
24
Speed trim settings
98
Menu enable selection settings
25
Inertia compensation settings
99
Configuration settings
26
History log settings
Demonstration Case User Manual (T1691)
Issue (05/01)
ALSPA MV3000 Demonstration Case
5.1.6
5. Menus and Parameters
User Configurable Menu 1
This is a special menu containing a selection of 30 parameters copied from the drive's
complete parameter list. Menu 1 can be configured via Menu 39 to hold the most
useful parameters in any application. Table 5-2 shows the parameters copied into
Menu 1 by !"#$. The table also shows the identity of the source parameters.
Table 5-2 Menu 1 – User Configurable Menu
Parameter
No.
Source
Parameter
Configured by
Menu 39
Function
Parameter
No.
Source
Parameter
Configured by
Menu 39
Function
P1.00
P9.00
Speed Reference
P1.17
P5.17
Minimum Speed Fwd
P1.01
P9.01
Speed Feedback
P1.18
P5.18
Minimum Speed Rev
P1.02
P9.05
Motor Current
P1.19
P3.00
Fluxing Control
P1.03
P9.09
Frequency Feedback
P1.20
P3.01
Fixed Volts Boost
P1.04
P9.07
Motor Volts
P1.21
P3.31
Economy Factor
P1.05
P9.08
Motor Power
P1.22
P6.00
Accel. Rate Fwd.
P1.06
P10.00
Warning No. 1
P1.23
P6.02
Decel. Rate Fwd.
P1.07
P10.10
Trip No. 1
P1.24
P4.00
Start Mode
P1.08
P10.11
Trip No. 2
P1.25
P4.07
Normal Stop Mode
P1.09
P99.10
User Text Language
P1.26
P3.05
Fixed Current Limit
P1.10
P2.01
Motor Base Voltage
P1.27
P99.05
Drive Nominal Current
P1.11
P2.00
Motor Base Frequency
P1.28
P4.12
Motor Regen. kW Limit
P1.12
P2.02
Motor Full Load Current
P1.29
P99.02
Overload Duty
P1.13
P2.04
Motor Nominal Speed
P1.30
P99.00
Number of Deltas
P1.14
P2.05
Motor Full Load Power
Factor
P1.15
P5.15
Maximum Speed Fwd
P1.31
Advanced Menus,
P1.16
P5.16
Maximum Speed Rev
P1.32
Security Code
5.1.7
The following parameters are ALWAYS present in Menu 1
initially only
Menu 1 is open,
see Section 5.1.7.
(as parameter
P99.06), allows the
user to “lock” the
access to the menus
Access to Other Menus (P1.31)
As shipped, only Menu 1 is accessible. Access to other menus is controlled by the value
entered into parameter P1.31, which determines the menus that can be displayed by
the DDM™. Three levels of access are provided:
P1.31 value
0
1
2
Note:
Access level
Show Menu 1 only (by default, only Menu 1 is shown)
As specified by Menu 98 (can choose which individual
menus are open by setting parameters in menu 98)
All menus open
P1.31 is controlled by an Engineering password. Refer to Section 5.1.4.
Issue (05/01)
Demonstration Case User Manual (T1691)
Page 5-3
5. Menus and Parameters
5.1.8
ALSPA MV3000 Demonstration Case
Reviewing Parameter Edits Made
There are 2 ways of reviewing the edits made to the CDC board (❸) parameters with
the items supplied with the case. One method is to use the ALSPA Drive Coach PC tool,
the other is to view the edits via the DDM™.
To use the DDM™ proceed as follows:
1. Set parameter P1.31 = 2.
2. Navigate to P35.03 and edit its value to 1, to set up a review of edits.
3. Press
to scroll through the current user edits; note these values.
4. When P35.03 re-appears all user edits have been displayed. Change P35.03
back to 0.
To use the ALSPA Drive Coach
1. Refer to section 4.3.4 for details of how to connect the case to a PC
2. Refer to the Coach help files to upload a “User Edits only” parameter listing.
5.1.9
Returning to Factory Default Settings
CAUTION
When the product is reset to factory default, all customised parameter settings
will be lost. Record customised parameter settings before the drive is reset. They
can be re-entered when required.
If incorrect data is entered during programming, the factory default settings can be
regained using the following procedure. The procedure, described is in 2 parts, record
the current settings for reference, then default the parameters:
1. Carry out a review of parameters if required, see section 5.1.8
2. Navigate to P99.06 and enter the password for engineer access (see Section
5.1.4)
3. Set P99.17 = 1 and press
4. The DDM™ communications will re-initiate, then display P1.00.
5. The drive will now be at default settings.
Page 5-4
Demonstration Case User Manual (T1691)
Issue (05/01)
ALSPA MV3000 Demonstration Case
5.1.10
5. Menus and Parameters
Default Configuration, as shipped by !"#$
When the MV3000 (hence the case) leaves the factory, all the parameters are preloaded with default values which allow it to drive a motor safely and in a sensible
manner. Table 5-3 will provide help in understanding the default settings for Start/Stop
control and Speed reference selection. The table should be read in conjunction with
sheet 3 of the control block diagrams (Section 5.3) and the explanation of Control
Flags (CF) and Status Flags (SF) in Section 5.2.1. Figure 5-1 shows the I/O connections
to the MV3000, provided solely for reference.
Table 5-3 Start/Stop and reference selecting at default
LOCAL CONTROL
WHEN
DIGIN4
(Local/Remote)
IS
OPEN
IT SELECTS
BECAUSE
WHICH
MEANS
Keypad (DDM™) Control
&
Reference Selection #1
CF116 is set OFF, as it is connected to DIGIN4
CF4 is set ON, as it is connected to the INV of
DIGIN4
(P4.09 = 1.004)
(P5.07 = -1.004)
Keypad (DDM™) has Start/Stop Control
The reference chosen by P5.01 is active, the
default for which is Keypad (DDM™).
(P5.01 = 1)
NOTE
All other Start/Stops are inactive
Lowest Control Flag reference selector takes
priority, thus when CF4 is ON the others (CF5,
CF6, CF7) are ignored.
REMOTE CONTROL
WHEN
DIGIN4
DIGIN5
(Local/Remote)
(Remote Reference 1/2 selection)
IS
CLOSED
OPEN
CLOSED
IT SELECTS
Remote Control & The next priority
reference selection
becomes active
Reference selection
#2 (if DIGIN4
closed)
Reference selection
#3 (if DIGIN4
closed)
BECAUSE
WHICH
MEANS
NOTE
CF116 is set ON, as
it is connected to
DIGIN4
CF4 is now OFF (INV
DIGIN 4), thus
CF5,6,7 become active
CF5 is ON, as it is
connected to the INV
of DIGIN5
CF5 is OFF, and CF6
is ON as it is
connected directly to
DIGIN5
(P4.09 = 1.004)
(P5.08 to P5.10)
(P5.08 = -1.005)
(P5.09 = 1.005)
Remote Start/Stop
connections become
active (DIGIN1 and
DIGIN 2 at default)
DIGIN5 becomes able
to select between
reference selections #2
and #3
The reference chosen
by P5.02 is active, the
default for which is
Analogue I/P 1
The reference chosen
by P5.03 is active, the
default for which is
Analogue I/P 2
(P5.02 = 2)
(P5.03 = 3)
Menu 7 and the DIP
switches configure
analogue inputs
Menu 7 and the DIP
switches configure
analogue inputs
Keypad (DDM™)
Start/Stops are
inactive
Lowest control flag still
has priority, thus CF5
has priority over CF6
Programming the case adjusts these defaults. If for any reason programming the case
results in an unworkable system, it is possible to restore the default values – see Section
5.1.9 on how to restore defaults.
Issue (05/01)
Demonstration Case User Manual (T1691)
Page 5-5
5. Menus and Parameters
PLANT INTERLOCK
STOP
RUN
REVERSE
KEYPAD/REMOTE
(open = Keypad)
ANALOGUE REF1/2
(open = Ref. 1)
TRIP RESET
At factory default state,
Analogue References are only
available in REMOTE mode
High Speed Digital I/O
To Programmable
logic controller...etc.
(Optional)
From
Encoder
and
PTC
REF1: +/-10V
20K
REF2:
4 - 20 mA
LOOP
METERS
Speed Feedback
Current
Feedback
Set the DIP switches to
Configure the analogue
I/O for Current or Voltage
Operation. Then refer to
menu 7, to configure the
relevant parameters.
+24V Aux Input
0V Aux Input
Fan supply fuses
Frame Sizes 4-6
V. Select
Common
TB3
10 +24V O/P
R/L1
9
INTERLOCK
8
DIGIN 1
7
DIGIN 2
6
DIGIN 3
5
DIGIN 4
4
DIGIN 5
3
2
1
DIGIN 6
+24 V O/P
0 Volts (digital)
RECT+
RECT-
HSIO HSIO +
CAN LO
CAN HI
GND
RS485 RxRS485 Rx+
RS485 TxRS485 Tx+
TB5
12
11
10
9
8
7
6
5
4
3
2
1
A+
AB+
BZ+
Z+24V
FB+
+5V
0V
FBM_PTC
9
8
7
6
5
4
3
2
1
+10V
AN I/P 1+
AN I/P 1 AN I/P 2 +
AN I/P 2 -10V
AN GND
AN O/P 1
AN O/P 2
20 mA
10 V
4
3
2
1
D
C
B
C
S/L2
T/L3
TB4
9
8
7
6
5
4
3
2
1
TB6
Fuses
DC Link
Inductor
(optional)
DCDC+
Internal
Dynamic
Braking
Unit
(Optional)
Externally fitted
DB Resistor
(Optional)
BR
Cabinet Boundary
U
V
W
AN I/P 1 Switch settings
AN I/P 2 shown in their
AN O/P 1 factory default
state.
AN O/P 2
A description of suitable cabinet layouts,
and the need for the options, is described
in Section 3 of this manual.
To run drive, INTERLOCK
must be connected to +24V
TB2
2
1
EARTH/GROUND
DIGOUT 3
EMC Filter
(optional)
0V
Isolator
DIGOUT 2
GLAND
AT SPEED
DIGOUT 1
Line Reactor
OUTPUT
RUNNING
AC LINE INPUT
RS232 link for Keypad
and PLC connection,
on harbour
Ferrite Rings
(optional)
HEALTHY
TB1
9
8
7
6
5
4
3
2
1
ALSPA MV3000
24V
Lamps on
cabinet door
ALSPA MV3000 Demonstration Case
U V W
Connect PTC
between:
TB5/1 and TB5/3
PTC
Motor Thermistor
To TB5
Note: a motor
thermostat can be
accommodated by
re-programming a
digital input
FB+
+5 V
E
OPTIONAL
ENCODER
0V
FB-
Figure 5-1 ALSPA MV3000 Default Wiring Diagram, given here for reference
Page 5-6
Demonstration Case User Manual (T1691)
Issue (05/01)
ALSPA MV3000 Demonstration Case
5.2
5. Menus and Parameters
Practise Application Programming
The case can be used to develop application programs or simply to practise
programming in the ALSPA MV3000 environment. Programs developed can be
transferred to a real working drive either via the ALSPA Drive Coach or via the DDM™
(using P99.16) and transferred to a fully installed ALSPA MV3000.
The key to understanding the drive is to refer to Control block diagrams. These
diagrams have been created to show the ALSPA MV3000 software as a picture.
Software flow, special functions and parameter numbers can all be identified from the
diagram. The diagrams are stored in Section 5.3.
The ALSPA MV3000 software contains a large number of pre-defined special functions
and a range of freely connectable logic, which, when combined, will allow the user to
solve many application problems and generally enhance the final application solution.
Special functions such as speed and torque monitors can be used to generate
conditional outputs to allow hoist brake control or duty standby pump control. A full
position controller is included and a function called Load Fault Detection, which will
allow a the drive to “condition monitor” the application so that preventive maintenance
can take place.
The following sections provide hints about how to achieve these application solutions.
Detailed parameter descriptions are contained within the optional Software Technical
Manual T1679.
5.2.1
Control Flags and Status Flags
The ALSPA MV3000 system employs two kinds of flags. These flags either allow the
user to CONTROL a function (Control Flag), e.g. Enable Jogging, or the drive can
report the STATUS of a function (Status Flag), e.g. Overspeed. In this manual these
flags are shown as below, where xx represents the flag number.
xx
Status Flag (SF)
xx
Control Flag (CF)
The flags can be combined together to form elegant application solutions or simply
passed to digital outputs or serial links to gain status information about the drive’s
condition. The most used flags are connected up already by the factory default
conditions. The default conditions are clearly marked on the user block diagrams.
The Control flags have parameters which allow the user to “patch” them to other parts
of the drive system. The control flag parameters appear in two logical places:
1.
In the menus local to the function associated with the flag, e.g. the START flag
is available in Menu 4 ,Starting and Stopping, and is parameter P4.04.
2.
In the control flag menus, Menu 33 and 34, where all the flags are grouped
together for easy location, e.g. the Start flag (CF1) is also P33.01, see the
“rules” below.
The Status flags have no parameters associated with them, as they are simply possible
connection sources for the Control flags, digital outputs and serial links etc.
Issue (05/01)
Demonstration Case User Manual (T1691)
Page 5-7
5. Menus and Parameters
5.2.2
ALSPA MV3000 Demonstration Case
Rules for Using the Flags
1.
Refer to the control block diagram to determine the Control flag required. The
diagram actually has the “Local” menu parameter number printed next to it.
2.
Alternatively determine the Control flag parameter number thus:
P33.xx, where xx is the control flag number
CF1 =P33.01
CF9 =P33.09 etc.
CF116 = P34.16 (the hundreds are in Menu 34)
3.
Edit a value into the Control Flag parameter, this value will determine what the
flag is connected to. Table 5-4 summarises the possible choices:
Table 5-4 Control flag and digital I/O connections
Value
Control Flag (CF) or Digital Output is connected to:
0.000 or 0
0.001 or 1
1.001 to 1.006
2.000 to 2.110
3.000 to 3.015, 3.100 to 3.115
4.000 to 4.015, 4.100 to 4.115
5.100 to 5.115, 5.200 to 5.215
Note:
OFF
ON
DIGITAL INPUT 1 to 6
STATUS FLAGS 0 to 110
RS485 CONTROL WORDS 0 and 1, BITS 0 to 15
RS232 CONTROL WORDS 0 and 1, BITS 0 to 15
FIP CONTROL WORDS 1 and 2, BITS 0 to 15
Any of the signals above can be inverted without the need to “waste” logic
gates by simply preceding the value with a “-” sign. Thus if:
if P33.01 = 1.002, then Control flag 1 will be connected to digital input 2
or if P33.01 = -1.002, then Control flag 1 will be connected to the INV of input 2.
Example 1: How the Start Flag is connected
At default the drive has the Start flag connected to digital input 2, this example shows
the software connections and the required edits, by way of a Control flag
programming example:
DIGIN 2
SOFTWARE
1
LINK
START
P33.01 = 1.002
(P4.04)
Example 2: How to connect Control and Status flags together
This example shows a simple connection which might be made to the logic blocks
HEALTHY
4
SOFTWARE
LINK
Page 5-8
40
LATCH A RESET INPUT
P33.40 = 2.004
(P30.12)
Demonstration Case User Manual (T1691)
Issue (05/01)
ALSPA MV3000 Demonstration Case
5.2.3
5. Menus and Parameters
Programming Digital I/O
Sheet 2 of the control block diagrams shows the parameters associated with the digital
I/O.
The digital I/O is programmed and used in exactly the same way as the Control and
Status flags. The digital inputs are used like Status flags, and appear in the list of
possible values which can be edited into the Control flag parameters
(see Section 5.2.2).
The Digital outputs have parameters and are programmed like Control Flags, having
access to all of the same possible connections (see Section 5.2.2). The Control block
diagram plant I/O sheet (sheet 2) shows the plant I/O.
Example 1: How the “O/P Running” output is connected
O/P RUNNING
5.2.4
8
SOFTWARE
DIGOUT 2
LINK
P7.28 = 2.008
Programming Analogue I/O
Sheet 2 of the control block diagrams shows the parameters associated with the
analogue I/O.
Analogue Inputs
The 2 inputs can be put into either current or voltage modes. The mode is chosen by
combining the mode parameter with the analogue DIP switches. If a voltage mode is
chosen, the relevant switch must be in its voltage position. The analogue input then
appears as an option in all of the reference parameters lists. Alternatively, the
analogue value can be picked as a source for the comparator logic (sheet 8) or a
pointer (sheet 10).
Scaling and Offsets. If a minimum speed is programmed, and the full range of
the analogue input is required to span minimum speed to maximum speed, then
the scaling and offset values must be set, example as follows:
P5.15 = Maximum speed forward
P5.17 = Minimum speed forward
=
=
1500rpm
150rpm
Then set:
P7.01 = 150 x 100 =
1500
10% offset,
P7.02 = 1500 - 150 =
1500
0.9 gain
Analogue Outputs
The 2 outputs can be put into either current or voltage modes. The mode is chosen by
combining the mode parameter with the analogue DIP switches. If a voltage mode is
chosen, the relevant switch must be in its voltage position. Any parameter within the
ALSPA MV3000 software can then be output via an analogue output and either
displayed on a meter or passed to another case or drive.
Issue (05/01)
Demonstration Case User Manual (T1691)
Page 5-9
5. Menus and Parameters
ALSPA MV3000 Demonstration Case
Scaling and Polarity. Once a parameter has been chosen for output, the relevant
scaling and polarity must be applied so that a sensible value appears. The scaling
parameter will automatically acquire the units of the parameter being output, then
simply edit the scaling to be the value that is required to represent full scale
deflection of the analogue output, for example:
To “send” DC link volts to an analogue output, then:
P7.17 = 11.03 (Parameter P11.03, DC link volts)
P7.19 = 0 (monopolar)
P7.20 = 560 (at 560Vdc the analogue output will show full scale)
5.3
Using the Control Block Diagrams
The Control Block Diagrams for the ALSPA MV3000 drive are shown on the following
pages. These diagrams graphically represent most of the drive’s parameters. They are
designed to show the inter-relationship of the drive functions and features and form a
set of sheets which will allow the user to completely design customised application
solutions and to understand the ALSPA MV3000 software.
Functions within the drive either output a value, which can be the source for an
analogue output or for another function, or they output status information (Status
Flags), e.g. Overspeed. The functions also accept control inputs (Control Flags), e.g.
Enable Jog, or freeze ramps etc. The diagrams clearly show this information by easily
recognised symbols. The symbols are shown in a key which is featured on each of the
diagrams.
Sheet 1 is an overview of the menus and the other nine sheets, and can be used as a
reference sheet.
Figure 5-2 shows how to use the control block diagrams to assist in configuring the
drive for an application.
1
2
Simply consult the sheets to
fully understand the flexibility
and scope of the ALSPA
MV3000 parameter set.
Use P99.16 to backup the
configuration either to the
backup parameter set or to
the keypad.
Use the security parameters
in menu 99 to “lock” these
sensitive parameters away.
See Section 5.1.4
Choose the functions
which will allow the
application to be
solved or enhanced.
4
Edit values into the dedicated
function’s parameters to
configure them to the application
needs, and if necessary, combine
the functions together.
3
Figure 5-2 Use of control block diagrams
Page 5-10
Demonstration Case User Manual (T1691)
Issue (05/01)
ALSPA MV3000 Demonstration Case
5. Menus and Parameters
Control System Overview
CONTROL MODE SELECTOR
P99.01
MACHINE BRIDGE CONTROL SYSTEM OVERVIEW
SHEET 5
ANALOGUE INPUTS
DIGITAL INPUTS
KEYPAD
SPEED REFS
& START/STOP
REFERENCE SELECTOR
SPEED CONTROL
DIRECTION CONTROL
POSITION CONTROL
ANALOGUE AND DIGITAL INPUTS
KEYPAD SPEED REFERENCE
STARTING AND STOPPING
TRIPS/WARNINGS
MONITORING
APPLICATION LOGIC
1.
2.
3.
4.
Note:
Option 4 is displayed only if
the bridge is a bi-directional
converter, or a DELTA with a
Mains Voltage Monitor unit
connected.
VVVF CONTROL
VECTOR CONTROL
SCALAR CONTROL
SFE MODE
1
M
1
1. FREQUENCY CONTROL (VVVF) MODE
U
2
V W
2
2. VECTOR CONTROL MODE
DC LINK
3
3
3. SCALAR CONTROL MODE
MACHINE CONTROL MODES
SFE MODE (MAINS CONTROL)
4
4
OR
4. SFE MODE
SFE CONTROL SYSTEM OVERVIEW
SHEET 2
ANALOGUE INPUTS
DIGITAL INPUTS
KEYPAD
START/STOP
REFERENCE SELECTOR
DC LINK VOLTAGE CONTROL
CURRENT CONTROL
MAINS MONITORING
LOAD POWER FEEDFORWARD
ANALOGUE AND DIGITAL INPUTS
KEYPAD REFERENCE
ANALOGUE AND DIGITAL INPUTS
STARTING AND STOPPING
TRIPS/WARNINGS
MONITORING
APPLICATION LOGIC
R
S
T
Mains
Network
R
S
T
Mains
Network
KEY
DIGOUT
DIGIN
xx
xx
CONTROL
FLAG
ANALOG
I/O
STATUS
FLAG
MONITOR
POINT
(A)
DEFAULT
SETTING
DEFAULT
CONNECTION
Sheet
1
Issue (05/01)
Demonstration Case User Manual (T1691)
Page 5-11
5. Menus and Parameters
ALSPA MV3000 Demonstration Case
SFE Control System Overview
PLANT INTERLOCK (IF THIS INPUT IS OPEN, THE SFE WILL TRIP)
INTERLOCK
SELECT 110% or 150%
OVERLOAD DUTY
P99.02 (P1.29)
SELECT STANDARD
OR ALTERNATE
AC VOLTAGE GRADE
P99.11 (P1.28)
FOR PLANT I/O SEE MENU 7, SHEET 6
THESE PARAMETERS MAY
BE ENTERED BY KEYPAD.
THIS DOES NOT MAKE THE
KEYPAD A "REFERENCE
SOURCE", SO KEYPAD
REMOVAL WILL BE
ALLOWED.
SFE VECTOR CONTROL, PART 1
SHEET 3
MAINS BRIDGE
ANALOG
REF 1
VECTOR CONTROL, PART 2
REACTIVE
CURRENT
REFERENCE
AuxR
AuxS
AuxT
SHEET 4
PRECHARGE
CIRCUIT AND
MAINS
MONITOR
+/- 10V @ DEFAULT
ANALOG
REF 2
CURRENT
CONTROL
MENU 52
DC LINK
VOLTAGE
CONTROL
REFERENCE
SOURCE
SELECTION
4 - 20mA @ DEFAULT
SHEET 11
PRECHARGE
COMPLETE
47
OPTIONAL
DYNAMIC
BRAKE
MENU 23
MENU 52
BI-DIRECTIONAL
CONVERTER
P11.03, P51.00
EDIT PARAMETERS
MENUS 50, 52
DC LINK VOLTS
LOAD
POWER
FEEDFORWARD
MENU 53
TB7
HARDWARE
BRIDGE
INTERLOCK
MAINS
MONITORING
+
MENU 52
V dc AT REF
STARTING AND STOPPING
DC LINK
100
MENU 52
MAINS
LCN
SHEET 7
R/U
KEYPAD
START/STOP
START AND STOP SFE
S/V
REMOTE
START/STOP
FLAGS
T/W
25
NORMAL
STOP
DIGIN 1
STOP
DIGIN 2
START
SFE RUNNING
0
OUTPUT
ENABLE/RUN
8
START
1
MENU 50
ANCILLARY COMPONENTS
DIGIN 4
DIGIN 3
KEYPAD/REMOTE
KEYPAD/
116
REMOTE
RUN
PERMIT
TRIPS/WARNINGS/DIAGNOSTIC MONITORS
DIGIN 6
TRIP
9
RESET
TRIP
RESET
TRIP MONITORING SYSTEM
10 PRESENT TRIPS.
10 PRESENT WARNINGS.
10 TRIP HISTORY STORAGE.
USER CONFIGURABLE TRIPS.
MENU 10
SHEET 11
USING "NOT" TRIPPED ENSURES THAT WARNINGS DO NOT AFFECT THE HEALTHY OUTPUT
5
HEALTHY
(MENU 7)
TRIPPED
HISTORY RECORDING
MONITORING
10 CHANNELS
MONITOR ANY
SFE PARAMETER
TRIGGER SET-UP
PRE AND POST TRIG
MANUAL TRIGGER
EXTENSIVE
SYSTEM
MONITORS
TO AID
VIEWING
AND
DIAGNOSTICS
MENUS 26 and 27
MENU 11 & 51
OTHER USEFUL MENUS
MENU 99 SECURITY CODES,
PARAMETER BACKUP
AND SYSTEM
CONFIGURATIONS
MENU 35 KEYPAD REMOVAL,
PARAMETER PRINTING
AND PARAMETER "LOCKING"
APPLICATION LOGIC, SPECIAL MONITORING FUNCTIONS
SHEET 12
SFE RUNNING
(MENU 7)
DIGOUT 1
DIGOUT 2
STATUS FLAG
BINARY GENERATOR
LOGIC GATES
COMPARATORS
DELAYS
MENU 30
V dc AT REF
MENU 31
(MENU 7)
DIGOUT 3
AUTO-RESETTING/STARTING
CONFIGURE THE SFE TO AUTO-RESET/RESTART AFTER A TRIP
CUSTOMER SELECTABLE RESET ENABLES
NUMBER OF RESETS AND TIMINGS OF RESETS
MENU 28
SUMMING NODES, SWITCHES AND POINTERS
MENU 40
KEY
SHEET 14
PROGRAMMABLE SUMMING NODES, ALLOWING SCALING AND
SUMMATION OF ANY SFE PARAMETER.
SFE MONITORING MENUS
MENU 45
MENU 11
xx CONTROL
FLAG
DIGOUT
DIGIN
xx
STATUS
FLAG
ANALOG
I/O
(A)
DEFAULT
SETTING
MENU 42 POINTERS. THESE POINTERS ARE ASSOCIATED WITH MOST
OF THE SFE's REFERENCEC CHOICES, AND ALLOWS THE USER
TO CHOOSE ANY SFE PARAMETER FOR THE REQUIRED USE.
MENU 51
MONITOR
POINT
ANALOG
O/P 1
MENUS 11, 45 and 51
SFE TEMPERATURES
MONITORING OF SFE VARIABLES, INCLUDING
TEMPERATURES, CONTROL AND STATUS FLAGS
HOURS RUN, DIGITAL I/O STATES,
ANALOGUE INPUT AND OUTPUT VALUES AND OTHERS.
+/- 10V @ DEFAULT
ANALOG
O/P 2
SFE VOLTS, CURRENTS, POWER FEEDBACKS
+/- 10V @ DEFAULT
DEFAULT
CONNECTION
(MENU 7)
(MENU 7)
Sheet
2
Page 5-12
Demonstration Case User Manual (T1691)
Issue (05/01)
ALSPA MV3000 Demonstration Case
5. Menus and Parameters
SFE Vector Control, Part 1
1
2
3
4
5
6
7
8
9
10
11
12
13
14
15
16
17
18
19
ONLY APPLICABLE FOR SFE MODE, P99.01 = 4
P50.00
ANALOG REF1
ANALOG REF2
RS485 REF1
RS485 REF2
RS232 REF1
RS232 REF2
PID CONTROLLER
REF SEQUENCER
FIXED REF MENU
MOTORISED POT
TRIM REFERENCE
FIXED VAL OF 0
FIXED VAL OF 0
SUMMING NODE A
SUMMING NODE B
SUMMING NODE C
SUMMING NODE D
POINTER 21
SFE REF LOSS
106
Vdc AT REF
X
P51.00
P11.03
Vdc
ACTIVE CURRENT DEMAND
IN POSITIVE LIMIT
100
DC LINK
VOLTAGE
PI CONTROL
CLAMP
101
1
2
3
4
5
6
7
8
9
10
11
12
13
14
15
16
17
Vdc REF
SOURCE
P53.00
Vdc REF
SCALE
Vdc REF
P50.00
Vdc
Kp
P53.01
P52.02
P52.03
P51.09
DC LINK
CONTROL
BANDWIDTH
P52.00
DC LINK
CONTROLLER
CURRENT
DEMAND
Vdc Ki
DC LINK
CONTROLLER
GAIN
AUTO
CALCULATION
DISABLE AUTO
CALCULATION
OF GAINS
1
2
3
4
5
6
7
8
9
10
11
12
13
14
15
16
17
TB6/8,7
ANALOG I/P REF 1
DC LINK
LOAD POWER FEEDFORWARD
TB6/6,5
ANALOG I/P REF 2
FEEDFORWARD CURRENT
DEMAND
P51.10
FEEDFORWARD POWER
DEMAND
P51.07
REACTIVE
CURRENT
POSITIVE
LIMIT
1
2
3
4
5
6
7
8
9
10
11
12
13
14
15
16
17
P52.16
CURRENT SENSOR
BURDEN RESISTOR
1
2
3
4
5
6
7
8
9
10
11
12
13
14
15
16
17
P52.06
ANALOG REF1
ANALOG REF2
RS485 REF1
RS485 REF2
RS232 REF 1
RS232 REF2
PID CONTROLLER
REF SEQUENCER
FIXED REF MENU
MOTORISED POT
TRIM REFERENCE
FIXED VALUE OF 0
FIXED VALUE OF 0
SUMMING NODE A
SUMMING NODE B
POINTER 26
X
REACTIVE
CURRENT
POSITIVE
LIMIT
SOURCE
REACTIVE
CURRENT
POSITIVE
LIMIT SCALE
P53.12
P52.05
ANALOG REF 1
ANALOG REF 2
RS485 REF 1
RS485 REF 2
RS232 REF 1
RS232 REF 2
PID CONTROLLER
REF SEQUENCER
FIXED REF MENU
MOTORISED POT
TRIM REFERENCE
FIXED VAL OF 0
FIXED VAL OF 0
SUMMING NODE A
SUMMING NODE B
POINTER 25
P53.13
103
DIGIN
Issue (05/01)
23
CONTROL
FLAG
STATUS
FLAG
P53.04
TO SHEET 4
ACTIVE CURRENT DEMAND
IN NEGATIVE LIMIT
ACTIVE
CURRENT
DEMAND
SCALE
102
P50.03
ANALOG REF1
ANALOG REF2
RS485 REF1
RS485 REF2
RS232 REF1
RS232 REF2
PID CONTROLLER
REF SEQUENCER
FIXED REF MENU
MOTORISED POT
TRIM REFERENCE
FIXED VAL OF 0
FIXED VAL OF 0
SUMMING NODE A
SUMMING NODE B
POINTER 24
X
ACTIVE
CURRENT
POSITIVE
LIMIT
SOURCE
P53.06
ACTIVE
CURRENT
POSITIVE LIMIT
REACTIVE CURRENT
REF. IN POSITIVE LIMIT
1
2
3
4
5
6
7
8
9
10
11
12
13
14
15
16
17
P50.04
ANALOG REF1
ANALOG REF2
RS485 REF1
RS485 REF2
RS232 REF1
RS232 REF2
PID CONTROLLER
REF SEQUENCER
FIXED REF MENU
MOTORISED POT
TRIM REFERENCE
FIXED VAL OF 0
FIXED VAL OF 0
SUMMING NODE A
SUMMING NODE B
POINTER 23
P50.03
ACTIVE
CURRENT
POSITIVE
LIMIT SCALE
-1
X
X
ACTIVE
CURRENT
NEGATIVE
LIMIT
SOURCE
P53.08
ACTIVE
CURRENT
NEGATIVE
LIMIT SCALE
ACTIVE
CURRENT
NEGATIVE
LIMIT
P50.04
P53.09
X
CLAMP
TO SHEET 4
REACTIVE
CURRENT
REFERENCE
SOURCE
P53.10
KEY
12
ACTIVE
CURRENT
DEMAND
SOURCE
ACTIVE CURRENT
DEMAND
CLAMP
P53.07
REACTIVE
CURRENT
REFERENCE
REACTIVE
CURRENT
REFERENCE
SCALE
P52.05
104
ANALOG
I/O
MONITOR
POINT
<A>
DEFAULT
SETTING
DEFAULT
CONNECTION
REACTIVE CURRENT REF.
IN NEGATIVE LIMIT
REACTIVE CURRENT
DEMAND
REACTIVE
CURRENT
DEMAND
P53.11
DIGOUT
P52.06
LOAD POWER SIGNAL
SOURCE AND MODE
CURRENT SENSOR
TURNS RATIO
X
P51.11
P51.12
P53.05
P52.01
P52.15
ACTIVE
CURRENT
DEMAND
LOAD
CONVERTER
RATING
P50.02
P53.03
VDC CONTROLLER
ANALOG REF1
ANALOG REF2
RS485 REF1
RS485 REF2
RS232 REF 1
RS232 REF 2
PID CONTROLLER
REF SEQUENCER
FIXED REF MENU
MOTORISED POT
TRIM REFERENCE
FIXED VAL OF 0
FIXED VAL OF 0
SUMMING NODE A
SUMMING NODE B
POINTER 22
P57.15
P57.16
-1
1
2
3
4
5
6
7
8
9
10
11
12
13
14
15
16
17
P52.07
ANALOG REF1
ANALOG REF2
RS485 REF1
RS485 REF2
RS232 REF1
RS232 REF2
PID CONTROLLER
REF SEQUENCER
FIXED REF MENU
MOTORISED POT
TRIM REFERENCE
FIXED VALUE OF 0
FIXED VALUE OF 0
SUMMING NODE A
SUMMING NODE B
POINTER 27
X
REACTIVE
CURRENT
NEGATIVE
LIMIT
SOURCE
P53.14
REACTIVE
CURRENT
NEGATIVE
LIMIT SCALE
X
REACTIVE
CURRENT
NEGATIVE
LIMIT
P52.07
P53.15
Demonstration Case User Manual (T1691)
Sheet
3
Page 5-13
5. Menus and Parameters
ALSPA MV3000 Demonstration Case
SFE Vector Control, Part 2
ACTIVE CURRENT
P51.13, P51.14
REACTIVE CURRENT
ONLY APPLICABLE FOR SFE MODE, P99.01 = 4
P51.17, P51.18
ESTIMATED DC LINK CURRENT
MAINS CURRENT
P51.08
P51.01, P51.02
PWM VOLTAGE
P51.06
MAINS POWER
P35.00
8
P51.05
RUNNING
PWM FREQUENCY
LINE REACTOR
FROM SHEET 3
MAINS
ACTIVE CURRENT
DEMAND
SFE CURRENT CONTROLLER
FROM SHEET 3
PULSE WIDTH
MODULATION
MAINS ANGLE
REACTIVE CURRENT
DEMAND
P52.04
CURRENT CONTROLLER BANDWIDTH
P50.01
CHOKE INDUCTANCE
MAINS ANGLE
P52.13
SUPPLY INDUCTANCE
X
105
Note:
Negative frequency
indicates negative phase
rotation detected.
P52.09
P52.12
MAINS SYNC OFFSET
P51.03
MAINS FREQUENCY
MAINS SYNC VALID
MAINS VOLTAGE
MONITORING
MAINS UNDERFREQ WARNING
WARNING 133
P52.10
X
MAINS OVERFREQ WARNING
MAINS VOLTS SCALING
P52.14
MEASURED MAINS VOLTS
P51.04
KEY
DIGOUT
DIGIN
xx
xx
DEFAULT
SETTING
CONTROL
FLAG
ANALOG
I/O
(A)
STATUS
FLAG
MONITOR
POINT
DEFAULT
CONNECTION
P52.08
MAINS UNDERFREQ WARNING
P52.11
MAINS UNDERFREQ TRIP
TRIP 93
Sheet
4
Page 5-14
Demonstration Case User Manual (T1691)
Issue (05/01)
ALSPA MV3000 Demonstration Case
5. Menus and Parameters
Machine Bridge Control System Overview
PLANT INTERLOCK (IF THIS INPUT IS OPEN, THE DRIVE WILL TRIP)
INTERLOCK
FOR PLANT I/O SEE MENU 7, SHEET 6
SPEED REFERENCE ARBITRATION
DIGIN 3
DIGIN 4
DIGIN 5
SHEET 7
MAX/MIN SPEEDS
"OFF" = KEYPAD
REMOTE
ANALOGUE
P5.15 to P5.18
(P1.15 to P1.18)
P5.14 and P5.27
DIRECTION MODE
P5.11
CHOOSE MOTOR
CONTROL STRUCTURE
P99.01
LOWEST
FLAG "ON"
WINS
SELECT
3
SELECT
2
SELECT
1
REGEN POWER
LIMIT P4.12
CLAMP
ZERO
REFERENCE
DIRECTION
6
5
4
3
DC LINK VOLTS
MENU 4
P11.03
CURRENT
CONTROL
SLIP
COMPENSATION
AND
MOTOR
STABILITY
MENU 3
MENU 3
SHEET 11
OPTIONAL
DYNAMIC
BRAKE
F
FLUXING
CONTROL
AND
VOLTAGE
BOOST
MENU 23
MOTOR VOLTS
KEYPAD
SPEED REF
RAMP RATES 1/2
SELECT RATES 1/2
RAMP FREEZE
S - SHAPING
MAX RAMP DEVIATIONS
SKIP SPEEDS
TC
MENU 5
MENU 5
MENU 22
MENU 6
POSITION CONTROL
P9.00/P1.00
DETAILS OF ALL
POSSIBLE SPEED
REFERENCE CHOICES
MOTOR
VECTOR CONTROL MODE
NORMAL
STOP
0
REMOTE
START/STOP
FLAGS
AND
BACKUP
START/STOP
FLAGS
START
INERTIA
COMPENSATION
BASIC MOTOR DATA
MENU 25
MENU 2
=3
SPEED FEEDBACK
% = P9.01/P1.01
rpm = P9.03
MENU 4
P4.00 = LOW FREQUENCY START)
P4.07 = DISABLE AND COAST)
P4.08 = DISABLE AND COAST)
TRIPS/WARNINGS/DIAGNOSTIC MONITORS
TRIP
9
RESET
TRIP
RESET
TRIP MONITORING SYSTEM
=2
SPEED FEEDBACK
TACHO
SELECTIONS
=1
SHEET 15
THIS IS A SPECIAL CONTROL MODE, FOR VERY SPECIALISED APPLICATIONS.
REFER TO SUPPLIER FOR DETAILS.
SHEET 11
USING "NOT" TRIPPED ENSURES THAT WARNINGS DO NOT AFFECT THE HEALTHY OUTPUT
5
HEALTHY
(MENU 7)
TRIPPED
HISTORY RECORDING
MONITORING
USER CONFIGURABLE TRIPS.
MOTOR PROTECTION
MENU 10
10 CHANNELS
MONITOR ANY
DRIVE PARAMETER
EXTENSIVE
SYSTEM
MONITORS
TO AID
VIEWING
AND
DIAGNOSTICS
TRIP AVOIDANCE
SHEET 10
SCALAR CONTROL MODE
10 PRESENT TRIPS.
10 PRESENT WARNINGS.
10 TRIP HISTORY STORAGE.
TRIGGER SET-UP
PRE AND POST TRIG
MANUAL TRIGGER
MENUS 26 and 27
ENC
ENCODERLESS
SPEED
FEEDBACK
MENU 13
(DEFAULT START MODE
(DEFAULT NORMAL STOP MODE
(DEFAULT RAPID STOP MODE
OUTPUT
ENABLE/RUN
MENU 12
BUMPLESS
ENCODER LOSS
RIDETHROUGH
116
REMOTE
(1)
SELECT SPEED FEEDBACK SOURCE
P13.00
MENU 24
MOTOR
AND
DRIVE
PROTECTION
25
SPEED TRIM
SELECTIONS
ZERO SPEED
HOLD TIMES
KEYPAD/REMOTE
KEYPAD/
ADVANCED
MOTOR
MODEL
DATA
MENU 8
START
AND
STOP
DRIVE
SHEET 11
8
DRIVE
O/P RUNNING
VECTOR
CONTROL
MENU 14
NORMAL STOP MODE
RAPID STOP MODES
STOP TIME LIMIT
MENU 4
1
IGBT's + PWM
MENU 12
TORQUE LIMIT
CONTROL
AND
SELECTIONS
DROOP CONTROL
ERROR DEADBAND
START MODE
SYNCROSTART MODE
START
MOTOR TEMP.
COMPENSATION +
FLUX LIMIT
SPEED CONTROL
AMPLIFIER
SHEET 13
SHEET 7
START/STOP
SEQUENCING
SHEETS 9 & 10
REGEN POWER
LIMIT P4.12
=3, SCALAR
FULL POSITION CONTROLLER, INCLUDING A
FIXED POSITION MENU, A POSITION TEACHER,
A UNI-DIRECTIONAL APPROACH AND A
COMPREHENSIVE DATUMMING CONTROLLER
STARTING AND STOPPING
STOP
P9.09/P1.03
=2, VECTOR
SPEED REF
KEYPAD
START/STOP
FREQUENCY
=1, FREQUENCY
DIRECTION MAXIMUM SPEEDS
CONTROL MINIMUM SPEEDS
DEMAND CLAMPS
DIRECTION INHIBITS
JOG SPEEDS
BACKUP REFERENCE
P9.05/P1.02
+
HARDWARE
BRIDGE
INTERLOCK
RAMPS
REV
4 REFERENCE SOURCES
REFERENCE SELECTOR
-
SHEETS 8, 9
JOG
SOURCE 3
SOURCE 4
MOTOR CURRENT
MENU 2
MENU 24
CLAMP
FWD
?
BASIC MOTOR NAMEPLATE DATA
SPEED TRIM
SELECTIONS
MENU 5
SOURCE 2
4 - 20mA @ DEFAULT
DIGIN 6
+
MENU 3
RAMPS
SOURCE 1
ANALOG
REF 2
DIGIN 4
-
MENU 4
CURRENT LIMIT
AND
TORQUE LIMIT
SELECTIONS
SPEED REF
TIME CONST.
DIRECTION
0 = FORWARD
1 = REVERSE
+/- 10V @ DEFAULT
DIGIN 2
SYNCRO-STARTING
MODE SET-UP
DC INJECTION
BRAKING
SET-UP
P9.07/P1.04
ANALOG
REF 1
DIGIN 1
SHEET 8
V
JOG SPEEDS
"OFF" = REF1
REF1/2
FREQUENCY CONTROL MODE
SELECT STANDARD OR
ALTERNATE
VOLTAGE GRADE
P99.11
REVERSE
KEYPAD/
R S T
SELECT 110% or 150%
OVERLOAD DUTY
P99.02 (P1.29)
MENU 9 & 11
APPLICATION LOGIC, SPECIAL MONITORING FUNCTIONS
OTHER USEFUL MENUS
MENU 99 SECURITY CODES,
PARAMETER BACKUP
AND SYSTEM
CONFIGURATIONS
MENU 35 KEYPAD REMOVAL,
PARAMETER PRINTING
AND PARAMETER "LOCKING"
LOGIC GATES
COMPARATORS
DELAYS
MENU 30
STATUS FLAG
BINARY GENERATOR
PROGRAMMABLE
REFERNCE
SHAPER
ALLOWS THE
USER TO "SHAPE"
ANY OF THE
DRIVES SIGNALS.
LOAD FAULT
DETECTION
WINDOW
MENU 44
MENU 43
MENU 31
DIGOUT 1
SHEET 12
TORQUE MONITOR
WINDOW
OUTPUT RUNNING
(MENU 7)
DIGOUT 2
MENU 29
ALLOWS PLANT
CONDITION
MONITORING
SPEED MONITOR
WINDOW
12
AT SPEED
(MENU 7)
DIGOUT 3
AT SPEED
MENU 29
AUTO-RESETTING/STARTING
CONFIGURE THE DRIVE TO AUTO-RESET/RESTART AFTER A TRIP
CUSTOMER SELECTABLE RESET ENABLES
NUMBER OF RESETS AND TIMINGS OF RESETS
MENU 28
SUMMING NODES, SWITCHES AND POINTERS
xx CONTROL
FLAG
DIGIN
Issue (05/01)
xx
STATUS
FLAG
DRIVE MONITORING MENUS
MENU 40 PROGRAMMABLE SUMMING NODES, ALLOWING SCALING AND
SUMMATION OF ANY DRIVE PARAMETER.
KEY
DIGOUT
SHEET 14
ANALOG
I/O
MONITOR
POINT
(A)
DEFAULT
SETTING
MENU 9
BASIC MONITORING OF THE MAIN DRIVE VARIABLES
MENU 11
ADVANCED NONITORING OF DRIVE VARIABLES, INCLUDING
VECTOR CURRENTS, TEMPERATURES, CONTROL AND STATUS FLAGS
HOURS RUN, ENERGY CONSUMED, DIGITAL I/O STATES,
ANALOGUE INPUT AND OUTPUT VALUES AND OTHERS.
MENU 42 POINTERS. THESE POINTERS ARE ASSOCIATED WITH MOST
OF THE DRIVE's REFERENCEC CHOICES, AND ALLOWS THE USER
TO CHOOSE ANY DRIVE PARAMETER FOR THE REQUIRED USE.
MENU 38
DEFAULT
CONNECTION
Demonstration Case User Manual (T1691)
MENUS 9, 11 and 38
EXCLUSIVELY MONITORS ALL THE VARIABLES IN THE POSITION
CONTROLLER
SPEED FEEDBACK
ANALOG
O/P 1
+/- 10V @ DEFAULT
(MENU 7)
CURRENT FEEDBACK
ANALOG
O/P 2
+/- 10V @ DEFAULT
(MENU 7)
Sheet
5
Page 5-15
5. Menus and Parameters
ALSPA MV3000 Demonstration Case
Plant I/O and Serial Links
DEFAULT CONNECTIONS TO DIGITAL O/P SHOWN
RS232 SERIAL LINK
P32.00
P32.01
P32.10
SERIAL WRITE ENABLE
SERIAL GLOBAL RESPONSE
RS232 BAUD RATE
P32.11
RS232 TRIB. ADDRESS
P32.12
RS232 PROTOCOL
P32.13
RS232
SERIAL
LINK
SET-UP
HEALTHY
TRIPPED
RS232 CRC FAILURES
P32.16
RS232 TIME OUTS
P32.17
USING "NOT" TRIPPED ENSURES THAT
WARNINGS DO NOT AFFECT THE HEALTHY OUTPUT
DRIVE O/P RUNNING
P32.14
RS232 TIME OUT PERIOD
P32.15
RS232 LOSS ACTION
DIGITAL O/P STATES MONITOR
Rx DATA FROM THE LINK
RS232
DATA
CLAMP
(2.008)
8
3
2
AT SPEED
1
P32.19
RS232 REFERENCE 2
DIGITAL I/P STATES MONITOR
6
1
USE THE FOLLOWING VALUES FOR
CONTROL FLAGS AND DIGITAL O/P's
TO ALLOW CONNECTION TO THE
BITS OF THE CONTROL WORDS
P32.22
RS232 CONTROL WORDS @ LOSS ACTION
P32.23
RS232 DEFAULT FOR WORD 0 (after loss)
P32.24
RS232 DEFAULT FOR WORD 1 (after loss)
P32.25
RS232 USER PAGE 1 SIZE
RS232 CONTROL WORD 0
RS232
USER
PAGE1
SET-UP
RS232 USER PAGE ELEMENTS 1 to 20
15
0
P32.20
14
13 . . . . .
2
RS232. WORD 0 BITS 0 to 15 =
INV =
P32.21
RS232 CONTROL WORD 1
4.015
-4.015
. . .to . . . 4.000
. . .to . . . -4.000
RS232. WORD 1 BITS 0 to 15 =
4.115
-4.115
. . .to . . . 4.100
. . .to . . . -4.100
INV =
5
4
3
P7.28
(2.012)
(2.100)
100
1
Tx and Rx
TO/FROM
USER PAGES
DIGOUT 3
DIGITAL OUTPUT 3 SIGNAL
P7.29
USE THE FOLLOWING VALUES FOR CONTROL FLAGS AND DIGITAL O/P's
TO ALLOW CONNECTION TO THE DIGITAL INPUTS
P11.21
2
AT SPEED (MOTOR CONTROL)
V dc AT REF (SFE MODE)
TB1/3,2,1
12
P32.18
RS232 REFERENCE 1
TB1/6,5,4
DIGOUT 2
P99.01 = 1,2,3
P99.01 = 4
CLAMP
P7.27
P11.22
V dc AT REF
P32.26
to
P32.45
DIGITAL OUTPUT 1 SIGNAL
DIGITAL OUTPUT 2 SIGNAL
+/-100%
RS232 PARITY
TB1/9,8,7
DIGOUT 1
DRIVE O/P RUNNING
RS232
HEALTHY
58
(-2.005)
5
DIGIN 1
TB3/8
DIGIN 2
TB3/7
DIGIN 3
TB3/6
DIGIN 4
TB3/5
DIGIN 5
TB3/4
DIGIN 6
TB3/3
1.001 for DIGIN 1, -1.001 for INV DIGIN 1
1.002 for DIGIN 2, -1.002 for INV DIGIN 2
1.003 for DIGIN 3, -1.003 for INV DIGIN 3
1.004 for DIGIN 4, -1.004 for INV DIGIN 4
1.005 for DIGIN 5, -1.005 for INV DIGIN 5
1.006 for DIGIN 6, -1.006 for INV DIGIN 6
RS485 SERIAL LINK
P32.00
P32.01
P32.89
P32.90
SERIAL WRITE ENABLE
SERIAL GLOBAL RESPONSE
RS485
SERIAL
LINK
SET-UP
P32.50
RS485 BAUD RATE
P32.51
RS485 TRIB. ADDRESS
P32.52
RS485 PROTOCOL
P32.53
RS485 PARITY
P32.54
RS485 TIME OUT PERIOD
P32.55
RS485 LOSS ACTION
RS485 CRC FAILURES
P32.56
RS485 TIME OUTS
P32.57
HSIO +/- INPUT
+/-100%
P32.62
RS485 CONTROL WORDS @ LOSS ACTION
P32.63
RS485 DEFAULT FOR WORD 0 (after loss)
P32.64
RS485 DEFAULT FOR WORD 1 (after loss)
HS I/P FREQ. FOR 100% SPEED
TB4/9,8
50
HS I/P
SCALING
HS INPUT REF.
HSIO REF. INPUT
OUTPUT
1 = INPUT
>1 = OUTPUT
CLAMP
RS485 REFERENCE 1
P32.58
CLAMP
RS485 REFERENCE 2
P32.59
P20.00
ENCODER FEEDBACK
HS O/P SCALING
HSIO MODE
SPEED FEEDBACK
O/P FREQ = Encoder line count x Speed
30 x P20.00
P7.16
ANALOG REF TIME CONST.
REF 1 MODE
D-D Tx CONTROL 0/1
P32.87
P32.88
D-D Tx REF 1/2
P32.91
P32.92
Tx REF 1/2 SCALE
TRANSMIT
DATA TO
ALL OTHER
Rx DRIVES
ON
D-D LINK
Tx
DATA
X
DRIVE
to
DRIVE
RS485 CONTROL WORD 0
INV =
RS485 CONTROL WORD 1
Rx CONTROL WORDS
RECEIVED
DATA FROM
ONE OTHER
Tx DRIVE
ON
D-D LINK
Rx
DATA
P32.93
P32.94
Rx REF's 1/2
15
P32.60
0
RS485. WORD 0 BITS 0 to 15 =
14
3.015
-3.015
13 . . . . .
2
TB6/8,7
ANALOG I/P REF 1
P7.02
X
MODE
ANALOG REF1
+
+
DIGITAL
1
P7.01
26
3.115
-3.115
REF 2 MODE
ANALOG REF TIME CONST.
. . .to . . . 3.100
. . .to . . . -3.100
REF 2 GAIN
X
TB6/6,5
ANALOG I/P REF 2
P32.66
to
P32.85
RS485 USER PAGE 2 SIZE
RS485
USER
PAGE 2
SET-UP
RS485 USER PAGE ELEMENTS 1 to 20
REF1
4-20mA ON
P7.04
P7.06
ANALOG
X
MODE
DIGITAL
+
ANALOG REF2
+
REF 2 VALUE
P32.65
P7.03
REF 1 OFFSET
. . .to . . . 3.000
. . .to . . . -3.000
P7.16
RS485. WORD 1 BITS 0 to 15 =
INV =
Rx REF 1/2 SCALE
MOTOR
CONTROL
ONLY
ANALOG
REF 1 VALUE
P32.61
P20.03
P7.00
REF 1 GAIN
USE THE FOLLOWING VALUES FOR
CONTROL FLAGS AND DIGITAL O/P's
TO ALLOW CONNECTION TO THE
BITS OF THE CONTROL WORDS
HS REF ON
INPUT
Rx DATA FROM THE LINK
RS485
DATA
HS I/P FREQ. FOR 0% SPEED
P20.02
HIGH SPEED DIGITAL
INPUT/OUTPUT
RS485
HEALTHY
57
P20.01
P7.05
P7.07
REF 2 OFFSET
Tx and Rx
27
TO/FROM
USER PAGES
REF2
4-20mA ON
WHEN USING THE O/P SCALERS, SIMPLY EDIT IN THE VALUE THAT IS
REQUIRED TO BE 100%.
P7.19
O/P 1 POLARITY
P7.20
O/P 1 MODE
O/P 1 SCALE FACTOR
P7.18
TB6/2
DIGITAL
P7.17
ANALOG O/P 1
ANALOG O/P 1 SIGNAL
ANALOG
O/P 1 VALUE
P7.21
KEY
O/P 2 POLARITY
DIGOUT
xx
CONTRO
L
FLAG
ANALOG
I/O
STATUS
FLAG
MONITOR
POINT
(A)
DEFAULT
SETTING
P7.25
O/P 2 MODE
O/P 2 SCALE FACTOR
DIGITAL
DIGIN
xx
DEFAULT
CONNECTION
P7.22
ANALOG O/P 2 SIGNAL
ANALOG
Sheet
O/P 2 VALUE
P7.24
P7.23
TB6/1
ANALOG O/P 2
P7.26
6
Page 5-16
Demonstration Case User Manual (T1691)
Issue (05/01)
ALSPA MV3000 Demonstration Case
5. Menus and Parameters
Reference Arbitration and Starting/Stopping
1
FIXED REF #0
2
4
ANALOG REF 1
FIXED VAL OF 0
FIXED REF MENU
5
REF. SEQUENCER
3
6
MOTORISED POT
7
TRIM REFERENCE
RS485 REF 1
8
9
RS232 REF 1
10
12
TORQUE DEMAND
SPEED DEMAND
SUMMING NODE A
13
SUMMING NODE B
14
POINTER 4
11
P16.03
PROPORTIONAL BAND
P16.04
INTEGRAL TIME
P16.05
DIFFERENTIAL TIME
P16.06
ERROR TIME CONST.
P16.07
ERROR DEADBAND
ONLY APPLICABLE FOR MOTOR CONTROL MODES, P99.01 = 1, 2, 3
P5.14
JOG SPEED
P5.27
JOG SPEED 2
KEY
P16.10
P16.08
ERROR INVERT
(0)
(0)
INTEGRAL
FREEZE
26
PID
CONTROLLER
(MENU 16)
P16.11
69
SUICIDE
JOG
5
ANALOG REF 2
FIXED VAL OF 0
RS485 REF 2
RS232 REF 2
TORQUE DEMAND
6
SPEED DEMAND
7
SPEED ERROR
ACTIVE CURRENT
FLUX DEMAND
SUMMING NODE C
2
3
4
8
9
10
11
PID FB SCALE
FACTOR
1
ANALOG REF1
2
ANALOG REF2
3
4
RS485 REF 1
RS232 REF 1
5
PID CONTROLLER
6
FIXED REF MENU
MOTORISED POT
TRIM REFERENCE
8
P17.02
FEEDBACK SELECT
9
10
11
P17.18
12
(0)
SEQUENCE
FREEZE
27
33
P17.19
(0)
SEQUENCE
TRIGGER
28
SEQUENCER
RUNNING
34
OUTPUT
NOT =
0% REF
P17.20
P17.00
14
16
17
18
19
(1)
SEQUENCE
RESET
13
15
REFERENCE
SEQUENCER
(MENU 17)
29
20
SERIAL LINK
4-20mA
FIELDBUS
etc.
KEYPAD SPEED
REFERENCE
FIXED VAL OF 0
FIXED VAL OF 0
FIXED REF #0 (P21.00)
MONITOR
POINT
DEFAULT
CONNECTION
P5.12
2
P22.00, P22.02
P22.04, P22.06
25
P5.13
SKIPPING
SPEED DEMAND CLAMPS
(0)
P5.15, P5.16
P5.17, P5.18
MAX. SPEEDS
MIN. SPEEDS
3
ANALOG REF2
P5.01 = (1)
REF. SRC. 1
RS485 SERIAL
LINK REF 1
4
P5.02 = (2)
CLAMP
REF. SRC. 2
DIRECTION
CONTROL
P5.03 = (3)
RS232 SERIAL
LINK REF 1
6
(0)
REF. SRC. 4
SPEED REFERENCE
P9.00
P5.00
P1.00
7
P21.20
8
REF. SRC.
SELECT
MENU 5
SPEED DEMAND
CLAMP ENABLE
LOWEST
FLAG "ON"
WINS
REFERENCE
SEQUENCER
9
FIXED REF
MENU
10
(-1.004)
(0)
MOTOR. POT. OUTPUT
SPEED REF
TIME CONST.
12
P5.20
REVERSE
INHIBIT
FORWARD
INHIBIT
DIGIN INVERTS ARE PERFORMED BY SIMPLY
APPLYING A -VE SIGN TO THE SELECTION ENTERED
INTO THE CONTROL FLAG PARAMETER.
P21.16
30
11
P5.19
(0)
DEFAULT CONNECTIONS SHOWN.
PID CONTROLLER
FIXED REF #15
P21.15
(0)
117
P5.25
SELECT
REF
RS232 SERIAL
LINK REF 2
SELECTED
SPEED
REFERENCE
P5.26
P5.04 = (1)
SEQUENCER TIMES
SKIP SPEEDS
DIRECTION
INHIBITS
CLAMP
CLAMP
REF. SRC. 3
REF.SEQUENCER OUTPUT
FIXED REF. OUTPUT
SKIP BAND CENTRES
8
DIRECTION MODE
BACKUP SRC.
ANALOG REF1
SUMMING NODE B
SUMMING NODE C
SUMMING NODE D
POINTER 3
P22.01, P22.03
P22.05, P22.07
P5.23, P5.24
P5.05 = (0)
FIXED REF #1 (P21.01)
FIXED REF #2 (P21.02)
FIXED REF #3 (P21.03)
FIXED REF #4 (P21.04)
SUMMING NODE A
SKIP BAND WIDTHS
ENABLE
JOGGING
(1.003)
P5.11
SEQUENCER SOURCES
REF_SELECT.0
STATUS
FLAG
3
1
RS485 SERIAL
LINK REF 2
P17.21
FIXED REF #0
P21.00
xx
REFERENCE LOSS
MONITOR
NUMBER POINTS
P17.08 TO
P17.17
DIGIN
WARNING ON BACKUP ?
P5.06
5
P17.03 TO
P17.07
(A)
BACKUP CONTROL
SEQUENCER MODE
P17.01
ANALOG
I/O
TB3/6
7
CURRENT POINT
P16.01
DEFAULT
SETTING
CONTROL
FLAG
DIGIN 3
P16.02
SUMMING NODE D
POINTER 5
12
SPEED 1/2
SELECT
REVERSE
P16.09
SETPOINT SELECT
1
xx
P5.28
(-2.000)
PID OUTPUT MONITOR
P16.00
DIGOUT
121
REF. #1
SELECT
P5.07
P18.07
REF. #2
SELECT
5
P5.08
BRAKING
0
RUNNING
1
STOPPED
2
STARTING
3
STOPPING
(0)
(1.005)
(-1.005)
4
48
6
REF. #3
SELECT
7
P5.09
REF. #4
SELECT
P5.10
P21.17
31
REF_SELECT.1
(0)
MOTORISED POT
FIXED
REF
MENU
(MENU 21)
P21.18
32
REF_SELECT.2
(0)
TRIM REFERENCE
P19.04
12
TB3/4
TRIM REF. OUTPUT
DIGIN 5
13
P21.19
(0)
REF_SELECT.3
11
FIXED VAL OF 0
33
ANALOGUE REF1/2
P4.09
KEYPAD/REMOTE
116
FIXED VAL OF 0
KEYPAD
START/STOP
P18.04
(0)
RAISE
HS DIG I/P
34
P18.05
LOWER
(0)
35
ANALOG REF1
2
5
ANALOG REF2
FIXED VAL OF 0
FIXED VAL OF 0
RS485 REF 1
6
RS232 REF 1
7
9
PID CONTROLLER
FIXED REF MENU
MOTORISED POT
10
REF. SEQUENCER
3
MOTORISED POT
(MENU 18)
P18.06
(0)
PRESET
1
71
4
8
P18.00
RAISE RATE
11
P18.01
12
LOWER RATE
13
P18.02
MODE
P18.03
PRESET VALUE
14
15
16
TRIM REF.
INPUT A SELECT
POSITION CONTROL
TB3/5
16
DIGIN 4
P4.06
RAPID
STOP
KEYPAD/REMOTE
SUMMING NODE B
17
18
STOP
TB3/8
DIGIN 1
TRIM REF. INPUT B SELECT
P19.02
TRIM REF. SCALE FACTOR A
P19.03
Issue (05/01)
2
0
START/STOP
CONTROL
(1.001)
BACKUP
STOP
START
20
SUMMING NODE D
TB3/7
DIGIN 2
124
(0)
START
SYSTEM
CONTROL
FLAG
OVERRIDES
REMOTE
START/
STOP
P4.04
1
(1.002)
P4.20
21
TRIM
REFERENCE
(MENU 19)
(1)
P4.05
19
POINTER 1
BACKUP
START
125
(0)
22
START/STOP
SEQUENCER
P4.18
POINTER 2
P19.01
NORMAL
STOP
P4.19
SUMMING NODE C
FIXED REF #0 (P21.00)
FIXED REF #1 (P21.01)
POSITION CONTROL
SUMMING NODE A
SUMMING NODE B
POINTER 6
15
P19.00
SUMMING NODE A
(1.004)
14
BACKUP
START/
STOP
(0)
(MENU 4)
123
P4.00
START MODE
ZERO SPEED HOLD TIME
P4.10
P4.01
SYNCHROSTART MODE
NORMAL STOP MODE
P4.07
Sheet
P4.11
STOP TIME LIMIT
RAPID STOP MODE
P4.08
7
TRIM REF. SCALE FACTOR B
Demonstration Case User Manual (T1691)
Page 5-17
5. Menus and Parameters
ALSPA MV3000 Demonstration Case
Motor Frequency Control
P4.01
SYNC'START MODE
P4.02
SCAN CURRENT
P4.03
SCAN RATE
TRQ LIM
1/2
+VE TORQUE LIMIT 1
FIXED 100%
2
ANALOG REF1
ANALOG REF2
RS485 REF 1
4
5
10
FIXED REF MENU
11
12
MOTORISED POT
TRIM REFERENCE
13
FIXED VAL OF 0
FIXED VAL OF 0
SUMMING NODE A
8
14
15
16
17
SUMMING NODE B
POINTER 9
18
POINTER 10
+VE TORQUE LIMIT 2
DC INJ. DELAY
KEY
CURRENT MODE
CURRENT REFERENCE ARBITRATION
FROM START/STOP SEQUENCER
DIGOUT
DIGIN
DC INJECTION
BLOCK
CURRENT
CONTROL
BLOCK
X
P3.27
+VE TORQUE LIMIT SCALE SOURCE 2
TRQ LIM
1/2
P8.10
P8.01
-VE TORQUE LIMIT 1
P8.07
xx
xx
CONTRO
L
FLAG
ANALOG
I/O
STATUS
FLAG
MONITOR
POINT
(A)
DEFAULT
SETTING
DEFAULT
CONNECTION
X
FIXED 100%
2
ANALOG REF1
3
ANALOG REF2
FIXED VAL OF 0
FIXED VAL OF 0
5
(0)
-VE TORQUE LIMIT SCALE SOURCE 1
6
P8.09
7
8
P8.03
-VE TORQUE LIMIT 2
9
10
11
VARIABLE VOLTS BOOST O/P
P3.28
P8.11
X
>= 0
RS485 REF 1
RS485 REF 2
RS232 REF 1
RS232 REF 2
PID CONTROLLER
POINTER 19
P6.16
P3.25
VARIABLE V. BOOST SOURCE
P3.24
VARIABLE VOLTS BOOST
TORQUE
LIMIT
ENABLE
P3.09
RESPONSE SPEED
(0)
ENABLE
VARIABLE
V.BOOST
P3.02
AUTO BOOST
P3.01
FIXED BOOST
X
ACTIVE CURRENT
115
CUT-IN FREQUENCY
2ND RAMP RATES
(0)
REGEN. POWER LIMIT
126
P3.11
S-SHAPING
P3.10
P9.07
MOTOR VOLTAGE
P3.26
127
(0)
VOLTAGE/CURRENT
CONTROL MODE SELECTION
FROM START/STOP SEQUENCER
RECTIFICATION MODE
1
4
21
SELECT
2ND RAMP
RATES
P6.00
- P6.03
DC INJ. DURATION
P4.16
P8.02
-VE TORQUE LIMIT SCALE SOURCE 2
P6.12
- P6.15
P4.15
ONLY APPLICABLE FOR MOTOR
FREQUENCY CONTROL, P99.01 = 1
P8.08
X
P6.04
DC INJ. CURRENT
(0)
+VE TORQUE LIMIT SCALE SOURCE 1
9
7
P4.14
SYNCHROSTARTING
BLOCK
P8.07
X
RS485 REF 2
RS232 REF 1
RS232 REF 2
PID CONTROLLER
REF SEQUENCER
6
DC INJ. SPEED
21
1
3
P8.00
P4.13
P4.12
TAPER WITH
FREQUENCY
P3.00
FLUXING CONTROL
P2.00
BASE FREQUENCY
P2.01
BASE VOLTAGE
P3.31
ECONOMY FACTOR
RAMP RATES
PULSE
WIDTH
MODULATION
MOTOR
P6.05 P6.08
1417
CLAMP
ZERO
REFERENCE
(0)
RAMP
FREEZE
UP/DOWN
FWD/REV
(no bypass)
8
% = P9.01
RPM = P9.03
4
P5.21
13
DRIVE
O/P RUNNING
FLUX
CONTROL
SPEED FEEDBACK
(0)
SELECTED
SPEED
REFERENCE
CURRENT
LIMIT
(MENU 3)
RAMP
(MENU 6)
P3.07
FIXED 100%
2
ANALOG REF1
3
ANALOG REF2
4
RS485 REF 1
5
RS485 REF 2
6
RS232 REF 1
7
RS232 REF 2
8
PID CONTROLLER
P3.08
114
CURRENT &
TORQUE
LIMIT
DISABLE
9
REF SEQUENCER
FIXED REF MENU
P24.05
MOTORISED POT
12
TRIM REFERENCE
1
KEYPAD SPEED REF
2
ANALOG REF1
3
ANALOG REF2
RS485 REF 1
RS485 REF 2
5
6
P3.05
FIXED
CURRENT LIMIT
8
9
10
FIXED VAL OF 0
11
14
FIXED VAL OF 0
12
15
SUMMING NODE A
16
SUMMING NODE B
17
POINTER 13
13
14
15
16
17
18
19
CURRENT
LIMIT SOURCE
20
21
P3.05 = REQUIRED MOTOR PEAK I LIMIT x 100%
P99.04
Page 5-18
(0)
P3.04
ABS. MINIMUM FREQUENCY
(1)
SWITCHING FREQ.
70
25
P4.17
FREQUENCY FEEDBACK
SCALE THE
FIXED LIMIT
13
P3.06
P35.00
P24.03
ENABLE
SPEED
TRIM
SPEED TRIM SLEW RATE
7
11
MOTOR
CALIBRATION
RUN IN
PROGRESS
OUTPUT
ENABLE/RUN
4
10
CLAMP
CURRENT LIMIT
RESPONSE SPEED
(0)
1
49
TORQUE
LIMIT
(MENU 8)
RS232 REF 1
RS232 REF 2
PID CONTROLLER
REF SEQUENCER
FIXED REF MENU
MOTORISED POT
TRIM REFERENCE
FIXED VAL OF 0
FIXED VAL OF 0
HS DIG I/P
POSITION CONTROL
SUMMING NODE A
SUMMING NODE B
SUMMING NODE C
SUMMING NODE D
POINTER 7
SPEED TRIM SCALE 1
P24.01
SPEED TRIM SCALE 2
P24.02
75
P3.16
STABILITY T.CONST.
P3.17
MOTOR
STABILITY
P24.04
(0)
STABILITY GAIN
P9.09
SPEED TRIM
SCALE SELECT
SLIP
COMPENSATION
P24.00
TORQUE & SLIP
DERIVATION
SPEED TRIM SOURCE
P3.03
SLIP COMP. GAIN
Sheet
8
Demonstration Case User Manual (T1691)
Issue (05/01)
ALSPA MV3000 Demonstration Case
5. Menus and Parameters
Motor Vector Control, Part 1
P15.00
1
2
KEYPAD REFERENCE
WHEN CHOSEN
3
4
KEY
5
DIGOUT
xx
DIGIN
STATUS
FLAG
xx
MONITOR
POINT
(A)
DEFAULT
SETTING
8
PID CONTROLLER
9
REF SEQUENCER
FIXED REF MENU
MOTORISED POT
TRIM REFERENCE
FIXED VAL OF 0
FIXED VAL OF 0
HS DIG I/P
POSITION CONTROL
SUMMING NODE A
SUMMING NODE B
SUMMING NODE C
SUMMING NODE D
POINTER 8
11
12
13
14
15
16
17
18
19
20
21
TORQUE
REFERENCE
SOURCE
ANALOG REF2
RS485 REF 1
RS485 REF 2
RS232 REF 1
RS232 REF 2
10
DEFAULT
CONNECTION
KEYPAD TORQUE REF
ANALOG REF1
7
6
ANALOG
I/O
CONTROL
FLAG
ONLY APPLICABLE FOR MOTOR VECTOR CONTROL, P99.01 = 2
P15.04
TORQUE REFERENCE
MENU 15
P15.00
TORQUE REFERENCE
BACKUP
TORQUE
REFERENCE
SOURCE
P15.01
TORQUE
SCALE
FACTOR
X
P15.02
ENABLE
TRQ REF
72
SPEED LOOP P GAIN 1
SPEED LOOP I GAIN 1
P14.02
SPEED LOOP D GAIN 1
P14.03
SPEED LOOP P GAIN 2
P14.04
SPEED LOOP I GAIN 2
P14.05
SPEED LOOP D GAIN 2
(0)
3
SELECT
2ND
RAMP
P6.16
127
P14.17
(0)
P6.05 P6.08
1417
CLAMP
ZERO
REFERENCE
P14.18
RAMP
FREEZE
UP/DOWN
FWD/REV
(0)
SPEED DROOP
DROOP TIME CONST.
(0)
P5.21
SELECTED
SPEED
REFERENCE
(0)
76
INHIBIT
-VE
TORQUE
P8.05
SPEED DEMAND
TIME CONST.
P14.13
LIMIT
RAMP
22
P14.08
SPEED ERROR
TIME CONST.
20
P14.12
SPEED ERROR
DISABLE
TORQUE
P8.06
P8.04
23
(0)
24
(0)
(0)
OVERSPEED ACTION
(SEE P29.02)
P9.04
(0)
MENU 14
(1)
(0)
INHIBIT
+VE
TORQUE
DISABLE
SPEED
LOOP
P14.06
GAIN
SELECT
P14.10
P6.11
122
13
P4.12
REGEN. POWER LIMIT
3
MENU 14
RAMP
BYPASS
18
P15.03
TORQUE DEMAND
SLEW RATE
3
P6.09
4
P6.00 P6.03
P14.00
P14.01
MONITOR POINT
FOR ANY TORQUE
REFERENCE EXCEPT
KEYPAD
P15.05
TORQUE DEMAND
SPEED
LOOP
P.I.D
RAMP
(MENU 6)
TORQUE
DEMAND
P11.47
FWD/REV
RAMP RATES
P14.09
(0)
P6.12 P6.15
2nd RAMP RATES
P6.04
S-SHAPING
P6.10
MAX. DEVIATION
P14.14
SPEED DEMAND
TORQUE
DEMAND
SPEED ERROR
DEADBAND
19
P14.15
ENABLE
SPEED LOOP
DEADBAND
(0)
SPEED DEADBAND
OFFSET
73
CLAMP
ZERO
SPEED
INERTIA
COMP.
ACCEL.
TIME
P14.11
(0)
70
INERTIA COMP.
TIME CONST.
SPEED TRIM SLEW RATE
3
4
5
6
7
8
9
10
11
12
13
14
15
16
17
18
19
20
21
KEYPAD SPEED REF
ANALOG REF1
ANALOG REF2
RS485 REF 1
RS485 REF 2
RS232 REF 1
RS232 REF 2
PID CONTROLLER
REF SEQUENCER
FIXED REF MENU
MOTORISED POT
TRIM REFERENCE
FIXED VAL OF 0
FIXED VAL OF 0
HS DIG I/P
POSITION CONTROL
SUMMING NODE A
SUMMING NODE B
SUMMING NODE C
SUMMING NODE D
POINTER 7
74
P25.00
ENABLE
INERTIA
COMP.
INERTIA
COMP.
SPEED TRIM SCALE 1
SPEED TRIM SCALE 2
P24.02
75
TRQ LIM
1/2
1
(0)
3
SPEED TRIM
SCALE SELECT
4
5
6
7
8
9
P24.00
10
SPEED TRIM SOURCE SELECT
P25.04
P25.02
P24.01
2
P24.04
INERTIA COMP.
O/P TIME CONST.
P25.01
INERTIA COMP. SPEED SRC
1
(0)
MENU 25
MENU 24
2
INERTIA
COMP OUTPUT
P25.03
P24.03
ENABLE
SPEED
TRIM
P11.49
MAX. TORQUE AVAILABLE
P11.48
P14.16
P14.07
SPEED FEEDBACK
TIME CONST.
P24.05
SPEED LOOP
OUTPUT
11
12
13
14
15
16
17
18
FIXED 100%
ANALOG REF1
ANALOG REF2
RS485 REF 1
RS485 REF 2
RS232 REF 1
RS232 REF 2
PID CONTROLLER
REF SEQUENCER
FIXED REF MENU
MOTORISED POT
TRIM REFERENCE
FIXED VAL OF 0
FIXED VAL OF 0
SUMMING NODE A
SUMMING NODE B
POINTER 9
POINTER 10
+VE TORQUE LIMIT SCALE SOURCE 1
SGN
P8.08
P8.07
21
P8.00
+VE TORQUE LIMIT 1
+VE TORQUE LIMIT SCALE SOURCE 2
P8.02
+VE TORQUE LIMIT 2
-VE TORQUE LIMIT SCALE SOURCE 1
X
(0)
MENU 8
P8.10
X
P8.09
TRQ LIM
1/2
P8.07
21
P8.01
-VE TORQUE LIMIT 1
-VE TORQUE LIMIT SCALE SOURCE 2
P8.03
-VE TORQUE LIMIT 2
% = P9.01/P1.01
RPM = P9.03
X
(0)
P8.11
X
SPEED
FEEDBACK
SPEED FEEDBACK
Sheet
9
Issue (05/01)
Demonstration Case User Manual (T1691)
Page 5-19
5. Menus and Parameters
ALSPA MV3000 Demonstration Case
Motor Vector Control, part 2
ONLY APPLICABLE FOR MOTOR VECTOR
CONTROL, P99.01 = 2
P12.24
FLUX LIMIT SRC.
P12.04
ENABLE
MANUAL
TEMPERATURE
COMPENSATION
MOTOR TEMP. COMPENSATION
P12.08
TEMP. COMP. SOURCE
P12.05
1
KEY
DIGOUT
xx
DIGIN
xx
ANALOG
I/O
CONTROL
FLAG
STATUS
FLAG
(A)
DEFAULT
SETTING
DEFAULT
CONNECTION
MONITOR
POINT
2
FIXED 100%
ANALOG REF1
3
ANALOG REF2
4
FIXED VAL OF 0
5
6
FIXED VAL OF 0
RS485 REF 1
7
RS485 REF 2
8
RS232 REF 1
9
RS232 REF 2
77
(1)
EFFECTIVE ROTOR RESISTANCE =
P12.15-P12.15 x
100%-P12.04
100%
x
1
ANALOG REF2
3
RS485 REF 1
RS485 REF 2
4
RS232 REF 1
6
RS232 REF 2
7
PID CONTROLLER
8
REF SEQUENCER
2
MOTOR BASE FREQ.
P2.00
MOTOR BASE VOLTS
P2.01
MOTOR FULL LOAD I
P2.02
MOTOR NOM. POWER
P2.03
9
MOTOR NOM. SPEED
P2.04
FIXED REF MENU
MOTORISED POT
10
MOTOR POWER FACTOR
P2.05
TRIM REFERENCE
12
FIXED VAL OF 0
13
FIXED VAL OF 0
SUMMING NODE A
14
15
SUMMING NODE B
16
POINTER 12
17
BASIC MOTOR
NAMEPLATE
DATA
5
MENU 2
11
MENU 12
TEMP. COMP. SCALE
MOTOR PEAK I @ NOM. SPEED
P12.01
10
PID CONTROLLER
MOTOR PEAK I @ 0% SPEED
P12.29
11
SUMMING NODE C
MOTOR PEAK I @ 100% SPEED
P12.30
12
SUMMING NODE D
13
POINTER 11
100%
FLUX LIMIT
ENABLE
MENU 12
P12.09
P12.07
TEMPERATURE
COMPENSATION GAIN
NOTE:
CLAMPED TO
RANGE 20%-100%
P12.23-FLUX LIMIT
ANALOG REF1
MAX. POSSIBLE
MOTOR FLUX
CALCULATION
P12.11 - STATOR RESISTANCE
P12.12 - STATOR LEAKAGE INDUCTANCE
P12.13 - MAGNETISING RESISTANCE
P12.25
ESTIMATED TEMPERATURE
COMPENSATION
AUTOMATIC Rr
IDENTIFICATION
Rr > 0.5xP12.15
Rr < 1.5xP12.15
P12.00 - MOTOR MAGNETISING CURRENT
P12.01 - MOTOR PEAK CURRENT @ NOMINAL SPEED
P12.02 - NOMINAL MAINS SUPPLY VOLTS
68
(0)
OUTPUT FREQUENCY
P12.14 - MAGNETISING INDUCTANCE
DC LINK VOLTAGE
P12.15 - ROTOR RESISTANCE
P12.16 - ROTOR LEAKAGE INDUCTANCE
P12.17 - MOTOR MAGNETISING CURRENT @ 50% BASE VOLTS
P12.18 - MOTOR MAGNETISING CURRENT @ 60% BASE VOLTS
AUTO
P12.19 - MOTOR MAGNETISING CURRENT @ 70% BASE VOLTS
MOTOR
MODEL
MANUAL
P12.20 - MOTOR MAGNETISING CURRENT @ 80% BASE VOLTS
P12.21 - MOTOR MAGNETISING CURRENT @ 90% BASE VOLTS
AUTO TEMP. COMP.
P12.22 - LEAKAGE VOLTS
P12.06 0 = DISABLED (MANUAL)
1 = ENABLED (AUTO)
VECTOR
TORQUE
DEMAND
M
PULSE
WIDTH
MODULATION
CONTROL
8
DRIVE
O/P RUNNING
P13.17
(0)
FORCE ENCODER LOSS
119
P12.27
CURRENT CONTROL BANDWIDTH
49
P13.18
ENCODER
LOSS
(0)
59
SELECT
BACKUP
FEEDBACK
120
MOTOR
CALIBRATION
RUN IN
PROGRESS
RESET ENCODER LOSS
ACTION ON LOSS
13.02
MAX. SPEED CHANGE
13.08
MAX. REVERSALS
13.19
REVERSALS THRESH.
13.20
P35.00
ENCODER LINE COUNT
118
ENC. ANGLE
P13.00
SPEED FB SOURCE
P13.01
SPEED FB BACKUP SRC
SPEED
FEEDBACK
SELECT
MAX. SPEED FWD
P5.15
MAX. SPEED REV
P5.16
# ENC. REVERSALS
ENC
13.10
13.07
TACHO
SPEED
FEEDBACK
& SCALING
SPEED
FEEDBACK
(1)
25
OUTPUT
ENABLE/RUN
ENCODER
SPEED
FEEDBACK
& SCALING
ENCODER
MONITOR
(0)
SWITCHING FREQ.
P4.17
P13.03
MENU 13
P13.04/P13.05
ANALOG REF1
1
ANALOG REF2
2
FIXED VAL OF 0
3
FIXED VAL OF 0
4
RS485 REF 1
5
RS485 REF 2
6
RS232 REF 1
7
RS232 REF 2
8
HI SPEED INPUT
9
POINTER 18
10
SPEED FEEDBACK
% = P9.01,P1.01
RPM = P9.03
P11.51 (%)
SGN
TACHO FEEDBACK SRC.
P13.14
TACHO FEEDBACK SCALE
P13.15
TACHO FEEDBACK T.CONST.
P13.16
ENCODER SPEED
THIS PARAMETER
IS ACTIVE
IN FREQUENCY
CONTROL MODE
TO ALLOW SAFE
ENCODER CHECKING
9
REVERSE
SPEED
(motor going
in reverse)
ENCODERLESS
SPEED
ESTIMATION
& SCALING
MATHEMATICAL
MOTOR
MODEL
ENABLE Rs TRACKER
P12.28
Sheet
10
Page 5-20
Demonstration Case User Manual (T1691)
Issue (05/01)
ALSPA MV3000 Demonstration Case
5. Menus and Parameters
Trips/Warnings and Diagnostic Monitoring
MOTOR MONITORING (MOTOR CONTROL MODES ONLY)
RECTIFIER BRIDGE
(IF FITTED)
DC LINK VOLTS
IGBT
BRIDGE
P11.03
RECT+
DC+
RECT-
DC-
M
IGBT BRIDGE TEMPERATURE
PRECHARGE
COMPLETE
47
RECT BRIDGE TEMP.
ALL BRIDGE TEMPERATURES
ELECTRONICS TEMP.
DB RESISTOR MAXIMUM POWER
P23.03
DB RESISTOR MAX POWER TIME
OPTIONAL
DYNAMIC
BRAKE
UNIT
(MENU 23)
P23.04
DB VOLTAGE THRESHOLD
P23.06
DB RES. OVERLOAD ACTION
P23.20
NON-MV DB UNIT FITTED
P2.10
P11.04
ACTION ON MTRIP
P9.06
HOURS/DAYS RUN
P11.15/P11.16
MOTOR VOLTS (V)
P9.07
kW/MW HOURS
P11.19/P11.20
MOTOR POWER (kW)
P9.08
MOTOR
THERMOSTAT
TRIP
(1)
DB RESISTOR VALUE
P23.02
DRIVE CURRENT (%)
MOTOR PROTECTION/TRIP AVOIDANCE (MOTOR CONTROL MODES ONLY)
MENU 45
P2.11
DB RESISTOR AVERAGE POWER
P23.01
P9.05
P11.08
CONTROL
PCB
(CDC)
P23.00
P11.05 - P11.11
MOTOR CURRENT (A)
MAX EVER ELECTRONICS TEMP.
P11.13
MIN EVER ELECTRONICS TEMP.
P11.14
HOURS ENERGISED
P11.17
DAYS ENERGISED
P11.18
MTRIP
P2.13
TRIPS AND WARNINGS
MOTOR PTC TRIP RESISTANCE
P2.15
P9.05
TRIPS AND WARNINGS
113
MOTOR
PTC
TRIP
ACTION ON MOTOR PTC
MEASURED PTC RESISTANCE
P2.14
MOTOR CURRENT
TRIPS AND WARNINGS
DB RES. OVERLOAD REMAINING
P23.07
P23.08
(2.008)
P2.07
MOTOR 150% OVERLOAD TIME
P2.08
MOTOR COOLING FAN TYPE
P2.09
MOTOR I2T ACTION
MOTOR
OVERLOAD
PROTECTION
ALGORITHMS
MOTOR OVERLOAD REMAINING
P9.11
110
DB ENABLE
TRIPS AND WARNINGS
FROM THE DRIVE SYSTEM
P23.09
DB RESISTOR
THERMOSTAT
(0)
111
DRIVE TRIP AVOIDANCE (MOTOR CONTROL MODES ONLY)
P11.03
MORE MONITORING
16 BIT "WORDS" FOR
MONITORING
MENU 9 AND MENU 11 CONTAIN MANY
OTHER MONITORING PARMETERS.
INCLUDING....
P35.12
CONTROL FLAGS 0 - 15
62
DC LINK VOLTS
AC
LOSS
CONTROL
AC SUPPLY LOSS RIDETHROUGH
P35.13
P11.23
CONTROL FLAGS 112 - 127
P11.28
P35.09
CONTROL FLAGS 80 - 111
P38.10, P38.11
P35.10
STATUS FLAGS 0 - 15
RIDETHROUGH
ACTIVE
(MENU 10)
NOMINAL MAINS VOLTS
DRIVE
TRIP
AVOIDANCE
CONTROL
....to....
STATUS FLAG AND CONTROL FLAG
MONITORS
DRIVE
TRIP MONITORING
SYSTEM
AVOID DRIVE TIMED OVERLOAD
AVOID DRIVE OVERTEMPERATURE
DRIVE OVERLOAD REMAINING
HEALTHY
(NO TRIPS
OR WARNINGS)
5
TRIPPED
6
WARNING
P9.10
INFLUENCE
DRIVE
OUTPUT
FREQUENCY
MONITOR DRIVE TEMP.
MONITOR DRIVE OVERLOAD
P11.30
4
....to....
STATUS FLAGS 96 - 111
P11.35
TRIP RESETTING and USER TRIPS (ALL CONTROL MODES)
RESET
P28.05
TO
AUTO RESET DELAY
Reset
Delay time
USER
TRIP 2
?
No. AUTO RESETS LEFT
IS NOT ZERO
O/P RUNNING
ON BOARD DIAGNOSTIC
HISTORY CHART RECORDER
AUTO RESET
CONTROL
Time-out
Disable
Auto-resets
(MENU 28)
No. AUTO RESET LEFT
P28.04
KEY
Healthy time
Award
P28.00
DIGOUT
P28.06
.
.
.
.
to
.
.
.
.
.
P28.19
INST. OVERCURRENT
TIMED OVERCURRENT
DC LINK UNDERVOLTS
DC LINK OVERVOLTS
ALL MOTOR TRIPS - MOTOR CONTROL MODES ONLY
INTERLOCK (TB3/9)
REFERENCE LOSS
ALL TEMPERATURE TRIPS
SERIAL LINK LOSS
BOTH USER TRIPS
OVERSPEED - MOTOR CONTROL MODES ONLY
LOAD FAULT DETECT - MOTOR CONTROL MODES ONLY
DB RESISTOR - MOTOR CONTROL MODES ONLY
SFE MAINS - SFE MODE ONLY
AUTO RESET ENABLES
DIGIN
AUTO RESETTING ENABLES
xx
xx
8
TRIPPED
5
P26.00
Drive Healthy
AUTO RESET HEALTHY TIME
10
(0)
P10.33
Delay time
Supply Loss
P28.03
P10.31
112
(0)
AUTO RESET
Reset
7
SUPPLY LOSS TIME-OUT
USER
TRIP 1
STARTING/STOPPING
(MOTOR
CONTROL MODE
ONLY)
No. of AUTO RESET ATTEMPTS
Trip
P28.02
HOURS SINCE TRIP
P10.32
OVERRIDE
START MODE
ONLY
DURING
AUTO-RESET
START MODE AS P4.00
P28.01
RESET TRIPS
and
"TIMES SINCE"
9
FORCE A MOTOR CONTROLSYNCROSTART
SYNCROSTART
P28.00
P10.30
(1.006)
TRIP RESET
DIGIN 6
AUTO RESETTING CONTROL
SECONDS SINCE TRIP
P10.34
TB3/3
CONTRO
L
FLAG
ANALOG
I/O
STATUS
FLAG
MONITOR
POINT
(A)
DEFAULT
SETTING
DEFAULT
CONNECTION
RUN HISTORY
P26.25
STOP HISTORY
P26.26
78
79
(2.008)
(2.005)
SAMPLE PERIOD
P26.01,
P26.03 .. P26.19
CHANNELS 1-10 SIGNALS
P26.02,
P26.04 .. P26.20
CHANNELS 1-10 MODE
P26.21
TRIGGER SOURCE
P26.22
LOWER TRIGGER LIMIT
P26.23
UPPER TRIGGER LIMIT
P26.24
SAMPLES AFTER TRIGGER
P26.27
HISTORY COMMAND
P27.00
SAMPLE DISPLAY No.
HISTORY
RECORDING
PLAYBACK
P27.01
to
P27.10
HISTORY CHANNEL No.
(MENU 27)
WARNING
If the drive is configured to auto-restart, the motor can start rotating without
an operator command. Take precautions to prevent injury to personnel.
1 SCAN
= 5ms
HISTORY
RECORDING
SET UP
(MENU 26)
Sheet
11
Issue (05/01)
Demonstration Case User Manual (T1691)
Page 5-21
5. Menus and Parameters
ALSPA MV3000 Demonstration Case
Application Logic, Special Monitoring Functions
GENERAL PURPOSE LOGIC BLOCKS
COMPARATOR
A
OUTPUT
17
P30.00
18
APPLICATION MONITORS AND SPECIAL FUNCTIONS, MOTOR CONTROL MODES ONLY
DELAY A
OUTPUT
19
INPUT A
LOGIC
BLOCK A
OUTPUT
COMPARATOR
A
P30.01
SOURCE
DELAY A
THRESHOLD A
P30.07
TORQUE WINDOW LEVEL 1
P29.06
FWD OVERSPEED
P29.00
TORQUE WINDOW LEVEL 2
P29.07
REV OVERSPEED
P29.01
P29.02
ACTION ON OVERSPEED
P29.08
HYSTERESIS
P30.09
HYSTERESIS
P30.02
(0)
P30.03
MODE
37
DELAY TIME
P30.08
P30.05
SOURCE
36
(0)
LOGIC
BLOCK
A
P30.11
P30.10
(0)
39
(0)
SET
38
P30.04
P30.12
40
FUNCTION
P30.06
SET
RESET
LATCH
A
TORQUE
MONITOR
20
RESET
COMPARATOR B
OUTPUT
21
22
DELAY B
OUTPUT
23
LOGIC
BLOCK B
OUTPUT
30
HYSTERESIS
DELAY B
SOURCE
(0)
42
DELAY TIME
P30.21
(0)
MODE
P30.18
SOURCE
48
LOGIC
BLOCK
B
(0)
(0)
SET
44
SET
RESET
LATCH
B
P30.25
(0)
RESET
11
LOAD FAULT ACTION
16
LOAD
DELAY C
OUTPUT
37
INPUT C
COMPARATOR
C
P30.27
P43.01
LOAD FAULT INPUT
P43.02
LOAD FAULT TIME
LOAD FAULT
LOW
SOURCE
DELAY C
HYSTERESIS
(0)
MODE
47
DELAY TIME
P30.34
P30.29
P30.31
SOURCE
(0)
(0)
P31.20
98
P30.33
(0)
STATUS FLAG
GENERATOR
(0)
(MENU 31)
P31.21
PREVIOUS
LOGIC
BLOCK
C
(0)
P30.36
(0)
SET
49
48
46
P30.38
SET
RESET
LATCH
C
FUNCTION
50
COMPARATOR D
OUTPUT
40
DELAY D
OUTPUT
FORWARD SPEED 1
P43.04
FORWARD MAX LOAD 1
38
P43.05
RESET
MENU 30
39
P43.03
LATCH
OUTPUT C
(0)
P30.32
99
SPEED
P30.37
P30.30
P30.39
97
NEXT
P30.35
P30.28
BELOW SPEED WINDOW
61
THRESHOLD C
LOGIC
BLOCK D
OUTPUT
41
INPUT D
ABOVE SPEED WINDOW
P31.19
FREEZE
TORQUE DEMAND
LOGIC
BLOCK C
OUTPUT
IN SPEED WINDOW
LOAD FAULT
HIGH
60
36
ZERO SPEED
OUTSIDE SPEED WINDOW
15
P43.00
P9.01
MOTOR BRAKING
DRIVE CURRENT
COMPARATOR C
OUTPUT
AT SPEED
24
LATCH
OUTPUT B
45
FUNCTION
MENU 30
35
12
14
43
P30.19
OVERSPEED
13
P30.23
41
10
ABOVE TORQUE WINDOW
P30.24
P30.17
P30.26
SPEED FEEDBACK
BELOW TORQUE WINDOW
32
P30.20
P30.22
P30.16
P29.05
IN TORQUE WINDOW
OUTSIDE TORQUE WINDOW
31
COMPARATOR
B
P30.15
HYSTERESIS
(MENU 29)
INPUT B
THRESHOLD B
P29.04
SPEED MONITOR
AT TORQUE LIMIT
28
29
P30.14
P29.03
SPEED WINDOW LEVEL 2
LATCH
OUTPUT A
(0)
MENU 30
P30.13
P9.04
TORQUE
(MENU 29)
SPEED WINDOW LEVEL 1
FORWARD MIN LOAD 1
...to....
P43.18
REVERSE SPEED 3
P43.19
REVERSE MAX LOAD 3
P43.20
REVERSE MIN LOAD 3
70
FLAG GEN 0
71
FLAG GEN 1
72
FLAG GEN 2
73
FLAG GEN 3
74
SEQUENCE
RUNNING
P31.22
RESET
100
(0)
LOAD FAULT DETECTION
WINDOW
USED TO CONDITION
MONITOR THE PLANT
MODE
SEQUENCE START POINT
(MENU 43)
SEQUENCE LENGTH
SEQUENCE TIMES
P31.00
P31.01
P31.02
P31.03 TO P31.18
COMPARATOR
D
P30.40
SOURCE
DELAY D
THRESHOLD D
P30.46
P30.48
(0)
P30.41
HYSTERESIS
P30.47
P30.42
(0)
MODE
52
DELAY TIME
SOURCE
P30.44
P30.49
LOGIC
BLOCK
D
(OUTPUT)
(0)
(0)
SET
54
53
51
P30.43
P30.51
(0)
P30.45
P42.38
POINTER 20 SOURCE
P42.39
POINTER 20 SCALE
P30.50
SET
RESET
LATCH
D
RESET
(X8,Y8)
42
LATCH
OUTPUT D
55
FUNCTION
P44.00
X
REFERENCE SHAPER X1
(X5,Y5)
P44.01
REFERENCE SHAPER Y1
P44.18
REFERENCE SHAPER X10
P44.19
REFERENCE SHAPER Y10
56
P30.61
(0)
P30.54
57
(0)
62
LOGIC
BLOCK
E
43
LOGIC
BLOCK E
OUTPUT
P30.55
(0)
LOGIC
BLOCK
G
45
LOGIC
BLOCK G
OUTPUT
P30.63
(0)
(0)
58
P30.52
(0)
P30.62
63
P44.20
(MENU 44)
(X1,Y1)
MENU 30
REF. SHAPER OUTPUT
(INPUT)
REFERENCE
SHAPER
....to....
P30.53
(X10,Y10)
Y
INPUT
64
FUNCTION
FUNCTION
P30.60
KEY
DIGOUT
59
(0)
P30.58
60
(0)
P30.59
65
LOGIC
BLOCK
F
44
LOGIC
BLOCK F
OUTPUT
66
DEFAULT
SETTING
CONTROL
FLAG
ANALOG
I/O
(A)
STATUS
FLAG
MONITOR
POINT
DEFAULT
CONNECTION
(0)
P30.66
(0)
LOGIC
BLOCK
H
DIGIN
46
LOGIC
BLOCK H
OUTPUT
xx
P30.67
(0)
(0)
61
P30.56
xx
P30.65
P30.57
67
FUNCTION
P30.64
FUNCTION
Sheet
12
Page 5-22
Demonstration Case User Manual (T1691)
Issue (05/01)
ALSPA MV3000 Demonstration Case
5. Menus and Parameters
Motor Position Controller
ONLY APPLICABLE FOR MOTOR CONTROL MODES, P99.01 = 1, 2, 3
POSITION CONTROL OVERVIEW
POSITION
INCHER
MENU 36
POSITION
REFERENCE
SHAPER
POSITION
REFERENCE
SELECTIONS,
INCLUDING
15 FIXED
POSITIONS
POSITIONING
SPEED
KEY
MENU 36
DIGOUT
DATUM SPEED
DATUM
CONTROL
MODES
MENU 37
POSITION
TEACHER
MENU 36
DATUM
MOVE
IN
PROGRESS
DIGIN
xx
POSITION
INCHER
(0)
INCH DOWN
FIXED POSITION REF. TABLE
96
UP STEP
P36.49
P36.50
DOWN STEP
POSITION FEEDBACK
(0)
P37.04
1
OF
16
-X1 P36.12
-X2 P36.14
-X3 P36.16
-X4 P36.18
-X5 P36.20
X1 P36.22
X2 P36.24
X3 P36.26
X4 P36.28
X5 P36.30
FIXED MENU
1
ANALOG REF1
2
ANALOG REF2
3
FIXED VAL OF 0
4
REFERENCE LOSS
MONITOR
ENABLE
INCHING
SERIAL LINK
4-20mA
FIELDBUS
etc.
89
101
FIXED VAL OF 0
RS485 LINK
(DOUBLE PARA)
REF2 = high
REF1 = low
(0)
RS232 LINK
(DOUBLE PARA)
REF2 = high
REF1 = low
P37.39
(0)
92
SEL.1
...to...
P37.40
(0)
93
SEL.2
P37.41
(0)
SEL.3
94
POSN. CONTROL FLAGS 96 - 111
P38.11
POSITION SPEED REF.
POSITIONING
SPEED
8
RS485 LINK
REF2 = % POSN
9
RS232 LINK
REF1 = % POSN
10
RS232 LINK
REF2 = % POSN
11
P37.00 = (1)
P38.04
P38.05
% = P38.08
P37.01 = (4)
INHIBIT
NEGATIVE
INHIBIT
POSITIVE
P36.09
(0)
LOW
LIMIT
MENU 37
EITHER LIMIT
87
(0)
HIGH
LIMIT
66
OR
86
88
P37.03
REF. 1/2
SELECT
P36.40
PID
(% POSN)
MOTORISED
POT (% POSN)
POINTER 16
(% POSN)
DOUBLE POINTER
POINTER 17 = high
POINTER 16 = low
P36.54
P36.55
12
DATUM
PERMIT
(0)
DATUM
PERFORM
DATUM
MOVEMENT
13
P36.41
(0)
DATUM
APPROACH
P38.00
P38.01
(0)
(MENU 36)
84
(0)
DATUM INPUT
POSITION REFERENCE
P38.02
P38.03
POSITION FEEDBACK
P36.34
DATUM SPEED 1
P36.35
DATUM SPEED 2
P36.36
DATUM SPEED 3
P36.37
85
(0)
P36.32
P36.33
ENCODER LINE COUNT DIVIDER
80
64
AT POSITION
FORCE POSITION INVALID
POSITION
MONITOR
68
ABOVE POSITION
69
BELOW POSITION
POSITION
VALID
& CAPTURE
P36.39
Issue (05/01)
SEQUENCER
83
DATUM SEQUENCE
DATUM POSITION
11
64
MOVEMENT
P36.43
15
FORCE POSITION VALID
ZERO SPEED
DATUM MOVEMENT
IN PROGRESS
P36.42
14
P36.38
67
65
82
TOLERANCE
POSITION VALID
P38.12
SPEED REFERENCE
TO SPEED CONTROL SYSTEM
P36.08
RS485 LINK
REF1 = % POSN
P38.09
P36.10
P36.11
DATUMISING
SPEED
P38.00
P38.01
% = P38.06
(0)
FIXED
POSITION
MENU
POSITION SHAPER RANGE
POS.
ERROR
POSITION
ERROR
REF. SRC.
SELECT
7
P38.10
POSN. STATUS FLAGS 64 - 79
SPEED REF.
REF. SRC. 2
91
SEL.0
1111 = FIXED POSN 15
6
-Y1 P36.13
-Y2 P36.15
-Y3 P36.17
-Y4 P36.19
-Y5 P36.21
Y1 P36.23
Y2 P36.25
Y3 P36.27
Y4 P36.29
Y5 P36.31
POSN. CONTROL FLAGS 80 - 95
BACKUP SRC.
REF. SRC. 1
P37.38
0000 = FIXED POSN 0
5
CONTROL FLAGS
AND
STATUS FLAGS
(0)
POSITION TO LEARN
POSITION 15
ENABLE
UNIDIRECTIONAL
APPROACH
P36.51
P37.02 = (0)
(MENU 37)
P36.44
P36.45
P36.46
(0)
90
BACKUP CONTROL
LEARN
POSN. NOW
DEFAULT
CONNECTION
POSITION SHAPER
P36.47
P36.48
POSITION 0
P37.05
MONITOR
POINT
(MENU 36)
P37.06 TO P37.37
POSITION
REFERENCE
TEACHER
STATUS
FLAG
APPROACH BIAS
BIAS
FOR
SINGLE
DIRECTION
APPROACH
P36.53
MENU 38
64
(A)
(0)
95
INCH UP
POSITION VALID
ANALOG
I/O
P36.52
POSITION CONTROL MONITOR,
ALL VALUES AND FLAGS
P38.02
P38.03
DEFAULT
SETTING
CONTROL
FLAG
64
POSITION VALID
POSITION FEEDBACK
FROM ENCODER [ANY MODE]
MENU 36
xx
MAX. POSITION
P36.02
P36.03
MIN. POSITION
P36.04
P36.05
P36.01
(0)
81
A/B
P38.02
P38.03
% = P38.07
POSITION FEEDBACK WRAPPED
TO 0/MAX POSITION WHEN
MODE = TURNTABLE
POSITION FEEDBACK
P36.00
POSITION CONTROL MODE
Demonstration Case User Manual (T1691)
POSITION
FEEDBACK
ENC
Z
Sheet
13
Page 5-23
5. Menus and Parameters
ALSPA MV3000 Demonstration Case
Summing Nodes and Pointers
THE EQUATION BELOW SHOWS HOW SUMMING NODES A, B, C & D
OPERATE. THE FOUR DIAGRAMS ARE A LOGICAL REPRESENTATION.
SUMMING NODE OUTPUT
SUMMING NODE INPUT 1
=
SUMMING NODE SCALE 1
WHERE
?
P40.00
IS THE CHOSEN MODE
(+,
, x or
?
SUMMING NODE INPUT 2
THE POINTERS BELOW CAN BE USED BY SIMPLY SELECTING THE RELEVANT POINTER
FROM THE LIST OFFERED IN THE RELEVANT REFERENCE CHOICE.
E.G. CHOOSE POINTER 1 FROM THE SPEED REFERENCE CHOICE SELECTION (SHEET 2)
THEN CONFIGURE POINTER 1 BELOW.
THE POINTER SOURCES CAN BE ANY DRIVE PARAMETER.
X 100.00%
SUMMING NODE SCALE 2
)
P42.00
POINTER 1 SOURCE
P42.01
POINTER 1 SCALE
P42.04
POINTER 3 SOURCE
P42.05
POINTER 3 SCALE
P42.08
POINTER 5 SOURCE
P42.09
POINTER 5 SCALE
P42.12
POINTER 7 SOURCE
P42.13
POINTER 7 SCALE
P42.16
POINTER 9 SOURCE
P42.17
POINTER 9 SCALE
P42.20
POINTER 11 SOURCE
P42.21
POINTER 11 SCALE
P42.24
POINTER 13 SOURCE
P42.25
POINTER 13 SCALE
P42.28
POINTER 15 SOURCE
P42.29
POINTER 15 SCALE
P42.32
POINTER 17 SOURCE
POSSIBLE SOURCE FOR
SPEED REFERENCE
INPUT PARAMETER #1A
P42.02
POINTER 2 SOURCE
P42.03
POINTER 2 SCALE
P42.06
POINTER 4 SOURCE
P42.07
POINTER 4 SCALE
P42.10
POINTER 6 SOURCE
P42.11
POINTER 6 SCALE
P42.14
POINTER 8 SOURCE
P42.15
POINTER 8 SCALE
POSSIBLE SOURCE FOR
SPEED REFERENCE
SUMMING NODE A
P40.02
PARAMETER #1A SCALE
P40.20
SUMMING NODE A MODE
P40.01
INPUT PARAMETER #2A
(+)
SUMMING NODE A OUTPUT
POSSIBLE SOURCE FOR
REFERENCE SEQUENCER P17.21
POSSIBLE SOURCE FOR
PID SETPOINT
P40.04
MENU 40
P40.03
P40.05
POSSIBLE SOURCE FOR
PID FEEDBACK
POSSIBLE SOURCE FOR
TRIM REFERENCE
PARAMETER #2A SCALE
POSSIBLE SOURCE FOR
SPEED TRIM REFERENCE
POSSIBLE SOURCE FOR
TORQUE REFERENCE P15.00
INPUT PARAMETER #1B
SUMMING NODE B
P40.07
PARAMETER #1B SCALE
P40.21
SUMMING NODE B MODE
P40.06
INPUT PARAMETER #2B
(+)
SUMMING NODE B OUTPUT
P40.09
POSSIBLE SOURCE FOR
TORQUE LIMITS
P42.19
POSSIBLE SOURCE FOR
TEMPERATURE COMPENSATION
SCALE
MENU 40
P40.08
P40.10
PARAMETER #2B SCALE
INPUT PARAMETER #1C
POSSIBLE SOURCE FOR
CURRENT LIMIT
SUMMING NODE C
P40.12
PARAMETER #1C SCALE
P40.22
SUMMING NODE C MODE
P40.11
INPUT PARAMETER #2C
(+)
SUMMING NODE C OUTPUT
P40.14
MENU 40
P40.13
P42.33
PARAMETER #2C SCALE
P42.36
P40.15
INPUT PARAMETER #1D
P40.17
PARAMETER #1D SCALE
P40.23
SUMMING NODE D MODE
P40.16
INPUT PARAMETER #2D
SUMMING NODE D
(+)
SUMMING NODE D OUTPUT
POSSIBLE SOURCE FOR
TORQUE / MAGNET. CURRENT
POSSIBLE SOURCE FOR
POSITION REFERENCE
POSSIBLE SOURCE FOR
VARIABLE VOLTS BOOST
POINTER 19 SOURCE
POINTER 19 SCALE
P42.40
POINTER 21 SOURCE
P42.41
POINTER 21 SCALE
P42.44
POINTER 23 SOURCE
POSSIBLE SOURCE FOR
AEM VDC REFERENCE
POINTER 10 SOURCE
POINTER 12 SOURCE
P42.23
POINTER 12 SCALE
P42.26
POINTER 14 SOURCE
P42.27
POINTER 14 SCALE
P42.30
POINTER 16 SOURCE
P42.31
POINTER 16 SCALE
P42.34
POINTER 18 SOURCE
P42.38
POSSIBLE SOURCE FOR
TORQUE LIMITS
POINTER 10 SCALE
P42.22
P42.35
POINTER 17 SCALE
P42.37
P42.18
POSSIBLE SOURCE FOR
FLUX LIMIT
POSSIBLE SOURCE FOR
TORQUE / MAGNET. CURRENT
POSSIBLE SOURCE FOR
POSITION REFERENCE
POSSIBLE SOURCE FOR
TACHO FEEDBACK
POINTER 18 SCALE
POINTER 20 SOURCE
P42.39
POINTER 20 SCALE
P42.42
POINTER 22 SOURCE
P42.43
POINTER 22 SCALE
P42.46
POINTER 24 SOURCE
ONLY SOURCE FOR
REFERENCE SHAPER
POSSIBLE SOURCE FOR
AEM ACTIVE CURRENT REFERENCE
P40.19
POSSIBLE SOURCE FOR
AEM ACTIVE CURRENT NEGATIVE LIMIT
POSSIBLE SOURCE FOR
AEM ACTIVE CURRENT POSITIVE LIMIT
MENU 40
P42.45
P40.18
P42.47
POINTER 23 SCALE
POINTER 24 SCALE
PARAMETER #2D SCALE
P42.48
P42.49
KEY
DIGOUT
DIGIN
xx
xx
P42.52
DEFAULT
SETTING
CONTROL
FLAG
ANALOG
I/O
(A)
STATUS
FLAG
MONITOR
POINT
DEFAULT
CONNECTION
P42.53
POSSIBLE SOURCE FOR
AEM REACTIVE CURRENT REFERENCE
POINTER 25 SOURCE
P42.50
P42.51
POINTER 25 SCALE
POINTER 26 SOURCE
POSSIBLE SOURCE FOR
AEM REACTIVE CURRENT POSITIVE LIMIT
POINTER 26 SCALE
POSSIBLE SOURCE FOR
AEM REACTIVE CURRENT NEGATIVE LIMIT
POINTER 27 SOURCE
POINTER 27 SCALE
Sheet
14
Page 5-24
Demonstration Case User Manual (T1691)
Issue (05/01)
ALSPA MV3000 Demonstration Case
5. Menus and Parameters
Scalar Control
ONLY APPLICABLE FOR SCALAR
MOTOR CONTROL, P99.01 = 3
P3.22
MAGNET. CURRENT REF.
1
FIXED 100%
2
ANALOG REF1
3
ANALOG REF2
4
RS485 REF 1
5
RS485 REF 2
6
RS232 REF 1
P3.20
MAGNET. CURRENT SCALE
X
P3.18
7
RS232 REF 2
8
PID CONTROLLER
9
REF SEQUENCER
10
FIXED REF MENU
11
12
MOTORISED POT
TRIM REFERENCE
13
FIXED VAL OF 0
14
FIXED VAL OF 0
15
SUMMING NODE A
16
SUMMING NODE B
17
POINTER 14
18
POINTER 15
MAGNET. CURRENT SOURCE
P9.07
X=
P3.21
2
A + B
P+I
2
MOTOR VOLTAGE
TORQUE CURRENT SCALE
X
P3.19
TORQUE CURRENT SOURCE
TORQUE CURRENT REF.
P3.23
% = P9.01
RPM = P9.03
SPEED FEEDBACK
PULSE
WIDTH
MODULATION
SELECTED
SPEED
REFERENCE
M
CLAMP
FREQUENCY FEEDBACK
8
DRIVE
O/P RUNNING
P9.09
P35.00
P24.03
ENABLE
SPEED
TRIM
(0)
P3.04
MINIMUM FREQUENCY
(1)
SWITCHING FREQ.
70
25
P4.17
OUTPUT
ENABLE/RUN
P24.05
1
KEYPAD SPEED REF
2
ANALOG REF1
3
ANALOG REF2
4
RS485 REF 1
5
RS485 REF 2
6
RS232 REF 1
7
RS232 REF 2
8
PID CONTROLLER
9
1
01
REF SEQUENCER
11
21
31
41
51
61
71
81
29
02
1
Issue (05/01)
SPEED TRIM SLEW RATE
FIXED REF MENU
SPEED TRIM SCALE 1
P24.01
X
SPEED TRIM SCALE 2
P24.02
KEY
P24.04
75
(0)
SPEED TRIM
SCALE SELECT
MOTORISED POT
TRIM REFERENCE
DIGOUT
DIGIN
FIXED VAL OF 0
xx
xx
DEFAULT
SETTING
CONTROL
FLAG
ANALOG
I/O
(A)
STATUS
FLAG
MONITOR
POINT
DEFAULT
CONNECTION
FIXED VAL OF 0
HS DIG I/P
POSITION CONTROL
P24.00
SPEED TRIM SELECT
SUMMING NODE A
SUMMING NODE B
SUMMING NODE C
SUMMING NODE D
Sheet
POINTER 7
15
Demonstration Case User Manual (T1691)
Page 5-25
5. Menus and Parameters
ALSPA MV3000 Demonstration Case
This page intentionally left blank
Page 5-26
Demonstration Case User Manual (T1691)
Issue (05/01)
ALSPA MV3000 Demonstration Case
6. Diagnostics
6. Diagnostics
6.1
Describing the Diagnostic Philosophy
This section of the guide deals with 2 main issues. Problems with using the case and the
way in which the ALSPA MV3000 presents diagnostic information to the user of the drive.
The case has been designed to allow the extensive diagnostic features of the ALSPA
MV3000 to be demonstrated in a safe and convenient way.
The case diagnostics are dealt with in Section 6.3, and allow the user to successfully
diagnose problems whilst operating the case.
The rest of Section 6 is a generic description of the ALSPA MV3000 diagnostic system,
re-produced here, so that effective demonstrations can be performed.
6.2
LED Fault Indicators
A fault condition is indicated by illumination of the WARNING or flashing TRIPPED
indicator and extinguishing of the HEALTHY/STANDBY indicator.
The four LED indicators on the DDM™ (❾) are repeated on the DDM™ Harbour (❽) and
give a first indication of case status. The DDM™ Harbour indicators are shown in Section
4.6.1 and the DDM™ indicators are shown on the rear cover.
6.3
Diagnosing faults with the Case
Whilst using the case, problems may be experienced. Many of these problems can be
solved by correct use of the case controls. For convenience, a list of likely problems and
their solutions are given on the inside rear cover of this guide, however:
In general, most of the problems encountered when using the case can be corrected by
carrying out the following short procedure:
1. Ensure all the potentiometers in the power frame simulator (⑦), are all in the 12
O’clock position.
2. Ensure the green switches in the power frame simulator (⑦), are all ON (pressed in).
3. Ensure the green switch labelled 4-20mA loss (⑩), is switched ON (pressed in).
4. Ensure all the plant digital input switches (③) are all OPEN (up).
5. Ensure the Drive Data Manager (❾), is in its harbour (❽) or on its lead.
6. Carry out a trip reset by pressing the “?” key on the DDM™ (❾), and choosing
option 3 from the menu which is provided
7. The CDC board (❸) should be healthy, and this can be determined by the green
healthy/standby LED on the DDM™ (❾), the rear cover of this guide has a picture of
the DDM™, so the healthy/standby LED can be identified.
If the case does not power up healthy, it is possible that the parameter edits stored in the
CDC board (❸) are at fault, as the user is able to generate faults, e.g. User Trip 1. Default
the parameters by carrying out the procedure described in section 5.1.9, then repeat the
above procedure.
Issue (05/01)
Demonstration Case User Manual (T1691)
Page 6-1
6. Diagnostics
6.4
ALSPA MV3000 Demonstration Case
Warnings
It is possible
to use the controls on the case to simulate warning conditions. A list
of warnings which can be simulated by the case is shown on the rear cover and a
description of how to use the controls to produce these faults is described in Section 4.3. A
complete list of ALSPA MV3000 warnings is given in the optional software manual T1678
and the Getting Stated Manual T1676.
If the WARNING indicator is lit a problem has occurred which is not sufficiently serious to
trip the case. A warning code is stored in one of 10 locations in the Warning Record,
parameters P10.00 to P10.09, the code stored in P10.00 being for the most recent
warning, it is important that all warning codes are viewed to gain a complete picture.
Note:
Warnings are not latched and if the warning condition ceases, the WARNING
indicator will extinguish. (At default, Warning 1 is duplicated at P1.06).
6.5
Trips
It is possible to use the controls on the case to simulate trip conditions. A list of trips which
can be simulated by the case is shown on the rear cover and a description of how to use
the controls to produce these faults is described in Section 4.3. A complete list of ALSPA
MV3000 trips is given in the optional software manual T1678 and the Getting Stated
Manual T1676.
If the TRIPPED indicator is flashing, a fault has occurred which has caused the case to shut
down. In a real plant situation, the drive may be at fault, but usually the drive has tripped
in response to a problem on the plant, and the drive has protected the installation.
Each time a trip occurs a Fault is stored in one of ten locations in the Active Trip record,
parameters P10.10 to P10.19, the fault stored in P10.10 being for the most recent trip, it
is important that all trip codes are viewed to gain a complete picture. These trips are then
stored forever in a Trip History, storing the last 10 active trips, in P10.20 to P10.29.
Note:
Trips are latched and must be reset before the case can be operated again. See
Section 6.6.3 to reset the trip.
6.6
Viewing Warnings and Trips
Parameters in the case report the trip or warning currently present, and other parameters
hold a history of the last 10 trips. These parameters display codes and text which describe
particular warnings or trips, the DDM™ automatically displays these text messages.
Menu 10 is dedicated to trips and warnings, but at default Menu 1 also has some of these
parameters collected together for easy access.
Page 6-2
Available parameters in Menu 01
Available parameters in Menu 10
P1.06 = FIRST WARNING
P1.07 - P1.08 = FIRST 2 TRIPS
P10.00 - P10.09 = WARNINGS 1 to 10
P10.10 - P10.19 = CURRENT TRIPS 1 to 10
P10.20 - P10.29 = TRIP HISTORY 1 to 10
Demonstration Case User Manual (T1691)
Issue (05/01)
ALSPA MV3000 Demonstration Case
6. Diagnostics
Viewing using the navigation keys
Navigate to one of the above parameters, either a Trip or a Warning, and note the code
and the text message, remember to view all, not just the first one.
Viewing using the "help" key
6.6.1
6.6.2
6.6.3
1.
When the drive is showing either a Trip or Warning, press ? to view diagnostic
menu. If the DDM™ is connected and has not been used for about 5 minutes, this
menu will appear automatically. See Section 6.7 for more information on using the
help key.
2.
The DDM™ will display a diagnostics menu, choose the relevant option.
3.
See Section 6.6.1 and Section 6.6.2 for what to do when a trip or warning occurs.
Action in the Event of a Warning
1.
Press ? and select "2" – Display Warnings. See Section 6.7 for more
information on using the help key.
2.
P10.00 will be displayed, note the first warning. This is the problem which is causing
the warning indication.
3.
In turn, Display P10.01 to P10.09 and note any additional warnings. Any warnings
in these locations will be for secondary problems and will help with diagnosis.
4.
Refer to the rear cover and check the meaning of each warning. Take corrective
action as necessary.
Action in the event of a Trip
1.
Press ? and select "2" – Display Trips. See Section 6.7 for more information on
using the help key.
2.
P10.10 will be displayed, note the most recent trip. This is the problem which has
caused the trip indication. (For the default configuration, Trips 1/2 are located at
P1.07/P1.08).
3.
In turn, Display P10.11 to P10.19 and record any additional trips which may be present.
4.
Refer to the table inside the rear cover and check the meaning of each fault. Take
corrective action as necessary.
5.
See Section 6.6.3 for resetting trips.
Resetting Trips
From the Digital Inputs
From Default, toggle ON then /OFF the switch wired to DIGIN 6.
Note:
At Default, DIGIN 6 is connected to Control Flag 9 (the Reset flag) which may
have been re-programmed.
From the DDM™
Press ? and select option 3 (Attempt Trip Reset), see Section 6.7 for more information
on using the help key.
Issue (05/01)
Demonstration Case User Manual (T1691)
Page 6-3
6. Diagnostics
6.6.4
ALSPA MV3000 Demonstration Case
Fault Codes
Some of the more common Trip and Warning fault codes are listed inside the rear cover.
For this user guide, the codes are specific to those which can be seen whilst using the
demonstration case.
For a full listing and description, refer to the optional Software Technical Manual T1679.
6.7
Using the HELP Key for diagnostics
If the case trips, get information on the trip by pressing
? .
A screen appears, giving four choices, as shown:
1. PARAMETER HELP
2. DISPLAY TRIPS
3. ATTEMPT RESET
4. BACK TO PARAMETER
PX.XX
Continue with help on
selected parameter.
See Section 4.5.4 for
examples.
P10.10
(Information about the
most recent trip.)
RETURN WITH NO
FURTHER HELP.
RESET ATTEMPT FAIL
(Trip still present)
PX.XX
xxxxxx xx xxxx x
=xx xxx
Figure 6-1 Help screen for trips
PRESSING
1
Allows the user to view parameter help when a trip is present.
2
Displays parameter P10.10 – giving information about the trip.
3
Attempts to reset the trip. If the attempt fails, this screen re-appears.
4
Return to the parameter being viewed before the “?” was pressed, with no further
help.
If the case shows a Warning, get information on the warning by pressing
? .
The HELP system works as described for trips, except the diagnostic menu is modified to
allow warnings to be displayed. Pressing option 2 displays P10.00
1. PARAMETER HELP
2. DISPLAY WARNS
3. BACK TO PARAMETER
P10.00
(INFORMATION ABOUT
THE MOST RECENT
WARNING)
Figure 6-2 Help screen for warnings
Page 6-4
Demonstration Case User Manual (T1691)
Issue (05/01)
ALSPA MV3000 Demonstration Case
6.8
6. Diagnostics
Diagnostic Hints
There are a number of approaches the user can take to diagnose a problem:
1. Refer to Section 6.3, for a list of actions to take to make the case healthy
2. There is a list of helpful hints recorded on the inside of the rear cover of this user
manual.
3. Use Sections 6.6 and 6.7 to find out what the problem is. The trip or warning
messages give a clue to the problem and the trip/warning meanings inside the rear
cover of this guide will also help.
4. The case will normally only trip if one or more of the controls of the case are in a
state which simulates a fault, so the trip code will point towards one of the case
controls.
5. View the trip history in P10.20 to P10.29 for a list of the last 10 reasons why the
case has tripped. This list however, will only be a record of the last 10 things the
case has been asked to trip on by adjusting the relevant controls.
6.9
Changing a Case Fuse
The case fuse may blow during the life of the equipment, carry out the following
procedure when changing the fuse:
1. Disconnect the case from the mains by switching the mains off at the case and
pulling the IEC mains cable out (➍).
2. The mains connector (➍) has a small draw which can be levered open with a
terminal screw driver.
3. Inside the draw is a spare fuse of the correct type. The fuse at the front of the draw is
the spare, the fuse at the back is the one in use.
4. Remove the damaged fuse and replace it with the spare, ensuring that a
replacement of the correct type is obtained, the specification for which is given in
Section 2.1 of this user guide.
5. Before switching back on, inspect the case and its controls for a possible reason for
the fuse failure.
6. If the case continues to blow fuses, return the case to !"#$ at the address
shown on the rear cover of this guide.
Issue (05/01)
Demonstration Case User Manual (T1691)
Page 6-5
6. Diagnostics
ALSPA MV3000 Demonstration Case
6.10
Failure of CDC Board (❸) Firmware
6.10.1
General Description
Should a fault develop in the CDC firmware, normal software operation will stop. If a
DDM™ is plugged in it will display:
FIRMWARE INTEGRITY
FAILURE
(E000)
SEE USER MANUAL
To assist %&'())personnel in diagnosing the cause of the software malfunction, the
memory contents of the drive can be uploaded to a PC as shown in Section 6.10.2 and
sent to %&'( at the address shown on the rear cover.
6.10.2
Uploading the failed CDC Board (❸) firmware diagnostics
Proceed as follows:
Page 6-6
1.
Connect the COM port of a PC to the RS232 port of the drive (DDM™ port). A pinto-pin 9-way D-type lead is required (the DDM™ lead supplied with the case will
work).
2.
Run a simple terminal program on the PC (Telix, Windows Terminal etc.).
3.
Set the COM port parameters to 9600 baud, no parity, one stop bit.
4.
Set the terminal program to upload an ASCII file to disk.
5.
Press ’G’ on the PC to start the upload.
6.
The drive will then upload its entire memory map to the PC (takes about
10 minutes).
7.
The upload can be terminated at any time by pressing ’E’ on the PC.
8.
When the upload is complete, the produced file (about 1MB large) should be
E-mailed to %&'( for analysis (preferably compressed with PkZip/WinZip).
9.
The CDC Board (❸) software can then be re-started by pressing ‘.’ on the DDM™
or the PC, whichever is connected.
Demonstration Case User Manual (T1691)
Issue (05/01)
ALSPA MV3000 Demonstration Case
7. Accessories and Spares
7. Accessories and Spares
7.1
Accessories
7.1.1
Accessory listing
The parts listed below are standard ALSPA MV3000 parts. Some of these items will
have been included in the case at the time of purchase (see section 3 for details). The
numbers are provided to allow additional or new items to be ordered.
Item
ALSPA MV3000 Drive Data
Manager™
Part No.
Description
MVS3000-4001
A multi-function unit with Keypad functionality that
can be used to edit and monitor drive parameters,
extract warnings and trip reports, and provide
parameter specific help. The DDM™ has a large,
easy to read, backlit display and can be mounted to
the case, held in the hand or permanently mounted
on any suitable surface. The DDM™ incorporates
special keys to start and stop a motor, and to control
its speed.
MVS3001-4001
A DDM™-to-drive interconnection cable, mounting
gasket and drilling template to allow the DDM™ to
be mounted on a flat surface, e.g. the cabinet door.
(❾)
ALSPA MV3000 Drive Data
ManagerTM Lead and Door
Mounting Kit
Note: The case only includes the lead as standard.
When connected to the CDC Board (➌), underneath
the perspex cover (➋), the case can be connected
directly to a FIP fieldbus.
ALSPA MV3000 direct FIP
communications card
MVS3002-4001
Serial link support plate
029212981
A special bracket which is required to support the FIP
card, order these items together.
Demonstration case user
guide
T1691
Another copy of this guide might be required.
ALSPA MV3000 Getting
Started Manual
T1676 EN,G,F
The manual shipped with the ALSPA MV3000 drive.
English, German and French versions are available.
ALSPA MV3000 Hardware
Technical Manual
T1678 EN,G,F
Full installation manual for the ALSPA MV3000.
English, German and French versions are available.
ALSPA MV3000 Software
Technical Manual
T1679 EN,G,F
All parameter and function explained in full. English,
German and French versions are available.
7.1.2
Fitting Communication Accessories after sale
Most of the accessories described above are included with the case, extra details can
be found in Section 3.4 of this guide. Communications cards (like FIP) however, may
be purchased at a later stage, proceed as follows:
1. Remove power from the case before proceeding.
2. With an anti-static wrist strap fitted, remove the perspex cover (➋) over the CDC
board (➌) by carefully pulling upwards, the plastic rivets will slide out of the
pillars.
Issue (05/01)
Demonstration Case User Manual (T1691)
Page 7-1
7. Accessories and Spares
ALSPA MV3000 Demonstration Case
3. Undo the M4 nut positioned behind TB2 on the CDC (➌).
4. With an anti-static wrist strap fitted, Fit the Serial link support plate using the M4
nut removed above, the communications card will steady the plate when fitted.
5. With an anti-static wrist strap fitted, fit the communications card into the 96 way
connector and into the Serial link support plate, following the instructions
supplied with the card.
6. Carefully slide apart the plastic rivets on the perspex cover (➋), but do not
completely separate them, this will make the end of the rivets small enough to
slide back into the pillars.
7. Re-fit the perspex cover (➋) by locating the plastic rivets into the pillars and
pressing the top of the rivet firmly home, this will expand the rivet again allowing
it to grip the pillar.
8. Switch the case on and follow the operating instructions supplied with the
communications card.
7.2
Spares
The only item which is user changeable in the demonstration case, is the mains fuse.
The fuse is stored in the mains inlet (❹). A spare fuse is supplied with the case, for
details on fuse changing, see Section 6.9. The fuse used is an easily obtained
proprietary one, the details of which can be found in Section 2.1 of this guide.
Page 7-2
Demonstration Case User Manual (T1691)
Issue (05/01)
ALSPA MV3000 Demonstration Case
8. Disposal
8. Disposal
This equipment or any part of the equipment should be disposed of in accordance with the laws of
the country of use.
Modern high technology materials have been used in the manufacture of the equipment to ensure
optimum performance. Care has been taken with the selection of these materials to minimise risks
to health and safety. However, some materials require special consideration during disposal.
Issue (05/01)
Demonstration Case User Manual (T1691)
Page 8-1
8. Disposal
ALSPA MV3000 Demonstration Case
(This page intentionally left blank)
Page 8-2
Demonstration Case User Manual (T1691)
Issue (05/01)
Germany
Culemeyerstraße 1
D-12277 Berlin
Sales Tel:
+49 (0) 30 74 96 27 27
Support Tel (International):
+49 (0) 69 66 99 831
Support Tel (National):
01 80 3 23 45 72
UK
Boughton Road, Rugby
Warwickshire, CV21 1BU
Sales Tel:
+44 (0) 1788 563625
Support Tel:
+44 (0) 1788 547490
USA
610 Epsilon Drive
Pittsburgh, PA 15238
Sales Tel:
+1 412 967 0765
Support Tel:
+1 800 800 5290
!"#$
The logo ALSTOM and their frameworks are trademarks and service trademark applications of ALSTOM.
Other names mentioned, registered or not, are the property of their respective companies.
France
9, rue Ampère
91345 Massy Cedex
Sales Tel:
+33 (0) 8 25 02 11 02
Support Tel (International):
+33 (0) 3 84 55 33 33
Support Tel. (National):
08 25 02 11 02
© ALSTOM - 2001 - Publication No. T1691.
ALSTOM Power Conversion
CASE WARNING & TRIP CODES
DIAGNOSTIC HINTS
Note: These hints are aimed mainly at the DEFAULT case, to help with problems which may be
experienced while working with this user guide.
Problem
Case not powering up
Healthy LED is not lit.
The case will not run from
the Keypad.
The case will not run from
the terminals.
All LED's flashing
The speed reference is not
working.
The analogue input
references are not
functioning as expected.
The analogue outputs are
not functioning as expected.
Deceleration ramps not
being followed, seems to
take longer than set.
Case trips when the keypad
(❾) is removed.
Possible solution
Check the fuse in the UK mains lead. Check the fuse in the mains inlet (❹), ensure the
mains switch is on and illuminated.
If the transportation recommendations in Section 3.3, have not been followed, adverse
effects to the case internal power supply may have occurred, thus blowing the fuse.
Change the fuse, allow the case environment to stabilise, then try again.
Ensure the “switch on” procedure in Section 4.2 has been followed. View the trips and
determine the cause, remember, that programming the parameters in the case can
cause a trip to be permanently set (for example, incorrect use of the user trips), so a
parameter default may be necessary.
The drive must be in "Keypad control" (i.e. Local control). Check that DIGIN 4 is open.
Use a DVM or view P11.21. DIGIN 4 is connected to CF116 which selects local/remote
(LO/open for keypad). See Section 5.1.10 for a detailed look at local /remote control.
The drive must be in "Remote control". Check that DIGIN 4 is closed, use a DVM or
view P11.21. DIGIN 4 is connected to CF116 which selects local/remote(HI/closed for
remote). See Section 5.1.10 for a detailed look at local /remote control.
This indicates a major software or hardware fault with the controller. Normal software
operation cannot continue. Refer to Section 6.8.1.
The default drive has 3 speed references programmed:
a) Local (Keypad) reference value entered in P1.00
b) Remote ANIN1, programmed to be 0 - 10 V, view value in P11.36
c)
Remote ANIN2, programmed to be 4 - 20 mA, view value in P11.37
• Monitor P9.00 whilst operating the required reference.
• To achieve Keypad reference, ensure DIGIN 4 is open.
• To achieve any Remote reference, ensure DIGIN 4 is closed.
• To select between Remote references ANIN1 and ANIN2, toggle DIGIN 5.
• See Section 5.1.10 for a detailed look at local /remote control.
The default setting for ANIN1 is 0 - 10 V (0 - 100%) and the default for ANIN2 is
4 - 20mA (20% - 100%). The DIP switches configure the inputs for current or voltage.
• Check the DIP switches (⑥) against the graphic on the panel.
• Check the analogue input settings in P7.00 to P7.07 against default settings.
• Check the values entering the analogue inputs in P7.03, P7.07 respectively.
• See Section 5.2.4 for a detailed look at Analogue I/O.
The default settings for ANOP1 and ANOP2 are 0 - 10 V, 0 - 100%. The DIP switches
configure the outputs for current or voltage.
• Check the DIP switches (⑥) against the graphic on the panel.
• Check the analogue output settings in P7.17 to P7.26 against default settings.
• Check the values coming from the analogue outputs in P7.21, P7.26 respectively.
• See Section 5.2.4 for a detailed look at Analogue I/O.
The drive is programmed at the factory to prevent itself tripping on overvoltage trips.
When an AC motor is decelerated, the motor generates voltage back to the drive DC
link, the amount of voltage depends on the speed of the deceleration and the load
inertia. The case can simulate this effect by the set level of the DC Link Feedback (⑦).
If the time taken to ramp down is too long:
• Check the deceleration rates set in P1.23 or P6.02, P6.03 (duplicates).
• Check the value of the DC link feedback in P11.03, adjust the relevant power frame
simulation panel (⑦) pot to give about 460V.
• Check the value set in P4.12 and adjust it up, this tells the software to absorb more
simulated watts, thus allowing the required deceleration to occur.
For safety on a real plant, it is not allowed to simply remove the keypad if the keypad
has control of the start/stop or is the source of the speed reference. There is a
procedure described in Section 4.5.5. Note if the keypad is not in control, or is not the
speed reference, then it can simply be removed without a problem.
This is not a full list of ALSPA MV3000C fault codes, these codes are the only ones which are relevant to the case.
WARNING
CODE
TRIP CODE
-
1
WARNING/TRIP DESCRIPTION
Interlock
CASE CONTROL RESPONSIBLE, DIAGNOSTIC HINT
Plant interlock (②) has been pressed
105
2
Reference Loss
The primary reference has been lost, e.g. 4-20mA (⑩) switched off
-
3
DC Overvolts
DC Hardware Overvoltage switch is open (⑦)
-
4
DC Undervolts
DC link feedback is to low (⑦)
107
6
High/Over Temperature
Any of the temperature feedbacks (⑦) is too high, use menu 11 to solve
-
7
Instantaneous Overcurrent
Over current switches U,V or W open (⑦)
-
9
U-Phase - HW OverTemp
O/P Hardware OverTemperature switch is open (⑦)
-
15
Auxiliary ±15 V Fail
Internal CDC board (❸) voltage has failed
-
16
Auxiliary 24 V Fail
The user 24V has failed, check the mains fuse (❹)
-
18
History Restore Fail
At power up, the history record could not be recovered. INFO. only
-
20
Parameter Edits Lost
All parameters will be at default, restore backups made using P99.16
100
21
Motor Thermostat
Motor thermostat has opened. Block diagrams sheet 7, P21.10, P2.11
112
23
RS232 Loss
RS232 link has timed out, see menu 32, Block diagrams sheet 2
113
24
RS485 Loss
RS485 link has timed out, see menu 32, Block diagrams sheet 2
-
25
Internal Reference Fail
CDC board has failed, return the case for repair.
108
26
Low/Under Temperature
I/P Temperature feedback pot is set low (⑦)
-
27
Keypad Loss/Removed
Keypad (❾) removed without authorisation, see Section 4.5.5
-
30
Drive ID Violation
P99.13 is not equal to P99.14
-
58
Current Control Fail
Trying to run the case in vector mode causes this trip (P99.01)
-
60
Unsuitable Motor
The motor parameter data entered into menu 12 is not suitable
-
61
Encoder Loss
The speed feedback source (P13.00, P13.01) has been set to encoder,
the case has no encoder
-
62
User Trip 1
Control Flag 10, or something connected to it = HI
116
63
FIP Loss
The FIP link has failed, if used
129
65
Load Fault - Low
Load fault detection (menu 43) has detected low current,
the case cannot simulate any motor current
103
66
Motor PTC
The motor thermistor control (④) is set too high, see P2.14
104
67
DB Resistor
This fault can occur if the DC link Feedback is set too high (⑦)
and the output is running, a Warning seen at 25% dissipation remaining.
-
70
Datumize Error
Only possible if a datum movement has been requested in
position control (block diagrams sheet 9). The case has no encoder.
-
71
Speed Feedback Loss
Only possible in vector control (P99.01 =2)
-
73
User Trip 2
Control Flag 112, or something connected to it = HI
120-125
150
Internal Software/PWM Error
Please report this problem to !"#$
151
DB Overcurrent Trip
D.B. Overcurrent switch is open (⑦)
152
DB Hardware OverTemp Trip
D.B OverTemp switch is open (⑦)
VIEWING WARNINGS AND TRIPS
MENU 10
Parameter
View
10.00 - 10.09
10.10 - 10.19
10.20 - 10.29
10.30
10.31
10.32
10.33
10.34
Warning Nos. 1 - 10
Trip Nos. 1 - 10
Trip History Nos. 1 - 10
Secs Since Trip
Hours Since Trip
CF10 - User Trip 1
CF112 - User Trip 2
CF9 - Trip Reset
HISTORY
THE DRIVE IS EQUIPPED WITH A 10-CHANNEL
HISTORY RECORDER.
MENU 26 – ALLOWS SET-UP OF THE LOG
MENU 27 – ALLOWS PLAYBACK OF THE LOG
DRIVE DATA MANAGER™
KEYPAD FUNCTIONS
RUNNING led
(Green)
4 line 20 character backlit
Display
WARNING led
(Yellow)
HEALTHY
(STANDBY) led
(Green)
TRIPPED led
(Red)
*
key
* START/RUN
Press to run the output
RAISE and LOWER keys
Used to raise and lower the
reference when keypad
reference is selected as a
reference source.
bridge when in keypad
l
key
* STOP
Press to stop the output
bridge when in keypad
l
ESC key
Used whilst editing
and navigating, see
Section 4.5
ENTER key
Press to enter a menu, to
initiate editing or to load an
edit.
Alpha/Numeric keys
Used whilst editing or
short cutting
parameters
* At Default, DDM™ (Keypad) control is selected by digital input 4, which in
turn operates Control Flag 116. Keypad reference is also selected by digital
input 4. Refer to Section 5.1.10 and the control block diagrams, sheet 3, for
more information.
HELP key
Press to get context sensitive
diagnostic help when either
a trip or a warning is
displayed. Parameter help is
also available.
see Section 4.5.4 and
Section 6.
THE NAVIGATION KEY
NAVIGATION
EDITING
Go to Menu level
Increment Value
Decrement Menu
or Parameter no.
Increment Menu
or Parameter no.
Move Cursor Left
(Delete/Backspace)
Move Cursor Right
Go to Parameter level
Decrement Value
SHORTCUTTING TO PARAMETERS
If the parameter number is known, it can be entered directly using a shortcut method.
For example, the key Sequence to shortcut to P1.00, the Speed Reference:
PQR
6
1
ABC
.
0
P1.00 <Enter>
See over for Diagnostics and Help
0
www.alstom.com