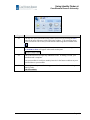
1
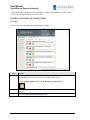
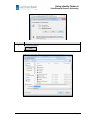
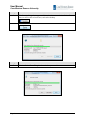
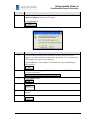
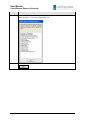
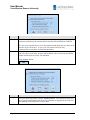
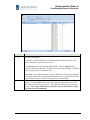
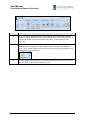
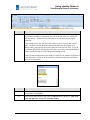
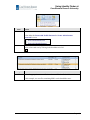
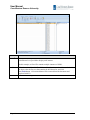
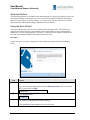
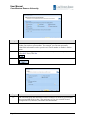
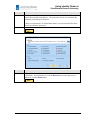
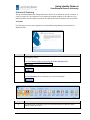
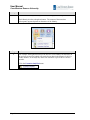
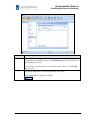
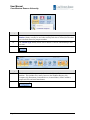
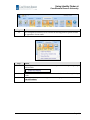
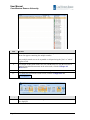
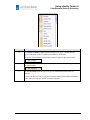
Using Identity Finder at
Case Western Reserve University
Created on 4/27/2010 9:20:00 AM
COPYRIGHT & TRADEMARKS
Copyright © 1998, 2009, Case Western Reserve University; Information Technology
Services Customer Service and Support; CAPS; ERP.
Using Identity Finder at
Case Western Reserve University
Table of Contents
Using Identity Finder at Case Western Reserve University ......................................... 1
Introduction ................................................................................................................................ 1
Basic Operation .......................................................................................................................... 1
Installing and Setting up Identity Finder.................................................................................................2
Basic Scan and Review of Results ..........................................................................................................8
Advanced Options .................................................................................................................... 18
Using the Scan Wizard ......................................................................................................................... 18
Advanced Scanning .............................................................................................................................. 23
Sorting and Filtering Scan Results ........................................................................................................ 28
Appendix ................................................................................................................................... 33
Page iii
Using Identity Finder at
Case Western Reserve University
Using Identity Finder at Case Western Reserve
University
Introduction
For more than 20 years, Case Western Reserve's administrative and academic operations used
Social Security Numbers (SSN's) in student academic records. In 2007, a revised student
information system was implemented which replaced SSN's with a 7-digit student identifier to
serve as the Student ID number. Concurrent with this student system development, a new policy
for SSN use and management (http://www.case.edu/its/security/docs/ssn_usage.html) was created
to eliminate the use of SSN's out of major business process not associated with finance and tax,
and thus reduce risk of misuse, disclosure, or loss of records containing SSN's. However, as
Information Technology (IT) systems audits and three major security incidents in 2008 and 2009
have proven, these types of data persist in the IT environment at case, and thus create a
significant risk of identity theft for persons in the Case community, including staff, students,
faculty, and alumni. In 2009-2010, the University President and Provost have called for the
removal of all non-sanctioned SSN's in university data systems, and Information Technology
Systems (ITS) has been given the task of implementing a program to identify and remove all old
SSN-based files that are outside of the ITS infrastructure (central databases and servers) and
found on desktops, laptops, and even handheld devices, where they are at risk for disclosure.
This campus-wide program for "SSN Abatement" begins in October, 2009.
The Identity Finder application meets some of the objectives for removing old SSN-based data in
IT systems, and reduces the risk of data loss through theft, malware infections, and inadvertent
online disclosure of sensitive (Restricted) data. A definition of Restricted data can be found at
http://blog.case.edu/its-security/2007/02/27/restricted_information_examples.
Identity Finder works like an anti-virus product. The client software installs locally, and
communicates logs to a management reporting console operated by the Information Security
Office (ISO). It scans local and external storage media (hard drives) for patterns that match
SSN's, Credit Card numbers (CCN’s), password files, and other potentially sensitive information
that could lead to the risk of identity theft. The users will then be given the option of destroying
old SSN data files, redacting Restricted data from the files, or moving the data to a secured
folder. Of primary interest to Case is the search for SSN's, with CCN's being of secondary
interest.
Basic Operation
This section of the manual will demonstrate how to download the Enterprise version of Identity
Finder from the Case Software Center (http://softwarecenter.case.edu/) and install it on your
Windows machine. Then, it will review the basic steps to scan a machine and review the results
of a scan. These are the steps that Case Western Reserve employees should follow when
operating Identity Finder Finder.
Before beginning for the first time, it is suggested that you backup your system (i.e. Carbonite) in
case you mistakenly remove any data that is needed. Also note that if you have data that is in a
Page 1
User Manual
Case Western Reserve University
“Legal Hold” status, you should scan your machine, but DO NOT REMOVE any data from it
until you have conferred with University Counsel.
Installing and Setting up Identity Finder
Procedure
Use these directions to download and install Identity Finder.
Step
1.
Action
After logging in to the Software Center and agreeing to the End User License
Agreement, you are taken to the list of available software titles.
Locate Identify Finder 4 and click the Windows Download button.
2.
Download information about Identity Finder 4 will appear. Scroll to the bottom of
the page.
3.
Click the Download Identity Finder 4 link.
Page 2
Using Identity Finder at
Case Western Reserve University
Step
4.
Action
Click the Save button.
Page 3
User Manual
Case Western Reserve University
Step
Action
5.
The Save As dialogue box appears. Select a location to save the installation files
that you will be able to locate later, such as the desktop.
6.
Click the Save button.
Step
7.
Page 4
Action
The installation files will begin to download on your machine.
Using Identity Finder at
Case Western Reserve University
Step
8.
Action
When the installation files have completely downloaded to your machine, the
Download Complete dialogue box will appear.
Click the Run button.
Step
9.
Action
If you do not have Microsoft .NET Framework version 2.0 or above on your
machine, you will be required to install it before proceeding. If your computer has
.NET installed, you will not see this message.
Click the OK button. Your machine will automatically begin downloading the
.NET setup files.
10.
The .NET setup window appears. Click the radiobutton to ACCEPT the terms of
the License Agreement.
11.
Click the Install button.
12.
Installation will begin. Please wait for further instruction.
13.
When the installation process has finished, you will receive a message that setup is
complete.
14.
Click the Exit button.
Page 5
User Manual
Case Western Reserve University
Step
Action
15.
Before Identity Finder can run, you must select your school or department from the
list that appears. Click on the appropriate item.
16.
Click the Select button.
Page 6
Using Identity Finder at
Case Western Reserve University
Step
Action
17.
Identity Finder will open on your desktop. A message will appear indicating that a
link to the Identity Finder manual has been placed on your desktop. This manual
will provide direction as you run your first Identity Finder scan and evaluate the
results. It is specific to users at Case Western Reserve University.
18.
This completes the process of downloading and installing Identity Finder. For
instructions on running your first scan and evaluating the results, please see the
Basic Scan and Review of Results document.
End of Procedure.
Page 7
User Manual
Case Western Reserve University
Basic Scan and Review of Results
This process demonstrates how to open Identify Finder, perform a scan, and review scan results.
Procedure
Use this process to scan your computer for Restricted data using Identity Finder.
Step
1.
Action
Immediately after installation, Identity Finder will open. The Profile Sign In screen
appears.
It is recommended that users create a password for Identity Finder. This protects the
results of scans from possible disclosure. Type your Identity Finder password into
the Enter Password field, and again in the Confirm Password field. If you choose
not to have a password, click Skip.
2.
Click the OK button.
3.
The Identity Finder application window appears.
It is not necessary to create or change any settings in the application. The default
settings have been pre-programmed by Case.
Click the Start button.
Page 8
Using Identity Finder at
Case Western Reserve University
Step
4.
Action
Identity Finder begins searching your machine for Restricted data. By Casedetermined default, it searches for Social Security Number (SSN) and credit card
number (CCN) data in the files, compressed files, messages, and attachments that
are found on your computer and within the machine's settings. Its progress,
including files scanned and data types found, will appear in this window.
You may continue with other tasks on your machine while the scan takes place.
Page 9
User Manual
Case Western Reserve University
Step
5.
Action
When the scan is complete, the Search Results Summary will appear. It displays the
locations searched on your machine and the matches found within those locations.
It is now your responsibility to review the matches found during the scan, but you do
not have to do it all at once. To save your scan results so that you may
systematically review them, click the Save As button.
6.
Save the scan results in a location on your computer where they can be found again.
The file will be saved in the .idf type, and by default, will be secured by the Identity
Finder Profile Password (if one was indicated).
Click the Save button.
Step
7.
Page 10
Action
To review your scan results, click the Advanced button. This option will allow you
to review your individual results one by one, and make an appropriate decision as to
the handling of each instance of sensitive data.
Using Identity Finder at
Case Western Reserve University
Step
8.
Action
The scan results appear.
For each file, you must decide how to handle the Restricted data within it. Only
those Actions that are activated can be used.
If you do not need to keep a file that contains SSN's, click the Shred action to
completely destroy the entire file. It cannot be recovered once shredded. The Shred
action overwrites the file on the disk drive.
Please Note: In accordance with the University SSN Policy, most faculty and staff
are no longer authorized to maintain Restricted data unless it is protected by Tier III
Controls (http://www.case.edu/its/security/docs/tier3_controls.html).
9.
If you need to keep the file but can use it without the Restricted data contained
within it, click the Scrub action to remove the Restricted data from the file. The
data will be replaced by a series of X's. The Scrub action does not work for every
file type. The version of ID Finder for Mac does not have this feature, so Mac
users must redact files manually.
Page 11
User Manual
Case Western Reserve University
Step
Action
10.
If the file must be kept and cannot be used without the Restricted data contained
within it, click the Secure action to encrypt the file in the associated file format. It
can then be opened with a password that you specify, or your Identity Finder
password.
11.
The Quarantine and Recycle actions do not meet the standards for security or
disposal that are sought by the implementation of the Identify Finder Product at
Case. These actions neither encrypt nor destroy Restricted data; consequently, they
should not be used by end-users.
12.
Use the Ignore action to ignore a file with data that provided a false positive. The
file will not be enumerated on subsequent scans.
Page 12
Using Identity Finder at
Case Western Reserve University
Step
13.
Action
To begin reviewing your scan results, click on the first row in the results screen.
The location of the data is indicated by the icon on the left of the row, and the file
path that follows. The data found is indicated by an icon and by displaying the
actual data.
In the example above, the first row on the results screen is a text file that contains
SSN's. All data, including the Restricted data IdentityFinder has flagged as an
identity match, will appear in the search results and in the Preview Pane. If you do
not want the full identity match displayed on your screen, refer to the Mask Matches
options described in Step 14 of the Advanced Scanning section.
In the case that multiple matches are found in a single file, the matches are displayed
in a drill-down list. Click on the first incidence of restricted data in the drill-down
list to see its information.
Step
Action
14.
The Preview Pane displays a preview of the file containing the restricted data. The
restricted data is highlighted.
15.
If the file does not need to be kept, click the Shred button to destroy it. This is the
preferred option for Case users of Identity Finder.
Page 13
User Manual
Case Western Reserve University
Step
16.
Action
A confirmation screen appears.
Click the Yes button to shred the file. To change actions, click the No button.
You can click the Always shred files checkbox option to automatically shred files
without confirmation whenever the Shred action is selected.
17.
A confirmation screen appears.
Click the OK button.
To bypass this screen in the future, click the Don't show this again checkbox
option.
18.
Select the next row in the scan results. Determine how it should be handled.
In this example, this file is text file that contains the names and SSN's of students.
19.
Page 14
If the file must be kept and it is not usable without the restricted data, click the
Secure dropdown button to activate the menu.
Using Identity Finder at
Case Western Reserve University
Step
20.
Action
Determine how to secure this file.
Select either the Secure with Profile Password or Secure with Alternate
Password list item.
21.
Step
22.
If you determine that multiple scan-result rows can be addressed with the same
action, select each row by clicking in the checkbox to its left.
Action
Select the appropriate action. All selected rows will be handled with that action.
In this example, two text files containing SSN's can be shredded at once.
Page 15
User Manual
Case Western Reserve University
Step
23.
Action
Some locations may contain more than one instance of restricted data. In that case,
a drill-down list is provided to display each instance.
In this example, an Excel file contains mutliple instances of SSN's.
24.
If it is determined that this file will be useful without its restricted data, and should
be kept, select the first row that contains the drill-down list, and click
the Scrub button. All restricted data will be removed from the document and
replaced with X's.
25.
Continue addressing all rows in the scan results until each item is addressed.
Page 16
Using Identity Finder at
Case Western Reserve University
Step
Action
26.
You may save your scan results at any point in your review by clicking the Save
button in the upper left corner of the application window. Your remaining items
will be saved to an .idf file and you can continue addressing them at another time.
27.
When all restricted data found by the scan has been addressed, the message There
are no items to show will appear in the search results pane.
28.
Run a scan once more to report any additional results. If nothing is found, your
immediate task is complete.
Scan your machine in weekly to monthly intervals in the future to address any new
restricted data on your machine.
29.
This completes the process of scanning your machine for restricted data using
Identify Finder.
End of Procedure.
Page 17
User Manual
Case Western Reserve University
Advanced Options
The following processes are included in this documentation as a courtesy for end-users who wish
to use Identity Finder at an advanced level, or to search for personally identifiable information
that is not a part of the Case search defaults. It is not necessary for Case end-users to use these
directions unless additional knowledge of Identity Finder is desired.
Using the Scan Wizard
This process demonstrates how to use the Scan Wizard in Identity Finder. The Wizard is an
option for users who wish to use more than the search options that have been programmed to
default for use at Case Western Reserve University. It offers the same options as an advanced
scan, but in a traditional Windows Wizard format for ease of use.
Procedure
Use this process to scan your computer for restricted data using the Scan Wizard in Identify
Finder
Step
1.
Action
Open Identity Finder.
Type your Identity Finder password into the Enter Password field. If you do not
have a password, click Skip.
2.
Click the OK button.
3.
The Identity Finder application window appears.
Click the Start dropdown button to activate the menu.
Page 18
Using Identity Finder at
Case Western Reserve University
Step
4.
Step
5.
Action
Click the Start Search Wizard menu item.
Action
The Identity Finder Wizard appears.
This window determines what identities will be looked for during the scan. An
Identity is a type of sensitive information, such as a Social Security Number (SSN).
An AnyFind Search is one where Identity Finder locates any data that resembles an
Identity that is selected for scanning.
6.
Of primary interest to Case Western Reserve University is the removal of SSN's and
Credit Card Numbers (CCN). Select any other identities for which a scan is
appropriate on your machine.
7.
Click the Next > button.
Page 19
User Manual
Case Western Reserve University
Step
Action
8.
The OnlyFind search option allows you to enter specific personal data for which ID
Finder can search on your machine. For example, you can enter personally
identifiable information such as your driver's license number or mother's maiden
name.
9.
If you are providing personal information for the OnlyFind search option,
select Yes. If not, click No.
10.
Click the Next > button.
Step
11.
Page 20
Action
The Locations group box determines where ID Finder will search on your machine
for restricted and sensitive data. The preference of Case is to search Files and
Compressed Files, Browsers, and Emails and Attachments.
Using Identity Finder at
Case Western Reserve University
Step
12.
Action
The File Locations group box determines where on your machine that ID Finder will
look for the locations selected above. The preference of Case is to search the My
Documents and Settings file locations.
Contact your department’s IT administrator before you scan networked file shares
and server-side Home directories.
13.
Step
14.
Click the Next > button.
Action
The Confirmation screen displays the Identities and Locations that will be scanned
by ID Finder. If you find an error, click the Back button to locate and correct it.
Otherwise, click the Finish button.
Page 21
User Manual
Case Western Reserve University
Step
15.
Action
Identity Finder begins searching your machine for sensitive data. Its progress,
including files scanned and data types found, will appear in this window.
You may continue with other tasks on your machine while the scan takes place.
When the scan is complete, Search Results will appear and the review can proceed.
16.
Page 22
This completes the process of using the Scan Wizard to scan your machine using
Identity Finder.
End of Procedure.
Using Identity Finder at
Case Western Reserve University
Advanced Scanning
This process demonstrates the settings that can be used to run an advanced scan of a machine. It
is not necessary for Case employees to use advanced scanning methods, as the software is predefined with the search settings required for the identification and elimination of restricted data.
Procedure
Use this process to scan your computer for restricted data using advanced search options in
Identify Finder.
Step
1.
Action
Open Identity Finder.
Type your Identity Finder password into the Enter Password field.
2.
Click the OK button.
3.
The Identity Finder window appears.
Click the Identities tab to customize your scan search options.
Step
4.
Action
The Identities tab contains the types of restricted and sensitive data for which
Identity Finder can search.
Page 23
User Manual
Case Western Reserve University
Step
5.
Action
To activate an identity with its system default settings, click its respective button.
Each Identity also has a dropdown button. The content of the menu that
subsequently appears depends on the nature of the Identity.
Step
6.
Action
For example, the dropdown menu for the Driver License identity has the ability to
do perform an AnyFind, which will search for any data in the format of a driver's
license number, or an OnlyFind, which will search for a specific drivers license
number.
Click the Customize OnlyFind menu.
Page 24
Using Identity Finder at
Case Western Reserve University
Step
7.
Action
The Settings window appears. This screen is used to define values for any identity
that can utilize the OnlyFind search. The Add Identity dropdown box allows you to
select an identity to define.
In this example, a specific driver's license number can be entered. Click the Add
button to save it.
8.
The value is added to the list of OnlyFind identity type values.
Click the OK button to apply these settings.
Page 25
User Manual
Case Western Reserve University
Step
Action
9.
Some identities can only be utilized with OnlyFind. For example, the Passport
Number identity can only be used when an OnlyFind value is defined, because there
isn't a defined format for passport numbers.
10.
The Custom Type identity allows users to define a value for which Identity Finder
can scan.
11.
Click the Locations tab.
Step
Action
12.
The Locations tab allows users to define where the Identity Finder scans on a
machine. This includes files, emails, browsers, the Windows Registry, My
Computer, My Documents, removable drives, custom folders, remote machines,
compressed files and email attachments.
13.
Click the Configuration tab.
Page 26
Using Identity Finder at
Case Western Reserve University
Step
14.
Step
Action
The Configuration tab allows users to define advanced application options and edit
the appearance of scan results.
Action
15.
For example, the Mask Matches menu contains options for masking or disguising
restricted data.
16.
Click the User Guide button to see the manufacturer's directions for using Identity
Finder.
17.
This completes the process of using advanced scanning options.
End of Procedure.
Page 27
User Manual
Case Western Reserve University
Sorting and Filtering Scan Results
This process demonstrates how to sort and filter scan search results. Sorting and filtering can be
used by end-users to better identify and eliminate or secure the data that is most vulnerable on a
machine.
Procedure
This process demonstrates how to sort and filter the results of a scan in Identity Finder.
Step
1.
Step
2.
Page 28
Action
First, perform the scan and wait for the results to appear. Close the Status Window
when complete.
Action
Click the Filter Results button.
Using Identity Finder at
Case Western Reserve University
Step
3.
Action
Search filters appear above the scan results.
Click the Search For: All Identity Types list.
4.
All identities are available for filtering in the dropdown list. Select an identity to see
only the matching scan results.
5.
Click the Search For: All Location Types list.
Step
Action
6.
The dropdown list contains the locations where identity matches can be found.
Select a location to see scan results that are only in that location.
7.
To remove filter settings, click the Filter Results button.
Page 29
User Manual
Case Western Reserve University
Step
8.
Action
When more than one scan-result match is found in a particular file location, a drill
down list appears containing the multiple matches.
Any multiple match row can be expanded or collapsed using the "plus" or "minus"
sign to its left.
9.
To collapse all drill down menus in a scan, and therefore see only the first lime of
multiple match drill down menus in the scan results, click the Collapse All
Rows button.
10.
To expand all multiple match rows, click the Expand All Rows button.
11.
To change the layout of the results screen, click the Configuration tab.
Step
12.
Page 30
Action
The Configuration tab contains settings for how the results view and Preview Pane
are displayed.
Using Identity Finder at
Case Western Reserve University
Step
13.
Action
The Results Columns dropdown menu contains a list of the columns that can
appear in the scan results. Columns can be added or subtracted.
Click on a column without a checkmark to make it appear in the search results.
14.
Click on a column name that has a checkmark next to it to make it disappear from
the search results.
15.
The Preview Pane contains a preview of a file with restricted data when it is
selected.
To move the Preview Pane, click your left mouse button on the header and drag the
mouse until you reach the desired location for the pane.
Page 31
User Manual
Case Western Reserve University
Step
Action
16.
When you release the mouse, the pane floats on the search results. It can be moved
to any location on the screen.
17.
The Properties Pane can also be closed completely by clicking the Properties Pane
button.
18.
To reset the search results to the default view, click the Reset View button.
Step
19.
Action
Search results can be sorted in the display area by clicking on the column header by
which you would like them sorted.
Items can be sorted by File Type, Location, Date Modified, or any other column
chosen in the Results Columns menu.
20.
Page 32
This completes the process of sorting and filtering scan results.
End of Procedure.
Using Identity Finder at
Case Western Reserve University
Appendix
For additional information on the Identify Finder software or on Case’s policies with regard to
handling and storing Restricted data, please use the following links.
Detailed user manuals for both the Windows and Mac versions of Identity Finder can be accessed
online:
Windows: http://www.identityfinder.com/help/client/index.html
Mac: http://www.identityfinder.com/help/mac/index.html
Manufacturer's homepage: http://www.identityfinder.com/
Manufacturer's online demonstration: http://www.identityfinder.com/demo/index.html
For information about information security at Case Western Reserve University, go to the
Information Security Office homepage: http://securityaware.case.edu/
Case Policy on Use of SSN in IT Systems: http://www.case.edu/its/security/docs/ssn_usage.html
Examples of Restricted Information: http://blog.case.edu/itssecurity/2007/02/27/restricted_information_examples
Case Policy on Information Tiers and Sensitivity:
http://www.case.edu/its/security/docs/information_types.html
Tier III Basic Security Controls DRAFT (Standard network host configurations for systems
handling or storing Restricted information (especially SSN’s and CCN’s)
http://www.case.edu/its/security/docs/tier3_controls.html
Page 33