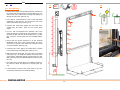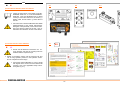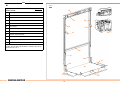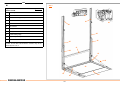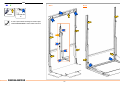
1
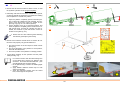
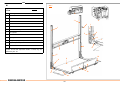
DH-V* 500-2000 kg
MONTAGE INSTRUCTIES
INSTRUCTIONS DE MONTAGE
MONTAGE ANLEITUNG
MOUNTING INSTRUCTIONS
Fabrikant :
Constructeur :
Hersteller :
Manufacturer :
DHOLLANDIA N.V.
Zoomstraat 9 9160 LOKEREN (Belgium)
Tel : +32 (0)9 349 06 92
Fax : +32 (0)9 349 09 77
e-mail : [email protected]
website : www.dhollandia.com
Disclaimer: de afbeeldingen en gegevens in deze
handleiding zijn niet contractueel bindend en
kunnen geen grond vormen voor enige juridische
vordering tegen DHOLLANDIA. DHOLLANDIA
laadkleppen worden continu aangepast aan nieuwe ontwikkelingen op gebied van voertuigen en
voertuigchassis, en aan de noden van haar klanten. Daarom behoudt DHOLLANDIA zich het
recht voor om productspecificaties te wijzigen
zonder voorafgaande melding, waardoor het
mogelijk is dat deze wijzigingen niet opgenomen
zijn in deze druk. Indien u verdere informatie
wenst over gewijzigde onderdelen, gelieve uw
officiële DHOLLANDIA-agent te contacteren voor
advies.
DHOLLANDIA
Avertissement : Les illustrations et informations
reprises dans ce manuel ne sont pas contraignantes contractuellement et ne peuvent en
aucun cas mener à des poursuites légales de
quelque nature que ce soit à l’encontre de Dhollandia. Les hayons élévateurs Dhollandia sont en
constante évolution pour s’adapter aux nouveautés en matière de véhicules et de châssis, ainsi
qu’aux exigences spécifiques des clients. À cet
effet, Dhollandia se réserve le droit de modifier
les spécifications produit sans avertissement
préalable ; il est possible que ces modifications
ne soient pas encore prises en compte au moment de l’impression. Si vous désirez de plus
amples informations au sujet des parties non
conformes, n’hésitez pas à prendre contact avec
votre agent Dhollandia agréé.
Haftungsausschluss: Die in diesem Handbuch
enthaltenen Abbildungen und Informationen sind
nicht vertraglich bindend, und können nicht zu
gerichtlichen Schritten gegen Dhollandia führen.
Dhollandia Hubladebühnen werden permanent
an neue Fahrzeug- und Chassis-Entwicklungen
sowie spezialisierte Kundenanforderungen
angepasst. Daher behält sich Dhollandia das
Recht vor, Produktspezifikationen ohne
vorhergehende Benachrichtigung zu ändern. Es
ist möglich, dass zum Zeitpunkt des Drucks
Änderungen nicht berücksichtigt wurden. Wenn
Sie weitere Informationen über nicht konforme
Teile wünschen, kontaktieren Sie Ihren offiziellen
Dhollandia-Händler für eine Beratung
1
Doc : FIT-V01-2009-01A_Rev0
Disclaimer: the illustrations and information contained within this manual are not contractually
binding, and cannot lead to any form of legal
action against Dhollandia. Dhollandia tail lifts are
constantly being adapted to new vehicle and
chassis developments, and specialised customer
requirements. Therefore Dhollandia reserves the
right to alter product specifications without prior
notice; and modifications might not have been
taken into account at the time of printing. If you
require further information on non-conforming
parts, contact your official Dhollandia agent for
advice.
Origin : 30/06/2008
Rev. 0 : 12/01/2010
DE
EN
Inhaltsverzeichnis
Contents
0) LISTE DER ABKÜRZUNGEN ................................................................................. 4
0) LIST OF ABBREVIATIONS ..................................................................................... 5
1) ALLGEMEINE MONTAGEANLEITUNGEN ............................................................. 6
1) GENERAL FITTING INSTRUCTIONS ..................................................................... 7
2) VARIANTEN VON HLB-HUBWERKEN UND MONTAGEMETHODEN .................. 12
2) TYPES OF HTL FRAMES AND FITTING METHODS ............................................. 13
3) VORBEREITUNG DER ARBEIT AN FAHRZEUGKAROSSERIE
3) PREPARATION WORK ON VEHICLE BODY, CHASSIS ....................................... 15
UND -CHASSIS ...................................................................................................... 14
4) MOUNTING OF THE LIFT FRAME: 3 WAYS TO GET STARTED .......................... 23
4) MONTAGE DES HUBWERKS: 3 METHODEN ZUM BEGINNEN .......................... 22
§4.1 - Method with the fitting jigs ........................................................................ 23
§4.1 - Methode mit den Montageschablonen..................................................... 22
§4.2 - Method with vertical platform ................................................................... 25
§4.2 - Methode mit vertikaler Plattform ............................................................. 24
§4.3 - Auswirkungen der Gummi-Plattformdichtungen (Option S600, 601...) .... 28
§4.3 - Impact of rubber platform seals (option S600, 601...) ............................... 29
§4.4 - Methode mit horizontaler Plattform .......................................................... 28
§4.4 - Method with horizontal platform ................................................................ 27
5) MONTAGE DES HUBWERKS UNTER DEM CHASSIS ......................................... 32
5) MOUNTING OF THE LIFT FRAME UNDER THE CHASSIS................................... 33
§5.1 - Testmontage Hubwerk und Montageplatten ............................................ 32
§5.1 - Test fitting lift frame and mounting plates ................................................. 33
§5.2 - Fixierung der geschraubten Montageplatten am Fahrzeugchassis ......... 34
§5.2 - Fixation of the bolt-on mounting plates to the vehicle chassis .................. 35
§5.3 - Montage der verschweißten Montageplatten am Fahrzeugchassis ......... 40
§5.3 - Fixation of the integrated mounting plates to the vehicle chassis ............. 41
§5.4 - Allgemeine Hinweise ............................................................................... 40
§5.4 - General remarks ....................................................................................... 41
6) MONTAGE DER PLATTFORM & FERTIGSTELLUNG DER
6) MOUNTING THE PLATFORM & FINALIZING THE MECHANICAL WORK ............ 43
MECHANISCHEN ARBEITEN ................................................................................ 42
§6.1 - Mounting the platform to the lift arms ....................................................... 43
§6.1 - Montage der Plattform an die Hubarme................................................... 42
§6.2 - Montage der Plattformschläge für die Betriebsposition ........................... 46
§6.2 - Mount the end stops for the work position ................................................ 47
§6.3 - Einstellung der Fahrtposition der Plattform.............................................. 48
§6.3 - Finalize the stow position of the platform .................................................. 49
§6.4 - Montage des Unterfahrschutzes .............................................................. 52
§6.4 - Mounting of the bumper bar ...................................................................... 53
7) ELEKTRISCHER ANSCHLUSS DER HLB ............................................................. 54
7) ELECTRICAL INSTALLATION OF THE HTL .......................................................... 55
§7.1 - Montage der Bedienung, des (+) Batteriekabels
§7.1 - Mounting of the control box, the (+) battery cable and (-) earth cable ...... 55
und (-) des Massekabels ......................................................................... 54
§7.2 - Optional mounting brackets for the external control box ........................... 55
§7.2 - Optionale Montagebügel für die externe Bedienung ............................... 54
8) PUTTING THE HTL INTO SERVICE ....................................................................... 57
8) INBETRIEBNAHME DER HUBLADEBÜHNE ......................................................... 56
ANNEXES ..................................................................................................................... 61
ANHÄNGE .................................................................................................................... 60
A.1 - Maximum tightening torques for bolts in N.m ....................................................... 61
A.1 - Vorgeschriebene Anzugsdrehmomente für Schrauben in N.m ............................ 60
A.2 - Übersicht der wichtigsten HLB Komponenten ...................................................... 62
A.2 - Overview of the principal HTL components .......................................................... 63
A.3 - Schmierplanen ..................................................................................................... 64
A.3 - Electric and hydraulic diagrams ............................................................................ 65
A.4 - Elektrische und hydraulische Schaltpläne ............................................................ 66
A.4 - Electric and hydraulic diagrams ............................................................................ 67
DHOLLANDIA
3
EN
0) LIST OF ABBREVIATIONS
Attention! Or: Danger!
Don’t do!
Consult the text which is referred to
M
Applicable to HTL with mechanical tilt
at ground level (DH-LM, LC, LMP,…)
H
Applicable to HTL with hydraulic tilt
at ground level (DH-LSU, LSP*, LV, LE,…)
Tag indication something is “correct”
Tag indication something is “incorrect”
Study in detail
EX.
Example, not for all models identical!
Drawing attention to a particular item in a
drawing or illustration
!
1
2
Numbered references between text & illustration, or between 2 illustrations
To be executed symmetrically on both sides
Bolt instructions
Drill instructions
Apply sufficient anti-corrosive protection (zincspray, Dinitrol, …)
Grease thoroughly all articulation bearings
and pins
HTL
Hydraulic tail lift
DHOLLANDIA
5
EN
1.1
EX.
1) GENERAL FITTING INSTRUCTIONS
Before the preparation of the vehicle chassis and installation
of the Hydraulic Tail Lift (= named HTL hereafter), read and
make sure you understand the underlying fitting instructions
first, and progress step by step after that.
Before getting started, also take notice of the safety
instructions for repair and maintenance, included
in the user’s manual issued with this HTL. In case
of doubt, and before making any further progress,
please consult your Dhollandia-agent.
After installation, perform the put-into-service test following
the check-list included in the user’s manual, and fill-out the
CE Fitting Declaration in the same document.
Check the following points before getting started:
• Check if the kit is complete, and if all parts needed to fit the
HTL correctly have been delivered.
• Compare the voltage of the batteries of the vehicle with the
voltage of the hydraulic power pack of the HTL.
• Compare the fitting dimensions given on the “FITTING
DRAWING” [see Fig. 1.1] with the actual dimensions of the
vehicle concerned . The actual floor height K should not
exceed the theoretical maximum lifting height of the HTL,
which depends on its arm-length.
1.2
• Observe the FITTING AND BODY BUILDING
INSTRUCTIONS of the manufacturer of the
vehicle. Observe in particular the maximum allowed HTL capacity, the instructions on the use
of hydraulic stabilising legs, the instructions for
mounting and bolting to the vehicle chassis, and
the manufacturer’s guidelines for the electrical
interfaces [See Fig. 1.2].
DHOLLANDIA
7
EN
• Check if the structure of vehicle chassis and body are
strong enough to carry the proper weight of the HTL with
its nominal load, and to resist the forces & moments induced by the platform and its load. Check the stability of
the vehicle and the weight on the vehicle axles in function
of the real proper weight of the HTL, and the load which is
expected to be handled. The weights indicated in the technical documentation and price list are theoretical, and may
vary according to the specific execution of the HTL.
• Make sure that the body is accurately fitted to the vehicle
chassis. Place the vehicle on a even flat ground.
• Always remove the battery clips and ABS plugs during
fitting.
• Finish the HTL in accordance with the road legislation of
the country where the vehicle will be registered.
• Welding should be done by qualified personnel only, and
only to the extent that such is not forbidden by the manufacturer of the vehicle.
• When connecting hydraulic parts, make sure that the connections are totally clean, and that the hydraulic circuit
doesn’t get contaminated.
• Grease all bearings and pins before putting the HTL into
service. It is recommended to grease all articulation bearings before mounting the corresponding articulation pin.
• Do not overpressure any lift functions (lift / close / retract in
or out) before full completion of the installation.
• During fitting and testing, make sure that the HTL and its
moving parts don’t interfere with, or cause damage to the
vehicle suspension, braking system, oil pipes and wiring
circuits.
• Any modifications to the mounting plates and fitting procedures are strictly forbidden. No deviation is allowed without
prior written approval from DHOLLANDIA.
DHOLLANDIA
9
EN
• These fitting instructions aim to clarify and teach
the work method required to fit DHOLLANDIA
HTL successfully. On numerous occasions, reference will be made to the TECHNICAL SUMMARY of the various lift types. These TECHNICAL SUMMARIES contain quantified details for
each individual lift type. Some illustrations in
these fitting instructions therefore mention that
they are an example, which means that they
don’t apply to each and every lift model covered
by this handbook.
• The various steps of these fitting instructions are characterised by a LETTER reference above each chapter. This
to help those fitting companies that wish to split-up the
work between the different skills or specialties within the
labour force.
G
= General guide lines
E
= Electrical work
M
= Mechanical work / steel plating work
F
= Finish & anti-corrosive protection
S
= Test and put into Service
• See Annex A.2 for an overview of the principal HTL components.
DHOLLANDIA
11
EN
G
2.1
2.2
EX.
2) PREPARATION WORK ON VEHICLE BODY, CHASSIS
• Refer to the FITTING DRAWING or the product-specific
TECHNICAL SUMMARY to get insight in the most important technical fitting parameters, and to determine the
scope of the work that will be required to prepare and
adapt the vehicle chassis to the HTL.
• Both documents contain useful fitting information such as:
1. Column & platform dimensions
2. Max. lifting height in function of the HTL dimensions
3. Depth of the HTL behind the vehicle body
4. …
• But:
→ FITTING DRAWING = 1 single page, with fitting
details of 1 specific HTL on 1 well-defined vehicle = study on request or order confirmation.
[See Fig. 2.1]
→ TECHNICAL SUMMARY = general fitting information for a type of HTL, separated from a specific vehicle. See www.dhollandia.com or local
DHOLLANDIA agent. [See Fig. 2.2]
• These fitting instructions assume that the rear
frame of the vehicle body is sufficiently strong to
carry the HTL and its load, and the dynamic
forces from working with it, over the expected lifetime of the HTL.
DHOLLANDIA disclaims liability for any personal
injury or property damage that results from
mounting the HTL to a vehicle body that is too
weak for purpose.
• Check that the main dimensions of the supplied HTL conform to the dimensions of your order.
DHOLLANDIA
13
EX.
EN
G
2.3
EX.
2.4
EX.
• Ensure that the rear frame of the vehicle body is flush and
free from any obstructions. Remove all obstructions, or
create a flush mounting surface by using suitable packers.
• Make sure that the vehicle licence number plate, rear
lights, etc... will not conflict in any way with the cylinder
beam or the bumper bar when the HTL is in it’s installed
position.
• For vehicles with rear doors, make sure to confirm your
drawing of internal hinges [see Fig. 2.3] or external hinges
[see Fig. 2.4] at the stage of ordering, as it will influence on
the configuration of the HTL supplied.
E
• Remove the battery clips from the batteries, If the vehicle
is equipped with an ABS system, or other electronic devices, loosen the corresponding plugs in the vehicle cabin.
DHOLLANDIA
15
EN
G
M
3.1
3.2
3) MOUNTING OF THE HTL FRAME
• The frames of the column HTL can be mounted to the rear
frame of the vehicle body in 2 different ways:
1. WELD-ON fitting: the columns and cylinder beam are
welded to the mounting frame of the vehicle body.
2. BOLT-ON fitting: the columns and cylinder beam are
bolted to the mounting frame of the vehicle body.
• Take this information into account when preparing the fitting work of the HTL.
§3.1 - WELD-ON fitting
• Use a fork lift, overhead gantry crane or other safe lifting
equipment to raise the HTL, and approach it to the rear
frame of the vehicle body. [See Fig. 3.1]
• Push the HTL frame firmly against the rear frame of the
vehicle body, and raise / lower it to the correct fitting
height.
3.3
• For HTL with an integrated floor extension, this is the
height whereby the top side of the floor extension or cylinder beam is flush with the vehicle loading floor. For other
lifts, source the correct height from the FITTING DRAWING.
• Check that the ground clearance is as per FITTING
DRAWING. Take note of the bumper height. The clearance from the ground to the under side of bumper should
not exceed 550mm. [See Fig. 3.2]
• Centre the HTL frame, align it, and make sure it is square
to the vehicle body and loading floor. [See Fig. 3.2]
DHOLLANDIA
17
EN
G
M
3.3
3.4
• Disconnect the battery terminals prior to welding. Welding
[DH-VB4]
should be done by qualified personnel only, and only to the
extent that such is not forbidden by the manufacturer of the
vehicle.
• Clamp the columns to the rear frame of the vehicle, and
tag weld them at the top, sufficiently strongly to prevent the
HTL from falling when trying out the different platform positions. [See Fig. 3.3]
• Check the column centres at the top, middle and bottom of
the columns. Adjust the alignment if required. [See Fig.
3.2]
• If disconnected, reconnect the power pack to the HTL.
Connect the power pack to an external battery.
• LOWER and OPEN the platform into work position. Prior to
finishing the big welding work, test the platform in all positions. LOWER the platform and test if it reaches ground
level (at the expected position of the vehicle suspension).
LIFT the platform and test if it reaches the expected lifting
height.
3.5
EX.
[DH-VB4]
[DH-VOC]
• If all OK, weld the columns to the rear frame of the vehicle
according to the welding instructions. [See Fig. 3.4].
!
• Ensure that no grinding swarf, welding spatters,
other dirt... drop down into the columns. Failure to
prevent this may cause excessive wear to the
columns, lift runners and their Teflon wear pads
or roller bearings [see Fig. 3.5], or might cause
irreparable damage to the chains or steel cables.
!
!
• DON’T weld close to the Teflon wear pads
mounted on the lift runners. LIFT / LOWER the
platform in order to keep the Teflon wear pads or
roller bearings at max. distance from the location
where you weld. DON’T subject the chains or
steel cables to heat.
!
!
DHOLLANDIA
EX.
19
EN
G
M
3.7
3.6
EX.
§3.2 - BOLT-ON fitting
!
• Reinforcement strips must be fitted inside the rear frame of
the vehicle body to spread the forces executed by the HTL
and its load, and to prevent the mounting bolts pulling out
through the rear frame. [See fig. 3.6]
• Use a fork lift, overhead gantry crane or other safe lifting
equipment to raise the HTL, and approach it to the rear
frame of the vehicle body. [See Fig. 3.1]
B
• Push the HTL frame firmly against the rear frame of the
vehicle body, and raise / lower it to the correct fitting
height.
3.8
• For HTL with an integrated floor extension, this is the
height whereby the top side of the floor extension or cylinder beam is flush with the vehicle loading floor. For other
lifts, source the correct height from the FITTING DRAWING.
• Check that the ground clearance is as per FITTING
DRAWING. Take note of the bumper height. The clearance from the ground to the under side of bumper should
not exceed 550mm. [See Fig. 3.2]
• Centre the HTL frame, align it, and make sure it is square
to the vehicle body and loading floor. [See Fig. 3.2]
• Drill the top holes left & right, and mount the top mounting
bolts. [See Fig. 3.7] Clamp the columns to the rear frame
of the vehicle, sufficiently strongly to prevent the HTL from
falling when trying out the different platform positions. [See
Fig. 3.8]
• Check the column centres at the top, middle and bottom of
the columns. Adjust the alignment if required. [See Fig.
3.2]
• If disconnected, reconnect the power pack to the HTL.
Connect the power pack to an external battery.
DHOLLANDIA
21
EN
G
M
• LOWER and OPEN the platform into work position. Prior to
finishing all the drilling work, test the platform in all positions. LOWER the platform and test if it reaches ground
level (at the expected position of the vehicle suspension).
LIFT the platform and test if it reaches the expected lifting
height.
• If all OK, use the pattern of the columns to mark
the required drilling positions on the rear frame.
Remove the HTL frame from the rear frame and
drill the remainder of the holes.
• Ensure that no drilling or other metal swarf, other
dirt... drop down into the columns. Failure to prevent this may cause excessive wear to the columns, lift runners or Teflon wear pads, or might
cause irreparable damage to the chains or steel
cables.
• Move the HTL frame back against the rear frame of the
vehicle body. Mount the bolts. Check again the overall
alignment.
• If all OK, fasten the mounting bolts according to
the required torque settings [See annex].
M
F
§3.3 - General remarks
• The torque fastenings of all bolts should be
checked after completion of the compulsory static
and dynamic weight tests at the end of the fitting
process, and retightened if required.
DHOLLANDIA
23
EN
M
F
4.1
• Ensure that all freshly made chassis perforations are properly deburred, and that all metal
work (cutting, drilling, welding, grinding,...) is
properly treated with an anti-corrosive protection
(e.g. Zinc-spray or Dinitrol). Allow to dry. Consult the FITTING AND BODY BUILDING INSTRUCTIONS of the vehicle manufacturer to
take into account their instructions.
MIN. 4
M14 DIN6921 -10.9
4) MECHANICAL FINISHING STEPS
§4.1 - Mounting of the bumper bar
• The bumper bar has a fixed position on the columns. Take
195 N.m
4.3
4.2
this into account when planning on the fitting height, so
that the fitted HTL complies with legal bumper requirements [See Fig. 4.1].
• Prior to carrying out the majority of drilling and / or welding
works, test fit the HTL at a complying bumper height, and
test the platform in all positions. LOWER the platform and
test if it reaches ground level (at the expected position of
the vehicle suspension). LIFT the platform and test if it
reaches the expected lifting height. [See Chapter 3]
• Measure the width over the mounting brackets for the
bumper tube premounted on the columns. Cut the bumper
tube to the correct length.
• Slide the bumper tube through the mounting brackets on
the front face of the columns, and fasten the corresponding bolts [See Fig. 4.2]
• Mount the middle plates to the bumper bar, straighten
them, and make sure they stand perpendicular to the vehicle chassis and the bumper tube. [See Fig. 4.3]
DHOLLANDIA
25
EN
M
4.4
4.5
4.6
• Mark the pattern for the drill holes. Drill
the required holes [See Fig. 4.3] into
the chassis [ø of the drill = M-value of
the bolt + 0.5mm).
• Fit the mounting plates to the vehicle chassis, and
fasten the mounting bolts to the required torque
settings.
M
§4.2 - Mounting of diagonal supports
4.7
EX.
• Is hostile environment conditions (frequent reversing on
loading docks, other situations with increased risk of column damage,…), the use of diagonal supports is recommended. [See Fig. 4.7]
• Ensure that - after mounting the supports -sufficient space
remains available for the exterior control box, conform to
DHOLLANDIA’s mounting instructions and the CE regulations
• Mount the diagonal supports as low as possible on the
!
columns, and to a strong enough fixing point on the vehicle chassis or cross bearers of the vehicle body. The supports should be fitted at approx. 45° angle.
• Cut the diagonal supports of a min. strength of
70x70x3mm to length, and mount them using one of the
following methods:
→ Welded to the columns, and bolted to the chassis via
an intermediate bracket;
→ Bolted to both the columns and vehicle chassis via 2
intermediate brackets.
DHOLLANDIA
27
EN
M
4.8
4.9
§4.3 - Mounting of the end stops
• The columns need a pair of end stops for the lift runners:
→ In order to stop the lift runners and the platform at the
correct floor height;
→ In order to protect the upper structure of the vehicle
body & the roof against damage.
• Most lifts made to order come with premounted end-stops.
In any case, ensure that the columns are equipped with
end-stops. If missing, mount stops during the fitting process using one of the following methods:
→ Welded to the columns [See Fig. 4.8]
→ Bolted through the columns [See Fig. 4.9]
F
Remark:
• Ensure that all metal work above (cutting, drilling,
welding, grinding,...) is properly treated with an
anti-corrosive protection (e.g. Zinc-spray or Dinitrol).
DHOLLANDIA
29
EN
G
E
5.1
5.2
5) ELECTRICAL INSTALLATION OF THE HTL
• Follow the instructions of document FIT-ELECGENERAL-2006-01A or FIT-ELEC-GENERAL2008-02A [see www.dhollandia.com for latest
version] to mount the control box, the 35mm² (+)
battery cable, and the 35mm² (-) earth cable of
the HTL.
• Also follow the FITTING AND BODY BUILDING
INSTRUCTIONS of the vehicle manufacturer.
Disregard could potentially cause serious damage to the electric systems of the HTL, and / or
the electric and electronic circuits of the vehicle.
6) PUTTING THE HTL INTO SERVICE
E
6.1
EX.
S
• Ensure that all electrical connections are correctly finished, and that all mounting bolts are
fastened with the required torque.
• Switch on the battery switch. Use the functions “lift” and
“tilt” to bring hydraulic pressure in the hydraulic circuits.
Do not overpressure at this stage.
• Consult the USER’S MANUAL in case of doubt
with regards to the correct use of the different lift
functions, and of the applicable safety instructions [See Fig. 6.1].
DHOLLANDIA
31
5.3
EN
M
S
6.2
6.3
• Execute the lift and tilt functions at least 2 times, so that
the hydraulic cylinders can be purged completely.
• Preferably, raise the rear end of the vehicle off the ground,
or raise the vehicle air suspension to its maximum. Starting
from the platform in vertical stow position:
1. Open the platform completely (below horizontal position), until the tilt cylinders are fully retracted, and continue to push the function “open” for another 20 sec
[See Fig. 6.2] (only for HTL with tilt cylinders)
2. Tilt the platform back up to horizontal position, and
lower the platform completely (further down below normal ground level), until the lift cylinders are fully retracted, and continue to push the function “lower” for
another 20 sec [See Fig. 6.3].
6.4
• Grease the HTL with acid-free grease following
the relevant grease plan. [See Annex].
• Execute all movements several times to ensure all HTL
functions work properly. Pay special attention to:
1. the correct function of the end stops for the lift runners
[See § 4.3];
2. the correct alignment of the platform in work position,
flush with the vehicle floor;
3. the correct position of the platform in stowage position.
• Fit all safety markings for the operators and the public
traffic [See Fig. 6.4].
1. For remote controls: mark the safe-working zone
on the vehicle floor and the HTL platform. See
document FIT-ELEC-OPTION-2008-02A .[see
www.dhollandia.com for latest version]
2. Fit the platform flags. Check if the flashing lights
work ok
3. Apply RD/WH reflective marker tape on both
sides of the platform
4. Apply the instruction stickers near the control
box, in direct sight of the operator
DHOLLANDIA
!
!
33
!
EN
M
S
6.5
EX.
• Execute the complete put-into-service test, on the basis of
the CHECKLIST FOR WEIGHT TEST AND COMMISSIONING included in chapter 3 of the user’s manual. [See
fig. 6.5]
• During the weight test, check (and adjust if required) the
hydraulic pressure to suit the nominal lift capacity of the
HTL [See Fig. 8.6]. Seal the pressure relief valve after that.
DHOLLANDIA
35
EN
M
A.1
ANNEXES
Prescribed tightening moment M (N.m)
A.1 - Prescribed tightening torques for bolts in N.m
Type of thread
Standard
The tightening torques of all bolted connections
should be checked after completion of the compulsory static and dynamic weight test at the end
of the fitting process, and retightened if required.
Fine
DHOLLANDIA
Size
Strength class
8.8
10.9
M6 x 1
10
14
M8 x 1.25
24
33
M10 x 1.5
47
68
M12 x 1.75
82
115
M14 x 2
129
185
M16 x 2
195
285
M14 x 1.5
135
195
M16 x 1.5
208
300
M20 x 1.5
360
-
M24 x 2
450
-
37
EN
G
A.2.1
Fig. A.2.1 - Lower beam column lift with manual OPEN /
CLOSE
N°
Description
1
Lift columns
2
Cylinder beam
3
Platform
4
Travel lock
5
Lift runners
6
Platform retaining catch
7
Lift cylinder
8
Torsion bar
9
Open-platform-lock
10
Hinged ramps (optional)
11
Hydraulic power pack
12
Electric control box:
12
1
11
4
1
1
6
5
9
3
2
5
Remark: Pos. 6, 8, 9 are only for lifts with manual OPEN /
CLOSE. On lifts with hydraulical OPEN / CLOSE, they are
replaced by Pos. 26.
8
7
5
10
8
6
3
10
9
10
DHOLLANDIA
39
EN
G
A.2.2
Fig. A.2.2 - Overhead beam column lift with hydraulical
OPEN / CLOSE
N°
Description
20
Lift columns
21
Cylinder beam
22
Platform
23
Travel lock
24
Lift runners
25
Lift cylinder
26
Tilt cylinder
27
Hinged ramps (optional)
28
Floor extension (optional)
29
Hydraulic power pack
30
Electric control box:
25
30
21
20
20
23
23
29
Remark: Pos. 26 is only for lifts with hydraulical OPEN /
CLOSE. On lifts with manual OPEN / CLOSE, they are replaced by Pos. 6, 8, 9.
28
24
24
27
26
22
27
DHOLLANDIA
41
27
EN
G
A.2.3
Fig. A.2.3 - Overhead beam column lift with hydraulical
OPEN / CLOSE
N°
Description
40
Lift columns
41
Floor extension (optional)
42
Platform
43
Travel lock
44
Lift runners
45
Lift cylinder
46
Tilt cylinder
47
Fixed leading edge
48
Hydraulic power pack
49
Electric control box:
49
40
48
40
45
44
45
Remark: Pos. 46 is only for lifts with hydraulical OPEN /
CLOSE. On lifts with manual OPEN / CLOSE, they are replaced by Pos. 6, 8, 9.
41
44
43
46
42
43
46
DHOLLANDIA
43
47
EN
M
F
A.3.1
ANNEXES
A.3 - Grease plans
Fig.
HTL type
A.3.1
Lower beam lift with chains & manual OPEN /
CLOSE
A.3.2
Overhead beam lift with steel cables & hydraulic
OPEN / CLOSE
A.3.3
Fully Hydraulic column lift (no chains, no steel cables)
Grease
Lubricate with
oil
In case of special tail lifts deviating from these images,
contact DHOLLANDIA to obtain further instructions.
DHOLLANDIA
45
EN
M
F
Grease
A.3.2
A.3.3
Lubricate with
oil
In case of special tail lifts deviating from these images,
contact DHOLLANDIA to obtain further instructions.
DHOLLANDIA
47
EN
ANNEXES
A.4 - Electric and hydraulic diagrams
• In the annex A4, you find a couple of examples of
the most important electrical wiring diagrams for the
column HTL DH-V*. The wiring diagram applicable
to the HTL just supplied, can also be found back on
the inside of the control box.
• The majority of wiring diagrams can also be
downloaded from our internet website
www.dhollandia.com.
• Other important references:
1. See manual FIT-ELEC-GENERAL-2006-01A or
FIT-ELEC-GENERAL-2008-02A for the wiring
diagrams of the (+) battery cable and the (-) earth
cable. [See www.dhollandia.com for the latest
edition].
2. See manual FIT-ELEC_OPTION-2008-02A for
the wiring diagrams of the principal electrical options. [See again www.dhollandia.com for the
latest edition].
• See following pages.
DHOLLANDIA
49