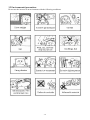
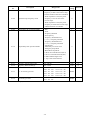
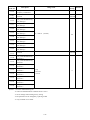
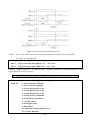
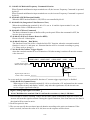
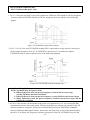
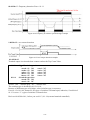
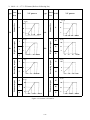
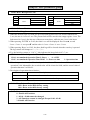
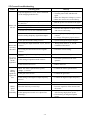
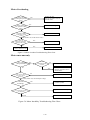
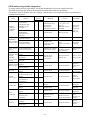
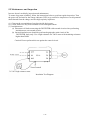
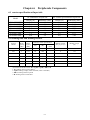
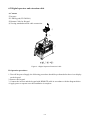
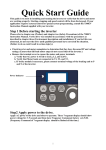
1
Microprocessor Controlled
I G B T Drive
Inverter Motor Speed Regulator
Operating Manual
E310 Series
200V class
0.4~1.5KW
(1.2~2.9KVA)
400V class
0.75~3.7KW
(1.7~6.7KVA)
E310
Table of Contents
Chapter 0
0.1
0.2
Chapter 1
1.1
Preface
Preface
Product Inspection
Safety Precautions
Operation Precautions
1.1.1 Before Power UP
1.1.2 During Power UP
1.1.3 Before Operation
1.1.4 During Operation
1.1.5 During Maintenance
Chapter 2
Definition of Model
Chapter 3
Ambient Environment and Installation
3.1
Environment
3.2
Environmental Precautions
3.3
Electrical Installation
3.3.1 Wiring guidelines
3.3.2 Contactor and Circuit Breaker specification and wiring
3.3.3 Precautions for Peripheral Applications
3.4
Specifications
3.4.1 Product Specifications
3.4.2 General Specifications
3.5
Wiring Diagram E310 Series Inverter
3.6
Description of connection terminals
3.7
Outline Dimension
Chapter 4
Software Index
4.1
Keypad Description
4.1.1 Keypad Display and Operation Instruction
4.1.2 Operation Instruction of the LED keypad
4.2
Control Mode Selection
4.3
E310 Programmable Functions List
4.4
Parameter Function Description
Chapter 5
Troubleshooting and Maintenance
5.1
Error Display and Corrective Action
5.1.1 Faults which can not be recovered manually
5.1.2 Special conditions
5.1.3 Operation errors
5.2
General Troubleshooting
5.3
Quick Troubleshooting of E310
5.4
Routine and periodic inspection
Maintenance and Inspection
5.5
Chapter 6
Peripheral Components
6.1
Reactor Specification at Input Side
6.2
Braking unit and braking Resistor
6.3
Digital operator and extension cable
AppendixⅠ E310 Parameters Setting List
i
0-1
0-1
0-1
1-1
1-1
1-1
1-2
1-2
1-3
1-3
2-1
3-1
3-1
3-2
3-3
3-3
3-4
3-5
3-8
3-8
3-9
3-11
3-12
3-13
4-1
4-1
4-1
4-2
4-3
4-4
4-18
5-1
5-1
5-1
5-2
5-3
5-4
5-5
5-11
5-12
6-1
6-1
6-1
6-2
App1
Index of Figures
Figure 2-1 Inverter Nameplate .....................................................................................2-1
Figure 3-1 Panel and enclosure arrangement for E310 inverters ...................................3-1
Figure 3-2 Din rail mounting of the E310 inverter ........................................................3-1
Figure 3-3 Typical Installation Schematic.....................................................................3-5
Figure 3-4a) Installation Examples...............................................................................3-6
b) Installation Examples Using a Filter and Isolation transformer ................3-6
c) Installation Examples with Adjacent Signal Conductors ...........................3-6
Figure 3-5 Control Cable requirements ........................................................................3-7
Figure 3-6 Grounding Examples ..................................................................................3-7
Figure 3-7 Wiring Diagram.......................................................................................... 3-11
Figure 3-8 Frame size 1 Dimensions ............................................................................. 3-13
Figure 3-9 Frame size 2 Dimensions ............................................................................. 3-14
Figure 4-1 Keypad Layout ...........................................................................................4-1
Figure 4-2 LED Keypad Operations Sequence..............................................................4-2
Figure 4-3 Control Mode Selection Chart.....................................................................4-3
Figure 4-4 Frequency reference limits .......................................................................... 4-18
Figure 4-5 Terminal Board Drive Operation Modes ..................................................... 4-19
Figure 4-6 3-Wires Start/Stop Wiring........................................................................... 4-19
Figure 4-7 Drive Start/Stop Operation sequences ......................................................... 4-20
Figure 4-8 Acceleration and deceleration Prohibit ........................................................ 4-22
Figure 4-9 UP/DOWN original mode example .............................................................. 4-24
Figure 4-10 UP/DOWN with incremental steps............................................................. 4-24
Figure 4-11 Frequency reached example ...................................................................... 4-25
Figure 4-12Frequency within specified range example.................................................. 4-26
Figure 4-13 Frequency outside of range example .......................................................... 4-26
Figure 4-14 Frequency at or below specified range example.......................................... 4-27
Figure 4-15 Over torque detection example .................................................................. 4-27
Figure 4-16 Analog scaling examples ........................................................................... 4-29
Figure 4-17 Multifunction analog output ...................................................................... 4-29
Figure 4-18 KEB function diagram .............................................................................. 4-34
Figure 4-19 DC Injection Braking Example.................................................................. 4-34
Figure 4-20 Custom V/F settings .................................................................................. 4-35
Figure 4-21 Custom V/F Patterns................................................................................. 4-36
Figure 4-22 V/F curve with torque boost ...................................................................... 4-37
Figure 4-23 Output Torque Capacity .......................................................................... 4-38
Figure 4-24 Slip Compensation .................................................................................... 4-39
Figure 4-25 Low Frequency Voltage Compensation...................................................... 4-39
ii
Figure 4-26 PID block diagram .................................................................................... 4-43
Figure 4-27 PID sleep wake mode diagram................................................................... 4-45
Figure 4-28 S-Curve Characteristics ............................................................................ 4-47
Figure 4-29 Single cycle auto run ................................................................................. 4-51
Figure 4-30 Periodic cycle auto run .............................................................................. 4-52
Figure 4-31 Single cycle auto run: final step hold.......................................................... 4-52
Figure 4-32 AUTO_RUN cycle with interrupt ............................................................. 4-53
Figure 5-1 E310 Fault Display and Troubleshooting Flow Chart...................................5-6
Figure 5-2 OC, OL Fault Display Flow Chart...............................................................5-7
Figure 5-3 OV, LV Fault Display Flow Chart ..............................................................5-8
Figure 5-4 Motor RUN failure Flow chart ...................................................................5-9
Figure 5-5 Motor Overheat Troubleshooting Flow Chart.............................................. 5-10
Figure 5-6 Motor Instability Troubleshooting Flow Chart ............................................ 5-10
Figure 6-1 Digital Operator Extension Cable................................................................6-2
iii
Chapter 0 Preface
0.1 Preface
To extend the performance of the product and ensure personnel safety, please read this manual
thoroughly before using the inverter. Should there be any problem in using the product that
cannot be solved with the information provided in the manual, contact your nearest Taian’s
technical or sales representative who will be willing to help you.
※Precautions
The inverter is an electrical product. For your safety, there are symbols such as “Danger”,
“Caution” in this manual as a reminder to pay attention to safety instructions on handling,
installing, operating, and checking the inverter. Be sure to follow the instructions for highest
safety.
Danger
Indicates a potential hazard that could cause death or serious personal injury if
misused.
Caution
Indicates that the inverter or the mechanical system might be damaged if
misused.
Danger
z
z
z
z
Do not touch any circuit boards or components after the power is turned off and while the
charging indicator is still lit. (The light will fade)
Do not make any connections when the inverter is powered on. Do not check parts and
signals on circuit boards during the inverter operation.
Do not disassemble the inverter or modify any internal wires, circuits, or parts.
Ground the ground terminal of the inverter properly.
For 200V class ground resistance 100 Ω or below. For 400V class 10Ω or below.
Make sure that grounding conductors are adequately sized and are according to your
local safety regulations.
Caution
z
z
z
Do not perform a voltage test on parts inside the inverter. High voltage can destroy the
semiconductor components.
Do not connect T1, T2, and T3 terminals of the inverter to any AC input power supply.
CMOS ICs on the inverter’s main board are susceptible to static electricity. Do not touch
the main circuit board
0.2 Product Inspection
Taian inverters have all passed the function test before delivery. Please check the following
when you receive and unpack the inverter:
z The model of the inverter are the same as those specified in your purchase order.
z Check for any damages caused by transportation. Please do not apply power, and
contact a Taian sales representative if any of the above problems occurred.
0-1
Chapter 1
1.1
Safety Precautions
Operation Precautions
1.1.1. Before Power Up
Caution
The line voltage applied must comply with the inverter’s specified input voltage.(See
product nameplate)
Danger
Make sure the main circuit connections are correct. L1, L2 and L3 are power-input
terminals and must not be mistaken for T1, T2 and T3. Otherwise, inverter damage can
result.
Caution
z To avoid the front cover from disengaging or other damage, do not carry the inverter by
its cover. Support the drive by its heat sink when transporting. Improper handling can
damage the inverter or injure personnel, and should be avoided.
z To avoid the risk of fire, do not install the inverter on flammable objects. Install on
nonflammable objects such as metal surfaces.
z If several inverters are placed in the same control panel, provide heat extraction means
to keep the temperature below 40℃ to avoid overheat or fire hazard.
z When removing or installing the operator keypad, turn OFF the power first, and secure
the keypad correctly to avoid keypad operation or display failure.
Warning
This product is sold subject to IEC 61800-3. In a domestic environment this product may
cause radio interference in which case the user may be required to apply corrective
measures.
1-1
1.1.2. During Power Up
Danger
z Do not insert or remove input connections to the inverter when powered up to avoid
damage to the control board resulting from possible voltage surge due to contact
bounce.
z
When momentary power loss is longer than 2 seconds (the larger of horse power, the
longer of time), the inverter does not have enough storage power to control the circuit;
Therefore, when the power is re-applied, the operation of the inverter is based on the
setup of 00-03(or00-04) /04-09 and the condition of external switch, this is considered
to be「restart」in the following paragraphs.
z When the momentary power loss is short, the inverter still has enough storage power to
control the circuit. Therefore, when power is re-applied, the inverter will automatically
restart depending on the setup of 04-03/04-04.
z When restarting the inverter, the operation of the inverter is based on the setup of 0003(or00-04) and 04-09 and the condition of external switch (FWD/REV button).
Attention: the start operation will be regardless of 04-03/04-04/04-06/04-07.
1. When 00-03(or00-04) =0, the inverter will not automatically run after restart.
2. When 00-03(or00-04) =1 and the external switch is OFF, the inverter will not run
after restart.
3. When 00-03(or00-04) =1, the external switch is ON, and 04-09=0, the inverter will
run automatically after restart.
Attention: To ensure safety, please turn off the external switch (FWD/REV button)
after power loss, to protect machines from possible damage and potential injury to
personnel on sudden resumption of power.
z If 4-09 is set to 0 (direct start up), please refer to the description and warnings for 04-09
to verify the safety of operator and machine.
1.1.3. Before Operation
Danger
Make sure the model and inverter capacity are the same as that set in parameter 12-00.
Caution
On power up the supply voltage set in parameter 05-03 will flash on display for 2 seconds.
1-2
1.1.4. During Operation
Danger
Do not connect or disconnect the motor during operation. Otherwise, the over-current will
cause the inverter to trip or damage the unit.
Danger
z To avoid electric shock, do not take the front cover off when power is on.
z The motor will restart automatically after stop when auto-restart function is on. In this
case, use caution while working near the drive, motor, or driven equipment.
z Note: The stop push button and external stop command have no safety function.
For Emergency stop, it is necessary to use a correct latch type push button and an
appropriate circuit or devices to ensure safety.
Caution
z Do not touch heat-generating components such as heat sinks and braking resistors.
z The inverter can drive the motor from low speed to high speed. Verify the allowable
speed range of the motor and the load before operation.
z Note the settings related to the braking unit.
z Do not check signals on circuit boards while the inverter is running.
Caution
Allow 5 minutes after disconnecting power before disassembling or checking the
components. The power led should not be illuminated.
1.1.5. During Maintenance
Caution
The Inverter can be used in a non-condensing environment in temperature range from
14˚-104℉ (-10-40℃) and relative humidity of 95%
Inverter Disposal
Caution
z Please dispose of this unit with care as an industrial waste and according to your
required local regulations.
z The capacitors of inverter main circuit and printed circuit board are considered as
hazardous waste and must not be burnt.
z The Plastic enclosure and parts of the inverter such as the top cover board will release
harmful gases if burnt.
1-3
Chapter 2
Inverter model →
Definition of model
MODEL: E310-201-H
Input voltage →
I/P: AC 1 OR 3PH
200~240V 50/60Hz
Output specifications→
O/P: AC 3PH 0~240V
1.7 KVA 4.5 A
TECO Electric & Machinery co., Ltd.
E310Series:
E31
0 - 2
01 - H
Supply voltage
Adhibition
0 standard Type
2
200Vclass
4
400Vclass
Specification
H
Horsepower
P5
0.5 HP
01
1 HP
02
2 HP
03
3 HP
05
5 HP
Power supply
3
Three phase
common model
for single /Three
Blank phase
Figure 2-1 Inverter Nameplate
2-1
Chapter 3 Ambient Environment and Installation
3.1 Environment
The environment will directly affect the proper operation and the life span of the inverter, so install
the inverter in an environment complying with the following conditions:
z
Ambient temperature: 14-104℉(-10oC - +40oC)
z
z
z
Avoid exposure to rain or moisture.
z Avoid direct sunlight.
Avoid oil mist and salinity.
z Avoid corrosive liquid and gas.
z Keep away from radioactive and
Avoid dust, lint fibers, and small metal
flammable materials.
filings.
Avoid electromagnetic interference (soldering machine, power machine).
Avoid vibration (stamping, punching machine). Add a vibration-proof pad if the situation
cannot be avoided.
If several inverters are placed in the same control panel, provide heat removal means to
maintain temperatures below 40oC.
z
z
z
CONTROL
CONTROL
PANEL
PANEL
E310
Fan
E310
E310
Enclosure
Fan
Enclosure
E310
(Correct configuration)
(Incorrect configuration)
(Correct configuration)
(Incorrect configuration)
Figure 3-1 Panel and enclosure arrangement for E310 inverters
z
Place the inverter facing forward and its top facing upward to assist with cooling.
12cm
73000CV
E310
Installing
direction
12cm
5cm
5cm
5cm
Air convection
-10oC - +40oC
(b) Side view
(a) Front view
Figure 3-2 Din rail mounting of the E310 Inverter
3-1
3.2 Environmental precautions
Do not use the inverter in an environment with the following conditions:
3-2
3.3 Electrical Installation
3.3.1 Wiring guidelines
A. Power Cables
Power cables are connected to TM1 terminal block, terminals L1, L2, L3, T1, T2, T3, P, R.
Choose power cables according to the following criteria:
(1)Use copper wires only. Correct wire diameters should be based on ratings at 105oC.
(2)For rating voltage of wires, the minimum voltage of 200V class type is 300V, and 400 V class
type is 600V.
B. Control Cables
Control cables are connected toTM2 control terminal block.
Choose control cables according to the following criteria:
(1) Use copper wires only. Correct wire diameters should be based on ratings at 105oC.
(2) For rating voltage of wires, the minimum voltage of 200V class type is 300V, and 400 V class
type is 600V.
(3) To avoid noise interference, do not route power and control cables in the same conduit or
trucking.
(4) Where possible use screened / shielded control cables to minimizes electromagnetic
interference.
(5) To avoid ground loops always earth the shield of control cables at one end only.
C. Nominal electrical specifications of the terminal Block TM1:
Horsepower
Power source
Amps
Volts
0.5/1/ 2
200-240V
15
600
1/ 2
380-480V
3/ 5
380-480V
40
※Note: Nominal values of input and output signals (TM2,TM3) – follow the specifications of
class 2 wiring.
D. Fuse types
Drive input fuses are provided to disconnect the drive from power in the event that a component
fails in the drive’s power circuitry. The drive’s electronic protection circuitry is designed to clear
drive output short circuits and ground faults without blowing the drive input fuses. Table below
shows the E310 input fuse ratings.
To protect the inverter most effectively, use fuses with current-limit function.
Horsepower
power supply standard
Fuse types
1/2
200-240V
15A, 600VAC, 100KA I.R.
1
5A, 600VAC, 100KA I.R.
2
10A, 600VAC, 100KA I.R.
380-480V
3
15A, 600VAC, 100KA I.R.
5
20A, 600VAC, 100KA I.R.
※Notice
z To avoid shock hazards, do not touch any electrical component when the power is applied or
with in five minutes after the power is disconnected. Any inspection should be performed after
the charge indicator goes off.
z Do not perform wiring on the inverter with power on. Disregard of this notice may result in
serious injury.
3-3
3.3.2 Contactor and Circuit Breaker specification and wiring.
Molded-case circuit breaker/magnetic contactor
z
Teco bears no responsibility to service for failures caused by the following conditions:
(1) A molded-case circuit breaker is not installed, or an improper or overrated breaker is used,
between the power source and the inverter.
(2) A magnetic contactor, a phase capacitor, or a burst absorber is connected between the
inverter and the motor.
model:
E310-□□□-XXX
Molded-case circuit
breaker made by Teco
2 P5
201
202
50 E
10 A
50E
20 A
50E
30 A
Magnetic contactor
(MC) made by Teco
Main circuit terminals
(TM1)
Signal terminals
CN-11
Wire gauge 2.0 mm2
terminal screw M3.5
Wire gauge 0.80mm2 ( # 18 AWG)
terminal screw M3
(TM2,TM3 )
model:
E310-□□□-XXX
401/402/403/405
Molded-case circuit
breaker made by Teco
Magnetic contactor
(MC) made by Teco
Main circuit terminals
(TM1)
Signal terminals
(TM2,TM3 )
z
z
z
50 E 15A
CN-11
Wire gauge 2.0 mm2
terminal screw M3.5
Wire gauge 0.80mm2 ( # 18 AWG)
terminal screw M3
Use three-phase squirrel cage induction motor with capacity suitable for the inverter.
If one inverter is driving several motors, the total current of all motors running simultaneously
must be less than the rated current of the inverter, and each motor has to be equipped with a
proper thermal relay.
Do not add capacitive components, such as a phase capacitors, LC or RC, between the inverter
and the motor.
3-4
3.3.3 Precautions for peripheral applications:
Power supply:
z Make sure the correct voltage is applied to avoid
damaging the inverter.
z A molded-case circuit breaker or fused disconnect
must be installed between the AC source and the
inverter
Molded-case circuit breaker:
z Use a molded-case circuit breaker that conforms to the
rated voltage and current of the inverter to control the
power ON/OFF and protect the inverter.
z Do not use the circuit breaker as the run/stop switch
for the inverter.
Leakage breaker:
z Install a leakage breaker to prevent problems caused
by electric leakage and to protect personnel.
z Setting current should be 200mA or above and the
operating time at 0.1 second or longer to prevent
malfunctions.
Magnetic contactor:
z Normal operations do not need a magnetic contactor.
However a contactor has to be installed in primary
side when performing functions such as external
control and auto restart after power failure, or when
using a brake controller.
z Do not use the magnetic contactor as the run/stop
switch of the inverter.
E310
AC reactor for power quality improvement:
z When inverters below 200V/400V class 15KW are
supplied with high capacity (above 600KVA) power
source or an AC reactor can be connected to improve
the power performance.
Install fast action fuse:
z To ensure the safety of peripheral devices, please
install fast action fuse. Regarding the specification,
please refer to P3-3.
Input noise filter:
z A filter must be installed when there are inductive
loads affecting the inverter
Inverter:
z Input power terminals L1, L2, and L3 can be used in
any sequence regardless of phase.
z Output terminals T1, T2, and T3 are connected to U,
V, and W terminals of the motor. If the motor is
reversed while the inverter is set to run forward, just
swap any two terminals of T1, T2, and T3.
z To avoid damaging the inverter, do not connect the
input terminals T1, T2, and T3 to AC input power.
z Connect the ground terminal properly. 200V class:
class 3 grounding, <100Ω; 400V class : <10Ω.
Figure 3-3 Typical Installation Schematic
3-5
Make external connections according to the following instruction. Check connections after wiring
to make sure all connections are correct. (Do not use the control circuit buzzer to check connections)
(A) Main circuit’s wiring must be separated from other high voltage or high current power line to
avoid noise interference. Refer to the figures below:
Figure 3-4a) Installation Examples
Figure 3-4b) Installation Examples using a filter and Isolation transformer
z
z
A noise filter in the output of the main circuit can suppress conducted noise.
To prevent radiated noise, the wires should be put in a metal pipe and distance from signal
lines of other control equipment should be more than 30 cm.
MCCB
Metal Box
Metal Pipe
Power Supply
Noise
Filter
Noise
Filter
E310
30 cm above
Signal Wire
Controller
Figure 3-4c) Installation Examples with Adjacent Signal Conductors
3-6
z
When the connection between the inverter and the motor is too long,consider the voltage
drop of the cables. Phase-to-phase voltage drop (V) =
3 ×resistance of wire (Ω/km)×length of line (m)×current×10-3.
z
Carrier frequency must be adjusted based on the motor cable length.
Cable length between the inverter and
Below 150ft
Below 300ft
the motor
Recommended
Below 12KHz
Below 8KHz
carrier frequency
Setting of parameter 10-03
12
Above 300ft
Below 5KHz
8
5
(B) The control circuit wiring must be separated and routed away from the main circuit control line
or other high voltage or current power lines to avoid noise interference
● To avoid erroneous operation caused by noise interference, shield the control circuit wiring
with twisted-wires, and connect the shielded wire to a ground terminal. Refer to the figure below.
The wiring distance should not exceed 50 meters.
Shielding sheath
Protective covering
To ground terminal
Do not connect this end
Wrapped with insulating tape
Figure 3-5 Control Cable requirements
(C)Inverter Ground terminal must be connected to installation ground correctly and according to
the required local wiring regulations.
For 200V class ground resistance should be 100Ω or less.
For 400V class ground resistance should be 10Ω or less.
●Ground cable size must be according to the required local wiring regulations. The shorter the
better.
●Do not share the ground of the inverter with other high current loads
(Welding machine, high power motor). Connect the terminals to their own ground.
●Do not make a loop when several inverters share a common ground point.
E310
E310
(a) Good
E310
E310
E310
E310
(b) Good
Figure 3-6 Grounding Examples
E310
E310
E310
(c) Bad
(D) To ensure maximum safety, use correct wire size for the main power circuit and control circuit.
(According to the required local regulations)
(E) Verify that all wiring is correct, wires are intact, and terminal screws are secured.
3-7
3.4 Specifications
3.4.1 Product Specifications
Single / Three phase, 200-240V model
Model: E310-□□□-XXX
2 P5
201
202
Horsepower(HP)
Max Applicable Motor Output
(KW)
Rated Output Current(A)
0 .5
1
2
0 .4
0 .75
1 .5
3 .1
4 .5
7 .5
Rated Capacity(KVA)
Max Applicable Motor Output
(KW)
Max. Output Voltage
1 .2
1 .7
2 .9
Sing le/Th ree Ph ase: 200 ~240V +10% -15%, 50 /60H Z ± 5 %
Th ree Phase: 200 ~240V
Net Weight (KG)
Allowable momentary power loss
time (second)
1.37
1.37
1.47
1.0
1.0
2.0
Three phase, 380 – 480V model
Model:E310-□□□-XXX
401
402
403
405
1
2
3
5
0.75
1.5
2.2
3.7
2.3
3.8
5.2
8.8
Rated Capacity(KVA)
Max Applicable Motor Output
(KW)
Max. Output Voltage
1.7
2.9
4.0
6.7
Net Weight (KG)
Allowable momentary power loss
time (second)
1.33
1.35
2.22
2.25
1.0
1.0
2.0
2.0
Horsepower(HP)
Max Applicable Motor Output
(KW)
Rated Output Current(A)
Th re e phase:380 ~480V +10% -15%, 50 /60H Z ± 5%
Th re e phase : 380~480V
3-8
3.4.2 General Specifications
Item
Control Mode
Frequency Control
Range
E310
V/F or Vector Control
0.01~400.00 Hz
Start control torque
150%/1Hz ( Vector)
Speed control range
1:100 ( Vector)
Speed Control Precision
±0.5% (Vector)
Setting resolution
Keypad setting
Display Function
External signal setting
Digital: 0.01Hz, Analog: 0.06Hz/ 60Hz(10bits)
Set directly with▲▼ keys or the VR on the keypad
Five digital LED and status indicator; display frequency/ line
speed/ DC voltage/ Output voltage/ Current/ Rotation direction/
Inverter parameter/ Fault Log/ Program Version / Heat sink
temperature/PID feed back
1. External potentiometer0-10V/ 0-20mA
2. Provides up/down controls, speed control or automatic
procedure control with multifunctional contacts on the terminal
block (TM2)
Frequency Limit
Function
Upper/lower frequency limits and three programmable skip
frequencies
Carrier frequency
1 ~ 12 kHz
V/F pattern
Acc/Dec control
Multifunction analog
output
18 fixed patterns, 1programable curve
Two-stage Acc/Dec time (0.1 – 3,600 seconds) and four-stage S
curves (refer to descriptions on 10-07.)
5 functions (refer to description on 2-12)
Multifunction input
22 functions (refer to description on 01-00~01-05)
Multifunction output
14 functions (refer to description on 01-09~01-10)
Other Functions
Momentary Power Loss Restart, Speed Search, Overload
Detection, 8 preset speeds. Acc/Dec Switch (2 Stages), S Curves,
3-wire Control, PID control, torque boost, Slip Compensation,
Frequency Upper/ Lower Limit, Auto energy saving, Modbus
slave and PC/PDA Link, Auto Restart, Encoder input.
3-9
Item
Communication Control
Braking Torque
1. Control by RS485
2. One to one or one to many control.
3. BAUD RATE/STOP BIT/PARITY/bit can be set
About 20﹪, the model below 20HP with built-in braking
transistor and the specified external braking resistors can provide
100%
Operation temperature
14-120℉(-10 ~ 50℃)
Storage temperature
4-140℉(-20 ~ 60℃)
Humidity
0 – 95% Relative Humidity(Non-condense)
Vibration
1G (9.8m/ S2 )
Enclosure
IP20
Overload protection
Protective Functions
E310
The relays to protect the motor (the curve can be set) and the
inverter (150 % / 1min)
Over Voltage
200V class: DC Voltage>410V 400Vclass: DC Voltage>820V
Under Voltage
200V class: DC Voltage<190V 400Vclass: DC Voltage<380V
Momentary Power
Loss Restart
Stall Prevention
Restart can be initiated with spin start after momentary power loss
in Max 2 sec.
Stall prevention for Acceleration/ Deceleration/ Operation.
Short-circuit output
terminal
Electronic Circuit Protection
Grounding Fault
Electronic Circuit Protection
Other Function
Protection for overheating of heat sink, over torque detection,
error contact control, reverse prohibit, prohibit for direct start
after power up and error recovery, parameter lock up.
3-10
3.5 Wiring diagram E310 series inverter
(
(
(
RY1
TR1
Figure 3-7 Wiring Diagram
Note 1: Please refer to description of main circuit terminals (P, R) and specification of braking
resistor for value selection.
2: please avoid connecting output of inverter to the earth.
3-11
3.6 Description of connection terminals
Descriptions of main circuit terminals
TM1
Symbol
L1
L2
L3
P
R
T1
T2
T3
Description
Main power input
Single-phase: L1/ L2
Three-phase: L1/L2/L3
Braking resistor connection terminal: Used in applications
220V:0.5~2HP,
when it is required to stop a high inertia load rapidly. (refer
380V:1~5HP
to specifications of the braking resistor)
Inverter outputs
Descriptions of E310 control circuit terminals
Symbol
RC
10V
AVI
Description
Normal open
Contact rated capacity:
contact
Multifunctional
(250VAC/1A or30VDC/1A)
output
Normal close
Contact using description:
terminals
contact
(refer to parameters 01-09, 01-10)
Common contact
Frequency knob (VR) power source terminal (pin 3)
Analog frequency signal input terminal AVI (0~10VDC/2~10VDC)
ACI
PID signal input terminal or Bias signal input terminal ACI(0~20mA /4~20mA)
GND
ground
SYN+
Positive terminal for multi-function output
SYN-
Negative terminal for multi-function output
COM
Common for digital input signal for S1~S6 input.
RA
RB
TM2
30VDC/200mA
S1
S2
multifunction input terminals (refer to parameter 1-00~1-02 description)
S3
TM3
COM
S4
S5
S6
FM+
Common for digital input signal for S1~S6 input.
multifunction input terminals (refer to parameter 1-03~1-05 description)
The positive multifunction analog output signal for multifunction (refer to
parameter 2-12 description), the signal for output terminal is 0-10VDC (below
2mA).
3-12
3.7 Outline Dimensions (unit: mm)
(1) Frame1 : single /Three phase: E310-2P5/201/202 Three phase: E310-401/402
+ a
530
)5(4
6(7
Figure 3-8 Frame size 1 Dimensions
E310-2P5/201/202/401/402
3-13
(2) Frame2 : Three phase E310-403/405
+ a
530
)5(4
6(7
Figure 3-9 Frame size 2 Dimensions
MODEL : E310-403/405
3-14
Chapter 4
Software Index
4.1 Keypad Description
4.1.1Keypad Display and Operation Instruction
Figure 4-1 Keypad Layout
1. Four actions of FUN mode: Hz/RPM, and display of five 7-segment display. (Refer to operation
description of the keypad).
2. FWD LED: Forward Direction, LED action (Flash while stopped, solid Lit during operation).
3. REV LED: Reverse Direction, LED action (Flash while stopped, solid Lit during operation).
Caution
To avoid keypad damage, do not operate it with a screwdriver or any sharp and hard tool.
4-1
4.1.2 Operation Instruction of the LED keypad
Power On
: LED fully Lit
: LED flashing
●
2seconds later or after Enter operation signal, Press DSP to modify the display
HZ/RPM
‧
HZ/RPM
‧
FUN
HZ/RPM
‧
☉
—
FUN
☉
FUN
FUN
—
VOLT
VOLT
‧
AMP
PID
Output
Counter
Figure 4-2 LED Keypad Operations Sequence
4-2
4.2 Control Mode Selection
The E310 Series inverter has two control modes:
1. V/F Control Mode. 2. General Vector Control Mode.
The user can choose these modes with the digital keypad according to the application requirement.
The factory setting is V/F Control Mode. Before operation, please set the control mode and the
related motor parameters in accordance with the following flow chart. (The Vector control mode is
suitable for the motors with the same power rating as the inverter, or one size bigger or smaller if
necessary).
Setting procedure for
control mode
Vector Control
Control Mode
V/F Control
Control mode selection
00-00=0
Control mode selection
00-00=1
Set the following parameters:
V/F Pattern
00-01
Torque Boost
05-00
Motor no load current
05-01 (<=06-01)
Motor Rated Slip
05-02
Max output frequency
05-04
Max output voltage
05-05
Mid output Frequency
05-06
Mid output voltage
05-07
Min output frequency
05-08
Min output voltage
05-09
Motor Rated Current 06-01 (OL1 reference)
Set the following parameters:
Motor rated voltage
06-00
Motor rated current
06-01
Motor power
06-02
Motor rated Speed
06-03
Motor rated Frequency 06-04
Perform Auto tuning (06-05=1)
End
Figure 4-3 Control Mode Selection Chart
※Note:
1. Use V/F Control Mode:
(1) Use one inverter to drive several motors simultaneously
(2) Motor’s nameplate is unknown or motor ’s specifications are too special, it will
cause Auto-tuning fault.
(3) Specification of inverter and motor differs by more than 1 size.
2. One inverter drives several motors (Only in V/F mode), set the motor parameters according to the
following rules:
(1). Sum the rated current of all motors for total inverter current.
(2). Input correct VF Pattern parameter (05-04~05-09).
3. When the nameplate of the motor is unknown, the inverter will be set by default to parameters
according to the standard TECO motor.
4. When parameter 00-00=0, the keypad will display ‘Err2’ when performing Auto tuning.
5. In VECTOR MODE, the max. & min. value of 06-01~06-05 will be limited by one size higher or
lower than TECO standard motor specification. In VF MODE control, there is no limitation.
4-3
4.3E310 Programmable Functions List
Parameter
Group No.
Description
00-
The basic parameters group
01-
External terminal digital signal input function group
02-
External terminal analog signal input function group
03-
Preset Frequency function group
04-
Start/Stop command group
05-
V/F command group
06-
Motor parameter group
07-
Protection function group
08-
Communication function group
09-
PID function group
10-
Assistant function group
11-
Keypad display group
12-
User parameter group
13-
Auto Run(Auto Sequencer) function group
0- The basic parameters group
FunctionCode
No.
Description
00-00
Control Mode
00-01
Volts/Hz Patterns(V/F)
00-02
Motor rotation
00-03
Main Run
Command Source Selection
00-04
Subsidiary Run
Command Source Selection
00-05
Main Frequency
Command Source Selection
Range/Code
0:Volts/Hz
1:Vector
0~18
0:Forward
1:Reverse
0:Keypad
1:External Run/Stop Control
2:Communication
0:Keypad
1:External Run/Stop Control
2:Communication
0:Keypad
1:Potentiometer on Keypad
2:External AVI Analog Signal Input
3:External Up/Down Frequency Control
4:Communication setting Frequency
4-4
Factory
Setting
Remarks
0
0/9
*5
0
*1
0
0
0
FunctionCode
No.
Description
00-06
Subsidiary Frequency
Command Source Selection
00-07
00-08
00-09
00-10
Frequency Upper Limit (Hz)
Frequency Lower Limit (Hz)
Acceleration Time 1(S)
Deceleration Time 1(S)
00-11
Operation modes for external
terminals
00-12
Jog Frequency (Hz)
00-13
00-14
Range/Code
0:Keypad
1:Potentiometer on Keypad
2:External AVI Analog Signal Input
3:External Up/Down Frequency Control
4:Communication setting Frequency
0.01~400.00
0.01~399.99
0.1~3600.0
0.1~3600.0
0:Forward/Stop-Reverse/Stop
1:Run/Stop-Forward/Reverse
2:3-Wire Control Mode-Run/Stop
0.00~25.00
Factory
Setting
Remarks
0
50.00/60.00
0.00
10.0
10.0
*1
*1
0
2.00
*1
Jog Acceleration Time (MFIT) (S) 0.1~25.5
0.5
*1
Jog Deceleration Time (MFIT) (S) 0.1~25.5
0.5
*1
1- External terminal digital signal input function group
FunctionCode
No.
01-00
01-01
01-02
01-03
01-04
Multifunction Input Term. S1
Multifunction Input Term. S2
Multifunction Input Term. S3
Multifunction Input Term. S4
Multifunction Input Term. S5
01-05
Multifunction Input Term. S6
Description
Range/Code
0 : Forward/Stop Command
1 : Reverse/Stop Command
2 : Preset Speed unit 0 (3-02)
3 : Preset Speed unit 1 (3-03)
4 : Preset Speed unit 2 (3-05)
5 : Jog Forward Command
6 : Jog Reverse Command
7 : Acc/Dec 2
8 : Emergency Stop
9 : Base Block
10 : Main/Alt run Command select
11 : Acc/Dec Disabled
12 : Up Command
13 : Down Command
14 : Main/Alt Frequency Command
select
15 : PID Function Disabled
16 : Integration Value Resets to Zero
17 : Reset
18 : KEB function
19 : Auto _ Run Mode
Factory
Remarks
Setting
0
1
2
3
4
17
20 : Counter Trigger Signal
21 : Counter Reset
01-06
01-07
Multifunction terminal S1~S6 confirm
1~ 200(X 4ms)
the scan times
Up/Down (Hz)
0.00~ 5.00
4-5
5
0.00
FunctionCode
No.
Description
01-08
Up/Down keep Frequency mode
01-09
Output Relay RY1 Operation Mode
01-10
Output Relay TR1 Operation Mode
01-11
01-12
Frequency Output Setting (Hz)
Frequency Detection Range
01-13
S1~ S5 switch type select
01-14
S6 switch type select
Factory
Remarks
Setting
Range/Code
0 : When Up/Down is used, the preset
frequency is held as the inverter stops,
and the UP/Down function is disabled.
1 : When Up/Down is used, the preset
frequency is reset to 0 Hz as the
inverter stops.
2 : When Up/Down is used, the preset
frequency is held as the inverter stops,
and the UP/Down is available.
0 : Run
1 : Fault
2 : Frequency Reached
3 : Set Frequency
4 : Frequency Threshold Level
(> 1-11) - Frequency Reached
5 : Frequency Threshold Level
(< 1-11) - Frequency Reached
6 : Auto Restart
7 : Momentary AC Power Loss
8 : Emergency Stop Mode
9 : Base Block Stop Mode
10 : Motor Overload Protection(OL1)
11 : Drive Overload Protection(OL2)
12 : PID Feedback Signal Loss
13 : Top Count Value Attained
0.00 ~ 400.00
0.00 ~ 30.00
xxxx0 : S1 NO
xxx0x : S2 NO
xx0xx : S3 NO
x0xxx : S4 NO
0xxxx : S5 NO
xxxx0 : S6 NO
xxxx1 : S6 NC
※ “NO”: Normal open, “NC”: Normal close.
4-6
0
1
0
0.00
2.00
xxxx1 : S1
xxx1x : S2
xx1xx : S3
x1xxx : S4
1xxxx : S5
NC
NC
NC
NC
NC
00000
00000
*1
*1
2- External terminal analog signal input function group
Function
Code No.
Description
Range/Code
Factory
Setting
ACI
0~20mA
4~20mA
0~20mA
4~20mA
Remarks
02-00
AVI/ACI analog Input signal type
select
02-01
AVI Signal Verification Scan
setting AVI
0
0~10V
1
0~10V
2
2~10V
3
2~10V
1 ~ 100(x 4ms)
02-02
AVI Gain (%)
0 ~1000
100
*1
02-03
AVI Bias (%)
0 ~100
0
*1
02-04
AVI Bias Selection
0
*1
02-05
AVI Slope
0
*1
02-06
ACI function Select
02-07
ACI Signal Verification Scan
1 ~ 100(x 4ms )
50
02-08
ACI Gain (%)
0 ~1000
100
*1
02-09
ACI Bias (%)
0.0 ~100.0
0.0
*1
02-10
ACI Bias Selection
0
*1
02-11
ACI Slope
0
*1
0
*1
0
50
0 : Positive
1 : Negative
0 : Positive
1 : Negative
0 : PID feedback signal
0
1 : ACI Bias signal input
0 : Positive
1 : Negative
0 : Positive
1 : Negative
0 : Output Frequency
1 : Frequency Setting
02-12
Analog Output Mode(FM+)
2 : Output Voltage
3 : DC Bus Voltage
4 : Motor Current
02-13
Analog Output FM+ Gain (%)
0 ~1000
100
*1
02-14
Analog Output FM+ Bias (%)
0 ~100
0
*1
02-15
FM+ Bias Selection
0
*1
02-16
FM+ Slope
0
*1
0 : Positive
1 : Negative
0 : Positive
1 : Negative
3-preset Frequency function group
Function
Code No.
Description
Range/Code
Factory
Setting
0 : common
03-00
Preset Speed Control mode
Selection
(Is uniform time( Acc1/Dec1or Acc2/Dec2)
1 : special
(is single time Acc0/Dec0~ Acc7/Dec7)
4-7
0
Remarks
Function
Code No.
Description
Range/Code
Factory
Setting
Remarks
03-01
Preset Speed 0 (Hz)
0.00 ~ 400.00
5.00
Keypad Freq
03-02
Preset Speed1 (Hz)
0.00 ~ 400.00
5.00
*1
03-03
Preset Speed2 (Hz)
0.00 ~ 400.00
10.00
*1
03-04
Preset Speed3 (Hz)
0.00 ~ 400.00
20.00
*1
03-05
Preset Speed4 (Hz)
0.00 ~ 400.00
30.00
*1
03-06
Preset Speed5 (Hz)
0.00 ~ 400.00
40.00
*1
03-07
Preset Speed6 (Hz)
0.00 ~ 400.00
50.00
*1
03-08
Preset Speed7 (Hz)
0.00 ~ 400.00
60.00
*1
03-09~
Reserved
03-16
Reserved
03-17
Preset Speed0-Acctime(s)
0.1 ~ 3600.0
10.0
*1
03-18
Preset Speed0-Dectime(s)
0.1 ~ 3600.0
10.0
*1
03-19
Preset Speed1-Acctime(s)
0.1 ~ 3600.0
10.0
*1
03-20
Preset Speed1-Dectime(s)
0.1 ~ 3600.0
10.0
*1
03-21
Preset Speed2-Acctime(s)
0.1 ~ 3600.0
10.0
*1
03-22
Preset Speed2-Dectime(s)
0.1 ~ 3600.0
10.0
*1
03-23
Preset Speed3-Acctime(s)
0.1 ~ 3600.0
10.0
*1
03-24
Preset Speed3-Dectime(s)
0.1 ~ 3600.0
10.0
*1
03-25
Preset Speed4-Acctime(s)
0.1 ~ 3600.0
10.0
*1
03-26
Preset Speed4-Dectime(s)
0.1 ~ 3600.0
10.0
*1
03-27
Preset Speed5-Acctime(s)
0.1 ~ 3600.0
10.0
*1
03-28
Preset Speed5-Dectime(s)
0.1 ~ 3600.0
10.0
*1
03-29
Preset Speed6-Acctime(s)
0.1 ~ 3600.0
10.0
*1
03-30
Preset Speed6-Dectime(s)
0.1 ~ 3600.0
10.0
*1
03-31
Preset Speed7-Acctime(s)
0.1 ~ 3600.0
10.0
*1
03-32
Preset Speed7-Dectime(s)
0.1 ~ 3600.0
10.0
*1
04-start/stop command group
Function
Code No.
Description
Range/Code
Factory
Setting
04-00
Starting Method Selection
0 : Normal Start
1 : Enable Speed Search
0
04-01
Stopping Method Selection
0 : braking capacity
1 : Coast to stop
0
04-02
Keypad Stop Button
0 : Stop Button Enabled
1 : Stop Button Disabled
0
4-8
Remarks
Function
Code No.
Description
Range/Code
Factory
Setting
Remarks
0 : Momentary Power Loss and Restart
disable
1 : Momentary power loss and restart
04-03
Momentary Power Loss and
enable
2 : Momentary power loss and restart
Restart
0
enable while CPU is operating.
(According to the capacity of DC
power)
04-04
Momentary Power Loss
Ride-Thru Time (Seconds)
0.0 - 2.0
0 : Enable Speed Search
04-05
Auto Restart Method
04-06
Auto Restart Delay Time (Seconds)
0.0 - 800.0
04-07
Number of Auto Restart Attempts
0-10
04-08
Reset Mode Setting
0.5
1 : Normal Start
0
0.0
0
0 : Enable Reset Only when Run
Command is Off
1 : Enable Reset when Run
0
Command is On or Off
04-09
Direct Running After Power Up
0 : Enable Direct running after power
up
1 : Disable Direct running after power
1
up
04-10
04-11
Delay-ON Timer (Seconds)
1.8 ~300.0
Kinetic Energy
0.0 : Disable
Back-up Deceleration Time
1.0
0.1~25.0:KEB Deceleration Time
04-12
Lower Limit of Power Voltage Detect 150.0~210.0/300.0~420.0
04-13
DC Injection Brake Level (%)@start 0.0~150.0
04-14
04-15
04-16
04-17
DC Injection Brake Time
(Seconds) @start
DC Injection Brake Start
Frequency (Hz) @stopped
DC Injection Brake
Level(%)@Stopped
DC Injection Brake Time
(Seconds) @stopped
0.0
190.0/380.0
50.0
0.0~25.5
0.5
0.10~10.00
1.50
0.0~150.0
50.0
0.0~25.5
0.5
05-V/F command group
Function
Code No.
05-00
05-01
Description
Volts/Hz Curve Modification
(Torque Boost) (%)
Motor No Load Current(Amps AC)
Range/Code
0 ~ 30.0
-----
Factory
Setting
Remarks
10.0
*5
*5
4-9
Function
Code No.
Description
Range/Code
05-02
Motor rated Slip Compensation (%)
0.0 ~ 100.0
05-03
v/f max voltage
05-04
Maximum Frequency (Hz)
05-05
Maximum Frequency VoltageRatio (%) 0.0 ~ 100.0
05-06
Medium Frequency 2(Hz)
05-07
Medium Frequency Voltage Ratio2 (%) 0.0 ~ 100.0
05-08
Medium Frequency1 (Hz)
05-09
Medium Frequency Voltage Ratio1 (%) 0.0 ~ 100.0
05-10
Minimum Frequency (Hz)
05-11
05-12
Factory
Setting
Remarks
0.0
*5
220V series : 170.0 ~ 264.0
*5
440V series : 323.0 ~528.0
0. 20 ~ 400.00
50.00/60.00
*5
100.0
*5
25.00/30.00
*5
50.0
*5
10.00/12.00
*5
20.0
*5
0.50/0.60
*5
Minimum Frequency VoltageRatio (%) 0.0 ~ 100.0
1.0
*5
V/F start Frequency
0.00
*5
Factory
Setting
Remarks
0.10 ~ 400.00
0. 10 ~ 400.00
0. 10 ~ 400.00
0.00 ~ 10.00
06-Motor parameter group
Function
Code No.
Description
Range/Code
06-00
Motor Rated Voltage (VAC)
-----
*4
06-01
06-02
Motor Rated Current (Amp AC)
Motor Rated Power (kW)
---------
*4
*4
06-03
Motor Rated Speed (RPM)
-----
*4
06-04
Motor Rated Frequency (Hz)
-----
*4
06-05
Reserved
06-06
Torque Boost Gain (Vector)
Slip Compensation Gain
(Vector)
06-07
Reserved
0~ 600
*3*4
0 ~ 600
*3*4
06-08
Reserved
Reserved
06-09
Reserved
Reserved
06-10
Reserved
Reserved
06-11
Low-frequency compensation Gain
0 ~ 100
4-10
30
07-Protection function group
Function
Code No.
Description
Range/Code
xxxx0 : Enable Trip Prevention During
Acceleration
xxxx1 : Disable Trip Prevention During
Acceleration
xxx0x : Enable Trip Prevention During
Deceleration
xxx1x : Disable Trip Prevention During
Deceleration
xx0xx : Enable Trip Prevention in Run Mode
xx1xx : Disable Trip Prevention in
Run Mode
x0xxx : Enable over voltage Prevention in
Run Mode
x1xxx : Disable over voltage Prevention in
Run Mode
Factory
Remarks
Setting
07-00
Trip Prevention Selection
07-01
Trip Prevention Level During
Acceleration (%)
50 ~ 200
200
07-02
Trip Prevention Level During
Deceleration (%)
50 ~ 200
200
07-03
Trip Prevention Level In Run Mode
(%)
50 ~ 200
200
07-04
over voltage Prevention Level in Run
Mode
07-05
07-06
07-07
07-08
07-09
350.0 VDC ~ 390.0 VDC
700.0 VDC ~ 780.0 VDC
0 : Enable Electronic Motor
Electronic Motor Overload Protection
Overload Protection
Operation Mode
1 : Disable Electronic Motor
Overload Protection
0 : Electronic Motor Overload Protection Set
for Non-Inverter Duty Motor
Motor type Selection
1 : Electronic Motor Overload Protection Set
for Inverter Duty Motor
0 : Constant Torque (OL =103 %)
Motor Overload Protection
(150 % for 1 Minute)
Curve Selection
1 : Variable Torque (OL = 113 %)
(123 % for 1 Minute)
0 : Coast-to-Stop After Overload
Operation After Overload Protection is
Protection is Activated
Activated
1 : Drive Will Not Trip when Overload
Protection is Activated (OL1)
0 : Disable Over torque Operation
1 : Enable Over torque Operation
Over torque Detection Selection
Only if at Set Frequency
(OL3)
2 : Enable Over torque Operation
while the Drive is in Run Mode
4-11
00000
380.0/
760.0
1
0
0
0
0
Inverter
Rated
Current
200%
Inverter
Rated
Current
200%
Inverter
Rated
Current
200%
Function
Code No.
07-10
07-11
07-12
07-13
Description
Range/Code
0 : Coast-to-Stop After Over
Operation After Over torque Detection
torque is Activated
is Activated
1 : Drive will Continue to Operate After
Over torque is Activated (OL3)
Over torque Threshold Level(%)
30 ~ 300
Over torque Activation Delay Time (S) 0.0 ~ 25.0
0 : Auto (Depends on temp.)
OH over heat Protection ( cooling fan 1 : Operate while in RUN mode
2 : Always Run
control)
3 : Disabled
Factory
Remarks
Setting
1
160
0.1
1
08-Communication function group
Function
Code No.
Description
08-00
Assigned Communication
Station Number
08-01
RTU code /ASCII code select
08-02
Baud Rate Setting (bps)
08-03
Stop Bit Selection
08-04
Parity Selection
08-05
Data Format Selection
08-06
Communication time-out
detection time
08-07
Communication time-out
operation selection
08-08
08-09
Err6 fault tolerance times
Drive Transmit Wait Time(ms)
Range/Code
1~ 32
0 : RTU code
1 : ASCII code
0 : 4800
1 : 9600
2 : 19200
3 : 38400
0 : 1 Stop Bit
1 : 2 Stop Bits
0 : Without Parity
1 : With Even Parity
2 : With Odd Parity
0 : 8-Bits Data
1 : 7-Bits Data
0.0 ~ 25.5
0 : Deceleration to stop
(00-10 : Deceleration time 1)
1 : Coast to stop
2 : Deceleration to stop
(10-06 : Deceleration time 2)
3 : continue operating
1 ~ 20
1 ~ 16(×4ms)
4-12
Factory
Remarks
Setting
1
*2*4
0
*2*3
2
*2*3
0
*2*3
0
*2*3
0
*2*3
0.0
0
3
2
09-PID function group
Function
Code No.
09-00
09-01
09-02
09-03
09-04
09-05
09-06
09-07
09-08
09-09
09-10
09-11
09-12~09-13
09-13
09-14
09-15
09-16
09-17
Description
Range/Code
0 : Disabled
1 : Bias D Control
2 : Feedback D Control
PID Mode Selection
3 : Bias D Reversed Characteristics Control
4 : Feedback D Reversed Characteristics
Control
Feedback Gain coefficient
0.00 ~ 10.00
Proportional Gain (%)
0.0 ~ 10.0
Integration Time (S)
0.0 ~ 100.0
Differentiation Time (S)
0.00 ~ 10.00
0 : Positive
PID Offset
1 : Negative
PID Offset Adjust (%)
0 ~ 109
PID Output Lag Filter Time(S) 0.0 ~ 2.5
0 : Disabled
1 : Enabled - Drive Continues to
Feedback Loss Detection Mode
Operate After Feedback Loss
2 : Enabled - Drive "STOPS"
After Feedback Loss
Feedback Loss Detection Level
0 ~100
(%)
Feedback Loss Detection Delay
0.0 ~ 25.0
Time (S)
Integration Limit Value (%)
0 ~ 109
Reserved
Allowable Integration Error
Margin (Units)
0 ~100
(1 Unit = 1/8192)
Sleep Frequency Level
0.00 ~ 400.00
Sleep Function Delay Time
0.0 ~ 25.5
Wake up frequency Level
0.00 ~ 400.00
Wake up function Delay Time 0.0 ~ 25.5
Factory
Remarks
Setting
0
1.00
1.0
10.0
0.00
*1
*1
*1
*1
0
*1
0
0.0
*1
*1
0
0
1.0
100
Reserved
*1
0
0.00
0.0
0.00
0.0
10-Assistant function group
Function
Code No.
Description
10-01
Reverse operation control
10-02
Keypad Operation with
Up/Down Keys in Run Mode
10-03
Carrier Frequency (kHz)
Range/Code
0 : Reverse command is enabled
1 : Reverse command is disabled
0 : ‘Enter’ must be pressed after
Frequency change with Up/Down Keys on
keypad.
1 : Frequency will be changed
directly when Up/Down Keys
are Pressed
1~ 12
4-13
Factory
Setting
0
0
5
Remarks
Function
Code No.
Description
Range/Code
10-04
Carrier mode Selection
10-05
10-06
10-07
10-08
10-09
10-10
10-11
10-12
10-13
10-14
Acceleration Time 2 (MFIT) (s)
Deceleration Time 2 (MFIT) (s)
S-Curve Acc/Dec 1 (s)
S-Curve Acc/Dec 2(s)
S-Curve Acc/Dec 3 (s)
S-Curve Acc/Dec 4 (s)
Skip Frequency 1 (Hz)
Skip Frequency 2 (Hz)
Skip Frequency 3 (Hz)
Skip Frequency Bandwidth (±Hz)
10-15
Carrier Frequency
Reduction by temperature raising
10-16
Auto Voltage Regulation (AVR)
10-17
Count Down Completion
0 : Carrier mode0
3-phase PW M modulation
1 : Carrier mode1
2-phase PW M modulation
2 : Carrier mode2
2-phase randomized PW M modulation
0.1 ~ 3600.0
0.1 ~ 3600.0
0.0 ~ 4.0
0.0 ~ 4.0
0.0 ~ 4.0
0.0 ~ 4.0
0.00 ~ 400.00
0.00 ~ 400.00
0.00 ~ 400.00
0.00 ~ 30.00
0 : disabled
1 : enabled
0 : AVR function disabled
1 : AVR function enabled
0 ~9999
Factory
Setting
Remarks
1
10.0
10.0
0.2
0.2
0.2
0.2
0.00
0.00
0.00
0.00
*1
*1
*1
*1
*1
*1
0
1
0
11-Keypad display group
Function
Code No.
11-00
Range/Code
Description
Display Mode
xxxx0 : Disable Motor Current Display
xxxx1 : Enable Motor Current Display
xxx0x : Disable Motor Voltage Display
xxx1x : Enable Motor Voltage Display
xx0xx : Disable Bus Voltage Display
xx1xx : Enable Bus Voltage Display
x0xxx : Disable temperature Display
x1xxx : Enable temperature Display
0xxxx : Disable PID feedback Display
1xxxx : Enable PID feedback Display
Factory
Setting
Remarks
00000
*1
Custom Units (Line Speed)
0~65535
1800
Value
0 : Drive Output Frequency is Displayed
1 : Line Speed is Displayed in Integer (xxxxx)
2 : Line Speed is Displayed with One Decimal Place
Custom Units (Line Speed)
(xxxx.x)
0
11-02
Display Mode
3 : Line Speed is Displayed with Two Decimal
Places (xxx.xx)
4 : Line Speed is Displayed with Three Decimal
Places (xx.xxx)
11-03-06 Reserved
Reserved
0 : Disable data Display
11-07
Counter display
0
1 : Enable data Display
11-01
4-14
*1
*1
12-User parameter group
Function
Code No.
12-00
12-01
Drive Horsepower Code
Software Version
12-02
Fault Log (Last 3 Faults)
12-03
12-04
Range/Code
Description
Accumulated Operation Time1
(Hours)
Accumulated Operation Time2
(Days)
12-05
Accumulated Operation Time Mode
12-06
Reset Drive to Factory Settings
12-07
Parameter Lock
12-08
Parameter password
-----
Factory
Setting
---------
Remarks
*3
*3
-----
*3
0~23
-----
*3
0~65535
-----
*3
0
*3
0 : Time Under Power
1 : Run Mode Time Only
1150 : Reset to the 50Hz factory setting
1160 : Reset to the 60Hz factory setting
0 : Enable all Functions
1 : 03-01~03-08 cannot be changed
2 : All Functions cannot be changed
Except 03-01~ 03-08
3 : Disable All Function
00000~65535
----
0
00000
13-Auto Run function group
Function
Code No.
13-00
13-01
13-02
13-03
13-04
13-05
13-06
Description
Range/Code
0 : Disabled.
1 : Single cycle. (Continues to run from the
unfinished step if restarted).
2 : Periodic cycle. (Continues to run from the
unfinished step if restarted).
Auto Run( sequencer) mode 3 : Single cycle, then holds the speed Of final step to
selection
run.(Continues to run from the unfinished step if
restarted).
4 : Single cycle. ( starts a new cycle if restarted).
5 : Periodic cycle. ( starts a new cycle if restarted).
6 : Single cycle, then hold the speed of final step to run.
( starts a new cycle if restarted).
Auto _ Run Mode
0.00 ~ 400.00 (Hz)
Frequency Command 1
Auto _ Run Mode
Frequency Command 2
Auto _ Run Mode
Frequency Command 3
Auto _ Run Mode
Frequency Command 4
Auto _ Run Mode
Frequency Command 5
Auto _ Run Mode
Frequency Command 6
4-15
Factory
Remarks
Setting
0
0.00
Function
Code No.
Description
13-07
Auto _ Run Mode
Frequency Command 7
13-08~
13-15
Reserved
13-16
13-17
13-18
13-19
13-20
13-21
13-22
13-23
13-23~
13-31
13-32
13-33
13-34
13-35
13-36
13-37
13-38
13-39
Range/Code
Factory
Remarks
Setting
Reserved
Auto_ Run Mode Running
Time Setting 0
Auto_ Run Mode Running
Time Setting 1
Auto_ Run Mode Running
Time Setting 2
Auto_ Run Mode Running
0.0 ~ 3600.0 (second)
Time Setting 3
Auto_ Run Mode Running
Time Setting 4
Auto_ Run Mode Running
Time Setting 5
Auto_ Run Mode Running
Time Setting 6
Auto_ Run Mode Running
Time Setting 7
Reserved
0.0
Reserved
Auto_ Run Mode Running
Direction 0
Auto_ Run Mode Running
Direction 1
Auto_ Run Mode Running
Direction 2
Auto_ Run Mode Running
0: stop
Direction 3
1: forward
Auto_ Run Mode Running
2: reverse
Direction 4
Auto_ Run Mode Running
Direction 5
Auto_ Run Mode Running
Direction 6
Auto_ Run Mode Running
Direction 7
0
※Notes : *1 Can be modified during run
*2 cannot be modified while communication is active
*3 do not change while making factory setting
*4 the parameter will be changed by replacing model
*5 only available in V/F mode
4-16
4.4 Parameter Function Description
Group0- The basic parameters group
00-00 : Control Mode
0 : V/F mode
1 : Vector mode (General Purpose)
To select the appropriate vector control mode or V/F mode according to the load characteristics.
1. If V/F mode is selected, please set parameters, group5 to comply with the load features.
Vector is best suited to control the general load or rapidly-changed torque load.
00-01 : Volts/Hz Patterns (V/F)
= 0 ~ 18
1.00-01= 0 ~17, V / F Pattern. (Refer to group5)
2.00-01=18,Flexiable V/F pattern, programmable according to parameters 05-04~05-09.
00-02 :Motor rotation
= 0 : forward
1 : reverse
Note:when10-01is set to 1, 00-02 is not set to1
00-03 : Main Run Command Source Select
=0 : Keypad
=1 : External Run/Stop Control
=2 : Communication
00-04 : Alternative Run Command Source Select
=0 : Keypad
=1 : External Run/Stop Control
=2 : Communication
1. 00-03/00-04=0, the inverter is controlled by the keypad.
2. 00-03/00-04=1, the inverter is controlled by the external terminals, and the Stop key for emergency
stop is operational. (Refer to 04-02 description)
※Note: 00-03/00-04=1,please refer to parameter 04-03,04-04,04-06,04-07 for detailed description
in order to ensure safety of operators and machines.
3. 00-03/00-04=2, the inverter is controlled by Communication.
4. When 01-00 ~ 01-05 is set 10(Main/Alt Control Signal Select),if the terminal is ON, the inverter is
controlled by parameter 00-03,if the terminal is Off, the inverter is controlled by parameter 00-04.
00-05 : Main Frequency Command Source Select
=0 : UP/DOWN of Keypad
=1 : Potentiometer on Keypad
=2 : External AVI Analog Signal Input
=3 : External Up/Down Frequency Control
=4 : Communication setting Frequency
00-06 : Alternative Frequency Command Source Select
=0 :UP/DOWN of Keypad
=1 : Potentiometer on Keypad
=2 : External AVI Analog Signal Input
=3 : External Up/Down Frequency Control
=4 : Communication setting Frequency
1. Please refer to description of parameter group 01-00 ~ 01-05 (multifunction input terminals) for
the function Up/Down terminal.
2. The priority in reading frequency is Jog> preset speed>▲▼ on keypad or Up / Down or
communication control.
3. When 01-00 ~ 01-05 is set 14(Main/Alt Frequency Command Select),if the terminal is ON, the
inverter frequency command is set by parameter 00-05,if the terminal is Off, the inverter
frequency command is set by parameter 00-06.
4-17
0.01
~
400.00
00-08 : Frequency Lower limit(Hz)
0.01
~
399.99
Internal frequency
00-07 : Frequency Upper limit(Hz)
00-07 (upper frequency limit)
00-08 (lower frequency
(Note)
Figure 4-4 Frequency reference limits
※Note: When 00-08 = 0 Hz and frequency command is 0 Hz; the inverter will stop at 0 speed.
When 00-08 > 0 Hz and frequency command ≦00-08, the inverter will output the
00-08 preset value.
00-09 : Acceleration time 1 (s) =0.1
~
3600.0
00-10 : Deceleration time 1 (s) =0.1
~
3600.0
1. Formula for calculating acceleration and deceleration time: The denominator is base on the
rated frequency of motor.
acc el er at i on t i me =
0 0- 09( or10- 05)× p reset freq uency
0 6 − 04
deceleration time = 0 0- 10( or 10- 06)× pr eset f r equency
06 − 04
2. When 01-00~01-05 is set 07 (the second acceleration and deceleration time),the first
acceleration/ deceleration or the second acceleration/ deceleration/ will be set by OFF or
ON the external input terminal.
3. When 01-00~01-05 is set 05/06 (Jog),Jog run is controlled by external terminals.
The acceleration and deceleration action will be at Jog acceleration and deceleration time.
The list setting:
Function
preset value
01-00 ~ 01-05=05/06
Jog command
01-00 ~ 01-05=07
Toggle Acc/Dec time
Acc/ Dec time 1
(00-09/0-10)
Acc/ Dec time 2
(10-05/10-06)
JOG Acc/Dec time
(00-13/00-14)
00-05/00-06
determines the output
frequency
00-05/00-06
determines the
output frequency
Run at 00-12
Jog frequency
Off
Off
On
Off
On
Off
4-18
2. 10-01=1, the reverse command is unavailable
00-11 : Operation modes for external terminals
0 : Forward/stop-reverse/stop
1 : Run/stop-forward/reverse
2 : 3-wire control mode -run/stop
1.) When operation command 00-03/00-04 = 0 (external terminal), 00-11is valid.
2.) When operation command 00-03/00-04 = 1 (external terminal control), the stop button for
emergency is available. (Refer to04-02 for detail description).
3.) That both forward and reverse commands are ON will be treated as STOP.
1. 00-11 = 0, Control mode is as below:
2. 00-11 = 1, Control mode is as below:
Figure 4-5 Terminal Board Drive Operation Modes
3. 00-11 = 2, Control mode is as below:
S1 (RUN)
S2 (STOP)
S3 (FWD/REV)
COM (0V)
Figure 4-6 3-Wire start/stop wiring
4-19
Figure 4-7 Drive start/stop operation sequences
※Note: 1.As 3 wire control mode is selected, the terminal S1, S2 and S3 is not controlled
by 01-00, 01-01 and 01-02.
00-12 : Jog Frequency (Hz) =1.00 ~ 25.00
00-13 : Jog Acceleration Time (MFIT) (S)
=0.1 ~ 25.5
00-14 : Jog Deceleration Time (MFIT) (S) =0.1 ~ 25.5
Example:When 1-00(S1)=5,1-01(S2)=6 (Jog),
Jog-forward, S2 on is Jog-reverse.
Jog run is controlled by external terminals, S1 on is
Group1- External terminal digital signal input function group
Multifunction input terminals (TM2 S1~S6) controlling:
01-00~05:
0 : Forward/Stop Command
1 : Reverse/Stop Command
2 : Preset Speed unit 0 (3-02)
3 : Preset Speed unit 1 (3-03)
4 : Preset Speed unit 2 (3-05)
5 : JOG Forward Command
6 : JOG Reverse Command
7 : Acc/Dec time 2
8 : Emergency Stop
9 : Base Block
10 : Main/sub Control Signal Select
11 : Acc/Dec Disabled
4-20
12 : Up Command
13 : Down Command
14 : Main/sub Control Signal Select
15 : PID Function Disabled
16 : Integration Value Resets to Zero
17 : Reset
18 : KEB function
19 : Auto _ Run Mode
20 : Counter Trigger Signal
21 : Counter Reset
A. The terminals S1- S6 on terminal block (TM2) are multifunction input terminals. The 22 functions
shown above can be set for these terminals.
B. Function Description for 1-00~05:
1. 01-00~05=0/1(Forward/Reverse/Stop)
As forward command is ON, the inverter runs and stops when the command is OFF. The 1-00
factory setting is forward.
As reverse command is ON, the inverter runs and stops when the command is OFF. The 1-01
factory setting is reverse.
2. 01-00~05=2/3/4 (Frequency Command 1/2/4 at 3-02/3-03/3-05)
When External multifunction input terminals are ON, the inverter is operates at the preset speed and
the duration is determined by the time the input is ON. The corresponding preset frequency will be
according to preset value of parameters 3-01 to 3-07 and in relation to the operation of input
terminals 1 to 3. as shown in the table below:
Output frequency
preset value
3-01
3-02
3-03
3-04
3-05
3-06
3-07
3-08
Multifunction terminal 3
Preset value =4
0
0
0
0
1
1
1
1
Multifunction terminal 2
Preset value =3
0
0
1
1
0
0
1
1
Multifunction terminal 1
Preset value =2
0
1
0
1
0
1
0
1
3. 01-00~05=5/6(Forward/ Reverse JOG)
When Jog operation, is selected, the inverter operates at the Jog acceleration and
deceleration times. The corresponding jog frequency parameter is shown below:
The priority order of frequency : Jog Speed→Preset Speed→Keypad frequency or
external frequency signal
4. 01-00~05=7 (Acc/Dec time selection)
This input selects the acceleration 1/ deceleration 1 or acceleration 2/ deceleration 2.
5. 01-00~05=8 : External Emergency Stop.
The inverter will decelerate to stop by 10-06 setting and Flash E.S as the emergency stop signal
is received regardless of 04-01 setting. After the emergency stop signal is removed, turn the
RUN switch OFF and then ON again, or press the run key in keypad mode, the inverter will
restart again up and ramps up to the command frequency.
4-21
If the emergency signal is released before the inverter stops completely, the inverter still carries
out the emergency stop. The 01-09/01-10 determines the action of the error terminal. If
01-09/01-10=0: the fault is not enabled when the external emergency signal input. If
01-09/01-10=8, the fault is actuated when the emergency signal input.
6. 01-00~05=9 : Base Block
The inverter immediately stops output, and the motor does a Coast with flashing B.B.
8. 01-00~05=10 : Main/sub Control Signal Selection
When External multifunction input terminals are off, the inverter is operated by 00-03.
When External multifunction input terminals are on, the inverter is operated by 00-04.
9. 1-00~05=11 : Disable acceleration and deceleration
The acceleration and deceleration action is unavailable until the disable signals are released.
The action is illustrated in the graph below:
Note : Operation Switch is OFF, the command of disable
Operation
Signal
Disable
ACC/DEC
Output
Frequency
Figure 4-8 Acceleration and deceleration Prohibit
10. 1-00~05=12, 13: UP/DOWN Function (Actual ACC/DEC time is based on the setting) :
(1) 00-05/00-06 = 3 to use the UP/DOWN Function. The other frequency signals are ignored.
(2)Set 01-07=0 and 01-08=0. The inverter accelerates to the preset value of 03-01 when in
RUN, and then it maintains a constant speed. As the inverter receives either the UP/DOWN
command, it will accelerate / decelerate until the command is released. The inverter runs at
the speed setting at the time of release. The inverter will ramp stop or Free-Fun stop which
is determined by the 04-01 as long as the inverter receives the STOP command. The
frequency at Stop time will be stored in03-01. The UP/DOWN KEY is invalid when the
inverter is stopped. It is necessary to use the Keypad to modify the preset parameters.
(3)Set 01-08 = 1, the inverter will operate from 0Hz when the operation terminal is ON. The
action of UP/DOWN is the same as above. The inverter will ramp stop or free-run stop as
determined by 04-01 setting when it receives the Stop Command. The next operation will
start at 0 Hz.
(4)UP/Down Signals simultaneously pressed are invalid
(5)01-07≠ 0, the inverter accelerates to the setting of 03-01 and maintains speed. When the
UP/Down terminal is on, setting frequency is the value 03-01±01-07, and the inverter will
accelerate/ decelerate to frequency 03-01. The upper frequency limit and lower frequency
limit also restrict the operation. If the signal of UP/ DOWN is maintained over 2 seconds,
the inverter will begin to accelerate/ decelerate. If 01-07=0, the operation is the same, until
the UP/ DOWN signal is released. Please refer to the time diagram of 01-07.
4-22
11. 1-00~05=14 Main/sub Frequency Command Selection
When External multifunction input terminals are off, the inverter Frequency Command is operated
by 00-05.
When External multifunction input terminals are on, the inverter Frequency Command is operated
by 00-06.
12. 01-00~05=15(PID Function Disable)
When the PID Function Disable is ON, PID is not controlled by 09-00.
13. 01-00~05=16 (Integration Value Resets to Zero)
When the multifunction terminal 01-00~05 is set at 16 and the input terminal is on , the
Integration Value of PID Resets to Zero .
14. 01-00~05=17(Reset Command)
The Reset command is same as the Reset Key on the panel. When the command is OFF, the
inverter does not respond.
15. 01-00~05=18 (Power Source Detect for KEB)
Please refer to 4-11description.
16. 01-00~05=19(Auto _ Run Mode)
The function of auto-run is like a simple built-in PLC function, when the extermal terminal
function is set to 19, and turns on. Autorun function will be executed according to group
13.( Please refer to group13)
17. 01-00~05=20(Counter Trigger Signal)
when the extermal terminal s6 is set a function of 20,after turning it on then off once the counter
value increase 1.
Indication value c0000 c0001
c0002 c0003
c0004 c0005
c0001
c0002
11-07=1
Counter trigger signal
Multi-function input termin
1.5ms
The trigger timing can't be less than
1.5ms.
Signal output with10-17
counter value is attained. 10-17=5
In vector mode, the extermal terminal S6 function of "counter trigger signal input" is disabled.
18. 01-00~05=21(Counter Reset)
When anyone of the extermal terminals S1~S6 is set a function of 21 and turned on, the counter
value will be cleared, and display "c0000", only after this signal turns off, the inverter can
receive trigger signal and count up.
Digital /Analog input signal scan times:
01-06: Multifunction terminal S1~S6 confirm the scan times (x 4ms),1~200 times
1. TM2 terminal is used for scanning. If there are the same signals continuously input for N times, the
inverter will treat the signal as normal. During the signal evaluation, if the scan times are less than N,
the signal will be treated as noise.
2. Each scan period is 4ms.
3. The user can specify the scan times interval duration according to the noise environment. If the
noise is serious, increase the value of 01-06, however the response will be slower.
4-23
Step of Up/Down Function (Hz):
01-07: Up/Down (Hz) 0.00 ~ 5.00
There are two modes covered below:
1 .01-07 = 0.00, the operation is just as the original one. When the UP terminal is ON, the frequency
increases while the DOWN terminal is ON, the frequency decreases. (Refer to the following
graph).
Figure 4-9 UP/DOWN original mode example
2. 01-07 = 0.01 to 5.00, and UP/ DOWN terminal ON, is equivalent to a step increase/ decrease at
the increment frequency in 01-07. If UP/DOWN is pressed over 2 seconds, the original
UP/DOWN mode is restored (Please refer to the following diagram)
Figure 4-10 UP/DOWN with incremental steps
Stop Mode Using Up/Down:
01-08 : Up/Down keep Frequency mode
0 : When Up/Down is used, the preset frequency is held as the inverter stops,
and the UP/Down function is disabled.
1 : When Up/Down is used, the preset frequency is reset to 0 Hz as the inverter stops.
2 : When Up/Down is used, the preset frequency is held as the inverter stops, and the
UP/Down is available.
1. 01-08=0 : the inverter will accelerate to the speed set in parameter 03- 01 as receiving the Run
command and run at such certain speed. The inverter begins to accelerate (decelerate) as the UP
(Down) terminal is energized. The inverter will hold the speed as the UP/DOWN command
released. When the Run Signal releases, the inverter will ramp stop or stop which determined by
the 04-01. It will store the frequency when the run signal is removed. UP/DOWN keys are idle
4-24
when the inverter is stopped. The keypad is available to modify the preset frequency (03-01). If
1-08=2, the UP/Down is available as the inverter stops.
2. 01-08=1 : as the Run terminal is energized, the inverter operates from 0 Hz, the Function of
UP/DOWN is same as the above description. When the Run signal is released, the inverter will
ramp stop or stop output (determined by 04-01) to 0 Hz. The next run command will always
begin from 0 Hz.
Multifunction output terminals control:
01-09 : Output Relay RY1 Operation Mode (RC,RB,RA terminal )
01-10 : Output Relay TR1 Operation Mode (SYN+, SYN- terminal)
0 : Run
1 : Fault
2 : Frequency Reached
3 : Set Frequency (01-11 ±01-12)
4 : Frequency Threshold Level (> 01-11) - Frequency Reached
5 : Frequency Threshold Level (< 01-11) - Frequency Reached
6 : Auto-restart
7 : Momentary AC Power Loss
8 : Emergency Stop Mode
9 : Base Block Stop Mode
10 : Motor Overload Protection
11 : Drive Overload Protection
12 : Over-torque Threshold Level
13 :Top Count Value Attained
14 :Preliminary Counter Value Attained
01-11 : Frequency Reached Output Setting =0.00 ~ 400.00Hz
01-12 : Frequency Detection Range =0.00 ~ 30.00Hz
01-09/10= 2:
The preset frequency is reached (± 01-12)
Figure 4-11Frequency reached example
4-25
01-09/10= 3:
Arbitrary frequency consistency Fout = 01-11 ±01-12
Figure 4-12 Frequency within specified range example
01-09/10= 4 : Frequency detection Fout > 01-11
Figure 4-13 Frequency outside of range example
4-26
01-09/10= 5 : Frequency detection Fout < 01-11
Figure 4-14 Frequency at or below specified range example
1-09/10=12 : over torque detection
01-09/10=13
Figure 4-15 Over torque detection example
Terminal output is activated when counter reaches the Top Count Value.
01-13:
S1~ S5 switch type select
xxxx0 : S1 NO
xxxx1 : NC
xxx0x : S2 NO
xxx1x : NC
xx0xx : S3 NO
xx1xx : NC
x0xxx : S4 NO
x1xxx : NC
0xxxx : S5 NO
1xxxx : NC
01-14:
S6 switch type select
xxxx0 : S6 NO
xxxx1 : S6 NC
※Note: “NO” : Normal open, “NC” : Normal close.
The switches type is decided by 01-13/01-14,
Because of different types of switches, select switches type is necessary.
If set 01-13=0 0 0 0 0, means S1~S5 types of switches is Normal open, otherwise, if each bit of
01-13 is set to “1”, types of switches is Normal close.
Don’t set 00-03/00-04=1, before you set 01-13, 01-14 (external terminal controlled)
4-27
Group2- External terminal analog signal input function group
02-00 : AVI/ACI analog Input signal type select
=0 : AVI 0~10V, ACI 0~20mA
=1 : AVI 0~10V, ACI 4~20mA
=2 : AVI 2~10V, ACI 0~20mA
=3 : AVI 2~10V, ACI 4~20mA
1~100 (×4ms)
02-01 : AVI signal verification Scan Time
02-02 : AVI Gain(%) 0 ~ 1000
02-03 : AVI Bias(%) 0.0 ~ 100.0
02-04 : AVI Bias Selection
0 : positive
02-05 : AVI Slope
0 : positive
02-06 : ACI function Select
=0 : PID feedback signal
1 : Negative
1 : Negative
=1 : ACI Bias signal input
1. 02-06=0 (PID feedback input)
When 02-06 is set 0 means the PID feedback input terminal is controlled by the setting of 09-00.
2. 02-06=1 (Bias Input)
ACI To regulate the Offset of the Keypad VR or AVI analog input, only the signal of 0~20
mAor4~20mA .
Hz
Freq upper limit
02-06=1function
00-07
0V
10
AVI+ACI
02-07 : ACI signal verification Scan Time 1~100 (× 4ms)
02-08 : ACI Gain(%)
0 ~ 1000
02-09 : ACI Bias(%)
0 .0~ 100.0
02-10 : ACI Bias Selection
0 : positive 1 : Negative
02-11 : ACI Slope
0 : positive 1 : Negative
Note : When 02-06 is set to 1, settings of 02-07~02-11 will not be effective.
Example:
The setting of figure 4-18A:
The setting of figure 4-18B:
2-02
2-03
2-04
2-05
/2-08
/2-09
/2-10
/2-11
A
100%
50%
0
0
100%
C
100%
50%
0
1
100%
B
100%
0%
0
0
100%
D
100%
0%
0
1
100%
Hz
Bias
100% 60Hz
50%
2-09
Upper Frequency
(00-07=60)
A
30Hz
0Hz
0V 5V
(0mA)
2-02
2-03
2-04
2-05
/2-08
/2-09
/2-10
/2-11
Hz
Bias
60Hz
100%
50%
B
C
4-28
Upper Frequency Limit
(00-07=60)
30Hz
D
0Hz
0V 5V
(0mA)
V
10V
(20mA)
2-09
V
10V
(20mA)
The setting of figure 4-18C :
E
The setting of figure 4-18D :
2-02
2-03
2-04
2-05
/2-08
/2-09
/2-10
/2-11
20%
1
0
100%
2-09
100%
F
2-02
2-03
2-04
2-05
/2-08
/2-09
/2-10
/2-11
100%
50%
1
60Hz
-50%
-100%
60Hz
Upper Frequency Limit
(00-07=60)
30Hz
0Hz
1
100%
Hz
Hz
Bias
0%
2-09
E
Upper Frequency Limit
(00-07=60)
30Hz
Bias
0Hz
-0%
V
2V
10V
(4mA) (20mA)
F
5V
-50%
10V
(20mA)
V
-100%
Figure 4-16 Analog scaling examples
1) The inverter reads the average value of A/D signals once per (02-01/02-07 x 4ms). Set scan
intervals according to possible noise interference in the environment. Increase 02-01/02-07 in an
environment with noise interference, but the response time will increase accordingly.
Multifunction analog output control
02-12 :Analog Output Voltage Mode
0 : Output frequency
1 : Frequency Setting
2 : Output voltage
3 : DC Bus Voltage
4 : Output current
02-13 : FM+ Gain(%)
0 ~ 1000
02-14 : FM+ Bias(%)
0 .0~ 100.0
02-15 : FM+ Bias Selection
0 : positive
1 : Negative
02-16 : FM+ Slope
0 : positive
1 : Negative
1. The multifunction analog output terminal of the terminal block , is 0~10Vdc analog output. The
output type is determined by the02-12. The output voltage level can be scaled by parameter 02-13 to
suit external meters and peripherals.
Note: the max output voltage is 10V due to hardware of the circuit. Use only devices that require a
maximum of 10V signal.
2. FM+ Function Description
10V
0
Xmax
Figure 4-17 Multifunction analog output
2-12=0 Output Frequency
Xmax= upper frequency limit
=1 frequency setting
upper frequency limit
=2 Output Voltage
Motor Rated Voltage (VAC)
=3 DC Bus Voltage
220V: 0~400V
440V: 0~800V
=4 Motor Current
2 times rated current of inverter
Note: 02-13~02-16, refer to Figure 4-19 Analog scaling examples.
4-29
Group3- preset Frequency function group
03-00 : Preset Speed Control mode Selection
=0 : common Is uniform time( Acc1/Dec1or Acc2/Dec2)
=1 : Special (is single time Acc0/Dec0 ~ Acc7/Dec7)
Setting frequency 03-01~03-08 :
Preset Speed 0 ~ Preset Speed 7(Hz) : =0.00 ~ 400.00
Setting time 03-17~03-32 :
Preset Speed 0~7 Acceleration time(second) : =0.1 ~ 3600.0
Preset Speed 0~7 Deceleration time(second) : =0.1 ~ 3600.0
1. When 03-00 is set to 0, Acc-time (Dec-time) is determined by the 00-09/00-10(10-05/10-06).
2. When03-00 is set to 1, Acc-time (Dec-time) is determined by the03-01~03-08.
Function Description:
1)
Formula for calculating acceleration and deceleration time:The denominator is base on the
rated frequency of motor (06-04).
Acctime parameter ×preset frequency
Actual Acctime =
06 −04
Dectime parameter×pr eset f r equency
Actual Dectime =
06 − 04
Example: 06-04=50hz (motor Rated frequency), 03-02=10hz (preset speed),
03-19=5s (Acc time), 03-20=20s (Dec-time),
03−19×10(hz )
Preset speed 1 Actual Acc time=
= 1(s)
06 −04
03− 20×10(hz )
Preset speed 1 Actual Dec time =
= 4(s)
06 −04
2) When 03-00is set to 1,the time has two modes to be set:
Example: 00-03=1,01-00=0 (S1=RUN/STOP),
01-01=1 (S2=forward/reserve),
01-02=2 (S3=preset speed1), 01-03=3 (S4= preset speed 2),
01-03=4 (S5= preset speed 4);
mode1: When the run command is uncontinuous, calculate acceleration and deceleration time of
each segment like this
a=
(03−17)×(03− 01)
(03−18)×(03− 01)
(03−19)×(03− 02)
(03− 20)×(03−02)
,b =
,c=
,d =
……
06 − 04
06 − 04
06 −04
06 − 04
4-30
Frequency
Hz
Forward
……
Time
a
b
c
Panel freq
d
e
Preset speed 1
f
Preset speed 2
S1
S2
S3
S4
S5
mode2: When the run command is continuous , calculate acceleration and deceleration time of each
segment like this
a=
(03−17)×(03− 01)
(03− 20)×[(03− 01) − (03−02)]
(03− 21)×[(03−03) − (03− 02)]
,b=
,c=
06 − 04
06 −04
06 −04
d =
h=
(03− 24)×(03−03)
(03− 23)×(03−04)
(03− 26)×(03−04)
(03− 25)×(03−05)
, e=
,f=
,g =
,
06 − 04
06 − 04
06 − 04
06 − 04
(03− 26)×(03−05)
……
06 −04
frequency
Hz
Forward
……
e
a
S1
S2
S3
S4
S5
面Panel freq
b
c
f
g
d
Preset
Preset
Preset
Preset
speed1
speed2
speed3
speed4
4-31
h
Time
Group4- Start/Stop command group
04-00 : Starting Method Selection
=0 : Normal start
=1 : Enable Speed Search
1.04-00=0: On starting, the inverter accelerates from 0 to target frequency in the set time.
2.04-00=1: On starting, the inverter accelerates to target frequency from the detected speed of
motor.
04-01 : Stopping Method Selection
=0: braking capacity
=1: Coast to stop
1.04-01=0 : the inverter will decelerate to 0Hz in preset deceleration time after receiving the stop
command.
2.04-01=1: the inverter will stop output as receiving the stop command. The motor will inertia
Coast to stop.
04-02 : Stop Key on keypad
=0 : Stop Button Enabled
=1 : Stop Button Disabled
04-02=0, The STOP key is available for controlling the inverter to stop.
04-03 : Momentary power loss and restart
=0 : Momentary Power Loss and Restart disable
=1 : Momentary power loss and restart enable
=2 : Momentary power loss and restart enable while CPU is operating.
(According to the capacity of DC power)
04-04 : Momentary Power Loss Ride-Thru Time (Seconds) : 0.0 ~ 2.0 second
1.If the input power supply due to sudden increase in supply demand by other equipment results in
voltage drops below the under voltage level, the inverter will stop output at once. If the power
supply voltage level recovers in the 04-04 preset time, it will spin start tracing from the trip
frequency, or otherwise the inverter will trip with ‘LV-C’ fault displayed.
2. The allowable power loss time differs with the models. The range is from 1second to 2 second.
3. 04-03=0: as power lost, the inverter will not start.
4. 04-03=1: if the loss time is less than the value of 04-04, the inverter will Spin Start in 0.5 second
as the power is resumed and restart times are infinite.
5. 04-03=2:the power lost for long time, before the inverter lost the control power for the CPU, the
inverter will restart according to the 00-03 and 04-05 setting and status of external switch as the
resumed.
Note: 00-03=1 04-05=0 04-03=1or 2 after a power loss for a long time, please turn OFF the power
and power switches to avoid any possible injury to operators and machines when the power is
resumed unexpectedly.
04-05 : Auto Restart Method:
=0 : Enable Speed Search
=1 : Normal Start
1. 04-05=0: When auto-restarting the inverter will detect the rotating speed of the motor. The Motor
will be controlled to accelerate from the present speed to the target speed.
2. 04-05=1: The inverter restart from 0 speed to set frequency in acceleration time when
auto-restart.
4-32
04-06 : Auto Restart Delay Time (Seconds) : 0 ~ 800.0 second
04-07 : Number of Auto Restart Attempts : 0 ~ 10 times
1. 04-07=0: The inverter will not auto restart after trips due to fault.
2. 04-07>0, 04-06= 0:
The inverter will conduct SPIN START in 0.5 second after trips due to fault. The motor will
Coast to stop while the output is switched off, once the rotating speed is determined then it will
accelerate or decelerate from this speed to the running speed before the fault.
3. 04-07>0, 04-06>0:
The output will be stopped for a period which is determined by the 04-06 after a fault trip. Then,
spin start to set target frequency.
4. Auto restart after a fault will not function while DC injection braking or decelerating to stop.
04-08 : Reset Mode Setting
0 : Enable Reset Only when Run Command is Off
1 : Enable Reset when Run Command is On or Off
04-08=0 Once the inverter is detected a fault, please turn Run switch Off and then On again to
perform reset, otherwise restarting will not be possible.
04-09 : Direct Running After Power Up
0 : Enable Direct running after power up
1 : Disable Direct running after power up
Danger:
1. 04-09=0 and the inverter is set external terminal controlled (00-03/00-04=1), if the run switch is
ON as power is supplied, the inverter will auto start. It is recommend that the power is turned off
and the run switch is also off to avoid possibility of injury to operators and machines as the
power is reapplied.
Note: IF this mode is required all safety measures must be considered including warning labels.
2. 04-09=1and the inverter is set external terminal controlled (00-03/00-04=1), if the run switch is
ON as power is supplied, the inverter will not auto start and the display will flash with STP1.
It is necessary to turn OFF the run switch and then ON to start normally.
04-10 : Delay-ON Timer (Seconds) : 1.8 ~ 300.0 second
As power on and 04-09=0, the inverter will perform auto restart in the setting time for delay.
04-11 : Kinetic Energy Back-up Deceleration Time (S)
= 0.0 : Disable
= 0.1~25.0 : KEB Deceleration Time
04-11 = 0 KEB function disable 04-11≠ 0 KEB function enables
Example : 220V system
4-33
Figure 4-18 KEB function diagram
※Note:
1. When 04-11≠0, the momentary power loss and Restart is disabled, the inverter will do KEB
Function.
2. When input power is turned off, CPU detects the DC bus Voltage and as soon as DC bus Voltage
becomes lower than190V (220V system) or 380V (440V system), then the KEB function is
activated.
3. When KEB function is enabled, the inverter decelerate to zero by 04-11, and the inverter stop
4. IF the power on signal enabled during the KEB function, the inverter accelerate to original
frequency.
04-12 : Lower Limit of Power Voltage Detect = 150.0 ~ 210.0/300.0 ~ 420.0
04-13 : DC Injection Brake Level(%) @start = 0.0 ~150.0
04-14 : DC Injection Brake Time (Seconds) @start = 0.0 ~ 25.5
04-15 : DC Injection Brake Start Frequency (Hz) @Stopped = 0.10 ~ 10.00
04-16 : DC Injection Brake Level (%)@Stopped = 0.0 ~ 150.0
04-17 : DC Injection Brake Time (Seconds)@stopped = 0.0 ~ 25.5
1. 04-17 / 04-15is the action time and start frequency of DC braking, as graph below:
Figure 4-19 DC Injection Braking Example
4-34
Group5- V/F command group
V/F PATTERN Selection
05-00 : Volts/Hz Curve Modification (Torque Boost) (%) =0 ~ 30.0
05-01 : Motor no load current(Amps AC)
-------------
05-02 : Motor rated Slip Compensation (%) = 0.0 ~ 100.0
05-03 : v/f Maximum voltage (Vac)
05-04 : Maximum Frequency (Hz) = 0.20 ~ 400.0Hz
05-05 : Maximum Frequency Voltage Ratio (%) = 0.0 ~100.0
05-06 : Medium Frequency2 (Hz) = 0.10 ~400.0Hz
05-07 : Medium Frequency Voltage Ratio2(%) = 0.0 ~100.0
05-08 : Medium Frequency1 (Hz) = 0.10 ~400.0Hz
05-09 : Medium Frequency Voltage Ratio1 (%) = 0.0 ~100.0
05-10 : Minimum Frequency (Hz) = 0.10 ~400.0Hz
05-11 : Minimum Frequency Voltage Ratio (%) = 0.0 ~100.0
05-12 : V/F start Frequency =0.00~ 10.00
1.00-01=18, set the V/F pattern freely complying with 05-04 ~ 05-09 (Refer to following diagram)
(V)%
05-05 (Vmax)
05-07
05-09
Figure 4-20 Custom V/F Settings
05-11 (Vmin)
05-10 05-08
05-06
4-35
05-04
400.00
2. 00-01 = 0 ~ 17 V / F Pattern (Refer to following list )
type
Func
00-01
tion
V/F pattern
type
Funct
00-01
ion
V (%)
100
100
B
C
60
1.5
2.5 50
General Use
50
General Use
V (%)
0
Hz
C
1.3 2.5
50
High start torque
High start torque
B
2
C
400 Hz
10
Decreasing torque
Decreasing torque
100
C
1.3
25
50 400 Hz
V (%)
Constant torque
6
100
7
8
60
400 Hz
V (%)
11
B
C
12
1.5
3.0
60
400 Hz
60
400
V (%)
B
5
3.0
100
V (%)
4
B
1.5
100
3
Constant torque
Hz
9
400 Hz
V (%)
1
V/F pattern
B
C
0.5
25 50
400 Hz
Figure 4-21 Custom V/F Patterns
4-36
13
100
B
14
C
1.5
15
30
V (%)
100
16
17
B
C
0.6
30 60
400 Hz
00-01
B
C
0/9
7.5%
4.5%
1 / 10
10.0%
7.0%
2
11.0%
8.5%
3
12.0%
9.5%
4
17.5%
4.0%
5
25.0%
5.0%
11
11.0%
8.0%
12
12.0%
9.0%
13
20.5%
7.0%
14
28.5%
8.0%
6 / 15
45.0%
1.0%
7 / 16
55.0%
1.0%
8 / 17
65.0%
1.0%
3. The inverter will output the value of B, C voltage (refer to 00-01) plus the 05-00 V/F pattern
setting. The starting torque will be raised as shown.
Voltage
Figure 4-22 V/F curve with torque boost
100%
B
05-00=
C
Hz
1
2.5/3.0
50/60
※Note: 05-00=0, Torque boost function is invalid
4. When the induction motor is in running, there must be slip due to the load. It is necessary to boost
voltage to improve the precision of the speed.
Slip frequency boost =
05-02 approximate
value=
Output Current-(05-01)
(06-01)-(05-01)
× (05-02)
Note : 06-01=motor rated current
05-01=motor no load current
(Motor synchronization speed– Rated speed) / Motor synchronization speed
Marked on the motor nameplate
Motor synchronization speed (RPM)=
120
Motor Poles
4-37
× Motor rated frequency (50Hz or 60Hz)
Example: 4 Poles,60Hzinduction motor synchronization speed =
120
4
× 60=1800 RPM
※ Note: Motor no load current (05-01) differs with the inverter capacities (12-00) (Refer to 06-01
note). It should be regulated according to actual conditions.
Group6- Motor parameter group
06-00 : Motor Rated Voltage (VAC)
06-01 : Motor Rated Current (Amp AC)
06-02 : Motor Rated Power (kW)
06-03 : Motor Rated Speed (RPM)
06-04 : Motor Rated Frequency (Hz)
06-06 : Torque boost gain (Vector)
Performance: If the motor load is determined to be too large increase the output torque.
ΔTe
≒
I
(load current)
¯(compensation
Gain gain)
• Torque/Speed curve pattern :
Torque
B
ΔTe: Increase output torque capacity
A
Q
RPM
A: before torque boost
B: after torque boost
Figure 4-23 Output Torque Capacity
• Operating frequency range: 0~Motor rate frequency
• When the motor output torque is not enough and increase 06-06 setting value.
• When the motor is erratic or vibrates decrease 06-06 setting value.
• The max. Output torque limit to the inverter is current rated.
• If increase 06-06 setting value then the output current is too large. Please increase 06-07 setting
value on the same time.
4-38
06-07 : Slip compensation gain (vector)
Performance : If the motor load appears too large, increase slip compensation.
ΔFslip
I
≒
(load current)
¯
Gain
(compensation gain)
• Torque/Speed curve pattern :
Torque
ΔFslip
A: before slip compensation
A
B
B: after slip compensation
RPM
Q
Figure 4-24 Slip Compensation
• Operating frequency range : 0~motor rated frequency.
• When the motor output rotation speed is too low increase 06-07 setting value.
• When the motor is erratic or vibrates, decrease 06-07 setting value.
• The max. output rotation speed limit to the motor max. setting frequency.
• If increase 06-07 setting value then the output current is too large. Increase 06-05 setting value at
the same time.
06-11:Low frequency voltage compensation
Performance : During low frequency
Increase 06-11 setting value to increase output voltage and low frequency torque.
Decrease 06-11 setting value to decrease output voltage and low frequency torque.
• Output voltage/frequency curve pattern :
V
Figure 4-25 Low Frequency Voltage Compensation
06-07
F
• Operating frequency range : 0~12HZ / 60HZ 0~10HZ / 50HZ
• During low frequency use :
When the motor output torque is insufficient, increase 06-07 setting value.
When the motor is vibrating excessively, decrease 06-07 setting value.
4-39
Group7- Protection function group
07-00: Trip Prevention Selection
=xxxx0 : Enable Trip Prevention During Acceleration
=xxxx1 : Disable Trip Prevention During Acceleration
=xxx0x : Enable Trip Prevention During Deceleration
=xxx1x : Disable Trip Prevention During Deceleration
=xx0xx : Enable Trip Prevention in Run Mode
=xx1xx : Disable Trip Prevention in Run Mode
=x0xxx : Enable over voltage Prevention in Run Mode
=x1xxx : Disable over voltage Prevention in Run Mode
07-01 : Trip Prevention Level During Acceleration (%)
07-02 : Trip Prevention Level During Deceleration (%)
07-03 : Trip Prevention Level In Run Mode (%)
07-04 : Over voltage Prevention Level in Run Mode
50 ~ 200
50 ~ 200
50 ~ 200
350.0 VDC ~ 390.0 VDC
700.0 VDC ~ 780.0 VDC
Note:
1. In acceleration, the inverter will delay the acceleration time if the time is too short resulting in the
over current in order to prevent the inverter trips.
2. In deceleration, the inverter will delay the acceleration time if the time is too short resulting in the
over voltage of DC VUS in order to prevent the inverter trips with ‘OV’ displayed.
3. Some mechanical characteristics (such as press) or unusual breakdown (seize due to insufficient
lubrication, uneven operation, impurities of processed materials, etc.) will cause the inverter to
trip, thus inconvenience users. When the operating torque of the inverter exceeds the setting of
07-03, the inverter will lower the output frequency following the deceleration time , and return to
the normal operation frequency after the torque get steady.
07-05: Electronic Motor Overload Protection Operation Mode :
0 : Enable Electronic Motor Overload Protection
1 : Disable Electronic Motor Overload Protection
07-06 : Motor type selection:
0 : Electronic Motor Overload Protection Set for Non-Inverter Duty Motor
1 : Electronic Motor Overload Protection Set for Inverter Duty Motor
07-07 : Motor Overload Protection Curve Selection:
0 : Constant Torque (OL =103 %) (150 % for 1 Minute)
1 : Variable Torque (OL = 113 %)(123 % for 1 Minute)
07-08 : Operation After Overload Protection is Activated
0 : Coast-to-Stop After Overload Protection is Activated
1 : Drive Will Not Trip when Overload Protection is Activated (OL1)
Description of the thermal relay function:
1. 07-07 = 0: To protect the general mechanical load, as long as the load is less than 103% rated
current, the motor continue to run. The load is larger than 150% rated current, the
motor will run for 1 minute. (Refer to following curve (1)).
= 1: To protect HVAC load(FAN、PUMP…so on):as long as the load is less than 113%
rated current, the motor continue to run. The load is larger than 123% rated current,
the motor will run for 1 minute.
4-40
2.
3.
4.
The heat sinking function will not be as effective when the motor run at low speed. So the
thermal relay action level will decline at the same time. (The curve 1 will change to curve 2).
07-06 = 0: Set 06-04 as the rated frequency of the serve motor.
07-08 = 0: the inverter coast to stop as the thermal relay acts and flash OL1. Press the
‘Reset’ or the external reset terminal to continue to run
= 1: the inverter continues to run as the thermal relay acts and flash OL1. Until the
current decline to 103% or 113 %( determined by 9-10), OL1 will disappear.
Minute
(1)
1.0
(2)
150
Current Percent
07-09 : Over torque Detection Selection(OL3)
= 0 : Disable Over torque Operation
= 1 : Enable Over torque Operation Only if at Set Frequency
= 2 : Enable Over torque Operation while the Drive is in Run Mode
07-10 : Operation After Over torque Detection is Activated
= 0 : Coast-to-Stop After Over torque is Activated
= 1 : Drive will Continue to Operate After Over torque is Activated
07-11 : Over torque Threshold Level(%) : 30~300
07-12 : Over torque Activation Delay Time (S) : 0.0~25.0
1. Over Torque is detected when the output torque level exceeds the level set in
Parameter 07-11 ( Inverter rated torque is 100%) and if it is detected for a duration of time
which is set in parameter 07-12.
2. 07-10 =0 : If there is over torque, the inverter coasts to stop and flashes OL3. It is necessary to
press’RESET’ or external terminal to continue to run.
=1 : If there is over torque, the inverter can continue to run and flashes OL3 until the output
torque is less than the 07-11 set value.
3. Parameter 01-09/10(Multifunction output terminal) = 12, the output terminal signal will be set
for over torque condition.
Note: Over torque detection will be enabled only when parameter 07-09 is set to options 1or2.
07-13 : OH over heat Protection ( cooling fan control)
0 : Auto (Depends on temp.)
1 : Operate while in RUN mode
2 : Always Run
3 : Disabled
1. 07-13=0 : The fan runs as the inverter senses temperature rises. Thusly, extend the service period.
2. 07-13=1 : The fan runs while the inverter is running.
3. 07-13=2 : The fan is continuously running regardless of the action of the inverter.
4. 07-13=3 : The fan is Disabled.
4-41
Group8- Communication function group
08-00 : Assigned Communication Station Number = 1 - 32
08-00 : to set the communication station codes which are suitable for driving more than one
inverters situations.
08-01 : RTU code /ASCII code Selection = 0 : RTU code
08-02 : Baud Rate Setting (bps)
= 0 : 4800
= 1 : 9600
= 2 : 19200
= 3 : 38400
=1 : ASCII code
In vector control mode, the communication baud rate setting (8-02) is limited under 9600 (includ).
08-03 : Stop Bit Selection
08-04 : Parity Selection
= 0 : 1 stop bit
=0 : no parity
=2 : odd parity
08-05 : Data Format Selection
=0 : 8 bit data
= 1 : 2 stop bits
=1 : even parity
=1 : 7 bit data
1.RS-485 Communication:
a. One to one communication: A controller, PC or PLC, controls one inverter. (set 08-00 = 1~32)
b. One to many communication: A controller, PC or PLC ,controls multiple inverters (Up to 32
inverters as max. Set 08-00 = 1~32).
c. When any inverter receive the communication station number 0, from the PC or PLC
( Broadcast mode) then all these inverters will be controlled in communication mode
regardless of the setting of parameter 08-00.
Note:
a. Communication data parameters (08-02/08-03/08-04/8-05) for controller, PC or PLC and
inverters should all be set the same.
b. The inverter will confirm the validity of new parameters set by PC.
c. Please refer to the E310 Communication instruction manual for communication protocol.
d. when 08-01=0, can not set 08-05=1.
08-06 : Communication time-out operation selection(S) = 0.0 ~ 25.5
08-07 : Communication time-out detection time
1)Time-out detection time: 00.0~25.5sec; setting 00.0 sec: disable time-out function.
2)Time-out operation selection:
0: Deceleration to stop (00-10: Deceleration time 1).
1: Free run to stop.
2: Deceleration to stop (10-06: Deceleration time 2).
3: Continue operating.
*Cannot be modified during communication.
08- 08 : Err6 fault tolerance times
= 1 ~ 20
When communication error times ≥ 08-08 setting, display ERR6 on the keypad.
08- 09 : Drive Transmit Wait Time (ms) = 1 ~ 16(×4ms)
Setting the time from the beginning of receiving to the end of transmitting.
4-42
Group9- PID function group
1 PID function description
The Proportional, Integral and Derivative control function provides closed –loop control, or
regulation of a system process variable (Flow, Pressure, temperature, etc).This regulation is
obtained by comparing a feed back signal with a reference (target) signal, which results in an error
signal. The PID control algorithm then performs calculations on this error signal, based upon the
PID parameter group9.The result of the PID algorithm is then used as the new frequency reference,
or is added to the existing speed reference. The PID target value can be set by parameter 00-05/006,
for example the frequency command (target) can be set from Operator keypad, AI1 Analogue input
or multi function analog input terminals. Select the PID control feed back signal from external
terminal AI2 for a current signal (0-20ma) or a voltage (0-10vdc), depending on setting of Jumper 3
on control board and setting of parameter 2-06.
See PID block diagram below.
※Note : PID Function is available for controlling the output flow, external fan flow and temperature.
The PID block diagram is as follows:
Figure 4-26 PID block diagram
1. To enable PID control, set 02-06=0, ACI on TM2 is defined as the PID feedback signal.
2. The set point in the above diagram is the 00-05/00-06 input frequency.
4-43
2 PID Group 9 parameter descriptions
09-00: PID operation selection
=0 : disable
=1 : enable (Deviation is D-controlled)
=2 : Feedback D-controlled
=3 : D Reverse characteristic controlled
=4 : Feedback D characteristic controlled
09-00 =1, D is the deviation of (target value –detected value) in the unit time (09-04).
=2, D is the deviation of the detected values in unit time (09-04).
=3, D is the deviation of (target value – detected value) in the unit time (09-04). If the deviation is
positive, the output frequency decreases, vice versa.
=4, D is the deviation of detected value in unit time (09-04). When the deviation is positive, the
frequency decreases, vice versa.
09-01 : Feedback Gain coefficient (%) 0.00 ~10.00
09-01 is the calibration gain. Deviation = set point –(feedback signal×09-01)
09-02 : Proportional Gain(%)
09-02 : Proportion gain for P control.
0.00 ~ 10.00
09-03 : Integration Time(s)
0.0 ~100.0
09-03 : Integrate time for I control
09-04 : Differentiation Time(s)
09-04 : Differential time for D control
0.00 ~ 10.00
09-05: PID Offset
0 : Positive Direction
1 : Negative Direction
09-06 : PID Offset Adjust (%)
0 ~ 109
09-05/09-06: Calculated PID output is offset by 09-06 (the polarity of offset is according to 09-05).
09-07: PID Output Lag Filter Time(s)
0.0 ~ 2.5
09-07: Update time for output frequency.
09-08 : Feedback Loss Detection Mode
0 : Disable
1 : Enable – Drive Continues to Operate After Feedback Loss
2 : Enable – Drive “STOPS” After Feedback Loss
09-08= 0: Disable; 09-08= 1 : detect, continue running, and display ‘PDER’; 09-08= 2: detect, stop,
and display ‘PDER’.
09-09 : Feedback Loss Detection Level (%) 0 ~ 100
09-09 is the level for signal loss. Error = (Set point – Feedback value). When the error is larger than
the loss level setting, the feedback signal is considered lost.
09-10:Feedback Loss Detection Delay Time (s) 0.0 ~25.5
09-10 : the minimum time to consider the feedback signal lost.
09-11 : Integration Limit Value (%) 0 ~ 109
09-11 : the Limiter to prevent the PID from saturating.
4-44
09-13 : Allowable Integration Error Margin (Unit) (1 Unit = 1/8192) =0 ~ 100
09-13=0 ~ 100% unit value : Restart the tolerance after the integrator reset to 0.
09-14 : Sleep Frequency Level(Hz)
= 0.00 ~ 400.00
09-15 : Sleep Function Delay Time(S)
= 0.0 ~ 25.5
09-16 : Wake up frequency Level(Hz)
= 0.00 ~ 400.00
09-17 : Wake up function Delay Time(S) = 0.0 ~ 25.5
PID SLEEP MODE:
09-00=1(PID Enable)
02-06=0(PID FEEDBACK Enable)
00-05=PID setting frequency source (Target Value)
09-14 : set the sleep threshold frequency, Unit:HZ
09-15 : set the time for sleep delay, Unit: sec
09-16 : set the wake threshold frequency, Unit:HZ
09-17 : set the time for wake delay, Unit: sec
When PID output frequency is less than the sleep threshold frequency and exceeds the time of sleep
delay, the inverter will decelerate to 0 and enter PID sleep mode.
When PID output frequency is larger than the Wake threshold frequency for Wake start the inverter will
reactivate and enter PID wake mode. The time diagram is as follow:
Figure 4-27 PID sleep wake mode diagram
4-45
Group10- Assistant function group
10-01: Prevention of Reverse operation
0 : Reverse command is enabled
1 : Reverse command is disabled
10-01=1, the reverse command is disabled.
10-02 : Keypad Operation with Up/Down Keys in Run Mode
0 : ‘Enter’ must be pressed after frequency change with Up/Down Keys on keypad.
1 : Frequency will be changed directly when Up/Down Keys are Pressed
10-03 : Carrier Frequency (KHz)
1-12
Carrier
Carrier
Carrier
10-03
10-03
10-03
Frequency
Frequency
Frequency
1
1KHz
5
5KHz
9
9KHz
2
2KHz
6
6KHz
10
10KHz
3
3KHz
7
7KHz
11
11KHz
4
4KHz
8
8KHz
12
12KHz
Note:
1. In applications where there is excessive audible noise from the motor or it is required to
reduce electrical interference (RFI) from the inverter caused by use of long cable then
the carrier frequency can be adjusted. To reduce electromagnetic interference due to long cable
etc, decrease carrier frequency. To reduce motor audible noise, increase carrier frequency.
2. The carrier frequency as minimum should be set higher than ten times the max running
frequency.Example: If the Max running frequency=400Hz, then set the carrier Frequency
higher than 4 KHz. If the Max running frequency =300Hz, then set the carrier frequency higher
than 3 KHz. 3.In the vector control mode, set carrier frequency lower than 6K, to reduce noise,
set random carrier frequency mode(10-04 = 2)
10-04 : Carrier mode selection
=0 : Carrier mode0
3-phase PWM modulation
=1 : Carrier mode1
2-phase PWM modulation
=2 : Carrier mode2
2-phase randomized PWM modulation
1. 10-04=0 : Carrier mode0 is recommended in environments where low noise is required.
Correct ambient temperature and cooling is necessary.
2. 10-04=1 : Carrier mode 1 is recommended in locations where fan or pumps is required.
3. 10-04=2 : Carrier mode 2 Help to slow down the temperature raise, prolong life-span of IGBT
and control electromagnetism noise.
Note: When the inverter is running at high speed and high carrier frequency is selected then,
please set 10-04=1 this can reduce the IGBT switching losses (heat loss).
10-05 : Acceleration Time 2 (MFIT) (s)
10-06 : Deceleration Time 2 (MFIT) (s)
10-07 : S-Curve Acc/Dec 1 (s)
10-08 : S-Curve Acc/Dec 2(s)
10-09 : S-Curve Acc/Dec 3 (s)
10-10 : S-Curve Acc/Dec 4 (s)
0.1 ~ 3600.0
0.1 ~ 3600.0
0.0 ~ 4.0
0.0 ~ 4.0
0.0 ~ 4.0
0.0 ~ 4.0
4-46
Use S Curve parameters where a smooth acceleration or deceleration action is required, this will
prevent possible damage caused to machines by sudden acceleration/deceleration.
Four parameters can be selected as shown on the diagram below:
Figure 4-28 S-Curve Characteristics
Note:
a. Regardless of the stall prevention period, actual acceleration and deceleration time =preset
acceleration / deceleration time + S curve time.
b. Please set the S curve time separately in the parameter (10-07~10-10)
c. When S curve time (10-07~10-10) is set as 0, the S curve function is disabled.
d. Note : The calculating of S curve time is based on the rated frequency of motor (06-04), Please
refer to the parameter (00-09/00-10).
10-11 : Skip frequency 1(Hz)
= 0.00 ~ 400.00
10-12 : Skip frequency 2(Hz)
= 0.00 ~ 400.00
10-13 : Skip frequency 3(Hz)
= 0.00 ~ 400.00
10-14 : Skip frequency range (± Hz)
= 0.00 ~ 30.00
Skip frequency parameters can be used to avoid mechanical resonance in certain applications.
Example:10-1=10.00(Hz); 10-12=20.00(Hz); 10-13=30.00(Hz); 10-14=2.00(Hz).
10Hz
±2Hz=8~12Hz
20Hz
±2Hz=18~22Hz
Skip frequency
30Hz
±2Hz=28~32Hz
10-14
10-13
10-12
10-11
10-15 : Carrier Frequency reduced by temperature raising
=0 : disable
=1 : Enable
When inverter is temperature overrun 80°C on keypad display(11-00=01000), Carrier Frequency
reduced 4K.when inverter is temperature reduced less than 70°C, Carrier Frequency resume.
4-47
temperature
80°C
70°C
Carrier Frequency
0
t1
t2
0
t1
t2
Time
10k
4k
Time
10-16 : Auto Voltage Regulation (AVR):
0 : AVR Function disable
1 : AVR Function enable
AVR function automatically regulates the AC motor drive output voltage to the Maximum
Output Voltage
10-17 : Count Down Completion
=00~9999
This parameter sets purpose value of E310 built-in counter, this counter can take extermal terminal
S6 as a trigger in control circuit. When count value reaches purpose value ,multi-RELAY output
terminal acts.
Group11-keypad display group
11-00 : Display Mode
=xxxx0 : Disable Motor Current Display
=xxx0x : Disable Motor Voltage Display
=xx0xx : Disable Bus Voltage Display
=x0xxx : Disable temperature Display
=0xxxx : Disable PID feedback Display
=xxxx1 : Enable Motor Current Display
=xxx1x : Enable Motor Voltage Display
=xx1xx : Enable Bus Voltage Display
=x1xxx : Enable temperature Display
=1xxxx : Enable PID feedback Display
11-01 : Custom Units (Line Speed) Value
=0~65535
The max preset line value of 11-01 is equal to the rated frequency (06-04) of the motor. For
instance, given line speed 1800 is equal to display 900 when output is 30Hz while the operation
frequency is 60Hz.
11-02 : Custom Units (Line Speed) Display Mode
0 : Drive Output Frequency is Displayed
1 : Line Speed is Displayed in Integer (xxxxx)
2 : Line Speed is Displayed with One Decimal Place (xxxx.x)
3 : Line Speed is Displayed with Two Decimal Places (xxx.xx)
4 : Line Speed is Displayed with Three Decimal Places (xx.xxx)
When 11-02=1/2/3/4, line speed is displayed while the inverter is running or stopped.
11-07 : Counter display
=0 Disable data Display
4-48
=1 Enable data Display
Group12- User parameter group
12-00 : Drive Horsepower Code
12-00
20P5
2001
2002
Inverter Model
20P5
2001
E3102002
12-00
4001
4002
4003
4005
Inverter Model
4001
4002
E3104003
4005
12-01 : Software Version
12-02 : Fault Log (Latest 3 times)
1. When the inverter trips on a fault, the previous fault log stored in2.xxx will be transferred to
3.xxx, the one in 1.xxx to 2.xxx. The present fault will be stored in the empty register 1.xxx. The
fault stored in 3.xxx is the last one of the most recent three, while the one 1.xxx is the latest.
2. When pressing ‘ENTER’ at 12-02, the fault 1.xxx will be displayed first. Press▲, to read
2.xxx→3.xxx→1.xxx press▼ and the order is 3.xxx→2.xxx→1.xxx→3.xxx.
3. When pressing ‘Reset’ at 12-02, the three fault log will be cleared when the reset key is pressed.
The log content will change to 1.---, 2.---, 3.---.
4. E.g. the fault log content is ‘1.OC-C’; this indicates the latest fault is OC-C, etc.
12-03 : Accumulated Operation Time 1 (Hours) : 0 ~ 23
12-04 : Accumulated Operation Time 2 (Days) :
0 ~ 65535
12-05 : Accumulated Operation Time Mode 0 : Power on time
1 : Operation time
1. When the operation time is to23 as the elapsed time 1 is set. The next hour will be carried to
operation12-04. Meanwhile, the recorded value will be cleared to 0000, and the record value of
operation duration 2 will be 01.
2. Description of operation time selection:
Preset value
Description
0
Power on, count the accumulated time.
1
Inverter operation, count the accumulated operation time
12-06 : Reset Drive to Factory Settings
1150 : Reset to the 50Hz factory setting
1160 : Reset to the 60Hz factory setting
12-07 : Parameter lock
0 : Enable all Functions
1 : 03-01~ 03-08 cannot be changed
2 : All Functions cannot be changed Except 03-01~ 03-08
3 :Disable All Function
4-49
12-08 : Parameter password
= 00000 ~ 65535
This function is used to prevent parameter from being modified by disrelated personnels, keep
parameter safety.
When a password has been set, parameters cannot be modified, and it is forbidden to reset to factory
set.
(1) Setting password:
① open 12-08, ”00000”is shown on keypad, input password, press” enter”,
display “End".
② When open 12-08 again, display “00001”, input password again, press” enter”,
display “LOC” display .
If setting is different from the first time, display “Err2”, setting failed
(2) cancel password:
① open 12-08, display ”00002”,input the correct password, press” enter” key
,display“End", Disable the password is successed.
If typing a wrong password, display “LOC”(password is still holded)
Note: set 12-08=00000, password can’t work
Group13- Auto Run (Auto Sequencer) function group
Auto Run( sequencer) mode selection:
13-00:
0 : Disabled.
1 : Single cycle.
(Continues to run from the unfinished step if restarted).
2 : Periodic cycle. (Continues to run from the unfinished step if restarted).
3 : Single cycle, then holds the speed of final step to run.
(Continues to run from the unfinished step if restarted).
4 : Single cycle.
(Starts a new cycle if restarted).
5 : Periodic cycle. (Starts a new cycle if restarted).
6 : Single cycle, then hold the speed of final step to run.
(Starts a new cycle if restarted).
13-01 : Auto _ Run Mode Frequency Command 1
13-02 : Auto _ Run Mode Frequency Command 2
13-03 : Auto _ Run Mode Frequency Command 3
13-04 : Auto _ Run Mode Frequency Command 4
13-05 : Auto _ Run Mode Frequency Command 5
13-06 : Auto _ Run Mode Frequency Command 6
13-07 : Auto _ Run Mode Frequency Command 7
(0.00 ~ 400.00Hz)
(0.00 ~ 400.00Hz)
(0.00 ~ 400.00Hz)
(0.00 ~ 400.00Hz)
(0.00 ~ 400.00Hz)
(0.00 ~ 400.00Hz)
(0.00 ~ 400.00Hz)
13-16 : Auto_ Run Mode Running Time Setting 0 ( 0.0 ~ 3600.0s)
13-17 : Auto_ Run Mode Running Time Setting 1 ( 0.0 ~ 3600.0s)
13-18 : Auto_ Run Mode Running Time Setting 2 ( 0.0 ~ 3600.0s)
13-19 : Auto_ Run Mode Running Time Setting 3 ( 0.0 ~ 3600.0s)
13-20 : Auto_ Run Mode Running Time Setting 4 ( 0.0 ~ 3600.0s)
13-21 : Auto_ Run Mode Running Time Setting 5 ( 0.0 ~ 3600.0s)
13-22 : Auto_ Run Mode Running Time Setting 6 ( 0.0 ~ 3600.0s)
4-50
13-23 : Auto_ Run Mode Running Time Setting 7
( 0.0 ~ 3600.0s)
13-32 : Auto_ Run Mode Running Direction 0 (0 : STOP
13-33 : Auto_ Run Mode Running Direction 1 (0 : STOP
13-34 : Auto_ Run Mode Running Direction 2 (0 : STOP
13-35 : Auto_ Run Mode Running Direction 3 (0 : STOP
13-36 : Auto_ Run Mode Running Direction 4 (0 : STOP
13-37 : Auto_ Run Mode Running Direction 5 (0 : STOP
13-38 : Auto_ Run Mode Running Direction 6 (0 : STOP
13-39 : Auto_ Run Mode Running Direction 7 (0 : STOP
1 : forward
1 : forward
1 : forward
1 : forward
1 : forward
1 : forward
1 : forward
1 : forward
2 : reverse)
2 : reverse)
2 : reverse)
2 : reverse)
2 : reverse)
2 : reverse)
2 : reverse)
2 : reverse)
Note:
1. Auto Run (sequencer) various modes cab is selected by parameter 13-00.
2. Auto Run (sequencer) mode set up parameters are parameters (13-01 ~ 13-39).
3. Auto run mode (sequencer) operation as selected by parameter 13-00 can be set up as follows : a. Setting multi-step frequency commands, by using the available multi-step frequency
commands 0~7as required can be set by parameters (13-00 ~ 13-07).
b. Setting multi-step run time, by parameters (13-16 ~ 13-23) for each required step.
c. FWD/REV direction can be selected by setting of parameters (13-32 ~ 13-39).
d. d. Auto _ Run Mode Frequency Command 0 is3-01, running time is 13-16, Running Direction
13-32.
Some examples in auto_run mode as follows:
(A) Single Cycle Running (13-00= 1, 4)
The inverter will run for a single full cycle based upon the specified setting mode. Then, it
will stop.
‧ For example :
13-00=1(or 4)
‧ Panel Frequency (3-01)=15 Hz
13-16=20s
13-32=1
‧
13-01=30Hz
13-17=25s
13-33=1
13-04 ~ 13-07=0Hz,
13-02=50Hz
13-03=20Hz
13-18=30s
13-19=40s
13-34=1(FWD) 13-35=2(REV)
13-20 ~ 13-23=0s,13-36 ~ 13-39=0
Figure 4-29 Single cycle auto run
4-51
(B) Periodic cycle Running (13-00=2, 5)
The inverter will repeat the same cycle periodically.
For example:
13-00=2(or 5)
13-01 ~ 13-03 , 13-16 ~ 13-23 , 13-32 ~ 13-39 : Same setting as the example (A)
Figure 4-30 Periodic cycle auto run
(C) Auto_Run Mode for Single Cycle (13-00 = 3, 6)
The speed of final step will be held to run.
For example:
13-00 = 3(or 6)
Panel Frequency (3-01) =15 Hz
13-01=30Hz
13-02=50Hz 13-07=20Hz
13-16=20s
13-17=25s
13-18=30s
13-23=40s
13-32=1
13-33=1
13-34 = 1 13-39=1(FWD)
13-04 ~ 13-06=0Hz ,13-20 ~ 13-22=0s ,13-35 ~ 13-38 = 0
13-07
(13-16) (13-17) (13-18) (13-23)
Figure 4-31 Single cycle auto run: final step hold
Note: 13-00 = 1~3 : If the inverter stops and re-starts, it will continue running from the unfinished
step, according to the setting of 13-00.
= 4~6 : If the inverter stops and re-starts, it will begin a new cycle and continue
running according to the setting of 13-00.
4-52
1~3
13-00
Output Frequency
Run
Command run stop
4~6
Run
Command run stop
run
Output
Frequency
Output
Frequency
run
begin a new cycle
Continue running from
unfinished step
time
Figure 4-32 AUTO_RUN cycle with interrupt
●ACC/DEC time follow the setting of 00-09/00-10 or 10-05/10-06 in Auto Run Mode.
4-53
time
Chapter 5 Troubleshooting and maintenance
5.1. Error display and corrective action
5.1.1. Faults which can not be recovered manually
1. Faults which can not be recovered manually
Display
-OV-
-LV-
-OHCTER
EPR
Fault
Voltage too high
when stopped
Voltage too low
when stopped
The inverter is
overheated
when stopped
Current Sensor
detection error
EEPROM
problem
Cause
Corrective action
Detection circuit malfunction
Return the inverter
1. Power voltage too low
2. Pre-charge resistor or fuse
burnt out.
3. Detection circuit malfunction
1. Check if the power voltage is
correct
2. Replace the pre-charge resistor
or the fuse
3. Return the inverter
1. Return the inverter
2. Improve ventilation
conditions
1. Detection circuit malfunction
2. Ambient temperature too high
or bad ventilation
Current sensor error or circuit
malfunction
Faulty EEPROM
Return the inverter
Replace EEPROM
2. Faults which can be recovered manually and automatically
Display
Fault
OC-S
Over current at
start
OC-D
Over-current at
deceleration
OC-A
Over-current at
acceleration
Cause
1. Short circuit between the
motor coil and the case
2. Short circuit between motor
coil and ground
3. the IGBT module damaged
The preset deceleration time is
too short.
1. Acceleration time too short
2. The capacity of the
motor exceeds the capacity of
the inverter
3. Short circuit between
the motor coil and the case
4. Short circuit between
motor wiring and ground
5. the IGBT module damaged
OC-C
Over-current at
fixed speed
1. Transient load change
2. Transient power change
OV-C
Excessive
Voltage during
operation/
deceleration
1. Deceleration time setting too
short or excessive load inertia
2. Power voltage varies widely
(fluctuates)
Err4
Unacceptable
CPU interrupt
External noise interference
5-1
Corrective Action
1. Inspect the motor
2. Inspect the wiring
3. Replace the transistor module
Set a longer deceleration time
1. Set a longer acceleration time
2. Replace inverter with one that
has the same rating as that of the
motor
3. Check the motor
4. Check the wiring
5. Replace the IGBT module
1.Increase the capacity of the
inverter
2.Repeat parameter auto tuning
(06-05= 1)
3.Reduce stator resistance
(06-06) if the above actions are
ineffective
1. Set a longer deceleration time
2. Add a brake resistor or brake
module
3. Add a reactor at the power input
side
4. Increase inverter capacity
Return unit if this happens
regularly
3. Faults which can be recovered manually but not automatically
Display
Fault
OC
Over-current during
stop
1. Detection circuit
malfunction
2. Bad connection for CT
signal cable
OL1
Motor overload
1. Excessive load
2. Incorrect settings for
06-01, 07-05~08
1. Increase the motor capacity
OL2
Inverter overload
Excessive Load
Increase the inverter capacity
OL3
Over torque
1. Excessive Load
2. Incorrect settings for
07-11, 07-12
1. Increase the inverter capacity
LV-C
Voltage too low
during operation
Cause
Corrective Action
1.Check the noise between Power
line and motor line
2.Return the inverter for repair
2. set 06-01, 07-05~08 correctly
2. set 07-11, 07-12 correctly
1. Power voltage too low
2. Power voltage varies widely
(fluctuates)
1. Improve power quality or
increase the value of 4-04
2. Set a longer acceleration time
3. Add a reactor at the power input
side
4. Increase the motor capacity
5.1.2. Special conditions
Display
Fault
STP0
Zero speed at stop
Occurs when preset frequency <0.1Hz
Fail to start directly
On power up.
1. If the inverter is set for external terminal control mode
(00-03/00-04=1) and direct start is disabled (04-09=1)
The inverter cannot be started and will flash STP1.
The run input is active at power-up, refer to descriptions of (04-09).
2. Direct start is possible when 04-09=0.
STP2
Keypad Stop
Operated
when inverter
in external
Control mode.
1. With the function of Stop key enabled by (04-02=0)
And if the Stop key is pressed while the inverter is set to external
control mode (00-03/00-04=1) then, the inverter will stop according
to the setting of 04-01 and the error message, ‘STP2’flashes after
stop.
Release and re-activate the run contact to restart the inverter.
2. If the inverter is in communication mode and the Stop key is enabled
(04-02=0), the inverter will stop in the way set by 04-01 when Stop
key is pressed during operation and then flashes STP2. The Host
controller has to send a Stop command then a Run command to the
inverter for it to be restarted.
3. Stop key will be disabled when 04-02=1
E.S.
External
Rapid stop
The inverter will decelerate to stop and then flash E.S., when input
external Rapid stop signal via the multifunctional input terminal
activates (refer to descriptions of 01-00~01-05).
STP1
Description
5-2
External base
block
The inverter stops immediately and then flashes b.b., when external
base block is input by the multifunctional input terminals.
(Refer to descriptions of 01-00~01-05).
PDER
PID feedback loss
PID feedback loss detect
COT
Communication
error
Communication error detect (refer group 8 )
b.b.
5.1.3. Operation errors
Display
Error
LOC
Parameter and
frequency reverse
already locked
Err1
Err2
Err5
Err6
Err7
Keypad
operation error
Cause
1.Attempt to modify frequency
parameter while 12-07>0
2.Attempt to reverse while
10-01=1
1. Press ▲ or ▼while 00-05/0006>0 or running at preset speed.
2. Attempt to modify the Parameter.
Can not be modified during operation
(refer to the parameter list).
1. 00-08 is within the range of
10-11 ± 10-14 or 10-12 ± 10-14 or
10-13 ± 10-14
Parameter setting
2. 00-07≤00-08
error
3.Setting error while
Performing Auto tuning.
(e.g.00-03/00-04≠0,00-05/00-06 ≠ 0 )
1. Control command sent during
Modification of
communication.
parameter is not
2. Attempt to modify the function
available in
08-02 ~ 08-05 during
communication
communication
1. Wiring error
2. Communication parameter setting
Communication
error.
failed
3. Check-Sum error
4. Incorrect communication protocol
1. Attempt to modify the function 1200/12-06.
Parameter conflict
2. Voltage and current detection circuit
is abnormal
5-3
Corrective Action
1. Set 12-07=0
2. Set 10-01=0
1.The ▲ or▼ is available
for modifying the
parameter only when 0005/00-06=0
2. Modify the parameter
in STOP mode.
1. Modify 10-11~10-13 or
10-14
2. Set 00-07>00-08
3. Set 00-03/00-04=0 and
05/00-06=0,
during Auto tuning
1. Issue enable command
before communication
2. Set parameters
08-02 ~ 08-05 function
before communication
1.Check hardware and wiring
2.Check Functions
08-02 ~ 08-05
If Reset is not possible,
please Return the inverter
5.2 General troubleshooting
Status
Checking point
Remedy
Is power applied to L1, L2, and L3 terminals
(is the charging indicator lit)?
Motor can
not run
Is there voltage across the output terminals T1,
T2, and T3?
Is overload causing the motor to stall?
Are there any abnormalities in the inverter?
Is forward or reverse run command issued?
Motor runs
in wrong
direction
The motor
speed can
not be
regulated.
Motor
running
speed too
high or too
low
Motor
speed
varies
unusually
‧Is the power applied?
‧Turn the power OFF and then ON
again.
‧Make sure the power voltage is correct.
‧Make sure screws are secured firmly.
‧Turn the power OFF and then ON again.
‧Reduce the load so the motor will run.
‧See error descriptions to check wiring
and correct if necessary.
Has the analog frequency signal been input?
‧ Is analog frequency input signal wiring
correct?
‧Is voltage of frequency input correct?
Is the operation mode setting correct?
‧Operate through the digital keypad .
Are wiring for output terminals T1, T2, and T3
correct?
‧Wiring must match U, V, and W
terminals of the motor.
Are wiring for forward and reverse signals
correct?
‧Check for correct wiring.
Is the wiring for the analog frequency inputs
correct?
‧Check for correct wiring.
Is the setting of operation mode correct?
‧Check the operation mode of the
operator.
Is the load too excessive?
‧Reduce the load.
Check the motor specifications (poles,
voltage…) correct?
‧Confirm the motor specifications.
Is the gear ratio correct?
‧Confirm the gear ratio.
Is the setting of the highest output frequency
correct?
‧Confirm the highest output frequency.
Is the load too excessive?
‧Reduce the load.
‧Minimize the variation of the load.
‧Increase capacities of the inverter and
the motor.
‧Add an AC reactor at the power input
side if using single-phase power.
‧Check wiring if using three-phase
power.
Does the load vary excessively?
Is the input power erratic or is a phase loss
occurring?
5-4
5.3 Quick troubleshooting of E310
E310 INV Fault
z
z
NO
Is fault known?
DM =Diode Mdule
I.G.B.T =Insulat Gate Bipolar Transistor
YES
Symptoms other than burn
out, damage, or fuse meltdown in
the inverter?
Any
Symptoms of burn
out and damage?
NO
YES
Check burnt and damaged
parts
NO
Replace DM
NO
Replace fuse
NO
Replace I.G.B.T
YES
Fault signal?
NO
Is the main circuit
DM intact?
YES
Check according to displayed
fault messages
YES
Is the fuse
intact?
YES
Is the main circuit
I.G.B.T intact?
Visually check controller and
Drive boards
Any visual abnormalities?
YES
YES
有
Replace the defective boards
Apply the power
Are displays and
indicators of the
operating unit working
normally?
NO
YES
Any fault
display?
Is LED lit?
NO
Replace the pre-charge resistor
NO
Any fault
display?
What’s the
message?
3 fault values in
12-2
Check 3 fault values of 12-2 with
▼key.
YES
Is the DC input voltage
controlling the power
correct
NO
Check terminals and wiring
YES
Is +5V control
voltage correct?
NO
Replace the driver board
YES
Replace control board and
digital operating unit
Is the error eliminated
after replacing control
board?
YES
NO
The inverter has faulted
Perform detailed check
*to next page
5-5
*From previous page
Check Inverter parameters
Perform parameter
initializations
Specify operation control
mode
FWD or REV LED
light after flashes ?
NO
Replace the control board
YES
Set up frequency command
Is the frequency value
displayed in operation
unit?
NO
Replace the control board
YES
Are there
voltage outputs at
terminalsT1 T2 T3
NO
Replace the control board
YES
Does the control
Board function after
replacement
Connect the motor to run
YES
Is there any fault
display?
YES
NO
Are output
currents of each phase
even?
‧
NO
YES
The inverter is failed
Perform detailed check
The inverter is OK
Figure 5-1 E310 fault display and troubleshooting flow chart
5-6
NO
Troubleshooting for OC, OL error displays
The inverter displays OC, OL
errors
Is the main circuit
I.G.B.T working
NO
Replace I.G.B.T
YES
Any visual abnormalities?
YES
Replace faulty circuit board
Apply power
YES
Any abnormal
indications?
Is the current detector
OK?
YES
Input operation command
Replace control board
Is FWD LED
illuminated?
NO
NO
Replace the current controller
Replace control board
YES
Input frequency command
Is the output frequency of the
operating unit displayed?
NO
Replace control board
NO
Replace control board
YES
Is there
Voltage at T1-T2-T3 output
terminals?
YES
Is the inverter
operating well after
ports replacement?
Connect the motor to run
YES
Any fault values displayed? YES
NO
Is the output current of
each phase even?
NO
‧
NO
YES
The inverter is faulted
The inverter’s output is OK
Perform detailed check
Figure 5-2 OC, OL Fault Display Flow Chart
5-7
Troubleshooting for OV, LV error
The inverter displays OV, LV
Is the main circuit fuse
intact?
YES
Any visual abnormalities?
NO
Replace the main circuit fuse
YES
Replace the faulty circuit
board
NO
Apply power
Any abnormal
indications?
YES
Replace the control board
NO
Input operation command
Is FWD LED still
illuminated after flash
Replace the control board
NO
YES
Input frequency commands
Is the output frequency of the
operating unit displayed?
NO
Replace the control board
YES
NO
Is there
Voltage at T1,T2,T3 output
terminals?
Replace the control board
Is the inverter
working well after
replacement?
YES
Connect the motor to run
NO
YES
YES
Any abnormal value?
NO
‧
NO
Is the current on all
phases even?
YES
The inverter is failed
The inverter’s output is OK
Perform detailed check
Figure 5-3 OV, LV Fault Display Flow Chart
5-8
The motor can not run
YES
Is MCCB
applied?
NO
Can MCCB be
applied?
NO
Short circuited wiring
YES (within ±3% of the normal value)
Are voltages
between power
terminals correct?
NO
Is LED lit?
NO
Is the operation switch
in “RUN’ ?
NO
․The power is abnormal
․Incorrect wiring
E310fault
The operation switch is set to
“RUN’ position
YES
Are there outputs between the
U-V-W terminals of the motor?
NO
Are outputs between UV-W even
NO
YES (voltage deviation between output pairs are even if
within ±3% of the normal value without the motor
․Motor
․Motor faults
․Incorrect wiring
z
Figure 5-4 Motor RUN failure Flow chart
5-9
E310fault
E310fault
Motor Overheating
Is load or current
exceeding the specified
value?
Reduce the load.
Increase capacities of E310
and the motor.
YES
NO
Is motor running at
low speed for a long
time?
YES
Select the motor again
NO
Is motor voltage
betweenT1-T2-T3
E310faults
correct?
YES (within ±3% of the normal value)
Is there any
deterrence preventing
cooling of the motor
YES
Clear the deterrence
NO
YES
Bad connection between
E310 drive and the motor
Correct the bad connection
Figure 5-5 Motor Overheat Troubleshooting Flow Chart
Motor runs unevenly
YES
Does it happen
during deceleration?
Is the
acceleration time
correct?
NO
Increase the Acc/ Dec time
NO
YES
Are the output voltages
between T1-T2-T3
balanced?
NO
Reduce the load.
Increase capacities of E310
and the motor.
E310 faults
YES (within ±3% of rated output voltage
Is the load
fluctuating?
Reduce the load fluctuation
or add a flywheel.
YES
NO
Inspect the mechanical system
Any mechanical vibration or
gear backlash?
Minimal
E310 faults
Figure 5-6 Motor Instability Troubleshooting Flow Chart
5-10
5.4 Routine and periodic inspection
To ensure stable and safe operations, check and maintain the inverter at regular intervals.
The table below lists the items to be checked to ensure stable and safe operations.
Check these items 5 minutes after the “Charge” indicator goes out to prevent injury to personnel by
residual electric power.
Items
Ambient
conditions
around the
machine
Installation
and grounding
of the inverter
Details
Confirm the
temperature and
humidity at the
machine
Are there
inflammable
materials in the
vicinity?
Any unusual vibration
from the machine
Is the voltage of the
main circuit correct?
External
terminals and
internal
mounting
screws of the
inverter
Are secure parts
loose?
Is the terminal base
damaged?
Visual rust stains
present?
Any unusual bends or
breaks?
Any damage of the
wire insulation?
Excessive dust or
debris
Excessive conductive
metal shavings or oil
sludge
Discolored,
overheated, or
burned parts
Unusual vibration and
noise
Excessive dust or
debris
Excessive dust or
debris
Heat sink
Printed
circuit board
Cooling fan
Power
component
Capacitor
Criteria
○
Temperature:
-10 – 40oC (14120℉)
Humidity: Below
95% RH
○
Visual check
Keep area clear
○
Visual, hearing check
No vibration
○
Measure the
resistance with a
multi-tester
Measure the voltage
with a multi-tester
○
200Vclass: below
100Ω
400V class: below
10Ω
Voltage must
conform with the
specifications
Remedies
Improve the
ambient or
relocate the
drive to a
better area.
Secure screws
Improve the
grounding
Improve input
voltage
○
○
Visual check
Check with a
screwdriver
Secure terminals
and no rust
Secure or send
back for repair
Visual check
No abnormalities
Replace or
send back for
repair
Visual check
No abnormalities
Clean up
debris or dust
Visual check
No abnormalities
Clean or
replace the
circuit board
○
○
○
○
○
○
○
Visual or hearing
check
No abnormalities
Visual check
○
Check resistance
between each
terminals
Any unusual odor or
leakage
Any deformity or
protrusion
Methods
Measure with
thermometer and
hygrometer
according to
installation notices.
Is the grounding
resistance correct?
Input power
voltage
Internal wiring
of the inverter
Checking
period
Daily 1Year
Clean fan
○
Visual check
No abnormalities
○
Measure with a
multi-tester
No short circuit or
broken circuit in
three-phase output
Visual check
No abnormalities
○
○
5-11
Replace the
cooling fan
Clean
component
Replace
power
component or
inverter
Replace
capacitor or
inverter
5.5 Maintenance and Inspection
Inverter doesn’t need daily inspection and maintenance.
To ensure long-term reliability, follow the instructions below to perform regular inspection. Turn
the power off and wait for the charge indicator (LED) to go out before inspection to avoid potential
shock hazard from the charge stored in high-capacity capacitors.
(1) Clean up the accumulation of any dust inside the inverter.
(2) Check if there are any loose terminal screws and tighten them.
(3) Insulation tests
(a) Disconnect all leads connecting the INVERTER with external circuits when performing
insulation tests on external circuits.
(b) Internal insulation test should be performed against the main circuit of the
INVERTER body only. Use a high resistance DC 500V meter with insulating resistance
higher than 5MΩ.
Caution! Do not perform this test against the control circuit.
E310
Insulation Test Diagram
5-12
Chapter 6 Peripherals Components
6.1 reactor specification at Input side
AC inductance at input side
Model
E310-2P5-XXX
E310-201-XXX
E310-202-XXX
E310-401-XXX
E310-402-XXX
E310-403-XXX
E310-405-XXX
Current (A)
2.5
5.0
10.0
2.5
5.0
7.5
10.0
DC reactor specification at input side
Inductance (mH)
4.2
2.1
1.1
8.4
4.2
3.6
2.2
Current (A)
3.1
4.5
7.5
2.3
3.8
5.2
8.8
Inductance (mH)
5.65
3.89
2.33
15.22
9.21
6.73
3.98
6.2 Braking unit and braking resistor
Inverter
Model
2P5
Suitable Suitable
Motor
Motor
Capacity Capacity
(KW)
(HP)
0.5
0.375
Braking resistor Specification
Braking resistor
Duty Cycle (%)
Braking torque
(%)
(W)
(Ω)
Number
used
60
200
-
8
218
201
1
0.75
60
200
-
8
119
202
2
1.5
150
100
-
10
119
401
1
0.75
60
750
-
8
125
402
2
1.5
150
400
-
10
119
403
3
2.2
200
250
-
8
128
405
5
3.7
300
150
-
8
127
※ Formula for brake resistor: W= (Vpnb * Vpnb) * ED% / R
1. W: braking resistor power (Watts)
2. Vpnb: braking voltage (220V=380VDC, 440V=760VDC)
3. ED%: braking effective period
4. R: braking resistor rated ohms
6-1
6.3 Digital operator and extension cable
A. Content
c Inverter
d LED Keypad (E31DOP-01)
e Remote Cable for Keypad
※e using standard network cable connection.
②
③
①
Figure 6-1 Digital Operator Extension Cable
B. Operation procedure:
1. Turn off the power Supply; the following procedures should be performed after there is no display
on the keypad.
2. Remove the keypad.
3. Connect the inverter and the keypad with REMOTE cable in accordance with the diagram below.
4. Apply power to operate once the installation is complete.
6-2
Extension KEYPAD installation
(1) KEYPAD installation Dimensions:
+ a
530
)5(4
6(7
底面尺寸图
2. Dimension for remote keypad
a. Keypad hatch Installation Dimension
E31DOP-01
6-3
b. Keypad Installation Dimension for nut( superaddition gasket and nut)
fixing board
E31DOP-01
flap gasket (M3)
elastomeric gasket (M3)
nut (M3)
c. none gasket and nut, Keypad Installation Dimension
fixing board
E31DOP-01
6-4
Appendix
Appendix1: E310 parameter setting list
Customer
Inverter Model
Site Location
Contact Phone
Address
Parameter
code
00-00
00-01
Setting
content
Parameter
code
02-11
02-12
Setting
content
00-02
02-13
Parameter
code
04-10
04-11
04-12
00-03
02-14
04-13
07-11
00-04
02-15
04-14
07-12
00-05
02-16
04-15
07-13
00-06
04-16
08-00
00-07
03-00
03-01
04-17
08-01
00-08
03-02
05-00
08-02
00-09
03-03
05-01
08-03
00-10
03-04
05-02
08-04
00-11
03-05
05-03
08-05
00-12
03-06
05-04
08-06
00-13
03-07
05-05
08-07
00-14
03-08
05-06
08-08
01-00
03-17
05-07
08-09
01-01
03-18
05-08
09-00
01-02
03-19
05-09
09-01
01-03
03-20
05-10
09-02
01-04
03-21
09-03
01-05
03-22
05-11
05-12
09-04
01-06
03-23
06-00
09-05
01-07
03-24
06-01
09-06
01-08
03-25
06-02
09-07
01-09
03-26
06-03
09-08
01-10
03-27
06-04
09-09
01-11
03-28
06-05
09-10
01-12
03-29
06-06
09-11
01-13
03-30
06-07
09-13
01-14
03-31
06-08
09-14
02-00
03-32
06-09
09-15
02-01
04-00
06-10
09-16
02-02
04-01
06-11
09-17
02-03
02-04
02-05
04-02
07-00
10-01
04-03
04-04
07-01
07-02
10-02
10-03
02-06
04-05
07-03
10-04
02-07
04-06
07-04
10-05
02-08
02-09
02-10
04-07
04-08
04-09
07-05
07-06
07-07
10-06
10-07
10-08
Appendix 1
Setting
content
Parameter
code
07-08
07-09
07-10
Setting
content
Appendix
Parameter
code
10-09
10-10
10-11
10-12
10-13
10-14
10-15
10-16
10-17
11-00
11-01
11-02
Setting
content
Parameter
code
11-07
12-00
12-01
12-02
12-03
12-04
12-05
12-06
12-07
12-08
13-00
13-01
Setting
content
Parameter
code
13-02
13-03
13-04
13-05
13-06
13-07
13-16
13-17
13-18
13-19
13-20
13-21
Appendix 2
Setting
content
Parameter
code
13-22
13-23
13-32
13-33
13-34
13-35
13-36
13-37
13-38
13-39
Setting
content
Distributor
TECO Electric & Machinery Co., Ltd.
10F.,No.3-1 , Yuancyu St., Nangang District
Taipei City 115, Taiwan
Tel : +886-2-6615-9111 Ext:1721
Fax : +886-2-6615-0933
Http://www.teco.com.tw
4KA72X254T01 VER:01 2010.6
This manual may be modified when necessary because of improvement of the product,
modification, or changes in specification, this manual is subject to change without notice.