1
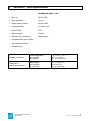
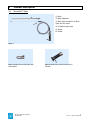
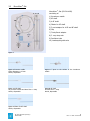
Operating Manual MICROPERC® Optic 10,000 pixels, semi-rigid PD-PN-0080 0483 PD_IFU_MicroPerc-optic-E_A PD-PN-0080 1 Rev.: A Date: 19.03.2015 Table of Contents Page 1 Safety instructions ..................................................................................................... 4 1.1 Intended Use............................................................................................................. 4 1.2 Operating Instructions ................................................................................................ 4 1.3 After Receiving the optic............................................................................................. 4 1.4 Surroundings / Operation ........................................................................................... 4 1.5 Reprocessing and storage ........................................................................................... 5 1.6 Products in sterile packaging....................................................................................... 5 1.7 Compatibility and accessories ...................................................................................... 5 1.8 Tolerability ................................................................................................................ 5 1.9 Repair / replacement .................................................................................................. 5 2 MICROPERC® Optic Specifications .................................................................................. 6 3 Product Description .................................................................................................... 7 3.1 MICROPERC® Optic ...................................................................................................... 7 3.2 MICROPERC® Set ......................................................................................................... 8 4 MICROPERC® operating mode ..................................................................................... 10 4.1 Assembly ................................................................................................................ 10 4.2 Connection to the endoscopy video system ................................................................ 11 4.3 Check the endoscopic image ..................................................................................... 11 4.4 Changing instruments after puncture ......................................................................... 11 4.5 Larger lumens ......................................................................................................... 12 4.6 Optional Instruments ............................................................................................... 13 5 Reprocessing ........................................................................................................... 14 5.1 General Instructions ................................................................................................. 14 5.1.1 RKI guidelines ......................................................................................................... 14 5.1.2 Important information .............................................................................................. 14 5.1.3 Definition of terms ................................................................................................... 14 5.1.4 Causes of improper reprocessing ............................................................................... 15 5.2 Cleaning, disinfection and sterilisation........................................................................ 15 5.2.1 Instructions ............................................................................................................. 15 5.2.2 Precautions ............................................................................................................. 16 5.2.3 Pre-cleaning ............................................................................................................ 17 5.2.4 Manual cleaning and disinfection ............................................................................... 17 5.2.5. Mechanical cleaning and disinfection (disinfector) ....................................................... 19 5.2.6 Sterilisation ............................................................................................................. 20 5.2.7 Material tolerability .................................................................................................. 22 5.3 Storage of optic and accessories ............................................................................... 24 6 Troubleshooting ....................................................................................................... 25 PD_IFU_MicroPerc-optic-E_A PD-PN-0080 2 Rev.: A Date: 19.03.2015 6.1 Occurrence of a problem .......................................................................................... 25 7 Repair, warranty, disposal ........................................................................................ 26 7.1 Sending for repairs................................................................................................... 26 7.2 Warranty ................................................................................................................. 26 7.3 Disposal .................................................................................................................. 26 8 Transport of the optic............................................................................................... 27 9 Classification ........................................................................................................... 27 PD_IFU_MicroPerc-optic-E_A PD-PN-0080 3 Rev.: A Date: 19.03.2015 1 Safety instructions 1.1 Intended Use MICROPERC® optic for percutaneous micro endoscopic diagnosis and therapy of kidney stones is designed exclusively for use with the MICROPERC®-Set (PD-PN-1008) from PMT GmbH. 1.2 Operating Instructions Before using optic, thoroughly read the manual as well as manuals for other necessary equipment which are used in examination. Follow the instructions. All safety instructions must be observed. Keep the manual in a safe, easily accessible place. The different endoscopic procedures and the medical aspects of endoscopy are not covered by this manual. A prerequisite for the safety of the patient is that the physician and medical staff properly handle the endoscope. The user must be instructed on the unit. 1.3 After Receiving the Optic Check the optic for damage and operability. Do not use the optic if damage can be seen and / or the functionality is not assured. If you have any abnormalities or irregularities, contact your customer service representative. Transport damage must be reported to the parcel service / carrier immediately. WARNING: Optic are neither sterilised nor disinfected before delivery. They must be cleaned and disinfected / sterilised before each use as described in the corresponding chapter of the manual. 1.4 Surroundings / Operation Note the operating conditions of the endoscope and the conditions for storage and transport. The endoscope could be damaged or fail to operate if it is outside specified tolerances. The optic and related accessories must be checked before each use for possible optical and mechanical damage to eliminate the risk of injury. Endoscopes with damaged or defective items must not be used. Follow with the use of laser, electrosurgery, pneumatic or electro-hydraulic lithotripters the instructions for use and safety of the devices and accessories used. Ensure that BF conditions (insulated, ungrounded application parts) are maintained with joint operation of the endoscope with electrical medical devices. The failure of a jointly used light source may cause hazards. Make sure you have a ready replacement light source. PD_IFU_MicroPerc-optic-E_A PD-PN-0080 4 Rev.: A Date: 19.03.2015 1.5 Reprocessing and storage Prepare the optic after use, and store them in accordance with general guidelines. Inadequate reprocessing may pose a risk of infection and cause equipment damage. NOTE: The optic are not autoclavable. Autoclaving may destroy the optic. 1.6 Products in sterile packaging Check in sterile packed products that the sterile packaging is undamaged. The products may not be used if the packaging is damaged. 1.7 Compatibility and accessories Combination with devices other than those recommended can lead to a deterioration of security and performance. Use only the specified accessories for optic. The use of incompatible accessories may lead to functional disruptions and/or damage to the user, patient and third parties. 1.8 Tolerability Our products may contain nickel and / or latex. One must note applicable allergies. In such cases the use of the equipment is at the discretion of the physician. 1.9 Repair / replacement Repair of faulty equipment must be performed by persons authorized by the manufacturer and only with the use of original spare parts. Do not make any unauthorized modification to the product and do not attempt a repair. This may result in equipment damage and thus a danger to patients / staff. Unauthorized changes or repairs release the manufacturer from any liability for the safety of the appliance. Arbitrarily performed repairs performed during the warranty period may void any warranty. NOTE: POLYDIAGNOST GmbH assumes no liability for damages and harm which occurs due to erroneous use of the device and non-observance of this operating manual. Changes, which were not carried out by POLYDIAGNOST GmbH or through POLYDIAGNOST authorized professionals, can lead to the loss of all warranty claims. POLYDIAGNOST GmbH assumes no liability for injuries or damage which occur after changes which have not been undertaken by POLYDIAGNOST GmbH. PD_IFU_MicroPerc-optic-E_A PD-PN-0080 5 Rev.: A Date: 19.03.2015 2 MICROPERC® Optic Specifications 10.000 pixel Optic, 120° Item no.: PD-PN-0080 Outer diameter: 0.9 mm Image control system: 10,000 pixels Viewing direction: 0°, direct-view Field of View: 120° Optical length: 272 mm Standard light connection: ACMI adapter Integrated fibre optic lighting Optic nitinol reinforced Reusable optic Operating conditions room temperature rel. humidity air pressure + 15 °C to + 35 °C 30 % to 60 % 760 to 1060 mbar Conditions for storage and transport temperature rel. humidity air pressure - 10 °C to 45 ° C. 10 % to 85 % 760 to 1060 mbar PD_IFU_MicroPerc-optic-E_A PD-PN-0080 6 Rev.: A Date: 19.03.2015 3 Product Description 3.1 MICROPERC® Optic 1) Optic 4 2) Optic objective 3) Body with connection to fibreoptic and for ocular 2 6 4) Protective optic tube 5) Ocular 3 6) Shifter 1 5 Figure 1 Figure 2: Shifter autoclavable 26 mm (PD-DS-1210) PD_IFU_MicroPerc-optic-E_A PD-PN-0080 Figure 3: Fixed-focus reusable ocular (PD-FS-4001) 7 Rev.: A Date: 19.03.2015 3.2 MICROPERC® Set 1 2 3 4 MICROPERC® -Set (PD-PN-1008) consisting of: 1) Introducer needle 2) 8F shaft 10 3) 4.8F shaft 4) Dilator for 8F shaft 9 5) 3-port adapter for 4.8F and 8F shaft 6) Cap 7) Tuohy Borst adapter 8 7 8) 3 -way stop cock 9) Perfusion tube 10) Lunderquist guide wire 5 6 Figure 4 Figure 5: Puncture needle Outer diameter: 1.65 mm Sterile, disposable Figure 6: Figure 7: 4.8F Figure 8: 8F shaft for puncture needle and laser fibre < 400μ Sterile, disposable needle T-piece to the stiletto of the introducer shaft for laser fibre > 400µ Sterile, disposable Figure 9: Dilator for 8F shaft Sterile, disposable PD_IFU_MicroPerc-optic-E_A PD-PN-0080 8 Rev.: A Date: 19.03.2015 Figure 10: 3-port adapter for introducer needle, 4.8F and 8F shaft Sterile, disposable Figure 11: Cap Figure 12: Tuohy Borst Adapter for fibre laser Sterile, disposable Figure 13: 3-way Figure 14: Perfusion Figure 15: Lunderquist tube Sterile, disposable PD_IFU_MicroPerc-optic-E_A PD-PN-0080 Sterile, disposable stop cock Sterile, disposable guide wire Sterile, disposable 9 Rev.: A Date: 19.03.2015 4 MICROPERC® operating mode Figure 16 4.1 Assembly Figure 17: 4.8F Figure 19: Get shaft, puncture needle optic and shifter ready Figure 18: Join together and affix to one another Figure 20: Shift the shifter with open screw onto the optic Figure 21: Introduce into the puncture needle PD_IFU_MicroPerc-optic-E_A PD-PN-0080 Figure 22: Place optic in stylus and attach the shifter screw 10 Rev.: A Date: 19.03.2015 Figure 23: Connect the perfusion tube Figure 24: Connect ocular with optic and connect it to the camera. Flush the system before puncture 4.2 Connection to the endoscopy video system Connect the endoscope through the ocular with the endoscopy video system. Connect the fibre optic cable to the endoscope. 4.3 Check the endoscopic image After switching on the endoscopy video system, turn the light source on the highest intensity. Hold the distal end of the semi-rigid optic about 1 cm above a white surface and set the white balance using the appropriate switch. Then, hold the distal end of the optic at the same distance above a „colourful graphic“ and adjust the image sharpness by turning the adjustment ring on the TV adapter. Also check the colour fidelity. Note: Image quality also depends upon optimal light output. Always keep the light interfaces of the endoscope and the fibre-optics clean in order to ensure that light output remains optimal. 4.4 Changing instruments after puncture Figure 25: Loosen the puncture needle including optic from the working shaft and pull it out Figure 26: Attach Figure 27: Remove Figure 28: Insert optic from puncture needle PD_IFU_MicroPerc-optic-E_A PD-PN-0080 the 3-port adapter to the working shaft into the middle port 11 Rev.: A Date: 19.03.2015 Figure 29: Affix Figure 30: Connect Figure 31: Ability Figure 32: Connect to flush and for administration of contrast medium 4.5 the 3-way stopcock the Tuohy Borst adapter to attach the laser fibre Larger lumens If a larger lumen is needed, in accordance Seldinger technique, change from the 4.8F working shaft to the 8F working shaft. Figure 33: Remove all instruments incl. optic from the 4.8F shaft Figure 34: Enter Figure 35: Insert Figure 36: Insert dilator in 8F shaft PD_IFU_MicroPerc-optic-E_A PD-PN-0080 Lunderquist guide wire under control, then pull out 4.8F shaft 8F shaft with dilator using the guide wire, then remove the dilator and guide wire from the shaft 12 Rev.: A Date: 19.03.2015 Figure 37: Insert the optic through the side port, then insert into the 8F shaft and affix 4.6 Optional Instruments Figure 38: 10F shaft with obturator (PD-PN-1020), 3-port adapter (PD-PN-1030) autoclavable NOTE when used with lasers: The optic must be protected from penetration of the laser. In order to avoid burns and / or undesirable low effects in surrounding tissue, or damage to the optic, the laser power may only be activated when the tip of the laser fibre can be seen through the endoscope. When using laser devices, wear suitable protective glasses to avoid potential damage to the eyes. PD_IFU_MicroPerc-optic-E_A PD-PN-0080 13 Rev.: A Date: 19.03.2015 5 Reprocessing 5.1 General Instructions 5.1.1 RKI guidelines The Robert Koch Institute (RKI) has issued guidelines for the treatment of applied medical products. First one must review the necessary preparation steps: Proper preparation (collect, possibly disassembling, pre-treatment and pre-cleaning) of medical devices used and their safe enclosure and bringing the protected goods to the processing area, Cleaning, disinfection, rinsing, and drying, Testing for cleanliness and integrity of the surfaces, Care and maintenance, Checking the technical and functional safety, Labelling, Packaging and sterilization, Storage. 5.1.2 Important information All personnel responsible for reprocessing must be thoroughly incorporated into: - the relevant reprocessing procedure the work protection regulations the national and local hospital policy the operating instructions the functions of the endoscopic equipment labelling of disinfectants 5.1.3 Definition of terms Microorganisms Bacteria, yeasts, fungi and viruses Microorganisms should not be found on surgical instruments and endoscopes (risk of infection) Cleaning Physical / chemical removal of impurities (including organic matter) Disinfection Reducing the number of microorganisms with the goal of minimising the number of viable micro-organisms (low-germ product) Sterilization Reducing the number of microorganisms with the objective that no viable microorganisms survive (sterile product) Sterile Absence of viable microorganisms (very high safety, and only less than one micro-organism per million may survive) PD_IFU_MicroPerc-optic-E_A PD-PN-0080 14 Rev.: A Date: 19.03.2015 5.1.4 Causes of improper reprocessing Shortening or interruption of the reprocessing process Non-compliance with mandatory concentration and residence time Use of improper chemicals Incompatible cleaning and disinfecting solution Misunderstanding of the consequences that might arise from improper implementation of reprocessing Insufficiently reprocessed and prepared equipment and / or cleaning and disinfectant solutions (note storage times) 5.2 5.2.1 Cleaning, disinfection and sterilisation Instructions Effective pre-cleaning, cleaning and disinfection are an essential prerequisite for effective sterilization of optic and accessories. Ensure that there is complete wetting of all surfaces with the solution, including any working channels or cavities. Note concentration and immersion time manufacturers' specifications for cleaning and disinfectants. Pay attention to the mutual compatibility of the solutions used and follow the manufacturer's instructions, e.g. in relation to concentration and exposure times. Ensure that only appropriate equipment and product-specific validated methods for cleaning, disinfection and sterilization are used, and that the validated parameters are maintained at each cycle. It is the user's responsibility to perform the treatment process to achieve the desired disinfection, cleaning and sterilization. In addition, observe the regulations of the hospital and the manufacturer of the cleaning and disinfectant, the disinfectors and sterilizers, and the applicable laws in your country. WARNING: Optic are not sterilized or disinfected before delivery. They must be cleaned and disinfected / sterilised before each use. PD_IFU_MicroPerc-optic-E_A PD-PN-0080 15 Rev.: A Date: 19.03.2015 5.2.2 Precautions NOTE If the devices and related accessories are not properly cleaned and disinfected / sterilized, this may jeopardize the safety of the patient / staff. If the cleaning is not done, this may jeopardize the effectiveness of the disinfection / sterilization. Devices and accessories must be thoroughly cleaned before disinfection. Thorough cleaning reduces the number of microorganisms present, removes organic materials and so supports the effectiveness of the disinfection / sterilization procedure. Contact with patient secretions and reprocessing chemicals can affect your health. Therefore, always wear the prescribed protective equipment as specified in the hospital or national regulations when reprocessing the equipment. Suitable protective equipment includes: Eye protection glasses, face masks, moisture-resistant protective clothing or gowns (Note: Contaminated gowns must be taken off before leaving the reprocessing area), chemicalresistant, tight gloves, which fit well and are sufficiently long. Gloves should be changed and disposed of regularly. Make sure that the reprocessing area is adequately ventilated, as set out in the hospital or national health and safety regulations. Provide general ventilation (at least eight to ten air changes per hour) to reduce chemical vapours. Rinse the channels thoroughly and carefully. All internal channels must be thoroughly rinsed with sterile water to be free of disinfectants. Do not use pressure greater than 50 kPa to dry or flush the channels with air or liquid, otherwise the channels could be damaged. PD_IFU_MicroPerc-optic-E_A PD-PN-0080 16 Rev.: A Date: 19.03.2015 5.2.3 Pre-cleaning Pre-cleaning must take place immediately following the examination. This will prevent drying of blood, protein and other or other substances - loosen/remove all instruments, valves, caps and accessories from the optic. dispose of all disposable products. loosen the shifter from the optic. clean all exterior surfaces with a disinfectant with a dunked soft cloth. flush the internal channels of the accessories with disinfectant. carefully clean the objective (distal end) of the optic with light friction with a damp cloth. put the optic protection tube on the optic. then flush with disinfectant solution, see Figure 39. Figure 39 Note: The disinfectant used must be approved by the manufacturer for the disinfection of endoscopes. Use cleaning-friendly instrument panel for endoscopes. Avoid shocks and contact with other instruments. Finally, it must be sufficiently rinsed with tap water or sterile water. Cleaning and disinfection must be carried out immediately after use. This can be done (soaking in cleaning and disinfectant) in mechanized process (disinfector) or the manual method. 5.2.4 Manual cleaning and disinfection Important: Note that cleaning and disinfection agents have a proven efficacy. Ensure that the cleaning and disinfectant products are compatible. The materials used by the manufacturer are approved for cleaning and disinfection of endoscopes. The concentrations and exposure times specified by the manufacturer of the cleaning or disinfecting agent must be strictly adhered to. Use only sterile water for rinsing after disinfection. One may only use freshly prepared cleaning, disinfecting and rinsing solutions; they may not be used more than once. PD_IFU_MicroPerc-optic-E_A PD-PN-0080 17 Rev.: A Date: 19.03.2015 The optical surfaces must not be treated with sharp objects. In general, endoscopes must be treated with special care in cleaning/disinfection in order to avoid damage through use of great force, hitting, bending or dropping. Do not use brushes or sponges made of metal for cleaning the surfaces and internal channels, as this may lead to damage. Semi-rigid optic endoscopy accessories and other parts must not be placed in physiological saline solution and should also not be cleaned in an ultrasonic bath. Both methods lead directly to damage to the endoscope and its accessories. Cleaning: 1. Fill a basin with fresh cleaning solution. 2. Put the optic with an attached protection tube (Figure 40) or the accessories into the cleaning solution; the optic / accessories must be completely immersed. Figure 40 3. Clean the outside surfaces with a soft cloth or sponge. 4. Clean interior channels of the accessories with the respective suitable cleaning brushes within the cleaning bath. The brush must always move from the proximal to distal end. 5. Ensure that the cleaning solution does not foam too much (reduced cleaning action). 6. Rinse the optic thoroughly with cleaning solution at least five times by (disposable syringe), see Figure 40. 7. Also rinse the accessories at least five times thoroughly with the cleaning solution. 8. Remove the optic and the accessories at the earliest after the time recommended by the manufacturer for exposure to the cleaning agent. 9. Then rinse all at least five times with sterile water (disposable syringe). Duration per cycle at least 1 minute. 10. Then dry all internal passages by blowing with medical grade compressed air. PD_IFU_MicroPerc-optic-E_A PD-PN-0080 18 Rev.: A Date: 19.03.2015 Disinfection: 1. Fill a basin with fresh disinfectant solution. 2. Put the optic with an attached protection tube or the accessories into the disinfectant solution; the optic / accessories must be completely immersed. 3. Disinfect the outside surfaces with a soft cloth or sponge. 4. Rinse the optic thoroughly with disinfectant solution at least five times by (disposable syringe), see Figure 40. 5. Also rinse the accessories at least five times thoroughly with the disinfectant solution. 6. Remove the optic and the accessories at the earliest after the time recommended by the manufacturer for exposure to the cleaning agent. 7. Then rinse all at least five times with sterile (disposable syringe). Duration per cycle at least 1 minute. 8. Then dry all internal passages by blowing with medical grade compressed air. Remaining contamination on optical surfaces can be treated and removed with a swab which has been dunked in alcohol (70% ethanol), or with a neutral detergent. Thorough suitability of POLYDIAGNOST endoscopy devices for effective manual cleaning and disinfection was tested by an independent testing laboratory using the cleaning agent CIDEZYME1 (concentration used: 1.6 %, penetration time 5 min.) and the disinfectant CIDEX1 (undiluted, activated solution, penetration time 30 min.). The procedure described above was considered in this process. 1 Johnson & Johnson Medical GmbH, Norderstedt 5.2.5. Mechanical cleaning and disinfection (disinfector) Important: Note that the device has proven efficacy. The device via appropriate connections for the work and has flushing channels. Ensure that the cleaning and disinfectant products are compatible. The materials used by the manufacturer are approved for cleaning and disinfection of endoscopes. Ensure that an appropriate program is selected for thermolabile products. Do not use too-high flushing pressure for the working and flushing channels (see 5.2.2 precautions: pressure not greater than 50 kPa). The program contains sufficient rinse cycles. If a thermal disinfector is used, it should be noted that due to the drying temperatures of about 100 °C which can be reached, only endoscopes / units marked as autoclavable may be so treated. For thermolabile endoscopes, cleaning programs must be selected which do not exceed a temperature of 60 °C. The concentrations and exposure times specified by the manufacturer of the cleaning or disinfecting agent must be strictly adhered to. Use only sterile water for rinsing after disinfection. One may only use freshly prepared cleaning, disinfecting and rinsing solutions; they may not be used more than once. PD_IFU_MicroPerc-optic-E_A PD-PN-0080 19 Rev.: A Date: 19.03.2015 Note: The endoscope and endoscopic accessories must be manually pre-cleaned when using mechanical cleaning and disinfection, as per RKI guidelines. Therefore, follow steps 1 to 10 of the "Cleaning" set in Chapter 5.2.5, Manual cleaning and disinfection." Only then proceed as follows: 1. Put the disassembled endoscopy system into the disinfector using sterilization tablets. Ensure that the equipment is not damaged in this step. Sort instruments and accessories properly on machine-suitable instrument trays. 2. Close the working and flushing channels to the hoses connected to the disinfection basket. 3. Choose the appropriate and manufacturer's recommended endoscope cleaning program in accordance with the loading. Start the program 4. Remove the endoscopy system after the program ends. 5. Let the endoscopy dry, if necessary. Remaining contamination on optical surfaces can be removed with a cloth which has been dunked in alcohol (70% ethanol), or with a neutral detergent, and disposed of. The thorough suitability of POLYDIAGNOST endoscopy devices for effective mechanical cleaning and disinfection was conducted by an independent testing laboratory, using the Hamo LS-20001 disinfector (program No. 89, 50 °C), Korsolex Endo-Cleaner2 cleaning agent (concentration 150 ml /30 l, penetration time 5 min.) and Korsolex Endo-Disinfectant2 (concentration 300 ml/30 l, penetration time 10 minutes). The procedure described above was considered in this process. 1 2 Hamo AG, Switzerland Bode Chemie GmbH, Hamburg After cleaning, disinfection, rinsing, and drying, inspect for cleanliness and integrity of the surfaces (e.g., corrosion, material properties, free of sharp edges and dents) and patency of the internal channels; if applicable identification to deciding whether to restart the reprocessing or disposal care, check the technical and functional safety. 5.2.6 Sterilisation Only previously cleaned, disinfected and completely dried endoscopes and accessories may be sterilised. The products must be inserted in the sterilization tray prior to sterilization. One must ensure that the products are not kinked or damaged. The sterilization tray is then placed in a suitable sterilization pack (disposable sterilization packaging for the sterilization method) according to DIN EN 8682 and DIN EN ISO 11607-1. Holding clamps are installed in the original sterilization trays of the POLYDIAGNOST which prevent mechanical damage of unattached devices. PD_IFU_MicroPerc-optic-E_A PD-PN-0080 20 Rev.: A Date: 19.03.2015 Only the following presented sterilization methods are to be used for sterilisation; other sterilisation procedures are not allowed: MICROPERC® Optics with protection tube in the sterilization tray ETO gas sterilization (55 °C to max. 60 °C) Low-temperature plasma sterilization: ® STERRAD 100S Steam sterilization (autoclaving) 121 °C, 20 minutes (max. 124 °C) Steam sterilization (autoclaving) 132 / 134 °C, 5 minutes (max. 137 °C) X X Shifter (PD-DS- 1210), with the obturator shaft 10F (PD-PN-1020), 3- port adapter (PD-PN-1030) X X X X (X = allowed) Ensure that only appropriate equipment and product-specific validated methods for cleaning, disinfection and sterilization are used, and that the validated parameters are maintained at each cycle. In addition, observe the regulations of the hospital and the manufacturer of the sterilisers, and the applicable laws in your country. Proof in principle of suitability of endoscopes for effective ETO gas sterilization was performed by an independent testing laboratory, using the Sterivit process from DMB Apparatus GmbH, Wiesbaden. The procedure described above was considered in this process. Note: It is the user's responsibility to perform the treatment process to achieve the desired sterilization. The use of various sterilization processes in alternating sequence can lead to premature ageing of endoscopes. If possible, use only one of the approved methods. PD_IFU_MicroPerc-optic-E_A PD-PN-0080 21 Rev.: A Date: 19.03.2015 5.2.7 Material tolerability One cannot guarantee that this list is complete due to constant technical development. We recommend the tested and approved disinfectants (type 1) and detergent (type 2) shown below: Manual cleaning and disinfection / sterilization: Product name Manufacturer Type ® Advanced Sterilization Products c/o Johnson & Johnson Medical GmbH 2 Cidex OPA Advanced Sterilization Products c/o Johnson & Johnson Medical GmbH 1 ® Bode Chemie GmbH 1 ® Bode Chemie GmbH 1 ® Bode Chemie GmbH 1 Sekusept Extra N ® Ecolab GmbH 1, 2 ® Ecolab GmbH 1 Sekusept Plus ® Ecolab GmbH 1, 2 Instru Plus Laboratory of Dr Deppe, PhD 1 Instru Star Laboratory of Dr Deppe, PhD 1, 2 Instru Zym Laboratory of Dr Deppe, PhD 2 ® Schülke & Mayr GmbH 1 ® Schülke & Mayr GmbH 1 CIDEZYME ® Aseptisol Korsolex AF Korsolex Plus Sekusept Forte gigasept gigasept FF Mechanical cleaning and disinfection / sterilization: Product name Manufacturer Type BHT Scope Cleaner BHT Hygienetechnik GmbH 2 BHT Scope Disinfectant BHT Hygienetechnik GmbH 1 ® Bode Chemie GmbH 2 Korsolex Endo-Cleaner ® Bode Chemie GmbH 2 ® Bode Chemie GmbH 1 neodisher Septo DN ® Dr Weigert GmbH & Co. KG 1 ® Dr Weigert GmbH & Co. KG 1 Sekumatic FD Ecolab GmbH 1 Endomat Plus Laboratory of Dr Deppe, PhD 1 3E-Zyme Dismoclean 24 Vario Korsolex Endo-Disinfectant neodisher Septo DA ® Medisafe UK, Ltd. 2 ® Schülke & Mayr GmbH 1 ® Schülke & Mayr GmbH 2 ® Schülke & Mayr GmbH 2 thermosept ED thermosept ER thermosept RKN-zym PD_IFU_MicroPerc-optic-E_A PD-PN-0080 22 Rev.: A Date: 19.03.2015 Please ensure when selecting the cleaning agents and disinfectant that these do not contain the following listed chemicals: - aromatic hydrocarbons - hydroxylamine - weak and strong mineral acids - isobutene - weak and strong organic acids - isopropanol - oxidising acids - iodine and tincture of iodine - strong bases - iodine starch solution - acetone - potassium hydroxide solution - ethanol - potassium bifluoride - ethyl acetate - potassium hypochlorite - ethylene glycol - calcium hypochlorite - battery acid 10% - aqua regia - formic acid - cupric chloride - long-chain alcohols from 3C atoms - methanol - aluminium chloride - methyl chloride - concentrated ammonia - methyl ethyl ketone - ammonium bifluoride - mineral lubricants - aniline hydrochloride - monochloroacetic acid - antimony chloride - sodium hydroxide (10%) and conc. - benzene - sodium hypochlorite - benzoic acid - nicotinic acid - benzene - nitrobenzene - bromine - perchlorethylene - bromine > 1% - perchloric acid - hydrogen bromide - phenol solution - butanol - phosphoric acid (10%) - chlorine - mercuric chloride - lime chloride - nitric acid (10%) - chloric acid - hydrochloric acid (10%) - chlorosulphonic acid - sulphuric acid (10%) and conc. - chloroform - styrene - chromic acid - turpentine - chromic acid - tetra-hydrochloric - dimethylformamide - toluol - ferric chloride - trichloroethane - acetic acid (10%) and conc. - trichlorethylene - hydrofluoric acid - hydrogen peroxide (30%) - hydrofluoric acid - xylene - formalin (30%) - cinnammonium hexachloride - glycol and glycolic acid - citric acid PD_IFU_MicroPerc-optic-E_A PD-PN-0080 23 Rev.: A Date: 19.03.2015 5.3 Storage of optic and accessories - The storage area must be germ-free, low dust, dry and well-ventilated. Avoid temperature variation. - Do not store the optic in the carrying case. - Store the optics and accessories in the supplied protective tube in an appropriate sterilization tray or a suitable storage tray. This reduces the risk of damage. - Thoroughly dry all optic parts and accessories before storage. - Store the accessories separately from the optic. - Storage in direct sunlight, high temperature or under the influence of X-rays can damage the optic and accessories, or pose a risk of infection. PD_IFU_MicroPerc-optic-E_A PD-PN-0080 24 Rev.: A Date: 19.03.2015 6 Troubleshooting 6.1 Occurrence of a problem Problem: Possible causes: Remedy: Problem: Possible causes: Remedy: Problem: Possible causes: Remedy: No picture. - no or insufficient connection to the light guide cable/endoscope or the light source. - incorrect light guide cable adapter - no or insufficient connection between the endoscope and the ocular - defective optic - light source and / or camera and / or monitor defective - configuration of the monitor / camera is not correct - mains power not connected, or failed - check the connections to the light guide cable and ocular - check the light guide cable - check the light source, camera and monitor - check the monitor / camera configuration - check the mains power - send in the optic Cloudy image, stripes, streaks, etc. - the optical components of the endoscope are dirty - defective optic - carefully clean with a swab dunked in alcohol (70% ethanol) or appropriate cloths - send in the optic Severe noise due to insufficient amount of light. - the optical components of the endoscope are dirty - insufficient connection to the light guide cable/endoscope or the light source. - insufficient connection between the endoscope and the ocular - defective light guide cable or defective light guide to the optic - careful cleaning with a Q-tip dunked in alcohol or suitable cloths - check the connections to the light guide cable and ocular - check the light guide cable - send in the optic If the trouble cannot be solved using simple measures, please contact your service technician or your POLYDIAGNOST customer representative. PD_IFU_MicroPerc-optic-E_A PD-PN-0080 25 Rev.: A Date: 19.03.2015 7 Repair, warranty, disposal 7.1 Sending for repairs Maintenance of defective equipment may only be performed by persons authorized by the manufacturer, and only with the use of original spare parts. Do not make any unauthorized modification to the product and do not attempt a repair. This could result in equipment damage and thus a danger to patients / staff. Unauthorized changes or repairs release the manufacturer from any liability for the functionality and reliability of the device. Arbitrarily performed repairs performed during the warranty period void any warranty. Important: Ask for a repair number from POLYDIAGNOST before sending the device. You can send the unit for repair with this repair number. Provide a description of the fault and the phone number of the contact with the shipment Equipment must be thoroughly cleaned and disinfected before being sent for repair. Place a written confirmation of this with the device. Insufficiently reprocessed devices represent an infection risk for anyone who comes into contact with it. Contaminated instruments are not accepted by POLYDIAGNOST. 7.2 Warranty The warranty period is 12 months from date of invoice. 7.3 Disposal The device must be disposed at the end of its useful life in accordance with local requirements. PD_IFU_MicroPerc-optic-E_A PD-PN-0080 26 Rev.: A Date: 19.03.2015 8 Transport of the optic Optic may only be transported and disposed if they are in a disinfected state. In order to reduce the risk of damage, transport the optic and accessories using a sterilisation tray or appropriate storage tray. Or transport the optic using the carrying case. Ensure that the optic are carefully placed in the places provided for them in the case, and that it is not closed as long the cables stick out of the case. NOTE: The carrying case cannot be cleaned or disinfected. Clean and disinfect or sterilize the optic before you put it in the carrying case. Important: Observe the following instructions if there is transport damage, as not complying with the formal requirements of the transport insurer may lead to non-payment of claims. If there is transport damage, it is in your interest to ensure payment of damage claims, and those claims must be made to agents of the parcel services / transport companies as per the relevant provisions in time for determination of the damages. This means loss or damage of the goods which can be recognised from the outside must be notified by the receiver to the freight forwarder in the case of loss or damage, at latest at the delivery of the goods. If transported by rail, in addition, one must request a statement of facts. For parcel shipments, before acceptance, damaged packages must be indicated to the parcel delivery service in writing. If damages are not immediately recognised, they must be notified after recognition immediately and in writing to the parcel service or the transport company. In addition, notify the sending office in our company, with the delivery note and the invoice number, and put your complaint into the above-mentioned documents. 9 Classification Classification: CE: This device complies with the requirements of Council Directive 93/42/EEC concerning medical devices. 0483 This product is in class IIa. POLYDIAGNOST GmbH Am Söldnermoos 17 D – 85399 Hallbergmoos Telephone: +49 (0)811 9987338-0 PD_IFU_MicroPerc-optic-E_A PD-PN-0080 27 Rev.: A Date: 19.03.2015