1
Join Me
User Guide & Tutorial
TELSTRA
®
EASYTOUCH
DISCOVERY 3
T3 Join Me User Guide
1
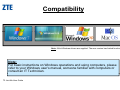
Compatibility
All Products
P d t Supported
S
t d
Note: 64-bit Windows drivers are supplied. The mac version has limited functionality.
Note:
For basic instructions on Windows operations and using computers, please
refer to your Windows user’s manual, someone familiar with computers or
consult an IT Technician.
T3 Join Me User Guide
2
Launch Join Me
Double-Click on the JoinME icon on y
your desktop
p to
launch the software
If no icon is present:
Please install JoinME from the supplied DVD or visit the
ZTE website to download www.zte.com.au
www zte com au
Note:
For basic instructions on Windows operations and using computers and
peripherals, please see your respective user’s manual.
T3 Join Me User Guide
3
Initial Loading
Join Me will now initialize ((ie. the software will now load))
Note:
For basic instructions on Windows operations and using computers and
peripherals, please see your respective user’s manual.
T3 Join Me User Guide
4
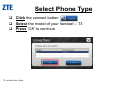
Select Phone Type
Click the connect button
Select the model of your handset – T3
Press ‘OK’ to continue
T3 Join Me User Guide
5
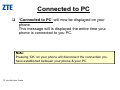
Connected to PC
‘Connected
Connected to PC
PC’ will now be displayed on your
phone.
This message will is displayed the entire time your
phone is connected to you PC.
Note:
N
t
Pressing ‘OK’ on your phone will disconnect the connection you
have established between your phone & your PC.
T3 Join Me User Guide
6
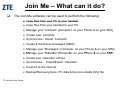
Join Me – What can it do?
The Join Me software can be used to perform the following:
Copy files from your PC to your handset
Copy files from your handset to your PC
Manage
g yyour ‘Contacts’ ((Computer, on yyour Phone & on yyour SIM))
Create new ‘Contacts’
Synchronise - Import ‘Contacts’
Create & Send text messages (SMS)
Manage your ‘Messages’ (Computer, on your Phone & on your SIM)
Manage
M
your ‘C
‘Calender’
l d ’ (C
(Computer,
t on your Ph
Phone & on your SIM)
Create new ‘Calender’ entries
Synchronise – Import/Export ‘Calendar’
Calendar
Connect to the Internet
Backup/Recover
p
p
phone,, PC data & the non-volatile ((NV)) file
T3 Join Me User Guide
7
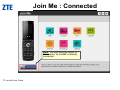
Join Me : Connected
Note: You only have the option to
‘Disconnect’ as JoinME is already
connected.
T3 Join Me User Guide
8
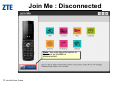
Join Me : Disconnected
Note: You only have the option to
‘Connect’ as JoinME is
disconnected.
T3 Join Me User Guide
9
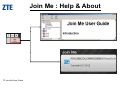
Join Me : Help & About
T3 Join Me User Guide
10
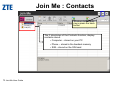
Join Me : Contacts
To return to the main
menu press the back
button
The 3 directories of the Contacts function, display
contacts stored:
• Computer – stored on your PC
• Phone – stored in the handset memory
• SIM – stored on the SIM card
T3 Join Me User Guide
11
Join Me : SMS
Message List viewing area
The 3 directories of the Message
g function,, display
p y
messages stored in folders:
• Computer – stored on your PC
• Phone – stored in the handset memory
• SIM – stored on the SIM card
T3 Join Me User Guide
12
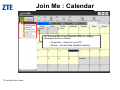
Join Me : Calendar
The 2 directories of the Calendar function, display
messages stored in folders:
• Computer – stored on your PC
• Phone – stored in the handset memory
T3 Join Me User Guide
13
Join Me : Internet
The ‘Connect’ button creates an
internet connection
Status
Ares
T3 Join Me User Guide
14
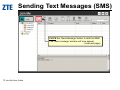
Sending Text Messages (SMS)
CLICK the ‘New Message’ button to draft an SMS.
The ‘New message’
g window will now appear.
pp
(see next page)
T3 Join Me User Guide
15
Sending SMS
Enter the phone number here
CLICK the magnifying glass
to select a contact from PC,
mobile phone or SIM.
Type your message here
Note: You can send the same message to multiple recipients
T3 Join Me User Guide
16
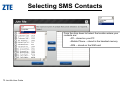
Selecting SMS Contacts
From the drop down list select the location where your
contacts are:
• PC– stored on your PC
• Mobile Phone – stored in the handset memory
• SIM – stored on the SIM card
T3 Join Me User Guide
17
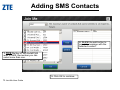
Adding SMS Contacts
2. CLICK the
2
th add
dd b
button
tt tto
populate message with the
selected contact.
1. TICK the
1
th b
box off the
th contact
t t you
wish to SMS. Remember you can
select more than one.
3. Click OK to continue.
T3 Join Me User Guide
18
Sending SMS
CLICK save as
draft to save & edit
& send later
T3 Join Me User Guide
CLICK send to
send the SMS
19
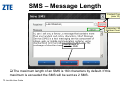
SMS – Message Length
Contact Counter
(max 10)
Character / SMS
Number Counter
CLICK send to
send the SMS
The maximum length of an SMS is 160 characters by default. If this
maximum is exceeded the SMS will be sent as 2 SMS.
T3 Join Me User Guide
20
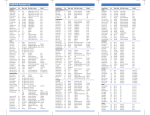
SMS – Unicode characters
The characters indicated by a red box in the image
here are Unicode Characters. This means that they are
not part of the standard SMS character set and they
require 2 SMS characters to transmit them
them.
If you use any of these characters in your message
the message length is limited to 70 characters
characters. If you
exceed 70 characters then the message will be sent
using 2 SMS messages.
T3 Join Me User Guide
21
Sending SMS
Note: The status window will be displayed showing
the status of your sent message.
SMS messages sent from JoinME are stored on your PC in the
‘Computer’ folder of the ‘Message’ tab.
T3 Join Me User Guide
22
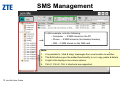
SMS Management
In this example, note the following:
• Computer – 2 SMS stored on the PC
• Phone – 9 SMS stored in the handset memory
• SIM – 2 SMS stored on the SIM card
Note:
T3 Join Me User Guide
1.
It is possible to “click & drag” messages from one location to another.
2.
The Edit buttons give the added functionality to cut, copy, paste & delete
3.
A right-click displays more menu options.
4.
Ctrl+C, Ctrl+X, Ctrl+V shortcuts are supported.
23
SMS Backup/Recover
NAVIGATE to the
backup/restore location
T3 Join Me User Guide
24
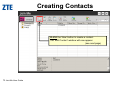
Creating Contacts
CLICK the ‘New’ button to create a contact.
The ‘Edit Contact’ window will now appear.
(see next page)
T3 Join Me User Guide
25
Create ‘Contact’
1. From the options listed SELECT the location
where your contact will be saved:
• Computer – stored on your PC
• Phone – stored in the handset memory
•SIM – stored on the SIM card
• All – computer, phone & (U)SIM
2. ENTER all the information for the
contact for the new contact
3. CLICK Save
T3 Join Me User Guide
Note: There is space to insert a picture,
however this is not supported.
26
Contact Management
In this example
example, note the following:
• Computer – 1 Contacts stored on the PC
• Phone – 12 Contacts stored in the handset memory
• SIM – 0 Contacts stored on the SIM card
Notes:
T3 Join Me User Guide
1.
It is p
possible to “click & drag”
g contacts from one location to another.
2.
A right-click displays more menu options.
3.
Ctrl+C, Ctrl+X, Ctrl+V shortcuts are supported.
4.
Contact information supported by computer, phone & SIM card is different,
some information
i f
i lloss may occur when
h contact iinformation
f
i iis copied
i d or
moved from your PC to the phone and SIM.
27
Export Contacts
SELECT the contacts you want to export.
CLICK the ‘Export’ button to export contacts
then SELECT the export option.
(see next pages)
T3 Join Me User Guide
28
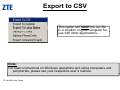
Export to CSV
This option will SAVE the csv file
to a location on yyour computer
p
for
use with other applications.
Note:
For basic instructions on Windows operations and using computers and
peripherals, please see your respective user’s manual.
T3 Join Me User Guide
29
Export to Outlook
TICK the
th b
boxes tto select
l t the
th fields
fi ld you wish
i h
to export from Join Me, then SELECT the
Outlook fields you wish to map them to.
CLICK ‘Start
Start Export
Export’ to commence the
export.
T3 Join Me User Guide
30
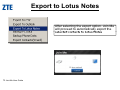
Export to Lotus Notes
After selecting the export option. Join Me
will proceed to automatically export the
selected
l t d contacts
t t to
t Lotus
L t Notes
N t
T3 Join Me User Guide
31
Export to VCard
BROWSE to
t th
the folder
f ld where
h
you wantt
to save the VCards, then CLICK OK
T3 Join Me User Guide
32
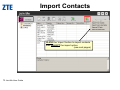
Import Contacts
CLICK the
th ‘Import’
‘I
t’ button
b tt to
t import
i
t contacts
t t
then SELECT the import option.
(see next pages)
T3 Join Me User Guide
33
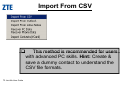
Import From CSV
T3 Join Me User Guide
This method is recommended for users
with advanced PC skills. Hint: Create &
save a dummy contact to understand the
CSV file formats.
34
Import From Outlook
1. SELECT the appropriate synchronisation option, click
OK & follow the prompts to allow access (if prompted)
Note:
If you are having trouble with the importing of contacts from Outlook not all
f
functions
ti
are supported.
t d ZTE suggestt you ffollow
ll
th
the IImportt from
f
CSV process
outlined on the previous page.
T3 Join Me User Guide
35
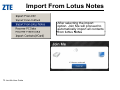
Import From Lotus Notes
After selecting the import
option. Join Me will proceed to
automatically import all contacts
f
from
Lotus
L t Notes
N t
T3 Join Me User Guide
36
Import from VCard
BROWSE to
t th
the folder
f ld where
h
you wantt
to save the VCards, then CLICK OK
T3 Join Me User Guide
37
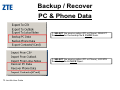
Backup / Recover
PC & Phone Data
1. SELECT the source option (PC or Phone), SELECT
the location for the backup file & CLICK Save.
1. SELECT the source option (PC or Phone), LOCATE
the backup
p file & CLICK Open.
p
T3 Join Me User Guide
38
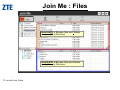
Join Me : Files
PC Explorer: Navigate & View folders on your PC in this
area.
Phone
o e Explorer:
p o e Navigate
a ga e & View
e folders
o de s o
on you
your p
phone
o e in
this area. This is the same directory structure as seen on the
handset in ‘File Manager’.
T3 Join Me User Guide
39
Join Me : Files
NAVIGATE & Browse
B
files
fil and
d folders
f ld
on your PC in this area.
NAVIGATE & Browse files and folders
your phone in this area.
T3 Join Me User Guide
40
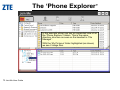
The ‘Phone Explorer’
In the example shown we see an expanded view of all
the ‘Phone Explorer’ folders. This is the same
directory structure as seen on the handset in ‘File
Manager’.
With the ‘My Pictures’ folder highlighted (as shown)
we see 2 image files.
T3 Join Me User Guide
41
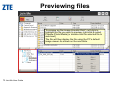
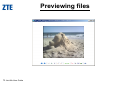
Previewing files
To preview an file (image & audio ONLY), left-click to
hi hli ht th
highlight
the fil
file you wish
i h tto preview,
i
right-click
i ht li k & select
l t
Preview Photo/Media {or double-click the selected file to
auto-load}
The file will then display the file using the PC’s default
image viewer
viewer. As shown on the next slide
slide.
T3 Join Me User Guide
42
Previewing files
T3 Join Me User Guide
43
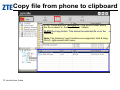
Copy file from phone to clipboard
In the 'Phone Explorer‘ NAVIGATE to the source folder where
the file is saved, ie. Audios, Pictures, Videos.
CLICK the Copy button
button. This stores the selected file on to the
clipboard.
Note: The following 'copy' functions are supported, click & drag,
Ctrl+C, right-mouse click menu.
T3 Join Me User Guide
44
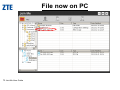
Paste file from phone to PC
In the 'PC Explorer‘ NAVIGATE to the destination folder where
you want to store the file on your PC (for this example the ‘My
Pictures’ folder was selected).
CLICK the Paste button. This stores the selected file on to the
clipboard.
Note: The following ‘paste' functions are supported, click & drag,
g
click menu.
Ctrl+V,, right-mouse
T3 Join Me User Guide
45
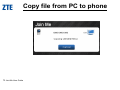
Copy file from PC to phone
T3 Join Me User Guide
46
File now on PC
T3 Join Me User Guide
47
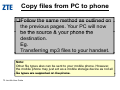
Copy files from PC to phone
Follow the same method as outlined on
the previous pages. Your PC will now
be the source & your phone the
destination.
Eg.
g mp3
p files to yyour handset.
Transferring
Note:
Other file types also can be sent to your mobile phone. However,
the mobile phone may just act as a mobile storage device as not all
file types are supported on the phone
phone.
T3 Join Me User Guide
48
Calendar ‘Month View’
The Import &
Export buttons
are not active
Date
Selection
CLICK the ‘Month View’ button to view all
entries for the month selected
Today is highlights
dark blue
T3 Join Me User Guide
49
Calendar ‘Week View’
The Import &
Export buttons
are not active
CLICK the ‘Week View’ button to view all the
entries for the week selected
T3 Join Me User Guide
50
Calendar ‘Day View’
The Import &
Export buttons
are active
CLICK the ‘Day View’ button to view all the
entries for the day selected
T3 Join Me User Guide
51
Calendar ‘List All’
The Import &
Export buttons
are active
CLICK the ‘List All’ button to view all entries
T3 Join Me User Guide
52
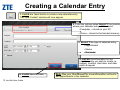
Creating a Calendar Entry
1. CLICK the ‘New’ button to create a new calendar entry.
The ‘New Contact’ window will now appear.
2. From the options listed SELECT the location
where your calendar entry will be saved:
• Computer – stored on your PC
• Phone – stored in the handset memory
3 SELECT the
3.
th ttype off calendar
l d entry:
t
• Appointment
• Memo
• Reminder
4. ENTER the information for the
calendar entry you wish to create. ie.
subject,
bj t location,
l
ti
start
t td
date,
t end
dd
date,
t
alarm & repeat.
5. CLICK Save & Close
T3 Join Me User Guide
Note:
N
t See
S your User
U
M
Manuall ffor more iinformation
f
ti on h
how tto
set appointments in the calendar.
53
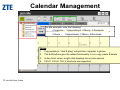
Calendar Management
In this example, note the following:
• Computer
p
– 2 Appointment,
pp
, 0 Memo,, 3 Reminder
• Phone – 1 Appointment, 2 Memo, 4 Reminder
Notes:
T3 Join Me User Guide
1.
It is p
possible to “click & drag”
g entries from computer
p
to p
phone.
2.
The Edit buttons give the added functionality to cut, copy, paste & delete
3.
In day & list views, a right-click displays more menu options.
4.
Ctrl+C, Ctrl+X, Ctrl+V shortcuts are supported.
54
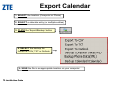
Export Calendar
1. SELECT the location (Computer or Phone)
2. SELECT a calendar entry (or multiple entries)
3. CLICK the ‘Export/Backup’ button
4. SELECT the backup file
format. ie. CSV,, TXT or Outlook
5. SAVE the file in an appropriate location on your computer
T3 Join Me User Guide
55
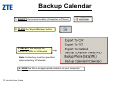
Backup Calendar
1. SELECT the source location (Computer or Phone)
2. CLICK the ‘Export/Backup’ button
3. SELECT the backup file
format. ie. XML or VCalendar
Note: A directory must be specified
when selecting VCalendar.
4. SAVE the file in an appropriate location on your computer
T3 Join Me User Guide
56
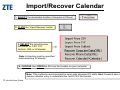
Import/Recover Calendar
1. SELECT the destination location (Computer or Phone)
2. CLICK the ‘Import/Recover’ button
3. SELECT the import/recover
file format. ie. CSV, TXT,
Outlook, XML or VCalendar.
Note: A directory must be specified
when selecting VCalendar.
4. CHOOSE then OPEN the file from the location on your computer
Note: This method is recommended for users with advanced PC skills. Hint: Create & save a
dummy calendar entry to understand the text & CSV file formats.
T3 Join Me User Guide
57
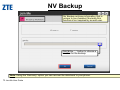
NV Backup
NV Backup archives information that is
unique to your handset. Normally this
function is not required
q
by
y an end user.
CLICK the ‘...’
... button to choose a
location for the backup.
Note: Using the ‘Recovery’ option you can recover the data back to your phone.
T3 Join Me User Guide
58
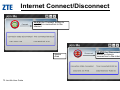
Internet Connect/Disconnect
CLICK the ‘Connect’ button to
establish a connection to the
internet.
Status
Ares
T3 Join Me User Guide
CLICK the ‘Disconnect’
Disconnect
button to close a
connection to the internet.
59
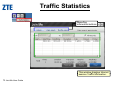
Traffic Statistics
Reporting
R
ti
information buttons
This window displays Internet
session / traffic
ff information.
f
T3 Join Me User Guide
60
Settings
•
•
•
T3 Join Me User Guide
General - Sets language, SMS settings, download mode etc
Alerts - Sets alert of phone connect, disconnect and SMS arrived
te et - Internet
e e APN Op
Options
o sa
are
ed
displayed
sp ayed & ca
can be cchanged
a ged if
Internet
changing carrier: User Name <blank>, Password <blank>,
Dial Number (*99#) [default is Telstra]
61
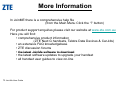
More Information
In JoinME there is a comprehensive
p
help
p file
(from the Main Menu Click the ‘?’ button)
For p
product support
pp enquiries
q
p
please visit our website at www.zte.com.au
Here you will find:
• comprehensive product information
((ZTE Next G handsets,, Telstra Data Devices & Car-kits))
• an extensive FAQ knowledgebase
• ZTE discussion forums
• the latest JoinMe software to download
• the latest software updates to upgrade your handset
• all handset user guides to view on-line
T3 Join Me User Guide
62