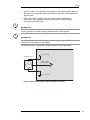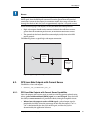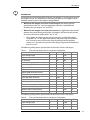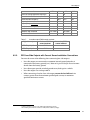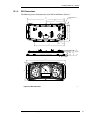
1
DPS
Display Panel Standard (DPS)
User Manual HY33-5012-IB/US
Ed. 07/2011
UM-928B05-201107-02
Parker Hannifin Corporation
Electronic Controls Division
1305 Clarence Avenue
Winnipeg, MB R3T 1T4 Canada
Office +1 204 452 6776
Fax
+1 204 478 1749
http://www.parker.com/ecd
http://www.vansco.ca
http://www.iqan.com
Copyright 2011 © Parker Hannifin Corporation. All rights reserved. No part of this work may be
reproduced, published, or distributed in any form or by any means (electronically,
mechanically, photocopying, recording, or otherwise), or stored in a database retrieval system,
without the prior written permission of Parker Hannifin Corporation in each instance.
Warning!
FAILURE OR IMPROPER SELECTION OR IMPROPER USE OF THE PRODUCTS AND/OR
SYSTEMS DESCRIBED HEREIN OR RELATED ITEMS CAN CAUSE DEATH, PERSONAL INJURY
AND PROPERTY DAMAGE.
•
This document and other information from Parker Hannifin Corporation, its subsidiaries and
authorized distributors provide product and/or system options for further investigation by users
having technical expertise.
•
The user, through its own analysis and testing, is solely responsible for making the final selection of
the system and components and assuring that all performance, endurance, maintenance, safety
and warning requirements of the application are met. The user must analyze all aspects of the
application, follow applicable industry standards, and follow the information concerning the product
in the current product catalog and in any other materials provided from Parker or its subsidiaries or
authorized distributors.
•
To the extent that Parker or its subsidiaries or authorized distributors provide component or system
options based upon data or specifications provided by the user, the user is responsible for
determining that such data and specifications are suitable and sufficient for all applications and
reasonably foreseeable uses of the components or systems.
Offer of Sale
The items described in this document are hereby offered for sale by Parker Hannifin Corporation, its
subsidiaries or its authorized distributors. This offer and its acceptance are governed by the provisions
stated in the "Offer of Sale" elsewhere in this document, or available at www.parker.com.
Contents
Contents
1. Introduction
1.1.
Safety symbols
2. Precautions
2.1.
5
5
6
General safety regulations
6
2.1.1.
2.1.2.
2.1.3.
2.1.4.
7
7
7
7
Construction regulations
Safety during installation
Safety during start-up
Safety during maintenance and fault diagnosis
3. Understanding the DPS
8
4. How to Use this Manual
10
4.1.
Diagram Conventions
10
5. Inputs
12
5.1.
DPS Digital Inputs
12
5.2.
5.1.1. DPS Digital Input Capabilities
5.1.2. Digital Input Installation Connections
DPS Analog Inputs
12
14
15
5.3.
5.2.1. Analog Input Capabilities
5.2.2. Analog Input Installation Connections
DPS Direct Coupled Frequency Inputs
15
16
17
5.3.1.
5.3.2.
18
18
DPS Direct Coupled Frequency Input Capabilities
Direct Coupled Frequency Input Installation Connections
6. DPS Outputs
20
6.1.
DPS High-Side Outputs
20
6.2.
6.1.1. DPS High-Side Output Capabilities
6.1.2. DPS High-Side Output Installation Connections
DPS Low-Side Outputs with Current Sense
20
21
22
6.2.1.
6.2.2.
DPS Low-Side Outputs with Current Sense Capabilities
22
DPS Low-Side Outputs with Current Sense Installation Connections 24
7. Power
26
7.1.
Logic and Output Power
26
7.2.
7.1.1. Logic and Output Power Installation Connections
Sensor Power
26
26
7.2.1.
7.2.2.
27
27
DPS Sensor Power Capabilities
Sensor Power Installation Connections
8. Communication
28
8.1.
Controller Area Network (CAN)
28
8.2.
USB Communication
28
Display Panel Standard (DPS)
3
Contents
9. LCD
30
9.1.
Backlight
30
9.2.
LCD Heater
30
9.3.
Large Graphic LCD
31
10. Gauges
10.1. Gauge Backlighting
32
33
11. Status LEDs
34
12. Buttons
35
12.1. Wake-up Feature
35
13. Buzzer
36
14. DPS Connectors
37
14.1. DPS Connector Pin-outs
38
15. Installing a DPS into a Vehicle
40
15.1. DPS Mechanical Requirements
40
15.1.1. Mounting the DPS to a Vehicle
15.1.2. DPS Dimensions
15.2. DPS Environmental Requirements
40
41
42
15.3. DPS Electrical Requirements
42
16. Startup
16.1. Start-up procedures
16.1.1. Starting the control system
16.1.2. Prepare for system start
16.1.3. Start the system
17. Appendix A
17.1. DPS Technical Overview
44
44
44
45
45
46
46
18. Glossary of Terms
49
19. Index
53
Display Panel Standard (DPS)
4
Introduction
1.
Introduction
These instructions are meant as a reference tool for the vehicle manufacturer's
design, production, and service personnel.
The user of this manual should have basic knowledge in the handling of electronic
equipment.
1.1.
Safety symbols
Sections regarding safety, marked with a symbol in the left margin, must be read and
understood by everyone using the system, carrying out service work or making
changes to hardware and software.
The different safety levels used in this manual are defined below.
WARNING
Sections marked with a warning symbol in the left margin, indicate that a hazardous
situation exists. If precautions are not taken, this could result in death, serious injury
or major property damage.
CAUTION
Sections marked with a caution symbol in the left margin, indicate that a potentially
hazardous situation exists. If precautions are not taken, this could result in minor
injury or property damage.
NOTICE
Sections marked with a notice symbol in the left margin, indicate there is important
information about the product. Ignoring this could result in damage to the product.
Contact the manufacturer if there is anything you are not sure about or if you have
any questions regarding the product and its handling or maintenance.
The term "manufacturer" refers to Parker Hannifin Corporation.
Display Panel Standard (DPS)
5
Precautions
2.
Precautions
2.1.
General safety regulations
Work on the hydraulics control electronics may only be carried out by trained
personnel who are well-acquainted with the control system, the machine and its
safety regulations.
WARNING
Mounting, modification, repair and maintenance must be carried out in accordance
with the manufacturer's regulations. The manufacturer has no responsibility for any
accidents caused by incorrectly mounted or incorrectly maintained equipment. The
manufacturer does not assume any responsibility for the system being incorrectly
applied, or the system being programmed in a manner that jeopardizes safety.
WARNING
Damaged product may not be used. If the control system shows error functions or if
electronic modules, cabling or connectors are damaged, the system shall not be
used.
WARNING
Electronic control systems in an inappropriate installation and in combination with
strong electromagnetic interference fields can, in extreme cases, cause an
unintentional change of speed of the output function.
NOTICE
As much as possible of the welding work on the chassis should be done before the
installation of the system. If welding has to be done afterwards, the electrical
connections on the system must be disconnected from other equipment. The
negative cable must always be disconnected from the battery before disconnecting
the positive cable. The ground wire of the welder shall be positioned as close as
possible to the place of the welding. The cables on the welding unit shall never be
placed near the electrical wires of the control system.
Display Panel Standard (DPS)
6
Precautions
2.1.1.
Construction regulations
CAUTION
The vehicle must be equipped with an emergency stop which disconnects the supply
voltage to the control system's electrical units. The emergency stop must be easily
accessible to the operator. The machine must be built if possible, so that the supply
voltage to the control system's electrical units is disconnected when the operator
leaves the operator’s station.
2.1.2.
Safety during installation
CAUTION
Incorrectly positioned or mounted cabling can be influenced by radio signals which
can interfere with the functions of the system.
2.1.3.
Safety during start-up
WARNING
The machine's engine must not be started before the control system is mounted and
its electrical functions have been verified.
Ensure that no one is in front, behind or nearby the machine when first starting up
the machine.
Follow the instructions for function control in the Start-up section.
2.1.4.
Safety during maintenance and fault diagnosis
CAUTION
Ensure that the following requirements are fulfilled before any work is carried out on
the hydraulics control electronics.
• The machine cannot start moving.
• Functions are positioned safely.
• The machine is turned off.
• The hydraulic system is relieved from any pressure.
• Supply voltage to the control electronics is disconnected.
Display Panel Standard (DPS)
7
Understanding the DPS
3.
Understanding the DPS
The Display Panel Standard (DPS) is an innovative user interface that makes
complete vehicle information accessible in a single centralized location. The Display
Panel Standard is a software-programmable, multiplexing, display panel that
controls indicator LEDs, gauges, and a graphic LCD screen in a vehicle HMI. The
DPS also monitors various dedicated input types, and activates solid-state switched
outputs.
The DPS product family is a generic platform of features that can be implemented in
many different instrument cluster shapes. The figure below shows a typical DPS
layout.
Figure 1: DPS with 4 gauges
The DPS is controlled by software.
•
You can write the software using the Vansco Display Software Developer's Kit
(SDK) tool. Contact your Parker Vansco Account Representative for more details
about the SDK.
The DPS has many features, as follows:
•
The DPS has 26 LEDs that are used as tell-tale lights. There are 6 green, 12
amber, 7 red and 1 blue LED. The locations of the these colors is fixed. The
overlay can be configured by the customer, depending on volumes. Contact your
Parker Vansco Account Representative for more details..
•
The DPS is available with 3, 4, or 5 gauges and a large (256x80) LCD.
•
The DPS has a buzzer that is intended to be used typically for a fault alarm, but
could also be used for other noises.
•
The DPS can monitor up to 27 inputs:
•
ο
5 analog inputs.
ο
2 frequency inputs
ο
20 digital inputs (4 are configured for Wake-up/power control).
The DPS has up to 3 outputs, rated at 2.5 A maximum current:
Display Panel Standard (DPS)
8
Understanding the DPS
•
•
ο
1 high-side output (configured for alternator excitation and is limited to
80mA max).
ο
2 low-side outputs (these outputs monitor current, and can be used for
current feedback if a high-side output is used for Pulse Width Modulation
(PWM) control).
The DPS can detect the following faults on the outputs:
ο
Short-circuit
ο
Over-current
ο
Open load
ο
Short-to-battery
ο
Short-to-ground
The DPS has 3 connectors:
ο
2 x 20-pin Molex connectors that are used to interface with the inputs,
outputs, and CAN.
ο
1 x 4-pin Molex connector for USB interface, typically routed to a panel
mounted USB port.
a) A separate cable is available to provide the interface from the 4-pin
molex connector to a USB, type B port.
Display Panel Standard (DPS)
9
How to Use this Manual
4.
How to Use this Manual
This manual describes the hardware components of the DPS, but does not explain
how to write or configure the software. For more information about software, refer to
the appropriate software manual, or contact your Parker Vansco Account
Representative.
4.1.
Diagram Conventions
There are many connection diagrams found throughout this manual. The following
table provides meanings for the different symbols used in those diagrams:
Symbol
Meaning
General input
General output
Frequency input
Analog input
Frequency sensor
Pulse sensor
Resistive sensor
General sensor
Application switch
Display Panel Standard (DPS)
10
How to Use this Manual
Symbol
Meaning
Load
Pull-down resistor
Pull-up resistor
Battery
Fuse
Resistor
Ground
Chassis ground
Display Panel Standard (DPS)
11
Inputs
5.
Inputs
The DPS has three types of inputs, as follows:
•
Digital
•
Analog
•
Frequency
NOTICE
Do not connect inputs directly to unprotected inductive loads such as solenoids or
relay coils, because they can produce high voltage spikes that may damage the DPS.
If an inductive load must be connected to an input, use a protective diode or
transorb.
5.1.
DPS Digital Inputs
The DPS has 20 digital inputs:
•
INPUT1_D through INPUT20_D.
The digital inputs can be categorized into two groups called type 1 and type 2. Four
of the digital inputs (INPUT1_D through INPUT4_D) are type 1, and the remaining
digital inputs (INPUT5_D through INPUT20_D) are type 2.
The differences between the two types of digital inputs are the switching thresholds
and the maximum processing speeds.
5.1.1.
DPS Digital Input Capabilities
5.1.1.1.
Type 1
Type 1 digital inputs are processed quicker than type 2 digital inputs. All type 1
digital inputs have an option to be populated as either an active high input (with a
pull-down resistor), or an active low input (with a pull-up resistor). The pull-up
resistors are referenced to a switched battery supply, which is equivalent to the
battery voltage when the unit is in normal operating power mode, but is
disconnected when in inactive or disconnected power modes.
The type 1 digital inputs can be configured as wake-up inputs. When a high signal is
applied to a digital input configured as a wake-up input when the unit is in inactive
power mode, the unit will enter normal operating mode and begin to operate. A
digital input that is configured as a wake-up input must also be configured as an
active high input (pull-down resistor) to prevent the system from continuously
remaining powered up. All configuration is done using the Parker Vansco Display
SDK.
Display Panel Standard (DPS)
12
Inputs
INPUT1_D through INPUT4_D are type 1 inputs. On the standard DPS configuration,
type 1 inputs have 2.0K ohm pull-down resistors and are configured as wake-up
inputs.
The following table provides specifications for the DPS's type 1 digital inputs:
Table 1:
Type 1 Digital Input Capabilities
Item
Min
Nom
32
Unit
Input voltage range
0
-
Pull-up / pull-down resistance
-
2
V
Minimum negative going threshold
-
-
1.587
V
Maximum positive going threshold
4.013
-
-
V
13
mV
kΩ
Error in switching threshold due to circuit
leakage current
5.1.1.2.
Max
Cutoff frequency (3dB)
-
242
-
Hz
Input capacitance
-
50
-
nF
Over-voltage
-
-
36
V
Wetting current
-
12
-
mA
Amplifier gain
-
2
-
V/V
Type 2
All type 2 digital inputs have an option to be populated as either an active high input
(with a pull-down resistor), or an active low input (with a pull-up resistor). The pullup resistors are referenced to a switched battery supply, which is equivalent to the
battery voltage when the unit is in normal operating power mode, but is
disconnected when in inactive or disconnected power modes.
Some of the type 2 digital inputs can be configured as wake-up inputs. When a high
signal is applied to a digital input configured as a wake-up input when the unit is in
inactive power mode, the unit will enter normal operating mode and begin to
operate. A digital input that is configured as a wake-up input must also be
configured as an active high input (pull-down resistor) to prevent the system from
continuously remaining powered up.
INPUT5_D through INPUT20_D are type 2 inputs. On the standard DPS
configuration, type 2 inputs 9-12, 14, and 19 have 2.0K ohm pull down resistors. Type
2 inputs 5-8, 13, 15-18, and 20 have 2.0K ohm pull up resistors.
The following table provides specifications for the DPS's type 2 digital inputs:
Table 2:
Type 2 Digital Input Capabilities
Item
Min
Nom
Max
Input voltage range
0
-
Pull-up / pull-down resistance
-
2
Minimum negative going threshold
-
-
1.953
V
Maximum positive going threshold
4.668
-
-
V
47.5
mV
-
Hz
Error in switching threshold due to circuit
leakage current
Cutoff frequency (3dB)
Display Panel Standard (DPS)
-
670
32
Unit
V
kΩ
13
Inputs
Item
5.1.2.
Min
Nom
Max
Unit
Input capacitance
-
50
-
nF
Over-voltage
-
-
36
V
Wetting current
-
12
-
mA
Amplifier gain
-
2
-
V/V
Digital Input Installation Connections
You must be aware of the following when connecting digital inputs:
A digital input is typically connected to a switch that is either open or closed.
•
When the switch is open, the pull-down resistor will ensure no voltage exists on
the input signal, which will be interpreted by the DPS as inactive.
•
When the switch is closed, the input is connected to battery voltage, which will
be interpreted by the DPS as active.
Since the input is active high
•
It must be connected to battery power to ensure there is a battery connection
when the state of the input changes.
•
The power provided to the digital switch connected to the input must be
provided through a fuse in the wire harness.
The following shows a typical active high digital input connection:
Internal to product
Application Switch
Active High
Digital Input
Battery
Figure 2: Active high digital input
Display Panel Standard (DPS)
14
Inputs
5.2.
DPS Analog Inputs
Analog inputs are typically used to read electrical signals that span a voltage range.
The DPS has 5 analog inputs:
•
INPUT21_A through INPUT24_A (Analog 1 through Analog 4).
•
A high-side output, OUTPUT2_HS has been configured as a 5th analog input in
the standard DPS variants (Analog 5).
Three of the analog inputs, INPUT21_A, INPUT22_A and INPUT24_A are type 1,
and INPUT23_A is type 3.
i
INFORMATION
Analog inputs can be configured to function as programmable digital inputs.
5.2.1.
Analog Input Capabilities
5.2.1.1.
Type 1
Type 1 analog inputs have an option for a pull-up resistor referenced to a regulated
+5V supply (through a diode, so actual reference will be about 4.4V), and options for
pull-down resistors to provide a wider array of input range options. Type 1 analog
inputs are well-suited to read resistive sensors or voltage sensors.
The standard DPS variants type 1 analog inputs are configured as follows:
5.2.1.2.
•
Analog 1 is configured for resistive loads and has an input range of 0-350Ω with a
150Ω pull-up.
•
Analog 2 is configured for voltage loads and has an input range of 0-16V.
•
Analog 4 is configured for voltage loads and has an input range of 0-6.6V.
Type 2
Type 2 analog inputs are well-suited to read voltage sensors, but are not
recommended for resistive sensors, because they do not have a regulated pull-up
reference (as the type 1 and type 3 inputs have).
The standard DPS variant high side output OUTPUT2_HS is configured to be used as
an additional analog input. It is a type 2 analog input and is configured as follows:
•
5.2.1.3.
Analog 5 is configured for voltage loads and has an input range of 0-6.6V.
Type 3
The type 3 input is essentially the same as the type 1 inputs with the exception that it
has a software selectable pull-up resistor. This software selectable pull-up resistors is
intended to allow for an extended range when the input is configured for reading a
resistive sensor. An extended range is often required for reading thermistors that
operate over a large temperature range.
The standard DPS variants type 3 analog inputs are configured as follows:
Display Panel Standard (DPS)
15
Inputs
•
5.2.2.
Analog 3 is configured for resistive loads and has a input range of 600-100KΩ.
Analog Input Installation Connections
When connecting analog inputs, there are two issues you must be aware of: system
noise and ground shift.
System Noise
Analog inputs are more susceptible to system noise than digital inputs. Too much
system noise can create inaccurate analog input readings.
To reduce system noise:
•
Use the shortest possible wires when connecting analog inputs to sensors, to
prevent noise pickup on the sensors.
The following shows how to connect analog inputs to reduce system noise:
Internal to product
Sensor
+5 Vdc Sensor Supply
Analog Input
Sensor Ground
Figure 3: Analog input system noise connection
Ground Shift
The accuracy of analog inputs can be affected by ground shift. Ground shift refers to
the difference between the DPS system ground input voltage (system ground inputs
are called GND), and the sensor ground voltage.
To reduce ground shift:
•
Dedicate one of the four system ground inputs (GND) to sensors that have
dedicated ground wires, and connect all sensor grounds to this system ground
input.
•
Splice the other three system ground inputs together in the vehicle harness
(close to the connector), to provide a better ground for the noisier low-side
outputs and digital circuits.
Display Panel Standard (DPS)
16
Inputs
•
i
Ensure the sensor’s ground connection is close to the system ground
connections. This will help ensure the signal remains within the digital
activation range of the input.
INFORMATION
The DPS system ground inputs are rated for low-current signals, which ensures the
sensor's ground is very close in voltage potential to the system ground.
i
INFORMATION
Sensors that don’t have a dedicated ground wire are typically grounded to the
vehicle chassis through the sensor’s body.
The following shows how to address ground shift with sensors that have dedicated
ground wires:
Internal to product
Sensor Power
Active Sensor
Analog Input
Pull-up
Resistor
Analog Input
Resistive Sensor
Figure 4: Analog input ground shift connection for sensors that have dedicated ground
wires
5.3.
DPS Direct Coupled Frequency Inputs
There is one type of frequency input in the DPS:
•
Direct coupled frequency input
Direct coupled frequency inputs are typically used to read pulse signals.
The DPS has 2 direct coupled frequency inputs:
•
INPUT25_F to INPUT26_F
Display Panel Standard (DPS)
17
Inputs
5.3.1.
DPS Direct Coupled Frequency Input Capabilities
Direct coupled frequency inputs allow you to read the frequency of external signals
that have a ground reference and no DC offset. These inputs are ideal for use with
hall-effect type sensors.
i
INFORMATION
Quadrature and pulse counting is possible with direct coupled frequency inputs.
The following table provides specifications for the DPS's direct coupled frequency
inputs:
Table 3:
Direct Coupled Frequency Input Capabilities
Item
MIN
NOM
Negative going switching threshold
Positive going switching threshold
5.3.2.
MAX
.904
1.11
UNIT
V
V
Input capacitance at pin
500
pF
Gain (Vcomp/Vpin)
1
V/V
Cut-off frequency (3dB)
6.4
kHz
Pull-up resistor
10
kΩ
Pull-up reference voltage
4.4
V
Direct Coupled Frequency Input Installation Connections
When connecting direct coupled frequency inputs, there are two issues you must be
aware of: system noise and ground shift.
System Noise
Direct coupled frequency inputs are more susceptible to system noise than digital
inputs.
To reduce system noise:
•
Connect direct coupled frequency inputs to sensors that produce signals with no
DC offset.
•
Use the shortest possible wires when connecting direct coupled frequency
inputs to sensors to prevent noise pickup on the sensors.
Ground Shift
Ground shift affects the accuracy of direct coupled frequency inputs. Ground shift
refers to the difference between the system ground input (GND) voltage, and the
sensor ground voltage.
To reduce ground shift:
•
Dedicate one of the 2 system ground inputs (called GND) to sensors that have
dedicated ground wires, and connect all sensor grounds to this system ground
input.
Display Panel Standard (DPS)
18
Inputs
i
•
Splice the other system ground inputs together in the vehicle harness (close to
the connector), to provide a better ground for the noisier low-side outputs and
digital circuits.
•
Ensure the sensor’s ground connection is close to the system ground
connections. This will help ensure the signal remains within the digital
activation range of the input.
INFORMATION
The DPS system ground inputs are rated for low-current signals, which ensures the
sensor’s ground is very close in voltage potential to the system ground.
i
INFORMATION
Sensors that don’t have a dedicated ground wire are typically grounded to the
vehicle chassis through the sensor’s body.
The following shows a typical direct coupled frequency input connection:
Internal to product
Sensor Voltage
Hall Effect Sensor
Direct Coupled
Frequency Input
Sensor Ground
Figure 5: Direct coupled frequency input installation connections
Display Panel Standard (DPS)
19
DPS Outputs
6.
DPS Outputs
The DPS has solid-state FET technology outputs designed for low to medium
current and high inrush inductive load switching. Output currents can range up to
2.5 A.
The DPS has 2 types of outputs:
6.1.
•
High-side outputs
•
Low-side outputs with current sense
DPS High-Side Outputs
The DPS has 1 high-side output:
•
6.1.1.
OUTPUT1_HS (configured for 80 mA alternator excitation).
DPS High-Side Output Capabilities
High-side outputs are used for switching voltages to loads using either a pulse width
modulated (PWM) signal, or an on/off signal. They can also test for various fault
conditions, which can be used for software diagnostics (refer to High-Side Output
Diagnostics and Fault Protection for more details).
All high-side outputs come with internal flyback diodes that provide protection
when driving inductive loads.
•
When a high-side output is used as a PWM signal, a pulsed output signal is
provided by the DPS, where the percentage of time that the output is “on” vs.
“off” is determined by the duty cycle of the signal, and the duty cycle is
determined by the application software.
•
When a high-side output is used as an on/off signal, the output provides
battery voltage when in the “on” state (the application software is responsible for
switching high-side outputs "on" and "off").
The following table provides specifications for the DPS high-side outputs:
Table 4:
High-Side Output Specifications
Item
Min
Nom
Max
Unit
Operational voltage range
7
-
32
V
Over-voltage
-
-
36
V
Output current range
0
-
2
A
Load impedance @ 12 V
4
-
-
Ω
PWM frequency
5
-
500
Hz
-
0.1
-
%
1
PWM resolution
1
This is the typical value. Actual value is dependent on the base frequency, since the counter used for this
operation has a finite number of steps.
Display Panel Standard (DPS)
20
DPS Outputs
Item
Min
2
6.1.1.1.
Nom
Max
Unit
Flyback diode current
-
-
1
A
Short-circuit current limit
(Tjunc = -40ºC to +150ºC)
9
15
23
A
Short-circuit trip time
-
2
-
ms
Thermal protection
-
150
-
ºC
Digital feedback negative threshold
1.5
-
-
V
Digital feedback positive threshold
-
-
3.58
V
Digital feedback cutoff frequency
-
322
-
Hz
Open-load detection – max
detectable load @ 12 V
-
-
1.4
kΩ
Open-load detection pull-up
9.8 k
-
10.2
kΩ
Current sensing
-
No
-
-
Analog feedback
-
No
-
-
High-Side Output Diagnostics and Fault Protection
Each high-side output has the ability to report many different fault conditions.
The types of faults that are reported are determined by the configuration of your
high-side outputs, and this configuration must be considered when writing the
application software.
6.1.2.
DPS High-Side Output Installation Connections
You must be aware of the following when connecting the high-side output:
i
•
The high-side output is connected to an internal bus bar, which can be
connected to a +12 V or +24 V battery. The bus bar is connected to logic power
(VBATT), and both share the same connector pins.
•
The high-side output can provide switched battery power to any load type in a
vehicle.
•
The high-side output can source up to 80mA in the alternator excitation
configuration.
•
The high-side output has an internal flyback diode, which is needed when
driving an inductive load (the flyback diode absorbs electrical energy when the
load is turned off).
INFORMATION
Inductive loads will create an average current flow that moves out of the high-side
output. When the output is on, the current flows through the output driver, and
when the output is off, the current flows through the flyback diode. A duty cycle of
50% will produce the worst case average current flow through these two devices.
2
This is an average current value, meaning a worst case PWM current of 2 A at 50% duty cycle is possible with
inductive loads.
Display Panel Standard (DPS)
21
DPS Outputs
NOTICE
If large inductive loads are used, and the high-side output is providing a continuous
PWM signal, then the PWM peak current must not be greater than the specified
continuous current for the output (in continuous mode, the average current flow
through the diode at 50% duty cycle is approximately equal to ½ the peak current).
When connecting high-side outputs, ensure you follow these best practices:
•
High-side outputs should not be connected to loads that will draw currents
greater than the maximum peak current, or maximum continuous current.
•
The grounds for the loads should be connected physically close to the DPS
power grounds.
The following shows a typical high-side output connection:
Internal to product
High-Side
Output
Application
Load
Figure 6: Typical high-side output installation connections
6.2.
DPS Low-Side Outputs with Current Sense
The DPS has 2 low-side outputs:
•
6.2.1.
OUTPUT3_2A5_LS to OUTPUT4_0A7_LS
DPS Low-Side Outputs with Current Sense Capabilities
Low-side outputs with current sense are used for switching grounds to loads using
either a pulse width modulated (PWM) signal, or an on/off signal. They also have
the ability to sense current that is provided to loads, through an amplifier circuit.
•
When a low-side output is used as a PWM signal, a pulsed output signal is
provided by the DPS, where the percentage of time that the output is “on” vs.
“off” is determined by the duty cycle of the signal, and the duty cycle is
determined by the application software.
Display Panel Standard (DPS)
22
DPS Outputs
i
INFORMATION
Current flow gets interrupted when using low-side outputs as a PWM signal, because
the outputs are not "on" continuously. Therefore, the DPS can not support current
feedback control systems if the output is being PWMed.
•
When low-side outputs are used as an on/off signal, the output provides
ground when in the “on” state (the application software is responsible for
switching low-side outputs "on" and "off").
•
When low-side outputs are used to sense current, the application software will
monitor the current flowing into the low-side output, and based on the amount
of current, will turn the output either "on" or "off".
ο
The amplifier that measures the sensed current has an allowable voltage
range of 0 V to 3 V. The application software will protect the circuit from an
over-current or short-circuit event when the voltage from the amplifier
reaches 2.9 V; therefore, the actual usable voltage range from the amplifier is
only 0 V to 2.8 V.
The following table provides specifications for the DPS 2.5A low-side output:
Table 5:
2.5A Low-Side Output with Current Sense Configuration
Item
Min
Nom
Max
Unit
Output voltage range
0
-
0.25
V
Output current
-
-
2.5
A
On resistance
-
45
100
mΩ
Maximum voltage applied to output pin
-
-
32
V
Current limit in short-to-battery condition
18
24
30
A
Maximum PWM frequency
-
500
-
Hz
PWM resolution
-
No
200
µs
1
A
Flyback diode continuous current
Flyback diode non-repetitive surge current -
-
30
A
Output pull-down resistance
-
8.39
-
kΩ
Output pull-up resistance
-
10
-
kΩ
Feedback gain (Vmicro/Vpin)
-
1/11
-
V/V
Feedback max readable voltage
-
-
36.3
V
Feedback cut-off (3dB) frequency
-
322
Feedback worst case fixed error
-
-
±251
mV
Feedback worst case relative error
-
-
±2.8
%
Hz
The following table provides specifications for the DPS 0.7A low-side output:
Table 6:
0.7A Low-Side Output with Current Sense Configuration
Item
Min
Nom
Max
Unit
Output voltage range
0
-
0.945
V
Output current
-
-
0.7
A
On resistance
-
550
1350
mΩ
Display Panel Standard (DPS)
23
DPS Outputs
Item
Min
Max
Unit
Maximum voltage applied to output pin
-
-
32
V
Current limit in short-to-battery condition
1
1.5
1.9
A
Communication frequency
-
10.4
12.5
kHz
Output pull-down resistance
-
52.5
-
kΩ
Output pull-up resistance
-
1
-
kΩ
Feedback cut-off frequency
-
31.8
Feedback low threshold
0.4*VSW
-
Feedback high threshold
0.47*VSW -
0.6*VSW
V
Feedback hysteresis
0
0.2*VSW
V
3
4
Table 7:
-
kHz
0.53*VSW V
Low-side output PWM control methods
High-side output
6.2.2.
Nom
Preferred PWM
control method
OUTPUT3_2A5_LS
Software PWM control
OUTPUT4_0A7_LS
Software PWM control
Secondary PWM
control method
DPS Low-Side Outputs with Current Sense Installation Connections
You must be aware of the following when connecting low-side outputs:
•
Low-side outputs are connected to a common internal ground point that is
connected to the battery ground (GND). Refer to Logic and Output Power for more
details about the battery ground.
•
Low-side outputs provide switched ground to any load type in a vehicle.
•
Low-side outputs can sink up to 2.5 A.
•
When connecting a load to a low-side output, ensure the load will not drive
currents greater than the maximum specified peak current, or maximum
specified continuous current.
3
4
Pull-up resistance is referenced to VSW (switched battery voltage).
The switching thresholds are relative to VSW (switched battery voltage).
Display Panel Standard (DPS)
24
DPS Outputs
The following shows a typical low-side output connection:
Internal to product
Low-Side
Output
Application
Load
Battery
Figure 7: Low-side outputs with current sense installation connections
Display Panel Standard (DPS)
25
Power
7.
Power
The DPS is powered by the vehicle battery. The DPS operates in a system, and can
operate from up to , with overvoltage protection at protection.
The DPS has various pins on the connectors that are used for different types of
power, as detailed in the following sections.
7.1.
Logic and Output Power
The DPS has 1 pin(s) dedicated to providing power for logic and outputs, called
VBATT, and 2 pin(s) dedicated to grounding the DPS, called GND.
i
INFORMATION
The power and ground connections are usually paralleled over several pins to
minimize voltage drops on higher current applications.
7.1.1.
Logic and Output Power Installation Connections
When connecting the DPS logic and output power, you should be aware of the
following:
i
•
Logic and output power connections are made using the VBATT and GND pins.
•
The number of wires needed to connect the DPS power depends on the amount
of current required by the application. It is recommended to use one (1) 16 AWG
wire for every 8 A of expected output current; however, this is not always true
and ultimately depends on your application.
•
The DPS is protected against reverse battery connections by an internal highcurrent conduction path that goes from ground to power. To protect the DPS
from damage in a reverse battery condition, place a fuse of 20 A or less in series
with the power wires in the application harness.
•
All power connections to the DPS should be fused to protect the vehicle harness.
INFORMATION
The system designer is responsible for selecting the appropriate fuses. Select fuse
sizes by multiplying the maximum continuous current during normal operation by
1.333 (75% de-rating factor). Do not use slow blow fuses for this application.
7.2.
Sensor Power
The DPS has one pin dedicated to providing power to external sensors called
SENSOR_SUPPLY.
Display Panel Standard (DPS)
26
Power
WARNING
Do not drive more than 50 mA of current through the SENSOR_SUPPLY pin. If you
do, the pin will protect itself by dropping the voltage, which will result in a lack of
power to your sensors, potentially causing unknown vehicle responses.
7.2.1.
DPS Sensor Power Capabilities
SENSOR_SUPPLY is a 5 V linear power supply that is capable of continuously
providing <Sensor_Supply_n1> mA to external sensors.
i
INFORMATION
The voltage provided to the DPS must be 6.5 V or greater to ensure the sensor supply
can provide 5 V.
The following table provides specifications for the DPS sensor power:
Table 8:
Sensor Power Specifications
Item
7.2.2.
Min
Nom
Max
Unit
Output voltage range
4.8755
5.0
5.1255
V
Operational current output
-
-
50
mA
Short circuit voltage
0
-
32
V
Analog feedback voltage range
0
-
6.6
V
Analog feedback gain
(Vmeasured/5V reference)
-
0.5
-
V/V
Analog feedback cut-off frequency
-
265
-
kHz
Analog feedback relative error
-
-
±2.0
%
Analog feedback fixed error
-
-
±50
mV
Sensor Power Installation Connections
For information on how to connect sensors, refer to Application Examples.
Display Panel Standard (DPS)
27
Communication
8.
Communication
The DPS uses two methods of communication when communicating with other
modules on the vehicle, or with a personal computer:
8.1.
•
CAN communication
•
USB communication
Controller Area Network (CAN)
The DPS hardware provides CAN communication according to the SAE J1939
specification, making the DPS compatible with any CAN-based protocol through
software.
CAN communication is used to communicate the status of multiple modules that are
connected together in the same network.
The standard DPS has 2 CAN ports. Each CAN interface has a software selectable
120Ω terminating resistor.
8.2.
USB Communication
The DPS can send and receive data with a personal computer, using an USB
communication channel. The USB connection is intended for service use only (for
example, downloading data logs, updating application code, configuring the unit
with a service tool, etc.), it is not intended to be connected at all times in the
application.
There are 4 pins used for USB communication:
•
Vbus
•
D-
•
D+
•
GND
The USB circuitry is electrically isolated from the rest of the circuitry on the DPS
using optical isolators. The reason for the isolation is to protect the DPS or PC from
being damaged in the case that the DPS and the USB host (PC) have different ground
potentials.
The following table specifies the parameters for the USB interface:
Table 9:
USB interface parameters
ITEM
Absolute maximum voltage
applied to USB Power
Display Panel Standard (DPS)
MIN
-0.5
NOM
MAX
6.0
UNITS
Volts
28
Communication
USB Power Operating
Voltage
3.3
Operating Supply Current
5.0
5.25
15
Volts
mA
Absolute maximum voltage
applied to data signals
-0.5
3.8
Volts
Data Signal Operating
Output Voltage (High)
2.8
3.6
Volts
Display Panel Standard (DPS)
29
LCD
9.
LCD
The LCD that is supported in the DPS is:
•
9.1.
A large graphic LCD (256 x 80 pixel)
Backlight
The LCD is backlit with LED backlighting. The LEDs used for the LCD backlighting
populated is tri-colour LEDs
The tri-colour backlighting LEDs allows the option of having the LCD change
colours through software control. This may be required by certain customers to
signal an error condition being displayed on the LCD, or it may be required to give
users different options in the LCD backlighting colour.
The brightness control of the LCD is driven with a PWM signal, which means that
variable brightness of the backlighting is possible. The tri-colour LED controls do not
have PWM control, and are only on/off control signals. This means that the number
of different colours possible for the LCD backlighting is limited to 7 when using tricolour LEDs. The 7 possible colours that can be achieved with the tri-colour LEDs
are:
•
Red
•
Green
•
Blue
•
Light Blue
•
Purple
•
Yellow
•
White
The LED colours and brightness are configured by the user through the software
tool.
9.2.
LCD Heater
There is an LCD heater populated on the DPS. The LCD heater is required for the
graphic LCDs to operate in an ambient temperature below -20°C. With the use of the
LCD heater the graphic LCD can operate down to -40°C. The LCD may take a few
minutes to heat up to the point where it is visible at -40°C. When the LCD first starts
up at -40°C, it will take the heater approximately 5 minutes to heat up the LCD to the
point where the LCD is legible, about 10 minutes before the LCD is very clearly
legible, and about 20 minutes before the response time of the LCD is less than 2
seconds.
Display Panel Standard (DPS)
30
LCD
The DPS cluster has an internal temperature sensor that is used to determine the
ambient temperature so the LCD heater will only be turned on in cold conditions,
and not when the ambient temperature is above freezing temperatures.
9.3.
Large Graphic LCD
The large graphic LCD is the standard LCD for the DPS. The LCD is a monochrome
FSTN (film super twisted nematic) transflective, positive image LCD, with a
resolution of 256 x 80 pixels. It has been designed for use in both low and high
ambient light conditions. The best viewable contrast is when viewed from above the
horizontal plane of the LCD.
The LCD has an operating temperature of -20°C to +70°C. However, with the use of
the heater the lower operating temperature can be extended to -40°C. The LCD will
operate up to an ambient temperature of +85°C, however the contrast and viewing
angle will degrade above +70 °C. This means that the LCD will not look as nice at
+85°C, but it will still be legible.
Display Panel Standard (DPS)
31
Gauges
10.
Gauges
The DPS has a 3, 4 or 5 gauge configuration.
The following diagrams shows the gauge positions.
SM5
SM3
SM2
SM7
SM4
SM3
SM2
SM1
SM4
SM2
SM1
SM6
Figure 8: DPS gauge locations
Display Panel Standard (DPS)
32
Gauges
The DPS gauges are controlled by microstepping, except for the gauge on the bottom
left side of the display, labeled SM7. Microstepping allows for finer resolution, when
compared to partial stepping of the gauge, which is how SM7 is driven. This means
that SM7 will look a little more coarse for small movements than the other gauges.
This will not be noticeable for gauges that are representing vehicle parameters that
do not change quickly, such as the fuel gauge, or temperature gauges. However, the
SM7 location may not be suitable for gauges that represent faster moving vehicle
parameters, such as RPM or speed. This should be considered when determining the
function of SM7 in your application.
10.1.
Gauge Backlighting
The DPS gauges are backlit with LED backlighting. The LEDs used for the gauge
backlighting are tri-color LEDs. The tri-color backlighting LEDs allows for the option
of the gauges to change colors through software control.
The brightness control of the gauges are driven with a PWM signal, which means
that variable brightness of the backlighting is possible using the DPS configuration
software. The tri-color LED controls are also driven by PWM control, which means
that many different shades of color are possible for the gauge backlighting. If the
gauge backlighting control signals are only used as on/off in software, then the are
are 7 colors that are possible. The 7 possible colors that can be achieved with the tricolor LEDs in on/off control are:
•
Red
•
Green
•
Blue
•
Light Blue
•
Purple
•
Yellow
•
White
There are also red LEDs that are used to light up the gauge pointers. The pointer
backlighting cannot be dimmed, it is only on or off.
Display Panel Standard (DPS)
33
Status LEDs
11.
Status LEDs
There are 26 status LEDs on the DPS cluster. These are positioned as shown in the
following figure.
MAX. 26 STATUS LEDs
GREEN, AMBER, RED, BLUE
WHEN BACK-LIT
LED 17
LED 9
LED 19
LED 24
LED 1
LED 11
LED 12
LED 18
LED 23
LED 11
LED 2
LED 3
LED 6
LED 4
LED 5
LED 20
LED 7
LED 14
LED 25
LED 26
LED 13
LED 8
LED 15
LED 16
LED 22
LED 21
Figure 9: DPS status LEDs
Each of the status LEDs is a single color LED, and is one of the following colors:
•
Green (LED 17, 18, 19, 24, 25, 26)
•
Amber (LED 3, 4, 8, 11, 12, 13, 14, 15, 16, 20, 21, 22)
•
Red (LED 1, 2, 5, 6, 7, 9, 10)
•
Blue (LED 23)
The icons associated with each status LED is determined by the overlay, which can
be customer specific.
Display Panel Standard (DPS)
34
Buttons
12.
Buttons
There are two buttons on the DPS that are used for the user to interface to the unit.
These buttons use rubber button caps over metal switch domes that, when pushed,
close the switches electrically.
The switch domes have a trip force of 700 grams +/- 40 grams. The rated life of the
dome is 1,000,000 cycles.
BUTTONS,
BLACK RUBBER
Figure 10: DPS button locations
12.1.
Wake-up Feature
The buttons can be configured to wake-up the DPS when they are pressed. The
wake-up feature allows information to be displayed on the LCD when the button is
pressed, even if the ignition is inactive. The wake-up feature is application
controlled.
Display Panel Standard (DPS)
35
Buzzer
13.
Buzzer
The DPS has a buzzer that is intended to be used for a fault alarm, but it has also
been used for other noises (e.g. to create a relay clicking noise) in some applications.
BUZZER
Figure 11: DPS buzzer location
There is a hole in the back cover of the enclosure to allow the sound to exit the DPS.
A buzzer gasket is placed between the buzzer housing and the back cover, which
prevents water and dust from entering the unit. This gasket also acts as a tunnel for
the sound coming from the buzzer. The buzzer is significantly louder with the gasket
installed.
Display Panel Standard (DPS)
36
DPS Connectors
14.
DPS Connectors
There are up to four Molex MX-150 style connectors shells molded into the rear
cover. Connectors J1, J2, and J4 (USB) are used to interface with external signals.
Connectors J1 and J2 have 20 positions.
Figure 12: 20 position MX-150 connector
Connector J4 (USB) has 4 positions.
Figure 13: 4 position MX-150 connector
The following table shows the part numbers for the mating connectors that are used
in the vehicle harness:
Table 10:
Mating Connector Part Numbers
Connector
Molex part no. with
Connector Position
Assurance
Molex part no.
without CPA
Grey (J1) connector
20 position, key option B
334722007
334722002
Black (J2) connector
20 position, key option A
334722006
334722001
Black (J4) USB connector
4 position, key option A
334720406
334720401
Display Panel Standard (DPS)
37
DPS Connectors
14.1.
DPS Connector Pin-outs
Connector pins connect to inputs, outputs, and communication channels. They
provide the interface between the vehicle harness and the internal circuitry of the
DPS.
The following tables show the pin-outs for each connector:
Table 11:
Grey (J1) Connector Pin-out
Connector
pin
Name
Function
1
INPUT2_D
Digital input
2
INPUT1_D
Digital input
3
CAN2_SHLD
CAN 2 shield
4
CAN2_LO
CAN 2 Low
5
CAN2_HI
CAN 2 High
6
CAN1_SHLD
CAN 1 shield
7
CAN1_LO
CAN 1 Low
8
CAN1_HI
CAN 1 High
9
GND
Ground
10
+VBATT
Power
11
INPUT3_D
Digital input
12
INPUT4_D
Digital input
13
INPUT5_D
Digital input
14
INPUT6_D
Digital input
15
GND
Ground
16
INPUT21_A
Analog input
17
INPUT22_A
Analog input
18
INPUT25_F
Frequency input
19
OUTPUT1_HS
High-side output
20
OUTPUT4_0A7_LS
0.7A Low-side output
Table 12:
Black (J2) Connector Pin-out
Connector
pin
Name
Function
1
INPUT17_D
Digital input
2
INPUT16_D
Digital input
3
INPUT15_D
Digital input
4
INPUT14_D
Digital input
5
INPUT13_D
Digital input
6
INPUT12_D
Digital input
7
INPUT11_D
Digital input
8
INPUT10_D
Digital input
Display Panel Standard (DPS)
38
DPS Connectors
Connector
pin
Name
Function
9
INPUT9_D
Digital input
10
INPUT8_D
Digital input
11
INPUT23_A
Analog input
12
INPUT24_A
Analog input
13
INPUT26_F
Frequency input
14
OUTPUT3_2A5_LS
2.5A Low-side output
15
OUTPUT2_HS/INPUT27_A
High-side output/Analog input
16
INPUT18_D
Digital input
17
INPUT19_D
Digital input
18
INPUT20_D
Digital input
19
INPUT7_D
Digital input
20
SENSOR_SUPPLY
+5V sensor power
Table 13:
Black (J4) USB Connector Pin-out
Connector
pin
Name
Function
1
USB_D-
USB data low
2
USB_VCC
USB power (5V from Host)
3
USB_D+
USB data high
4
USB_GND
USB ground (0V from Host)
Display Panel Standard (DPS)
39
Installing a DPS into a Vehicle
15.
Installing a DPS into a Vehicle
Because every system is different, it is difficult for us to provide specific instructions
on how to install a DPS into a vehicle. Instead, we have provided mechanical,
environmental, and electrical guidelines and requirements that you should be
aware of before installing the product.
i
INFORMATION
The vehicle manufacturer is responsible for creating procedures for mounting the
DPS in a vehicle during production assembly.
15.1.
DPS Mechanical Requirements
Review the following mechanical requirements before selecting a mounting location
for the DPS:
15.1.1.
•
The DPS should be mounted with the panel oriented as close to perpendicular to
the operator's viewing angle as possible.
•
The harness should be shielded from harsh impact.
•
The harness should connect easily to the connector and have adequate bend
radius.
•
The should be easy to read.
•
The DPS should be in a location that is easily accessible for service.
Mounting the DPS to a Vehicle
It is up to the original equipment manufacturer (OEM) to ensure the product is
securely mounted to the vehicle.
The following guidelines are related to physically attaching the DPS to a vehicle:
•
The DPS should be secured with screws in all 7 screw holes using #10-32
screws.
•
The screws should be tightened according to the .
•
A trim ring is recommended (to be supplied by the OEM).
Display Panel Standard (DPS)
40
Installing a DPS into a Vehicle
15.1.2.
DPS Dimensions
The following shows the dimensions of the DPS in millimeters [inches]:
MOUNTING BOSS WITH
#10-32 THREADED BRASS INSERT
7 PLACES
387.4
[15.25”]
193.7
[7.63”]
5.6
[.22”]
137.8
[5.43”]
158.9
[6.26”]
70.6
[2.78”]
316.8
[12.47”]
9.5 [.37”]
57.0 [2.24”]
MTG 45.0 [1.77”] 51.0 [2.01”]
CONNECTORS
REAR
BOSSES
BUZZER
COVER
5.0 [.20”]
BUTTONS
406.4
[16.00”]
178.0
[7.01”]
Figure 14: DPS dimensions
Display Panel Standard (DPS)
41
Installing a DPS into a Vehicle
15.2.
DPS Environmental Requirements
The DPS is intended to be mounted in a panel or dashboard in a vehicle. Typically
this is in an enclosed cab or operator station.
NOTICE
The DPS warranty does not cover damage to the product when exposed to
environmental conditions that exceed the design limitations of the product.
Review the following environmental specifications before selecting a mounting
location for the DPS:
•
The DPS must be in an environment that is within its ambient temperature
range.
ο
•
The DPS must be in an environment that does not exceed its ingress rating.
ο
15.3.
Safe operating temperature range for a DPS is –40°C to +85°C.
The sealing standard for the DPS is EP455 level 1 (IPX6) from the front.
DPS Electrical Requirements
The DPS is powered with a direct battery connection (+VBATT) on connector pin J110, and a ground connection on connector pins J1-9, and J1-15. The direct battery
connection does not cause the cluster to power up in normal operating mode by
itself. All functions are switched on and off with power up sources (wake-up digital
inputs, buttons). The direct battery input is protected against vehicle transients such
as load dump, inductive load switching, etc. It is also protected against reverse
battery voltage of -42V by creating a high current path that will cause the external
fuse (required) to blow.
The following table provides the electrical requirements of the DPS:
Table 14:
DPS Electrical Specifications
ITEM
Min
Input voltage for normal operation
when configured for both 12V and
24V system
8
Minimum voltage during cranking
5.5
Nom
12
32
42
33
Units
Volts
Volts
Over Voltage Protection (DC)
Over Voltage Shutdown Voltage
Max
34
Volts
Volts
Reverse Battery Protection
-42
Volts
Maximum Continuous Current
12.6
Amps
Off-State Current when configured for
either 12V system only or 24V system
only
1
mA
Display Panel Standard (DPS)
42
Installing a DPS into a Vehicle
ITEM
Min
Nom
Max
Units
Off-State Current when configured for
12V and 24V system
2
mA
Maximum Current Rating of External
Fuse
20
Amps
Display Panel Standard (DPS)
43
Startup
16.
Startup
16.1.
Start-up procedures
This chapter contains instructions for action to be taken in connection with the
initial start.
WARNING
Risk of injury!
If the control system is not fitted properly, the machine could move uncontrollably.
The machine's engine shall not be started before the control system is completely
fitted and its signals are verified.
16.1.1.
Starting the control system
Start the control system as follows:
•
Prior to start, all modules and cables are to be fitted correctly.
•
Check fuses, i.e. make sure that the supply voltage to the modules is equipped
with the correct fuse.
•
Make sure that connections for supply voltage and return lines are correct in the
cable's conductor joint.
•
Make sure the emergency stop works.
ο
The emergency stop should disconnect the supply voltage to all modules.
Module
Dump
Valve
Figure 15: Emergency stop
Alternatively, the emergency stop may also shut off the diesel engine or a dump
valve, and with that depressurize the hydraulic system.
Display Panel Standard (DPS)
44
Startup
16.1.2.
Prepare for system start
WARNING
Make sure no one is in dangerous proximity to the vehicle to avoid
injuries when it starts.
Prepare for the initial system start as follows:
16.1.3.
•
The engine for the hydraulic system's pump shall be in off position.
•
Make sure that all connectors are properly connected.
•
Turn on the control system.
•
Make sure that voltage is being supplied to all modules.
•
Make sure the emergency stop is functioning properly.
Start the system
Start the system as follows:
•
Start the engine for the hydraulic system's pump, assuming that the above
mentioned inspections have been carried out and shown correct values.
•
Calibrate and adjust input and output signals, and check every output function
carefully.
•
In addition to these measures, the machine shall also meet the machine
directives for the country in question.
Display Panel Standard (DPS)
45
Appendix A
17.
Appendix A
17.1.
DPS Technical Overview
The following table lists the results for verification tests that were performed for the
DPS:
Table 15:
DPS Technical Specifications
Test
Test Specification
Notes
High Temperature Soak
Vansco Spec 5.1.1
96h soak at +85°C
Low Temperature Soak
Vansco Spec 5.1.2
96h soak at -40°C
Temperature Cycle
EP455 (Feb 2003) Section 5.1.1
– Level 2
Temperature Shock
J1455 (Jun 2006) Section 4.1.3.2
Handling Shock
J1455 (Jun 2006) Section
4.11.3.1
Installation Shock
EP455 (Feb 2003) Section
5.14.2.1
Operational Shock
EP455 (Feb 2003) Section 5.14.1
Random Vibration
J1455 (Jun 2006) Section
4.10.4.2
Particle Impact
(Lenses/Display Glass)
Vansco Spec 5.2.7
Altitude (Storage)
EP455 (Feb 2003) Section 5.2.2
Dust Ingress
IEC 60529 (Feb 2001) Sections
13.4 and 13.5 – IP5X Rating
Water Ingress
IEC 60529 (Feb 2001) Section
14.2.6 – IPX6 Rating from the
front
Humidity Soak
EP455 (Feb 2003) Section 5.13.2
Humidity and
Temperature Cycle
EP455 (Feb 2003) Section 5.13.1
Salt Spray
IEC 68-2-11 Part 2 (1981)
Readability
EP455 (Feb 2003) Section 5.4.2
– Level 2
Solar Radiation, UV
Effects
IEC 68-2-5:1975 Part: Test S
Procedure C
Chemical Exposure
J1455 (Jun 2006) Section 4.4
Drop a 50g steel sphere
onto the display lens
EP455 (Feb 2003) Section 5.8.2
Electrical Steady State
(Operating Voltages)
EP455 (Feb 2003) Section 5.10.1
Display Panel Standard (DPS)
46
Appendix A
Test
Test Specification
Electrical Steady State
(Over-Voltage)
EP455 (Feb 2003) Section 5.10.2
– Level 2
Electrical Steady State
(Reverse Polarity)
EP455 9Feb 2003) Section
5.10.3
Electrical Steady State
(Short Circuit)
EP455 (Feb 2003) Section 5.10.4
Electrical Steady State
(Power Up Operational
Requirements)
EP455 (Feb 2003) Section 5.10.7
Electrical Transients
(Inductive Load
Switching – Power
Lines)
ISO 7637-2 (Jun 1990) Section
4.6.1
Electrical Transients
(Alternator Field Decay)
EP455 (Feb 2003) Section 5.11.2
Notes
J1113/11 (Jan 2006)
Electrical Transients (DC ISO 7637-2 (Jun 1990) Section
Motor Field Decay)
4.6.2
Electrical Transients
(Mutual Coupling –
Power Lines)
ISO 7637-2 (Jun 1990) Section
4.6.3
Electrical Transients
(Mutual Coupling –
Signal Lines)
ISO 7637-3 (Jul 1995) Section
4.5
Electrical Transients
(Cranking)
ISO 7637-2 (Jun 1990) Section
4.6.4
J1113/11 (Jan 2006)
J1113/11 (Jan 2006)
J1113/11 (Jan 2006)
Electrical Transients
(Load Dump)
ISO 7637-2 (Jun 1990) Section
4.6.5
J1113/11 (Jan 2006)
Accessory Noise
EP455 (Feb 2003) Section 5.11.1
Batteryless Operation
EP455 (Feb 2003) Section 5.11.3
Electrostatic Discharge - EP455 (Feb 2003) Section 5.12
Surface
Electrostatic Discharge - ISO 10605 2001(E) Section 5 test
Connectors
level 4
Electromagnetic
Compatibility
(Susceptibility) – Safety
Critical Applications
ISO 11452 Part 2 (Dec 1995)
Electromagnetic
Compatibility
(Susceptibility) – NonSafety Critical
Applications
ISO 11452 Part 2 (Dec 1995)
100 V/m
J1113/21 (Oct 2006)
50 V/m
J1113/21 (Oct 2006)
Display Panel Standard (DPS)
47
Appendix A
Test
Electromagnetic
Compatibility
(Emissions)
Test Specification
Notes
ISO 14982 (Jul 1998) Section 6.4
and 6.5
J1113-41 (May 2000) Level 3
Display Panel Standard (DPS)
48
Glossary of Terms
18.
Glossary of Terms
active-high
Input type that is considered "on" when it reads a battery voltage level and "off"
when it is floating or grounded.
active-low
Input type that is considered "on" when it reads a ground voltage level and "off"
when it is floating or connected to battery voltage.
analog input
An input that allows a voltage level to be read and converted to discrete digital values
within a microprocessor.
application software
A level of software that makes a product (hardware) perform desired functions for
the end user.
CAN
Controller Area Network
CAN High
One of the wires used in the shielded twisted-pair cable, which provides the positive
signal that, when connected with CAN Low, provides a complete CAN differential
signal.
CAN Low
One of the wires used in the shielded twisted-pair cable, which provides the negative
signal that, when connected with CAN High, provides a complete CAN differential
signal.
CAN Shield
A shielding that wraps around the CAN High and CAN Low wires (twisted-pair),
completing the shielded twisted-pair cable.
configured
When the hardware configuration of the DPS is changed.
Controller Area Network
A computer network protocol designed for the heavy equipment and automotive
environment that allows microcontrollers and other devices to communicate with
each other without using a host computer; also known as CAN.
Display Panel Standard (DPS)
49
Glossary of Terms
current feedback
A circuit that allows software to measure the amount of current provided by the
outputs. This circuit is typically connected to an analog input that is connected to
the microprocessor. Note that current feedback is also known as current sense or
current sensing.
current sensing
When an analog input reads the amount of current flowing through an output driver
circuit.
DC-coupled
A circuit used with signals that have minimal DC offset. The signal being read by this
circuit must fall within the detection threshold range specified for the input.
digital input
An input that is typically controlled by an external switch that makes the input either
active (on), or inactive (off).
dimension
Selecting value(s) to generate optimal results.
frequency input
An input that allows a frequency value to be read from an oscillating input signal.
gain
Increasing the voltage level of an input signal to maximize the resolution of an input.
ground shift
The difference in ground potential from one harness location to another, which is
typical in systems with large wire harnesses and high current loads.
high-side output
An output that provides switched battery voltage to an external load.
inductive load
A load that produces a magnetic field when energized. Inductors are electrical
components that store energy and are characterized by the following equation:
E stored
1
2
2 LI
load
Any component that draws current from the module, and is typically switched “on”
and “off” with outputs. Examples include bulbs, solenoids, motors, etc.
low-side output
An output that provides a switched ground voltage to an external load.
Display Panel Standard (DPS)
50
Glossary of Terms
open load
A fault state that occurs when a load that should be connected to an output becomes
disconnected, which typically occurs because of a broken/worn wire in the wire
harness or a broken/worn connector pin.
over-current
A fault state that occurs when a load draws more current than specified for an
output, which results in the output shutting down to protect the circuitry of the
product.
over-voltage
When the voltage exceeds the normal operating voltage of the product, which results
in the DPS shutting down to protect its circuitry.
panel-mounted
The act of mounting a product into a flat panel that has a cutout in the shape of the
product.
programmable input
An input that can be programmed in software as digital or analog, with varying
voltage ranges and active states.
pull-down
A resistor that connects an input to a ground reference so that an open circuit can be
recognized by the microprocessor, which is typically used on active-high digital
inputs or analog inputs.
pull-up
A resistor that connects an input to a voltage reference so that an open circuit can be
recognized by the microprocessor, which is typically used on active-low digital
inputs or analog inputs.
pulse counting
The act of counting the number of pulses that occur over a certain period of time on
a frequency input.
Pulse Width Modulation (PWM)
A type of square wave frequency signal where the ratio of “on” time vs. “off” time is
determined by the duty cycle of the signal. The duty cycle refers to the percent of
time the square wave is “on” vs. “off”. PWM signals are typically used to drive varying
amounts of current to loads, or to transmit data.
sensor power
A regulated voltage output that provides a set voltage level for analog sensors
attached to the product.
switching threshold current
The minimum amount of current required for an input before the telltale appears
“on.”
Display Panel Standard (DPS)
51
Glossary of Terms
system noise
Electrical interference generated from external devices that affect the behaviour of
inputs, outputs and sensors. System noise can be generated from things like the
vehicle alternator, engine, transmission, etc.
translucent
The state in which an icon diffuses light so that objects on the other side of the icon
are not clearly visible (also known as semi-transparent).
transparent
The state in which you can see through an icon when the telltale is inactive.
wetting current
The amount of current that flows into, or out of, a digital input. The current helps
eliminate oxidation on the contacts of digital switches and relays. Switches with gold
or silver contacts typically require much less wetting current than standard tinned
contacts.
Display Panel Standard (DPS)
52
Index
19.
Index
A
active-high • 49
active-low • 49
analog input • 49
Analog Input Capabilities • 15
Analog Input Installation Connections • 16
Appendix A • 46
application software • 49
B
Backlight • 30
Buttons • 35
Buzzer • 36
C
CAN • 49
CAN High • 49
CAN Low • 49
CAN Shield • 49
Communication • 28
configured • 49
Controller Area Network • 49
Controller Area Network (CAN) • 28
current feedback • 50
current sensing • 50
D
DC-coupled • 50
Diagram Conventions • 10
digital input • 50
Digital Input Installation Connections • 14
dimension • 50
Direct Coupled Frequency Input Installation Connections • 18
DPS Analog Inputs • 15
DPS Connector Pin-outs • 38
DPS Connectors • 37
DPS Digital Input Capabilities • 12
DPS Digital Inputs • 12
DPS Dimensions • 41
DPS Direct Coupled Frequency Input Capabilities • 18
DPS Direct Coupled Frequency Inputs • 17
DPS Electrical Requirements • 42
DPS Environmental Requirements • 42
DPS High-Side Output Capabilities • 20
DPS High-Side Output Installation Connections • 21
DPS High-Side Outputs • 20
DPS Low-Side Outputs with Current Sense • 22
DPS Low-Side Outputs with Current Sense Capabilities • 22
DPS Low-Side Outputs with Current Sense Installation Connections • 24
DPS Mechanical Requirements • 40
DPS Outputs • 20
DPS Sensor Power Capabilities • 27
Display Panel Standard (DPS)
53
Index
F
frequency input • 50
G
gain • 50
Gauge Backlighting • 33
Gauges • 32
ground shift • 50
H
high-side output • 50
High-Side Output Diagnostics and Fault Protection • 21
How to Use this Manual • 10
I
inductive load • 50
Inputs • 12
Installing a DPS into a Vehicle • 40
Introduction • 5
L
Large Graphic LCD • 31
LCD • 30
LCD Heater • 30
load • 50
Logic and Output Power • 26
Logic and Output Power Installation Connections • 26
low-side output • 50
M
Mounting the DPS to a Vehicle • 40
O
open load • 51
over-current • 51
over-voltage • 51
P
panel-mounted • 51
Power • 26
Precautions • 6
programmable input • 51
pull-down • 51
pull-up • 51
pulse counting • 51
Pulse Width Modulation (PWM) • 51
S
sensor power • 51
Sensor Power • 26
Sensor Power Installation Connections • 27
Startup • 44
Status LEDs • 34
switching threshold current • 51
system noise • 52
Display Panel Standard (DPS)
54
Index
T
translucent • 52
transparent • 52
U
Understanding the DPS • 8
USB Communication • 28
W
Wake-up Feature • 35
wetting current • 52
Display Panel Standard (DPS)
55