1
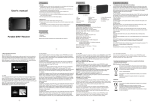
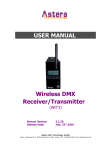
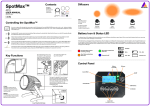
Lightdrop™
Uses
AX3
USER MANUAL
CONTENTS
-Lightdrop™
-Charger
-Rubber Feet (x4)
-Rubber Socket Plug
-Diffusor Dome
-Hooks (x3)
-Bracket
-User Manual
(b)
(d)
(c)
(e)
(a) Attach diffusor dome;
place inside PE objects
(b) Use as a angled spotlight
with use of the bracket
or attach truss clamp into
hole in the center of bracket
and affix to tables, truss etc.
(c) Use as a wallwasher by
extending the tilt thread
(d) Attach the hooks and
hang from the ceiling
(e) Use the magnet and
place underneath tables
(a)
Manual Version: 1.0
Date of Issue: 15/07/14
Control Methods
Press the ON/OFF button for 1-2 sec. to turn it on or off. Once
on, press the ON/OFF button for 2.5 sec. to place into BLUE
MODE (stop pressing when you see flashing blue). When in
BLUE MODE, a firm tap on the ON/OFF button will scroll
through the colors being displayed. To choose a color, press
the ON/OFF button for 2 sec. To FACTORY RESET, press the
ON/OFF button for 5 sec. until the fixture shows red color.
Key Functions
Screw Threads
for Hooks
Assembly
Magnet
Tilt-Wallwash
Adjustor
Rubber Feet
To use Astera’s ARC1 remote control; point at your lights
and press your chosen effect, color, speed, or brightness.
Underside
ON/OFF Button
Astera’s ARC2 remote control and Android application, the
AsteraApp™, can group many lights together, address
individual lights or groups of lights and send complex
effects to all lights in range. For additional information refer
to the manual and quickstart guide for the ARC2 and ART6
at www.astera-led.com/downloads
Connect an ART3 (Wireless DMX Transmitter) to your DMX
desk to send wireless DMX signals to the AX3. You can set
the AX3’s DMX address from any Astera RF remote controller.
The AX3 can also be controlled by CRMX Wireless DMX, which
also supports W-DMX (from Wireless Solutions). The pairing of
AX3 to Transmitter is done automatically. To unpair, simply do
a FACTORY RESET (as indicated above). For additional
information, refer to the respective manufacturer’s manual.
Charging Socket
Bracket Adjustor
Side ON/OFF
Button
Bracket
ASTERA
Astera LED Technology
Nahestrasse 68-70
55593 Rüdesheim an der Nahe
Kreis Bad Krueznach
Germany
www.astera-led.com
+49 (0) 671 92028292
Lightdrop™
Technical Data
Item Codes:
Total LED Power:
Luminous Flux:
Illuminance:
typical values on 6500K White
Strobe:
Beam Angle:
Battery:
Battery Lifetime:
Operation:
LED Lifetime:
Charging Time:
Ambient Charging Temperature:
Working Voltage:
Input Current:
Wireless Module:
Range:
DMX Interface:
Optional DMX Interface:
Housing:
IP Rating:
Relative Humidity:
Operating Temperature:
Weight:
Dimensions:
Environment:
Features:
Included Accessories:
Also Available:
Battery Status
Charging
While on standby or during operation, press the ON/OFF button to check the status
of the battery.
Less than 30mins runtime
remaining; recharge
Up to 30mins runtime
have been used
Over 30mins runtime
have been used
Troubleshooting
AX3
AX3-CRMX (includes Lumen Radio CRMX)
15W (1 x RGBW CREE LED Chip)
850 lm on 6500K White
3000 lx at 10m
760 lx at 2m
0-25Hz
13° (achieved through Khatod lens)
Built-in Samsung battery
70% capacity (after 300 charging cycles)
5-15 hours
50,000 hours
5-20 hours (depending on ambient temp.)
0°-35°C (40°C max.)
Input 110-240V, 50/60Hz
2.5A at 5V
868MHz receiver (US: 902-928MHz)
2.4GHz wireless module
300m (330yds)
Wireless DMX (with ART3 Transmitter)
CRMX Wireless DMX from Lumen Radio
also supports W-DMX
Polyamide / Polystyrene
IP65 (when rubber charging plug is inserted)
0-100% (non-condensing)
0°-40°C (32°-104°F)
0.430kg (0.9lbs)
L119mm x H59mm x W110mm
L5.1” x H2.3” x W4.3”
Indoor / Outdoor
TruColor™ Calibration, Temperature
compensation, Dynamic power-boost
Charger, Diffusor Dome, Hooks, Bracket,
Rubber Feet (x4), Charging Port Plug
17°x46° Wallwash & 32° Flood Diffusor
How can I see if My Lightdrop™ is on or off..
Tap the ON/OFF button and if it displays the battery status above, the fixture is on.
My Lightdrop™ will not start up..
The battery may be empty. Connect it to the AC and try again. If there is still no power,
consult your Astera Service Center.
My Lightdrop™ starts up, but the LEDs do not emit light..
The fixture could be set to BLACKOUT mode or set to display black color. If set to
BLACKOUT, use the remote control to adjust the intensity or color. If this does not
solve the problem, do a FACTORY RESET to wipe all settings.
My Lightdrop™ is not working correctly - it does not display the color or
effect chosen..
The fixture may still be operating under a previous setting. Do a FACTORY RESET to
completely wipe all settings.
After completing a Factory Reset, my Lightdrop™ still cannot be controlled..
Make sure the RADIO PIN of the fixture and controller are the same. If it still cannot
be controlled, consult your Astera Service Center.
My Lightdrop™ has a shorter runtime than 8 hours..
The LED POWER default setting is HIGH BRIGHTNESS. To achieve a greater battery
runtime, set the LED POWER to NORMAL or MAXIMISE RUNTIME, which will
guarantee either 8 hrs or 15 hrs of operation. Alternatively, program the fixture
to only display colors that use less power, such as Red, Green and Blue.
The charger is plugged in but my Lightdrop™ is not charging..
If the status LED is flashing red or alternating between red and blue, make sure the
Lightdrop™ is powered off and the ambient temperature is below 40°C. If it has
been charging in a warmer environment before, it may take longer to cool down.
If the Indicator LED is not flashing at all, it is not connected correctly. If it still not
charging, consult your Astera Service Center.
Charging is very slow..
Check the color of the Status LED. If it is red or flashing yellow, move the light into
a colder environment.
My Lightdrop™ will not pair with my Lumen Radio Transmitter..
It may be that your Lightdrop™ is already paired with another transmitter. Start by
doing a FACTORY RESET of your Lightdrop™ in order to unpair it from CRMX devices,
then try re-pairing. If it still cannot be paired, it may be that your transmitter is faulty,
and you should consult your Astera Service Center or contact Lumen Radio support.
Only charge when the fixture is powered off. The charging status colors below are
only present in this state. The ambient charging temperature is 0°-35°C.
Slow flashing; 0°-35°C
charging at full current
Slow flashing; 36°-40°C
charging at reduced current
Fast flashing; ≤-1°C or ≥41°C
fixture is under/overheating
charging has stopped
Fast flashing;
battery error
Safety
Before you operate this device, read the manual carefully. Keep in
mind that this manual cannot address all possible dangers and
environments. Please use your own caution when operating.
Do not operate the device in areas of temperature conditions or
under direct sunlight. It will cause abnormal function or damage
the product.
Only qualified personnel may repair this product. Do not open the
product housing.
A rechargeable battery is built into this device. Please avoid
bumping or plunging, it will cause FIRE or EXPLOSION. Never store
the battery when fully drained. Always recharge immediately when
empty.
Make sure to fully charge all units before storing them. Partially
charged batteries will lose capacity. Do not store the unit for longer
than 3 months without re-charging.
The exterior surfaces of the Lightdrop™ can become hot, up to 55° C,
during normal operation. Ensure that accidential physical contact
with the device is not possible. Allow all Lightdrop™ devices to cool before
servicing. Use only Astera approved accessories to diffuse or modify
the light beam.
Do not directly look at the light beam for long periods. It can cause
harm to your eyes. Do not look into the beam at a distance of less
than 0.5m (20 inches) from the front surface of the product, and do
not look at LEDs with a magnifying glass or any other optical
instrument that may concentrate the light output.
This product is for professional use only. It is not intended for
household use.