1
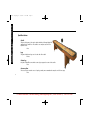
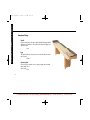
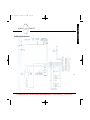
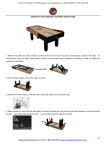
Manual layout_kb
2/22/05
3:48 PM
Page 1
Manual layout_kb
2/22/05
3:48 PM
Page 2
I. Getting Started
Tool List .....................................................................................3
Overview of Components
The Grand Champion Limited/Grand Champion/
Champion/American Heritage........................................4-5
Bullet/Bumper ................................................................6-7
Qualifier Series ...............................................................8-9
American TriPlay .........................................................10-11
See Maintenance & Care for registering your shuffleboard
III. Electronic Assembly
Electronic Assembly .................................................................20
Scoring Units
1. Wood Score Unit ..........................................................20
2. Triangle Score Unit.......................................................21
3. J-BarR/Rail Mount/Small Wood JBar Score Unit.........21
Coin-Op only
Pingate Systems................................................................22
Light Kit ............................................................................22
II. Setup Procedures
The Grand Champion Limited/Grand Champion/
Champion/American Heritage
The Cradle ................................................................12
Playfield Installation............................................12-13
Leveling and Adjusting ............................................14
Climatic Adjusters.....................................................14
Leg Levelers...............................................................15
Bullet/Bumper
The Cradle ................................................................16
Leveling and Adjusting ............................................16
2
Bumper & American Triplay ............................................17
Bullet.................................................................................17
Qualifier Series
The Cradle ...............................................................18
Leveling and Adjusting ............................................18
Climatic Adjusters.....................................................18
Leg Levelers...............................................................19
IV. Troubleshooting.....................................................................23
V. DIP Switch Settings
Controller Operation ..........................................................24-25
DIP Switch Diagram .................................................................26
Controller Test Routines .....................................................27-28
Controller Fault Codes .............................................................28
V. Wiring Diagram (Controller Harness) ....................................29
VI. Maintenance & Care
Weekly Maintenance Procedures and Table Preparation .....30
Periodic Maintenance Procedures .....................................31-32
Shuffleboard Registration .......................................................33
VII. Playing the Game
Shufflers Glossary .....................................................................34
How to Play ..............................................................................35
Handicap Scoring .....................................................................35
Horsecollar................................................................................36
For More Information, Visit BMI Gaming | www.bmigaming.com | 1-800-746-2255 | + 1-561-391-7200
Manual layout_kb
2/22/05
3:48 PM
quality
Page 3
products
Tool List
To make your job as easy as possible we've put together a list of the tools we believe will help with the installation of your
shuffleboard.
• Phillips screw driver (small screw gun with Phillips head makes it faster)
• 3/4" wrench or a large crescent wrench
• Socket set with the following sockets:
7/16"
1/2"
9/16"h
• A 24" regular bubble level
• Good 24" metal straight edge (or you can use the edge of your level)
3
For More Information, Visit BMI Gaming | www.bmigaming.com | 1-800-746-2255 | + 1-561-391-7200
Manual layout_kb
2/22/05
3:48 PM
Page 4
Grand Champion Limited Edition/Grand Champion/Champion/American Heritage
Cradle
This part of the game is the cabinet the playfield lays in. These cradles are in two sections
ranging from 6’ to 11’ each in length depending on the size of the game.
2 Boxes
Playfield
The playfield is the most important part. It's the surface you play on. The
playfield is made from solid maple with our polymer surface on top. The
climatic adjusters are already installed on the bottom of the playfield to adjust the
surface. This part is heavy weighing 387 lbs to 605 lbs.
1 Large Crate
Small End Legs
These legs support the end of the cradle. The number of legs depends on the size of the game.
12’ – 18’ games - 2 legs
2 Boxes (includes bolts, nuts and
20’ – 22’ games - 4 legs
4 Boxes leg levelers)
4
Center Leg
The center leg is the attaching component of the two cradle halves. The size and type of center leg depends on
the type of game and optional score unit. The center leg also houses some of the electronics for certain types of
score units.
1 Box (includes bolts, nuts and leg levelers)
Accessory Box
The accessory box contains one set of pucks, powder, the owner’s manual and a sample can of silicone spray.
1 Box
For More Information, Visit BMI Gaming | www.bmigaming.com | 1-800-746-2255 | + 1-561-391-7200
Manual layout_kb
2/22/05
3:48 PM
quality
Page 5
products
OPTIONAL ACCESSORIES
Scoring Unit
Electronic scoring systems for this game are packaged as follows:
Wood Score Unit
1 Box containing score head
(mounting bracket located on center leg)
Triangle Score Unit
Attached to center leg
Small Wood Score
2 Boxes
(1- mounting arm, 1 – scoring head)
Jbar Score Unit
2 Boxes
(1- mounting arm, 1 – scoring head)
Rail Mount Score
1 Box
Abacus Score Unit
Included in cradle box
Pingate
The pingate is available only as an option with coin operated scoring systems. This device is crucial to prevent free play of
the game.
1 Box
Light Kit
The light kit is designed to highlight the scoring zones at each end of the game.
1 Box
For More Information, Visit BMI Gaming | www.bmigaming.com | 1-800-746-2255 | + 1-561-391-7200
5
Manual layout_kb
2/22/05
3:48 PM
Page 6
Bullet/Bumper
Cradle
This part of the game is the entire cabinet with the laminated playfield
attached
to the floor of the cabinet. The cradle for this game is one complete
section.
1 Box
End Legs
These games include two legs for each end of the table.
2 Boxes (includes bolts, nuts and leg levelers)
Center Leg
The center leg is always placed in the center of the game. It also serves
as a shell for the electronics when ordering the optional electronic score
unit.
1 Box (includes bolts, nuts and leg levelers)
Accessory Box
6
The accessory box contains one set of pucks, powder, owners manual
and a sample can of silicone spray.
1 Box
For More Information, Visit BMI Gaming | www.bmigaming.com | 1-800-746-2255 | + 1-561-391-7200
Manual layout_kb
2/22/05
3:48 PM
quality
Page 7
products
OPTIONAL ACCESSORIES
Scoring Units
The optional electronic scoring system for this game is packaged as follows:
Bullet Score Unit
Attached to the center leg
Small Wood Score
2 Boxes
(1- mounting arm/1 – scoring head)
JBar Score Unit
2 Boxes
(1 – mounting arm /2 – scoring head)
Rail Mount Score
1 Box
Abacus Score Unit
Included in cradle box
Pingate (Commercial Units Only)
The pingate is only available as an option with coin operated scoring systems. If the table is ordered with a pingate, the board
will have wholes in the center.
1 Box
Light Kit
The light kit is designed to highlight the scoring zones at each end of the game.
1 Box
For More Information, Visit BMI Gaming | www.bmigaming.com | 1-800-746-2255 | + 1-561-391-7200
7
Manual layout_kb
2/22/05
3:48 PM
Page 8
Qualifier Series
Cradle
This part of the game is the entire cabinet with the solid maple playfield
attached to the cradle floor. The cradle is one complete section for the
Qualifier Series.
1 Box
Legs
The game includes two legs one for each end of the cradle.
2 Boxes
Center leg
Only the 14’ Qualifier comes with a center leg to support the center of the cradle.
1 Box
Accessory Box
The accessory box contains one set of pucks, powder, owners manual and a sample can of silicone spray.
1 Box
8
For More Information, Visit BMI Gaming | www.bmigaming.com | 1-800-746-2255 | + 1-561-391-7200
Manual layout_kb
2/22/05
3:48 PM
quality
Page 9
products
OPTIONAL ACCESSORIES
Scoring Units
The optional electronic scoring system for this game is packaged as follows:
Small Wood Score
2 Boxes
(1- mounting arm, 1 – scoring head)
JBar Score Unit
2 Boxes
(1 – mounting arm, 2 – scoring head)
Rail Mount Score
1 Box
Abacus Score Unit
Included in cradle box
Light Kit
The light kit is designed to highlight the scoring zones at each end of the game.
1 Box
9
For More Information, Visit BMI Gaming | www.bmigaming.com | 1-800-746-2255 | + 1-561-391-7200
Manual layout_kb
2/22/05
3:48 PM
Page 10
American Triplay
Cradle
This part of the game is the entire cabinet with the laminate playfield
attached to the cradle floor. The cradle for the American Triplay is one
complete section.
1 Box
Legs
This game includes two legs one for each end of the cradle. No center
leg is needed.
2 Boxes
Accessory Box
The accessory box contains one set of pucks, powder, owners manual
and a sample can of
silicone spray.
1 Box
10
For More Information, Visit BMI Gaming | www.bmigaming.com | 1-800-746-2255 | + 1-561-391-7200
Manual layout_kb
2/22/05
3:48 PM
quality
Page 11
products
OPTIONAL ACCESSORIES
Scoring Units
The optional electronic scoring system for this game is packaged as follows:
Small Wood Score
2 Boxes
(1- mounting arm, 1 – scoring head)
JBar Score Unit
2 Boxes
(1 – mounting arm, 2 – scoring head)
Rail Mount Score
1 Box
Abacus Score Unit
Included in cradle box
Light Kit
The light kit is designed to highlight the scoring zones at each end of the game.
1 Box
11
For More Information, Visit BMI Gaming | www.bmigaming.com | 1-800-746-2255 | + 1-561-391-7200
Manual layout_kb
2/22/05
3:48 PM
Page 12
Grand Champion Limited Edition/Grand Champion/Champion/American Heritage
The Cradle
1. Do you have all the components of the game? If so, let's begin setup. Place the two halves of the cradle upside down near the
permanent location of the game. Attach the end legs to the cradle and adjust the leg levelers exposing approximately 1/2 inch
of thread between the bottom of the leg and the leveler foot. (Perfect... You're off to a good start!)
2. Next, place the center leg in the spot you want the game to be permanently located. Adjust the leg levelers as you did on the
end legs. Now turn both halves of the cradle upright and attach them to the center leg, one leg at a time. If your center leg
has a mounting bracket for a score unit it needs to be to the back side of the game.
3. When the cradle is attached to the center leg, then check the position and alignment of the cradle. Time for a quick level check.
Use a bubble level to make sure you're on track and your table is level. The majority of the leveling and adjusting will take
place after the playfield is installed.
NOTE: If your game has an electronic score system STOP. See Electronic Assembly before you continue.
BEFORE INSTALLING THE PLAYFIELD MAKE SURE (REALLY!) THE CRADLE IS IN THE LOCATION YOU WANT IT. THIS GAME CANNOT BE
MOVED ONCE IT'S SET - IT'S REALLY, REALLY HEAVY!
12
Playfield (It's really heavy!)
4. Now that the cradle is in its permanent location, it's time to install the heaviest part of the game - the playfield.
a. First, you need to draft a few friends to assist you with installing the playfield. To get a commitment from your friends, you
may want to offer them the beverage of choice. Only no drinking until the installation is complete or you'll never get it
done. We recommend you use the following moving techniques. And, trust us, we've moved a few playfields.
b. If available, place two carpeted or padded 2x4's (34" long) across the rails of the cradle in the middle of each half. This acts
as your first support spot for the playfield installation. Remember, the playfield is heavy... be extra careful!
For More Information, Visit BMI Gaming | www.bmigaming.com | 1-800-746-2255 | + 1-561-391-7200
Manual layout_kb
2/22/05
quality
c.
3:48 PM
Page 13
products
Next, place two pucks (plastic cap down) at each end approximately 8"-10" apart and approximately 10" from the end of
the cradle. This serves as the next support spot and also eliminates the possibility of crushing your fingers between the
playfield and cradle.
d. Unpack and install the playfield. Remove the playfield from the crate using the claws of a hammer to pry off the top of the
crate. Be very careful not to scratch or damage the playfield while uncrating. It scratches easily. (You want the playfield to
stay looking new as long as possible.)
e. After the top of the crate is removed, tilt the crate on one edge and lean it slightly forward allowing the playfield to ease
out onto its side. To maneuver the playfield without damaging it requires strength and support. Remember, IT'S HEAVY!
f.
With the playfield resting on its side remove the crate from the area and lay the playfield upright with the climatic adjuster
on the floor. Remove packing material from around the playfield.
g. Here's where your committed friends come in. Lift the playfield from each end and move toward the cradle. (Don't try this
alone, you'll regret it later.) Once beside the cradle, lift the playfield high enough to clear the rail of the cradle with the
climatic adjusters on the bottom of the playfield. NOTE: The climatic adjusters can easily scratch the cradle and rails if not
lifted high enough. Place the playfield on the first support (2x4 or pucks) you have available. DO NOT (again, DO NOT)
attempt to rest the playfield on the rail as the climatic adjuster will severely damage the finish.
h. If your playfield is resting on the 2x4 support system, lift it one end at a time removing the support and lower it to the
pucks as the next support. (Good job!)
i.
The playfield is now resting on the pucks at each end. One end at a time, designate one friend to lay under the cradle and
push the end of the playfield up off the pucks. While the playfield is being held up have the other friend/or yourself reach
under the playfield to remove the pucks. Reach in from the outside of the playfield past the pucks and pull them toward
the end. This will keep the pucks from being knocked through the hole in the cradle and onto the person lifting the
playfield who could drop it and crush his hands and the pucks will give the poor guy under the table a black eye.
j. The playfield should be sitting in and on the cradle floor at this time.
For More Information, Visit BMI Gaming | www.bmigaming.com | 1-800-746-2255 | + 1-561-391-7200
13
Manual layout_kb
2/22/05
3:48 PM
Page 14
Leveling and Adjusting
5. The following procedure is recommended for adjusting the climatic adjusters and leg levelers to level your table. The following
is our personal preference on leveling.
Climatic Adjusters for Concave or Convex Playfield
a. Start at either end of the playfield and lay the 24" straight edge across the playfield over the first climatic adjuster. This will
determine if your playfield is concave or convex. You want your playfield concave. This can be determined by sliding a piece
of paper back and forth under the middle of the straight edge (the paper usually stopping 3" to 5" from the side of the
playfield). Again, this is our personal preference.
b. If the straight edge rocks from side to side the playfield is convex and needs to be corrected. Begin adjusting the climatic
adjusters located under the cradle. Notice each climatic adjuster consists of two brackets with
an all-thread bolt running between them and held in place by four nuts (two per
bracket). To adjust, tighten the inside and outside nut of one bracket to hold the bolt
in place. Loosen the outside bolt on the opposite bracket moving it away from the
outside of the bracket. Then begin tightening the inside nut, which will start adding space
between the brackets raising the outer edge of the playfield and making it concave. Now,
tighten the inside nut slowly with 1/4 to 3/4 turns while checking the straight edge regularly
with the paper to make the appropriate adjustment.
IMPORTANT NOTE: Don't expect a direct response. The table will react to the adjustments for several days.
If you're unable to make the desired adjustment allow the table a few days to continue to conform to the
constant pressure of the adjusters, then check it with the straight edge. If more adjustments are needed at that time make
them as described above.
14
c.
Continue down the table making the same adjustments at each climatic adjuster. When all adjustments are made the table
should be concave to some degree. If the pucks drift toward the center of the scoring zone the cradle and playfield are
level.
For More Information, Visit BMI Gaming | www.bmigaming.com | 1-800-746-2255 | + 1-561-391-7200
Manual layout_kb
2/22/05
quality
3:48 PM
Page 15
products
Leg Levelers for Leveling Cradle
d. Now that your playfield is concave, it's time to finish the leveling process. First, clean the playfield and apply a coat of
shuffleboard powder to the surface. Starting at one end, begin shooting pucks to the opposite end of the playfield. Shoot
several pucks down each edge. You're watching for the direction the pucks are drifting. If the pucks drift toward the center
of the opposite scoring zone your playfield is level at that end.
e. If the pucks drift toward one side of the playfield as they continue down the table that side of the cradle is low. To adjust
it, simply raise the low side by the leg levelers clockwise 1/2 to 1 full turn.
f.
Repeat the above steps from each end until all the pucks drift toward the center of both scoring zones.
NOTE: When leveling and adjusting, remember your playfield is made of solid maple and being made from a natural
product it will react differently to the adjustments throughout the playfield. The wood/board needs time to get acclimated
to your climate. Therefore, it's likely you will not achieve identical drifts from side to side or end to end of the playfield.
15
For More Information, Visit BMI Gaming | www.bmigaming.com | 1-800-746-2255 | + 1-561-391-7200
Manual layout_kb
2/22/05
3:48 PM
Page 16
Bullet/Bumper
The Cradle
1. Do you have all the components of the game? Let's begin setup. Start by placing the cradle upside down near the permanent
location of the game. Next attach the legs to the table using the four bolts and nuts supplied.
2. While the table is upside down adjust the leg levelers to the same distance exposing approximately 1/2 inch of thread. This will
assist in leveling the table later. (You've got it!)
NOTE: If your game has an electronic score system STOP. See Electronic Assembly before you continue.
3. When the legs are attached to the cradle and leg levelers, turn the cradle over in the permanent location of the game.
Leveling and Adjusting
4. Being a laminate playfield there aren't any climatic adjusters as on solid wood playfields. Therefore, no adjustments are
necessary.
5. Next, clean the playfield and apply a coat of shuffleboard powder to the surface. Starting at one end, begin shooting pucks to
the opposite end of the playfield. Shoot several pucks down each edge. You're looking for the direction the pucks are drifting.
.
16
For More Information, Visit BMI Gaming | www.bmigaming.com | 1-800-746-2255 | + 1-561-391-7200
Manual layout_kb
2/22/05
3:48 PM
quality
Page 17
products
Bumper and American Triplay
If the pucks drift toward one corner of the table, the leg leveler under that end should be raised until the pucks begin to drift straight
down the board. These tables are designed to play relatively flat because of the scoring zone located in the corners of the playfield.
Repeat the process until the pucks drift straight down the table. (You're striving for a perfect game.)
Bullet
If the pucks drift toward one side of the playfield as they continue down the table then that side of the cradle is low. To adjust it,
simply raise the low side by the leg levelers clockwise 1/2 to 1 full turn. Repeat the above steps from each end until all pucks drift
toward the center of both scoring zones. The bullet is designed to be slightly concave to allow the pucks to drift toward the center of
the scoring zone.
17
For More Information, Visit BMI Gaming | www.bmigaming.com | 1-800-746-2255 | + 1-561-391-7200
Manual layout_kb
2/22/05
3:48 PM
Page 18
Qualifier Series
The Cradle
1. Do you have all the components of the game? Let's begin setup. Start by placing the cradle upside down near the permanent
location of the game. Next attach the legs to the table using the four bolts and nuts supplied.
2. While the table is upside down adjust the leg levelers to the same distance exposing approximately 1/2 inch of thread. This
will assist in leveling the table later.
3. When the legs are attached and leg levelers adjusted, turn the table over and place it in its permanent location.
NOTE: If your game has an electronic score system STOP. See Electronic Assembly before you continue.
Leveling and Adjusting
4. Because your playfield was installed at the factory installation is not necessary. Your next step is to adjust and level your
playfield to suit your playing style. The following is our personal preference on leveling.
Climatic Adjusters for Concave or Convex Playfield
18
a. Begin the adjustment process by placing a straight edge (20" long) across the playfield directly
above the first climatic adjuster at either end. This will determine if your playfield is concave or
convex. You want your playfield concave. This can be determined by sliding a piece of paper back
and forth under the middle of the straight edge (the paper usually stopping 3" to 5" from the
side of the playfield). The pucks should drift toward the center of the scoring zone when shot.
b. If the straight edge rocks from side to side the playfield is convex and needs to be corrected.
Begin adjusting the climatic adjusters located under the cradle. Notice the climatic adjuster on
the Qualifier consists of three anchor bolts attached to the playfield and through a metal bar.
DO NOT touch or adjust the two outside anchor bolts and nuts. Their purpose is simply to hold
the bar away from the playfield. Use only the middle anchor bolt and nuts to adjust the playfield.
For More Information, Visit BMI Gaming | www.bmigaming.com | 1-800-746-2255 | + 1-561-391-7200
Manual layout_kb
2/22/05
quality
c.
3:48 PM
Page 19
products
To correct a convex playfield first turn both nuts between the metal bar and playfield until they are touching the playfield. This
will move them out of the way allowing you to pull the anchor bolt through the metal bar with the next adjustment. It's easy.
d. Begin to tighten the nut located just below the metal bar. Make a few more turns. Now check the straight edge for improvement.
Keep turning pulling the center of the playfield downward, if more adjustment is needed. Once you have reached the desired
adjustment, continue to the next climatic adjuster and repeat the above steps.
IMPORTANT NOTE: The table will continue to react to the adjustments for several days. If you're unable to make the desired
adjustment allow the table a few days to conform to the pressure of the adjusters then check it with the straight edge. If more
adjustments are needed at that time make them as described above.
Leg Levelers for Leveling the Cradle
f.
Now that your playfield is concave, it's time to finish the leveling process. First, clean the playfield and apply a coat of shuffleboard
powder to the surface. Starting at one end begin shooting pucks to the opposite end of the playfield. Shoot several pucks down
each edge. You're watching for the direction the pucks are drifting. If the pucks drift toward the center of the opposite scoring
zone your playfield is level at that end.
g. If the pucks drift toward one side of the playfield as they continue down the table then that side of the cradle is low. To adjust it,
simply raise the low side by the leg levelers clockwise 1/2 to 1 full turn.
h. Repeat the above steps from each end until all pucks drift toward the center of both scoring zones.
NOTE: When leveling and adjusting remember your playfield is made of solid maple. Being made from a natural product it will
react differently to the adjustments throughout the playfield. The wood/board needs time to get acclimated to your climate.
Therefore, it's likely you will not achieve identical drifts from side to side or end to end of the playfield.
5. Now that you have leveled your table and made the proper adjustments you're ready to play. Have fun!
For More Information, Visit BMI Gaming | www.bmigaming.com | 1-800-746-2255 | + 1-561-391-7200
19
Manual layout_kb
2/22/05
3:48 PM
Page 20
Electronic Assembly
If your cradle is assembled and in place, then it's time to install the electronics. It's important to install all electronics prior to
the playfield in case the cradle needs to be moved. Follow these simple procedures:
Wood Score Unit
1. The mounting pole and scoring head are in two pieces: the long vertical pole, which is attached to the center leg, and the
scoring head with curved mounting arm.
2. Cut the ties that hold the wire harnesses on both the pole and arm.
3. Draft your closest friend to help with this step. Be sure to promise cold refreshments afterwards. Have your friend lift and
hold the scoring head up to the pole close enough for you to connect the wire harnesses. Connect all harnesses.
NOTE: On non-coin operated score units one extra harness and plug will be present on the scoring head. It doesn't have a
corresponding plug on the pole.
4. Feed all wire harnesses and plugs into the hole on the pole and scoring arm.
5. Attach the scoring head to the pole with the two bolts.
20
6. Under each side of the cradle attach the button harnesses to the appropriate connection on the center leg. There are two
button harnesses to connect.
NOTE: For some non-coin operated models it's necessary to connect a third wire harness to the center leg for the reset
button.
7. Plug in the power cord and turn the score unit on. Use the black ON/OFF switch located on the side of the center leg.
8. Check all buttons to ensure proper connection. Press the reset button or insert coins to start the game, then press all the
buttons to check the connections. If you have any problems, refer to the Troubleshooting section.
9. Score unit installation is complete. Return to playfield installation.
For More Information, Visit BMI Gaming | www.bmigaming.com | 1-800-746-2255 | + 1-561-391-7200
Manual layout_kb
2/22/05
quality
3:48 PM
Page 21
products
Triangle Score Unit
1. The scoring head is attached to the center leg, which was originally attached to the cradle in the Setup Procedures section.
2. Under each side of the cradle attach the button harnesses to the appropriate connection on the center leg. There are two
button harnesses to connect.
3. Plug in the power cord and turn the score unit on. Use the black ON/OFF switch located on the side of the center leg.
4. Check all buttons to ensure proper connection. Press the reset button or insert coins to start the game. Now, press all the
buttons to check the connections. If you have any problems, refer to the Troubleshooting section.
5. Score unit installation is complete. Return to playfield installation.
JBar/Rail Mount/Small Wood JBar Score Units
1. These score units include two parts: scoring head and mounting arm.
2. Begin installation by feeding the wire harness from the scoring head through the mounting arm - top to bottom.
3. Once the harness is through the arm, attach the scoring head to the arm using the matching screws.
NOTE: Make sure the buttons are facing away from the arm on the JBar and Small Wood Score Units.
4. Next, attach the mounting arm and score unit to the cradle using the bracket on the bottom of the scoring arm. It's
normally located in the middle of the game.
5. After mounting the score unit, connect the AC adaptor to the wire harness and plug it in. The score unit should turn on.
6. Check all buttons then unplug the score unit and continue to the playfield installation.
For More Information, Visit BMI Gaming | www.bmigaming.com | 1-800-746-2255 | + 1-561-391-7200
21
Manual layout_kb
2/22/05
3:48 PM
Page 22
Pingate (coin operated scoring systems only)
1. Before installation begins, turn the playfield upside down onto a padded surface to avoid scratching the finish.
2. Insert the 10 pins into the holes on the bottom of the playfield.
3. Next, attach the pingate frame to the bottom of the playfield with the four wood screws. Leave the
screws a 1/2 turn loose from being snug against the playfield. This allows some movement by the
frame during operation to prevent possible jamming of the pins.
4. Carefully turn the playfield upright. Make sure the pins are loose and not in a bind
or jammed in the holes.
5. After placing the playfield in the cradle connect the three pin harnesses on the
pingate to the wire harness in the center leg.
6. When the score unit is turned on and coined up, check the movement of the pins as they drop. Now, press the
scoring buttons until the game is over. Finally, check the movements of the pins as they rise.
Light Kit
1. To install the light kit, simply feed the wire harness from the light fixture through the mounting arm.
22
2. Attach the light fixture to the mounting arm using the four machine screws.
3. Mount the light fixture on the cradle toward the scoring zone.
4. Connect the wire harness to the plug and plug it in.
5. Repeat steps 1-4 to install the second light. Light assembly complete.
For More Information, Visit BMI Gaming | www.bmigaming.com | 1-800-746-2255 | + 1-561-391-7200
Manual layout_kb
2/22/05
quality
3:48 PM
Page 23
products
Troubleshooting
1. My Champion lights are on, but I have no LED's lit up.
Check the wire harness from the power supply to the LED's. Make sure the harness is properly plugged into the LED and
not misspinned exposing a connection.
2. When I coin the game up the pingates do not go down.
Be sure the wire harness from the scoring unit and pingate have been installed correctly. (See Pingate assembly.)
3. When I put coins in, it doesn't give me the correct points according to how the dip switches are set.
Make sure the harness from the dip switch board is in place and not on backwards. If you just set the switches be sure you
turn the game off and on so the changes take place.
4. After I coin the game up I can't score with the buttons at each end.
Make sure you hooked the cradle harness to the center leg harness. Also check to make sure the buttons didn't come apart
during shipping. If they did, press them together to ensure clean contact.
5. My board playfield is very slow and the puck stops in places.
A simple cleaning of the playfield will solve the problem. It's very important you keep the playfield clean. Also, the wax
may be dirty and needs replacing. See Maintenance & Care section.
6. Game locks up.
Static is a terrible problem. We have taken precautions to prevent static from hurting our game. However, it still presents
some problems. Using anti-static mats around the game and also spraying a mist of fabric softener near the coin door will
help bad locations.
For More Information, Visit BMI Gaming | www.bmigaming.com | 1-800-746-2255 | + 1-561-391-7200
23
Manual layout_kb
2/22/05
3:48 PM
Page 24
Controller Operation
The controller has two large displays and one small display, each one having two digits. The large displays are for scoring and credit.
The small display is for showing the game level being played and time of play left. (Note: Displays time at last minute only.) All
references to "beep signals" assume that signals have not been disabled during DIP switch setup. See switch setup instructions.
On Power-Up:
1. Both digits on all three displays show the figure 8 for three seconds (segment test).
2. A short beep sounds.
3. All displays show zero (leading zeros blank).
4. The decimal point to the extreme right of the right hand score display will flash at one second intervals to show the program is
running. (The "Heartbeat.")
Inserting Coins:
Any time a coin is inserted, the coin counter will advance once and a short beep will sound. If a game is not in progress, the left score
display and small display will blank and the right score display will show the present number of coins which have been inserted. When
enough coins have been inserted to give a game credit, the game level (15, 21 or 51) will show on the small display.
The score displays will show zero (leading zero blanked), the pin gate (if fitted) will be lowered and the timer will start (if not
disabled). The game is now started.
24
If no score has been registered, more coins may be inserted to change the game level. The small display will show the level paid for.
The game time left at the moment of level change will be extended by the amount set on the DIP switches for the new level. Once a
score has been registered, the game level cannot be changed. Any coins inserted will be counted for credit later.
Any push of scoring button will increment the associated score display until the maximum score for the game being played is reached.
For More Information, Visit BMI Gaming | www.bmigaming.com | 1-800-746-2255 | + 1-561-391-7200
Manual layout_kb
2/22/05
quality
3:48 PM
Page 25
products
If the timer has not been disabled during DIP switch setup:
1. The small display will show the game level until the last minute of the game.
2. At the beginning of the last minute, a short beep will sound and the display will switch to show seconds left.
3. A short beep will sound each second for the last 10 seconds of the game. (If this feature has not been disabled during DIP switch
setup.)
4. When the timer times out, the pingate will be raised and a long beep will sound.
5. If the timer has been disabled during DIP switch setup the "Heartbeat" will stop flashing when the game starts and the game will
terminate on score only.
After the game has ended, any coins left over or entered during play will show on right hand score display. If there is enough credit
for a new game, that game will start at once without cycling the pingate. The score from the previous game will remain on the score
displays until credit for a new game is received.
25
For More Information, Visit BMI Gaming | www.bmigaming.com | 1-800-746-2255 | + 1-561-391-7200
Manual layout_kb
2/22/05
3:48 PM
Page 26
Switch Settings for Shuffleboard Controller
26
For More Information, Visit BMI Gaming | www.bmigaming.com | 1-800-746-2255 | + 1-561-391-7200
Manual layout_kb
2/22/05
3:48 PM
quality
Page 27
products
Controller Test Routines
To enter the test routings, set the CONTROL SWITCH #4 (DIP switch S3 #8) to ON and power up the board. All displays should show 00
and the "heartbeat" (RH decimal point) should flash.
Display tests:
Successive pushes of the LH score switch should step the LH score display from 00 through 99 and reset to 00.
Successive pushes of the RH score switch should step the RH score display from 00 through 99 and reset to 00.
Successive pushes of the COIN switch should step the small display from 00 through 99 and reset to 00.
Signal and output tests:
While the COIN switch is held on, the signal beeper should sound, the coin counter should be energized and the pingate relay should
be energized.
Releasing the COIN switch should silence the signal beeper, de-energize the coin counter and the pingate relay.
DIP switch tests:
Pushing the AUX switch once should display the HEX value of DIP switch S1 on the LH score display and the HEX value of DIP switch S2
on the RH score display. The number 12 should be shown on the small display as a reminder.
Pushing the AUX switch again should display the HEX value of DIP switch S3 on the LH sore display and the HEX value of DIP switch S4
on the right hand digit of the RH score display. (Only four switches as LH digit is always 0.) The number 24 should be displayed on the
small display as a reminder. Successive pushes of the AUX switch will select DIP switches 1, 2 and 3, 4. Pushing the COIN switch returns
the test program to the display tests.
For More Information, Visit BMI Gaming | www.bmigaming.com | 1-800-746-2255 | + 1-561-391-7200
27
Manual layout_kb
2/22/05
3:48 PM
Page 28
HEX switch values are as follows:
Switch Section
#1
#2
#3
#4
#5
#6
#7
#8
Value Displayed
1
2
4
8
1
2
4
8
Controller Fault Codes
The shuffleboard controller does some checks during power up. If a problem is found, the controller reports it by showing a fault code
on the left hand score display and giving a constant beep. The fault codes are as follows:
28
FI
F2
F3
F4
SF
The coin-in switch is stuck shut.
The Left score switch is stuck shut.
The Right score switch is stuck shut.
The Auxiliary switch is stuck shut. (Not currently used.)
Switch programming error. No game selected. (All game cost switches are off.)
Correcting the fault will clear the fault indication and the controller will complete its power-up routine.
For More Information, Visit BMI Gaming | www.bmigaming.com | 1-800-746-2255 | + 1-561-391-7200
Manual layout_kb
2/22/05
quality
3:48 PM
Page 29
products
Shuffleboard Controller Harness
29
For More Information, Visit BMI Gaming | www.bmigaming.com | 1-800-746-2255 | + 1-561-391-7200
Manual layout_kb
2/22/05
3:48 PM
Page 30
Protect your investment. A shuffleboard playing surface is subject to heavy wear. It requires reasonable care and maintenance just like
your home or automobile. The better care you give it, the more fun and satisfaction you and your family or establishment will derive
from it. By simply following these suggested maintenance procedures you will be insuring the seamless transition of your shuffleboard
into future generations.
Weekly Maintenance Procedures and Table Preparation
Sun-Glo Spray Cleaner
This cleaner may be used as needed, depending on play frequency and shuffleboard environment. Its purpose is to quickly remove dirt
and grime from the play surface.
Sun-Glo Silicone Spray
This spray forms a foundation for the powdered wax. It is one of the most important elements of table performance. As you might
have already noticed, the powder on your table moves around very easily. You can just walk by the table and the air will disburse the
powder. Using silicone spray before you powder the table reduces the amount of powder you use per game and reduces the tracking
of your pucks on the table... tracking slows down the game. Before you powder the table, apply a light coat of Sun-Glo Silicone Spray.
Let it dry for approximately one minute, then apply the powdered wax.
30
Sun-Glo Speed Powders
Sometimes referred to as salt or sand. We offer seven different speeds of wax. You might be wondering why there are so many speeds.
Well, its really very simple. If you have a 9-12 foot table, you would need a wax that has a component to it, which allows you to keep
the puck on the playfield. If you are playing on an 18-22 foot table, you probably want to play the fastest game possible. Our Speed 1
and 2 are designed specifically for maximum speed play. If you have a 14-16 foot table, you may want to experiment with different
speeds.
Remember... the object of the game is to HAVE FUN!
For More Information, Visit BMI Gaming | www.bmigaming.com | 1-800-746-2255 | + 1-561-391-7200
Manual layout_kb
2/22/05
quality
3:48 PM
Page 31
products
If you have played shuffleboard in public environments before you might have noticed the owners sometimes reuse the powder out of
the gutters. Bad idea! Keep in mind the main component of most powders is very, very tiny silicone balls. These silicone balls are
perfectly round. Once the pucks ride on top of them they become jagged and imperfect. Reusing the product could damage your
playfield and will certainly slow your game. Not to mention, the dirt and impurities that accompany reused products.
Caring for your shuffleboard should not be a grueling process. In fact, the maintenance hours that you will spend over the coming
years may be shared with your friends, family and growing children and may may very well be remembered as some of the fondest
memories of your life.
Periodic Maintenance Procedures
Some of the most common questions our table owners ask are "How often," "How much," and "What do we need?" We hope the
following information answers these mystic questions.
Sun-Glo Shuffleboard Combination Cleaner and Polish: Step B
This product is designed to effectively clean the playfield. It removes deep stains such as nicotine and other liquids that might have
spilled on the playfield. This dual purpose product should be applied about once a month for a table in a home environment and every
two weeks if the table is in public use. Apply the cleaner in thin even coats. Buff in circular motions until dry.
Sun-Glo Past Wax: Step C
Wow, what a difference a good paste wax makes! Just like your car or favorite surfboard, your shuffleboard needs to be waxed and
buffed. Paste wax will fill in the small cracks and imperfections that naturally occur over time. Just as your car key scratches around the
door lock of your car, the playfield gets wear spots that if left untreated will slow or derail your game. As you get to know your table
you will notice certain areas take more wax than others. Applying the wax isn't rocket science - it's simply wax on, wax off. How often
should you wax your shuffleboard? Probably about every other month. If you wax it too often you might not be able to keep the puck
on the table.
For More Information, Visit BMI Gaming | www.bmigaming.com | 1-800-746-2255 | + 1-561-391-7200
31
Manual layout_kb
2/22/05
3:48 PM
Page 32
Sun-Glo Master Glaze: Step D
Step back people... I'm going to shoot this puck and it's going to float down the table! This liquid glaze product puts a protective
coating on the playfield that looks like warm butter. It can be used on the cradle and legs of the shuffleboard as well. Apply the
combo Cleaner and Polish and Master Glaze about every two weeks.
You can purchase these products and Sun-Glo Spray Cleaner in our Sun-Glo Maintenance Kit.
Let us help keep a record of your care and maintenance and provide timely service information. Simply, register your shuffleboard by
calling 1-800-826-7856 and provide us your serial number.
32
For More Information, Visit BMI Gaming | www.bmigaming.com | 1-800-746-2255 | + 1-561-391-7200
Manual layout_kb
2/22/05
quality
3:48 PM
Page 33
products
Shufflers Glossary
Black Numbers:
Foul Line:
Free Hand:
Frame:
Go Around:
Hammer:
Handicap Scoring:
Hanger:
Partners:
Puck:
Red Numbers:
Score Zone:
Shooting the Rail:
Singles:
Regular scoring
Line closest to the shooter, the puck must cross this line or the shot is forfeited and removed.
Puck is thrown from middle of board, the rail is not used to help guide the release of the shot.
Refers to all eight pucks being shot and scored.
Puck curves around another puck.
Player or team who has the last shot.
Players of all levels of expertise can compete evenly.
Puck is hanging over end of board. One extra point.
Four players
Heavy metal object that is slid on playfield.
Handicap scoring
Area in which points can be earned.
Fingers hang over the side of the rail when shooting and the puck slides on the edge of the playfield.
Two players
33
For More Information, Visit BMI Gaming | www.bmigaming.com | 1-800-746-2255 | + 1-561-391-7200
Manual layout_kb
2/22/05
3:48 PM
Page 34
How to Play Shuffleboard:
The object of the game is to score more points than your opponent by either knocking his pucks off or by sliding your pucks past his
into a higher score zone.
A typical game (partners or singles) is played to 15 points.
Let's Begin:
A coin toss determines who shoots first and who gets the hammer. The winner normally takes the hammer and loser picks the color of
pucks he will shoot.
Player A begins by shooting one of his colored pucks. Player B shoots the other color. Players then rotate shots until all eight pucks
have been shot. If a puck doesn't cross the foul line closest to the player shooting, it must be removed and the shot forfeited.
After all eight pucks have been shot, the players determine who scored by counting only the pucks closest to the end of the table and
are the same color. If a player has more than one puck closer to the end of the table then his opponent may also count those pucks.
Remember, only one color can sore per frame. A puck must be completely inside the score zone to receive the points in that zone.
The team or player that scores in that frame must shoot first in the next frame. This process is repeated until one team or player
reaches 15 points.
34
How to Play Handicap Scoring:
The purpose of handicap scoring is to allow players of different expertise play at an even level, similar to a golf handicap. The better
team or player simply uses the smaller red numbers and the other team or player uses the black numbers. Example: The more
advanced player may receive three points for a particular shot whereas the other player would receive four points for the same shot.
Remember: The puck must be completely inside the score zone to count in the higher zone. If you're not sure, look directly down on
top of the puck. If it's touching the line it counts in the smaller zone.
For More Information, Visit BMI Gaming | www.bmigaming.com | 1-800-746-2255 | + 1-561-391-7200
Manual layout_kb
2/22/05
3:48 PM
quality
Page 35
products
How to Play Horsecollar:
The object of the game is for one team (two players) or one player (individual) to reach 51 points before their opponent. We'll use two
teams (four players) as an example:
A coin toss decides which team shoots first and which team gets to choose the end they want to shoot from. The game is not over
until each team has shot the same number of frames. If the first team reaches 51 points before their opponent, the other team still
gets one last frame to shoot.
Each team tries to shoot their pucks as close to the end of the board as possible to score as many points as they can. Sometimes the
second shooter on your team may try to bump up some of the pucks. A team must have at least one puck in the four score zone to
receive any points. All other pucks receive their full value. If a puck is hanging off the end of the board the team receives 10 points.
Each player on the team must shoot four pucks, in any order. The most common shooting order is one player shoots four pucks and
then the other shoots four. After the first team shoots all eight pucks and tallies the sore, the second team shoots and the process is
repeated until one team hits 51.
IMPORTANT: The game of Horsecollar has an additional twist. After a team has shot all eight pucks, the opposing team adds their score
(if any) and tells their opponent what they scored. Here's where the fun begins, the shooting team can either accept their opponents
offer or walk the board. In other words, if a team doesn't believe their opponent they can look (tally the score) for themselves. While a
team is studying to decide if they want to walk or not, they must always keep one finger on the black molding on the top of the table.
This keeps players from getting too close to the end of the table.
35
If the walking team finds the score they were given is correct, they tally up the points (if any) and buy their opponents a beer. If the
walking team finds their opponent lied about the score, they tally up the correct score and receive a free beer from their dishonest
opponent.
For More Information, Visit BMI Gaming | www.bmigaming.com | 1-800-746-2255 | + 1-561-391-7200