1
RIGHT. FROM THE START
RIGHT. FROM THE START
RIGHT. FROM THE START
RIGHT. FROM THE START
RIGHT. FROM THE START
RIGHT. FROM THE START
RIGHT. FROM THE START
ALPHAFIX
User’s Manual
RIGHT. FROM THE START
RIGHT. FROM THE START
RIGHT. FROM THE START
RIGHT. FROM THE START
RIGHT. FROM THE START
RIGHT. FROM THE START
RIGHT. FROM THE START
DSM-00017-02
1996 Alpha Microsystems
REVISIONS INCORPORATED
REVISION
00
01
02
DATE
March 1988
April 1991
June 1996
AlphaFIX User’s Guide
To re-order this document, request part number DSO-00017-00.
This document applies to AMOS versions 2.2C and later.
The information contained in this manual is believed to be accurate and reliable. However, no
responsibility for the accuracy, completeness or use of this information is assumed by Alpha
Microsystems.
This document may contain references to products covered under U.S. Patent Number 4,530,048.
The following are registered trademarks of Alpha Microsystems, Santa Ana, CA 92799:
AMIGOS
AlphaBASIC
AlphaLAN
AlphaNET
CASELODE
AMOS
AlphaCALC
AlphaLEDGER
AlphaPASCAL
OmniBASIC
Alpha Micro
AlphaCOBOL
AlphaMAIL
AlphaRJE
VER-A-TEL
AlphaACCOUNTING
AlphaFORTRAN 77
AlphaMATE
AlphaWRITE
VIDEOTRAX
The following are trademarks of Alpha Microsystems, Santa Ana, CA 92799:
AlphaBASIC PLUS
DART
inFront/am
AlphaVUE
ESP
AM-PC
MULTI
AMTEC
inSight/am
All other copyrights and trademarks are the property of their respective holders.
ALPHA MICROSYSTEMS
2722 S. Fairview Street
P.O. Box 25059
Santa Ana, CA 92799
TABLE OF CONTENTS
QUICK REFERENCE TABLES
CHAPTER 1 - INTRODUCTION
USING ALPHAFIX . . . . . . . . . . . . . . . . . . . . . . . . . . . . . . . . . . . . . . . . . . . . . .
CALLING ALPHAFIX . . . . . . . . . . . . . . . . . . . . . . . . . . . . . . . . . . . . . . . . . . . .
ALTERNATE TERMINAL SUPPORT . . . . . . . . . . . . . . . . . . . . . . . . . . . . . . .
ALPHAFIX MODES . . . . . . . . . . . . . . . . . . . . . . . . . . . . . . . . . . . . . . . . . . . . .
1-1
1-1
1-2
1-3
CHAPTER 2 - DISPLAY MODE
DISASSEMBLER NOTES . . . . . . . . . . . . . . . . . . . . . . . . . . . . . . . . . . . . . . . .
CURSOR COMMANDS . . . . . . . . . . . . . . . . . . . . . . . . . . . . . . . . . . . . . . . . . .
Cursor Down: Control-J or Down arrow . . . . . . . . . . . . . . . . . . . . . . . .
Cursor Up: Control-K or Up arrow . . . . . . . . . . . . . . . . . . . . . . . . . . . .
Page Down: Control-T or Next Screen . . . . . . . . . . . . . . . . . . . . . . . .
Initial Page: Control-R or Prev Screen . . . . . . . . . . . . . . . . . . . . . . . . .
Home: Control-^ . . . . . . . . . . . . . . . . . . . . . . . . . . . . . . . . . . . . . . . . . .
EXECUTION COMMANDS . . . . . . . . . . . . . . . . . . . . . . . . . . . . . . . . . . . . . . .
Toggle Breakpoint: Control-P or F5 . . . . . . . . . . . . . . . . . . . . . . . . . . .
Proceed to Breakpoint: Control-X . . . . . . . . . . . . . . . . . . . . . . . . . . . .
Single-step: RETURN . . . . . . . . . . . . . . . . . . . . . . . . . . . . . . . . . . . . .
Proceed from Subroutine: Control-E . . . . . . . . . . . . . . . . . . . . . . . . . .
Proceed to Cursor: Control-G . . . . . . . . . . . . . . . . . . . . . . . . . . . . . . .
Toggle Skip Subroutine Mode: Control-\ or Shift-F16 . . . . . . . . . . . . .
Up to Previous Label: Control-F or Char Ins . . . . . . . . . . . . . . . . . . . .
Up to Previous Non-local Label: Control-D or Char Del . . . . . . . . . . .
Repaint Screen: Control-S . . . . . . . . . . . . . . . . . . . . . . . . . . . . . . . . . .
Change to Command Mode: ^[ or ESC or MENU . . . . . . . . . . . . . . . .
SPLIT SCREEN DISPLAY MODE . . . . . . . . . . . . . . . . . . . . . . . . . . . . . . . . . .
2-2
2-2
2-3
2-3
2-3
2-3
2-3
2-3
2-3
2-4
2-4
2-4
2-5
2-5
2-5
2-5
2-5
2-6
2-6
CHAPTER 3 - COMMAND MODE
COMMAND EXPRESSIONS . . . . . . . . . . . . . . . . . . . . . . . . . . . . . . . . . . . . . .
Numbers . . . . . . . . . . . . . . . . . . . . . . . . . . . . . . . . . . . . . . . . . . . . . . .
Address Base Relocation . . . . . . . . . . . . . . . . . . . . . . . . . . . . . . . . . .
Register Expressions . . . . . . . . . . . . . . . . . . . . . . . . . . . . . . . . . . . . . .
THE COMMANDS . . . . . . . . . . . . . . . . . . . . . . . . . . . . . . . . . . . . . . . . . . . . . .
An or Dn or SP - Set Register n to Specified Value . . . . . . . . . . . . . . .
BREAK - Set a Breakpoint at Specified Location . . . . . . . . . . . . . . . .
CLEAR - Clear Breakpoint . . . . . . . . . . . . . . . . . . . . . . . . . . . . . . . . . .
3-2
3-3
3-3
3-4
3-4
3-5
3-5
3-6
AlphaFIX User’s Manual, Rev. 02
Page 2
DDB - Display Contents of a DDB . . . . . . . . . . . . . . . . . . . . . . . . . . . .
DSECT - Declare DSECT Base Register . . . . . . . . . . . . . . . . . . . . . .
GO - Execute AMOS Command . . . . . . . . . . . . . . . . . . . . . . . . . . . . .
MOVx - Move Data of Type x . . . . . . . . . . . . . . . . . . . . . . . . . . . . . . .
PROCEED - Proceed to Breakpoint . . . . . . . . . . . . . . . . . . . . . . . . . .
PSECT - Declare PSECT Base Register (32K bias) . . . . . . . . . . . . . .
QUIT - Exit AlphaFIX . . . . . . . . . . . . . . . . . . . . . . . . . . . . . . . . . . . . . .
REL - Set Address Base Mode . . . . . . . . . . . . . . . . . . . . . . . . . . . . . .
SEARCH - Search for Program Symbol or Location . . . . . . . . . . . . . .
SET - Set Option . . . . . . . . . . . . . . . . . . . . . . . . . . . . . . . . . . . . . . . . .
SPEC - Set up Command Line . . . . . . . . . . . . . . . . . . . . . . . . . . . . . .
VIEW - Display Memory Contents From Specified Address . . . . . . . .
WATCH, WATCHB, WATCHW - SET DYNAMIC BREAKPOINTS . . . . . . . . .
CHAPTER 4 - ALPHAFIX OVERLAY COMMANDS
EA . . . . . . . . . . . . . . . . . . . . . . . . . . . . . . . . . . . . . . . . . . . . . . . . . . . . . . . . . .
JCB . . . . . . . . . . . . . . . . . . . . . . . . . . . . . . . . . . . . . . . . . . . . . . . . . . . . . . . . .
MAP . . . . . . . . . . . . . . . . . . . . . . . . . . . . . . . . . . . . . . . . . . . . . . . . . . . . . . . . .
PTR . . . . . . . . . . . . . . . . . . . . . . . . . . . . . . . . . . . . . . . . . . . . . . . . . . . . . . . . .
TRMDEF . . . . . . . . . . . . . . . . . . . . . . . . . . . . . . . . . . . . . . . . . . . . . . . . . . . . .
TYPE . . . . . . . . . . . . . . . . . . . . . . . . . . . . . . . . . . . . . . . . . . . . . . . . . . . . . . . .
3-6
3-6
3-7
3-7
3-8
3-8
3-8
3-8
3-9
3-9
3-9
3-10
3-11
4-1
4-1
4-2
4-2
4-3
4-3
APPENDIX A - INPUT TRANSLATION
DOCUMENT HISTORY
INDEX
AlphaFIX User’s Manual, Rev. 02
Page 3
QUICK REFERENCE GUIDE
Display Mode
^[ or ESC or MENU
^J or ↓
^T or NEXT SCREEN key
^E
^^ or HOME
^R or PREV SCREEN key
^X
^G
^S
Change to command mode
Down
Down page
Exit subroutine
Home (to PC)
Initial page
Proceed
Proceed to here (cursor)
Repaint screen
Single step
Toggle breakpoint
Toggle subroutine mode
Up
Up to previous label
Up to previous non-local label
RETURN
^P or F5
^\ or Shift-F16
^K or ↑
^F or CHAR INS key
CHAR DEL key
Command Mode
Clear breakpoint at location <expr>
Declare DSECT base register
Declare PSECT base register (32K Bias)
Display DDB at <expr>
Display data from location <expr>
Execute AMOS command <string>
Exit AlphaFIX
Move data
Proceed until breakpoint
Search for program symbol or location
Set address register n to value <expr>
Set address base mode
Set breakpoint at location <expr>
Set data register n to value <expr>
Set option (Octal, Hex, Split, Nosplit,
Cmode, Nocmode)
Setup command line <string> @A2
Watch byte value
Watch longword value
Watch word value
AlphaFIX User’s Manual, Rev. 02
CLEAR <expr>
DSECT An
PSECT An
DDB <expr>
VIEW <expr>
GO <string>
QUIT
MOVx <src>,<dest>
PROCEED
SEARCH <expr>
An <expr>
REL <mode>
BREAK <expr>
Dn <expr>
SET <option>
SPEC <string>
WATCHB <arg>
WATCH <arg>
WATCHW <arg>
Quick Reference Guide
Page 4
Overlay Commands
Compute effective address of <expr>
Display JCB status
Display terminal status
List memory modules
Type contents ASCII file
View from address in longword at <expr>
EA <expr>
JCB{<jobname>} {*}
TRMDEF {<term name>}
MAP
TYPE <filespec>
PTR <expr>
Command Mode Keystroke Commands
Delete character
Delete previous character
Execute command or overlay
Generate BREAK/PTR command
(View display mode)
(Register display mode)
Generate CLEAR command
(View display mode)
(Register display mode)
Go to end of command line
Go to start of command line
Home
(View display mode)
(Register display mode)
Insert blank character
Move cursor left
Move cursor right
Next page
(View display mode)
(Register display mode)
Previous page
(View display mode)
(Register display mode)
Register/Breakpoint Display
Scroll down line
(View display mode)
(Register display mode)
Scroll up line
(View display mode)
(Register display mode)
Toggle insert mode
^D or DEL CHAR key
RUBOUT
RETURN
^P or F4
Gen "PTR aaaa"; aaaa=top addr in display
Gen "BREAK aaaa"; aaaa=cursor address
^E
No action
Gen "CLEAR aaaa"; aaaa=top addr in bpt disp
^N
^U
^^ or HOME
Redisplays at original VIEW/PTR address
Positions to top of breakpoint list
^F or INS CHAR key
^H or ←
^L or →
^T or NEXT SCREEN key
Pages data display up 16 words
Pages breakpoint display up 6
^R or PREV SCREEN key
Pages data display down 16 words
Pages breakpoint display down 6
^S
^J or ↓
Scrolls data display down one word
Scrolls breakpoint display down one
^K or ↑
Scrolls data display up one word
Scrolls breakpoint display up one
^Q or F16
Key Commands during PROCEED With WATCH Enabled
BREAK program execution
GO full speed
^B
^G
AlphaFIX User’s Manual, Rev. 02
CHAPTER 1
INTRODUCTION
AlphaFIX is an interactive screen oriented debugging program for use under AMOS. It lets you
examine and run machine language programs. If you use AlphaXED or AlphaVUE, you will find
the operation of AlphaFIX familiar. AlphaFIX uses many of the same screen display concepts
to give you a two-level visual interaction with your program.
Throughout AlphaFIX, care has been taken to present the debugging information in a format
familiar to programmers. Data structures (such as DDBs and job control blocks) may be
displayed in symbolic form, rather than simply as octal or hex memory dumps.
This manual assumes you are familiar with M68 assembly language programming and the
AMOS runtime environment. Related documents are: the Instruction Set Manual, the Assembly
Language Programmer’s Manual, and the AMOS Monitor Calls manual.
USING ALPHAFIX
Debugging sessions with AlphaFIX follow a fairly consistent pattern for the simple
reason that most all debugging follows a standard procedure. Upon calling AlphaFIX,
you might set a breakpoint or preinitialize a register. You can then start execution and
trap on the breakpoint you set. At that point you can single step through the code,
examining and/or modifying registers or memory at any time.
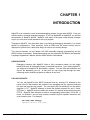
CALLING ALPHAFIX
You can call AlphaFIX from AMOS command level by entering FIX followed by the
name of the file that contains the program to be debugged and any optional command
line input the program may require. You can specify any file extension, but the default
extension is .LIT. AlphaFIX attempts to locate the desired program file, and, if found,
FETCHes it. AlphaFIX does not delete the module if it already exists before doing the
FETCH. AlphaFIX then attempts to locate a corresponding symbol table (.SYM) file. If
found, it is loaded in, and you may reference locations by their symbolic names as well
as by numeric value. For example:
FIX USER TEST.DAT RETURN
AlphaFIX Version X.X (xxx)
AlphaFIX User’s Manual, Rev. 02
Page 1-2
Introduction
where USER is the name of the program you are going to debug (the extension .LIT is
assumed) and TEST.DAT is the name of an optional data file USER needs for input.
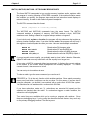
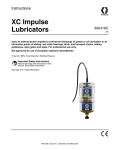
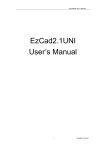
On the next line, "X.X (xxx)" indicates the version number of AlphaFIX. AlphaFIX now
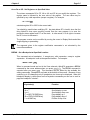
enters Command Mode, and you see a display something like this:
If you type in the FIX command and the program file name, but forget to type in the
optional input (TEST.DAT, in this case), AlphaFIX allows you to type in a "SPEC"
statement after its Command Mode display. See below.
AlphaFIX 2.1(156) Status:
Disassembly
Debugging USER.LIT with SYM
(PRG)=002559D4
PSECT: -8000(A3)
hex
DSECT: @A5
C Mode
>
Registers: D0:
D4:
A0:
A4:
0
0
0
0
D1:
D5:
A1:
A5:
PC
Cursor
Status: X
00000000(PRG) 00000012(PRG)
0
0
0
0
0
D2:
D6:
A2:
A6:
N
0
Z
0
V
0
0
0
24E8FC
0
C
0
T0 T1
0 0
D3:
D7:
A3:
SP:
S
0
0
0
0
24E846
M Int Mask
0
0
Breakpoints - ^R or ^T to see more
00000000(PRG)
00000012(PRG)
.PROG.:
main:
If you forgot to type in the optional program input (TEST.DAT in our example), type it in
now using a SPEC instruction, like this:
>SPEC TEST.DAT RETURN
See Chapter 3 for more information on Command Mode and the SPEC statement. Now
you can start debugging your program.
You can exit AlphaFIX at any time by typing: Q RETURN at command mode.
ALTERNATE TERMINAL SUPPORT
AlphaFIX supports use of an alternate terminal for all of the program’s keyboard input
and terminal output. This lets you separate the program’s I/O and the AlphaFIX session.
The alternate terminal must not be attached to a job.
To specify an alternate terminal, follow the FIX command with the /T switch and the
terminal name. /T must come before the name of the program you want to debug. For
example:
FIX/T:TERM2 USER TEST.DAT RETURN
AlphaFIX User’s Manual, Rev. 02
Chapter One
Page 1-3
ALPHAFIX MODES
AlphaFIX operates in two basic modes, called Display Mode and Command Mode. You
can switch between the two modes by pressing ESC . Display mode shows you a
disassembled listing of your program, including symbols if a .SYM file was located,
along with the address of each instruction. When in Display mode, you may set
breakpoints, proceed to or from a breakpoint, execute a single instruction, execute a
subroutine, and perform several other functions.
When in Command Mode, AlphaFIX displays the current status of AlphaFIX and your
program, and lets you modify the debugging environment. For instance, you can set
register values or delete memory modules.
Command mode is further subdivided into several submodes, such as Register
submode and View submode.
In the Register submode, AlphaFIX displays the current contents of the processor
registers, as well as the status of the condition codes, and any breakpoints you may
have set.
In the View submode, AlphaFIX displays a screenful of memory in byte, word, longword,
RAD50, ASCII, and floating point formats. You may step backward and forward through
this display by using the NEXT SCREEN and PREV SCREEN keys or by using the
control characters Control-T (Next Screen) or Control-R (Previous Screen).
Other submodes exist for displaying data in DDB or terminal control block format. When
you leave Display Mode and enter Command Mode, you always return to the Register
submode.
AlphaFIX User’s Manual, Rev. 02
CHAPTER 2
DISPLAY MODE
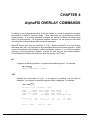
In Display mode, AlphaFIX displays memory as disassembled op codes. The format is:
00000000(PRG)
LABEL:
MOV
@A4,VAR(A5)
^
^
^
^
^
|
|
|
|
|
|
|
|
|
|
|
|
|
|
+-- operand field
|
|
|
+-- opcode field
|
|
+-- symbol field
|
+-- address base
+-- address
The first field is the address which is displayed in the current radix being used by
AlphaFIX. If the radix is octal, this address contains eight digits; if the radix is
hexadecimal, the address contains six digits. The default radix is the numeric base
used for display by your job, and represents an offset from the current address base. In
the sample line above, the address base is (PRG), the base of the program being
debugged. Legal address bases are:
(A0) - (A6)
(SP)
(PRG)
(ABS)
(JCB)
(SCA)
relative to an AM-100/L address register
relative to the stack pointer
relative to program base
absolute
relative to the user’s job control block
relative to the system communication area
The next field is the symbol field. If the address corresponds to a symbol, only the first
six characters of that symbol are displayed followed by a colon, although internally up to
32 characters are significant. If you have several long labels in your program that have
the same first 13 characters, they appear identical in the disassembly screen display,
but they are not duplicate labels. AlphaFIX uses all the characters in a symbol (up to
32) to identify a label, not just the first six. Therefore, when you use a search command
or any command that uses a label as an operand, you must include all the characters in
the label or AlphaFIX will tell you the label is undefined. Remember AlphaFIX is also
CASE SENSITIVE with respect to symbol names. That is, upper and lower case
characters are not considered to be the same.
AlphaFIX User’s Manual, Rev. 02
Page 2-2
Display Mode
If there is confusion as to the result of truncated labels in the display, use the following
method to get the full label name:
1.Position the cursor to the Label location in display (Disassembly) mode.
2.Switch to command mode.
CTRL /
P .
A "BREAK <label name>:" command is placed on the
3.Press
command line. This BREAK command contains the full label name.
The next two fields contain the disassembly of the instruction in standard M68 format. If
the instruction uses long symbols, the symbols are displayed in full. However, if the
symbols are extremely long, the instruction is truncated and the last few characters are
not displayed. AlphaFIX disassembles supervisor calls as well as standard machine
codes. Like all disassemblers, AlphaFIX can get out of sync when displaying unusual
code, such as embedded data tables.
Lines at which breakpoints are set are displayed in reduced intensity as they are
disassembled. This feature depends on your terminal having reduced intensity
capability.
DISASSEMBLER NOTES
This section describes some of the features and characteristics of the AlphaFIX
disassembler. The disassembler disassembles all opcodes and AMOS supervisor calls.
If a symbol file (.SYM) is present for the program being debugged, AlphaFIX loads it and
attempts to use symbolic values wherever possible. AlphaFIX only uses labels; equated
symbols are ignored. If a symbol is defined twice (for instance in two different modules)
only the first definition is used.
If an instruction uses absolute addressing, AlphaFIX checks for system variables (as
defined in SYS.UNV). For example:
MOV
UPTIME,D1
AlphaFIX tries to disassemble the instruction to the best of its ability. Most instructions
for the latest processors are known to AlphaFIX. If a disassembly line contains
something such as: ?20?, it means the opcode or the addressing mode will not execute
on the current CPU.
CURSOR COMMANDS
These commands move the cursor through the program being debugged.
possible to modify the program while in Display mode.
It is not
Your terminal may have cursor keys. If they generate the proper control characters, you
may use those keys. AlphaFIX includes input character translation (See Appendix A). If
the input translation table for your terminal is available, you can use keys on your
AlphaFIX User’s Manual, Rev. 02
Chapter 2
Page 2-3
keyboard that are used for AlphaVUE. For example, the ESC key and the MENU key
become equivalent.
Cursor Down: Control-J or Down arrow
Pressing ↓ or CTRL / J moves the cursor down one instruction. If the cursor was
already at the bottom of the screen, the screen is scrolled up one line and the next line
is disassembled.
Cursor Up: Control-K or Up arrow
Pressing ↑ or CTRL / K moves the cursor up one instruction. If the cursor was already
at the top of the screen, this command is ignored (since the disassembler has no way of
determining how far to back up to the last instruction).
Page Down: Control-T or Next Screen
This command moves the cursor down one page (the distance depends on the display
size of your terminal).
Initial Page: Control-R or Prev Screen
This command moves the cursor to the start of the program.
Home: Control-^
Pressing HOME or CTRL / ^ moves the cursor to the current program counter. This
command is useful when you have executed part of a program, then move the cursor to
look at something, and then wish to restart the program at the point you left off.
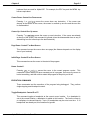
EXECUTION COMMANDS
These commands test the execution of the program being debugged. They perform
single-stepping annd breakpoint control.
Toggle Breakpoint: Control-P or F5
This command toggles a breakpoint at the current cursor location. If no breakpoint is
set at the current location, a breakpoint is added at this location. The line the cursor is
on redisplays in reduced intensity. Up to 16 breakpoints may be set at one time. If 16
breakpoints are already set, this command is ignored.
AlphaFIX User’s Manual, Rev. 02
Page 2-4
Display Mode
If there is already a breakpoint at this location, this command clears the breakpoint and
redisplays the line in full intensity.
Proceed to Breakpoint: Control-X
This command starts the user program at the current cursor location. The program
executes until a breakpoint, or a dynamic breakpoint set by a WATCH command, is
encountered (or until an EXIT supervisor call is encountered). When a breakpoint is
encountered, the cursor is left at the breakpoint location in Display mode.
See the description of the WATCH command in Chapter 3 for what happens when a
dynamic breakpoint is encountered, and for additional options available when you use
the WATCH commands.
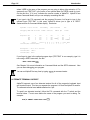
Single-step: RETURN
This command executes the instruction at the current cursor location. The cursor is
updated to point to the new PC (it may be on a new page if the instruction was a
transfer instruction). AlphaFIX single-steps properly through any instruction, including
AMOS monitor calls. As you single-step, the cursor "walks" through the program just as
you would if you were walking through a listing.
00000000(PRG)
00000002(PRG)
00000006(PRG)
00000010(PRG)
00000012(PRG)
00000014(PRG)
LOOP:
MOV
DCVT
CRLF
ASL
BNE
EXIT
#1,D1
0,2
D1
LOOP
This example is a sample AlphaFIX session. The cursor appears to loop on the screen
until the conditional branch fails. It then falls through to the EXIT statement.
Not all code can be single-stepped properly, due to timing or other considerations. For
instance, other users on your system could get annoyed if you single-step through a
JLOCK, prohibiting them from running.
Proceed from Subroutine: Control-E
This command sets a temporary breakpoint at the value on the top of the stack, and
proceeds to it (proceed until PC = @SP). In a normal subroutine, this command
executes the rest of the subroutine, returning control to the user just after the original
CALL instruction.
If the subroutine has modified the SP in any way (for example, "PUSHx", "SUB #n,SP",
"SAVE") the longword on the top of the stack will not be the return address and this
command will have undefined (or unmentionable) results.
AlphaFIX User’s Manual, Rev. 02
Chapter 2
Page 2-5
Proceed to Cursor: Control-G
This command sets a temporary breakpoint at the current cursor location and proceeds
to it. All other breakpoints are ignored. The terminal bell rings to indicate the operation
is successful, since the cursor does not move.
Toggle Skip Subroutine Mode: Control-\ or Shift-F16
This command turns Skip Subroutine Mode on and off. When this mode is on, an
uppercase S is displayed in the upper right-hand corner of the screen.
When Skip Subroutine Mode is on, the single-step command treats a CALL as a single
instruction. In other words, execution of code in subroutines proceeds at full speed until
the return instruction.
Skip Subroutine Mode assumes no data follows a CALL instruction (the return address
of a subroutine is the instruction following the subroutine). If a subroutine modifies the
return address, this mode may crash AlphaFIX.
Up to Previous Label: Control-F or Char Ins
This command positions the cursor to the largest PSECT label with a program relative
address (PRG) less than the cursor. Using this command presumes the symbol file
(.SYM) was found and loaded. If the cursor positions to a line that appears to have no
label, then the label that was found has an odd value.
Up to Previous Non-local Label: Control-D or Char Del
This command positions the cursor to the largest PSECT label with a program relative
address (PRG) less than the cursor that is not a local symbol. This command is useful
when returning from a subroutine to find the name of the calling routine. Use of this
command presumes the symbol file (.SYM) was found and loaded. If the cursor
positions to a line that appears to have no label, then the label that was found has an
odd value.
Repaint Screen: Control-S
This command causes the screen to redisplay. This can be useful, especially after
TCRT calls.
AlphaFIX User’s Manual, Rev. 02
Page 2-6
Display Mode
Change to Command Mode: ^[ or ESC or MENU
This command switches AlphaFIX to command mode.
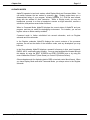
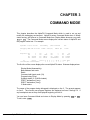
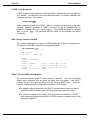
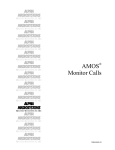
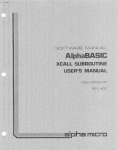
SPLIT SCREEN DISPLAY MODE
If split screen display mode is set, then AlphaFIX displays both disassembly and the
registers and status. See the SET command in command mode for details. You can
use this mode for single stepping through sections of the program that are difficult to
understand. This display is from a C program:
00000000(PRG)
00000004(PRG)
00000008(PRG)
0000000C(PRG)
0000000E(PRG)
00000012(PRG)
00000016(PRG)
00000018(PRG)
0000001C(PRG)
00000020(PRG)
00000022(PRG)
00000026(PRG)
0000002A(PRG)
0000002E(PRG)
00000030(PRG)
Registers: D0:
D4:
A0:
A4:
.PROG.:
LEA
JMP
SAVE
SUBW
PEA
CALL
ADDW
PEA
CALL
ADDW
JEQ
CALL
CALL
ADDW
REST
main:
2$:
2
1
255C8E
258592
D1:
D5:
A1:
A5:
A3,25DC8E
.init.-8000(A3)
A0-A1,D2
#4,SP
1$
typecr-8000(A3)
#4,SP
jb(A5)
setjmp-8000(A3)
#4,SP
2$
exit-8000(A3)
sub1-8000(A3)
#4,SP
A0-A1,D2
4
1FDF
24E13C
258514
PC
Cursor
Status: X
00000008(PRG) 00000008(PRG)
0
D2:
0
D6:
2
A2: 256808
A6:FFFF8008
N
0
Z
0
V
0
C
0
T0 T1
0 0
D3:
D7:
A3:
SP:
S
0
5A
8039
25DC8E
268740
M Int Mask
0
0
AlphaFIX User’s Manual, Rev. 02
CHAPTER 3
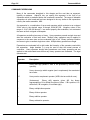
COMMAND MODE
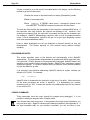
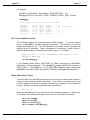
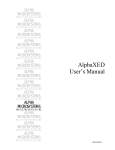
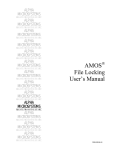
This chapter describes the AlphaFIX Command Mode which is used to set up and
modify the debugging environment. AlphaFIX enters Command Mode when it initially
starts running, and returns to Command Mode from Display Mode whenever you press
ESC
or MENU . The Command Mode screen displays the current status of AlphaFIX and
the program under test. For example:
AlphaFIX 2.1(156) Status:
Disassembly
Debugging USER.LIT with SYM
(PRG)=00255C8E
PSECT: -8000(A3)
hex
DSECT: @A5
C Mode
>
Registers: D0:
D4:
A0:
A4:
2
1
255C8E
258592
D1:
D5:
A1:
A5:
4
1FDF
24E13C
258514
PC
Cursor
Status: X
00000008(PRG) 00000008(PRG)
0
D2:
0
D6:
2
A2: 256808
A6:FFFF8008
N
0
Z
0
V
0
C
0
T0 T1
0 0
D3:
D7:
A3:
SP:
S
0
5A
8039
25DC8E
268740
M Int Mask
0
0
The first line of the screen displays the current AlphaFIX status. Statuses displayed are:
Display Mode (disassembly)
Base address and mode
Radix
Command edit insert mode (^Q)
Program being FIXed
Symbols status (if .SYM file loaded)
PSECT declaration (if any)
DSECT declaration (if any)
C Mode status
The name of the program being debugged is displayed on line 3. The prompt appears
on line 5. The currrent user program registers are displayed on lines 9 through 12. If
any breakpoints are set they are displayed beginning on line 14.
You can leave Command Mode and return to Display Mode by pressing
To exit, enter: Q RETURN .
AlphaFIX User’s Manual, Rev. 02
ESC
or
MENU
.
Page 3-2
Command Mode
COMMAND EXPRESSIONS
Many of the commands described in this chapter and the next take an argument,
typically an address. AlphaFIX lets you specify this argument in the form of an
expression which is evaluated before the command is executed. The range of allowable
expressions is quite broad and has been designed to be very similar to the expressions
used by the macro assembler, M68.
An expression is a combination of terms and operators which evaluate to an unsigned
32-bit value in the decimal range 0 through 4,294,967,295. Negative values in the
range of -2,147,483,648 through -1 are stored properly after evaluation, but are treated
the same as their unsigned counterparts.
All operators are defined as unary or binary. Unary operators precede a single term and
alter the evaluation of that term alone. Multiple unary operators may be applied in
sequence to the same term and are evaluated right to left. Binary operators combine
two terms to give a resultant single term value. Multiple binary operators are illegal.
Expressions are evaluated left to right under the hierarchy of the operators used within
the expression. Angle brackets (<,>) may be used to alter the normal process of
evaluation. Unary operators always take precedence over binary operators and are
applied to their associated terms before any binary operators are evaluated. The legal
operators are:
Operator
Description
+
Unary plus sign (default if term is not preceded by another unary
operator).
-
Unary minus sign which negates (two’s complement) the associated
term value.
^C
Unary ones’s complement operator (XOR’s the term with all ones).
_
(Underscore)
Binary shift operator (given AB, the binary
representation of A is shifted B number of times. If B is positive, A is
shifted left; if B is negative, A is shifted right).
*
Binary multiplication operator.
/
Binary division operator.
+
Binary addition operator.
-
Binary subtraction operator.
AlphaFIX User’s Manual, Rev. 02
Chapter 3
Page 3-3
Operator
Description
&
Binary logical AND operator.
!
Binary logical inclusive OR operator.
^D
Temporary radix change to decimal for the associated term.
^B
Temporary radix change to binary for the associated term.
^O
Temporary radix change to octal for the associated term.
^H
Temporary radix change to hexadecimal for the associated term.
Numbers
Any expression item which starts with a digit (0-9) is considered to be a number which is
evaluated under the currently prevailing radix being used by AlphaFIX unless preceded
by a temporary radix operator, or followed by a decimal point (.). The prevailing radix
may be changed through use of the AlphaFIX SET command. Any number that
terminates with a decimal point is evaluated as decimal (base 10) regardless of the
prevailing radix. Note that hexadecimal numbers must begin with a numeric digit; thus,
the hexadecimal value D56 must be entered to AlphaFIX as 0D56.
Address Base Relocation
Unlike the macro assembler, M68, AlphaFIX assumes all expressions are relocated
according to the current address base, unless explicitly overridden in the expression.
(The current address base is set using the REL command, see below.) Thus when
using the default base of (PRG), all expressions are relocated relative to the base of the
current program, unless you specify otherwise within the expression. For example, if
the base of the current program is 12000, and you specify the expression "1234", the
relocated value of the expression would be 13234 (12000+1234).
If you wish to override this automatic base address calculation, simply specify the base
address you wish in the expression. Base addresses are specified by enclosing them in
parentheses, since they function exactly the same as indexed addressing in the macro
assembler.
For example, if you want the expression to be taken as an absolute address, you may
override the default base address by specifying "(ABS)" in your expression. For
example, to specify absolute location 1234, you would use the expression "1234 (ABS)".
Valid base addresses are:
AlphaFIX User’s Manual, Rev. 02
Page 3-4
Command Mode
(A0) - (A6)
(SP)
(PRG)
(ABS)
(JCB)
(SCA)
relative to an address register
relative to the stack pointer
relative to program base
absolute
relative to the user’s job control block
relative to the system communication area
Register Expressions
Some commands, such as MOV, take registers (D0-D7, A0-A6, SP) as argument
expressions. Most commands, however, do not accept registers as arguments since
most commands operate on memory locations, not registers. If you try to specify a
register expression where it is not allowed, you see: Registers are not allowed
in this command.
THE COMMANDS
The basic format of AlphaFIX commands is the command name followed by a
parameter list. Commands may be abbreviated to as short as desired, provided the
abbreviation is unique. Note, however, that overlay commands must be fully specified.
Commands in AlphaFIX may be edited with most of the line edit commands available
under AlphaXED or AlphaVUE. The preceding command line can be recalled for editing
or re-execution by using the Control-N command. A summary of the commands
available for editing are:
Function
Keystroke(s)
Go to end of command line
Go to start of command line
Move cursor left
Move cursor right
Insert blank character
Delete character
Toggle insert mode
Delete previous character
^N
^U
^H or ←
^L or →
^F or Ins Char Key
^D or Del Char Key
^Q or F16
RUBOUT
AlphaFIX User’s Manual, Rev. 02
Chapter 3
Page 3-5
An or Dn or SP - Set Register n to Specified Value
The sixteen commands D0 to D7, A0 to A6, and SP let you modify the registers. The
register name is followed by the new value of the register. The new value may be
specified by any valid expression (except a register). For example:
>D0 2356 RETURN
sets data register D0 to 2356 in the current radix.
You should be careful when modifying SP. Any data below SP is invalid, since the first
thing AlphaFIX does upon acquiring control from the user program is to save the
processor status register and PC on the stack. In other words, it is all right to increase
the SP, but not to decrease it.
The program counter can be modified by moving the cursor in Display Mode and either
single-stepping or proceeding.
The argument given to the register modification commands is not relocated by the
current base address.
BREAK - Set a Breakpoint at Specified Location
This command sets a breakpoint. It accepts any valid expression, except a register
expression. A breakpoint is set at the specified location. For example:
>BREAK CML2: RETURN
When in command mode and not in the View submode, AlphaFIX generates a BREAK
command for the cursor address when you press CTRL / P . The BREAK command is
executed after you press RETURN . This command may be edited by the available line
editing commands. Breakpoints are listed at the bottom of the screen. Because of long
symbols (up to 32 characters) only 6 breakpoints at a time may be displayed. When the
breakpoint display is visible there are five keystroke commands you can use to scroll or
page the breakpoint "window":
Keystroke(s)
Function
^K or ↑
^J or ↓
^T or NEXT SCREEN key
^R or PREV SCREEN key
^^ or HOME key
Scroll display up one
Scroll display down one
Page display up 6
Page display down 6
Position to top of list
AlphaFIX User’s Manual, Rev. 02
Page 3-6
Command Mode
CLEAR - Clear Breakpoint
CLEAR accepts a single argument, which specifies the address where the breakpoint is
to be cleared. If a breakpoint is set at the specified location, it is cleared, otherwise, this
command is ignored. For example:
>CLEAR CML2 RETURN
clears breakpoint (if any) set at CML2. When in command mode and not in the View
submode, AlphaFIX generates a CLEAR command for the top breakpoint in the
breakpoint "window" when you press CTRL / E . The CLEAR command is executed
after you press RETURN . This command may be edited by the available line editing
commands.
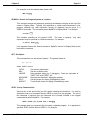
DDB - Display Contents of a DDB
This command displays the contents of a DDB (Dataset Driver Block) in symbolic form.
The address of the DDB is specified by a standard argument:
>DB INFILE(A6) RETURN
DDB display
Filespec:
START.CMD
D.ERR
D.FLG:
D.REC:
D.BUF:
D.SIZ:
D.IDX:
D.OPN:
0
40 INITed
0
255E0A
200
0
0 not open
D.CDT:
D.UDT:
D.BDT:
D.RSZ:
18-Mar-86 14:37:52
18-Mar-86 14:37:52
18-Mar-86 14:37:52
0
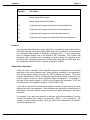
DSECT - Declare DSECT Base Register
This command declares a DSECT "base" register to AlphaFIX. If you are in the VIEW
display mode, addresses may be shown as offsets from this register. User DSECT
symbols may also be shown as offsets from the declared DSECT base. There are,
however, some prerequisites for AlphaFIX to generate "nice" displays:
The address register declared by the DSECT command must contain the start of
an AMOS memory module or point 32768(10) bytes into a memory module.
For symbols to appear in the display, they must have been defined in a DSECT.
Note impure area offsets defined by the .OFDEF macro do not appear in the .SYM
file used by AlphaFIX.
AlphaFIX User’s Manual, Rev. 02
Chapter 3
Page 3-7
For example:
AlphaFIX 2.1(156) Status: Disassembly (PRG)=002574EA
hex
Debugging TEST2.LIT with SYM PSECT: -8000(A3) DSECT: @A5 C Mode
>DSECT RETURN
Memory Display from v @a5+60 (Effective address 259DD0)
mins(A5):
0000062(A5)
maxs(A5):
00000066(A5)
emsgf(A5):
0000006A(A5)
vcount(A5):
000
000
001
000
000
001
000
000
004
000
000
000
000
000
000000
000400
000001
000000
000000
000001
000000
00000400
04000001
00010000
00000000
00000001
00010000
00000001
..
..
..
..
..
..
..
[
]
[ YX]
[ A]
[
]
[
]
[ A]
[
]
0
3.761582371E-37
0
0
0
0
0
GO - Execute AMOS Command
This command fetches and executes another AMOS program. It is used to debug
drivers or AlphaBASIC assembly language subroutines. The subroutine or driver is
loaded and breakpoints set. The GO command is then used to start a program that
calls the driver or subroutine. When a breakpoint is encountered, control returns to
AlphaFIX and the user may debug the subroutine or driver. For example:
AlphaFIX 1.0(111) Status: Disassembly (PRG)=00021136 octal
Debugging INPUT.SBR
>GO RUN MENU RETURN
In the example shown above, INPUT.SBR, an XCALL subroutine for AlphaBASIC
applications, is being debugged. The AlphaBASIC program MENU.RUN contains an
XCALL INPUT. If a breakpoint is set in INPUT.SBR, AlphaFIX gains control when
AlphaBASIC calls INPUT.SBR, allowing INPUT.SBR to be debugged under AlphaFIX.
MOVx - Move Data of Type x
The MOV, MOVW, and MOVB commands let you move data to memory and registers in
longword, word, and byte formats, respectively. These MOVx commands can be used
to move constants to memory or registers, from memory to registers, or from registers to
memory. All three commands accept data in the same format:
MOVx src,dst
where src and dst may be any valid source and destination expression, respectively.
For example, the following commands are all valid uses of the MOVx commands:
>MOV #123,D7 RETURN
>MOVB @A2,D1 RETURN
>MOVW #1,100(A3) RETURN
>MOV #^H0FFE1,2000(ABS) RETURN
AlphaFIX User’s Manual, Rev. 02
Page 3-8
Command Mode
Indexed addressing by use of the "[Rn]" format is not supported by MOVx commands.
PROCEED - Proceed to Breakpoint
This command starts program execution at the current user PC location. It is equivalent
to entering Display Mode and pressing CTRL / X (the proceed-to-breakpoint command).
When a breakpoint is encountered, you are left in Display Mode with the cursor at the
new PC location.
PSECT - Declare PSECT Base Register (32K bias)
This command declares a PSECT "base" register to AlphaFIX. The PSECT base is
assumed to be the start of the program memory module plus 32768(10) bytes. This
declaration information is used in display (Disassembly) mode. When AlphaFIX
disassembles a memory reference with a 16-bit offset that uses the declared PSECT
base, it takes the 32768(10) bias into account when searching for symbols. For
example, where a PSECT A3 is used:
00000012(PRG)
CALL
typecr-8000(A3)
QUIT - Exit AlphaFIX
This command is the normal method of leaving AlphaFIX. All modules in memory are
deleted, and you are returned to AMOS.
REL - Set Address Base Mode
This command sets the current Base Mode. The format is:
REL address mode
The legal modes are:
A0
A1
A2
A3
A4
A5
A6
SP
PRG
ABS
JCB
SCA
relative to A0
relative to A1
relative to A2
relative to A3
relative to A4
relative to A5
relative to A6
relative to the stack pointer
relative to base of program
absolute mode
relative to user’s JCB
relative to AMOS System Communication Area
AlphaFIX User’s Manual, Rev. 02
Chapter 3
Page 3-9
For example, to set the address base mode to A5:
>REL A5 RETURN
SEARCH - Search for Program Symbol or Location
This command accepts an expression specifying the address to display at the top of the
screen in Display Mode. Typically, this expression is a label used somewhere in your
program, although any valid expression (except for registers) may be given in a
SEARCH command. This command places AlphaFIX in Display Mode. For example:
>s LOOP: RETURN
This example searches for the symbol LOOP. The colon is optional.
expression may be specified in a Search command. For example:
Any valid
>s 332*4.(SCA) RETURN
If no argument follows the Search command, AlphaFIX returns to Display Mode at the
last location examined.
SET - Set Option
This command lets you set several "options". The general format is:
set option
where "option" can be:
OCTAL
HEX
CMODE
NOCMODE
SPLIT
NOSPLIT
Set octal as default radix.
Set hex as default radix.
Sets standard setting for C debugging. Does the equivalent of
"DSECT A5" and "PSECT A3".
Removes the standard C debugging settings.
Set split screen for display (Disassembly) mode.
Turns off split screen for display (Disassembly) mode.
SPEC - Set up Command Line
Stores a line of text and leaves your A2 register indexing the stored line. It is used to
simulate the set up of command lines by AMOS on entry to a user program. The use of
this command is optional since the command line is usually included in the original
command that called ALphaFIX. For example:
>SPEC =DSK0:[20,4]FIX.LIT,*.FX0 RETURN
This example sets up a command line for testing a wildcard program. If no argument is
specified, SPEC lists the last line SPEC’d. For example:
AlphaFIX User’s Manual, Rev. 02
Page 3-10
Command Mode
>SPEC RETURN
=DSK0:[20,4]FIX.LIT,*.FX0
VIEW - Display Memory Contents From Specified Address
Lets you display a portion of memory on your terminal. VIEW displays data in longword,
word, byte, RAD50, ASCII, and floating point formats. Simple one-keystroke commands
let you move the display forward and backward through memory.
VIEW accepts a single argument which specifies the address at which to start displaying
memory. Since the VIEW command always starts the display on an even byte
boundary, if you specify an odd address, AlphaFIX rounds the address down for you.
For example:
>VIEW 10000(ABS) RETURN
Memory Display from 10000(ABS)
00010000
00010002
00010004
00010006
037
163
010
170
007
116
057
054
003437
047163
027410
026170
(Effective address 10000)
00707647263
11634627410
05702026170
05436002224
..
sN
./
x,
[AEW]
[LVC]
[GU ]
[GDX]
2.962212196E-35
254996610.78
3.0962316106E-11
8.8113654443E-13
Use these keystroke commands to move the VIEW display:
Keystroke(s)
Function
^K or ↑
^J or ↓
^T or NEXT SCREEN key
^R or PREV SCREEN key
^^ or HOME key
^S
Scrolls data display up one word
Scrolls data display down one word
Pages data display up 16 words
Pages data display down 16 words
Redisplays at original VIEW/PTR address
Register/Breakpoint display mode
The following example uses data register indexed addressing mode. If A2 = 00200000,
and D0 = 0000FFFF, then the command:
>VIEW 6(A2)[~D0] RETURN
forces word extension of the contents of D0 to longword size before it is added to A2, so
the result is a display of address 00200005(abs), which is A2 minus 1, plus the six (D0
is extended to ^HFFFF FFFF).
Data register indexed addressing mode is only available in the VIEW command.
AlphaFIX User’s Manual, Rev. 02
Chapter 3
Page 3-11
WATCH, WATCHB, WATCHW - SET DYNAMIC BREAKPOINTS
The three WATCH commands let you monitor memory locations and/or registers while
the program is running following a PROCEED command. If the watched location meets
the condition you specify, the program stops and the last instruction traced displays in
reduced intensity. A watch is also called a dynamic breakpoint.
The WATCH command has this format:
WATCH {register or location}{=value}
The WATCHB and WATCHW commands have the same format. The WATCH
command watches a longword of memory; WATCHB watches a byte; WATCHW
watches a word. Setting a watch for a register always watches a longword.
If you include only register or location, the program will stop whenever that register or
memory location changes value. If you also include =value, the program will stop only if
the register or location equals the value you enter. Here are some sample commands:
WATCH D0
WATCH SP=^S4D50
WATCHB 0(ABS)
WATCHW 200(PRG)=1
Breaks when D0 changes value.
Breaks when SP equals 4D50 hex.
Breaks when the byte at 0(ABS) changes.
Breaks when the word at 200(PRG) equals 1.
If you set a watch on an equality, you probably want to clear it after it breaks. Otherwise,
AlphaFIX will break on every instruction until the equality is no longer true.
If you enter a WATCH command without any argument, it displays the current watches
at the bottom of the screen where breakpoints are normally displayed. If a watch
caused a break, it has an arrow to its left.
You can set up to six watches at once.
To clear a watch, type the same command you used to set it.
PROCEED (or ^X) is the only function which enables watches. Since watch processing
traces every instruction, loop times can be very slow. For this reason, if anyone else is
using the computer, you shouldn’t use watches with a routine that JLOCKs the system.
You should never use watches with a routine which SVLOKs.
If you have subroutine mode set (^\), subroutines are executed full speed and the
watches are checked after the return. If a subroutine triggers a watch condition, the
subroutine call is highlighted.
Two control keys are available while you’re running a program with watches. Since
these are debugging keys, if you’re using the alternate terminal feature, they work only
on the primary debugging terminal. The two keys are:
AlphaFIX User’s Manual, Rev. 02
Page 3-12
Command Mode
^B causes the program to break execution and puts you in display mode. You can
then examine memory or registers or ^X to continue.
^G causes the program to execute at full speed, disabling all watches and ^B
checking.
AlphaFIX User’s Manual, Rev. 02
CHAPTER 4
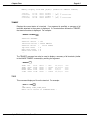
AlphaFIX OVERLAY COMMANDS
In addition to the commands described in the last chapter, a number of additional commands
are available in AlphaFIX Command Mode. These commands are not permanently resident,
but are overlays. If an overlay command is entered, the overlay is fetched into memory from
DSK0:[7,0] and executed. For all practical purposes, however, you can ignore the fact these
commands are overlays and treat them as regular commands.
AlphaFIX overlay files have an extension of .FXO. Because AlphaFIX must load overlay
commands from disk, you may notice a slight hesitation before the command executes. Under
normal circumstances, this hesitation is barely perceptible; however, if you find this hesitation
annoying, you may preload any AlphaFIX overlays you wish into your own memory partition.
This substantially increases the speed with which the overlay is FETCHed.
EA
Computes an Effective Address. It accepts one standard argument. For example:
>EA @A2 RETURN
Effective address = 20000
JCB
Displays the current status of a job. If no argument is specified, your job status is
displayed. If a job name is specified, that job’s status is displayed. For example:
>JCB JOB1 RETURN
Job Status for JOB1 (JCB address =
JOBSTS:
JOBTYP:
JOBPRV:
JOBCMZ:
...
0
2B1
FFFF
0
JOBBAS:
JOBSIZ:
JOBWAT:
JOBCPU:
Registers: D0:
D4:
...
User SP:
1D0A
1D0A
24E846
AlphaFIX User’s Manual, Rev. 02
24EAC4
20000
0
996
24E100)
JOBEXI:
JOBERC:
JOBTRC:
JOBBPT:
24E846
2522B0
250DB2
250FC2
D1:
3
D5:27080000
System SP:
24E456
D2:
D6:
JOBFPE:
0
JOBDSR:
C7
JOBDSW:
0
JOBUSR: DSK4:[101,11]
0
430B
D3:
D7:
254619
24E178
Page 4-2
AlphaFIX Overlay Commands
JCB can also display a summary of the system status, similar to the AMOS command
SYSTAT. To display the system status, enter JCB with an argument of *. For example:
>JCB * RETURN
Job
BILL
TASK
NETSER
%TSKAA
Term
TERM01
MANAGR
NETSER
%TSKAA
Prog
MULTI
LOG
NETSER
MAP
PPN
WIN2:[77,1]
DSK0:[1,4]
DSK0:[1,4]
WIN2:[77,1]
MAP
Displays the current memory map of your partition. The name (if any), size and address
of each module are listed, along with the free space. If a module is permanently loaded,
it is displayed in reduced intensity. For example:
AlphaFIX 1.0(110) Status
Disassembly
Debugging LOOP.LIT with SYM
(PRG)=101406
octal
>MAP RETURN
Memory Map
FIX
IMPURE
LOOP
LOOP
Free
LIT
FIX
LIT
SYM
16078
3344
284
60
60880
40012
77330
101406
102042
103136
362-226-773-443
356-034-233-653
232-123-624-771
122-222-437-152
The modules shown are:
FIX.LIT
IMPURE.FIX
LOOP.LIT
LOOP.SYM
Free
AlphaFIX debugger
Scratch space used by FIX
Program being debugged
Symbol table of program being debugged
Non-allocated memory space
PTR
Displays data through a pointer in memory. Functionally, PTR operates exactly the
same as VIEW except the parameter given is the effective address of a longword
containing the address to be displayed. For example:
>PTR jb(A5)
AlphaFIX User’s Manual, Rev. 02
Chapter Four
Page 4-3
Memory Display from PTR jb(A5): (Effective address 258554)
iobas(A5):
00000042(A5)
cmdlin(A5):
00000046(A5)
003
000
024
0FD
000
0F6
000
0E8
000003
00F600
000024
00E8FD
0003F600
F6000024
0024E8FD
E8FD0025
..
..
$.
..
[ C]
[9NP]
[ 6]
[7KE]
0
-1.6225999077E32
0
-2.3895228475E24
TRMDEF
Displays the current status of a terminal. If no argument is specified, a summary of all
terminals attached to the system is displayed. If a terminal-name follows the TRMDEF,
that terminal’s status is displayed. For example:
>TRMDEF WIZARD RETURN
Terminal= WIZARD
Terminal Status
Interface Driver
Terminal Driver
Inp Char Count
Echo Char Count
Break Char Count
...
=
=
=
=
=
=
163
54424 AM100L
55114 SOROC
0
0
0
The TRMDEF command can also be used to display a summary of all terminals (similar
to the AMOS TRMDEF command) by omitting the argument:
>TRMDEF RETURN
TERM01
TERM03
MANAGR
NETSER
%TSKAA
BILL
SLAVE1
TASK
NETSER
%TSKAA
008160
008FD8
009864
0099A2
22C3BE
AM100L
PSEUDO
PSEUDO
PSEUDO
PSEUDO
0
0
0
0
0
AM62
TELTYP
NULL
NULL
WINDOW
100,100,100
100,100,100
50,50,50
25,25,25
100,100,100
TYPE
This command displays a file on the terminal. For example:
>TYPE L.CMD RETURN
:T
LINK MAIN, SUB1,SUB2,UTIL
Enter CR to return to Command Mode -
AlphaFIX User’s Manual, Rev. 02
9600
19200
19200
19200
19200
APPENDIX A
INPUT TRANSLATION
Translation of input characters and multi-character sequences is a feature of AlphaFIX.
The translation tables used are the same as those used for AlphaVUE. The translation
tables for AlphaFIX are in DSK0:[7,0], (LIB:), and have the extension .FIX. Input
translation tables for the standard supported tables are part of the standard release. If
an input translation table for AlphaFIX does not exist for your terminal type but does
exist for AlphaVUE, you may create it. Follow this procedure:
1.Log into DSK0:[7,0].
2.Type the command "COPY .FIX=tttttt.VUX" where tttttt is the name of your
terminal type.
3.Now type "FIX FIX" and do a MAP display. Your terminal should then
display something like this:
Memory Map:
FIX
LIT
IMPURE FIX
tttttt FIX
Free
20366
14174
686
79940
24EAD0
253A6A
2571D4
25B27E
531-515-220-242
472-301-074-276
263-410-524-241
Note that a terminal translation table takes about 700 bytes. If your debugging
environment cannot afford this additional overhead, rename the .FIX file for your
terminal type. This prevents the translation table from being loaded.
AlphaFIX User’s Manual, Rev. 02
AlphaFIX USER’S MANUAL
DOCUMENT HISTORY
Revision A00 - AMOS/L Release 1.0 - (Printed 5/82)
New Document: part number DSS-10005-00.
Revision 00 - AMOS Release 2.0 - (Printed 3/88)
New part number assigned: DSO-00017-00. This document was revised and
rewritten to reflect AMOS 2.0.
Revision 01 - AMOS Release 2.2 - (Printed 4/91)
Re-wrote the document in new format. Removed a reference to FXO command
and modified VIEW command according to display change.
Revision 02 - AMOS Release 2.3 - (Released 6/96)
Re-ordered quick reference lists. Added alternate terminal support and WATCH
commands.
AlphaFIX User’s Manual, Rev. 02
Index
Page Index-1
INDEX
Absolute address . . . . . . . .
Address base . . . . . . . . . . .
Address base relocation . . .
AlphaBASIC . . . . . . . . . . . .
AlphaFIX Modes
Command mode . . . . . . .
Display mode . . . . . . . . .
AlphaFIX Modes . . . . . . . . .
Alternate terminal support .
3-3
2-1, 3-3
3-3
3-7
BREAK command . . . . . . . .
Breakpoint . . . . . . . . . . . . . .
At current cursor location
At top of stack . . . . . . . .
Clearing breakpoint . . . .
setting dynamic . . . . . . .
To execute subroutine . .
Breakpoints . . . . . . . . . . . . .
3-5
2-4, 3-5
2-5
2-4
3-6
3-11
2-4
2-3
3-1
2-1
1-3
1-2
Calling AlphaFIX . . . . . . . . . 1-1
CLEAR command . . . . . . . . 3-6
Command expressions . . . . 3-2
Legal operators . . . . . . . 3-2
Command Format . . . . . . . . 3-4
Command Mode . . . . . . . . . 1-3
Break . . . . . . . . . . . . . . . 3-5
Clear . . . . . . . . . . . . . . . . 3-6
Display DDB . . . . . . . . . . 3-6
DSECT . . . . . . . . . . . . . . 3-6
Editing a command line . 3-4
GO . . . . . . . . . . . . . . . . . 3-7
MOVx . . . . . . . . . . . . . . . 3-7
Proceed . . . . . . . . . . . . . 3-8
PSECT . . . . . . . . . . . . . . 3-8
Quit . . . . . . . . . . . . . . . . . 3-8
Register modification . . . 3-5
Returning to Display Mode3-1
Search . . . . . . . . . . . . . . 3-9
Set . . . . . . . . . . . . . . . . . 3-9
AlphaFIX User’s Manual, Rev. 02
Index
Page Index-2
Set address base mode . 3-8
SPEC . . . . . . . . . . . . . . . 3-9
View memory . . . . . . . . . 3-10
Command Mode Keystroke Commands
3-4
Cursor commands . . . . . . . . 2-2
DDB command . . . . . . . . . . 3-6
Debugging a program
Breakpoint control . . . . . 2-3
Execution of subroutine . 2-5
Moving the cursor . . . . . . 2-2
Positioning cursor to PSECT
2-5label
Single-stepping . . . . . . . 2-4
Debugging subroutine or driver
3-7
Disassembler . . . . . . . . . . . 2-2
Absolute addressing . . . . 2-2
Symbolic file . . . . . . . . . . 2-2
Disassembly . . . . . . . . . . . . 2-2
Display Mode . . . . . . . . . . . 1-3
Cursor down . . . . . . . . . . 2-3
Cursor up . . . . . . . . . . . . 2-3
Down arrow . . . . . . . . . . 2-3
Execution commands . . . 2-3
Home . . . . . . . . . . . . . . . 2-3
Initial page . . . . . . . . . . . 2-3
Page Down . . . . . . . . . . . 2-3
Proceed from subroutine 2-4
Proceed to breakpoint . . 2-4
Proceed to cursor . . . . . . 2-5
Repaint screen . . . . . . . . 2-5
Single-step . . . . . . . . . . . 2-4
Skip subroutine mode . . 2-5
Toggle breakpoint . . . . . 2-3
Up arrow . . . . . . . . . . . . . 2-3
Up to previous label . . . . 2-5
Up to previous non-local label
2-5
DSECT command . . . . . . . . 3-6
Dynamic breakpoints . . . . . . 3-11
GO Command . . . . . . . . . . . 3-7
Invoking AlphaFIX . . . . . . . . 1-1
Labels . . . . . . . . . . . . . . . . . 2-1 to 2-2
Finding full label name . . 2-2
Symbol length . . . . . . . . 2-1
MAP command . . . . . . . . . . 4-2
MOVx command . . . . . . . . . 3-7
AlphaFIX User’s Manual, Rev. 02
Index
Page Index-3
Overlay Commands . . . . . .
EA . . . . . . . . . . . . . . . . .
JCB . . . . . . . . . . . . . . . .
MAP . . . . . . . . . . . . . . . .
PTR . . . . . . . . . . . . . . . .
TRMDEF . . . . . . . . . . . .
TYPE . . . . . . . . . . . . . . .
4-1
4-1
4-1
4-2
4-2
4-3
4-3
PROCEED command . . . . . 3-8
PSECT command . . . . . . . . 3-8
Quit command . . . . . . . . . . . 3-8
Register modification . . . . . . 3-5
Register submode . . . . . . . . 1-3
REL command . . . . . . . . . . 3-8
Search command . . . . . . . . 3-9
SET command . . . . . . . . . . 3-9
Single-step . . . . . . . . . . . . . 2-4
CALL instruction in skip subroutine
2-5
mode
Split screen display mode 2-6
Skip subroutine mode . . . . . 2-5
SPEC command . . . . . . . . . 3-9
Split screen display mode . . 2-6
Subroutine
Finding name of calling routine
2-5
VIEW command . . . . . . . . . 3-10
View submode . . . . . . . . . . . 1-3
WATCH command . . . . . . . 3-11
WATCHB command . . . . . . 3-11
WATCHW command . . . . . . 3-11
AlphaFIX User’s Manual, Rev. 02