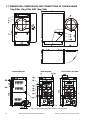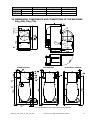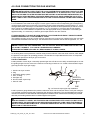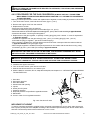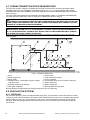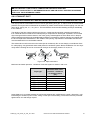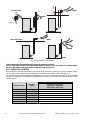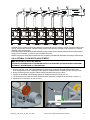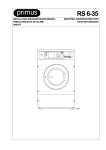
1
INDUSTRIAL TUMBLE DRYERS 9kg 11kg 13kg 16kg 24kg 35kg ORIGINAL INSTALLATION, MAINTENANCE AND USER'S MANUAL 508982 N Publication date: 20 Jan 2011 USER'S MANUAL 1. TABLE OF CONTENTS 1. TABLE OF CONTENTS ................................................................................................ 1 2. WARNINGS AND LABELS ........................................................................................... 2 2.1. SYMBOLS ON THE MACHINE...............................................................................................................3 2.2. INSTRUCTIONS FOR DRYING..............................................................................................................3 2.3. WRONG USAGE OF THE MACHINE.....................................................................................................3 2.4. INSTRUCTIONS FOR MAINTENANCE, ADJUSTMENT AND SAFETY OF PEOPLE..........................4 3. SYMBOLS ON CONTROL PANEL ............................................................................... 5 3.1. FULL CONTROL VERSION....................................................................................................................5 3.2. EASY CONTROL VERSION ...................................................................................................................5 4. OPERATING INSTRUCTIONS...................................................................................... 6 4.1. START THE MACHINE...........................................................................................................................6 4.2. POWER SUPPLY....................................................................................................................................6 4.3. STARTING THE DRYING PROCESS ....................................................................................................6 4.3.1. DRYING PROGRAMS ......................................................................................................................6 4.3.2. FULL CONTROL VERSION..............................................................................................................6 4.3.3. EASY CONTROL VERSION.............................................................................................................7 4.4. FINISHING THE DRYING CYCLE..........................................................................................................8 4.5. EMERGENCY STOP OF THE MACHINE ..............................................................................................8 4.6. HOW TO PROCEED ON ERROR MESSAGES .....................................................................................8 4.7. POWER SUPPLY INTERRUPTION........................................................................................................8 4.8. INTERRUPTION OF GAS SUPPLY .......................................................................................................9 4.9. RESET OF GAS HEATING.....................................................................................................................9 5. EXPLANATION ERROR MESSAGES ........................................................................ 10 5.1. HUMIDITY CONTROL - TROUBLE SHOOTING..................................................................................21 508982_N_PUB_DATE_20_JAN_2011.DOC USER’S MANUAL 1 2. WARNINGS AND LABELS TO MINIMIZE THE RISK OF FIRE, INJURY BY ELECTRIC SHOCK OR SERIOUS INJURIES TO PEOPLE OR PROPERTY DAMAGE, PLEASE READ AND FOLLOW THE FOLLOWING INSTRUCTIONS. – This version is the original version. Without this version, the instructions are incomplete. – Before installation, operation and maintenance of the machine read carefully the complete instructions, i.e. this „Installation, maintenance and user's manual“, „Programming manual“ and „Spare parts manual“. The Programming manual and Spare parts manual are not delivered with a machine by default. You shall ask the supplier / manufacturer to obtain Programming manual and Spare parts manual. – Follow the instruction written in manuals and keep the manuals in a proper place by the machine for later use. – Do not bypass the instructions stated in the instruction manual, and warnings on the labels. Follow all basic and valid safety instructions. – Children can not operate this machine. Before turning the machine „ON“, make sure that there are no people or animals present in or around the machine. – Do not operate the machine with broken / missing parts, opened covers, also do not operate a machine that was not installed and put in operation according to instructions stated in the „Installation and maintenance manual“. – Do not tamper with the machine‘s control. – Machine version OPL (without coin meter) is intended for qualified operator. – Do not store flammable materials around the machine. Keep the machine surface clean and without flammable materials and remove dust from filter once a day. – DO NOT spray or store aerosols in the vicinity of this appliance. – Various chemicals used in laundries contain chlorine (some dry cleaning fluids, aerosols, bleaches). When decomposed in a flame, these materials may rapidly corrode and destroy this appliance. – When the main switch is „OFF“, the supply terminals are still under current. – DO NOT bypass any safety devices. – Do not remove warning signs placed on the appliance. Observe signs and labels to avoid personal injuries. – Always follow the fabric care instructions supplied by the garment manufacturer. – DO NOT reach into tumbler if tumbler is revolving. – Dryer must be exhausted outdoors and area around dryer must be free of lint because dryer produces combustible lint. – The dryer produces equivalent continuous (A-weighted) sound power level which doesn't exceed 70 dB (A). – Use the dryer only for its intended purpose, drying water-washed fabrics. – Only qualified service personnel may open the appliance to carry out servicing. – Follow all valid basic safety rules and laws. The instructions in this manual cannot account for every possible dangerous situation. They must be generally understood. Caution and care are factors which can not included in the design of the appliance and all persons who install, operate or maintain the appliance must be qualified and familiar with the operating instructions. It is up to the user to take proper care when operating the appliance. – The manufacturer reserves the right to change the manuals without previous notice. – If any problems or failures should arise, immediately contact your dealer, serviceman or manufacturer. To avoid creating any flammable vapours that may explode, ignite or cause corrosive damage, DO NOT dry the following materials: – Articles that have been cleaned in, soaked in, washed in or spotted with gasoline, dry cleaning solvents or other flammable/explosive substances. – Plastics or articles containing foam rubber or similarly textured rubber like materials. – Articles that have traces of flammable substances like cooking oil, machine oil, flammable chemicals or thinner. – Articles containing wax or cleaning chemicals. – Fiberglas curtains or draperies (unless the label says it can be done). FOR GAS HEATED VERSION – Turn off the main gas supply when discovering a gas leak from the machine. Ventilate the premises, do not turn on any electrical devices, do not smoke, do not use open flame and call the maintenance. – Do not eliminate nor change settings of the underpressure switch, safety thermostat, primary air suction and all factory preset devices. FOR STEAM HEATED VERSION – Turn off the main steam supply when discovering that steam is leaking from the machine, and call the maintenance. 2 USER'S MANUAL 508982_N_PUB_DATE_20_JAN_2011.DOC ! WARNING! IF THE INSTALLED APPLIANCE OPERATE WITH COIN, TOKEN OR SIMILAR OPERATION FOR USE IN SELFSERVICE SITUATIONS, THEN THE OWNER-INSTALLER MUST PROVIDE A REMOTE-LOCATED EMERGENCY STOP DEVICE. THIS DEVICE MUST BE PLACED IN SUCH A WAY THAT IT IS EASY AND SAFELY ACCESSIBLE FOR THE USERS. THE EMERGENCY STOP DEVICE TAKES CARE THAT AT LEAST THE CONTROL CIRCUIT OF THE APPLIANCE IS INTERRUPTED. ! WARNING! ORIGINAL OR IDENTICAL PARTS MUST BE USED FOR REPLACEMENT IN THIS MACHINE. AFTER SERVICING REPLACE AND SECURE ALL PANELS IN THE ORIGINAL WAY. TAKE THESE MEASURES FOR CONTINUED PROTECTION AGAINST ELECTRICAL SHOCK, INJURY, FIRE AND/OR PROPERTY DAMAGE. 2.1. SYMBOLS ON THE MACHINE Warning, dangerous electrical current, electric device. Disconnect the power supply to the machine before doing any interventions into the machine. When the main switch is „OFF“, the supply terminals are still under current. Warning, high temperature Filter label 531406 Do not touch the area after the machine has been heated up. Main switch Warning, read and keep written instructions 2.2. INSTRUCTIONS FOR DRYING The machine is intended only for drying the flat linen (bed-linen, table-cloths, dish-towels, towels, handkerchiefs and other kinds of flat linen) and garments made of flax, wool, cotton, silk, polyacryl and polyester fibre. Before drying make sure whether manufacturer labelled the linen as possible to dry in the dryer. The manufacturer is not responsible for any fabric damage caused by improper drying action. The machine is not intended for drying the linen containing parts of plastics, glass fibres and foam rubber. Before starting the drying action, remove any articles from garments, as e.g. nails, pins, screws, etc. which could damage the garments as well as the machine. Linen must be rinsed and spin-dried properly. Recommended residual moisture of linen before drying should be 50% - 70% to get an optimal result. For the machine correct function it is necessary to clean the lint filter once a day at least. Stop the machine before you clean the filter. Remove cover of lower panel. For double dryer 13/13kg open both filter covers. Remove the lint filter and clean it. At the same time clean area in front of the lint filter. Pieces of lint on this area would pollute the lint filter and reduce effectiveness of drying process. Put the filter back and close the cover. Always finish the drying cycle by cooling down the linen. Remove the linen immediately after finishing the drying cycle. 2.3. WRONG USAGE OF THE MACHINE ! WARNING ! THIS MACHINE IS DESIGNED FOR INDUSTRIAL DRYING OF LINEN. IT IS NOT INTENDED FOR HOUSEHOLD USE. ANY USAGE DIFFERENT THAN MENTIONED ABOVE, WITHOUT WRITTEN AGREEMENT OF THE SUPPLIER, WILL BE CONSIDERED AS IMPROPER USAGE. – Do not load the machine with bigger amount of linen than it is designed for. – Do not forget to clean the lint filter regularly. – Do not stop the machine until the drying cycle including cooling down is finished, except of emergency events. – Do not dry synthetic fabrics at high temperature. – Do not leave the linen in the machine after the drying cycle is finished. 508982_N_PUB_DATE_20_JAN_2011.DOC USER’S MANUAL 3 2.4. INSTRUCTIONS FOR MAINTENANCE, ADJUSTMENT AND SAFETY OF PEOPLE The following information are not mentioned in this „User's manual“. You can find missing information in „Installation and maintenance manual“, which is delivered with the machine. References to „Installation and maintenance manual“ according to norm EN ISO 10472-1(-4): 1. Information about providing the user's manual 2. Extent of the machine usage and limits 3. Maintenance and adjustment 4. Ventilation 5. Covers 6. Defects, cleaning, maintenance 7. Thermal risks 8. Exhaust system 9. Handling, installation 4 USER'S MANUAL 508982_N_PUB_DATE_20_JAN_2011.DOC 3. SYMBOLS ON CONTROL PANEL 3.1. FULL CONTROL VERSION OPERATION BUTTONS START - Starting up a program - Continue an interrupted program - Advancing the program step by step STOP - Interrupting a program - Finishing a program PROGRAM SELECTION - Selecting a program number SERVICE - shows the states and the total number of cycles of the machine REVERSE - Switch On/Off Reverse function. ARROW UP - Increasing a value ARROW DOWN - Decreasing a value DRYING TIME - Setting for drying time COOLDOWN TIME - Setting for cool down time MOISTURE LEVEL - Setting for residual moisture level PROGRAM BUTTONS ARROW UP - Selecting the next element of an item list - Increasing a value ARROW DOWN - Selecting the previous element of an item list - decreasing a value ARROW LEFT - Selecting the previous menu item ARROW RIGHT - Selecting the next menu item ENTER - Selecting the next menu item - Confirmation of a new value or list element and going over to the next menu item DRYING TEMPERATURE - Setting for temperature 3.2. EASY CONTROL VERSION OPERATION BUTTONS START - Starting up a program - Continue an interrupted program - Advancing the program to the next sequence PROGRAM TEMPERATURE LOW - Program selection button Low temperature PROGRAM TEMPERATURE HIGH - Program selection button, High temperature ALARM INDICATION - Red light is flashing when an alarm occurs PROGRAM TEMPERATURE MEDIUM - Program selection button, Medium temperature 508982_N_PUB_DATE_20_JAN_2011.DOC USER’S MANUAL 5 4. OPERATING INSTRUCTIONS 4.1. START THE MACHINE Before the first start-up, make sure whether the machine is installed properly - see „Installation and maintenance manual“. Check the lint filter and other parts of the machine according to „Installation and maintenance manual“. 4.2. POWER SUPPLY Turn the main switch on the machine rear cover to position „on“. If the machine is equipped with emergency button, turn it slightly on the right. Display will light up. After few seconds it will fade - valid for Easy control version. The machine remains in stand-by mode. 4.3. STARTING THE DRYING PROCESS 4.3.1. DRYING PROGRAMS 1. High 1. Cold 2. Medium 2. Low 3. Low („EASY CONTROL“ version) („FULL CONTROL“ version) („EASY CONTROL“ version) („FULL CONTROL“ version) („EASY CONTROL“ version) („FULL CONTROL“ version) 4. Medium 5. Medium 6. Medium 7. Hot 8. Hot 9. Hot („FULL CONTROL“ version) 10. Hot („FULL CONTROL“ version) 11. Hot („FULL CONTROL“ version) 12. - 20. Drying („FULL CONTROL“ version) („FULL CONTROL“ version) („FULL CONTROL“ version) („FULL CONTROL“ version) („FULL CONTROL“ version) („FULL CONTROL“ version) 70°C 20 min 55°C 30°C 40°C 35°C 40°C 45°C 50°C 60°C 65°C 70°C 70°C - 9kg (20lb), 11kg (24lb), 13kg (27lb), 13/13kg (27/27lb), 16kg (35lb) 70°C - 24kg (53lb), 35kg (77lb) steam heating only 75°C - 24kg (53lb), 35kg (77lb) gas heating only 80°C - 24kg (53lb), 35kg (77lb) gelectrical heating only 70°C - 9kg (20lb), 11kg (24lb), 13kg (27lb), 13/13kg (27/27lb), 16kg (35lb) 70°C - 24kg (53lb), 35kg (77lb) steam heating only 82°C - 24kg (53lb), 35kg (77lb) gas and electrical heating only 45°C 4.3.2. FULL CONTROL VERSION 1. Open tumbler door, load with laundry and securely close door. 2. Select desired Program setting. Do not select temperature that is higher than the laundry maximum temperature. (For details on pre-set drying temperatures and times revert to „Programming manual Full Control“). The program number will light on the display. For manual set-up of drying, press repeatedly the button Program until you overstep program 20. Press the button Drying time, Drying temperature, Cool down time, Moisture degree for setting-up of individual parameters. Set required value using the button arrow up or arrow down. Press enter to confirm the value. 3. Press Start. 4. Select Reversing or Non-Reversing. This selection is optional. Not applicable for Non-Reversing model. 6 USER'S MANUAL 508982_N_PUB_DATE_20_JAN_2011.DOC 5. To load or unload tumbler during drying cycle, follow these steps: a. Stop tumbler by opening tumbler door. b. Load or unload tumbler. c. Restarting dryer: 1. Close tumbler door. 2. Press Start. 6. Cycle is finished as soon as the sign „!UNLOAD!“ is displayed. 7. Remove load immediately after cycle is finished. NOTE: TO INTERUPT PROGRAM, PRESS STOP ONCE. TO CANCEL PROGRAM, PRESS STOP TWICE. Stop button : 4.3.3. EASY CONTROL VERSION 1. Open the door and load the laundry into the drum. When the drum is loaded, close the door. 2. Select drying program : Version - Easy Control without coin meter : Select the program by pressing the temperature button. Do not select temperature that is higher than the laundry maximum temperature. (For details on pre-set drying temperatures and times revert to „Programming manual Easy Control“). The program number will light on the display. Version - Easy Control with coin meter : Select the program by pressing the temperature button. Do not select temperature that is higher than the laundry maximum temperature. Insert a coin. The pre-paid time value will be displayed. Insert further coins until the required drying time is reached. 3. Start the drying program : The START button LED is flashing. Press the START button. 4. Changing the drying programs : It is possible to change the drying programs while the machine is working. Version - Easy Control without coin meter : Select another program by pressing the relevant temperature button. The program will increase or decrease the drying temperature. The drying time remains unchanged. Version - Easy Control with coin meter : Select another program by pressing the relevant temperature button. The program will increase or decrease the drying temperature. The program will recalculate the remaining amount of money. The drying time will be adapted accordingly. 5. Increasing the drying temperature : Version - Easy Control without coin meter : Press the active temperature button. The dot on the display will stop flashing. Press the button again to increase the drying time. Version - Easy Control with coin meter : Increasing of the drying temperature is not possible. 6. Advancing the drying program : Version - Easy Control without coin meter : Press the button START while the machine is working. The program will be advanced to further step. Version - Easy Control with coin meter : Advancing the program is not possible. 7. Program end : The time on the display will count down until „0“. When „0“ is reached. The drying cycle is finished and the door can be opened. Remove the load immediately after the drying process is finished to avoid risk of linen burning. 508982_N_PUB_DATE_20_JAN_2011.DOC USER’S MANUAL 7 REMARKS : 1. Loading and unloading the machine during drying process : Stop the dryer by opening the door. Load or unload the linen in or from the dryer. Be careful since the linen load can be significantly hot. Close the door. Press the START button. 2. Interrupting of the drying process : Version - Easy Control without coin meter : Advance the drying program into next step by pressing the START button. Repeat the sequence until the end of the program is reached. Version - Easy Control with coin meter : Interruption of drying program is not possible in operation mode. IMPORTANT: ALL MANUALLY OPERATED DRYERS ARE FACTORY EQUIPPED WITH AN EMERGENCY STOP BUTTON LOCATED ON THE FRONT PANEL (NOT VALID FOR VERSION WITH COIN METER). Emergency stop button: 4.4. FINISHING THE DRYING CYCLE After the drying cycle is finished, the machine is prepared for another cycle. If you want to switch the machine off, press emergency stop button (not valid for Easy Control with coin meter). To switch off the machine completely, turn the main switch on the machine rear panel to position „OFF“. ! WARNING ! DO NOT INTERRUPT DRYING PROGRAM AND DO NOT SKIP THE STEP „COOL DOWN“ AT THE END OF DRYING CYCLE. 4.5. EMERGENCY STOP OF THE MACHINE Versions - Full Control and Easy Control without coin meter : If operator‘s safety or health is endangered, it is possible to stop the machine by pressing the button of emergency stop, see chapter 4.3. Emergency stop button is located on the machine upper front panel. Version - Easy Control with coin meter : The machine is not equipped with central stop button. The laundry owner must be make arrangements for remote-located emergency stop device. ! WARNING ! AS SOON AS THE REASON FOR THE MACHINE STOPPAGE IS ELIMINATED, UNLOAD THE LINEN FROM THE DRUM IMMEDIATELY. RISK OF FIRE! 4.6. HOW TO PROCEED ON ERROR MESSAGES Version - Full Control : Error message occurs on the machine display in the form of Er: and no. of failure (001 - 999). In some cases the programmer buzzer sounds. In some cases the drum goes on turning but the heating is off. The machine cools down and stops itself after it has reached safety temperature. After the machine has been stopped, the error message is possible to delete by opening and closing the door, possibly by pressing the button of emergency stop. If failure state continues, the error message is displayed again. For detailed information concerning error messages - see „Programming manual“. Version - Easy Control without coin meter and with coin meter : When there is an error the fault LED lights on. The number on the display corresponds with specific fault. In some cases the drum goes on turning but the heating is off. The machine cools down and stops itself after it has reached safety temperature. For detailed information concerning error messages - see „Programming manual“. 4.7. POWER SUPPLY INTERRUPTION Version - Full Control : When the power supply interruption occurs and the power is restored the machine will be in stand-by mode. The display is counting down. Once the display reaches 0 the machine will be waiting for further instruction. Close the door in case it is open. On the display the program number will be shown. Press the Start button to continue on the program, or press the STOP button to end the drying cycle. 8 USER'S MANUAL 508982_N_PUB_DATE_20_JAN_2011.DOC Version - Easy Control without coin meter and with coin meter : When the power supply interruption occurs and the power is restored the machine will be in stand-by mode. The display is counting down. Once the display reaches 0 the machine will be waiting for further instruction. Close the door in case it is open. On the display the program number will be shown and the LED on START button is flashing. Press the Start button to continue on the program. ! WARNING ! UNLOAD THE LINEN FROM DRYING DRUM. RISK OF FIRE AT HIGH TEMPERATURE OF DRYING! 4.8. INTERRUPTION OF GAS SUPPLY Version - Full Control : When gas supply is interrupted there is displayed the message „HEATING FAILURE“ or „NO HEAT“ when the temperature is not reached. The drum goes on turning but with heating off. As soon as it reaches the safety temperature it will stop. Error message is possible to delete - see chapter 4.6. When gas supply is recovered, it is possible to start the machine again. Version - Easy Control without coin meter and with coin meter : When gas supply is interrupted the display will show the gas error messages number 22, 23 or 24. The drum goes on turning but with heating off. As soon as the machine reaches safety temperature it will stop. For details on error messages revert to „Programming manual“. WARNING ! UNLOAD THE LINEN FROM DRYING DRUM. RISK OF FIRE AT HIGH TEMPERATURE OF DRYING! ! 4.9. RESET OF GAS HEATING After you start the machine, an electronic system of the machine will try three times the gas ignition. If the gas ignition does not occur during this time, the control unit of ignition will come over to safety block and the valve will not open until it is reset. There is a message on the display : Version - Full Control : „GAS IGNITION RESET/STOP“. Check the gas supply. Check whether the manual shut off valve of gas is open. When you press the button „START“, an electronic system of ignition will reset and the machine will repeat ignition sequence. Probably, it will be necessary to try several times to push out an air from the gas pipeline. If an error message is still displayed, put the machine out of operation and contact the manufacturer or your dealer. When you press the button „STOP“, the machine will stop. On the display there occurs an error message „ignition failure“. The error message is possible to delete - see chapter 4.6. Version - Easy Control without coin meter and with coin meter : „22“. Check the gas supply. Check whether the manual shut off valve of gas is open. Turn off and on the machine by emergency stop button - (valid for Easy control without coin meter) or by main switch. The machine ignition unit will reset. Probably, it will be necessary to try several times to push out an air from the gas pipeline. If the error message is still displayed put the machine out of operation and contact the manufacturer or your dealer. 508982_N_PUB_DATE_20_JAN_2011.DOC USER’S MANUAL 9 5. EXPLANATION ERROR MESSAGES For each failure message diagnostics are added. IMPORTANT! TECHNICAL INTERVENTION ON THE DRYER IS ONLY FOR QUALIFIED TECHNICIANS WITH SUFFICIENT TECHNICAL KNOWLEDGE OF THE EASY CONTROL DRYER MACHINE. FAILURE 1 : HEATING SAFETY 1 Failure 1 occurs when the electronic timer detects that the heating safety located at the air outlet has opened it’s NC contact. (NC thermal contact) (failure 1 can only occur when the drying cycle is running). A skilled and experienced technician must examine the heating-and air outlet system before the machine is put in operation again. DIAGNOSE: 1. Check the air outlet system. 2. Check the temperature sensor. 3. Check the heating system. 4. Check the heating contactor (valve) 5. Check the wiring. 6. If the heating safety is not closing within 15 minutes. 7. Check the output relay that controls the heating system. 8. Check the input Signal by monitoring the state at the Service menu. If the air flow is not sufficient, adjust the air outlet system. If the temperature sensor is not measuring correctly, replace the temperature sensor. If the heating system is broken repair, replace the heating system. If the heating contactor (valve) is not functional repair or replace the component. If the wiring is damaged, repair the wiring. The heating safety will be probably broken and must be replaced. If the output relay is not functional, replace the electronic card. If the input is not functional anymore, replace the electronic card. FAILURE 2: HEATING SAFETY 2 Failure 2 occurs when the electronic timer detects that the heating safety located at the heater has opened it’s NC contact. (NC thermal contact) (failure 2 can only occur when the drying cycle is running). A skilled and experienced technician must examine the heating-and air outlet system before the machine is put in operation again. DIAGNOSE: 1. Check the air outlet system. 2. Check the temperature sensor. 3. Check the heating system. 4. Check the heating contactor (valve) 5. Check the wiring. 6. If the heating safety is not closing within 15 minutes. 7. Check the output relay that controls the heating system. 8. Check the input Signal by monitoring the state at the Service menu. If the air flow is not sufficient, adjust the air outlet system. If the temperature sensor is not measuring correctly, replace the temperature sensor. If the heating system is broken repair, replace the heating system. If the heating contactor (valve) is not functional repair or replace the component. If the wiring is damaged, repair the wiring. The heating safety will be probably broken and must be replaced. If the output relay is not functional, replace the electronic card. If the input is not functional anymore, replace the electronic card. FAILURE 5 : MOTOR THERMIC Failure 5 occurs when the motor temperature (overcurrent) security has tripped. The contact will be closed again automatically after some time. (Failure 5 occurs for 1 motor machines). (NC thermal contact) A skilled and experienced technician must examine the motor-drive system before the machine is put in operation again. 10 USER'S MANUAL 508982_N_PUB_DATE_20_JAN_2011.DOC DIAGNOSE: 1. Check if the thermal security of the motor is open. 2. Check that the air flow, drum and ventilator rotation is not obstructed. 3. If the thermal motor security is not closing after 15 minutes. 4. Check the continuity of the wiring. 5. Check the input signal by monitoring the state at the Service menu. If the thermal security is open, within 15 minutes the security will close automatically. If a motor is defective, the security can go open again when you restart the dryer. If it was only a temperature problem and the motor is not defective: the overload security will not trip again. Solve the mechanical problem. The thermal motor security will be probably broken. If the wiring is not continuous: repair the wiring. If the input is not functional anymore, replace the electronic card. FAILURE 6 : FAN MOTOR THERMIC Failure 6 occurs when the fan motor temperature (overcurrent) security has tripped. The contact will be closed again automatically after some time. (Failure 6 occurs only for 2 motor machines). (NC thermal contact). A skilled and experienced technician must examine the motor-drive system before the machine is put in operation again. DIAGNOSE: 1. Check if the thermal security of the motor is open. 2. Check that the air flow, drum and ventilator rotation is not obstructed. 3. If the thermal motor security is not closing after 15 minutes. 4. Check the continuity of the wiring. 5. Check the input signal by monitoring the state at the Service menu. If the thermal security is open, within 15 minutes the security will close automatically. If a motor is defective, the security can go open again when you restart the dryer. If it was only a temperature problem and the motor is not defective: the overload security will not trip again. Solve the mechanical problem. The thermal motor security will be probably broken. If the wiring is not continuous, repair the wiring. If the input is not functional anymore, replace the electronic card. FAILURE 7: DRUM MOTOR THERMIC Failure 7 occurs when the motor temperature (overcurrent) security has tripped. The contact will be closed again automatically after some time. (Failure 7 occurs only for 2 motor machines) (NC thermal contact). A skilled and experienced technician must examine the motor-drive system before the machine is put in operation again. DIAGNOSE: 1. Check if the thermal security of the motor is open. 2. Check that the air flow, drum and ventilator rotation is not obstructed. 3. If the thermal motor security is not closing after 15 minutes. 4. Check the continuity of the wiring. 5. Check the input signal by monitoring the state at the Service menu. 508982_N_PUB_DATE_20_JAN_2011.DOC If the thermal security is open, within 15 minutes the security will close automatically. If a motor is defective, the security can go open again when you restart the dryer. If it was only a temperature problem and the motor is not defective: the overload security will not trip again. Solve the mechanical problem. The thermal motor security will be probably broken. If the wiring is not continuous, repair the wiring. If the input is not functional anymore, replace the electronic card. USER’S MANUAL 11 FAILURE 8: AIR FLOW SWITCH OPEN AT STARTUP Failure 8 occurs when there is not sufficient air flow when the ventilator is switched On. This security function prevents that the heating is switched On when the ventilator is not functional or if the airflow is obstructed. (Failure 8 occurs only at startup) (NO contact) The Air Flow Switch has a safety function and it’s function must not be obstructed. A skilled and experienced technician must examine the dryer system before the machine is put in operation again. ! ATTENTION !!! FOR NEW INSTALLATIONS THE AIR OUTLET TUBES MUST HAVE THE RIGHT SIZE FOR THE AIR FLOW OF THE CORRESPONDING MACHINE. FOLLOW THE INSTRUCTIONS IN THE INSTALLATION MANUAL. DIAGNOSE: 1. Check if the ventilator is functional. 2. Check if there is sufficient air flow. Check if the Dryer is a closed box. (Lint filter Door, mechanical panels must be present and closed properly) 3. Check if the switch and metal plate and air flow detection system is still functional. 4. Check the continuity of the wiring 5. Check the input signal by monitoring the state at the Service menu. If the ventilator is not functional, repair or replace the ventilator, belt, motor control system, wiring or the power supply circuit of the ventilator. In normal operation, the Ventilator is switched On immediately after pressing the START button. The ventilator must stay on for the complete time of the drying cycle. When the Dryer is not a closed box, air will escape and the air flow will not be sufficient to switch the Air Flow Switch. Make sure that there is no loss of Air Flow. Example : close the Lint Filter Door properly. If the air flow detection system or it's switch is out of order, it must be repaired or replaced. If the wiring is not continuous : repair the wiring If the input is not functional anymore, replace the electronic card. FAILURE 9: AIR FLOW SWITCH OPEN AFTER STARTUP Failure 9 occurs when there is not sufficient air flow when the ventilator is turning. This security function makes that the heating is switched Off when the ventilator is suddenly Not functional anymore or if the airflow gets obstructed. (Failure 9 occurs only after startup) (NO contact) The Air Flow Switch has a safety function and it’s function must not be obstructed. A skilled and experienced technician must examine the dryer system before the machine is put in operation again. DIAGNOSE: 1. Check if the ventilator is functional. 2. Check if there is sufficient air flow. Check if the Dryer is a closed box. (Lint filter Door, mechanical panels must be present and closed properly) 3. Check if the switch and metal plate and air flow detection system is still functional. 4. Check the continuity of the wiring 5. Check the input signal by monitoring the state at the Service menu. 12 If the ventilator is not functional, repair or replace the ventilator, belt, motor control system, wiring or the power supply circuit of the ventilator. In normal operation, the Ventilator is switched On immediately after pressing the START button. The ventilator must stay on for the complete time of the drying cycle. When the Dryer is not a closed box, air will escape and the air flow will not be sufficient to switch the Air Flow Switch. Make sure that there is no loss of Air Flow. Example : close the Lint Filter Door properly. If the air flow detection system or it's switch is out of order, it must be repaired or replaced. If the wiring is not continuous, repair the wiring If the input is not functional anymore, replace the electronic card. USER'S MANUAL 508982_N_PUB_DATE_20_JAN_2011.DOC FAILURE 10: AIR FLOW SWITCH CLOSED Failure 10 occurs at the start of the drying cycle. Before the ventilator is switched On, the Air flow switch must be open. If the flow detection system is out of order and the switch is closed, an error message will be displayed. (Failure 10 occurs only in standby mode) (NO contact) The Air Flow Switch has a safety function and it’s function must not be obstructed. A skilled and experienced technician must examine the dryer system before the machine is put in operation again. DIAGNOSE: 1. Check if the air flow detection system is still functional. 2. Check if the ventilator is switched On immediately after pressing start. 3. Check the continuity of the wiring 4. Check that the ventilator is switched Off at the end of the drying cycle. 5. Check the input signal by monitoring the state at the Service menu. If the air flow detection system or it's switch is out of order, it must be repaired or replaced. Check the contactor, wiring and the ventilator command signal. If the wiring is not continuous, repair the wiring If the contactor is not correctly functioning, replace the contactor. If the input is not functional anymore, replace the electronic card. FAILURE 11: FAULT COOLDOWN Failure 11 occurs when the temperature doesn’t decrease when the Cooldown sequence is in progress. (No cooldown at all after 15 minutes at cooldown sequence for temperature above 50°C.) A skilled and experienced technician must examine the heating-and air outlet system before the machine is put in operation again. DIAGNOSE: 1. Check if the heating system is switched Off. 2. Check if the temperature sensor is functional. 3. Check the output relay that controls the heating system. If no temperature ramp has been programmed for the cooldown sequence, the heating system must be switched Off. Check the contactor (valve), wiring, and the ventilator command signal. If the temperature sensor is not measuring correctly, replace the temperature sensor. If the output relay is not functional, replace the electronic card. FAILURE 12: NO REHEATING Failure 12 occurs at a heating (cooldown with ramp) sequence when the heating is not switched On again at the temperature control process when the lowest temperature hysteresis value is reached. A skilled and experienced technician must examine the heating-and air outlet system before the machine is put in operation again. DIAGNOSE: 1. Check if there is no interruption of the electrical power, gas or steam heating power supply 2. Check if the heating system is functional. 3. Check the heating contactor (valve) 4. Check the continuity of the wiring. 5. Check if the temperature sensor is functional. 6. Check the output relay that controls the heating system. 508982_N_PUB_DATE_20_JAN_2011.DOC The machine will not heat when there is no energy supply for the heating system. Avoid interruptions of the energy supply. If the heating system fails to work, repair or replace the heating system. If the heating contactor (valve) is not functional repair or replace the component. If the wiring is not continuous : repair the wiring If the temperature sensor is not measuring correctly, replace the temperature sensor. If the output relay is not functional, replace the electronic card. USER’S MANUAL 13 FAILURE 13: NO HEATING Failure 13 occurs when the heating system is not functional at start up. (No temperature raise of 5°C in 30 minutes after start drying cycle.) A skilled and experienced technician must examine the heating-and air outlet system before the machine is put in operation again. DIAGNOSE: 1. Check if there is no interruption of the electrical power, gas or steam heating power supply 2. Check if the heating system is functional. 3. Check the heating contactor (valve) 4. Check the continuity of the wiring. 5. Check if the temperature sensor is functional. 6. Check the output relay that controls the heating system. The machine will not heat when there is no energy supply for the heating system. Avoid interruptions of the energy supply. If the heating system fails to work, repair or replace the heating system. If the heating contactor (valve) is not functional repair or replace the component. If the wiring is not continuous, repair the wiring If the temperature sensor is not measuring correctly, replace the temperature sensor. If the output relay is not functional, replace the electronic card. FAILURE 15: TOO HOT Failure 15 occurs when the actual heating temperature goes 15°C above the target temperature at the drying process. A skilled and experienced technician must examine the heating-and air outlet system before the machine is put in operation again. DIAGNOSE: 1. Check the air outlet system. 2. Check the temperature sensor. 3. Check the heating system. 4. Check the heating contactor (valve) 5. Check the wiring. 6. Check the output relay that controls the heating system. 7. Check the input Signal by monitoring the state at the Service menu. If the air flow is not sufficient, adjust the air outlet system. If the temperature sensor is not measuring correctly, replace the temperature sensor. If the heating system is broken, repair or replace the heating system. If the heating contactor (valve) is not functional repair or replace the component. If the wiring is damaged, repair the wiring. If the output relay is not functional, replace the electronic card. If the input is not functional anymore, replace the electronic card. FAILURE 16: COIN BLOCKING 1 Failure 16 occurs when the input for coin drop 1 is blocked for more then 5 seconds. Case EP = ON. Fault 16 will be displayed if the external start release signal is high for more then 10 seconds when the door has been opened at the end of the program. DIAGNOSE: 1. Check the well functioning of coin drop 1 2. Check the continuity of the wiring If the coin drop micro contact or optocoupler is not functioning 100%, replace the coin drop If the wiring is not continue : repair the wiring FAILURE 17: COIN BLOCKING 2 Failure 17 occurs when the input for coin drop 2 is blocked for more then 5 seconds. DIAGNOSE: 1. Check the well functioning of coin drop 2 14 If the coin drop micro contact or optocoupler is not functioning 100%, replace the coin drop USER'S MANUAL 508982_N_PUB_DATE_20_JAN_2011.DOC 2. Check the continuity of the wiring If the wiring is not continue: repair the wiring FAILURE 18: TOO HOT SAFETY Failure 18 occurs when the actual heating temperature rises above safety temperature 85°C while the machine is waiting to be started (not running). On the display will be shown „Hot“ and the air temperature as indication that there is something wrong. Check Safety Thermostats ST1 & ST2 as they should switch off the heating system and prevent high temperatures. A skilled and experienced technician must examine the heating-and air outlet system before the machine is put in operation again. ! ATTENTION !!! IF FAILURE 18 OCCURS WE CAN EXPECT THERE IS RISK OF BURN AND NECESSARY ACTIONS MUST BE TAKEN TO REDUCE TEMPERATURE. DIAGNOSE: 1. Check the air outlet system. 2. Check the temperature sensor. 3. Check the heating system. 4. Check the heating contactor (valve) 5. Check the wiring. 6. Check the Safety Thermostats ST1 & ST2. 7. Check the output relay that controls the heating system. 8. Check the input Signal by monitoring the state at the Service menu. If the air flow is not sufficient, adjust the air outlet system. If the temperature sensor is not measuring correctly, replace the temperature sensor. If the heating system is broken, repair or replace the heating system. If the heating contactor (valve) is not functional repair or replace the component. If the wiring is damaged, repair the wiring. The Safety Thermostats should go open before failure 18 is generated. If the output relay is not functional, replace the electronic card. If the input is not functional anymore, replace the electronic card. FAILURE 19: DEFECTIVE TEMPERATURE SENSOR 1 Failure 19 occurs when the temperature sensor is broken. The fault is only displayed when the machine is in standby mode and no program is active. The fault can only be erased by switching off and on the power. If the fault is still present after switching on the power : fault message 19 will be generated again. A skilled and experienced technician must examine the heating-and air outlet system before the machine is put in operation again. DIAGNOSE: 1. Check if the temperature sensor is connected on the PCB Board. 2. Check the temperature sensor 3. Measure the resistance of the sensor 4. Check if the earth wire is at the middle position of the connector 5. If the fault is persistent The Female connector must be connected with the Male connector T1 of the PCB board. If the temperature sensor is broken: replace the temperature sensor If the resistance is not OK, replace the temperature sensor If the earth wire is not at the middle position: put the earth wire in the middle position of connector T Replace the electronic board Be sure that the problem is related to the electronic board and not to a defective temperature sensor FAILURE 20: DEFECTIVE TEMPERATURE SENSOR 2 Failure 20 occurs when the temperature sensor is broken. The fault is only displayed when the machine is in standby mode and no program is active. The fault can only be erased by switching off and on the power. If the fault is still present after switching on the power : fault message 20 will be generated again. A skilled and experienced technician must examine the heating-and air outlet system before the machine is put in operation again. 508982_N_PUB_DATE_20_JAN_2011.DOC USER’S MANUAL 15 DIAGNOSE: 1. Check if the temperature sensor is connected on the PCB Board. 2. Check the temperature sensor 3. Measure the resistance of the sensor 4. Check if the earth wire is at the middle position of the connector 5. If the fault is persistent The Female connector must be connected with the Male connector T2 of the PCB board. If the temperature sensor is broken: replace the temperature sensor If the resistance is not OK, replace the temperature sensor If the earth wire is not at the middle position: put the earth wire in the middle position of connector T Replace the electronic board Be sure that the problem is related to the electronic board and not to a defective temperature sensor FAILURE 22: IGNITION ERROR AT STARTUP, GAS HEATING ONLY Failure 22 occurs when the heating system has a problem to switch on the fire at start up. If the problem is still persistent after 3 automatic resets, error message 22 is generated. The dryer computer will try up to 9 times to turn on the gas heating. The gas ignition system closes contactor KA3 (input 4 High) to inform the dryer computer that the gas ignition system failed to switch on the fire. Then the ignition system is reset by the dryer computer by switching on the reset signal gas ignition system (contactor KA2)) A skilled and experienced technician must examine the heating- and air outlet system before the machine is put in operation again. DIAGNOSE: 1. Check the gas supply. 2. Check the heating system. 3. Check the gas ignition system. 4. Check the heating contactor. 5. Check contactor KA3 (Ignition Error). 6. Check the wiring. 7. Check the output relays that controls the heating system. 8. Check the electrical Input Ignition Error at the electronic card. Without gas supply, the heater can’t function. Right Gas supply and pressure must be available. If the heating system is broken repair, replace the heating system. If the gas ignition system is not functional, replace the gas ignition system. If a heating contactor is not functional replace the component. If the contactor KA3 is not functional replace the component. If the wiring is damaged, repair the wiring. If an output relay is not functional, replace the electronic card. If the input of the electronic card is not functional anymore, replace the electronic card. FAILURE 23: IGNITION ERROR AFTER STARTUP (RUN), GAS HEATING ONLY Failure 23 occurs when the heating system has a problem to switch on the fire when the dryer tries to restart the gas heating system. (while the dry cycle is running). If the problem is still persistent after 3 automatic resets, error message 23 is generated. The dryer computer will try up to 9 times to turn on the gas heating. The gas ignition system closes contactor KA3 (input 4 High) to inform the dryer computer that the gas ignition system failed to switch on the fire. Then the ignition system is reset by the dryer computer by switching on the reset signal gas ignition system (contactor KA2)) A skilled and experienced technician must examine the heating- and air outlet system before the machine is put in operation again. DIAGNOSE: 1. Check the gas supply. 2. Check the heating system. 3. Check the gas ignition system. 16 Without gas supply, the heater can’t function. Right Gas supply and pressure must be available. If the heating system is broken repair, replace the heating system. If the gas ignition system is not functional, replace USER'S MANUAL 508982_N_PUB_DATE_20_JAN_2011.DOC 4. Check the heating contactor. 5. Check contactor KA3 (Ignition Error). 6. Check the wiring. 7. Check the output relays that controls the heating system. 8. Check the electrical Input Ignition Error at the electronic card. the gas ignition system. If a heating contactor is not functional replace the component. If the contactor KA3 is not functional replace the component. If the wiring is damaged, repair the wiring. If an output relay is not functional, replace the electronic card. If the input of the electronic card is not functional anymore, replace the electronic card. FAILURE 24: IGNITION ERROR FAILURE, GAS HEATING ONLY Failure 24 occurs after 3 attempts when the Gas Ignition system fails to be reset. Cause : Input Signal Ignition Error Failure stays high (Input 4) nevertheless 3 attempts of dryer computer to reset gas ignition system (contactor KA2). This is to be considered a major hardware failure. A skilled and experienced technician must examine the heating- and air outlet system before the machine is put in operation again. DIAGNOSE: 1. Check the gas ignition system. 2. Check the wiring. 3. Check contactor KA3 (Ignition Error). 4. Check the electrical Input Ignition Error at the electronic card. If the gas ignition system is broken, replace the gas ignition system. If the wiring is damaged, repair the wiring. If the contactor KA3 is not functional replace the component. If the input of the electronic card is not functional anymore, replace the electronic card. FAILURE 25: NO HUMIDITY SENSOR HUMIDITY CONTROL ONLY Failure 25 occurs when the humidity sensor doesn't give an analog electrical output signal to the dryer computer. Example: connector not connected to dryer computer. (At the „t“-menu you can switch off/on the Humidity Control function) (Note : the humidity sensor needs 1 minute after switching on the power supply dryer to stabilise it’s analog output signal) Failure 25 can occur when the dryer is running without linen inside. This should not be considered as a system failure. Check correct dryer operation with a normal amount of wet linen. ! ATTENTION THE HUMIDITY CONTROL SYSTEM IS NOT MADE TO RUN WITHOUT LOAD OR WITH A VERY SMALL LOAD. THE SYSTEM CAN ONLY FUNCTION IN A NORMAL WAY WHEN THERE IS SUFFICIANT EVAPORATION TO BE MEASURED BY THE AIR HUMIDITY SENSOR DIAGNOSE: 1. Check if the humidity sensor is connected to the dryer computer. 2. Check the wiring. 3. Check the supply voltage humidity sensor. 4. Check the humidity sensor and amplifier. 5. Check the analog input signal. (Inputs can be checked one by one in the Service menu) If the humidity sensor is not connected to the dryer computer, connect the sensor If the wiring is damaged, repair the wiring. If there is no or wrong supply voltage replace the dryer computer. If the humidity sensor or amplifier is damaged replace the humidity sensor and amplifier. If for A3, the value at the Analog input menu = „0“ then the analog input signal is missing. If the input of the controller board is not functional, replace the controller board. (check first previous items) FAILURE 26: NO HUMIDITY SENSOR CAP HUMIDITY CONTROL ONLY Failure 26 occurs when the dust cap at the humidity sensor is missing. When the dust cap is missing, due to the influence of the air flow in the dryer, the sensor will measure a too big value which is out of range at normal operation. (At the „t“-menu you can switch off/on the Humidity Control function) 508982_N_PUB_DATE_20_JAN_2011.DOC USER’S MANUAL 17 (Note : the humidity sensor needs 1 minute after switching on the power supply dryer to stabilise it’s analog output signal) DIAGNOSE: 1. Check if the dust cap is mounted on the sensor. 2. Check the wiring. 3. Check the supply voltage humidity sensor. If the dust cap is missing or broken, put a new dust cap on the humidity sensor. If the wiring is damaged, repair the wiring. If there is no or wrong supply voltage replace the dryer computer. If the humidity sensor or amplifier is damaged replace the humidity sensor and amplifier. If for A3, the value at the Analog input menu > „800“ then the analog input signal is out of range. If the input of the controller board is not functional, replace the controller board. (check first previous items) 4. Check the humidity sensor and amplifier. 5. Check the analog input signal. (Inputs can be checked one by one in the Service menu) ! ATTENTION !!! IF THE DRYER IS EXECUTED WITH AIR HUMIDITY SENSOR, THE DRYER CAN ONLY OPERATE CORRECTLY IF THE DUST CAP IS MOUNTED ON THE AIR HUMIDITY SENSOR. FAILURE 27: NO HUMIDITY REDUCTION HUMIDITY CONTROL ONLY Failure 27 occurs when the humidity value doesn’t decrease within 60 minutes when the drying sequence is in progress. (Maximum drying time by humidity control is set default on 60 minutes.) DIAGNOSE: 1. Check if the humidity sensor is functional. 2. Check if the humidity sensor is functional. 3. Check if the humidity sensor is functional. 4. Check if the heating-drying system is functional. 5. Check if the analog input and power supply of the sensor on the electronic card is functional. Check if there is no lint that obstructs the well functioning of the sensor. If the wiring of the sensor is broken repair the wiring. If the sensor is not functional at all, replace the sensor. (If you blow with your mouth on the sensor, the humidity value must change.) (remove filter cap first) If there is not sufficient airflow or heating power, the fabrics in the dryer will not get dry. Repair the problem. If the sensor control circuit is not functional, replace the electronic card. FAILURE 28: LINT FILTER Failure 28 occurs when the Lint Filter Door has not been opened for 40 succeeding cycles. Check The value of the Lint Filter Door Cycle Counter can be inspected at the Running State-Service menu. (Special function button) DIAGNOSE: 1. The Lint Filter must be cleaned every day. 2. Check if the Lint Filter Door Cycle Counter is reset by opening the Lint Door. 3. Check if the Lint Filter Door Cycle Counter is reset by opening the Lint Door. 4. Check if the Lint Filter Door Cycle Counter is reset by opening the Lint Door. If the Lint Filter has not been cleaned for 40 days, open the Lint Door and clean the Filter. Close the door again. The Lint Filter Door Cycle will be reset. If the Lint Filter Door Switch is broken, replace the Lint Filter Door Switch (Normal Closed Contact) If the wiring is broken, repair the wiring. If the input of the electronic card is not correctly functioning, replace the electronic card. FAILURE 30: BROKEN RELAIS EXTERNAL PAYMENT SYSTEM 18 USER'S MANUAL 508982_N_PUB_DATE_20_JAN_2011.DOC Failure 30 occurs when the External payment system relais stays closed for longer then the maximum allowed drying time (60 minutes). Only applicable for set-up selection "EP = RL3". The dryer will run as long as the external payment system relais is closed. As the dryer should not run longer then maximum allowed drying time, it will be stopped for safety purposes. DIAGNOSE: 1. Check it the right machine set-up has been selected. 2. Check the external payment system. 3. Check the wiring. 4. Check the electrical Input at the electronic card. Select the right setup. If the external payment system is broken, repair the system. If the wiring is damaged, repair the wiring. If the input of the electronic card is not functional anymore, replace the electronic card. FAILURE 35: WRONG SOFTWARE VERSION When a total new software that isn’t downward compatible with previous software versions is loaded, then the software will detect that the old and new softwares are not compatible. You have to reconfigure the Full Control Dryer Computer. ! ATTENTION !!! ALL THE CUSTOM SETTINGS WILL BE ERASED IN THE FULL CONTROL DRYER COMPUTER BY LOADING THE FACTORY SETTINGS. After reinitialization of the Full Control Dryer Computer, fault 35 can only be erased by switching the power Off/On. FAILURE 36: TOO HOT END Failure 36 occurs when the actual cooldown temperature at the end of the dry cycle is still above 78°C. If at the end of the drying cycle the temperature is above 78°C the dryer will go on with the cooldown sequence for 60 minutes (or until temperature below 65°C or until open door) . If the temperature is still above 70°C after these 60 extra minutes cooldown Failure 36 is generated. On the display will be shown „Hot“ and the air temperature as indication that there is something wrong. DIAGNOSE: 1. Check the air outlet system. 2. Check the temperature sensor. 3. Check the heating system. 4. Check the heating contactor (valve) 5. Check the wiring. 6. Check the output relay that controls the heating system. 7. Check the Analog Temperature input Signal by monitoring the state at the Service menu. If the air flow is not sufficient, adjust the air outlet system. If the temperature sensor is not measuring correctly, replace the temperature sensor. If the heating system is broken, repair or replace the heating system. If the heating contactor (valve) is not functional repair or replace the component. If the wiring is damaged, repair the wiring. If the output relay is not functional, replace the electronic card. If the input is not functional anymore, replace the electronic card. FAILURE 37: TOO HOT SAFETY Failure 37 occurs when the actual heating temperature rises above safety temperature 85°C while the machine is running. ( (*) T24 & T35 ELECTRICAL HEATING ONLY: 100°C) If at the end of the drying cycle the temperature is above 85°C ( (*) 100°C) the dryer will go on with the cooldown sequence for 30 minutes (or until temperature below 65°C or until open door). On the display will be shown „Hot“ as indication that there is something wrong. Check Safety Thermostats ST1 & ST2 as they should switch off the heating system and prevent high temperatures. A skilled and experienced technician must examine the heating-and air outlet system before the machine is put in operation again. 508982_N_PUB_DATE_20_JAN_2011.DOC USER’S MANUAL 19 ! ATTENTION !!! IF FAILURE 37 OCCURS WE CAN EXPECT THERE IS RISK OF BURN AND NECESSARY ACTIONS MUST BE TAKEN TO REDUCE TEMPERATURE. DIAGNOSE: 1. Check the air outlet system. 2. Check the temperature sensor. 3. Check the heating system. 4. Check the heating contactor (valve) 5. Check the wiring. 6. Check the Safety Thermostats ST1 & ST2. 7. Check the output relay that controls the heating system. 8. Check the input Signal by monitoring the state at the Service menu. If the air flow is not sufficient, adjust the air outlet system. If the temperature sensor is not measuring correctly, replace the temperature sensor. If the heating system is broken, repair or replace the heating system. If the heating contactor (valve) is not functional repair or replace the component. If the wiring is damaged, repair the wiring. The Safety Thermostats should go open before failure 37 is generated. If the output relay is not functional, replace the electronic card. If the input is not functional anymore, replace the electronic card. FAILURE 38: LINT DOOR SWITCH Failure 38 occurs when the Lint Filter Door Switch is opened while the drying cycle is running. At normal operation it is not expected that the Lint Filter Door is opened while the drying cycle is running. DIAGNOSE: 1. Check if the Lint Filter Door is well closed. 2. Check if the Lint Filter Door Switch (NO contact), is well closed. 3. Check the wiring. 4. Check the input Signal by monitoring the state at the Service menu. If the Lint Filter Door is not well closed, close the door properly. When the Lint Filter Door is closed, the Door Switch contact must be closed. If the Switch is damaged, replace the Switch. If the wiring is damaged, repair the wiring. If the input is not functional anymore, replace the electronic card. FAILURE 41: SERVICE DUE Service Due Err message is an indication that there must be executed a maintenance intervention. Consult the Installation - Maintenance manual about the kind of the intervention that is required. Err message 41 is just informational purposes and the machine can still be operated, but to get rid of the Err message, a reset of the cycle counter is required. Set the key switch in program mode. Press the „MIDDLE“ Temperature button. On the display : the cycle counter is displayed (only for a few seconds) While the cycle counter is displayed, Press the „MIDDLE“ Temperature button 3 times. the cycle counter is now reset to value 0 and Err 41 Service Due is also reset. FAILURE 95: WATCH DOG If the watch dog has been activated, message 95 is logged in the Error log register. If this occurs often, ask the help of a technician. FAILURE 99: GENERAL MEMORY AND SOFTWARE ERROR In the memory log Err99 is replaced by the corresponding memory (150-165) and software (170-199) Errors. FAILURE 150-165: MEMORY ERRORS If a memory error occurs then something is going wrong with the eeprom. 20 USER'S MANUAL 508982_N_PUB_DATE_20_JAN_2011.DOC Try to reload the Programs. Check for source of electrical „noise“. FAILURE 170-199: SOFTWARE ERRORS Software errors must never occur. If a software error message occurs inform the manufacturer. ! ATTENTION !!! AT THE END OF THE DRYING CYCLE WHEN THE TEMPERATURE IS > 74°C AND < 79°C, THE COOLDOWN SEQUENCE WILL TAKE 3 MINUTES EXTRA. MEANWHILE THIS EXTRA COOLDOWN SEQUENCE IS HAPPENING, 0 MINUTES IS DISPLAYED. 5.1. HUMIDITY CONTROL - TROUBLE SHOOTING The analogue value humidity sensor can be watched while drying the linen. This can be helpful for diagnostic purposes. While dryer is running, key switch in Program mode, press High Temperature Button and the analogue value humidity sensor is shown for 2 seconds. ! ATTENTION THE HUMIDITY CONTROL SYSTEM IS NOT MADE TO RUN WITHOUT LOAD OR WITH A VERY SMALL LOAD. THE SYSTEM CAN ONLY FUNCTION IN A NORMAL WAY WHEN THERE IS SUFFICIANT EVAPORATION TO BE MEASURED BY THE AIR HUMIDITY SENSOR. CHECK CORRECT DRYER OPERATION WITH A NORMAL AMOUNT OF WET LINEN. Trouble shooting problems with Humidity Control : CHECK DUST FILTER CAP When humidty control doesn't work at all, probably the dust filter cap is missing. The dust filter cap is a white cover that must not be removed from the sensor device. Nevertheless it doesn't look in this way, the dust filter cap allows to pass the air. CHECK DOOR LOCK SYSTEM When the dryer door is not completely closed, air from the room is sucked in the dryer. This causes a wrong air humidity measurement. Make sure that the dryer can only run when the door is in it's closed (locked) position. (When door is still 10 mm open, it should not be possible to start a dryer program.) CHECK HEATING AND AIR FLOW The air humidity measurement can only function when there is sufficient water evaporation from the linen. Evaporation can only happen when the air and indirectly the linen is sufficiently heated. Suppose that the dryer has to run with reduced heating power, the air flow must be sufficiently reduced so that there is still evaporation. Example: There is not sufficient Electrical Current available at the building. The dryer works with only 50% of it's electrical heating power. The air flow must be sufficiently reduced so that there is still enough evaporation inside the dryer to allow optimal humidity control. CHECK FINAL DRYING TEMPERATURE At a normal drying process the outlet air temperature reaches it's programmed target value when the linen gets dry. For a correct drying process : when humidity control stops the dryer the dryer must have reached, before the end of the drying cycle, the programmed target temperature value. 508982_N_PUB_DATE_20_JAN_2011.DOC USER’S MANUAL 21 If this is not the case, probably there will not have occured sufficient evaporation at the drying process because of reduced heating power. And the air humidity measurement will not have been accurate to allow optimal humidity control. LINEN MUST BE SORTED A mixture of linen in the dryer can not result in an equal drying result. It is a good practice that the same kind of linen is sorted and dryed together. * Coton * Synthetic In case of Humidity Control a mixture of all kinds of linen will not give a good overall drying result. THIN - THICK FABRICS Thick fabrics like jeans trousers need a long drying time. Dryer program will probably be stopped when fabrics is mostly dry, but inside pockets it will still feel humid. In case of thin fabrics it can happen that were the linen is sewed togheter there are a few humid spots. This will dry overnight. Humidity Control stops the dryer when the linen is dry based on the measured air humidity. CORRECT LOAD IN DRUM Some fabrics need more space in dryer then others. It is important to choose the right size of dryer to obtain a good air flow. If the linen is strenghled this will restrict the air flow and the linen will not be dryed equally. 22 USER'S MANUAL 508982_N_PUB_DATE_20_JAN_2011.DOC INSTALLATION AND MAINTENANCE MANUAL 1. TABLE OF CONTENTS 1. TABLE OF CONTENTS ................................................................................................ 1 2. WARNING AND LABELS ............................................................................................. 3 2.1. PERSONAL SAFETY RULES .................................................................................................................3 2.2. MACHINE SYMBOLS ..............................................................................................................................4 2.3. IMPORTANT INFORMATION BEFORE INSTALLATION.......................................................................4 3. TECHNICAL INFORMATION ........................................................................................ 6 3.1. TUMBLER DRYER USE..........................................................................................................................6 3.2. MACHINE DESIGN..................................................................................................................................6 3.3. NAME PLATE ..........................................................................................................................................7 3.4. TECHNICAL SPECIFICATIONS 9kg (20lb), 11kg (24lb), 13kg (27lb) ....................................................7 3.5. TECHNICAL SPECIFICATIONS 16kg (35lb), 24kg (53lb), 35kg (77lb) ..................................................9 3.6. DIMENSIONS, COMPONENTS AND CONNECTIONS OF THE MACHINE 9kg (20lb) ...................................11 3.7. DIMENSIONS, COMPONENTS AND CONNECTIONS OF THE MACHINES 11kg (24lb), 13kg (27lb) AND 16kg (35lb) ..12 3.8. DIMENSIONS, COMPONENTS AND CONNECTIONS OF THE MACHINES 24kg (53lb), 35kg (77lb) ..............13 4. INSTALLATION........................................................................................................... 15 4.1. MANIPULATION AND UNPACKING.....................................................................................................15 4.2. WORKSTATION REQUIREMENTS ......................................................................................................16 4.3. MACHINE POSITIONING ON THE FLOOR..........................................................................................17 4.4. ELECTRICAL CONNECTION ...............................................................................................................18 4.5. GAS CONNECTION FOR GAS HEATING............................................................................................23 4.6. CONVERSION TO ANOTHER GAS .....................................................................................................26 4.6.1. OPTIONS FOR CONVERSION TO ANOTHER GAS.....................................................................26 4.6.1.1. CATEGORY OF APPLIANCE (SEE APPENDIX 530762) FOR YOUR COUNTRY CORRESPONDS / DOES NOT CORRESPOND WITH CATEGORY AND COUNTRY MENTIONED ON THE NAME PLATE................................................................................................................26 4.6.1.2. COUNTRY WITH APPLIANCE CATEGORY IS NOT MENTIONED IN APPENDIX 530762....26 4.6.2. PROCEDURE FOR THE GAS CONVERSION ..............................................................................27 4.7. STEAM CONNECTION FOR STEAM HEATING ..................................................................................28 4.8. EVACUATION SYSTEM........................................................................................................................28 4.8.1. FRESH AIR .....................................................................................................................................28 4.8.2. EXHAUST DUCT ............................................................................................................................29 4.8.3. MANIFOLD VENTING.....................................................................................................................30 4.8.4. OPTIMAL FLOW RATE ADJUSTMENT .........................................................................................31 4.9. PUTTING THE MACHINE INTO SERVICE...........................................................................................32 5. MAINTENANCE AND ADJUSTMENTS ...................................................................... 34 5.1. SAFETY INSTRUCTIONS FOR MAINTENANCE.................................................................................34 5.2. DAILY.....................................................................................................................................................34 5.3. MONTHLY OR AFTER 200 WORKING HOURS ..................................................................................34 5.4. EVERY 3 MONTHS OR AFTER 500 WORKING HOURS ....................................................................34 5.5. EVERY 6 MONTHS OR AFTER 3000 WORKING HOURS ..................................................................35 5.6. UNDERPRESSURE CLUTCH...............................................................................................................35 5.7. DOOR SWITCH .....................................................................................................................................36 5.8. BELTS TIGHTENING ............................................................................................................................36 6. TROUBLE SHOOTING AIDS ...................................................................................... 37 508982_N_PUB_DATE_20_JAN_2011.DOC INSTALLATION AND MAINTENANCE MANUAL 1 6.1. DISPLAY DOES NOT LIGHT AFTER START OF MACHINE............................................................... 37 6.2. TEXT ON DISPLAY IS DIFFICULT TO READ ...................................................................................... 37 6.3. MACHINE DOES NOT START.............................................................................................................. 37 6.4. MACHINE BEHAVES DIFFERENTLY THAN EXPECTED ................................................................... 37 6.5. MACHINE DOES NOT HEAT UP TO THE HIGHEST TEMPERATURE.............................................. 37 6.6. MODE OF WAITING OCCURS AND THE COUNTER COUNTS OFF................................................. 37 6.7. ERROR MESSAGE „UNLOAD“ AND „DOOR IS OPEN“...................................................................... 37 6.8. ERROR MESSAGE „DOOR FILTER“ ................................................................................................... 37 6.9. WARNING „LINT FILTER“..................................................................................................................... 37 6.10. MACHINE DRUM DOES NOT ROTATE.............................................................................................38 6.11. MACHINE DOES NOT REVERSE (ONLY MACHINES WITH REVERSE) ........................................ 38 6.12. UNDERPRESSURE CLUTCH DOES NOT REACT WHEN THE MACHINE IS STARTED (ERROR E8)... 38 6.13. UNDERPRESSURE CLUTCH IS OPENING IN COURSE OF DRYING (ERROR E9) ...................... 38 7. RECOMMENDED SPARE PARTS ..............................................................................39 8. REMOVING DRYER FROM SERVICE ........................................................................40 8.1. DISCONNECTING THE MACHINE....................................................................................................... 40 8.2. MACHINE DISPOSAL ........................................................................................................................... 40 8.2.1. POSSIBILITY OF THE MACHINE DISPOSAL BY THE SPECIALIZED COMPANY.............................. 40 8.2.2. POSSIBILITY OF THE MACHINE DISPOSAL BY OWN POTENTIAL .......................................... 40 2 INSTALLATION AND MAINTENANCE MANUAL 508982_N_PUB_DATE_20_JAN_2011.DOC 2. WARNING AND LABELS TO MINIMIZE THE RISK OF FIRE, INJURY BY ELECTRIC SHOCK OR SERIOUS INJURIES TO PEOPLE OR PROPERTY DAMAGE, PLEASE READ AND FOLLOW THE FOLLOWING INSTRUCTIONS. 2.1. PERSONAL SAFETY RULES –This English version is the original version. Without this version, the instructions are incomplete. –Before installation, operation and maintenance of the machine read carefully the complete instructions, i.e. this „Installation, maintenance and user's manual“, „Programming manual“ and „Spare parts manual“. The Programming manual and Spare parts manual are not delivered with a machine by default. You shall ask the supplier / manufacturer to obtain Programming manual and Spare parts manual. –Follow the instruction written in manuals and keep the manuals in a proper place by the machine for later use. –If any problems or failures occur, which you do not understand, immediately contact your dealer, serviceman or manufacturer. –Do not bypass the instructions stated in manuals, and warnings on the labels. –Follow all basic and valid safety instructions and laws. –The machine is in line with standard EN 602204-1 Safety of mechanical machinery - Electrical devices of machines. –Do not install the dryer, where it will be exposed to water and/or weather. –The machine must be connected to the power, ground, ventilation, and gas supply according to the installation manual, in compliance with the local standards done by qualified technicians with proper authorisation. The valid standards for connecting to the local power network (TT / TN / IT) must be followed. –Any changes concerning the installation, which are not described in Installation and maintenance manual, must be approved by the supplier or manufacturer. Otherwise, the supplier and manufacturer are not responsible for potential injuries to operators or for any damages. –Operation of the machine with malfunctions, missing parts or open covers is not allowed. –Interventions into the machine functions are not allowed, and the manufacturer refuses any responsibility in such cases. –Do not tamper with the machine's control. –Do not allow children to play on, around or in the dryer. –Do not store or spray flammable materials around the machine. –Keep the top of the machine clean, without the presence of flammable materials. –Keep the area around the exhaust opening and its surrounding area free from lint, dust, and lint. –Regularly check the proper function of ground, ventilation of the machine, and emergency stop. –The emergency stop device is omitted on machines design for coin, token, external payment system or similar operation for use in self-service situation. The owner-installer-user must provide a remotelocated emergency stop device that is connected to each machine. –Do not repair or adjust the belt drives when the machine is in operation, turn off the main switch. –The instructions and warnings described in installation manual do not include all conditions and situations, which may occur during the installation of your dryer. They must be generally understood. Caution and care are factors, which are not included in the design of this dryer and all persons who install, operate or maintain the machine must be qualified and familiar with the operating instructions. –Do not dry articles that have been previously cleaned in, washed in, soaked in, or spotted with gasoline, dry cleaning solvents, or other flammable or explosive substances as they give off vapours that could ignite or explode. –Do not reach into the drum if the drum is revolving. –Always clean the lint filter daily. –The interior of the drum and the exhaust duct should be cleaned periodically by qualified service personnel. –To reduce the risk of fire, do not dry plastic or articles containing foam rubber, similarly textured rubber-like materials or wax. Do not put clothes having traces of any flammable substances such as machine oil, thinner, flammable chemicals, etc. –Do not use fabric softeners or products to eliminate static electricity unless recommended by their manufacturer. –Do not put articles soiled with vegetable or cooking oil in the dryer, as these oils may not be removed during washing. Due to the remaining oil, the fabric may catch on fire by itself. –Do not dry fibreglass curtains and draperies unless the label says it is possible. –Always follow the fabric care instructions supplied with by the garment manufacturer. –Always follow the manufacturer's instructions on packages of laundry and cleaning aids. –Solvent vapours from dry-cleaning machines create acids when drawn through the heater of the drying unit. These acids are corrosive to the tumbler as well as to the laundry load being dried. Be sure that make-up inlet air is free of solvent vapours. –Be careful when using chemical cleaned laundry with chemical vapour and evaporated gas, which should lead to toxical and rust danger. It is necessary to take maximal care to prevent such situation. –Use the dryer only for its intended purpose, drying water-washed fabrics. –Do never stop the machine before the complete cool down cycle is completed 508982_N_PUB_DATE_20_JAN_2011.DOC INSTALLATION AND MAINTENANCE MANUAL 3 –Remove laundry immediately after the dryer stops. –Always disconnect the electrical power before servicing. –The dryer will not operate with the loading door open. Do not bypass the door safety switch to permit the dryer to operate with the door opened. –The dryer will stop tumbling when the door is opened. Do not use the dryer if it does not stop rotating when the door is opened. Put the dryer out of service and call the service person. –The dryer will not operate with lint screen panel open. Do not bypass front panel safety switch to permit the dryer to operate with the front panel open. FOR GAS HEATED MODELS –Turn off the main Gas supply when discovering a gas leak from the machine or if you smell gas. Ventilate the premises, do not turn on any electrical devices, do not touch any electrical switch, do not smoke, do not use open flame and call the maintenance. –Do not eliminate nor change settings of the pressure regulator, airflow switch, safety door switch, exhaust flap, and all factory pre-set devices unless the installation and/or maintenance require so. For such interventions strictly follow instructions stated in the chapters „Installation“ and „Maintenance and adjustment“. –Ensure minimal air vent of room recommended by manufacturer. FOR STEAM HEATED MODELS –Turn off the main steam supply when discovering that steam is leaking from the machine, and call the maintenance. FOR ALL MODELS PLACE THE MACHINE IN A WELL VENTILATED ROOM. RESPECT THE CORRECT FILLING RATIO ACCORDING THE TYPE OF LINEN. DO NEVER OVERLOAD THE MACHINE. INSTALLATION AND REPAIR CAN ONLY BE DONE BY A TECHNICIAN WITH MANUFACTURER'S CONSENT. IF THE INSTRUCTIONS IN THIS MANUAL ARE NOT MET, THE WARRANTEE MAY BE CANCELED. ! WARNING! FAILURE TO INSTALL, MAINTAIN, AND /OR OPERATE THIS MACHINE ACCORDING TO THE MANUFACTURER'S INSTRUCTIONS MAY RESULT IN CONDITIONS WHICH CAN PRODUCE SERIOUS INJURY AND/OR PROPERTY DAMAGE. 2.2. MACHINE SYMBOLS See - User's manual. 2.3. IMPORTANT INFORMATION BEFORE INSTALLATION PRE-INSTALLATION INSPECTION Upon delivery, visually inspect crate and parts for any visible shipping damage. If the crate, cover is damaged or signs of possible damage are evident, have the carrier note the condition on the shipping papers before the shipping receipt is signed, or advise the carrier of the condition as soon as it is discovered. FOR TRANSPORTATION AND STORAGE IN CASE OF TRANSPORTATION AND STORAGE, WATCH COMPONENTS PROTRUDING FROM THE CONTOUR LINE OF MACHINE (DOOR LOCKS, CONTROLS, ETC.), TO AVOID INJURIES. ! WARNING! NEVER PUSH, PULL OR APPLY PRESSURE ON COMPONENTS WHICH PROTRUDE FROM THE MACHINE CONTOURS (CONTROLLERS, DOOR LOCKS, CENTRAL STOP BUTTONS, MAIN SWITCH, ETC.). MAKE SURE THAT THESE COMPONENTS ARE PROPERLY SECURED TO ELIMINATE THEIR DAMAGE DURING THE INSTALLATION AND HANDLING THE DRYER. –In case of the machine transportation by the customer, follow the manufacturer's instructions for transportation, handling and storage of the product. In case of transportation of machine by the customer the manufacturer is not responsible for possible damage of the machine in course of transportation. –In case of storage the machine in a free area, it must be protected against mechanical damage, water, and weather condition factors. –The ambient temperature of transportation and storage must be between -25°C to +55°C. Relative humidity must be among 30% to 80% without condensation. –If it is convenient, leave the machine in its transport package or at least on its wooden transport skids until it is decided to install the dryer on the base in a room. A manner of handling the dryer is described in chapter „4.1. MANIPULATION AND UNPACKING“. 4 INSTALLATION AND MAINTENANCE MANUAL 508982_N_PUB_DATE_20_JAN_2011.DOC MATERIAL REQUIRED (OBTAIN LOCALLY) ALL MODELS GAS MODELS STEAM MODELS : One fused disconnect switch or circuit breaker. : One gas shut-off valve for gas service line to each dryer. : Three steam shut-off valves (one for service line to be connected upstream of solenoid steam valve, two for each condense return line). Two flexible steam hoses for connecting steam coils. Two steam traps for steam coil outlet to condense return line. Two vacuum breakers for condense return lines. Two check valves for each return line. 508982_N_PUB_DATE_20_JAN_2011.DOC INSTALLATION AND MAINTENANCE MANUAL 5 3. TECHNICAL INFORMATION 3.1. TUMBLER DRYER USE Machines are designed for drying of linen in laundries (e.g. bedroom linen, cloths, towels, dish towels, handkerchiefs and other linen). ! WARNING! THE MACHINE IS NOT DESIGNED FOR DRYING OF LINEN WHICH HAVE BEEN PREVIOUSLY CLEANED IN, WASHED IN, SOAKED IN, OR SPOTTED WITH GASOLINE, DRY CLEANING SOLVENTS OR OTHER FLAMMABLE OR EXPLOSIVE SUBSTANCES AS THEY GIVE OFF VAPORS THAT COULD IGNITE OR EXPLODE. IN ORDER TO REDUCE RISK OF FIRE DO NOT DRY LINEN, WHICH CONTAIN PLASTICS OR ARTICLES CONTAINING FOAM RUBBER OR SIMILARLY TEXTURED RUBBER LIKE MATERIALS. THE MACHINE IS NOT DESIGNED FOR DRYING OF LINEN, WHICH CONTAINS ARTICLES SOILED WITH VEGETABLE, OR COOKING OIL SINCE DUE TO THE REMAINING OIL, THE FABRIC MAY CATCH ON FIRE BY ITSELF. TO REDUCE THE RISK OF FIRE DO NOT PUT CLOTHES, WHICH HAVE TRACES OF ANY FLAMMABLE SUBSTANCES SUCH AS MACHINE OIL, FLAMMABLE CHEMICALS, THINNER, ETC. OR ANYTHING CONTAINING WAX OR CHEMICALS SUCH AS IN MOPS AND CLEANING CLOTHS. 3.2. MACHINE DESIGN This manual is common for standard tumbler dryers (hereafter dryer) with the drum volume 190 l, 250 l, 285 l, 345 l, 530 l, 680 l. Differences are mentioned properly in the text. The load volume at filling ration approximately 1:21 is 9kg (20lb), 16kg (35lb), for the machine 11kg (24lb), 13kg (27lb), 24kg (53Ib) the filling ratio is approximately 1:22, for the machine 35kg (77Ib) the filling ratio is approximately 1:20. Higher filling ration such as 1:25 is recommended for better drying conditions. Machines are operated manually by push buttons on keyboard (hereafter just OPL) for qualified operators in a laundry or with a coin meter for self serve laundries. Machines are heated by electricity (E), steam (S) or gas (G). Steam heating (S) is not applicable for 9kg (20lb). The temperature and time of drying can be set by means of the keyboard. GAS EXECUTION OF THE MACHINES: The machines category, country of destination, types of gas and gas pressures for which is the machine approved are specified in the appendix 530762. 6 INSTALLATION AND MAINTENANCE MANUAL 508982_N_PUB_DATE_20_JAN_2011.DOC 3.3. NAME PLATE The nameplate is located on the rear side of the machine (see fig.3.6., 3.7., 3.8., pos.8). 3.4. TECHNICAL SPECIFICATIONS 9kg (20lb), 11kg (24lb), 13kg (27lb) DRUM CAPACITY: 9kg (20lb) 11kg (24lb) 13kg (27lb) DIMENSIONS PACKING DIMENSIONS: Width Depth Height 880 mm / 34,64“ 885 mm / 34,84“ 1570 mm / 61,81“ 855 mm / 33,7“ 1100 mm / 43,3“ 1785 mm / 70,27“ 855 mm / 33,7“ 1190 mm / 46,85“ 1785 mm / 70,27“ MACHINE DIMENSIONS (1) Width Depth Height 795 mm / 31,29“ 815 mm / 32,08“ 1465 mm / 57,67“ 795 mm / 31,29“ 1070 mm / 42,12“ 1680 mm / 66,14“ 795 mm / 31,29“ 1160 mm / 45,66“ 1680 mm / 66,14“ DRUM DIMENSIONS: Diameter Depth Drum capacity Door opening 760 mm / 29,9“ 420 mm / 16,53“ 190 l 600 mm / 23,6“ 760 mm / 29,9“ 540 mm / 21,3“ 250 l 600 mm / 23,6“ 760 mm / 29,9“ 630 mm / 24,8“ 285 l 600 mm / 23,6“ 230 kg / 508 lb 240 kg / 530 lb 250 kg / 552 lb 265 kg / 585 lb WEIGHT WEIGHT: net gross 170 kg / 375 lb 180 kg / 397 lb ELECTRICAL DATA (MORE DETAILED INFORMATION, SEE TAB.4.4.) MOTOR POWERS: REVERSING MODEL: Drive motor (kW) Fan motor (kW) NON-REVERSING MODEL: Drive motor (kW) + fan motor (kW) ELECTRICAL SYSTEM OF THE MACHINE: Electrical heating 0,18 0,37 0,25 0,55 0,55 0,55 3x380-415V 50/60Hz 3x220-240V 50Hz 3x208-240V 60Hz 3x440V 60Hz 3x440V 60Hz 3x380-415V+N 50/60Hz 3x380-415V 50/60Hz 3x220-240V 50Hz 3x208-240V 60Hz 1x208-240V 60Hz 1x220-240V 50/60Hz Gas heating Steam heating not applicable for 9kg (20lb) 3x380- 415V 50/60Hz 3x220-240V 50Hz 3x208-240V 60Hz 3x440V 60Hz 1x220-240V 50Hz 1x208-240V 60Hz - CONSUMPTION Optimal air flow quantity (m3/h): See chapter 4.8. Tab.3.4. 508982_N_PUB_DATE_20_JAN_2011.DOC INSTALLATION AND MAINTENANCE MANUAL 7 DRUM CAPACITY: 9kg (20lb) 11kg (24lb) Equivalent resistance of exhaust duct (Pa): 13kg (27lb) See chapter 4.8. Exhaust piping diameter (mm) See chapter 4.8. HEATING Gas (G) Steam (S) Electrical (E) Gas (G) Electrical (E) Type of heating: ELECTRICAL MODELS (E) Heating element (kW): 9 kW / 12 kW 13,5 kW 18 kW Noise level (2) LAeq drying sequence 55 51 53 STEAM MODELS (S) Steam pressure (bar): 3 - 6 bar / 7 - 10 bar Steam output (kW)): (Steam output is flexible depending on steam pressure): - Steam plumbing (in): - G3/4“ Condense drain (in): - G3/4“ Noise level (2) LAeq drying sequence - 16,5 kW - 22 kW 19,5 kW - 27 kW 51 53 GAS MODELS (G) Gas connection: G3/4“ Gas heating output: Noise level (2) LAeq drying sequence 12,5 kW 16,5 kW 19,5 kW 58 51 53 WORKING CONDITIONS + 15°C to + 40°C Ambient temperature Average ambient temperature in 24 hrs Relative humidity Height above sea level Execution of internal protection up + 35°C 30% 90% without condensation up to 1000 m IP 43 Tab.3.4. continuation (1) maximum (2) 8 dimensions including protruding parts ISO 3744 INSTALLATION AND MAINTENANCE MANUAL 508982_N_PUB_DATE_20_JAN_2011.DOC 3.5. TECHNICAL SPECIFICATIONS 16kg (35lb), 24kg (53lb), 35kg (77lb) DRUM CAPACITY: 16kg (35lb) 24kg (53lb) 35kg (77lb) DIMENSIONS PACKING DIMENSIONS: Width Depth Height 855 mm / 33,7“ 1310 mm / 51,6“ 1785 mm / 70,27“ 1040 mm / 40,94“ 1320 mm / 51,96“ 2075 mm / 81,69“ 1040 mm / 40,94“ 1540 mm / 60,62“ 2075 mm / 81,69“ MACHINE DIMENSIONS (1) Width Depth Height 795 mm / 31,29“ 1280 mm / 50,39“ 1680 mm / 66,14“ 965 mm / 37,99“ 1270 mm / 49,99“ 1975 mm / 77,75“ 965 mm / 37,99“ 1490 mm / 58,66“ 1975 mm / 77,75“ 760 mm / 29,9“ 750 mm / 29,5“ 345 l 600 mm / 23,6“ 930 mm / 36,61“ 780 mm / 30,7“ 530 l 810 mm / 31,88“ 930 mm / 36,61“ 1000 mm / 39,36“ 680 l 810 mm / 31,88“ 275 kg / 606 lb 300 kg / 661 lb 305 kg / 673 lb 330 kg / 728 lb DRUM DIMENSIONS: Diameter Depth Drum capacity Door opening WEIGHT WEIGHT: net gross 250 kg / 552 lb 270 kg / 596 lb ELECTRICAL DATA (MORE DETAILED INFORMATION, SEE TAB.4.4.) MOTOR POWERS: REVERSING MODEL: Drive motor (kW) Fan motor (kW) NON-REVERSING MODEL: Drive motor (kW) + fan motor (kW) ELECTRICAL SYSTEM OF THE MACHINE: Electrical heating see the machine 11kg (24lb) 13kg (27lb) 0,55 see the machine 11kg (24lb) 13kg (27lb) 3x380-415V 50/60Hz 3x220-240V 50Hz, applicable for el. heating 30kW 3x208-240V 60Hz, applicable for el. heating 30kW 3x440V 60Hz 3x440V 60Hz 3x380-415V+N 50/60Hz 3x380-415V 50/60Hz 3x220-240V 50Hz 3x208-240V 60Hz 1x208-240V 60Hz 1x220-240V 50/60Hz see the machine 11kg (24lb) 13kg (27lb) 3x380- 415V 50/60Hz 3x220-240V 50Hz 3x208-240V 60Hz 3x440V 60Hz 1x220-240V 50Hz 1x208-240V 60Hz Gas heating Steam heating 0,25 0,55 CONSUMPTION Optimal air flow quantity (m3/h): See chapter 4.8. Tab.3.5. 508982_N_PUB_DATE_20_JAN_2011.DOC INSTALLATION AND MAINTENANCE MANUAL 9 DRUM CAPACITY: 16kg (35lb) 24kg (53lb) Equivalent resistance of exhaust duct (Pa): 35kg (77lb) See chapter 4.8. Exhaust piping diameter (mm) See chapter 4.8. HEATING Gas (G) Steam (S) Electrical (E) Type of heating: ELECTRICAL MODELS (E) Heating element (kW): 24 kW Noise level (2) LAeq drying sequence 53 30 kW / 36 kW 36 kW / 48 kW 60 STEAM MODELS (S) Steam pressure (bar): Steam output (kW)): (Steam output is flexible depending on steam pressure): 3 - 6 bar / 7 - 10 bar 22 kW - 32 kW 27 kW - 36,2 kW Steam plumbing (in): G3/4“ Condense drain (in): G3/4“ Noise level (2) LAeq drying sequence 53 39,3 kW - 52,7 kW 60 GAS MODELS (G) Gas connection (in): Gas heating output (kW): Noise level (2) LAeq drying sequence G3/4“ 25kW (G110-22,5kW) 33kW / 39kW (G110-33kW) 53 46kW /50kW (G110-46kW) 60 WORKING CONDITIONS Ambient temperature Average ambient temperature in 24 hrs Relative humidity Height above sea level Execution of internal protection + 15°C to + 40°C up + 35°C 30% 90% without condensation up to 1000 m IP 43 Tab.3.5. continuation (1) maximum (2) 10 dimensions including protruding parts ISO 3744 INSTALLATION AND MAINTENANCE MANUAL 508982_N_PUB_DATE_20_JAN_2011.DOC 3.6. DIMENSIONS, COMPONENTS AND CONNECTIONS OF THE MACHINE 9kg (20lb) GAS HEATING ELECTRICAL HEATING Fig.3.6. Dimensions and components of the machine 508982_N_PUB_DATE_20_JAN_2011.DOC INSTALLATION AND MAINTENANCE MANUAL 11 3.7. DIMENSIONS, COMPONENTS AND CONNECTIONS OF THE MACHINES 11kg (24lb), 13kg (27lb) AND 16kg (35lb) STEAM HEATING GAS HEATING ELECTRICAL HEATING Fig.3.7. Dimensions and components of the machines 12 INSTALLATION AND MAINTENANCE MANUAL 508982_N_PUB_DATE_20_JAN_2011.DOC DRYER CAPACITY A mm / inch B mm / inch C mm / inch 11kg (24lb) 990 / 38,97 1070 / 42,12 762 / 30 13kg (27lb) 1080 / 42,51 1160 / 45,66 852 / 33,54 Tab.3.7. 16kg (35lb) 1200 / 47,24 1280 / 50,39 972 / 38,26 3.8. DIMENSIONS, COMPONENTS AND CONNECTIONS OF THE MACHINES 24kg (53lb), 35kg (77lb) STEAM HEATING GAS HEATING ELECTRICAL HEATING Fig.3.8. Dimensions and components of the machines 508982_N_PUB_DATE_20_JAN_2011.DOC INSTALLATION AND MAINTENANCE MANUAL 13 DRYER CAPACITY mm / inch A B mm / inch C mm / inch 24kg (53lb) 868 / 34,17 1270 / 50 753 / 29,64 Tab.3.8. 35kg (77lb) 1088 / 42,83 1490 / 58,66 973 / 38,30 Legend 1. Programmer 2. Lock of the control panel 3. Emergency stop button (not applicable for version with coin meter) 4. Lint screen cover 5. Door lock microswitch 6. Lint cover microswitch 7. Lint screen 8. Name plate 9. Main switch 10. Main power supply 11. Heating chamber 12. Gas valve (G models only) 13. Pressure regulator (G models only) 14. Gas supply (G models only) 15. Airflow switch 16. Suction 17. Exhaust piping 18. Coin meter (version with coin meter) 19. Coin box (version with coin meter) 20. Steam supply 21. Condense drain 22. Serial number of the machine 14 INSTALLATION AND MAINTENANCE MANUAL 508982_N_PUB_DATE_20_JAN_2011.DOC 4. INSTALLATION ! WARNING! TO ACHIEVE A FAILURE-FREE OPERATION, THE DRYER MUST BE CORRECTLY BUILT IN ACCORDING TO THIS INSTALLATION MANUAL. ANY CHANGES IN THE INSTALLATION NOT DESCRIBED IN THIS INSTALLATION MANUAL MUST BE APPROVED BY THE SUPPLIER OR MANUFACTURER OF THE DRYER. TYPE OF THE MACHINE Before you start the installation, check the type of your dryer and electrical connection according to the name plate placed on the rear side of the machine (see fig. 3.6., 3.7., 3.8., pos. 8). FOR MACHINES WITH GAS HEATING ! WARNING! BEFORE INSTALLATION OF THE APPLIANCE MAKE SURE THAT LOCAL CONDITIONS OF GAS SUPPLY, PROPERTIES OF GAS, ITS OVERPRESSURE AND SETTING OF THE APPLIANCE ARE COMPATIBLE. Check the following information on the name plate: country of destination, pressure and kind of gas, (See appendix 530762). FOR MACHINES WITH STEAM HEATING ! WARNING! BEFORE MACHINE INSTALLATION MAKE SURE, THAT THE STEAM PRESSURE IS IN ACCORDANCE WITH THE VALUE MENTIONED ON THE NAME PLATE AND DOES NOT EXCEED MAXIMUM PERMITTED STEAM PRESSURE IN ANY CASE. 4.1. MANIPULATION AND UNPACKING DURING TRANSPORT ! WARNING! FORKS OF HIGH LIFTING TRUCK MUST HAVE SUFFICIENT LENGTH (SEE FIG.4.1). Use a lift truck or a manual skid cart for handling with the machine in transporting package. –The ambient temperature of transportation and storage must be between -25°C and +55°C. The machine is not designed to be placed in an environment where it can come into contact with splashing or spraying water. Do not store the machine where it can be subject to environmental conditions (rain, wind) or extreme humidity. When moisture condensates on the machine due to a sudden temperature change, water must not run over the walls and covers of the machine nor to cover the floor under and around it. Fig.4.1. Minimum length „X“ of lift truck forks DRYER CAPACITY 9kg (20lb) X [mm] 850 508982_N_PUB_DATE_20_JAN_2011.DOC 11kg (24lb) 13kg (27lb) 16kg (35lb) 24kg (53lb) 35kg (77lb) 1200 1250 Tab.4.1. 1400 1300 1400 INSTALLATION AND MAINTENANCE MANUAL 15 HANDLING DURING INSTALLATION All activities can be done only by a worker, which knows all information about the machine. Machine is delivered to the customer on a wooden palette and protected with polyethylene film. The machine is attached to the skid by means of four bolts (M10), machine 9kg (20lb) - two bolts. To remove the machines to its final location follow these precautions: –All passages and spaces the machine has to be transported through at installation should be reasonably dimensioned to meet the height and width of the machine including the package. –Make sure that the filling door is secured to avoid its opening during the handling. –Lift the machine up by lift truck together with a transport skid to which the machine has been attached. UNPACKING –After unpacking, check if the machine has not been damaged and if all the accessories are included according to your order. The accessories and the manuals are located inside the drum. –Before the machine locating to its place, remove the packaging. Machine positioning, see chapter „4.3. MACHINE POSITIONING ON THE FLOOR“. 4.2. WORKSTATION REQUIREMENTS WORKING CONDITIONS OF THE MACHINE See chapter „3.4., 3.5. TECHNICAL SPECIFICATION“. The machine is not designed to be placed in an environment where it can come into contact with splashing or spraying water. Do not install the machine where it can be subject to environmental conditions (rain, wind) or extreme humidity. When moisture condensates on the machine due to a sudden temperature change, water must not run over the walls and covers of the machine nor to cover the floor under and around it. The manufacturer is not responsible for machine corrosion caused by non-fulfilment of determined air ventilation in the room (i.e.: vapours, invasive chemical elements or dry cleaning process). REQUIRED ROOM DIMENSIONS The machine dimensions are stated in chapter „3.4., 3.5. TECHNICAL SPECIFICATION“. Leave at least 0,6m / 1,9ft (0,9m / 3 ft recommended) of a space between the dryer rear and the wall for the maintenance access. Between the lateral sides of each machine leave a minimum space of 0,02m / 0,07ft. A minimum 0,5m / 1,6ft of free space must be above the machine for maintenance access. Be aware that there may be local codes and safety precautions, which the installation must be complied with. To reduce the risk of serious injury in Laundromats, install lockable door(s) to prevent public access to rear of dryers. ! WARNING! KEEP DRYER AREA CLEAR AND FREE FROM GASOLINE, COMBUSTIBLE MATERIALS, AND OTHER FLAMMABLE VAPOURS AND LIQUIDS. ! WARNING! DO NOT BLOCK THE AIRFLOW ON THE REAR OF THE DRYER. DOING SO WOULD PREVENT ADEQUATE AIR SUPPLY TO THE COMBUSTION CHAMBER OF THE DRYER. ! WARNING! DO NOT BLOCK THE EXHAUST AIRFLOW AT THE REAR OF THE DRYER. 16 INSTALLATION AND MAINTENANCE MANUAL 508982_N_PUB_DATE_20_JAN_2011.DOC Fig.4.2. Required room dimensions Minimum dimension 9kg (20lb) 11kg (24lb) 13kg (27lb) 16kg (35lb) 24kg (53lb) 35kg (77lb) A B C D*) 2 600 mm 20 mm 500 mm 0,06 m 0,07 m2 0,09 m2 0,11 m2 0,14 m2 0,16 m2 Tab.4.2. *) Minimum opening area needed for make-up air for 1 dryer. If it is not feasible to provide the required opening, forced air access must be arranged in appropriate amount (see chapter 4.8.). 4.3. MACHINE POSITIONING ON THE FLOOR The dryer must be installed on a level floor capable of supporting 450 kg/m². Floor covering materials such as carpeting must be removed. To assure compliance, consult local building code requirements. POSITION AND LEVEL THE MACHINE Unscrew the four shipping bolts, machine 9kg (20lb) - two shipping bolts, (one at each corner). Pull the dryer out of the skid on two canned lengthwise timbers such way, that a pair of front and rear levelling legs can be mounted on the dryer bottom. Mount the levelling legs including safety nut. Blind the holes of shipping bolts by the plug. The dryer can be slightly tilted forward or backwards for easy mounting. Use the lift truck for locating the dryer to its position. Place the dryer on two canned lengthwise timbers again. Remove timbers out of the dryer initially by lifting/tilting one side of the machine and then by the other side of the machine. Place the machine on the floor. Adjust the levelling legs so as the dryer was in horizontal position. Check the correct positioning with a water level placed on a machine top. The dryer must not sway. LOCK LEVELLING LEGS WITH SAFETY NUTS INSTALLED IN ADVANCE. ! WARNING! KEEP DRYER AS CLOSE TO FLOOR AS POSSIBLE. DRYER MUST REST FIRMLY ON FLOOR SO WEIGHT OF DRYER IS EVENLY DISTRIBUTED. 508982_N_PUB_DATE_20_JAN_2011.DOC INSTALLATION AND MAINTENANCE MANUAL 17 4.4. ELECTRICAL CONNECTION ! WARNING! THE MACHINE MUST BE CONNECTED TO THE POWER, GROUND, VENTILATION AND STEAM, GAS SUPPLY ACCORDING TO THE INSTALLATION MANUAL, IN COMPLIANCE WITH THE VALID LOCAL STANDARDS DONE BY QUALIFIED TECHNICIANS WITH PROPER AUTHORIZATION. THE VALID STANDARDS FOR CONNECTING TO THE LOCAL POWER NETWORK (TT / TN / IT...) MUST BE FOLLOWED. THE DRYER IS INTENDED TO BE PERMANENTLY CONNECTED TO THE ELECTRICAL SUPPLY. CONNECTION TO ELECTRICAL NETWORK The machines have been designed for connecting to the electrical network according to the specifications of your order. Before connection check if the electrical values stated on the serial plate of the machine correspond to your electrical network. If not do not connect the machine, please contact your dealer. If the machine is not equipped with a supply disconnecting device, like a main switch then a supply disconnecting device need to be provided in the installation for all electrical supplies connected to the machine, in accordance with EN 60204-1 standard, point 5.3. This device shall disconnect the electrical equipment of the machine from the supply when required e.g. maintenance. EMERGENCY STOP DEVICE The machines are equipped with an emergency stop device in accordance with ISO13850 - category 0 stop function. Nevertheless, the emergency stop device is omitted on machines design for coin, token, external payment system or similar operation for use in self-service situation. The owner-installer-user must provide remote-located emergency stop device(s). This emergency stop device(s) needs to stop each machine in accordance with ISO13850 - category 0. There are made provisions in the wiring harness, were immediate removal of power to the actuators can be accomplished. See the electrical schematic of the machine for correct connection of the device. 1. Phase conductors 2. Protection conductor 3. Power supply breaker 4. Machine 5. Laundry switchboard 6. Main switch = supply terminal board Fig.4.4 A. 3-phase machine connection to electrical network 18 INSTALLATION AND MAINTENANCE MANUAL 508982_N_PUB_DATE_20_JAN_2011.DOC CONNECTION OF MACHINE WITH A LAUNDRY ROOM EARTH LEAKAGE TRIP In order to increase the safety of operators and service men during work and maintenance on the machine, producer recommend to mount an earth leakage trip in the laundry room switchboard, with an equipped current 30 mA. Main contacts of the earth leakage trip must correspond to the stated power supply. The earth leakage trip connection and machine connection to such a network is shown on fig.4.4.B. 1. Phase conductors 2. Protection conductor 3. Power supply protection 4. Machine 5. Laundry switchboard 6. Main switch = supply terminal board 7. Earth leakage trip (see tab.4.4.A.) Fig.4.4.B. 3-phase machine connection to electrical network ! WARNING! IF IN THE PLACE OF INSTALLATION THE STANDARD EN 60519 OBSERVANCE IS REQUIRED, THE MACHINE MUST BE CONNECTED VIA AN EARTH LEAKAGE TRIP. IMPORTANT! CHECK THE SENSE OF IMPELLER MOTOR REVOLUTIONS. The motor must revolve in indicated direction. See the arrow above the motor. Should the motor turn in opposite direction the machine will not work properly. The impeller can not create the required airflow in such a case. In case of wrong motor revolutions replace the phases L1-L2. 508982_N_PUB_DATE_20_JAN_2011.DOC INSTALLATION AND MAINTENANCE MANUAL 19 IMPORTANT! MACHINES WITH GAS HEATING: CHECK IF PHASE - L AND NEUTRAL CONDUCTOR - N WERE NOT SWITCHED OVER. IN CASE IT WAS SWITCHED OVER THE SPARK AUTOMATICS WILL NOT WORK! SUPPLY CABLE AND PROTECTION Use a cable or cord with copper conductors to connect the machine to the electrical network. Supply cable cross section depends on the dryer's type of heating and total power consumption. Protection of the cable against a short circuit or over load must be done with fuses or breakers in the laundry room switchboard. Recommended cross sections of supply cables and fuse values for their guarding for various types of machines are stated in tab.4.4. CABLE PREPARATION ! WARNING! THE PROTECTIVE CONDUCTOR MUST BE LONGER SO THAT WHEN THE CABLE IS PULLED OUT ACCIDENTALLY, THIS CONDUCTOR IS DISCONNECTED AS THE LAST ONE! When using the cable (hard copper conductors), strip the individual cores in such a way to avoid the protrusion of a stripped part from the terminal when the conductor is connected into the device (fig.4.4.C.,pos.8 - dimension X). When using a cord (stranded copper conductors) the individual cores can be stripped in a similar way as in the case of a cable, or moulded tubes (7) can be used. In this case use tubes with an insulated neck to avoid any contact to a part under current after the conductor connection. Fig.4.4 C - Supply cable preparation 1. Green-yellow protection conductor 2. Black-phase conductor 3. Brown-phase conductor (3 phase execution) 4. Blue-neutral conductor (single phase execution) 5. Black-phase conductor (3 phase execution) 6. Blue-neutral conductor (3 phase gas heating execution) 7. The neck of the moulded tube must be insulated to avoid any contact to a part under current (conductor) when the main switch is disconnected 8. The stripped length of the conductors must not protrude from the main switch terminal (supply switchboard) SUPPLY CABLE ATTACHMENT The cable can be attached to the machine in two ways: –From a cable channel (from below) –From a cable grate (from above) –If the cable is attached from above it is recommended to ensure the cable sagging in front of the entry into the cable bushing (see fig. 4.4.D). In this way any running condensed water into the bushing and/or machine can be avoided –Connection of the machine with aid of a plug for connection to power supply plug-in distribution network is also possible MECHANICAL CABLE SECURING When the cable is threaded through the bushing (2), tighten the sealing nut of the bushing. In this way the rubber ring in the bushing is pressed, thus securing the cable mechanically and against the water. Provided that this mechanical sealing is insufficient, use the securing clamp (3). 20 INSTALLATION AND MAINTENANCE MANUAL 508982_N_PUB_DATE_20_JAN_2011.DOC CONNECTION POINT The supply cable is connected to the main switch of the machine (1). The phase terminals are identified by U, V, W or L(L1) and A(L2). Connect the protection conductor directly to the protection terminal located on the internal side of the left stand of the machine. The terminal is identified by PE. 1. Main switch 2. Cable bushing 3. Securing clamp 4. External protective terminal 5. Internal protective terminal Fig.4.4.D. Main power supply connection LAUNDRY ROOM PROTECTIVE MACHINE CONNECTION For safety reasons it is necessary to connect the machine to the laundry protection system. The external protective terminal of the machine (M6) located on the rear part of the machine bottom (fig.4.4.E-pos.4) serves for this purpose and it is marked with an earthing mark. The protection conductor enabling this connection is not part of the delivery with the machine. The protection conductor cross section must at least correspond to the figures described in tab.4.4.A. However, for protection purposes, with a supply cable cross section below 2,5 mm2 we recommend to select a larger conductor cross-section at least 4 mm2. The protective connection and earthing of machines prevents unfavourable effects of static electricity which may adversely affect the machine operation. Fig.4.4.E. Protective machine connection 1. Machine (rear view) 2. Room protective connection 3. Machine external protective terminal 4. Protective conductor – machine connection 5. Earthing mark IF THE MACHINE PROTECTIVE CONNECTION IS NOT ALLOWED BY YOUR NATIONAL (LOCAL) STANDARDS, YOU MUST EARTH THE MACHINES ACCORDING TO YOUR VALID STANDARDS. 508982_N_PUB_DATE_20_JAN_2011.DOC INSTALLATION AND MAINTENANCE MANUAL 21 Tab.4.4. 22 INSTALLATION AND MAINTENANCE MANUAL 508982_N_PUB_DATE_20_JAN_2011.DOC 4.5. GAS CONNECTION FOR GAS HEATING ! WARNING! BEFORE INSTALLATION, CHECK THAT THE LOCAL DISTRIBUTION CONDITIONS, QUALITY OF GAS AND PRESSURE AND THE ADJUSTMENT, ARE COMPARABLE. IT IS OBLIGATORY, THAT THE GAS INSTALLATION AND ITS LATER REPAIRS MUST BE DONE BY AN AUTHORIZED ORGANIZATION. ALL USED INSTALLATION MATERIAL (PRESSURE REDUCING VALVE, HAND OPERATED VALVE, ETC.) MUST COMPLY WITH THE STANDARDS VALID IN THE COUNTRY WHERE THE MACHINE IS BEING USED. The dryers are designed to use the following gas, which is indicated on the nameplate (see fig. 3.6., 3.7., 3,8., pos. 8). It is not allowed to use other kinds of gas. For each type of machine and corresponding gas corresponding nozzle and gas pressure must be used. The scheme showing these parameters is a part of tab.4.5.A., 4.5.B, and appendix 530762. Generally it is not allowed to install gas machines in cellars (basements) as well as in rooms, which cannot be ventilated properly (see chapter 4.2.). It is necessary to consult it with the gas supplier. The machine has to be installed in compliance with the appropriate country's standards. To increase gas appliance safety, it is necessary to install a gas escape detector near the machine. IT IS OBLIGATORY TO PLACE IN ROOM AN EASILY ACCESSIBLE AND EASILY VISIBLE POWDER FIRE EXTINGUISHER OF 12-KILOGRAMS AT LEAST. The installing company must carry out the machine connection to the gas source. Leading for the gas connection is located on the backside of the each dryer. The dimensions of this connection can be seen on figures 3.6., 3.7., 3.8. ! WARNING! NEVER CHANGE THE USED PRESSURES, TYPE OF NOZZLES, NOZZLE'S DIAMETERS OR THE TYPE OF GAS BY YOURSELF. YOU COULD CAUSE SERIOUS DAMAGES. THE MANUFACTURER DECLINES ALL RESPONSIBILITY IN SUCH CASES. ONLY FOR MACHINE WITH GAS VALVE WITHOUT PRESSURE REGULATOR For ensuring these correct pressures, install an outer pressure reduction valve near each machine, which adapts the pressure in the pipe to an operating pressure. The machine is not provided with this valve. It is important to keep equal pressure at all dryer gas connections. FOR ALL MACHINES Install upstream of each dryer a manually operated gas shut-off valve on an easily accessible place, so that the guiding length from the valve to the machine connecting is less than 2 m. Install a dirt and water vapour pipe trap per each dryer gas supply. 1. Gas line to dryer controls 2. Plug 3. Gas supply piping system 4. Gas „T“ fitting 5. Gas pipe cap 6. Dirt and water vapour trap 7. Shut-off valve 152 mm (6 in.) MINIMUM GAS PIPE Fig.4.5. Dirt and vapour pipe trap installation Install a pressure gauge between the pressure reduction valve and the manual valve to verify the used gas or a valve with a pressure gauge and a protecting push button for subtracting. The conduit between the manual valve and the machine must be solid with sufficient gas flow needed for each machine and must always be provided with leak proof sealing material which is resistant against used gases. ! WARNING! IT IS NECESSARY TO VERIFY AIR-TIGHTNESS ON ALREADY EXECUTED JOINTS. DO NOT START THE MACHINE IF THE SUPPLIED GAS OR USED PRESSURE DOES NOT COMPLY WITH THE TECHNICAL DATA ON THE MACHINE NAME PLATE. TO ENSURE GAS EXHAUST AIR OUT, VERIFY THE TURNING DIRECTION OF THE VENTILATOR. 508982_N_PUB_DATE_20_JAN_2011.DOC INSTALLATION AND MAINTENANCE MANUAL 23 Data are shown in appendix: code 530762 Tab.4.5.A Instruction - Dryers - Gas - Nozzles 24 INSTALLATION AND MAINTENANCE MANUAL 508982_N_PUB_DATE_20_JAN_2011.DOC Data are shown in appendix: code 530762 Tab.4.5.B Instruction - Dryers - Gas - Nozzles 508982_N_PUB_DATE_20_JAN_2011.DOC INSTALLATION AND MAINTENANCE MANUAL 25 4.6. CONVERSION TO ANOTHER GAS ! WARNING! GAS INSTALLATIONS AND THEIR POSSIBLE REPAIRS MUST BE CARRIED OUT BY AUTHORISED COMPANY. ALL USED INSTALLATION MATERIAL / E.G. REDUCTION VALVE, MANUAL VALVE / AND THE EXECUTED GAS INSTALLATION MUST CORRESPOND TO THE VALID REGULATIONS IN THE COUNTRY WHERE THE MACHINE OPERATES. BEFORE DOING ANY CONVERSION CLOSE THE SHUT OFF VALVE, DO NOT SMOKE OR HAVING OTHER ELECTRICAL APPLIANCES WORKING. PROVIDE AS MUCH AS POSSIBLE AERATION OF THE ROOM. ANY OTHER GAS CLASSIFICATIONS, TYPES, GAS PRESSURE OR DIFFERENT GAS COMBINATIONS NOT MENTIONED IN APPENDIX 530762 ARE NOT ALLOWED AND THE MANUFACTURER REFUSES ALL THE RESPONSIBILITY IN SUCH CASES. –Check with the gas supplier which type of gas is supplied and under which pressure. Check the gas pressure in front of the machine. –Check if the gas type and pressure match with the data mentioned on the name plate. –Gas appliances are approved (CE approval), see information on the name plate. –If the data are identical, there is no need to execute any action. If not, proceed according to one of the following options: 4.6.1. OPTIONS FOR CONVERSION TO ANOTHER GAS 4.6.1.1. YOUR REQUIRED CATEGORY OF APPLIANCE (SEE APPENDIX 530762) FOR YOUR COUNTRY CORRESPONDS / DOES NOT CORRESPOND WITH CATEGORY AND COUNTRY MENTIONED ON THE NAME PLATE (FOR USE IN EU COUNTRIES GOVERNED BY THE GAS APPLIANCE DIRECTIVE) To make this change you will need a right nozzle, a covering plug and a label for the gas conversion: 1. Find out a right nozzle: – See appendix 530762. According to capacity and power of dryer, country of destination, your requested category and gas find out which nozzle diameter and which nozzle pressure you need to use. 2. Find out a necessity to use a covering plug: – See appendix 530762. According to capacity and power of dryer, country of destination, your requested category and gas find out if a pressure regulator is allowed. If not, you have to remove the pressure regulator in the gas valve and replace it by a covering plug. 3. Find out a right label for conversion: – See appendix 530762. According to the language of the country in which the machine is installed, find out a needed code label. Language of the label has to correspond to a spoken language in the country of destination. Using non-corrosive liquid for testing the conduit, check if the conduit is in order and leakproof after every adjustment. Check the pressure with all other gas appliances running. Stick a new label for the gas conversion in the relevant language next to the name plate and fill it in according to appendix 530762. (the values mentioned in line for your requested country of destination, category, gas and pressure gas). ! WARNING! CROSS OUT ITEMS ON THE NAME PLATE RELATED TO CATEGORY, TYPE OF GAS, GAS PRESSURE AND GAS CONSUMPTION! 4.6.1.2. COUNTRY WITH APPLIANCE CATEGORY IS NOT MENTIONED IN APPENDIX 530762 (NOT FOR USE IN EU COUNTRIES GOVERNED BY THE GAS APPLIANCE DIRECTIVE) To make this change you will need right nozzle and label for the gas conversion: 1. Find out a right nozzle: – See appendix 530762. According to capacity, power of dryer and gas, find out which nozzle diameter and which nozzle pressure you need to use. 2. Find out a right label for conversion: – See appendix 530762. According to the language of the country in which the machine is installed, find out a needed code label. If the language corresponding to the country of destination is not mentioned, use a label with English text. Using non-corrosive liquid for testing the conduit, check if the conduit is in order and leakproof after every adjustment. Check the pressure with all other gas appliances running. Stick a label for the gas conversion in the relevant language next to the name plate and fill it in according to appendix 530762 (the values mentioned in the line for your requested gas and gas pressure). 26 INSTALLATION AND MAINTENANCE MANUAL 508982_N_PUB_DATE_20_JAN_2011.DOC ! WARNING! CROSS OUT ITEMS ON THE NAME PLATE RELATED TO CATEGORY, TYPE OF GAS, GAS PRESSURE AND GAS CONSUMPTION! In case of any ambiguity contact your dealer, service technician or the manufacturer. 4.6.2. PROCEDURE FOR THE GAS CONVERSION (ALWAYS USE ONLY THOSE ITEMS WHICH RESULT FROM OPTIONS MENTIONED IN CHAPTER 4.6.1. OPTIONS FOR CONVERSION TO ANOTHER GAS) Bellow you will find procedure for version with replacement of regulator, nozzle, setting of pressure on the nozzle: 1. Turn off the main switch, close inlet shut off valve, (fig.4.5., pos.7) 2. Remove rear upper cover from the machine. 3. Replacement of nozzle: –Disconnect inlet pipeline from the machine. –Unscrew the bolts fixing the gas valve to the holder (fig.4.6.2., pos.3). –Remove the valve out of machine. Replace the nozzle (fig.4.6.2., pos.5). Size of nozzle according to appendix 530762. –Install the valve back. Connect gas inlet pipeline. 4. Replacement of the gas regulator, or possibly covering plug (plug code: 102019 - in case of requirement of appendix 530762). –Unscrew the regulator from the gas valve (fig.4.6.2., pos.7) or covering plug (fig.4.6.2., pos.10) and install the plug (or regulator - part of the machine supply). –When the plug is installed, the inlet gas pressure and nozzle must correspond with the value mentioned in appendix 530762 for the given type of gas. –When the gas regulator is installed, set required pressure on the nozzle with the machine running, using manometer (fig.4.6.2., pos.8 and 9) according to appendix 530762. ! WARNING! IF THERE ARE TWO GAS VALVES ON THE MACHINE, THE REQUIRED PRESSURE WILL BE SET ON BOTH VALVES. REQUIRED PRESSURE MUST BE EQUAL! ! WARNING! AFTER ANY INTERVENTION INTO THE GAS PIPELINE OF THE MACHINE, NEVER FORGET TO EXECUTE LEAKPROOF TESTING. NEVER USE OPEN FIRE FOR LEAKPROOF TESTING. 5. Install the rear upper cover back. 6. Turn on the main switch, open inlet shut off valve. 7. Start the machine and let it run one whole cycle. 8. Stick the label for conversion, fill it in, adapt the name plate, see chapter 4.6.1. OPTIONS FOR CONVERSION TO ANOTHER GAS. 1. Gas valve 2. Gas supply pipe line 3. Gas valve holder 4. Sheet metal with opening 5. Injector 6. Screw joint of injector 7. Pressure regulator 8. Required pressure as specified in appendix 530762 9. Manometer 10. Cover in case of non-regulated execution Fig.4.6.2. Gas shut off valve INFLUENCE OF HEIGHT To ensure complete combustion at higher height, the power is decreased by 5% per each 500m above sea level. Injector (nozzle) has to be adapted according to this decreased power starting from above 1000m above sea level. Consult the problem with manufacturer in such a case. 508982_N_PUB_DATE_20_JAN_2011.DOC INSTALLATION AND MAINTENANCE MANUAL 27 4.7. STEAM CONNECTION FOR STEAM HEATING The dryer with a steam heating is equipped with two pipe connections for connecting the steam supply and steam return lines. For the position of connections see fig. 3.6., 3.7., 3.8. Only the person with relevant authorization can carry out the installation of the steam supply. For the scheme of the steam supply and condensate return see fig.4.7. The value of inlet steam pressure must correspond to the range stated in chapter „3. TECHNICAL INFORMATION“. Any other pressure values may cause an improper or insufficient function of a dryer. ! WARNING! BY EXCEEDING THE MAXIMUM PRESSURE ONE CAN BE SERIOUSLY WOUNDED OR EVEN KILLED! WHEN CONNECTING STEAM PIPE LINE, FOLLOW THE DIRECTIONS AND BE VERY CAREFUL TO AVOID DAMAGE OF THE MACHINE (STEAM EXCHANGER)! ! WARNING! BEFORE EVERY STEAM VALVE IT IS NECESSARY TO INSERT THE FILTER WITH PERMEABILITY UP TO 300 MICROMETERS. POSSIBLE DIRT BIGGER THAN 300 MICROMETERS MIGHT DAMAGE THE STEAM VALVE AND CAUSE ITS LEAKAGE. Connect the steam installation according to the scheme to pertinent connection points on the rear side of the machine. Fig.4.7. Scheme of steam lines 1. Dryer 7. Check valve 2. Steam supply inlet 8. Trap with built-in strainer 3. Steam outlet 9. Vacuum breaker 4. Flexible hose for connecting the dryer to supply 10. Condensate return line from steam supply line and return lines 11. Steam return line 5. Solenoid valve (part of delivery) 12. Steam supply line 6. Filter (part of delivery) 13. Manual steam shut-off valve Sizes and types of steam fittings are sized by designer of the room (laundry). 4.8. EVACUATION SYSTEM 4.8.1. FRESH AIR For maximum efficiency and the shortest possible drying time, it is important to ensure that fresh air is able to enter the room from the outside in the same volume as that blown out of the room. The area of the required opening is shown in tab.4.2. To avoid draught in the room it is recommended to place the air inlet behind the dryer. Note that gratings/slatted covers often block half of the total fresh area. Remember to take this into account. 28 INSTALLATION AND MAINTENANCE MANUAL 508982_N_PUB_DATE_20_JAN_2011.DOC ! WARNING! DO NOT OBSTRUCT THE FLOW OF COMBUSTION AND VENTILATION AIR! CONSULT AN ARCHITECT TO DETERMINE EXHAUST AND AIR SUPPLY POSITION ACCORDING THE LOCAL VALID STANDARD CODES. 4.8.2. EXHAUST DUCT ! WARNING! THE DIAMETER OF EXHAUST DUCT MUST NOT BE SMALLER THAN AN OUTLET OF THE DRYER AT ANY CASE. The dryer produces combustible lint and in case of gas heating toxic gas. To reduce a risk of fire and health problems, the dryer must be exhausted to the outdoors by means of exhaust duct. Exhaust piping is on the rear part of dryer, see fig. 3.6., 3.7., 3.8., pos.17. The manufacturer recommends exhausting each dryer individually to the outdoors. The design of the flue system shall be such that any condensate formed when operating the appliance from cold shall either be retained and subsequently re-evaporated or discharged. If possible, do not install dryers and gas fired hot water heaters or the other gravity vented appliances in the same room. In the spot, where exhaust duct goes through combustible wall or sealing, it is necessary to make an opening 10cm bigger than the duct and place the exhaust duct in the middle of the opening. Gap between combustible wall and duct must be sealed with non-combustible material. The exhaust duct must be smooth on the inside (low air resistance). Do not use sharply curved elbows of 90° for outlet piping. Use galvanized sheet metal plates for ventilation system. Before installation of a new dryer verify that the existing duct to be connected to the dryer is thoroughly cleaned. If not, do so. Fig.4.8.2.A. Pipe connections Maximum back static pressure - resistance of exhaust system is shown in tab.4.8.2. Dryer type 9kg (20lb) E 9kg (20lb) G 11kg (24lb) E/G/S 13kg (27lb) E/G/S 16kg (35lb) E/G/S 24kg (53lb) E/G/S 35kg (77lb) E/G/S p Maximum back static pressure - resistance of exhaust system [Pa] 200 125 220 240 260 260 300 Tab.4.8.2. Leave distance of 1m at least between the roof and the exhaust duct overfall (see fig.4.8.2.B., dimension L min). Exhausting air should not point to wall, ceiling or other part of the building. The exhaust must be protected against wind, rain and foreign objects. 508982_N_PUB_DATE_20_JAN_2011.DOC INSTALLATION AND MAINTENANCE MANUAL 29 L min. 1,1 m / 3,5 ft ACCEPTABLE WIND WIND OR UNACCEPTABLE WIND WIND Fig.4.8.2.B. Individual exhaust duct THE FIGURES AND DISTANCES ABOVE ARE FOR REFERENCE ONLY. LOCAL BUILDING CODES CONCERNING AIR SUPPLY AND OUTLET OF FURNACES IN BUILDINGS SHOULD BE RESPECTED AND CONSULTED WITH AN ARCHITECT. 4.8.3. MANIFOLD VENTING Even thought an individual exhausting for each dryer to the outdoors is preferred a common manifold venting can be used. In this case the minimum diameter of ventilation piping must comply with tab.4.8.3. If a combination of dryers with different outlet diameter is used, see to it that speed is constant over the complete exhaust. You will gain such a condition by increasing the area of the common duct with the area of duct of each additional dryer. Dryer type Number of dryers Diameter (mm) 9kg (20lb), 11kg (24lb), 13kg (27lb), 16kg (35lb) 24kg (53lb), 35kg (77lb) 1 2 3 4 5 6 7 D1 D2 D3 D4 D5 D6 D7 150 200 283 346 400 447 490 Tab.4.8.3. Manifold venting minimum diameter 30 INSTALLATION AND MAINTENANCE MANUAL 508982_N_PUB_DATE_20_JAN_2011.DOC Fig.4.8.3. Manifold venting for range of dryers Manifold venting system requires provisions for lint removal and duct cleaning. Never connect the dryer duct at a 90° angle to the common manifold venting system otherwise the increase of back pressure is caused resulting in low performance. Improperly sized or assembled exhaust ventilation system causes excess of back pressure which results in slower drying, lint accumulation in the duct and increased risk of fire. Place the dryers according their required flow rate so that the pipe diameter increases according to this flow rate. 4.8.4. OPTIMAL FLOW RATE ADJUSTMENT ! WARNING! RISK OF INJURY BY ELECTRIC SHOCK! TECHNICAL INTERVENTION ON THE DRYER IS ONLY FOR QUALIFIED TECHNICIANS WITH SUFFICIENT TECHNICAL KNOWLEDGE OF THE MACHINE. 1. Remove the rear cover. Flow rate adjustment is carried out by measuring the static pressure at the point of the underpressure clutch. Opening for static pressure measurement is covered by a tape, see fig.4.8.4.B. 2. During measuring use a program without heating and without linen in the drum. 3. Pressure is decreased or increased by opening or closing the restrictor, see fig. 4.8.4.A. 4. The optimal air flow is reached when measured static pressure corresponds to the values in tab 4.8.4. 5. Mount the rear cover back on the machine. Fig.4.8.4.A 508982_N_PUB_DATE_20_JAN_2011.DOC Fig.4.8.4.B INSTALLATION AND MAINTENANCE MANUAL 31 QOPT p Optimal air flow Static pressure quantity [m3/h] [Pa]* 9kg (20lb) E 300 -30 9kg (20lb) G 350 -30 520 -40 11kg (24lb) E/G/S 13kg (27lb) E/G/S 550 -40 600 -40 16kg (35lb) E/S 600 -50 16kg (35lb) G 950 -20 24kg (53lb) E/S 900 -30 24kg (53lb) G 1200 -20 35kg (77lb) E/S 1100 -30 35kg (77lb) G Tab.4.8.4. Air flow specification * Do not confuse static pressure mentioned in tab.4.8.4 with back static pressure of the exhaust system in tab.4.8.2 Dryer type 4.9. PUTTING THE MACHINE INTO SERVICE YOU MUST DO: 1. Remove the cabinet protective foil (stainless steel cabinet only). 2. Remove the front bottom cover and make sure the lint filter is fixed in proper position. Put the front cover back. 3. Remove the rear cover and check accessible bolts, nuts, screws, and fittings for tightness. 4. Remove protective transport tape which secure position of underpressure clutch on the rear part of device and damper. 5. Check the protective connection (earthing) - „PE“ or „PEN“. 6. Connect the dryer to a vent collector system or exhaust it individually (preferred connection). 7. Wipe out the drum using a non inflammable cleaning detergent. Load the drum with a full load of clean rags and run to remove oil or dirt from drum without heating. Fig.4.9. Inner drum cleaning 8. Check the flow rate adjustment, see chapter 4.8. 9. Connect the dryer to a steam or gas supply (gas or steam models only). See chapters: „4.5. GAS CONNECTION FOR GAS HEATING“ or „4.7. STEAM CONNECTION FOR STEAM HEATING“. 10. By adjusting the pressure regulator set proper pressure value matching to a nozzle pressure (gas models only). 11. Carefully read the „User's manual“ before machine start and fully follow the instructions stated in it. ! WARNING! BEFORE STARTING THE MACHINE, CHECK WHETHER MACHINE INSTALLATION (SUPPLY OF MEDIA, EVACUATION OF BURNT GAS, MACHINE LAYOUT, SUFFICIENTLY VENTILATED ROOMS ETC.) WAS CARRIED OUT ACCORDING TO THIS INSTALLATION MANUAL AND IN ACCORDANCE WITH THE RULES SPECIFIC FOR THE RESPECTIVE COUNTRY. 32 INSTALLATION AND MAINTENANCE MANUAL 508982_N_PUB_DATE_20_JAN_2011.DOC 12. Turn on electrical supply to dryer. 13. Open the supply valve for gas or steam heated dryer. ! WARNING! CHECK ALL PIPE CONNECTIONS, INTERNAL AND EXTERNAL FOR GAS OR STEAM LEAKS. DO NOT OPERATE THE MACHINE WHEN ANY LEAKAGE IS DETECTED. CHECK THE GAS CONNECTION REGULARLY FOR LEAKAGE. 14. After performing the previous steps TURN THE DRYER ON. For detailed instructions see „User's manual“. Perform following checks during dryer run. Restart the dryer between each steps (if necessary): –Open the drum door. The drum should stop rotating within several seconds after the door is opened approximately 20 mm. –Check a proper function of main switch and emergency stop button. –Check a proper function of the airflow switch. Open the front cover of the dust filter and secure the safety switch. Turn the machine on by pushing the START button. The timer should declare error of the under-pressure switch. After testing of under-pressure switch function remove securing label from dust filter safety switch. Return the front cover to its original place. –The airflow switch operation may be affected by shipping tape still in place, lack of make-up air, or an obstruction in the exhaust duct. These should be checked and the required corrective action taken before attempting to adjust the airflow switch. For adjusting the airflow switch see chapter „5.6. UNDERPRESSURE CLUTCH“. ! WARNING! THE DRYER MUST NOT BE OPERATED IF THE AIRFLOW SWITCH DOES NOT OPERATE PROPERLY OTHERWISE AN EXPLOSIVE GAS MIXTURE CAN BE COLLECTED IN THE DRYER. 15. Check the proper function of ignition system (gas models only). The electronic ignition system will attempt to light the gas by sparking three times. If gas does not ignite within this period, the ignition control will go into a safety lockout and the valve will no longer open until the control is reset. It may be necessary to retry several times to bleed air from the gas lines. For reset press the button START. –If lockout condition persists, check that the manual gas shut-off valve is in the „ON“ position and that the gas service is properly connected. If condition still persists, put the dryer out of service. –Purge air in gas service line (gas models only) by operating the dryer in the drying mode. 16. Mount the rear covers back on the machine. ! WARNING! WHEN WORKING WITH FLAMMABLE PRODUCT, DO NOT USE OPEN FLAME, VENTILATE, DO NOT SMOKE AND DO NOT EAT. If the dryer does not meet any of the requirements mentioned above, put the dryer out of service. 508982_N_PUB_DATE_20_JAN_2011.DOC INSTALLATION AND MAINTENANCE MANUAL 33 5. MAINTENANCE AND ADJUSTMENTS 5.1. SAFETY INSTRUCTIONS FOR MAINTENANCE ! WARNING! KEEP INSTRUCTIONS MENTIONED BELLOW IN CHAPTER „5. MAINTENANCE AND ADJUSTMENT“. ! WARNING! ONLY WELL-TRAINED PERSON CAN EXECUTE MACHINE MAINTENANCE. BEFORE MAKING ANY MANIPULATION WITH THE MACHINE'S MECHANISM, MAKE SURE: 1. that the main machine switch is switched off 2. that the section switch of electric distributor in laundry is off and mechanically blocked 3. that some of the components are not in motion due to delayed action 4. that the machine is completely cooled-down 5. there is a sign hung on the machine or electrical box: „DEVICE UNDER REPAIR!“ and all other operators or workers are informed about it. 5.2. DAILY ! WARNING! DUE TO THE DANGER OF SERIOUS INJURY DO NOT OPEN THE LINT SCREEN COVER DURING MACHINE OPERATION. OPEN THE LOADING DOOR AND WAIT UNTIL THE DRYER COMPLETELY STOPS BEFORE LINT SCREEN CLEANING. 1. Open the lint screen cover. Take away the dust lint screen. 2. Remove all dust in the dust chamber. Gently clean the lint screen with the brush from the sediment dust. The dust left in this area would be sucked back on the lint screen which would worsen the air circulation. 3. Should be the lint screen torn remove it immediately. Torn lint screen will allow the dust to reach the pipe line which would worsen air circulation. 4. The lint screen must cover the panel hole. Possible gaps between the frame and the filter would allow the dust to get into the pipe line. 5. Position the lint screen back and secure it. The machine must not be operated without lint screen. 5.3. MONTHLY OR AFTER 200 WORKING HOURS LUBRICATION ! WARNING! IN ORDER TO REDUCE DANGER OF SERIOUS OR DEAD INJURIES DISCONNECT CURRENT SUPPLY IN THE MACHINE BEFORE EXECUTION OF THE FOLLOWING ACTIVITIES. Motor and shaft bearings, sealed and self lubricated. They do not require additional lubrication. Disassemble the exhaust pipe line from the machine exhaust and remove the dust. Should there be bigger amount of dust, dismantle further pipe line parts and clean them. Remove dust from all openings in rear panels of the machine. If the openings are clogged with bigger amount of dust, remove the rear panels and clean the whole rear space of the machine from dust. 5.4. EVERY 3 MONTHS OR AFTER 500 WORKING HOURS DUST REMOVAL ! WARNING! IN ORDER TO REDUCE DANGER OF SERIOUS OR DEAD INJURIES DISCONNECT CURRENT SUPPLY IN THE MACHINE BEFORE EXECUTION OF THE FOLLOWING ACTIVITIES. 1. Remove dust and other articles from the air impeller as well as from the motor cooling fans. The motors are cooled by air and accumulation of dust on the cooling fans would cause motor overheating. The motor protection will switch of the machine in such a case. 2. Gas and steam models. Check the steam coils, remove dust sediments and/or replace the lint filter. Check heating chamber, nozzle, heater and remove dust sediments. 3. It is necessary to check the exhaust pipe lines regularly and to remove possible dust sediments which obstruct air circulation. 4. It is necessary to check the dryer surroundings to find out possible air flow obstacles. 5. Remove the front panel and clean the dust sediments. 6. Remove the lint filter cover. Remove the cover below the drying drum, fig. 5.4. Clean the inner space with vacuum cleaner. Return the lint filter cover to its original place, not applicable for 24kg (53lb), 35kg (77lb). 34 INSTALLATION AND MAINTENANCE MANUAL 508982_N_PUB_DATE_20_JAN_2011.DOC Fig. 5.4. BELTS TIGHTENING Check the belts tension. If necessary, tighten them according to relevant instructions. UNDERPRESSURE CLUTCH CONTROL Check the underpressure clutch functionality. In case of improper function adjust the underpressure clutch position. 5.5. EVERY 6 MONTHS OR AFTER 3000 WORKING HOURS OVERALL INSPECTION ! WARNING! IN ORDER TO REDUCE DANGER OF SERIOUS OR DEAD INJURIES DISCONNECT CURRENT SUPPLY IN THE MACHINE BEFORE EXECUTION OF THE FOLLOWING ACTIVITIES. 1. Clean the machine properly from the dust and any articles according to chapters mentioned above. 2. Check the bolts, nuts, gas and steam pipeline and electrical connections. Tighten them in case of need. 3. Check the gas pipe line leaks with soap dilution. The leaks might occur due to the machine vibrations. NEVER USE OPEN FLAME FOR GAS LEAKS DETECTION! 4. It is necessary to inspect electrical and grounding connections. Tighten them in case of need. 5. Inspect all safety switches (door, lint screen panel and air switch) functionality. Adjust the position in case of need. 6. Check the flow rate adjustment, see chapter 4.8. 5.6. UNDERPRESSURE CLUTCH UNDERPRESSURE CLUTCH OF AIR CIRCULATION The proper underpressure clutch function is set up in the factory. IMPORTANT! DURING THE MACHINE OPERATION THE UNDERPRESSURE CLUTCH DISK MUST REMAIN CLOSED TO THE REAR SIDE OF DRYER. IT MEANS THAT THERE IS INSUFFICIENT AIR FLOW THROUGH THE DRYER IF IT OPENS DURING THE MACHINE SERVICE. IF THE UNDERPRESSURE CLUTCH OPENS AND CLOSES OR REMAINS OPEN DURING THE MACHINE OPERATION, THE MACHINE CONTROL LOGIC WILL STOP THE HEATING AUTOMATICALLY AND COOL THE MACHINE DOWN TO 50°C AND STOP THE MACHINE AFTER IT REACHES THIS TEMPERATURE. ERROR MESSAGE OCCURS ON THE DISPLAY. REMARK! The underpressure clutch function can be influenced by dust sediments on the lint screen or by insufficient air flow caused by external air blocking on the machine inlet of by obstacles in exhaust pipe lines. Make sure that there is no such obstacle before changing the underpressure clutch setting. ! WARNING! THE SWITCH OF UNDERPRESSURE CLUTCH MUST NOT BE BYPASSED. THE MACHINE MUST NOT BE OPERATED IF THE SWITCH DOES NOT FUNCTION PROPERLY. 508982_N_PUB_DATE_20_JAN_2011.DOC INSTALLATION AND MAINTENANCE MANUAL 35 5.7. DOOR SWITCH The door switch is set up in the factory. The machine drum will stop during opening of the door at approximately 20 mm. If there is a need to set up the position, follow the below procedure: 1. Disassemble the door hinges. Remove the door. 2. Remove the front panel. 3. Hang the door on the side wall. Close slowly the door and inspect the micro switch action. To set up the microswitch position release slightly the fixing bolts. Tilt the micro switch body until it switches on/off properly. 4. Disassemble the door. 5. Assemble the front panel and fix the door to its original position. 5.8. BELTS TIGHTENING ! WARNING! IN ORDER TO REDUCE DANGER OF SERIOUS OR DEAD INJURIES DISCONNECT CURRENT SUPPLY IN THE MACHINE BEFORE EXECUTION OF THE FOLLOWING ACTIVITIES. To tighten the belts follow the below procedure: 1. Remove the back covers. 2. Release securing bolts on the middle pulley holding plate. Release the nuts on the tightening bolt. 3. Shift the middle holding plate by the tightening bolt at the side of the drive. Tighten the belts. 4. Fix the position by fixation bolts. Secure the tightening bolts by nuts. 5. Tighten securing bolts on the middle pulley holding plate. FORCE OF BELT TIGHT CORRECTLY 9kg (20lb), 11kg (24lb), 13kg (27lb), 16kg (35lb), 24kg (53lb), 35kg (77lb) drum / tensioning tensioning / motor 200-220 N 180-200 N Tab.5.8. Belts tightening 36 INSTALLATION AND MAINTENANCE MANUAL 508982_N_PUB_DATE_20_JAN_2011.DOC 6. TROUBLE SHOOTING AIDS 6.1. DISPLAY DOES NOT LIGHT AFTER START OF MACHINE –Check external link of power supply. Switch on the main switch. Deactivate the button of emergency switch (Central stop). Check the machine electrical fuses. –Check, if the voltage is in accordance with the machine type. Voltage must not exceed +/- 10% of nominal value. (In case of discrepancy, it is possible to switch the voltage input over to transformer primary.) 6.2. TEXT ON DISPLAY IS DIFFICULT TO READ –Open the machine upper cover. Switch over an option button „Programming / Operational mode“ to programming mode. Set the display brightness on required value in the menu for configuration (Programming manual, chapter 4.2.). 6.3. MACHINE DOES NOT START Program menu is not displayed. –Open the machine upper cover. Switch over an option button „Programming / Operational mode“ to operational position. 6.4. MACHINE BEHAVES DIFFERENTLY THAN EXPECTED The reason could be that the machine type was selected incorrectly, e.g. 16 kg gas heating instead of 13 kg electrical heating. –Open the machine upper cover. Switch over an option button „Programming / Operational mode“ to programming mode. Check the type of machine and type of heating or further settings in configuration menu (Programming manual, chapter 4.2.). 6.5. MACHINE DOES NOT HEAT UP TO THE HIGHEST TEMPERATURE The machine is equipped with powerful ventilator with high capacity. If the exhaust duct is executed incorrectly (chapter 4.9., paragraph 8), then flow of air through the machine could be higher than it's determined for individual machine types. In this case the heating elements are cooled down too intensively and temperature of air on the machine input does not reach required level. –Check if installation of exhaust duct is executed correctly. Check the flow rate adjustment, see chapter 4.8. 6.6. MODE OF WAITING OCCURS AND THE COUNTER COUNTS OFF This is a situation when the power supply was interrupted or it is safety sequence of the machine. –Wait until the counter reaches the value 0. Do not switch power supply off and on again because the counter would reset. 6.7. ERROR MESSAGE „UNLOAD“ AND „DOOR IS OPEN“ If the door is closed and there is a message on display „Door is open“ or the door is open and there is a message on display „Unload“. It is probably a defect on the door microswitch. –Check function of the door microswitch. Push pointer of the door microswitch using a screwdriver. If the message „Door is open“ disappears, it is necessary to adjust the microswitch position (chapter 5,7.). If the microswitch does not react, it is necessary to replace it. Procedure for the following adjustment is the same. 6.8. ERROR MESSAGE „DOOR FILTER“ –Check, if the door of lint filter is closed correctly. Pushing the microswitch button check if the microswitch is functional. If so, adjust the microswitch box to the correct position. (It is necessary to remove the frontal panel). If the microswitch is not functional, replace it. 6.9. WARNING „LINT FILTER“ For the machine correct function it is necessary to clean the lint filter every day. The machine is equipped with the cycle counter, after 15 cycles an error message „Lint filter“ is displayed. If the lint filter is not cleaned even after the following 40 cycles, the machine is disabled. Operator must open the panel of lint filter and clean the filter. –Stop the machine. Open the lint filter panel. Clean the filter. Close the panel of lint filter. Press the button „Service“. Pressing the right arrow, skip the service message and check if the counter of cycles for cleaning the lint filter was reset. In case of the counter failure proceed according to Programming manual, Failure 28. 508982_N_PUB_DATE_20_JAN_2011.DOC INSTALLATION AND MAINTENANCE MANUAL 37 6.10. MACHINE DRUM DOES NOT ROTATE –Check if the belts are not damaged and if they are tight properly. (chapter 5.8.). Check the motor voltage. Check the motor function. Possibly thermal protection of the motor was damaged. 6.11. MACHINE DOES NOT REVERSE (ONLY MACHINES WITH REVERSE) –Check if reverse is ON (button „Reverse cycle“). 6.12. UNDERPRESSURE CLUTCH DOES NOT REACT WHEN THE MACHINE IS STARTED (ERROR E8) The machine controls a correct function of underpressure clutch. After the machine is started, the flap must brace. Cause of malfunction is probably insufficient airflow through the machine, incorrect adjustment of underpressure clutch, damage of microswitch of underpressure clutch. –Remove the machine back cover. Check if ventilator motor rotates. If not, check whether motor installation is correct or whether there is some failure. (You can check the state of motor in service menu). –Check whether the ventilator motor rotates in correct direction (see label „Direction of rotation“ above motor). If not, then individual phases of supply are connected incorrectly. Repair the machine connection according to electrical schema enclosed. –Check whether there is false suction of air. The drum door and the lint filter door must be closed properly. –Check the filter whether there is any dust and whether there is dust on the rotating wheel of ventilator. Clean if needed. –Check whether there is any obstruction in output pipeline and whether the maximal allowed static pressure in pipeline is kept. Clean it in case of need or take preventive action to reduce pressure loss in the pipeline. –Check the function of microswitch of under-pressure flap. Lift up the coil of under-pressure flap. Microswitch must disconnect in upper position. If it does not work, replace it. If it is functional, adjust tilting of microswitch in such a way so that the coil would brace in lower position and unbrace at moment, when you press under-pressure flap to rear face of the machine. 6.13. UNDERPRESSURE CLUTCH IS OPENING IN COURSE OF DRYING (ERROR E9) Cause of malfunction is probably insufficient airflow through the machine, incorrect adjustment of underpressure clutch, damage of microswitch of underpressure clutch or linen load bigger than the machine capacity. –Check the load of linen - it may exceed the limit recommended for the machine. –Check, whether there is false suction of air. The drum door and the lint filter door must be closed properly. –Check whether there are any obstructions behind the machine, which could impede suction of fresh air into the machine. –Check the filter whether there is any dust and whether there is dust on the rotating wheel of ventilator. Clean if needed. –Check whether there is no obstruction in output pipeline and whether the maximal allowed static pressure in pipeline is kept. Clean it in case of need or take preventive action to reduce pressure loss in the pipeline. 38 INSTALLATION AND MAINTENANCE MANUAL 508982_N_PUB_DATE_20_JAN_2011.DOC 7. RECOMMENDED SPARE PARTS – steam valve – steam valve coil – gas valve – nozzle – gas heater – heating element – thermostat – microswitch – V-belts – contactor – fuses – door gasket – ventilator Find more detailed information and order codes in the spare parts catalogue for individual machines at your dealer. 508982_N_PUB_DATE_20_JAN_2011.DOC INSTALLATION AND MAINTENANCE MANUAL 39 8. REMOVING DRYER FROM SERVICE 8.1. DISCONNECTING THE MACHINE 1. Switch off the external electric power inlet to the machine. 2. Turn off the main switch on the machine. 3. Shut the external steam or gas inlet to the machine. 4. Make sure that the external electric power, steam or gas inlets are shut off. Disconnect all electric power, steam or gas inlets. 5. Insulate the external electric power inlet conductors. 6. Equip the machine with a sign „OUT OF SERVICE“. 7. During transportation follow the instructions stated in chapters: „2.3. IMPORTANT INFORMATION BEFORE INSTALLATION“, paragraph „For transportation and storage“, „4.1. MANIPULATION AND UNPACKING“. In case the machine will never be used again, secure it so that injury of persons, damage to health, property, and nature is avoided. Make sure enclosing of persons or animals inside the machine cannot occur, injury of persons by moving or sharp parts of the machine, possibly operating fills, (e.g. remove the door, secure the drum against turning, … and similar.) BE CAREFUL, FALLING DOOR AND GLASS CAN CAUSE INJURIES! 8.2. MACHINE DISPOSAL ! WARNING! TAKE ALL NECESSARY ACTION AND PRECAUTIONS WHEN DOING DISASSEMBLY OF THE MACHINE TO AVOID INJURIES BY GLASS OR SHARP METAL EDGES. 8.2.1. POSSIBILITY OF THE MACHINE DISPOSAL BY THE SPECIALIZED COMPANY Information concerning the WEEE-directive (Waste Electrical and Electronic Equipment, for European Union member states only): – For the production of the machine that you have purchased, natural resources are being reclaimed and used. The machine can contain substances which are dangerous for health and environment. – When you dispose of your machine, to avoid spreading of these substances in our environment and to reduce the pressure on our natural resources, we encourage you to use the collection, reuse and recycle system of your region or country. These systems reuse or recycle most of the components. – The symbol „crossed out bin on wheels ( )“ invites you to make use of these systems. – If you wish more information concerning the systems for collection, reuse or recycling of disposed machines, you can take contact with the competent administration of your region or country (waste management). – You can also take contact with us for more information concerning the environmental performances of our products. – Please, consider that the WEEE directive is generally only valid for household machines. In some countries professional machines are added, in others not. Therefore the symbol ( ) may not be present. – Info for dealers: Due to the diversity of the national legislations, manufacturer can not take all the measures to be in accordance with all national legislations of each member state. We expect that each dealer who imports our appliances into a member state (and puts it on the market) takes the necessary steps to be in rule with the national legislation (as the directive requires). 8.2.2. POSSIBILITY OF THE MACHINE DISPOSAL BY OWN POTENTIAL It is necessary to sort out the parts for metal, non-metal, glass, plastics etc, and bring them to recycle places. The sorted out materials has to be classified in waste groups. These groups can be found on www.euwas.org Offer the sorted waste to the company which is competent for further treatment. 40 INSTALLATION AND MAINTENANCE MANUAL 508982_N_PUB_DATE_20_JAN_2011.DOC NOTES: 508982_N_PUB_DATE_20_JAN_2011.DOC INSTALLATION AND MAINTENANCE MANUAL 41 IMPORTANT! MACHINE TYPE: CONTROLLERS - ELECTRONIC TIMER FULL CONTROL - ELECTRONIC TIMER EASY CONTROL INSTALLATION DATE: INSTALLATION CARRIED OUT BY: SERIAL NUMBER: ELECTRICAL DETAILS: .............VOLT...............PHASE............Hz NOTE: ANY CONTACTS WITH YOUR DEALER REGARDING MACHINE SAFETY, OR SPARE PARTS, MUST INCLUDE THE ABOVE IDENTIFICATION. MAKE CERTAIN TO KEEP THIS MANUAL IN A SECURE PLACE FOR FUTURE REFERENCE. DEALER: