1
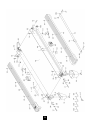
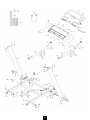
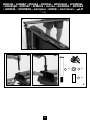
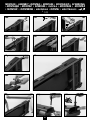
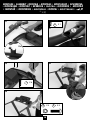
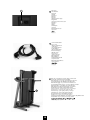
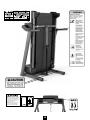
TC 490
MANUAL DE UTILIZAÇÃO
OPERATING INSTRUCTIONS INSTRUKCJA UŻYTKOWANIA
hasznÁlati ÚtmutatÓ
MODO DE EMPLEO
Инструкция по использованию
GEBRAUCHSANWEISUNG
INSTRUCŢIUNI DE UTILIZARE
ISTRUZIONI PER L’USO
Návod na použitie
GEBRUIKSHANDLEIDING
Návod k použití
notice d’utilisation
BRUKSANVISNING
УПЪТВАНЕ ЗА ИЗПОЛЗВАНЕ
KULLANIM KILAVUZU
ІНСТРУКЦІЯ ВИКОРИСТАННЯ
使用说明
TC 490
Notice à conserver
Keep these instructions
Conservar instrucciones
Bitte bewahren Sie diese Hinweise auf
Istruzioni da conservare
Bewaar deze handleiding
Instruções a conservar
Zachowaj instrukcję
Őrizze meg a használati útmutatót
Сохранить инструкцию
Păstraţi instrucţiunile
Návod je potrebné uchovať
Návod je třeba uchovat
Spara bruksanvisningen
Запазете упътването
Bu kılavuzu saklayınız
Збережіть цю інструкцію
Импортер :
ООО «Октоблу», 141031, Россия, Московская область, Мытищинский район,
МКАД 84-й км., ТПЗ «Алтуфьево», владение 3, строение 3
OXYLANE 4, bd de Mons - BP 299 - 59665 Villeneuve d’Ascq Cedex - France
Made in China - Hecho en China - Fabricado na China - 中国 制造 - Произведено в Китае - İmal edildiği yer Çin
Réf. Pack : 1170.313 - Importado para o Brasil por IGUASPORT Ltda - CNPJ : 02.314.041/0001-88 -
3
4
5
MONTAGE • ASSEMBLY •Montaje • MONTAGE • MONTAGGIO • AFwerking
• Montagem • MONTAŻ • szerelés • Сборка • MONTARE • Montáž
• Montáž • MONTERING • МОНТИРАНЕ • MONTAJ • МОНТУВАННЯ •
• 安装
10 X 4
22 X 1
8
2
X4
1
X6
6
X4
X4
31 X 3
104 X 2
27 X 3
79 X 4
5
6
X4
MONTAGE • ASSEMBLY •Montaje • MONTAGE • MONTAGGIO • AFwerking
• Montagem • MONTAŻ • szerelés • Сборка • MONTARE • Montáž
• Montáž • MONTERING • МОНТИРАНЕ • MONTAJ • МОНТУВАННЯ •
• 安装
1
2
3
4
X1
33 X 1
2
1
4
5
2
6
1
22
X1
X
X
7
7
22
X
X
X1
104 X 1
MONTAGE • ASSEMBLY •Montaje • MONTAGE • MONTAGGIO • AFwerking
• Montagem • MONTAŻ • szerelés • Сборка • MONTARE • Montáž
• Montáž • MONTERING • МОНТИРАНЕ • MONTAJ • МОНТУВАННЯ •
• 安装
8
9a
9b
X
5
X2
8
X2
79 X 2
9
8
MONTAGE • ASSEMBLY •Montaje • MONTAGE • MONTAGGIO • AFwerking
• Montagem • MONTAŻ • szerelés • Сборка • MONTARE • Montáž
• Montáž • MONTERING • МОНТИРАНЕ • MONTAJ • МОНТУВАННЯ •
• 安装
10a
10b
10d
10e
10g
10
10c
10f
10h
10i
10j
10k
X
5
X2
8
X2
79 X 2
9
MONTAGE • ASSEMBLY •Montaje • MONTAGE • MONTAGGIO • AFwerking
• Montagem • MONTAŻ • szerelés • Сборка • MONTARE • Montáž
• Montáž • MONTERING • МОНТИРАНЕ • MONTAJ • МОНТУВАННЯ •
• 安装
11
22 X 1
22 X 1
12
11a
13
14
1
X6
15
14a
10 X 4
10
6
X4
MONTAGE • ASSEMBLY •Montaje • MONTAGE • MONTAGGIO • AFwerking
• Montagem • MONTAŻ • szerelés • Сборка • MONTARE • Montáž
• Montáž • MONTERING • МОНТИРАНЕ • MONTAJ • МОНТУВАННЯ •
• 安装
16
17
27 X 3
31 X 3
18
11
1 Console
Console
Consola
Konsole
Console
Terminal
Consola
Konsola
Konzol
Консоль
Consolă
Konzola
Konzole
Konsol
Конзола
Kumanda paneli
Приставка
2 Capteur de pulsations
Heart rate monitor
Sensor de pulsaciones
Pulssensoren
Sensore di pulsazioni
Hartslagsensor
Sensor de pulsações
Czujnik pulsu
Szívritmus érzékelője
Датчик измерения пульса
Captor de pulsaţii
Snímač tepu
Snímač pulzů
Pulsmätare
Датчици за пулс
Titresim sensörleri
Пульсові сенсори
3 Clé de sécurité
Safety key
Llave de seguridad
Sicherheitsschlüssel
Chiave di sicurezza
Veiligheidssleutel
Chave de segurança
Klucz zabezpieczający
Biztonsági kulcs
Ключ безопасности
Cheie de siguranţă
Bezpečnostný kľúč
Bezpečnostní klíč
Säkerhetsnyckel
Ключ за сигурност
Güvenlik kilidi (anahtarı)
Ключ безпеки
4 Montant
Upright arm
Montante
Stütze
Montante
Stijlen
Barra vertical
Stojak
Állvány
Стойка
Cadru
Suma
Stojan
Påstigningsanordning
Стойка
Kolon
Стояк
5 Bande de course
Treadmill belt
Cinta de correr
Lauffläche
Nastro di corsa
Loopband
Passadeira de corrida
Taśma bieżni
Futófelület
Беговое полотно
Bandă de alergare
Bežecký pás pásu
Běžící pás
Löpband
Лента за бягане
Koşu bandı
Біговий килим
嵌板竖杆
安全钥匙
传送带
1
6 Vis de réglage pour le centrage et la tension de la bande de course
Adjusting nut to centre and set the tension of the treadmill belt
Tornillo de ajuste para el centrado y la tensión de la cinta de correr
Einstellschraube für das Zentrieren und die Spannung der Lauffläche
Vite di regolazione per la centratura e la tensione del nastro di corsa
Regelschroef voor het centreren en het spannen van de loopband
Parafuso de ajuste para centragem e tensão da passadeira de corrida
Śruba regulacji wycentrowania i naprężenia taśmy bieżni
A futófelület központosítására és a szalag feszességének beállítására szolgáló csavar
Натяжной болт для центрирования и натяжения бегового полотна
Şurub de reglare pentru centrarea şi întinderea benzii de alergare
Nastavovacia skrutka pre centrovanie a napínanie bežeckého pásu
Šroub pro nastavení centrování a napětí běžícího pásu
Justeringsskruv för centrering och sträckning av löpbande
Винт за регулиране на центрирането и обтягането на лентата за бягане
Koşu bandının gerilimi ve gerilim ayarı için ayar vidası
Гвинт регулюваvння центрування та натягу бігового килима
2
3
8
4
调节传送带位置和松紧的螺丝
7
7 Repose-pieds
Footrest
Reposapiés
Fußraste
Poggiapiedi
Voetensteun
Descanso para pés
Oparcia stóp
Lábtartó
Подножка
Sprijin picioare
Stúpačka
Stupačky
Fotstöd
Стъпенки
Ayak dayama desteği
Підніжка
5
10
9
7
6
8 Rampe
Rail
Rampa
Handlauf
Rampa
Leuning
Rampa
Pochylnia
Korlát
Поручень
Rampă
Zábradlie
Rampa
Räcke
Перило
Bant meyili (Rampa)
Бильця
扶手管
9 Système d’amorti DSI (Domyos Soft Impact)
DSI (Domyos Soft Impact) System
Sistema de amortiguación DSI (Domyos sofá Impact)
Dämpfungssystem DSI (Domyos Soft Impact)
Sistema di ammortizzatori DSI (Domyos Soft Impact)
Schok absorptiesysteem DSI (Domyos Soft Impact)
Sistema de amortecimento DSI (Domyos Soft Impact)
System amortyzacyjny DSI (Domyos Soft Impact)
DSI (Domyos Soft Impact) csillapítórendszer
Амортизационная система DSI (Domyos Soft Impact)
Sistem de amortizare (Domyos Soft Impact)
Systém stopnutého úderu DSI (Domyos Soft Impact)
Systém tlumení DSI (Domyos Soft Impact)
DSI stötdämpningssystem (Domyos Soft Impact)
Система амортисьори DSI (Domyos Soft Impact - Омекотяване на удара)
DSI hız kesme sistemi (Domyos Soft Impact)
Система амортизації DSI (Domyos Soft Impact)
置脚处
10 Roulettes de déplacement
Castors
Ruedas de desplazamiento
Transportrollen
Rotelle di spostamento
Transportwieltjes
Roletes de deslocação
Kółka do przewożenia
Görgők a mozgatáshoz
Транспортировочные ролики
Roti de deplasare
Posúvacie kolieska
Kolečka pro posouvání přístroje
Transporthjul
Ролки за отместване
Yer değiştirmeye yarayan tekerlekler
Коліщатка для пересування
移动小轮
DSI缓冲系统(Domyos Soft Impact)
12
11
11 Disjoncteur
Circuit-breaker
Interruptor
Schalter
Disgiuntore
Zekering
Disjuntor
Wyłącznik samoczynny
Megszakító
Предохранительный выключатель
Întrerupător
Vypínač
Spínač
Strömbrytare
Прекъсвач
Otomatik devre kesici
Запобіжник
断路开关
12
Cordon d’alimentation
Power cord
Cable de alimentación
Geräteschnur
Cavo d’alimentazione
Voedingskabel
Cabo de alimentação
Przewód zasilający
Hálózati zsinór
Шнур питания
Cablu de alimentare
Kábel napájania
Kabel napájení
Strömförsörjningssladd
Захранващ кабел
Elektrik (besleme) kablosu
Провід живлення
供电电线
13 Barre de verrouillage avec Piston d’aide à la descente
Locking bar with piston-assisted unfolding
Barra de bloqueo con pistón de ayuda para el descenso
Verriegelungsstange mit Hilfskolben zum Absenken
Barra di bloccaggio con pistone di aiuto alla discesa
Vergrendelingsstaaf met zuiger, vereenvoudigt het neerlaten
Barra de bloqueio com êmbolo de ajuda à descida
Belka blokująca z tłokiem ułatwiającym opuszczanie
Rögzítőrúd a leeresztést megkönnyítő hengerrel
Рычаг блокировки с плунжером для спуска с тренажера
Bară de blocare cu Piston de ajutor pentru coborâre
Zaisťovacia tyč s pomocným piestom pri zostupe
Uzamykací tyč s pomocným pístem při klesání.
Låsregel med kolv för att underlätta avstigning
Блокиращ лост с бутало за помощ при слизане
Aşağı doğru hareket kabiliyeti için yardımcı pistona sahip kilitleme kolu
Блокувальний штир з позицією допомоги при злізанні.
13
带活塞锁定杆帮助下降
13
To reduce risk of serious injury,
stand on foot rails before starting
treadmill, read and understand
the user's manual, all instructions,
To reduce
risk ofuse.
serious injury,
and the warnings
before
stand
on foot rails before starting
Keep children
away.
treadmill, read and understand
IMPORTANT: Incline must be set
the user's manual, all instructions,
at lowest level
folding
andbefore
the warnings
before use.
treadmill into
storage
position.
Keep
children
away.
IMPORTANT: Incline must be set
at lowest level before folding
treadmill into storage position.
14
To reduce risk of serious injury,
stand on foot rails before starting
treadmill, read and understand
the user's manual, all instructions,
and the warnings before use.
Keep children away.
IMPORTANT: Incline must be set
at lowest level before folding
treadmill into storage position.
15
E
N
G
L
I
S
H
You have chosen a piece of fitness equipment by DOMYOS. We thank you for your confidence in us.
We have created the DOMYOS brand to provide a way for all athletes to stay in shape.
This product has been designed by athletes for athletes.
We would be pleased to receive your comments and suggestions concerning DOMYOS products.
Therefore, your store team is ready to listen, as is the DOMYOS products design department.
You can also find us at www.domyos.com
We wish you successful training and hope that you will enjoy using this DOMYOS product.
T E C H N I C A L S P E C I F I C AT I O N S
-
Maximum speed: 16 km/h (10 mph)
Power supply: 220-240 V, 50 Hz
Maximum power consumed: 1300 W
Continuous motor power: 1.75 HP (HP)
Maximum motor power: 2.75 HP (HP)
Treadmill weight: 69 kg (153 lbs)
Dimensions of unfolded Treadmill: H 1283 x L 1724 x l 820 mm (H 50.51 x L 67.88 x W 32.27 in)
Dimensions of folded Treadmill: H 1467 x L 830 x l 820 mm (H 57.74 x L 32.67 x W 32.27 in)
Acoustic pressure level measured at 1m from the surface of the machine and at a height of 1.60m above the ground: 74db (at maximum
speed)
WA R N I N G
Before beginning any exercise program, consult your doctor. This is especially important for people aged over 35 or who have previously had
health problems, and those who have not done any sport for a number of years. Read all instructions before use.
The following information is general and should only be taken as a guide. Please therefore adapt these recommendations to your personal
fitness and leisure needs.
GENERAL CARDIO-TRAINING PRINCIPLES
If you are just starting out, begin by exercising for several days at a low speed, without forcing it, taking breaks if necessary. Gradually increase
the number or duration of the sessions.
Maintenance/Warm-up: Gradual
effort starting with 10 minutes.
For maintenance work to keep yourself in
shape or get back into shape, you can
train every day for about ten minutes. This
type of exercise will wake up your muscles
and joints, or it can be used as a warm-up
before another type of physical activity.
To increase muscle tone in the legs, choose
a greater speed and increase the duration
of the exercise.
Obviously, you can vary the speed over the
course of your workout.
need to push yourself beyond these limits.
Training on a regular basis is what will
produce the best results.
Choose a relatively low running speed
and exercise for around 30 minutes. This
exercise should cause you to build up a
mild sweat, but it certainly should not leave
you out of breath. It is the duration of the
exercise at a slow pace that will cause your
body to dip into your fat reserves to get its
energy, as long as you run for more than
about thirty minutes at least three times a
week.
Aerobic exercise for getting into
shape: Moderate effort for a relatively long time (35 minutes to 1
hour).
If you wish to lose weight, this type of
exercise, combined with a diet, is the only
way to increase the amount of energy your
body consumes. To do so, there is no
Aerobic training for endurance:
Sustained effort for 20 to 40 minutes.
This type of training aims to strengthen the
heart muscles significantly and improve
respiration.
Running speed is increased to accelerate
respiration during exercise. This type of
24
exercise is more sustained than when you
are working out to get into shape.
Little by little, as you train, you will be able
to work out for longer, at a faster pace.
Aerobic endurance training requires at
least three training sessions per week.
More intense workouts (anaerobic work
and red-zone work) are reserved for athletes and require specific preparation.
After each workout, set aside several minutes to jog at a lower speed to slow down
and gradually relax your body.
E
N
G
L
I
S
H
SAFETY
To reduce the risk of serious injury and damage to the product, read the following important instructions for safe
usage before using the product.
1. O
nly use this product in the manner described in this manual. Keep this
manual for the entire life of the product.
2. T he owner is responsible for ensuring that all users of this product are
properly informed as to how to use this product safely.
3. D
OMYOS cannot be held liable for claims of injury or damage sustained
by any person or property originating from the misuse of this product by
the purchaser or by any other person.
4. T his device complies with European standards (standard CE, standards
EN-957-1 and EN 957-6 category HC) concerning fitness equipment in
domestic, non-therapeutic use (equivalent to GB17498). Do not use this
product in a commercial, rental, or institutional setting.
PHYSICAL RISKS
19. Never insert any object into any opening.
20. K
eep your hands well away from any moving part. Never place your
hands or feet under the treadmill.
21. Use
the product indoors on a flat surface, in an uncluttered place free
from moisture and dust. Ensure that you have enough space to access
and move around the device safely. For safety, leave a clear space of 2m
behind the treadmill and 0.65m on each side. When using the machine,
please ensure that the space around it is sufficiently clear. Do not store or
use the product outside.
Top view
ELECTRICAL HAZARDS
5. Immediately after each use and before any cleaning, assembly or maintenance operation, turn off the master switch and disconnect the treadmill
from the mains.
Front
6. Never leave the treadmill plugged in without supervision.
7. N
ever use this treadmill: with a damaged electrical cable or plug; if it
has been knocked over or dropped; if it has suffered damage; or if it has
been in contact with water.
Top view
Minimum 0.65m (25 inches)
8. D
o not use the treadmill in a place where aerosol products are used or
where oxygen is administered.
9. N
ever pull the treadmill by its electrical power cable or use the cable
as a handle.
Left side
Rear
10. If you need an extension cable, only use one equipped with an earth
connection and which is at least 1.5m long.
12. Only plug the treadmill into a correctly earthed socket.
13. Y
ou treadmill must be connected to an electrical socket on a 10A
(amperes) network.
14. Y
our home’s electrical supply must be in a good state of repair and
comply with current standards.
15. Y
our home’s switchboard must be equipped with a 30mA earth-leak
circuit-breaker. This device detects leaks of electricity and guarantees
individuals’ safety.
16. In some regions, a lightening arrestor must be installed to the switchboard. Check whether the regulations in force in your French département, region or country require you to install a lightening arrestor.
DANGER
17. Before carrying out any maintenance or visual checks of your treadmill,
turn off the master switch and remove the plug from the mains socket.
Never remove the motor cover. Adjustments and modifications other
than those described in this manual must only be carried out by an
authorised technician. Non-compliance with this safety measure may
cause serious or even fatal injuries
Right
side
Minimum 2m (78 inches)
11. Keep the electrical cable away from hot surfaces.
Earthing instructions
In the event of malfunction or breakdown, the current is earthed to reduce the
risk of electrocution. This machine is also equipped with a wired cable and an
earthed plug. The plug must be connected to a correctly installed mains socket
earthed in accordance with current regulations. Incorrectly earthing the plug
may lead to a risk of electrocution. If in doubt, ask a qualified electrician to
check that the product is correctly earthed. Do not carry out any modifications
of the plug supplied with your treadmill. If it is not suited to your mains socket,
ask a qualified electrician to install a correctly earthed plug.
Minimum 0.65m (25 inches)
22. N
ever drop liquids onto the treadmill. If you drink while running, use a
bottle with a sealable sports cap.
23. Never damage the cord.
24. It is the user’s responsibility to inspect and if necessary tighten all parts
before using the product. Immediately replace any worn or defective
parts.
25. B
efore every use, ensure that the treadmill belt is perfectly aligned and
centred in relation to the foot rests.
26. C
heck the tension of the treadmill after two hours’ use and then every
ten hours (see maintenance chapter).
Please note: Non-compliance with these maintenance guidelines may void the warranty.
27. Do not modify your product.
28. S
hould your product deteriorate, report the fault to your Decathlon store
and do not use the product until it has been fully repaired. Only use
Decathlon spare parts.
29. D
o not store this product in a damp place (e.g. edge of a pool,
bathroom etc.)
18. Never submerge any component of the product in any liquid.
25
E
N
G
L
I
S
H
USE
Warning: Before using your treadmill, please read the
following advice carefully.
At the end of every session, please do the following:
1.Remove the safety key from the console and store it in a place which is
inaccessible to children.
1. Ensure that sufficient air can circulate throughout exercise.
2. For its protection, cover the floor under the product with a suitable floor
mat, available in Decathlon stores.
3. Never allow more than one person to use the treadmill at any time.
Before starting a training session
4. Wear sports shoes in a good state of repair. To avoid damaging your
machine, ensure that your soles are free of any debris, such as gravel or
small stones.
5. Check that your shoelaces are in no danger of catching in the treadmill
belt.
6. Put your hair up so that it does not get in the way during exercise.
7. Do not wear baggy clothing likely to get in your way during exercise.
8. Place the magnetic part of the safety key on the console and attach the
other end of the key to your clothing. In an emergency situation, the safety
key must be able to detach completely from the console in order to stop the
treadmill. Test the safety key by carefully moving away from the console.
Adjust the length of the cord so that the safety key detaches automatically
when you reach the end of the running surface.
9. Always start in a standing position on the foot rests and not on the treadmill belt. Before stepping onto the treadmill, wait for the speed to reach
1km/h. Never start at a higher speed.
10. Increase your speed gradually.
11. To get on or off the machine and to change speed, always use the rails.
12. When using your treadmill, never hang a towel on the machine.
13. Keep children and pets away from the product at all times.
14. After exercising, wait for the treadmill to stop completely before getting
off.
2. Stop the machine by moving the circuit-breaker to «OFF».
15. Never run the motor in the treadmill’s folded position.
WARNING : If you feel vertigo, nausea, chest pains or any other
abnormal symptom, stop exercising immediately and consult
your doctor before continuing to train.
16. Before starting your exercise programme, always stretch your muscles.
Warm up by walking slowly. Gradually increase your exercise intensity
until you reach your desired stride rate.
Before ending a training session, you should always
do the following:
1. Before ending your training, give yourself some time to slow down your
stride rate to return to rest and allow your heart rate to return to normal.
2. Hold the hand rails and press the « ▼ » button of the « ▲/▼ SPEED »
buttons. Slow your stride until you reach an easy walking pace (3 km/h).
3. Before getting off the treadmill, ensure that it has stopped completely.
3. Remove the power cord from the mains socket. This is particularly important
if you don’t use your machine for a long period.
4. Always place and keep the power cord in a place where it will not obstruct
passers by.
5. Check that the machine is securely locked into its folded position before
moving or storing the treadmill.
26
E
N
G
L
I
S
H
TREADMILL FUNCTIONS
CONSOLE FUNCTIONS
The safety key must be placed in the area marked with a key at the bottom of the console.
At the left-hand side of the console you will find the incline access buttons.
At the right-hand side of the console you will find the speed access buttons.
SCREEN DISPLAY
« TIME » : Exercise duration in minutes: seconds.
« CALS. » : Estimation of calories expended.
« DIST. » : Distance covered in kilometres or miles.
« SPEED » : Running speed in kilometres per hour or miles per hour.
« ♥ » in the bottom-right of the screen and when you place your hands on the heart rate sensors: Indicates your heart rate.
BUTTONS
« SELECT PROGRAM » : Selects the programme you want to choose.
« ▼/▲ SET MAX. SPEED » : Adjusts the programme speeds by increments of 0.1 km/h (0.1 mph) before launching the programme.
« GO » : Launches the programme.
« DISPLAY » : Allows you to modify the main display to give priority to an item of data of your choice: TIME, DIST., CALS and SPEED).
DIRECT ACCESS TO INCLINES – 0, 2, 4, 8 or 10%: Skips immediately to one of 5 pre-selected inclines. To choose a pre-selected incline, press the button corresponding to the incline you want.
DIRECT ACCESS TO PRE-SELECTED SPEEDS – 4, 8, 12, 14 or 16 km/h (2.5, 5.0, 7.5, 8.7 or 10 mph): Skips immediately to one of 5 pre-selected
speeds. To choose a pre-selected speed, press the button corresponding to the speed you want.
« ▲/▼ INCLINE » : Immediately changes the incline in increments of 0.5% from 0 to 10%.
« ▲/▼ SPEED » : Immediately changes the speed in increments of 0.1 km/h (0.1 mph) from 0.8 to 16 km/h (0.5 to 10 mph).
Note: Hold the button down to scroll through the speeds in increments of 0.5 km/h (0.5 mph).
« STOP » : Immediately stops the exercise.
27
E
N
G
L
I
S
H
GETTING STARTED
HEART RATE SENSORS
After inserting the safety key into the console and attaching the clip to your
clothing, the easiest way to start your training is to press the «GO» button. The
treadmill starts at a speed of 2km/h (1mph) and an incline of 0%.
You can adjust the speed and the incline by pressing the direct access buttons,
the « ▲/▼ SPEED » and « ▲/▼ INCLINE » buttons.
You can monitor your heart rate at the start and end of your exercise session
by placing each palm on the heart rate sensors. Your heart rate will be displayed in the bottom-right of the screen.
This measurement is indicative and is not medically reliable.
PROGRAMMES
INFORMATION mode
The TC 470 offers one manual program, four preset programs of varying
speed (P1, P2, P3 & P4) and two programs of varying incline (P5 & P6).
This is a mode which gives you access to the total distance covered and the
total number of hours the treadmill has been in use since it was turned on.
In this mode you can also select your speed and distance units and activate or
deactivate information mode.
Each program – P1 to P6 – is made up of 1-minute segments at
a given speed or incline.
Depending on your level, you can adjust the maximum speed
by pressing “SET MAX. SPEED”. This will automatically change
the speed of each segment but without exceeding the maximum
speed you have chosen.
To return to INFORMATION mode you need to press the « STOP » button and
while pressing it insert your safety key, then release the « STOP » button.
PROGRA SELECTION
In the bottom-right of your screen an « E » for miles or «
will then be displayed.
To change from one to the other press « ▲ SPEED ».
After inserting the safety key you can select the program by pressing the «
SELECT PROGRAM » button. The program you choose is displayed on the
screen (P1, P2, P3, P4, P5 or P6).
» for kilometres
In the bottom-left of the screen the total distance covered since the treadmill
was first used will be displayed.
Manual program:
Finally, the total number of hours that the treadmill has been in use will be displayed in the centre of the screen.
Please note that the console offers a demo mode for shop use.
When demo mode is activated your treadmill will function normally but when
you remove the safety key the console screen will still be lit.
When activated, demo mode is indicated by a «d» in the bottom-right of your
screen.
To disactivate it, press «▼ SPEED ».
Choose the incline you would like by pressing « ▲/▼ INCLINE ».
To exit information mode and save your speed unit, remove the safety key
from its magnetic holder.
Choose your speed by pressing one of the direct access speed buttons or
« ▲/▼ SPEED ».
CALIBRATING THE SLOPE
The treadmill starts as soon as you press one of the speed selection buttons.
If you remove the safety key while the slope motor is running, the system will
automatically recalibrate the slope when you restart the product. Calibration
generally results in the running platform gradually rising to its maximum level
and then coming back down into its horizontal position.
Your route is symbolised by a 400m track (0.25 miles)
Program P1 to P6:
Speed programs P1 to P4: speed varies during the exercise.
Exercise duration is preset and cannot be altered.
Incline programs P5 to P6 incline varies during the exercise.
Exercise duration is preset and cannot be altered.
Select your program and adjust the maximum speed using
the «▼/▲ SET MAX. SPEED» buttons in increments of 0.1km/h
(0.1mph). Start the program by pressing “GO”.
The treadmill and the program countdown timer start.
There is a sound every time the program segment changes during the exercise.
28
E
N
G
L
I
S
H
MAINTENANCE
CLEANING
Use a soft cloth to remove dust. Persistent stains (like sweat) can be removed with a slightly damp cloth.
Be aware of electrical dangers: ensure that the treadmill is off and unplugged.
If you tip the treadmill onto its side while the platform is open (in-use position), the platform may close suddenly. You are strongly advised to fold the platform into the
storage position and ensure that the locking system is engaged before tipping the treadmill.
ADJUSTING THE POSITION OF THE TREADMILL BELT
The treadmill belt should always be perfectly centred. An alignment defect will inevitably cause premature wearing of the belt (ripping at the edges) and, in the longterm, will prevent your treadmill from functioning properly (a lack of driving force in the rollers).
1. Run your treadmill at 5km/h (3mph) and stand behind the machine.
3. The belt is off-centre to the right: turn the right-hand adjusting nut a
half of a turn clockwise.
2. The belt is off-centre to the left: turn the left-hand adjusting nut a half
of a turn clockwise.
4. Let the treadmill run long enough for the belt to reposition itself (1 to 2 minutes) and repeat the procedure if necessary.
However, make sure that you do not over-tighten the belt.
4mm Allen key
The belt is off-centre to the left
The belt is off-centre to the right
ADJUSTING THE TENSION OF THE TREADMILL BELT
The treadmill belt is a part subject to wear and tear which slackens over time.
Retighten it as soon as it begins to slip over the rollers (skating).
1. Turn both adjusting nuts a quarter of a turn clockwise.
2. Repeat the procedure if necessary but be careful not to over-tighten the belt.
The belt is correctly tightened if you can lift the edges by a few centimetres
on each side.
4mm Allen key
LUBRICATING THE TREADMILL BELT
This treadmill does not need lubricating.
29
E
N
G
L
I
S
H
FOLDING/UNFOLDING
FOLDING AND UNFOLDING YOUR TREADMILL MUST BE CARRIED OUT WITH THE MACHINE STOPPED AND UNPLUGGED.
YOUR TREADMILL’S INCLINE MUST BE 0%.
To fold your treadmill:
Place both your hands under
the back legs of the treadmill
with your knees bent and
your back straight. You can
lift the treadmill completely.
The treadmill will lock into
a vertical position when you
hear the locking “click”.
Stand behind the treadmill, with your feet on the
ground. Lift the treadmill
with your hands on the
sides of the device. Your
knees should be bent and
your back straight.
If your treadmill does not lock, lower it by a few centimetres and repeat the procedure with your knees bent and your back straight.
To unfold your treadmill:
Put both your hands
under the treadmill belt
and unfold the treadmill.
You can move down with
your treadmill, not forgetting to bend your knees
and keep your back
straight.
With your left hand,
push the treadmill slightly
forward and maintain
this pressure while you
unlock the safety catch
with your right hand.
MOVING THE TREADMILL
Your treadmill has casters to help you move it.
Once the treadmill is in its folded position (ensure that the locking system is correctly engaged), hold the running deck by the edges or using the bar underneath
and move the machine towards you.
Important: this product is heavy (69kg/153lbs). Before moving it, ensure that you
are big and strong enough!
Turn off the treadmill (turn the switch to « OFF ») and unplug the power cord
from the wall socket. Secure the cord to the treadmill so as not to damage it
while moving the machine.
Once the treadmill is in the desired position, brace it with your foot and lower it
until it is in full contact with the ground.
30
E
N
G
L
I
S
H
TROUBLESHOOTING
My treadmill does not turn on (no display on the
console screen)
1. Remove the safety key and put it back in place.
2. Check that the power cord is connected to a wall socket, and that the socket
is in the on position. (To check that the wall socket is working, plug in a lamp
or any other electrical appliance).
3. Check that the other end of the power cord is connected to your treadmill.
4. Check that the circuit-breaker at the front of your treadmill is in “RESET”
position. If the circuit-breaker is in OFF position, you need to switch it back
on. To do this, wait five minutes and move it back to “RESET” position.
If the problem persists:
5. Turn off and unplug your treadmill. Remove the console and check that the
cables at the top of the right-hand riser are correctly connected.
My treadmill remains switched on when the safety
key has been removed:
Your console is in demonstration mode. Deactivate demonstration mode by following the instructions on page 28 (“INFORMATION MODE” paragraph).
Treadmill speed is not constant:
1. We strongly advise you not to use an extension lead. However, if you have
to use an extension lead, the length of the cable should not exceed 1.50m
in order to reduce electrical loss.
2. Avoid overloading electrical sockets with appliances which consume a
lot of electricity (white goods or DIY tools) which may interfere with your
treadmill’s performance.
3. Check that the power cord is correctly plugged in at both ends (wall socket
and treadmill connection) in order to avoid bad contacts. To check that
the wall socket is working correctly, plug in a lamp or any other electrical
appliance.
4. Check that the treadmill belt is correctly tightened (the belt should not be
over-tightened). See page 29.
My product is noisy:
1. Check that the treadmill belt is correctly centred. See page 29.
2. Check that the treadmill belt is correctly tightened (the belt should not slip).
See page 29.
WA R R A N T Y
DOMYOS guarantees the materials and workmanship of this product under normal conditions of use for 10 years for the structure, 5 years for
the drive motor and 2 years for parts subject to wear and tear, starting at the date of purchase as indicated by the date on the cash register
receipt.
DOMYOS obligation with regard to this guarantee is limited to the replacement or repair of the product, at the discretion of DOMYOS.
All products for which the warranty is applicable must be received by DOMYOS at one of its approved facilities, delivery prepaid, accompanied by adequate proof of purchase.
This warranty does not apply to cases of:
• Damage caused during transport.
• Use and/or storage outside or in a wet environment.
• Poor assembly.
• Improper or abnormal use.
• Poor maintenance.
• Repairs made by technicians not approved by DOMYOS.
• Use in a non-domestic setting.
This warranty does not exclude any legal guarantees applicable according to country and/or province.
OXYLANE - 4 BOULEVARD DE MONS – BP299 – 59665 VILLENEUVE D’ASCQ – France
31