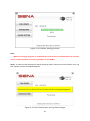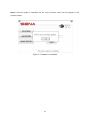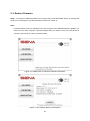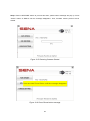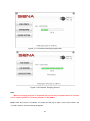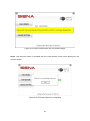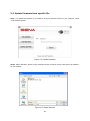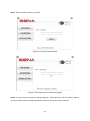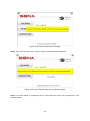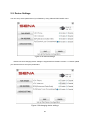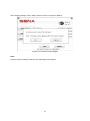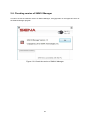
1
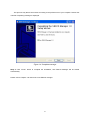
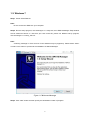
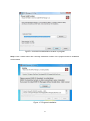
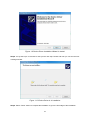
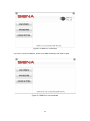
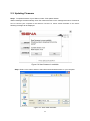
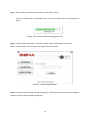
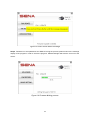
User’s Manual
SMH10 Manager
V1.3
2012-04-02
1
Copyright Information
Copyright 1998-2012 Sena Technologies, Inc. All rights reserved.
Sena Technologies reserves the right to make any changes and improvements to its product without
providing prior notice.
Notice to Users
Proper back-up systems and necessary safety devices should be utilized to protect against injury,
death or property damage due to system failure. Such protection is the responsibility of the user.
This device is not approved for use as a life-support or medical system.
Any changes or modifications made to this device without the explicit approval or consent of Sena
Technologies will void Sena Technologies of any liability or responsibility of injury or loss caused by
any malfunction.
Technical Support
3150 Almaden Exselectway, Suite 238
San Jose, CA 95118
United States
Toll Free (US/Canada): 8668-US-SENA (866-887-7362)
Main: 408-448-1997
Fax: 408-907-3738
E-Mail: [email protected]
Website: http://www.senabluetooth.com
Facebook: http://www.facebook.com/senabluetooth
2
Table of Contents
1. Software Installation
4
1.1. Windows XP ............................................................................................................................... 4
1.2. Windows 7 .................................................................................................................................. 7
2. Getting Started
15
2.1. Starting SMH10 Manager ......................................................................................................... 15
2.2. Updating Firmware ................................................................................................................... 17
2.3. Restore Firmware ..................................................................................................................... 22
2.4. Update Firmware from specific file ........................................................................................... 26
2.5. Device Settings ........................................................................................................................ 30
2.6. Checking version of SMH10 Manager ..................................................................................... 32
3
1. Software Installation
Please note that all software installation should be running with administrator privilege of your
computer.
1.1. Windows XP
Step 1. Power off the SMH10.
Note:
Do not connect the SMH10 to your computer until software installation is completed.
Step 2. Run the setup program, smh10manager-v1.0-setup.exe, and then SMH10 Manager setup
window will be started as follows.
Figure 1-1 Welcome Message
Step 3. Click “Next” button and then specify the destination location of program.
4
Figure 1-2 Choose the destination location of program
Step 4. Click “Install” button after choosing destination location of the program and then installation
will be started.
Figure 1-3 Program Installation
5
This process may take a few minutes according to the performance of your computer. Please wait
until final completing message is displayed.
Figure 1-4 Complete message
Step 5. Click “Finish” button to complete the installation, then SMH10 Manager will be started
automatically.
Please refer to Chapter 2 to learn how to use SMH10 manager.
6
1.2. Windows 7
Step 1. Power off the SMH10.
Note:
Do not connect the SMH10 to your computer.
Step 2. Run the setup program, smh10manager-v1.0-setup.exe, then SMH10 Manager Setup window
will be started as follows. In case that you have 64-bit OS, please run different set-up program,
smh10manager-V1.0-setup_x64.exe.
Note:
A warning message on User Account Control windows may be popped up. Please select “Allow”
or select “Yes” button to proceed to the installation of SMH10 Manager.
Figure 1-5 Welcome Message
Step 3. Click “Next” button and then specify the destination location of program.
7
Figure 1-6 Choose the destination location of program
Step 4. Click “Install” button after choosing destination location of the program and then installation
will be started.
Figure 1-7 Program Installation
8
Step 5. A message window will pop up to guide you to connect the SMH10 to the computer. Please
hook up the SMH10 with your computer by using USB cable and then turn it on by selecting “Phone
button” and “Jog Dial” together.
Note:
Please do not select “Cancel” button if it is the first time installation on your computer.
Step 6. A message box will disappear after 10 seconds, and it means the SMH10 is found
successfully in the installation.
Figure 1-8 SHM10 is found
Step 7.
Device Driver Installation Wizard will be started, then. Select “Next” button to proceed to the
installation process of device driver.
9
Figure 1-9 Device Driver Installation Wizard is started
Step 8. It may take up to 10 minutes to lead you the next step. Please wait until you can see the next
message window.
Figure 1-10 Device Driver is in installation
Step 9. Select “Finish” button to complete the installation to go to the final stage of the installation.
10
Figure 1-11 Completing the Device Driver Installation
Step 10. Final Installation message will be popped up. Select “Finish” button, and then SMH10
Manager will be started automatically.
Figure 1-6 Completing Setup Wizard
Please see the section 3 to learn how to use SMH10 manager.
11
Troubleshooting for failure in Device Driver Installation
If you see the error message on device driver installation failure, please follow the steps below to
do troubleshooting.
Figure 1-7 Cannot complete the Device Driver Installation
1. Select “Finish” button and close SMH10 manager setup windows.
2. Uncheck the “Run SMH10 Manager 1.0” checkbox in the next pop-up window and then
select “Finish” button.
12
Figure 1-8 Completing Setup Wizard
3. Restart your computer system.
Note:
Please make sure that SMH10 remains connected to your computer with keeping poweron status.
4. After your computer is restarted, please go to the menu, of SMH10 Manager program, by
moving to Start Menu -> All Programs -> Sena Technologies -> SMH10 Manager.
5. Select “Install Driver” in the SMH10 menu.
Figure 1-9 Run Install Driver manually
13
6. Device Driver Installation Wizard will be started again. Please repeat the steps from Step
6 to Step 10 to complete the installation.
14
2. Getting Started
2.1. Starting SMH10 Manager
Step 1. When you start SMH10 Manager, message box will be popped up as follows,
Figure 2-1 Start-up Instruction
Step 2. Please follow the steps on the message box and then click “OK” button.
Note: [Windows XP]
The further driver installation is required and it will be running automatically. Please look into the
Windows task bar until the installation is completed. And, then select “OK” button if the process is
completed.
Step 3. Then SMH10 Manger will display the firmware version of your SMH10 automatically. You may
find the message, “SMH10 is connected with computer” if the program is successfully connected to
the SMH10.
15
Figure 2-2 SMH10 is connected
If you fail to connect the SMH10, please close SMH10 Manager and restart it again.
Figure 2-3 SMH10 is not connected
16
2.2. Updating Firmware
Step 1. To update firmware of your SMH10, select “F/W Update” Button.
SMH10 Manager will automatically check the newest firmware on the management server. Please be
sure to connect your computer to the Internet. If there is a newer version firmware on the server
following message will be displayed.
Figure 2-4 New firmware is available
Step 2. Select “Yes” button and then select firmware download location on your computer.
Figure 2-5 Save New firmware
17
Step 3. After selecting download location and then select “Save” button.
Then new firmware will be downloaded from server and progress bar will be displayed as
follows.
Figure 2-6 Firmware Downloading progress bar
Step 4. If new firmware download is completed, “Update” button will be displayed as follows.
Select “Update” button to proceed to the next stage of firmware update.
Figure 2-7 Select Update button
Step 5. A yellow-colored message box will be popped up. Please press the “Phone” button of SMH10
and hold it awhile until the message disappears.
18
Figure 2-8 Press Phone button message
Step 6. Firmware is to be updated into the SMH10. During the process, please look into the message
display of the program in order to check the progress. SMH10 Manager will write the new one to the
device.
Figure 2-9 Firmware Writing process
19
Figure 2-10 Firmware Verifying process
Note:
When the verifying progress is completed, the process may look halted about 10 seconds.
This is normal operation for checking firmware on the SHM10.
Step 7. A yellow-colored message box will be popped up again. Please press “Phone button” and “Jog
Dial” together until the message disappears.
Figure 2-11 Press Phone button and Jog Dial message
20
Step 8. Firmware Update is completed and the current firmware version will be displayed on the
program window.
Figure 2-12 Update is completed
21
2.3. Restore Firmware
Step 1. To restore the SMH10 firmware to the original, select “F/W RESTORE” button. A message will
show you the information of the firmware which is stored as a back-up.
Note:
Firmware restore function is available only in the computer where SMH10 had been updated. You
need to use the same computer o firmware update when you restore it. Also you must be able to
connect to the internet in order to restore firmware.
Figure 2-13 Make sure to check the internet connection
Figure 2-14 Firmware Back up Information
22
Step 2. Select “RESTORE” button to proceed and then yellow-colored message will pop up. Press
“Phone” button of SMH10 until the message disappears. Then, firmware restore process will be
started.
Figure 2-15 Restoring firmware Started
Figure 2-16 Press Phone button message
23
Figure 2-17 Firmware Restoring progress bar
Figure 2-18 Firmware Verifying process
Note:
When the verifying progress is completed, the process may look halted about 10 seconds.
This is normal operation for checking firmware on the SHM10.
Step 3. After the process is completed, a message box will pop up again. Press “Phone button” and
“Jog Dial” together until the message disappears.
24
Figure 2-19 Press Phone button and Jog Dial message
Step 5. Then firmware restore is completed and the current firmware version will be displayed on the
program window.
Figure 2-20 Firmware Restore is completed
25
2.4. Update Firmware from specific file
Step 1. To update the firmware of your SMH10 using the firmware stored on your computer, select
“F/W UPDATE” Button.
Figure 2-21 Update firmware
Step 2. Select “SELECT” button to open selection window, and then choose a firmware to be updated
for your SMH10.
Figure 2-22 Open firmware
26
Step 3. Select “UPDATE” button to proceed.
Figure 2-23 Select update button
Figure 2-24 Progress bar in Firmware Update
Step 4. A yellow-colored message box will be popped up. Please press the “Phone” button of SMH10
and hold it awhile until the message disappears, and then the process will be continued.
27
Figure 2-25 Press Phone button message
Step 5. Press “Phone button” and “Jog Dial” together until the message disappears.
Figure 2-26 Press Phone button and Jog Dial message
Step 6. Firmware update is completed and the current firmware version will be displayed on the
program window.
28
Figure 2-27 Updating is completed
29
2.5. Device Settings
You can set up some parameters of your SMH10 by using “DEVICE SETTINGS” menu.
Figure 2-28 Device settings
Please note that changing device settings is supported from firmware version 3.1. Please update
your firmware first to set up the parameters.
Figure 2-29 changing device settings
30
After changing settings, select “SAVE” button to save the changes to SMH10.
Figure 2-30 Confirm save chnages
Note:
Change of device settings is effective only after SMH10 is restarted.
31
2.6. Checking version of SMH10 Manager
In order to check the software version of SMH10 Manager, click [?] button on the upper-left corner of
the SMH10 Manager program.
Figure 2-31 Check the version of SMH10 Manager
32