1
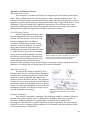
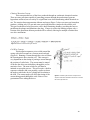
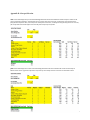
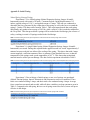
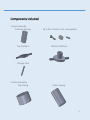
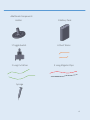
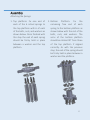
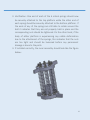
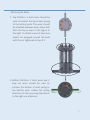
12/11/2013&
&
&
BMEG450/MEEG401&Senior&Design&&
West Pharmaceutical Services
Novel Injectable Drug Delivery Project
Team West Pharma
BMEG Madison DeFrank
BMEG Derek Hunter
BMEG Ryan O’Boyle
MEEG Hayley Shaw
MEEG Kailey Nelson
Sponsors Reginald Motley and Chris Evans
Company West Pharmaceutical Services
Advisor Dr. Singh
Table of Contents
!
ABSTRACT .................................................................................................................................................... 4&
INTRODUCTION............................................................................................................................................ 5&
Background&and&Significance ................................................................................................................... 5&
Project&Scope ........................................................................................................................................... 5&
Wants&&&Constraints ................................................................................................................................ 5&
Design&Metrics ......................................................................................................................................... 6&
CONCEPT&GENERATION&&&SELECTION ......................................................................................................... 6&
Benchmarking .......................................................................................................................................... 6&
Round&One&Preliminary&Concepts ............................................................................................................ 6&
Round&Two&Preliminary&Concepts............................................................................................................ 7&
Concept&Selection .................................................................................................................................... 8&
Preliminary&Testing .................................................................................................................................. 8&
FINAL&DESIGN............................................................................................................................................... 8&
Design&Overview ...................................................................................................................................... 8&
Design&Details .......................................................................................................................................... 9&
Prototype ............................................................................................................................................... 10&
Projected&Budget ................................................................................................................................... 10&
DESIGN&VALIDATION .................................................................................................................................. 11&
Failure&Analysis ...................................................................................................................................... 11&
Testing ................................................................................................................................................... 12&
Validation&Results .................................................................................................................................. 13&
CONCLUSION ............................................................................................................................................. 13&
Design&Evaluation .................................................................................................................................. 13&
Deliverables ........................................................................................................................................... 13&
Project&Plan&and&Path&Forward .............................................................................................................. 14&
APPENDICES ............................................................................................................................................... 15&
Appendix&A:&Metrics............................................................................................................................... 15&
Appendix&B:&Benchmarking.................................................................................................................... 16&
Appendix&C:&Preliminary&Concepts......................................................................................................... 18&
Appendix&D:&Concept&Selection.............................................................................................................. 20&
2&
&
Appendix&E:&Initial&Testing...................................................................................................................... 21&
Appendix&F:&Circuit&Calculations ............................................................................................................ 24&
Appendix&G:&Failure&Analysis.................................................................................................................. 26&
Appendix&H:&Projected&Budget............................................................................................................... 27&
Appendix&I:&Project&Plan......................................................................................................................... 28&
&&&&Appendix&J:&Drawing&Package……………………………………………………………………………………………………………..30&
&
&
&
&
&
&
&
&
&
&
&
&
&
&
&
&
&
&
&
&
&
&
3&
&
ABSTRACT
West Pharmaceutical Services manufactures drug packaging and auto-injector drug delivery
systems. West’s existing auto-injector products have been designed to be disposable and are intended for
a single dose of medication. This method of injection, although effective, is not economical. West hopes
to expand their product line to include a range of reusable drug delivery products. The scope of this
project is to research and develop a novel drive mechanism that can move a piston in a 1 mL syringe and
be reset for dispensing of multiple doses of medication. The final concept employs springs made of the
shape-memory alloy, Nitinol, to produce the driving force for the mechanism. The final design consists of
eight nitinol tension springs, six 3D-printed parts, an 11.1 V battery pack as the power source and an
“on”, “off” toggle switch. The battery pack allows a heating current of 3.25 Amps to be passed through
each spring, resulting in a compressive force to drive the injection of a viscous liquid. To prepare for use,
a prefilled syringe can be inserted through the bottom platform and locked in place. After use, the syringe
may be safely discarded and the system reset to prepare for a new injection. This design satisfies the
original scope and meets all of the high priority and the majority of the lower ranked metrics making it an
effective first prototype of this design. For future improvements upon this design one would alter the
power source, shutoff mechanism and material choice of the parts and springs to improve efficiency.
&
&
&
&
&
&
&
&
&
&
&
&
&
&
&
&
4&
&
&
INTRODUCTION
Background and Significance
West Pharmaceutical Services manufactures elastomer closures for injectable drug packaging and
drug delivery system components for the pharmaceutical/biotech industry. West has two divisions,
Packaging Systems and Delivery Systems. The Delivery Systems division develops and manufactures
safe, multi-component systems for drug administration. We will be working with the Innovation group for
Delivery Systems to research a reusable drug delivery aid for home use. Existing West auto-injector
products have all been designed to be disposable and are intended for only a single dose of medication.
This method of injection, although effective, is not economical. The intent is to design a device, which
can be reset and used multiple times, reducing waste and increasing sustainability.
Project Scope
To research and develop a novel drive mechanism that can be reset and move a piston in a 1 mL
syringe for dispensing of liquid.
Wants & Constraints
Before developing potential concepts for this design, a list of customers, wants, and constraints
was compiled. The identified customers included West Pharmaceutical Services and the users. Defined as
anyone in need of an injectable drug delivery system, the users included a range of clients from children
to adults, and able-bodied persons to those with serious disabilities. After speaking with the sponsor,
extensive research, and role playing, the design requirements were determined. An initial list of design
requirements was generated and ranked based off of the sponsor’s expressed wants as well as
benchmarking similar existing products, keeping the intended user in mind. For example, one expects a
device that is simple to operate would prove more attractive to consumers. As a result, easy to use was
established as a want and located higher on the rankings list. Overall, however, the final constraints and
wants were adjusted to meet the specifications defined by the sponsor, as they are most familiar with the
user’s wants. Below details the final ranked constraints and wants with corresponding descriptions.
Constraints (In order of importance)
• Reusable: Device can be reloaded multiple times for more than one use.
• Delivers full dose of fluid: A complete dose of medication must be ejected from the syringe and
administered to the user.
Wants (In order of importance)
• Delivers up to 50-centipoise viscous fluid: The pressure from the device must be strong enough to
release a 50 centipoise viscous fluid at an adequate speed so as to avoid injuring the user.
• Safe: The user will remain unharmed when using the device. A blocking device should be placed
over the trigger to avoid an accidental fluid release.
• Novel: The mechanism is a recent discovery or development and has not been used in the past.
• Compact: A small, portable mechanism is desired. The size should be comparable to similar
existing products.
• Easy to use: The use of the product should be very straightforward and simple with only a
minimal amount of controls to operate it.
• Easy to recharge/reset: The syringe containing the medication should not be complicated to
install. It should take the user less than two minutes to replace the old syringe.
• Sustainable: Due to the portability and purpose of the product, it should be durable and have a
long lasting lifetime.
• Lightweight: Due to portability and a wide range of customers, the device should be lightweight
so all users can carry and hold the device up to the skin.
5&
&
•
•
Controlled drug delivery speed: An adaptable product is ideal to accommodate multiple types of
fluids, and resultantly, multiple types of medications.
Cost Effective: The cost to manufacture and develop the device should remain within the
Sponsor’s predetermined budget.
Design Metrics
After reviewing and ranking the list of wants and constraints, as well as discussing them with the
sponsor, specific metrics were set. Each metric was assigned a target value with proper units. These target
values were generated after thorough research of existing products on the market as well as products
manufactured by West Pharmaceutical Services. The goal of the research was to understand what values
must be surpassed in order to design a more effective and novel drive system. In addition, collaboration
with West Innovation Team aided with the development of many of the target values. The Innovation
Team provided critical information about the design based on West’s existing products. For example, the
need for a compact device was assigned two metrics of max length and max width with associated target
values. These target values were defined by the Innovation Team to achieve a size equal to or less than
their existing drug delivery systems. Detailed in Appendix A Table 1 are the final metrics of each want
and constraint, as well as the corresponding target values.
CONCEPT GENERATION & SELECTION
Benchmarking
West Pharmaceutical Services has two products called the ConfiDose and the SmartDose, which
are not yet on the market. The ConfiDose Auto-injector is spring loaded with single push button
activation while the SmartDose Electronic Patch is motor driven with audible and visual drug
administration indicators. All of West’s current products, while effective, must be disposed of after the
first use. The LISA Auto-Injector System is a competitor product designed by Unilife that is an
automated, customizable and reusable auto-injector system. This system has various injection speeds,
LED indicators, push-on skin sensors, single button activation, and needle free removal compatible with
easy to load pre-filled syringes. The driving mechanism for this device is undisclosed. The medical
technology company BD also markets a competing reusable injector pen, the BDTM Pen II Reusable Pen,
which is manually driven by the user. The only other competing reusable auto-injector product currently
on the market is Cambridge Consultant’s Flexi-jectTM system, which employs flexible drug cartridges that
can be squeezed by an undisclosed mechanical system to deliver a drug dose. While novel, this approach
to auto-injection is incompatible with standard glass syringes making it unsuitable for adaptation in this
project.
After further benchmarking on possible
drive mechanisms, the idea of a flat coil spring was
explored. While researching to determine its specific
attributes, patents related to auto-injecting drive
mechanisms emerged. A patent, published in 2011,
Figure'1.!A!photograph!depicting!the!design!represented!in!the!
details a plunger drive mechanism using a flat coil
patent!incorporating!a!flat!coil!spring.
spring as the driving force. A picture of the patent is
depicted in Figure 1. Although the patent does not explain the mechanism of using a flat-coiled spring, it
mentions that it may be adapted for a resettable mechanism, a tool that might prove useful when
generating concepts. All benchmarking related resources are listed in Appendix B.
Round One Preliminary Concepts
When generating a list of possible concepts it is important to keep the sponsor’s interests in mind.
Through benchmarking and communication with West, multiple designs were developed to create a
reusable injectable drug delivery system. An initial round of concept generation produced five
preliminary concepts.
6&
&
SMA Concept
A shape-memory alloy (SMA) is an alloy that is
capable of undergoing temporary plastic deformation
from its initial dimensions and still returns to its predeformed shape when heated to a transition temperature.
This ability of SMAs to change shape affords the material
many possible applications, one of which potentially in
the field of auto-injection. This concept proposes the use
of SMA springs that can easily be elongated at low
temperatures but then return to a compressed state when
heated by an electrical current. This spring compression
Figure'2.!A!sketch!of!the!shape8memory!alloy!concept!
will pull the plunger of the syringe down its longitudinal
with!two!compression!springs!shown!on!either!side!of!
axis, driving the liquid contained within out through the
the!syringe,!driving!the!plunger!to!release!the!fluid.
needle. When the current passing through the springs is
shut off and the springs are allowed to return to a temperature below the alloy’s transition temperature,
the springs can then easily be reset to their elongated state in preparation for future injections. An
illustration of the SMA concept is depicted in Figure 2.
The concepts below were also generated as round one preliminary concepts. For a detailed
description of each, see Appendix C.
• Soft Metal Alloy Concept
• Flat Coil Spring Concept
• Motor Driven Concept
• Hydraulic Component
Round Two Preliminary Concepts
After conversing with the sponsor and presenting the initial concepts, the concern for originality
in the design arose. As a result, novelty was added to the list of wants. After further benchmarking, a
second round of concept generation produced additional concepts.
Magnet Concept
The upper casing of the auto-injector will be lined
with magnets all oriented on angles with the poles facing
down the shaft. Another smaller magnet will be held in
place at the top of the injector within the casing as can be
seen in Figure 3. After an initial activation force is applied,
this magnet will be drawn farther down the injector due to
the attractive force between it and the magnets lining the
casing. After it is displaced, it will then be attracted to the
next set of lining magnets and repelled by the previous
ones. In turn this will accelerate the small magnet with
enough force to exert on the plunger of the syringe. A
Figure'3.!A!sketch!of!the!concept!using!magnets!
neodymium magnet will be used as the one propelled since
lining!the!device!to!accelerate!a!smaller!magnet!
it is the strongest permanent magnet available with a wide
downward.!
variety of sizes.
The concepts below were also generated as round
two preliminary concepts. For a detailed description of each, see Appendix C.
• Chemical Reaction Concept
• Coil Wire Concept
7&
&
Concept Selection
There were two main rounds of concept comparison and selection based off the project metrics.
The first round included the initial five concepts; soft metal alloy, flat coil spring, SMA, motor driven,
and hydraulic. After conversing with the sponsor, the motor driven concept and hydraulic component
were immediately eliminated for lack of novelty in the design. The remaining concepts were ranked based
on their satisfaction of each metric. From this, the concept that achieved the highest ranking was our final
concept to pursue further—in this case the shape memory alloy concept. Thus, after this mathematical
analysis coupled with input from the sponsor, the SMA concept was determined to be the final concept
for this initial round of comparison. Refer to Table 1 in Appendix D to see the methodology behind the
selection for round one comparison.
A second round of concepts were generated including chemical reaction, magnet driven, and coil
wire gun. These concepts underwent the same comparison process as the first round of concepts.
Following this same procedure the leading design was the magnet concept. The methodology behind this
selection is illustrated in Table 2 of Appendix D.
After further communication with the sponsor, it was concluded that both the SMA concept and
the magnet concept should be explored in more detail to determine their feasibility; therefore, preliminary
testing on both concepts was conducted.
Preliminary Testing
Preliminary testing was performed on the magnet and SMA concept. This testing was done using
various magnet sizes, number of magnets, spring vendors, number of springs and supplied voltage to the
springs. Force, temperature, and current were some of the parameters tested. A summary of the
experiments is given below while their details are displayed in Appendix E.
Nitinol Spring Concept Testing
• Experiment 1: Nitinol springs (Images Scientific Instruments). Force generated, and force to
displace was measured. It was concluded that eight springs will be needed for the design.
• Experiment 2: Nitinol spring (Images Scientific Instruments). Temperature, and time to cool were
measured. From this experiment, 4A of current will be sufficient to provide the required force and
the peak temperature of the springs is 145oC.
• Experiment 3: Nitinol springs (Jameco Electronics). Force generated was measured. These new
springs were less expensive than the original but produced an average force of 2.33 lb, less than
that of the first springs.
Neodymium Magnet Concept Testing
• Experiment 4: Sets of three, four, and five magnets of increasing strength. Speed, time, and
plunger rod displacement were measured. From magnet testing, it was concluded that the magnets
will not produce enough force to drive the plunger rod, deeming this concept implausible.
Combined SMA and Neodymium Magnet Concept Testing
• Experiment 5: Two magnets. Attraction force was tested. The possible combination of the magnet
and SMA concept will not be advantageous.
After testing both concept ideas, as well as the combination of both concepts together, it was
concluded that the SMA concept would be the final and most plausible design.
FINAL DESIGN
Design Overview
After preliminary testing with the SMA and magnet concepts, the SMA concept was declared as
the final concept. This concept incorporates the use of nitinol springs, which are shape memory alloys.
This spring, when stretched to a certain displacement compresses and returns to its original length when a
current is passed through it in which a battery pack is used as the power source. The idea is to attach eight
8&
&
springs together in a circuit such that they all compress at the same time. The combined force of the
springs during compression will act as the driving force for the injectable drug delivery system. When the
springs compress, they apply force to the customized plunger rod, releasing the fluid from the syringe
until it is fully dispensed. After an injection is made, the stopper in the syringe will detach from the
plunger rod, removing the used syringe from the system. To reset the system, the user must pull the arms
of the top platform back to its original position. A new syringe is inserted into the mechanism to prepare
for the next injection. Figure 4 depicts a model of the drug delivery design with all parts labeled. The
drawing package for this design can be found in Appendix I.
Figure'4.!A!labeled!depiction!of!the!inner!mechanism!of!the!prototype!(left).!A!labeled!depiction!of!the!prototype!encased!
in!an!external!housing!(right).!!
Design Details
Each of the eight Nitinol springs being used in the drive
shaft of the mechanism is 916$inch long when compressed with a
coil diameter of 6 mm and a wire diameter of 0.75 mm. From the
results of previous testing, it was concluded that each spring has the
potential to produce a maximum force of 2.33 lbs when 4 amps of
current is passed through each. Thus, eight springs were chosen for
the design in order to be able to produce the necessary 16 lbs of
force with an added factor of safety. The bottoms of the springs are
fixed in place in a circle around an empty space that the glass
syringe can clip into. The tops of the springs are fixed in a circle
around a circular platform on which the top of the plunger rod is
fixed into. Therefore, when the springs compress, the top platform
will push down on the plunger rod to administer the fluid.
The current passing through each spring during their
compression must be precise as to not damage the springs while still
&
Figure'5.!A!depiction!of!the!circuit!
configuration!of!the!eight!nitinol!springs!in!
the!final!design.
!
9&
producing a sufficient force. This value was found through circuit calculations found in Appendix F. By
performing predictive calculations confirmed with validation testing using a multimeter, it was found that
the actual resistance of each nitinol spring was 0.85Ω. Evaluating the current and voltage requirements for
potential power sources using different circuit arrangements, it was found the most plausible circuit to
maximize the force produced and minimize size is to wire four springs in series and place this in parallel
with another four springs in series (Figure 5). The selected battery pack wired to the springs uses 11.1 V
and has a maximum discharge current of 6.5 A (Li-Ion 11.1V 2600mAh Rechargeable Battery Pack,
Tenergy). This allows a current of 3.25 A to be passed through each spring, a value approaching the 4
amps determined through preliminary testing. The contraction of the springs will be activated by a rocker
switch that will complete the spring circuit.
The wiring will be attached to the ends of the springs in order to eliminate obstruction during
compression, while the battery will be fixed in place outside of the housing of the spring mechanism.
Due to the high temperatures reached by the springs when current is passed through them, they must be
insulated with a heat shielding material in order to protect the rest of the unit and the user. The material
with the highest temperature resistance that is compatible with West Pharmaceutical’s 3D printer
(Stratasys) is RGD5250-DM with a heat deflection temperature of 50-56°C. The 3D printed material used
to manufacture the mechanism will be coated in heat shielding foil tape (Design Engineering) which
reflects up to 815°C followed by a heat shielding fiberglass tape (McMaster Carr) which shields up to
260°C to further protect against the heat radiation from the springs. The use of both types of tape was
necessary due to the fact that the foil tape is electrically conductive and will impede the functionality of
the springs. The foil tape was still incorporated, however, due to its greater heat shielding capabilities.
Prototype
&
The prototype consists of six 3D-printed parts (locking platform, bottom platform, plunger, top
platform, external casing, ultimate top platform, Figure 5), eight nitinol tension springs, and a power
source. In preassembly, the internal faces of all 3D-printed parts will be lined with two layers of heat
shielding tape. Assembly begins with the eight springs being fixed to the bottom platform via screws,
washers, and nuts. The driver rod is then fit into the top platform, followed by the fixture of the springs to
the top platform using the aforementioned fixing method. The bottom
platform can then be slid into the external casing and locked in place using
the locking arms. The arms on the top platform will sit in the tracking
grooves in the side of the external casing allowing for longitudinal
movement and resetting. The ultimate top platform encloses the top of the
external casing, confining the entire mechanism and adding support to the
structure. Assembly will conclude with the power source, which will be
wired to the springs in the configuration seen in Figure 6 through a highamp toggle switch. The final prototype is illustrated in Figure 6.
To make ready for use, a prefilled syringe can be inserted through
the bottom platform and locked in place with the locking platform that uses
a press fit to maintain the syringe at the proper height to dispense a full
1mL dose. After further testing and research, the final commercial design
may potentially differ in its power source and heat shielding method.
Figure'6.!The!final!assembled!
Alterations can be made to the SolidWorks design depending on
external!view!of!the!prototype.
performance, requests from sponsor, and aesthetic preferences. Once a
final power source in validated a complete unit housing must be designed
!
to hold the drive mechanism, power source, and toggle switch in place during use.
Projected Budget
Throughout the design process many components of the design have already been purchased.
Some of these include the nitinol springs and magnets used for preliminary testing as described above.
10&
&
The projected cost of building the final prototype will include the cost of 3D printing the components, 8
nitinol springs, a roll of heat shielding tape, an 11.1V 2600 mAh Li-ion rechargeable battery pack, Li-ion
battery pack smart charger, and high-amp rocker switch for a total cost of $512.84. The remainder of the
hardware is provided free of charge by West Pharmaceutical Services and the Senior Design Studio.
Incorporating all costs incurred, the projected budget is $931.04. West Pharmaceutical Services provides
a $2000 budget meaning the project cost is well within this constraint. For specific details on ordered
materials refer to the Bill of Materials in Appendix H. Mass production of 1,000 of these devices would
be achieved using the method of injection molding, using the material Delrin®, an acetal homopolymer
that has heat resistive properties. The projected cost of the injection-molded parts per device was found
by using an injection mold estimator on custompart.net. The combined manufactured parts per device
average to $104.37, which reduces the cost of each device by $270.63. All other components would be
purchased in bulk, decreasing overall cost. Thus the projected cost of a commercialized device would be
less than $230, which is greater than a fifty percent reduction in price, compared to the price of our final
prototype.
DESIGN VALIDATION
Failure Analysis
There were six main modes of failure that were considered for this design. First the topper
component may break due to the forces the user may apply on it when resetting. To deform eight springs,
one must apply about 10 pounds of force, the force each springs needs is a little more than a pound force
to deform. But with this force and the thinness of the topper arms, they make break due to the moment
applied. But using finite element analysis it was found that this part’s yield strength occurs at 18 pounds
force, which results is a large margin of safety (please refer to figure 1 and 2 in Appendix G).
The second was that the springs would fail to provide enough force to dispense the fluid. After
preliminary testing was performed on the springs, six springs were deemed necessary for the design
(Appendix E). A factor of safety of 2 springs was assigned to account for the uncertainty in the
measurements and optimize the force needed.
The third was overheating of all the exposed interior sides of the 3D printed material in the drive
mechanism. Lining each of these parts with two layers of heat shielding tape (foil tape and fiberglass
tape) as described in the design details mitigated this risk. Both tapes used successfully reflect against the
generated heat, completely avoiding this overheating problem.
The fourth mode of failure is a wiring malfunction during use. If a wire comes loose the circuit
will open and not all the springs will be heated to induce contraction. This problem was addressed by
fixing the wires under the screws at the end of each spring to be held in place.
Overheating of the springs is another potential mode of failure. The importance of each spring
receiving the proper amount of current from the battery is critical. Using 8 springs in total it was
determined that an 11.1 V battery will supply 6.5 Amps to the circuit, therefore delivering 3.25 V to each
spring. Through testing it was determined that this current will not overheat the springs during the time it
takes to complete an injection, partially eliminating this mode of failure. Overheating can also occur when
current continues to run through the springs after they are fully contracted. An on/off toggle switch and
visible indicator for successful injection were implemented, completely avoiding this overheating issue.
Finally, failure of springs to contract due to fatigue is the last mode of failure that was addressed.
After testing many viscous fluids, the maximum number of uses until fatigue was determined. This result
was a total of 15 uses with a viscosity value of 30 cP and 4 uses with a maximum viscosity value of 40
cP. If the number of uses does not exceed these values for the specified viscosities then the springs will
function correctly.
11&
&
Testing
The testing procedure was split up into two different methods: observational and experimental.
Observational testing included recording the measured values of any metrics without performing any
physical tests on the drive mechanism. For example, because number of sharp objects exposed is found
by simply examining the device, it was categorized as observational testing. Experimental testing
involved those values, which can only be deduced by running tests on the prototype. For example, the
only way to accurately measure the weight of the mechanism is to run an experiment using a scale.
Observational Testing of Metrics
• Number of Sharp Objects Exposed: The value for this metric is very subjective depending on how
some individuals may define “sharp”. As a result, a poll was taken with 10 subjects asking how
many sharp objects they consider the device to have. Nine people believed there to be zero sharp
objects exposed, leading to the final measured value of zero and an overall safe to use device.
• Not Previously Seen/Previously Seen: The value for this metric was predetermined though
benchmarking existing competing products evidenced by the second round of concept generation.
A subjective rating of zero was assigned as the final measured value meaning shape memory
alloys have never been used in an auto injector before resulting in a completely novel product.
• Number of Controls to Perform Function: Once the final working prototype was assembled, the
number of control to use the device was two. One control to turn the toggle switch on and another
to reset the device using the top platform arms, making it easy to use.
• Number of Speed Capabilities: The speed of contraction of the nitinol springs are incapable of
being controlled especially because they have never been used in this type of application before.
Consequently, at any given drug viscosity there is only one speed for the injection that cannot be
controlled.
• Cost: Throughout the project, all prices and quantities of every ordered material were recorded in
the bill of materials. The final costs include preliminary testing, viscous fluids, prototyping, and
additional costs (shipping) and amounted to $931.04 which is only 46.6% of the given budget.
Experimental Testing of Metrics
• Testing with 40 cP fluid: Once the final prototype was assembled, multiple trials of failure testing
were performed. This consisted of using brand new springs to dispense 40 cP fluid until the
springs fatigued and could no longer push the fluid out. There were four trials performed until
this occurred. By filling a 1 mL syringe with this 40 cP fluid and observing as the system
dispensed the full dose, a value of 1 mL was determined to be the final volume of drug delivered.
• Testing with 30 cP fluid: After, 30 cP fluid was tested with a new set of springs until failure
which resulted in 15 uses, achieving the reusability factor. Based on the fact that 30 cP allows for
greater usability, it was assigned to be the final viscosity value meaning up to 30 cP could be
delivered successfully over 10 times. From this, it can be said that more than one drug is
compatible with this system because any medication ranging from 1-30 cP can be dispensed.
• Time: This time corresponds to the time to reset the device. As it pertains to this final prototype,
that time depends on how long it takes for the springs to cool after an injection has been made
because the springs cannot stretch until this is done. The time to cool was measured
simultaneously with the 30 cP fluid test where a stopwatch was used. The time was recorded from
directly after the injection was made to when the springs were cool enough to be easily stretched.
The average time to reset was approximately three minutes. Since the time is due to waiting time
and not the addition of controls, the device remains relatively easy to reset.
• Max Length/Width: The dimensions were recorded by simply taking a caliper and measuring the
prototype. The final prototype is 100 mm x 60 mm, making it compact but slightly larger than the
target size suggested by West.
12&
&
•
Weight: The weight was found by placing all the components of the prototype on a scale. The 3D
printed parts, springs, battery pack, and toggle switch were included in this and a weight of 0.64
lb was recorded, making it a lightweight product and adding to its portability.
Validation Results
After completing validation testing of the prototype, the design was evaluated by comparing its
performance against the standards set by the previously established metrics. It was found that the design’s
functionality was great and met many of the metrics, but more importantly many that were of high
priority. Expectations for metrics such as number of uses and project cost were not only met, but also
exceeded the target performance. With these successes, however, the design did also fail to meet a few
metrics such as maximum length, time to reset, and number of speed capabilities. The size of the device
exceeded the maximum desired dimensions, but the team agreed to not sacrifice the functionality of this
device to meet the sizing component. Upon further inspection of the device, the length could be shortened
to accommodate this metric and this would be done so upon the next phase of prototyping.
The time to reset the mechanism exceeds the target value of two minutes, by a mere minute and
this is due to the need for the springs to cool in order to reset. But this device is not one that needs to be
immediately used again after each injection, thus this is not a main concern. Finally, with the power
source that is used within this design, there is one steady current that runs through the springs, such that
they will compress at one rate and one rate only. Thus, the metric for multiple speed capabilities is not
achieved, but with the use of a more complicated power source and circuit this can be achieved. Overall,
this prototype functions well as a drive mechanism that is resettable and novel, as requested by the
sponsor. Thus in its entirety it successfully meets the project requirements.
CONCLUSION
Design Evaluation
This design and prototype satisfies the original scope, that a novel drive mechanism can be
resettable, thus reusable, and can generate enough force to move a piston in a 1 mL syringe to dispense
medication. It meets all of the high priority and majority of the lower ranked metrics, thus this is an
effective first prototype of this design that was well within the allotted budget. Upon mass production the
price per device would drop drastically in comparison to the original prototype, making for a more
economical design.
Deliverables
&
Figure7:!This!figure!displays!all!of!the!deliverables!as!listed!below!of!the!final!prototype.!
13&
&
Deliverables provided to the sponsor include the following:
•
•
•
•
•
•
Battery Pack
Battery Charger
Toggle Switch
Alligator Clips
Inner Assembly Parts
Outer Assembly Parts
Project Plan and Path Forward
Throughout the entire design process, a project plan was maintained in order to ensure that the
requirements and deadlines were met. Specific tasks for each phase of the project were dealt out and role
delegations were assigned. Ultimately, all checkpoints were met and can be seen in Appendix I.
As discussed above, the final shape-memory alloy prototype successfully satisfied all of the final
design metrics except for controlled drug delivery speed, compactness, and ease to recharge/reuse. As this
concept is developed further these shortcomings as well as other potential design flaws identified in
testing must be considered. Outlined below are suggested directions in which to begin addressing these
issues.
• Custom Nitinol Springs: The main determining factor of the size of the drive mechanism is the
initial size (length and coil diameter) of the nitinol springs. Due to the time and budget constraints
of the project, only premade springs already on the market were researched for potential
incorporation into the prototype. Motion Dynamics offers custom orders of nitinol components
and might prove to be a useful source of smaller nitinol springs that will allow for a more
compact drive mechanisms design. A custom order from Motion Dynamics might also be used to
tailor the material properties of the springs to better suit a force generation application. A lower
transition temperature of nitinol will reduce the time required to heat the springs, decreasing the
time needed for the springs to begin to contract and the chances of overheating induced damage
to the springs.
• Alternative Power Source: The 11.1V battery pack (Tenergy) that is currently being employed to
supply the current needed to heat the nitinol springs, while effective, is quite large and heavy. A
potential alternative current source is ultracapacitors (Maxwell Technologies). Ultracapacitors are
significantly smaller than a battery pack and are still capable of generating short bursts of current.
A circuit might also be designed making it possible to adjust the rate of ultracapacitor discharge
and the speed of drug delivery. One drawback of ultracapacitors, however, is that they can only
store enough charge for one dose delivery by the drive mechanism and require recharging before
subsequent injections.
• Heat Resistant Material: In order to protect the 3D-printed components of the prototype from the
high temperatures generated by the nitinol springs during drug deliver these pieces were covered
in a layer of heat shielding tape. This taping is a very time-consuming process and can be avoided
if these components were composed a material with a higher melting temperature. Delrin® is a
commonly used material for injection molding and has a sufficiently high melting temperature
(175 °C) to withstand the heat emitted from the springs, making it an ideal material for the drive
mechanism.
• Automatic Shutoff: As previously mentioned, one of the most likely modes of failure of the drive
mechanism is failure of the springs due to heat damage. In order to prevent excessive heating of
the springs and increase their lifetime it would be prudent to incorporate an automatic current
shutoff into the circuit design. Once the springs have finished compressing and the full dose of
drug has been delivered, the automatic shutoff will short the circuit with the power source and
divert the current from the springs. A physical indicator such as a light bulb could then signal the
user to turn the device off.
14&
&
APPENDICES
Appendix A: Metrics
Table'1.!A!table!depicting!the!ranked!wants!and!constraints,!corresponding!metrics,!target!values,!and!resources!used!to!
determine!final!metrics.!The!target!values!associated!with!the!metrics!pressure!and!breaking!force!are!in!progress!until!the!
sponsor!sends!a!document!detailing!existing!product!specifications.!The!existing!products!refer!to!products!that!West!has!
developed,!but!are!not!on!the!market.!
Rank Wants/Constraints
Metric
1
Reusable
Number of Uses
2
Volume of drug
delivery
Viscosity
1 mL
4
Deliver full dose of
fluid
Ability to deliver up
to 50 centipoise of
viscous fluid
Safe
Number of sharp
objects exposed
0
Existing Product:
Selfdose
5
Novel
0
Existing Products
6
Compact
Easy to use
80 mm
65 mm
≤ 2 controls
Existing Products
7
8
Easy to
Recharge/Reset
Not Seen Previously: 0
Previously Seen: 1
Max Length
Max Width
Number of controls to
perform function
Time
< 2 Minutes
Innovation Team
and Sponsor
9
Sustainable
Number of uses
> 10
Existing Products
10
11
Lightweight
Controlled Drug
Delivery
13
Cost
Weight
Number of speed
capabilities
Number of compatible
drugs
Project Cost
< 1 lb
1-3 Speeds
(low, med,
high)
>1
< $2,000
Existing Products
Competitors
Product
Example: Unilife
LISA
Set Budget
3
Target
Value
>10
≤ 50 cP
Reference
Innovation Team
and Sponsor
Innovation Team
and Sponsor
Sponsor
Existing Products
15&
&
Appendix B: Benchmarking
i. West Pharmaceuticals Product Line:
a. Confidose® Auto-Injector:
http://www.westpharma.com/en/products/Pages/AdvancedInjectionSystems.aspx
b. Selfdose® Self-Injector:
http://www.westpharma.com/en/products/Pages/SelfDose.aspx
c. Smartdose® Electronic Patch Injector:
http://www.westpharma.com/en/products/Pages/SmartDose.aspx
ii. Competitor Products:
a. BD Physioject Disposable Auto-Injector:
http://www.bd.com/pharmaceuticals/products/self-injection/auto-injectors.asp
b. BD Pen II Reusable Pen: http://www.bd.com/pharmaceuticals/products/selfinjection/pens.asp
c. SHL Group SDI MIX + NIT: http://www.shl-group.com/en/products/shlmedical/sdi-mix-nit-auto-injector.html
d. UniLife RITA Auto-Injector:&http://www.unilife.com/product-platforms/autoinjectors/rita-auto-injector
e. UniLife LISA Auto-Injector: http://www.unilife.com/product-platforms/autoinjectors/lisa-auto-injector
f. PEGASYS ProClick Auto-Injector: http://www.pegasys.com/patient/forpatients/expect/how/proclick/index.html
g. Cambridge Consultants Flexi-jectTM Auto-Injector:
http://www.cambridgeconsultants.com/news/pr/release/7/en
iii. Concept Generation References, Patents, etc.:
a. Auto-Injector Coil Spring Patent: https://www.google.com/patents/US8038649
b. Hydraulic Shape Memory Actuator Patent:
http://www.google.com/patents/US4945727
c. Light Sensitive Hydro Gel:
http://www.rsc.org/chemistryworld/News/2012/March/polymer-gel-swells-3dshapes-uv-light.asp
http://www.google.com/url?q=http%3A%2F%2Fweb.mit.edu%2Fnewsoffice%2F
2005%2Fsmartplastics.html&sa=D&sntz=1&usg=AFQjCNGbtRsu9rucFJIilwFNAXRxQZahPw&
&
&
&
&
&
&
&
16&
&
d. Turkey Timer Figure: http://home.howstuffworks.com/pop^up^timer1.htm
&
Figure'1.!A!photo!illustrating!the!inner!workings!of!a!
turkey!timer,!an!idea!translated!over!to!one!of!the!
generated!concepts.!
&
&
&
&
&
&
&
&
&
&
&
&
&
&
&
&
&
&
&
17&
&
Appendix C: Preliminary Concepts
Soft Metal Alloy Concept
This concept for a reusable auto-injector was inspired by the observation of basic turkey
timers. These cooking timers use a soft metal alloy to hold a compressed spring in place. The
soft metal is in direct contact with the material being cooked and upon being heated to a specific
temperature, it melts and the spring is released and extended (refer to Appendix B figure 1 for an
illustration). This same concept can be applied an auto-injector. The soft metal alloy, when
heated to its melting point will release the spring and, in turn, drive the syringe downwards so
that the needle is exposed and penetrates the skin to release the medicine.
Flat Coil Spring Concept
A basic kitchen timer with gears, and 2
flat coil springs inspires this drive mechanism
concept. This auto-injector can be reset each
time by twisting the dial. For different
viscosities, the dial may be twisted varying
amounts. As the dial winds the coil, it stores
energy that activates the pinion gear, thus
activating the gear train as illustrated in Figure
1. At the end of the gear train, the remaining
Figure'1.!A!rough!sketch!flat!coil!spring!concept.!!In!this!
energy is used to push the plunger, releasing
sketch!a!pendulum!arm!press!is!employed!to!drive!the!syringe!
the medicine into the patient. A possible type
plunger,!but!this!component!can!easily!be!replaced!with!
of gear used in this mechanism may be a rack
similar!mechanisms!that!can!be!driven!with!a!gear.
gear, translating rotary motion into linear
motion. Another possible gear type for this design is a worm gear. Simply turning the dial, and
ultimately re-coiling the flat coil spring again can reset this mechanism.
Motor Driven Concept
The idea for this design is inspired by West
Pharmaceutical Services’ existing product SmartDose.
It incorporates a motorized gear system which, when
turned on, is linearly displaced and pushes on the
plunger to deliver the fluid to the user. This generated
concept also uses a motor as the driving force and acts
in a manner similar to an adjustable wrench as seen in
Figure 2. As opposed to SmartDose, however, the new
mechanism is reusable. This design is simple, easy to
use, and inexpensive to prototype.
Figure'2.!A!sketch!of!the!motor!driven!concept!with!
easily!understood!comparison!to!an!adjustable!
wrench.
Hydraulic Component
This concept is a hydraulic component. This component would be combined with any of
the other four system concepts to act as a displacement multiplier, using basic principles of
hydraulics. Including channels of varying diameter can multiply force, which can be
advantageous if the initial drive system is limited by minimal output force. The water channel
can then be reset to its original position with the use of a prismatic slider like switch accessible
on the exterior surface of the product.
18&
&
Chemical Reaction Concept
This concept makes use of the force produced through an exothermic chemical reaction.
There are many reactions capable of generating pressure through the production of gaseous
byproducts and heat; however safety is a significant issue when determining which chemicals to
use. The reaction between potassium chlorate and sugar (Figure 3) does not create any hazardous
products, yielding only CO2 gas and water upon being heated or catalyzed with sulfuric acid.
This gas can then be used to pressurize a drive shaft containing chamber, providing the force to
push down the plunger and administer the drug. If sugar is used as the limiting reagent, only a
fraction of the potassium chlorate provided will be reacted, allowing for multiple reactions/uses
as a drive mechanism.
Figure'3.!Potassium!chlorate!and!sugar!reaction!
&
&
Coil Wire Concept
This design incorporates wires coiled around the
casing with a drive magnet or a ferrous metal enclosed
(Figure 4). Running a current through the wires will draw
the ferromagnetic driver into the coil. This concept is
very dependent on the timing of passing a current through
the sections of coiled wire. The current must be turned
off before the driver travels halfway through the coil to
maximize force. The next coiled wire will then be
initiated to repeat the process. This will require a built in
sequence controller and even possibly a sensor to detect
the angle at which the device is being held in relation to
the skin. The contact angle will affect the timing of the
current being passed through the coils if there is less
gravitational force aiding the driver.&
&
Figure'4.!A!sketch!of!the!coil!wire!concept!with!a!
sequence!controller!attached!to!the!circuit!to!control!
the!current!for!each!coil.!
19&
&
Appendix D: Concept Selection
&
Table'1.!This!table!displays!the!first!round!methodology!behind!how!the!team!evaluated!the!initial!concepts!in!relation!to!the!
&
metrics!of!greatest!importance.!Assigned!each!metric!a!priority!value!from!one!to!five,!one!being!the!most!important!and!5!
being!the!least!important.!Next,!each!concept!was!ranked!from!one!to!three,!one!being!the!best,!five!being!the!worst.!From!this,!
the!concept!that!achieved!the!highest!score!was!the!final!concept!to!pursue!further.!
!
&
Table'2.!This!table!displays!the!second!round!methodology!behind!how!the!team!evaluated!the!second!round!concepts!in!
&
relation!to!the!metrics!of!greatest!importance.!The!process!for!the!concept!selection!is!the!same!as!with!Table!1!above.!
!
&
&
&
&
&
&
&
&
&
&
20&
&
Appendix E: Initial Testing
&
Nitinol Spring Concept Testing:
Experiment 1: Two Nitinol springs (Nitinol Expansion Springs, Images Scientific
Instruments) tested with a total of 20 trials. Constants include: spring displacement of 1.5
inches, applied voltage of 13.8 V, and applied current of 5 amps. This test was conducted to
determine the force generated by the contraction of the spring as well as the force to extend the
spring 1.5 inches. This data can be found in Table 1. This experiment showed that each spring
individually only produced an average of 2.82 lbs, while a total of 16 lbs is needed to administer
the 50 cp fluid. This data proved that 6 springs will be needed in the final design, plus a factor of
safety, resulting in a total of 8 springs needed in the final design.
Table'1.!A!table!showing!the!results!from!Experiment!1!with!the!initial!two!nitinol!springs!under!constant!!
displacement!and!voltage.!
Experiment 2: A single Nitinol spring (Nitinol Expansion Springs, Images Scientific
Instruments) was tested. During this experiment the applied current was varied. Approximately 3
minutes between each trial was allowed for cooling of the spring. This shows that with 4 amps
current supplied, a sufficient amount of force is generated. One drawback however, is that the
temperature of the springs reach a peak temperature of 145o C. This shows that an insulated
material must be used to prevent damage. The data for this experiment is detailed in Table 2.
Table'2.!A!table!showing!the!results!from!Experiment!2!with!one!nitinol!spring!under!constant!displacement!and!varying!current.!
Experiment 3: Due to fatigue of initial springs, a new set of springs was purchased
(Nitinol Tension Springs, Jameco Electronics) and comparative tests were conducted. Three
trials were conducted using 3 Amps, and three trials were conducted using 4 Amps. Average
force created was measured and recoded, while all other variables were kept constant as seen in
Table 3. Compared to the old spring, this new set of spring created less force, but are still prove
effective in the design.
Table'3.!A!table!showing!the!results!from!Experiment!3!with!two!new!nitinol!springs!under!constant!
!displacement!and!voltage!to!compare!force!data!with!Experiment!1.!
21&
&
Neodymium Magnet Concept Testing:
Experiment 4: Sets of three, four and five magnets of increasing strength were tested with
an 18 g metal drive shaft with an initial position of 80 mm from the
top of the plunger rod of an empty syringe. This setup can be seen
in Figure 1. Three trials for each set of magnets were run while
recording the speed and time the drive shaft took to reach the
plunger rod. In all 9 trials the distance that the magnetized drive
shaft was able to displace the plunger rod remained at a constant
value of zero. Based off this data, it has been concluded that
magnets will be unable to produce the necessary force to administer
the 50 cP (or any) fluid into the body. The magnet concept therefore
does not meet the necessary metrics, and will be no longer pursued
as a final concept. Refer to Table 4 for these data values and Table
5 for a list of strengths of the magnets used in each trial (K and J
Magnetics). Since the neodymium magnet concept is no longer
plausible, the addition of two magnets to the SMA spring concept is
further explored and plausibility is tested. This combination of
Figure'1.!Image!of!testing!setup!
concepts could be beneficial in the providing addition force to the
for!set!of!5!neodymium!magnets!
SMA concept.
with!attached!syringe!and!
plunger.!
&
!
Table'4.!A!table!showing!results!from!Experiment!4!with!three!sets!of!magnets!of!varying!strength,!placing!
!the!drive!shaft!at!a!fixed!distance!from!the!plunger!rod.!
Table'5.!A!table!listing!the!strengths!of!the!magnets!!
employed!in!each!of!the!trials!in!Table!4.!
Combined SMA and Neodymium Magnet Concept Testing:
Experiment 5: Two ½ x ½ x ½” Neodymium magnets were tested to measure the
attraction force between the two 21.5 pound magnets (Note: both of these magnets were chipped,
resulting in a slight reduction of pound strength). This attraction force was calculated to measure
22&
&
if two magnets on opposite sides of the spring mechanism would be able to aid in creating
additional driving forces and can be seen in Table 6. After these tests, it has been concluded that
the addition of the neodymium magnets to the spring concept will not be beneficial due to the
lack of substantial attractive force generated by the magnets, and this combination will no longer
be pursued.
'
Table'6.!A!table!showing!the!results!from!Experiment!5!with!two!!
25!lb!magnets!at!vary!distances!apart.!
23&
&
Appendix F: Circuit Calculations
The following details calculations for the resistance of the two slightly different nitinol
springs received from separate vendors.
Resistivity (ρ) of nitinol = 76 and 82 µΩ-cm in martensitic and austenitic states respectively
For ImagesCo springs:
Wire diameter = dw = 0.0754cm
Coil diameter = dc = 0.55cm
Number of turns = n = 21.4
Total length of wire = L = πdcn = π(0.55cm)(21.4) = 37.0cm
Resistance=R=ρLA=ρLπ4
•
Martensite: R=76µΩ∗cm37cmπ40.0754cm2!=0.63Ω
•
Austenite: R=82µΩ∗cm37cmπ40.0754cm2!=0.68Ω
For Jameco springs:
Wire diameter = dw = 0.075cm
Coil diameter = dc = 0.6 cm
Number of turns = n = 19
Total length of wire = L = πdcn = π(0.6cm)(19) = 35.8cm
•
Martensite: R=76µΩ∗cm35.8cmπ40.0750cm2!=0.62Ω
•
Austenite: R=82µΩ∗cm35.8cmπ40.0750cm2!=0.66Ω
Resistance of springs upon measuring with a multimeter was found to be 0.850Ω on average
Circuit Calculations:
All 8 springs wired in parallel (Figure 1):
Resistance of springs = R = 0.850Ω
Equivalent resistance: 1Req=$
1R1+$1R2+$…+$1R8=$8R
Req=R8=0.850Ω8=0.106Ω
•
For current of 2A to flow
through each spring,
24&
&
•
•
need total current of 8*2A= 16A
o Required power
source voltage: V = Figure'1.!A!depiction!of!the!circuit!configuration!of!the!eight!nitinol!springs!
in!parallel.
IR = (16A)(0.106Ω)
!
= 1.7V
For current of 3A to flow through each spring, need total current of 8*3A = 24A
o Required power source voltage: V = IR = (24A)(0.106Ω) = 2.6V
For current of 4A to flow through each spring, need total current
of 8*4A = 32A
o Required power source voltage: V = IR = (32A)(0.106Ω)
= 3.4 V
All 8 springs wired in series:
Equivalent resistance: Req = R1 + R2 + … + R8 = 8R = 8*0.850Ω = 6.8Ω
•
•
•
Required power source voltage for 2A current: V = IR =
(2A)(6.8Ω) = 13.6V
Required power source voltage for 3A current: V = IR =
(3A)(6.8Ω) = 20.4V
Required power source voltage for 4A current: V = IR =
(4A)(6.8Ω) = 27.2V
4 springs in series in parallel with other 4 springs in series (refer to
Figure 4 in Design Details):
Equivalent resistance: 1Req=14R+14R=12R;
Req = 2R = 2(0.850Ω) = 1.70Ω
•
•
•
Figure'2.!A!depiction!of!the!circuit!
configuration!of!the!eight!nitinol!
springs!in!series!
For current of 2A to flow through each spring, need total current of 2*2A = 4A
o Required power source voltage: V = IR = (4A)(1.70Ω) = 6.8V
For current of 3A to flow through each spring, need total current of 2*3A = 6A
o Required power source voltage: V = IR = (6A)(1.70Ω) = 10.2V
For current of 4A to flow through each spring, need total current of 2*4A = 8A
o Required power source voltage: V = IR = (8A)(1.70Ω) = 13.6V
25&
&
Appendix G: Failure Analysis
&
Figure'1:!This!is!a!picture!displaying!the!finite!element!analysis!of!the!topper!component!with!a!tensile!force!load!of!10!pounds.!
This!is!the!force!that!the!user!would!apply!on!this!component!while!resetting!the!device.
Figure'2:!This!is!a!picture!displaying!the!finite!element!analysis!of!the!topper!component!with!a!tensile!force!load!of!18!pounds.!
This!is!the!force!that!the!component!would!experience!failure.!As!one!can!see!the!yield!strength!of!this!component!is!far!greater!
than!that!of!the!force!applied!by!the!user!during!resetting.!Thus!there!is!a!large!margin!of!safety.!
26&
&
Appendix H: Projected Budget
!
&
27&
&
Appendix I: Project Plan
Project Plan
&
&
Figure'1.!A!table!depicting!the!proposed!project!timeline!for!phase!1!and!2!is!presented!above.!Project!plan!is!continually!
updated!based!upon!deadlines!met!and!unforeseen!circumstances!
&
&
Figure'3.!A!table!depicting!the!proposed!project!timeline!for!phase!3!is!presented!above.!Project!plan!is!continually!updated!
based!upon!deadlines!met!and!unforeseen!circumstances!
!
&
28&
&
Figure'4.!A!table!depicting!the!proposed!project!timeline!for!phase!4!is!presented!above.!Project!plan!is!continually!updated!
based!upon!deadlines!met!and!unforeseen!circumstances.!
29&
&
Appendix J: Drawing Package
West Pharmaceutical Services
Reusable Injectable Drug Delivery
User Manual
1
Table of Contents
Components Included ..................................................................................................................... 3
Assembly......................................................................................................................................... 5
Attaching the Springs .................................................................................................................. 5
Attaching the Wires .................................................................................................................... 7
Inserting Plunger Rod ................................................................................................................. 8
Combine Inner and Outer Assembly........................................................................................... 9
Adding the Battery Pack and Toggle Switch ............................................................................ 10
Instructions for Use ....................................................................................................................... 11
Inserting Syringe ....................................................................................................................... 11
Delivering an Injection ............................................................................................................. 11
Resetting the Device ................................................................................................................. 13
Removing Used Syringe ........................................................................................................... 14
2
Components Included
1 Inner Assembly
8 Nitinol Springs
Top Platform
16 4-40 x ½ bolts, nuts, and washers
Bottom Platform
Plunger Rod
1 Outer Assembly
Top Casing
Outer Casing
3
Additional Components
Holder
1 Battery Pack
1 Toggle Switch
6 Short Wires
2 Long Cut Wires
3 Long Alligator Clips
Syringe
4
Assembly
Attaching the Springs
1. Top platform: Fix one end of
each of the 6 nitinol springs to
the top platform with 6 of each
of the bolts, nuts, and washers as
shown below. Once finished with
this step the end of each spring
should be firmly held in place
between a washer and the top
platform.
2. Bottom Platform: Fix the
remaining free end of each
spring to the bottom platform as
shown below with the rest of the
bolts, nuts, and washers. The
arms of the bottom platform
should be rotated 90° from those
of the top platform if aligned
correctly. As with the previous
step, the end of the spring should
be firmly held in place between a
washer and the platform.
5
3. Verification: One end of each of the 6 nitinol springs should now
be securely attached to the top platform while the other end of
each spring should be securely attached to the bottom platform. If
the ends of any of the springs are still able to rotate around the
bolt it indicates that they are not properly held in place and the
corresponding nuts should be tightened. On the other hand, if the
body of either platform is experiencing any visible deformation
due to the attachment of the springs, this indicates that the nuts
are too tight and should be loosened before any permanent
damage is done to the parts.
4. If installed correctly, the inner assembly should look like the figure
below:
6
Attaching the Wires
1. Top Platform: 4 short wires should be
used to connect the top of each spring
to the battery pack. The wires should
be attached between every other bolt
from the top as seen in the figure to
the right. To attach a wire its bare end
should be wrapped around the bold
with the nut tightened on top of it.
2. Bottom Platform: 2 short wires and 2
long cut wires should be used to
connect the bottom of each spring to
the battery pack. Follow the wiring
directions in step one using the picture
to the right as a reference.
7
Inserting Plunger Rod
1. Insert the plunger rod through
the large opening in the bottom
platform and push it upwards
towards the top platform.
2. The plunger rod will lock into
the center indentation in the top
platform, completing the inner
assembly.
8
Combine Inner and Outer Assembly
1. Insert the arms of the bottom
platform of the inner assembly
into the locking grooves in the
walls of the outer casing and
begin pushing it in. The top
platform arms will then slide into
the straight guiding grooves, fully
encasing the inner assembly.
2. Slide the top
casing onto the
outer casing so
that the top
platform arms
fit into grooves
in top casing.
3. Rotate the top
casing clockwise so the top
platform arms
are locked in
place.
4. The final combined
inner and outer
assemblies should
look like the figure
below. Note how
the long wires are
still exposed.
9
Adding the Battery Pack and Toggle Switch
1. Attach the red lead
of the battery pack
to one of the
exposed long wires
with a red alligator
clip.
2. Attach the black
lead of the battery
pack to the toggle
switch with a black
alligator clip.
3. Attach
the
remaining exposed
long wire to the
toggle switch using
a black alligator
clip. Make sure the
toggle switch is in
the off position
before making final
connection.
10
Instructions for Use
Inserting Syringe
1. Insert the syringe
(with plunger rod
already inserted)
through the hole
in the bottom of
the outer casing.
2. Lock the bottom
holder in place
on the bottom of
the outer casing
to fix the syringe
in position.
Delivering an Injection
3. Before activating the drive mechanism, twist the top casing
counterclockwise to unlock the top platform arms to allow them free
movement in the guiding grooves.
11
4. Flip
the
toggle
switch into the on
position to begin
injection.
5. A successful full
delivery of drug is
indicated by the top
platform
arms
reaching the bottom
of
the
guiding
grooves. When this
occurs, flip the toggle
switch into the off
position.
12
Resetting the Device
6. Once the device cools (~3
minutes) the top platform arms
can be pulled upward in the
guiding grooves.
7. When the top platform arms
reach the top of the grooves, turn
the top platform clockwise to lock
the arms into position.
13
Removing Used Syringe
8. Pull the bottom
holder out of its
locked position to
free the syringe.
9. The syringe can
now be disposed
of safely.
14