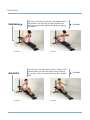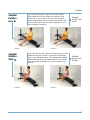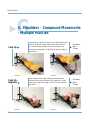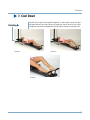
1
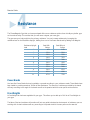
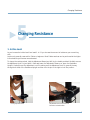
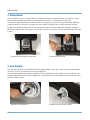
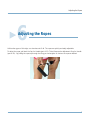
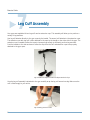
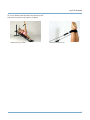
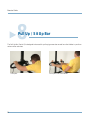
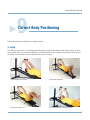
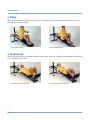
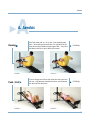
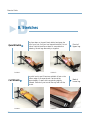
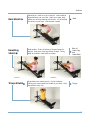
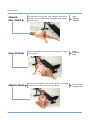
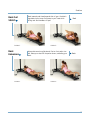
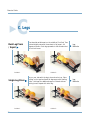
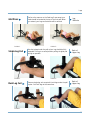
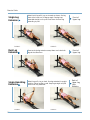
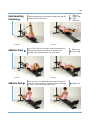
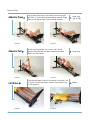
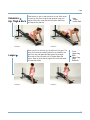
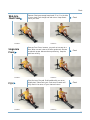
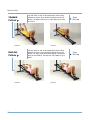
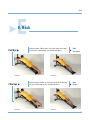
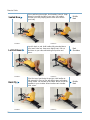
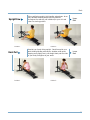
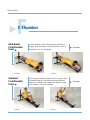
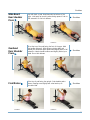
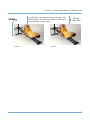
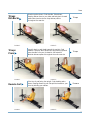
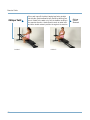
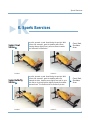
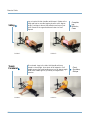
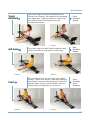
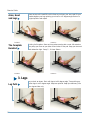
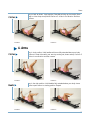
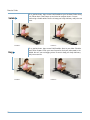
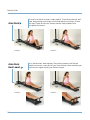
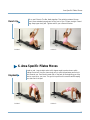
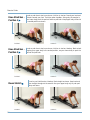
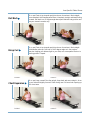
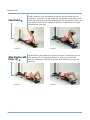
Exercise Guide
Toll Free 877-4 FIT GYM (877-434-8496)
Letter of Introduction
1
Letter of Introduction
Congratulations!
In purchasing a FitnessBargains gym, you have made an important step towards becoming more physically fit.
Whether you’re a beginner or have been working out for years, this gym is the tool you need to get results.
Regardless of your fitness goals, you have just acquired the one tool you need to make it happen.
Lose Weight,
Gain Muscle,
Reshape Your Body,
Strengthen Muscles,
Increase Endurance,
Cardio Vascular Health,
Stretch & Elongate Your Muscles,
Feel Better, Stronger, & Younger,
In as little as 20 minutes, three times a week you will be on your way to a healthier and happier you.
Boredom is a major reason that most individuals give up on a physical fitness program. With your new gym you
will have more exercise options and more variety than virtually any other piece of equipment on the market
today. You will be able to constantly change and vary your workout routines.
The result…
You won’t get bored.
Your body will respond faster.
You’ll have more fun and get in better shape than you ever dreamed.
You now have the tools. The rest is up to you.
Here is to a healthier and happier life.
FitnessBargains, Inc.
1
Exercise Manual Updates
Thank you for your purchase. Below you will find some additions and / or changes to
your Exercise Guide. Please read carefully before beginning your exercise program.
1. New Upgraded Leg Cuff Assembly.
Your VigorFit™ Gym includes a new upgraded leg cuff assembly. Easy instructions for
assembling your new leg cuff assembly can be found in your User Manual.
At the request of instructors and customers we have upgraded the leg cuff assembly. The
old assembly used to attach to the arm pulleys. While very effective, our instructors felt
that this kept the leg ropes too close to the users body and face.
To resolve this situation, we have added a separate pulley exclusively for the leg cuff
assembly. This new style leg cuff assembly works the same way as the old but the ropes
have been lifted above your head and further away from your body for a more efficient
workout.
All exercises illustrated in your Exercise Guide will be performed exactly as shown even
though the assembly looks slightly different.
2. Be Sure to Remove All Accessories.
When not in use, we recommend that you remove accessories. For example, the Pull Up
Bar should only be left in position on the gym when in use. When using the cables, you
must remove the Pull Up Bar accessory to avoid rubbing.
3. Resistance Calculation.
Below find revised resistance calculations for the ten top incline levels on the VigorFit™.
The below results are the average of three forces tested – Static Force, Motion Force &
Peak Force. Resistance will vary throughout the range of motion so an average is
provided. Static Force is the force needed to hold the load in place. Motion Force is the
force at speeds of approximately 20 reps/minute. Peak Force is the force required to
reverse the direction of the board at the beginning of each new cycle.
Incline Level
Average % w/ Pulleys
11
72.7%
10
66.2%
9
63.0%
8
58.8%
7
56.1%
6
53.8%
5
47.6%
4
45.4%
3
41.4%
2
41.8%
Exercise Guide
2
Safety Precautions
Please read carefully before proceeding.
This exercise equipment was designed and built for optimum safety. Certain precautions apply whenever you
operate a piece of exercise equipment. Before you assemble or operate the equipment, please read this entire
manual. Please note the following safety precautions.
1. Read the following instructions carefully before using the machine.
2. Consult your physician or health care provider before beginning this or any exercise program.
3. Always wear proper exercise apparel when using the machine.
4. If at any time you feel faint, light headed or dizzy while operating the machine immediately stop exercising.
Stop exercising if you feel any pain or pressure.
5. Keep children and pets away from the machine while in use.
6. Only one person can use the machine at a time.
7. Make sure that the machine is properly assembled before you use it. Be sure that all screws, nuts and bolts
are tightened prior to use.
8. Do not operate this exercise equipment if it is damaged.
9. Pay attention to your body. Come up slowly, dizziness after a session means you rose too fast. Wait a while
after eating before using the machine. If you get nauseous, stop exercising.
10. Always use the machine on a clear, level surface. Do not use outdoors or near water.
11. Keep hands, feet and hair away from any moving parts. Do not insert any objects into openings.
12. Keep clothes, jewelry or any loose items away from moving parts.
WARNING
Before beginning any exercise program consult your physician. This is especially important for
individuals over the age of 35 or persons with pre-existing health problems. Read all instructions
before using any fitness equipment.
We assume no responsability for personal injury or property damage sustained by or through the use
of this product.
Do not operate this equipment without properly fitted guards, as the moving parts can present a risk
of serious injury - especially to young children.
Caution: Read all instructions carefully before operating this product.
Retain this owners manual for future reference.
2
Exercise Tips
3
Exercise Tips
Your new gym makes getting into the best shape of your life easy and fun. In as little as 20 minutes a day, 3
days a week you can be on your way to the level of physical fitness you always dreamed of.
Here are some guidelines and tips:
1. A typical workout should be two or three sets of eight to 20 repetitions for every major muscle group. A
set is one group of repetitions.
2. Start off slow. Get used to the exercises and your routine. We recommend that beginners start with one
major exercise for each muscle group. As you progress add additional exercises for each body part to fully work
your muscles.
3. To increase the intensity of the workout, you can increase your repetitions, amount of resistance and
number of exercises performed for each body part. Do not over do it. Overworking your muscles is counter
productive and can lead to injury.
4. Rest is extremely important. Allow your muscles to fully recuperate before attempting to exercise again.
5. Varying your routine is the key to continually improving and making progress. You can vary the types of
exercises performed, the number of repetitions, the resistance, the order in which exercises are performed etc.
Your gym is ideal for this. There are many different exercises available, so you nor your muscles will ever get
bored.
6. Typically performing from 8 - 10 repetitions of exercises is ideal for mass building. Performing 11 - 13
repetitions is ideal for general conditioning. Performing repetitions of 14 - 20 generally builds muscle
endurance.
7. Because almost no changes have to be made between exercises, your gym is ideal for Circuit Training. Circuit
training involves moving from one exercise to the next with little or no rest in between. As a result, you not
only strengthen muscles but raise your heart rate for a cardiovascular workout as well.
8. Warm up before beginning your exercise program and cool down after exercising. This is important to
prevent injury.
9. Stretch before and after exercising.
3
Exercise Guide
4
Resistance
The FitnessBargains Gym that you have purchased offers more resistance options than virtually any similar gym
on the market today. This ensures that you will never outgrow your new gym.
The gym uses your body weight as the primary resistance. You can increase resistance by increasing the
resistance level on the Resistance Upright, Adding from one to five Power Bands and by adding Free Weights.
Resistance Upright
Level
Seat With
Pulleys
Seat Without
Pulleys
1
4%
10%
2
12%
21%
3
16%
25%
4
19%
31%
5
21%
38%
6
26%
45%
7
30%
51%
8
35%
56%
9
39%
61%
10
43%
68%
11
47%
72%
Power Bands
You have five Power Bands that can be added or removed according to your resistance needs. These Bands have
been tested to provide upwards of 200lbs of Max Resistance. The amount of resistance provided by the bands
will vary according to the angle of the board as well as the speed at which the user performs the exercise.
Free Weights
A Free Weight Bar has been supplied with your gym. This allows you to add up to 100 lbs of Free Weights to
your gym.
The Above Chart and resistance information will act as a guide to determine what amount of resistance you are
working with. Actual resistance will vary according to the speed at which the user performs the exercise.
4
Changing Resistance
5
Changing Resistance
1. Incline Level
As you increase the incline level from levels 1 to 11 you increase the amount of resistance you are working
with.
Level one is generally reserved for Pilates or beginners. Most Pilates exercises can be performed at the higher
incline levels as you become more advanced.
To change the resistance level, hold the Adjustment Beam (part # 6) by the handle provided. Carefully remove
the Adjustment Lock Pin (part # 49). Raise and Lower the Adjustment Beam up or down the Resistance
Upright. Carefully insert the Adjustment Lock Pin making sure the Adjustment Lock Pin goes all the way
through both sides of the Resistance Upright and then turn the pin to the right to lock into position.
Holding Adjustment Beam
Adjustment Lock Pin Inserted and
Turned to Locked Position
5
Exercise Guide
2. Power Bands
You can utilize from 0 to 5 Power Bands to increase the amount of resistance during your workout. These
power bands have been lab tested to produce upwards of 200 lbs of resistance at the top level.
To remove or add Power Bands, carefully pull back the white strip on top of the Power Band Sub Assembly.
Grasp the band, turn and pull out through the slot provided. Carefully push the white strip back in place.
To add Power Bands carefully pull back the white strip on top of the Power Band Sub Assembly. Grasp the
band to be inserted. Push through the slot provided. Twist to lock in place. Carefully push the white strip back
in place.
Power Band Assembly with all Power Bands
Power Band Being Inserted
3. Free Weights
You also have the ability to add standard size free weight plates to your gym. We do not recommend adding
more than 100 lbs of free weights to the free weight bar.
You have been supplied with Quantity 4 Weight Bar Clips. Squeeze the clips to slide over the weight bar. One
clip goes towards the pad to hold the Weight Bar in place. Slide on the free weights then slide a second clip to
hold the weights in place.
Weight Bar Clip Being Inserted
6
Weight Bar with Free Weights Installed
Adjusting the Ropes
6
Adjusting the Ropes
Unlike other gyms of this style, one size does not fit all. The ropes are quickly and easily adjustable.
To adjust the ropes, pull back the Cap for Handle (part # 23). This will expose the Adjustment Ring for Handle
(part # 22). By pulling the ropes up through the Ring you can lengthen or shorten the ropes as desired.
Cap Removed Exposing the Adjustment Ring
7
Exercise Guide
7
Leg Cuff Assembly
Your gym was supplied with two leg cuffs and an extension rope. This assembly will allow you to perform a
variety of leg exercises.
One leg cuff attaches directly to the gym ropes by the handle. The second cuff attaches to the extension rope.
The extension rope with leg cuff is then attached to the rope by the handle on the other side of the gym. The
extension rope is needed to allow the ropes to become long enough to efficiently perform leg exercises.
Push the handles to the side as shown to allow the clips from the cuff and extension rope to be properly
attached to the gym ropes.
Leg Cuff Extension Rope with Extension Rope attached to Gym
Once the leg cuff assembly is attached to the gym carefully wrap the leg cuff around one leg. Make sure the
cuff is fitted snugly to your ankle.
Leg Cuff being placed on ankle
8
Leg Cuff Assembly
Sit on the pad and carefully attach the second leg cuff.
Legs can be worked one at a time or together.
Working One leg at a time
Working both legs at once
9
Exercise Guide
8
Pull Up / Sit Up Bar
The Pull Up Bar (Part # 8) is designed to be used for pull up type exercises as well as a foot holder to perform
various other exercises.
Pull Up Bar
10
Pull Up Bar used as Foot Holder
Correct Body Positioning
9
Correct Body Positioning
Proper body position is essential to a quality workout.
1. Lying
Two different options for correct body positioning while lying down are shown below. Please note that while
some smaller users may have their heads lying on the board this is not necessary nor advisable. When lying on
the board, your shoulders should be located on the top of the pad.
Proper Position of Shoulders
Feet Position Option #1
Feet Position Option #2
Incorrect Positioning. Shoulders off Pad
11
Exercise Guide
2. Sitting
When performing exercises where you are sitting on the pad your buttocks should be towards the top of the
pad near the resistance upright.
Proper Sitting Position
Incorrect Sitting Position
3. Leg Exercises
When using the foot board your body should be positioned so that your buttocks is located towards the bottom
of the pad near the foot pad.
Correct Positioning for Foot Pad
12
Incorrect Positioning for Foot Pad
Aerobic
A
A. Aerobic
Rowing
Position 1
Push / Pull
Position 1
Place feet under pull up / sit up bar. Hold handles palms
down. Arms and legs outstretched. Curl legs while at the
same time pulling handles towards upper back. Vary hand
and elbow positions to work different muscles.
Full Body
Position 2
Perform a leg press while at the same time doing and arm
pull over. Legs become extended and arms come towards
your waist at the same time.
Full Body
Position 2
13
Exercise Guide
B
B. Stretches
Quad Stretch
Position 1
Calf Stretch
Position 1
14
Lay face down on the pad. Reach behind and grasp the
top of your foot. Pull your heel towards buttocks. Do not
bounce. Hold all stretches at least 10 seconds before
releasing. Stretch legs alternately or together.
Front of
Upper Leg
Position 2
Lay with back to pad. Place toes and balls of feet on the
bottom edge of the squat board. Feet should be
approximately 4” apart with toes pointing slightly
outward. Extend on your toes all the way and hold the
stretch.
Position 2
Back of
Lower Leg
Stretches
Back Stretch
Extend arms. Hold on to top of upright. Hips should be
aligned directly over your feet. Lower your upper body
below your arms by bending at the knees. You should feel
the stretch in your back. Hold and then release.
Back
Hamstring
Stretch
Hold handles. Sit at the bottom of the pad facing the
upright. Keep your arms, legs & back straight. Slowly
bend at the waist. Hold and then release.
Back of
Lower Leg
and
Lower Back
Position 1
Triceps Stretch
Position 2
Grab elbow over head as shown. Pull at the elbow.
Pulling your hand towards the middle of your back. Hold.
Repeat with other arm.
Triceps
15
Exercise Guide
Stomach /
Back Stretch
Lay with back on the ground. Keep shoulders touching the
ground. Pull your knee towards the ground. Hold. Repeat
with other leg.
Hips,
Stomach,
Buttocks
Upper Stretch
Arms extended back with palms flat on the ground. Extend
back as shown.
Chest,
Shoulders,
Arms
Adductor Stretch
Bottoms of feet together. Lean forward at your waist while
pushing down on your knees with your elbows.
Inner Portion
of Upper Leg
16
Stretches
Back Curl
Stretch
Position 1
Back
Extensions
Position 1
Back towards pad. Head towards foot of gym. Grab both
legs behind your knees. Pull knees to your chest while
lifting neck and shoulders off pad.
Back
Position 2
Hips and stomach on glide board. Feet on foot pad or toe
bar. Raise your chest off the pad as shown, extending your
back.
Back
Position 2
17
Exercise Guide
C
C. Legs
Dual Leg Press
/ Squat
Position 1
Single Leg Press
Position 1
18
Feet shoulder width apart on the middle of Foot Pad. Toes
pointed slightly outward. Knees bent to full squat – 90
degrees as shown. Push legs upwards to full extension but
do not lock knees.
Leg,
Buttocks
Position 2
Lay on your side with the leg to be worked on top. Place
top leg on foot pad and bend 90 degrees as with dual leg
press. Hold pad for additional support. Extend without
locking knees. Repeat with other leg.
Position 2
Leg,
Buttocks
Legs
Glut Press
Position 1
Single Leg Curl
Position 1
Dual Leg Curl
Position 1
Perform the same as on the Dual Leg Press except your
heels should be located at the top of the foot pad. When
you extend, your legs and buttocks will be worked.
Leg,
Buttocks
Position 2
One foot placed under the pull up bar. Leg should be fully
extended. Pull leg to a curled position pulling the glide pad
as high as possible.
Back of
Upper Leg
Position 2
Same as single leg curl except with both legs under the pull
up bar. Curl both legs at the same time.
Back of
Upper Leg
Position 2
19
Exercise Guide
Single Leg
Extension
Position 1
Dual Leg
Extension
Position 1
Single Hamstring
Extension
Position 1
20
Attach both leg cuffs. Lay on stomach as shown. One leg
bent at the knee to a 90 degree angle. One leg kept
extended straight on the pad. Push down the bent leg
extending to pad.
Front of
Upper Leg
Position 2
Same as single leg extension except lower and raise both
legs at the same time.
Front of
Upper Leg
Position 2
Attach leg cuffs. Lay on back. One leg extended in upright
position. Other leg flat on pad. Keep leg straight and pull
down until fully extended.
Position 2
Back of
Upper Leg,
Hips,
Buttocks
Legs
Dual Hamstring
Extension
Position 1
Abductor Press
Position 1
Abductor Push
Position 1
Same as single hamstring extension except both legs will
be worked at the same time.
Back of
Upper Leg,
Hips,
Buttocks
Position 2
Lay on back. Feet on foot board a few inches apart with
toes pointing inward. Knees bent 90 degrees. Push
upwards until extended. Never lock your knees.
Outer Leg,
Top of Leg
Position 2
Sit at the top of the glide pad facing upright. Place both
feet on the ropes as shown. Keep back and arms straight
as shown. Push feet outward and return.
Outer Leg
Position 2
21
Exercise Guide
Adductor Press
Position 1
Adductor Pull
Position 1
Calf Raise
Position 1
22
Lay on back. Place feet on foot board as wide as the pad
will allow. Toes should be pointed slightly outward. Knees
bent at a 90 degree angle. Push until fully extended.
Inner Leg,
Top of Leg
Position 2
Attach leg cuff assembly. Lay on your side. Top leg
upright, fully extended. Pull down keeping leg straight.
Return and then repeat.
Inner Leg
Position 2
Place toes and balls of feet on the bottom of foot pad. Feet
2” apart. Toes pointed slightly outward. Extend up on toes
to full extension.
Position 2
Calves
Legs
Extensions
Hip, Thigh & Back
Position 1
Lunges
Position 1
Face bottom of gym. Kneel at bottom of pad. With hands
on push up bar, push the glide pad upwards using your
legs and hips only. Keep arms and shoulders stationary
throughout the exercise.
Hips
Thighs
Lower Back
Position 2
Place one foot on the floor by the bottom of the gym. The
other foot should be carefully placed in the middle of the
pad. Push the pad upwards keeping back leg straight.
Allow leg on board to bend to a 90 degree angle and
return. Keep in mind that the higher the incline the easier
this exercise will be.
Front
Upper Leg,
Back
Upper Leg,
Hips,
Buttocks
Position 2
23
Exercise Guide
D
D. Chest
Chest Bench
Press
Position 1
Upper Chest
Press
Position 1
24
Sit at top of pad. Hold handles palms facing down and
ropes under arms as shown. Hands positioned shoulder
width besides your chest. Push arms straight out. Keep
elbows out to your side.
Chest
Position 2
Same as the chest press, however, instead of pushing
straight out push upwards at a 45 degree angle and
return back to your chest. Keep elbows out to your side.
Position 2
Upper
Chest
Chest
Wide Grip
Chest Press
Position 1
Single Arm
Press
Position 1
Same as Chest press except keep hands 2” to 4” to the side
of your chest. Push straight out and return. Keep elbows
out to your side.
Position 2
Same as Chest Press, however, you push out one arm at a
time. When one arm returns the other pushes out. Be sure
to maintain proper elbow and arm positioning. Keep the
pad from moving.
Position 1
Chest
Position 2
Sit at the top of the pad. Grab handles with your arms
slightly bent. Palms facing out. Push arms forward until
they meet in the center of your chest and return.
Fly's
Chest
Chest
Position 2
25
Exercise Guide
Standard
Pullover
Position 1
Bent Arm
Pullover
Position 1
26
Lay with back on pad. Grab handles with palms facing
upward as shown. Arms should be slightly bent at the
elbow. Pull slightly bent arms to right above your waist
and return.
Chest,
Rib Cage
Position 2
Lay with back on pad. Grab handles with palms facing
upward as shown. Arms should be slightly bent at the
elbow. Pull arms towards waist bending at a 90 degree
angle in the middle of the exercise. Pull handles to your
waist.
Position 2
Chest,
Rib Cage
Back
E
E. Back
Pull Ups
Position 1
Chin Ups
Position 1
Grab pull up bar. Palms down. Pull your body all the way
up until your head reaches your hands and return.
Back,
Shoulders
Position 2
Grab Pull up bar. Palms up. Pull your body all the way up
until your head reaches your hands and return.
Back
Biceps
Position 2
27
Exercise Guide
Seated Row
Position 1
Lat Pull Down
Position 1
Back Fly
Position 1
28
Sit on pad facing the upright. Hold handles. Palms in. Keep
elbows in towards the side of your body. Pull handles
towards your body keeping elbows down and towards
your body.
Middle
Back
Position 2
Lay with back on pad. Hold handles fully extended above
your head. Palms out. Keep arms slightly bent. Pull out
and down to your sides maintaining arm position and
return.
Back
Shoulders
Position 2
Sit at the top of pad facing the upright. Hold handles at
full extension in front of you and slightly down with palms
facing inward. Pull handles out and back. Motion should be
upwards to your shoulder. When handles reach shoulder
level, return.
Position 2
Middle
Back
Back
Upright Row
Position 1
Back Pull
Position 1
Sit on pad facing upright. Hold handles, palms down. Arms
fully extended. Keeping elbows pointing outward
throughout the exercise, pull handles up to your chin and
return to starting position.
Upper
Back
Position 2
Kneel at top of pad, facing upright. Bend forward at your
waist holding handles palms down, shoulder width apart.
Keeping arms slightly bent, pull straight back past the sides
of your body. Straighten at your waist.
Lower
Back
Position 2
29
Exercise Guide
F
F. Shoulders
Glide Board
Front Shoulder
Press
Position 1
Overhead
Front Shoulder
Press
Position 1
30
Lay with stomach on pad. Head towards the bottom of
the gym. Grab push up bar. Palms facing down. Push to
full extension. Do not lock elbows.
Shoulders
Position 2
Sit at the top of the pad facing the foot of the gym. Hold
the handles palms up. With elbows pointing down and
beside your shoulders push upward and slightly forward
to full extension. Do not lock elbows.
Position 2
Shoulders
Shoulders
Glide Board
Rear Shoulder
Press
Position 1
Overhead
Rear Shoulder
Press
Position 1
Front Raises
Position 1
Lay with back on pad. Head towards the bottom of the
gym. Hold push up bar with palms facing upward. Push to
full extension. Do not lock elbows.
Shoulders
Position 2
Sit at the top of the pad facing the foot of the gym. Hold
the handles palms up. With elbows pointing down and
beside your shoulders push upward and slightly back to full
extension. Hands should be above and slightly behind your
head. Do not lock elbows.
Shoulders
Position 2
Sit at top of pad facing the upright. Grab handles palms
down. Keeping arms slightly bent raise hands up to
shoulder level.
Shoulders
Position 2
31
Exercise Guide
Side Raises
Position 1
Arm Pull
Position 1
32
Sit at top of pad facing the upright. Grab handles palms in.
Pull handles out and up until you reach shoulder level.
Keep arms straight with slightly bent elbows throughout
the exercise.
Shoulders
Position 2
Sit at the top of the pad facing the foot of the gym. Hold
handles behind your back with palms forward. Keeping
arm position, pull arms forward until they reach shoulder
level.
Position 2
Shoulders
Shoulders
Shoulder
Rotation Inner
Position 1
Shoulder
Rotation Outer
Position 1
Sit at the top of the pad. Legs over the side as shown.
Hold handle with the arm closest to the upright. Keep
elbow tight to your side with your arm at a 90 degree
angle. Keeping elbow and arm position pull handle to the
front of your body. Other arm holds handle tight to your
hip throughout the exercise.
Shoulder
Rotator Cuff,
Inside
Position 2
Sit at the top of the pad. Legs over the side as shown. Hold
handle with the arm farthest to the upright. Keep elbows
tight to your side with arms at a 90 degree angle. Keeping
elbow and arm position pull handle away from your body.
Other arm holds handle tight to your hip throughout the
exercise.
Shoulder
Rotator Cuff,
Outside
Position 2
33
Exercise Guide
G
G. Shoulders - Compound Movements
- Multiple Muscles
Push Up
Position 1
Push Up Beginner
Position 1
34
Push pad all the way back. Kneel on pad while getting into
position. Grab push up bar. Palms down. Extend up on
your toes with legs straight. Knees off the pad. Push
upwards to full extension. Keep back straight throughout
the exercise.
Shoulders,
Back,
Triceps
Position 2
Same as above but instead maintain kneeling position.
Back and knees should be kept at 90 degrees for proper
positioning. Keep back straight. Push up to full extension
and return.
Position 2
Shoulders,
Back,
Triceps
Shoulders - Compound Movements - Multiple Muscles
Shrugs
Position 1
Lay with back to pad. Head facing foot of the gym. Hold
handles palms in with arms at full extension. Rotate and
shrug shoulders. Hold and return.
Shoulder,
Neck, Back
Position 2
35
Exercise Guide
H
H. Arms
Bicep Curl
Position 1
Alternating
One Arm Curls
Position 1
36
Sit at top of pad facing upright. Arms at full extension.
Elbows kept in towards the side of your body. Pull
handles up to your chest by bending at the elbow. It is
important to maintain elbow position throughout the
exercise.
Bicep
Position 2
Same as bicep curl but pull one arm to chest at a time,
alternating arms. Keep board from moving.
Position 2
Bicep
Arms
Triceps
Kick Backs
Position 1
Triceps
Press
Position 1
Reverse Curl
Position 1
Kneel on pad as shown. Grab handles. Palms down.
Keeping elbows close to your sides and body bent forward
extend arms back as shown. Keep elbow position
throughout the exercise.
Triceps
Position 2
Lay with back to pad. Head towards the upright. Grab
handles. Palms up. With elbows bent and pointing upward
move handles from your forehead to full extension.
Maintain elbows upward throughout the entire exercise.
Triceps
Position 2
Sit at top of pad facing the upright. Grab handles palms
down. Keeping elbows at your side pull the handles to your
chest by bending your elbows.
Forearm
Position 2
37
Exercise Guide
Wrist Curl
Position 1
38
Sit on the pad as shown. With your forearms on your legs
as shown hold the handles palms up. Curl wrists to full
extension by bending at the wrists only.
Position 2
Forearm,
Wrist
Arms - Compound Movement - Multiple Muscles
I
I. Arms - Compound Movement Multiple Muscles
Lay with back to pad. Head towards the upright. Grab
handles. Palms in. With elbows bent and kept close to
your sides move the handles from your chest to full
extension and back. Elbows should be pointed down
throughout the exercise.
Dips
Position 1
Chest,
Triceps
Position 2
39
Exercise Guide
J
J. Stomach
Sit Ups
Position 1
Crunch
Position 1
40
Lock feet under pull up / sit up bar securely. Keeping
hands on your chest and knees bent at a 90 degree angle
sit up to bring lower portion of your back off the pad.
Abdominals
- Stomach
Muscles
Position 2
Lock feet under pull up / sit up bar securely. Keeping
hands on your chest and knees bent at a 90 degree angle.
Instead of bringing entire lower back off the pad, lift your
head and shoulders squeezing the abdominals.
Position 2
Abdominals
- Stomach
Muscles
Stomach
Decline Crunch
Position 1
Advanced
Decline Crunch
Position 1
Reverse Crunch
Position 1
Lay on back. Legs on foot pad. Knees slightly bent. Arms
resting across your chest. Lift head and shoulders off the
pad squeezing your abdominals.
Abdominals
- Stomach
Muscles
Position 2
Lay with back on pad. Head facing towards the upright.
Hold handles with palms in and elbows bent. Palms resting
on your chest. Lift your head and shoulders using and
squeezing your abdominal muscles.
Abdominals
- Stomach
Muscles
Position 2
Lay with back to pad. Buttocks to the bottom of the pad.
Hold pad. Bring your knees towards your shoulders by
bending at the waist. At the same time lift head and
shoulders off the pad.
Abdominals
- Stomach
Muscles
Position 2
41
Exercise Guide
Oblique Twist
Position 1
42
Sit on pad. Legs off the side. Keeping legs facing straight
out the side, grab handle with both hands by twisting your
trunk. Rotate at the waist only. Pull the handles rotating in
the opposite direction. Hands should remain at waist level
and arms should maintain position throughout the exercise.
Position 2
Oblique Side of
Stomach
Sports Exercises
K
K. Sports Exercises
Swim Crawl
Stroke
Position 1
Swim Butterfly
Stroke
Position 1
Lay with stomach on pad. Head facing the upright. With
arms at full extension, grab the handles palms down.
Keeping elbows slightly bent, pull arms down towards
your side until full extension.
Chest, Back,
Shoulders,
Arms
Position 2
Lay with stomach on pad. Head facing the upright. With
arms at full extension, grab the handles palms out
towards the side. Keeping arms slightly bent pull to your
side. Return by bringing arms slightly up above shoulder
level and back. This should mimic the butterfly stroke.
Chest, Back,
Shoulders,
Arms
Position 2
43
Exercise Guide
Lay on back with feet shoulder width apart. Rotate entire
body and feet to one side keeping knees to a 90 degree
angle. Push legs to almost full extension and up on your
toes. Rotate to the opposite side and return to start.
Repeat.
Skiing
Position 1
Tennis
Forehand
Position 1
44
Complete
Leg,
Buttocks,
Caves
Position 2
Sit on board. Legs to the side. Hold handle with arm
closest to the upright. Arm starts at full extension. Pull
handle across your body bending arm to a 90 degree angle.
Hold other handle tight to your body throughout the
exercise.
Position 2
Chest,
Shoulders,
Oblique
Sports Exercises
Tennis
Backhand
Position 1
Golf Swing
Position 1
Punch
Position 1
Sit on board. Legs to the side. Hold handles with arm
farthest from the upright. Pull handles out and up keeping
arms slightly bent. To perform single arm, hold the rope
with the arm closest to the upright by your side
throughout the exercise.
Chest,
Shoulders,
Oblique
Position 2
Sit on board. Legs to the side. Grab the handle with both
hands. Pull across your body mimicking a golf swing.
Back,
Shoulders,
Oblique
Position 2
Sit on the pad facing the foot of the gym. Grab handles.
Palms up. Elbows at 90 degrees. Hands start beside your
waist. Extend one arm forward rotating your hand so that
palm faces down until arm is at full extension. Return to
original position and repeat with your other arm.
Chest,
Shoulders,
Arms,
Forearms
Position 2
45
Exercise Guide
L
L. Pilates
Perform the following series of exercises in order with very little rest in between
exercises. Start with only 5 repetitions per exercise and increase to 10 repetitions slowly
as you progress. Start with only 2 or 3 bands at level 1 to start with and increase as you
make progress. Concentrate on your form and breathing throughout the exercise. Inhale
on the contraction portion of the exercise. Exhale on the return portion.
1. Footwork
Lay with back to pad. Toes a few inches apart on toe bar. Heels together. Legs
at a 90 degree angle. Extend your legs and bring your knees together. Return
to original position.
Toes
Position 1
Arches
Position 1
46
Position 2
Lay with back to pad. Arches resting on toe bar with toes curled around the bar.
Keep legs and feet close together. Extend your legs and then return. Be sure to
keep your knees facing upward throughout the exercise.
Position 2
Pilates
Pulses - Arches
Position 1
Same position as Arches except you never go to full extension. Push out only
halfway.
Position 2
Heels on toe bar. Toes pointing up. Keep knees close together throughout the
exercise. Press to full extension without locking your knees.
Heels
Position 1
Pulses - Heels
Position 1
Position 2
Same as heels except instead of pushing to full extension push out only half
way.
Position 2
47
Exercise Guide
Tendon Stretch
Position 1
Wide Stretch
Position 1
48
Place legs extended place the balls of your feet on toe bar. Push out with your
toes to full extension. Maintaining this position now lower your heels to stretch
your calves.
Position 2
With heels on the outside ends of the toe bar. Knees facing out and in line with
your feet. Extend your legs.
Position 2
The Hundred
2. The Hundred
These movements strengthen your core – your torso by requiring your back muscles to
work synergistically with your abdominal muscles. Concentrate on breathing and holding
your abdominal and back muscles tight while performing all of the following exercises.
Lay on back. Get into chair position as shown. Knees bent to a 90 degree angle.
Start with hands straight above your head. Palms towards the foot of the gym.
Keeping your arms straight, lower them to a few inches off the pad.
Arms
Position 1
Arms with
Head Lift
Position 1
Position 2
Same as arms but as you lower your arms lift your head off the pad.
Position 2
49
Exercise Guide
Arms, Head
and Legs
Position 1
The Complete
Hundred
Position 1
Same as arms with head lift but this time as you lower your arms and lift your
head straighten your legs pointing your toes to a 45 degree angle. Return to
original position and repeat.
Position 2
Putting it all together. Same as the previous exercise but once at full extension
you pump your arms at your sides a few inches off the pad. Keep your stomach
and midsection tight. Pump 5 – 6 times. Return
Position 2
3. Legs
Leg Pulls
Position 1
50
Lay on back as shown. Start with legs at a 90 degree angle. Toes pointing up.
Lower legs to a 45 degree angle. Keep toes pointed. Keep hips stationary. Use
your legs and abs only.
Position 2
Arms
Lay on back as shown. Legs together. Extended pointing up at an angle. Move
legs in circles. Keep toes pointed. Perform 5 circles in one direction and then
reverse.
Circles
Position 1
Position 2
4. Arms
Circles
Position 1
Lay in chair position. Hold handles with arms fully extended above your body.
Palm out. Draw circles with your arms by moving out, down and up. Perform 5
circles in one direction and then reverse.
Position 2
Lay in the chair position. Hold handles fully extended above your body. Lower
arms to pad. Return to starting position. Repeat.
Beats
Position 1
Position 2
51
Exercise Guide
Salute
Position 1
Position 2
Sit on pad as shown. Legs crossed. Hold handles. Arms to your sides. Shoulder
level. Palms forward. Push your arms forward so that your palms meet in the
middle. Act as if you are hugging a tree. Be sure to keep your body stationary
and just move arms.
Hug
Position 1
52
Sit on pad as shown. Legs crossed. Hold handles at your forehead. Palms facing
out. Elbows bent. Extend arms up and out at an angle as shown. You are
performing a double salute. Be sure to keep your body stationary and just move
arms.
Position 2
Roll Up
5. Roll Up
Strengthen your abdominal area. Concentrate on lifting and activating your stomach
muscles while performing each exercise.
Back Curved
Position 1
Back Curved,
Heel Lowers
Position 1
Sit on pad very close to the toe bar. Toes pointing out and heels touching.
Lower your head and round your back while holding the pad as shown. Extend
your legs while tightening and lifting your stomach muscles.
Position 2
Sit on pad close to the toe bar as shown. Lower your head and round your back
while holding the pad as shown. Lower and lift your heels as shown. When
extending your toes be sure to tighten and lift your stomach muscles.
Position 2
53
Exercise Guide
Arms Back
Position 1
Arms Back,
Heel Lowers
Position 1
54
Sit close to the toe bar as shown. Heels together. Toes pointing outward. With
upper body pressing across thighs hold the pad behind you as shown. Extend
your legs. Tighten and lift your stomach muscles. Keep shoulders loose
throughout the exercise.
Position 2
Sit on pad as shown. Heels together. Toes pointing outward. Hold the pad
behind you as shown. Lower and lift your heels as shown. When extending your
toes be sure to tighten and lift your stomach muscles.
Position 2
Area Specific Pilates Moves
Sit on pad. Close to Toe Bar. Heels together. Toes pointing outward. Knees
bent. Arms extended upwards and to the front of you. Fingers straight. Extend
legs. Keep upper body still. Tighten and lift your stomach muscles.
Reach Up
Position 1
Position 2
6. Area Specific Pilates Moves
Elephant
Position 1
Stand on pad. Legs straight and at a 90 degree angle to pad as shown while
holding the toe bar. Use your lower body only to push the pad away and bring it
back towards you. Feet should remain flat on the pad. At the beginning you may
have to move up to your toes. The goal is to perform this exercise while keeping
your feet flat to the pad.
Position 2
55
Exercise Guide
Knee Stretches Position 1
Position 1
Knee Stretches Position 2
Position 1
Down Stretch
Position 1
56
Kneel on pad close to toe bar as shown. Hold on to toe bar. Round your back and
sit back towards your feet. Tuck hips under shoulders. Using only the muscles in
your lower body push the pad out and then pull back. Keep upper body still and in
a rounded position as shown.
Position 2
Kneel on pad close to toe bar as shown. Hold on to toe bar. Head up. Back arched.
Keeping your upper body in the arched position, use your lower body to push the
pad out and pull back.
Position 2
Kneel on pad. Hold toe bar. Head up. Back straight as shown. Keep back and
hips straight throughout the exercise. Use your upper body only to push pad
away and return.
Position 2
Area Specific Pilates Moves
Roll Back
Position 1
Bicep Curl
Position 1
Chest Expansion
Position 1
Sit on pad. Feet at top towards upright as shown. Knees bent. Back straight.
Arms extended. Hold handles palms down. Keep back straight and head looking
forward. Roll back to a 45 degree angle above pad. Maintain body position and
use your stomach muscles only.
Position 2
Sit on pad. Feet at top towards upright as shown. Knees bent. Back straight.
Hold handles palms up. Roll back to a 45 degree angle as in the previous
exercise. Keeping your elbows tight to your side, curl arms upward. Return to
starting position. Repeat.
Position 2
Sit on pad. Legs crossed. Face the upright. Keep back and arms straight. Arms
by your side and slightly forward. Palms facing rear. Pull arms back opening up
your chest area.
Position 2
57
Exercise Guide
Side Stretch
Position 1
Wide Position with
Pelvic Lift
Position 1
58
Kneel on pad with your side towards the toe bar. Hold the toe bar with the
closest arm. Pad close to toe bar. Stretch out the opposite arm as shown. Bend
at the hips pushing out on pad while reaching the arm opposite the toe bar over
your head for a full stretch. Complete 5 repetitions. Reverse body and repeat
exercise on the other side.
Position 2
Lay with back on pad. Heels at the ends of the toe bar. Toes pointing out. Lift
your buttocks off of the pad approximately 4”. Keep your stomach and
buttocks muscles tight. Maintain this position while extending your legs and
returning.
Position 2
Cool Down
7. Cool Down
Running
Lay with back to pad. Toes should be together on the toe bar. Lower the right
heel and bend your left knee. Be sure to keep your feet in line with your knee
throughout the exercise. Repeat with the left heel to mimic a running motion.
Position 1
Position 2
Position 3
59