1
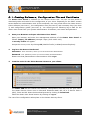
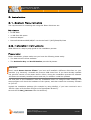
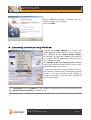
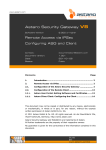
www.astaro.com
Astaro Secure Client V9
Software version:
9.000 or higher
Configuration Guide
Astaro Security Gateway V7
Author:
Richard Striegel
Contact:
[email protected]
Document version:
1.000
Date:
2007-03-21
Status:
Public
Contents
Page
1.
Introduction........................................................................ 3
2.
What is Astaro Secure Client? ............................................. 3
2.1.
Getting Software, Configuration File and Certificate ........... 4
3.
Installation ......................................................................... 5
3.1.
System Requirements ......................................................... 5
3.2.
Installation Instructions ..................................................... 5
4.
Licensing and Importing Profiles ........................................ 8
5.
Configuration of X.509 based Connections.........................10
5.1.
X.509 Certificate when using PKCS#12..............................16
5.2.
X.509 Certificate using Smart Cards or USB Tokens ...........16
6.
Connecting and Disconnecting ...........................................19
7.
Configuring Connections via X.509 Certificate ...................20
8.
Configuration of the Astaro Security Gateway ...................23
8.1.
X.509 Certificate Connections ............................................23
Guide
EN
www.astaro.com/kb
Configuration Guide
ASC V9 to ASG V7
This document may not be copied or distributed by any means, electronically
or mechanically, in whole or in part, for any reason, without the express
written permission of Astaro AG.
© 2007 Astaro AG. All rights reserved. Amalienbadstraße 36/Bau 33a,
76227 Karlsruhe, Germany, http://www.astaro.com
Astaro Security Gateway, Astaro Secure Client and WebAdmin are trademarks
of Astaro AG. All further trademarks are the property of their respective
owners.
No guarantee is given for the correctness of the information contained in this
document.
Guide
EN
www.astaro.com/kb
Configuration Guide
ASC V9 to ASG V7
1. Introduction
Congratulations on your purchase of the VPN IPSec client Astaro Secure Client V9, and
welcome to the Astaro family. This guide gives you a tutorial on how to set up the Astaro
Secure Client in order to use it as a IPSec VPN client with Astaro Security Gateway.
The most recent version of this document is always available at the following address:
http://www.astaro.com/kb
In order to provide you with the most up-to-date information possible, this document makes
occasional reference to other documents available at the web sites of Astaro and other
organizations. Please note that these addresses may change over time, and that documents
hosted by other organizations may even be removed entirely.
If you have further questions, or notice any mistakes in this manual, please do not hesitate to
contact us at
[email protected]
For further support, please visit our user support forum at
http://www.astaro.org
or make use of the Astaro Support Program:
http://www.astaro.com/support
2. What is Astaro Secure Client?
Astaro Secure Client is an IPSec VPN client which is interoperable with Astaro Security
Gateway. IPSec allows you, to give individual hosts access to your network through an
encrypted IPSec tunnel. The structure is described in the following chart.
The Astaro User Portal of
the remote Astaro Security
Gateway offers the Astaro
Secure Client software, the
configuration files, the necessary keys.
You should get the log-in
data for the user portal of
the remote Astaro Security
Gateway from your system
administrator.
The most recent version of this Astaro Secure Client is also available at the following address:
http://www.astaro.com/download/software
© 2007 Astaro AG.
Subject to change without notice.
3 of 30
Configuration Guide
ASC V9 to ASG V7
2.1. Getting Software, Configuration File and Certificate
The Astaro User Portal is available for the remote access user. You can use this portal to
download guides and tools for the configuration of your client. Especially for the IPSec remote
access based on authentication with X.509 certificate, the user portal offers the Astaro Secure
Client software (see item 1), the configuration files (see item 2) and necessary keys (see item
3) and configuration guides (see item 4). You should get the following log-in data for the
Astaro User Portal from your system administrator: IP address, user name and password.
1.
Start your Browser and open the Astaro User Portal:
Start your browser and enter the management address of the Astaro User Portal as
follows: https://IP address (example: https://192.168.2.100).
A security notice will appear.
Accept the security notice by clicking OK (Mozilla Firefox) or Yes (Internet Explorer).
2.
Log in to the Astaro UserPortal:
Username: Your username, which you received from the administrator.
Password: Your password, which you received from the administrator.
Please note that passwords are case-sensitive! Click Login.
3.
Load the tools for the IPSec Remote Access to your client:
The IPSec VPN tab will contain the software, configuration files and keys for your client.
The Astaro Secure Client runs on Microsoft Windows 98SE, ME, NT 4.0 Service Pack 5
(SP5), 2000 and XP. Start the download process by clicking on Download.
Close the Astaro User Portal session by clicking on Logout.
The rest of the configuration takes place on the Astaro Security Client.
© 2007 Astaro AG.
Subject to change without notice.
4 of 30
Configuration Guide
ASC V9 to ASG V7
3. Installation
3.1. System Requirements
The requirements for installing and using this IPSec VPN client are:
Hardware
• 64 MB RAM
• 10 MB free disk space
• Network adapter
• Microsoft Windows 98SE/ME/NT 4.0 Service Pack 5 (SP5)/2000/XP/Vista
3.2. Installation Instructions
What follows is a step-by-step guide to the installation process.
Preperation
Before installation, please make sure you have the following items ready:
• The Astaro Secure Client software
• The Activation Key and Serial Number provided by Astaro
Attention:
Don’t install Astaro Secure Client if you have still installed a different VPN client on your
machine (e.g. Sentinel). Uninstall the previous VPN client first. If you have already installed
the previous version of the Astaro Secure Client, during the installation process the software
will detect the already installed version and ask you whether it shall be updated.
The first part of the installation uses the Installation Menu to configure basic settings. The
setup program will check the hardware of the system, and then install the necessary software
on your PC.
Unpack the installation package (for example by using WinZip), if you have received it as a
.ZIP file. Open a file browser and go to the appropriate directory.
Launch the file ASC_V9-0.exe from this directory.
© 2007 Astaro AG.
Subject to change without notice.
5 of 30
Configuration Guide
ASC V9 to ASG V7
Pick the installation language of your choice and press OK.
You should see the installation wizard now.
Click on Next to proceed.
You will see the software license.
If you agree to the terms of the license, click on
Yes.
© 2007 Astaro AG.
Subject to change without notice.
6 of 30
Configuration Guide
ASC V9 to ASG V7
As installation method, choose Typical.
Click on Next to proceed.
Then the installation process will be started.
The installation wizard will copy the necessary
files on your system. A virtual network card will
be installed during the installation process. Since
the relevant driver is not certified by Microsoft, a
corresponding caution message will appear during the installation process. You can ignore this
message.
Click on Continue Anyway.
© 2007 Astaro AG.
Subject to change without notice.
7 of 30
Configuration Guide
ASC V9 to ASG V7
When installation process is finished, you are
asked to reboot your computer.
Click on Finish.
4. Licensing and Importing Profiles
Through the Profile Import (1) function the
profile settings of the INI-file can be automatically imported by the Astaro Secure Client.
The INI-file can either be created by the destination system with an appropriate export function
or be edited manually.
The Import_d.txt and Import_e.txt example
files for the manual creation can be found in the
installation folder of the client.
You have the choice to enter a license key (2) for
the software (“Install as an Authorized Licensed
Version”) or to use the client on trial (“Install as
30 day Test Version”). You can enter the license
key at a later time.
Activating and/or Licensing of the software is described in the user manual of the
Astaro Secure Client V9 in chapter 4.6.2.
© 2007 Astaro AG.
Subject to change without notice.
8 of 30
Configuration Guide
ASC V9 to ASG V7
Configuring Astaro Secure Client using the Profile Import function:
For Road Warrior tunnels between Astaro Secure Client and Astaro Security Gateway the
Profile Import function may be used when the connection to the X.509 certificates is setup. In this case, first configure the settings on the Astaro Security Gateway security system.
The settings for a connection with X.509 certificates are described in chapter 8.1 on page 23.
Note:
For IPSec connections with X.509 certificates, make sure that the CA certificate which issued
the remote endpoint's certificate is stored on the CA Management page.
In order to set up the Astaro Secure Client, the following steps need to be performed:
1.
Import the User’s Configuration File.
Start the profile import wizard by clicking Configuration/Profile Import.
The Astaro User Portal of the remote Astaro Security Gateway offers the configuration
files and the necessary keys. You should get the log-in data for the appropriate user portal
from your system administrator.
Getting the configuration file and the necessary keys is described in chapter 2.1 on page
4.
Store the profile (*.ini file) and close afterwards the profile import wizard by clicking OK.
2.
Import the PKCS#12 file.
Importing the PKCS#12 file is described in chapter 5.1 on page 16.
Store the key by clicking OK.
3.
Establish a road warrior connection between the client and the destination system.
Establishing a connection between the client and a destination system is described in
chapter 6 on page 19.
© 2007 Astaro AG.
Subject to change without notice.
9 of 30
Configuration Guide
ASC V9 to ASG V7
5. Configuration of X.509 based Connections
This chapter describes how to set up a road warrior connection which uses X.509 certificates
as authentication method.
1.
Start the Configuration Assistant:
When Astaro Secure Client starts after the reboot, it will
automatically ask you whether you want to set up a new
connection. Click on Yes.
2.
Choose the Connection Type:
The configuration wizard starts and asks you for
the type of connection you want to create.
Select Link to Corporate Network using
IPSec and click on Next.
3.
Define the Connection Name:
As next step you are asked to enter a name for
the connection. Pick a name of you choice and
click on Next.
© 2007 Astaro AG.
Subject to change without notice.
10 of 30
Configuration Guide
ASC V9 to ASG V7
4.
Choose the Link Type:
Astaro Secure Client offers the possibility to
control your dial-up devices, like modem or
DSL. However, this is not mandatory. You can
use the internal Microsoft Windows dialer instead. Therefore normally you just choose LAN
(over IP) as Communication Media in this dialog.
Click on Next.
5.
Define the VPN Gateway Parameters:
You are now asked to enter the address of the
VPN gateway, i.e. your Astaro Security Gateway machine. If you have a DNS record for the
gateway, then you can enter the DNS name
here. Otherwise simply enter the IP address of
the gateway. Do not enable the option Use
extended
authentication
(XAUTH),
since
ASG does not support it.
Click on Next.
6.
Configure the Basic IPSec Parameters:
In the next step you are asked for the basic
IPSec parameters. Set the PFS group, as you
configured it on Astaro Security Gateway (in
WebAdmin: Remote Access >> IPSec >>
Policies - the policy used in your road warrior
connection definition), then click on Next.
Exchange mode: Select Main Mode.
The Aggressive Mode option is not supported
by Astaro Security Gateway.
© 2007 Astaro AG.
Subject to change without notice.
11 of 30
Configuration Guide
ASC V9 to ASG V7
PFS group: Set the PFS group, as specified on Astaro Security Gateway.
Use IP compression: The data can be compressed in order to increase transmission
rates.
Click on Next.
7.
Set the VPN ID:
In this window, leave the two Pre-shared key
fields empty, since you want to use X.509
authentication. Select the correct VPN ID of the
user, as specified on Astaro Security Gateway (in WebAdmin: User in Remote Access
>> IPSec >> Connections). Depending on
the VPN ID type, you need to enter the
following information in the ID field:
Depending on the configuration on Astaro Security Gateway, you need to execute the
following settings:
| Pre-shared key
Shared secret: Leave this field empty.
Confirm secret: Leave this field empty.
| Local identify
The settings for the local identify must be aligned with the settings on the Astaro Security Gateway (ASG). The following settings can be made.
The possible settings in the WebAdmin configuration tool are …
IP Address: leave input field empty.
Fully Qualified Domain Name: enter the host name (FQDN) of the client, as defined in
Astaro Security Gateway. Example: host.company.org
Fully Qualified Username: enter the e-mail address (USER_FQDN) of the client, as
defined in Astaro Security Gateway. Example: [email protected]
On the ASG this corresponds to the E-Mail Address setting.
ASN1 Distinguished Name: leave input field empty.
On the ASG this corresponds to the Distinguished Name (DER_ASN1_DN) setting.
© 2007 Astaro AG.
Subject to change without notice.
12 of 30
Configuration Guide
ASC V9 to ASG V7
All other identifier types are not available on Astaro Security Gateway.
Type: Choose the VPN ID.
ID: Enter the VPN ID, if you have selected Fully Qualified Domain Name (e.g.
host.company.org) or Fully Qualified Username (e.g., [email protected]). Otherwise leave the field empty.
Click on Next.
8.
Assign the IP Address to the Client:
Now, you are asked to enter the IP address
configuration of the connection.
IP address assignment: For an IPSec VPN
connection to Astaro Security Gateway V7 set
this option to Use local IP address.
DNS server: Enter the IP address of your DNS
server, if desired.
WINS server: Enter the IP address of your
WINS server, if desired.
Click on Next to proceed.
9.
Configure the Firewall Features:
The last step of the wizard is to specify the
personal firewall settings. It is recommended to
enable the firewall when connected and to
deny split tunneling with the option Only communication within the tunnel permitted.
Depending on your security policy, you can
configure different settings here, of course.
Enable Stateful Inspection: With this option
you can specify whether the personal firewall
should be disabled (off), enabled at all times
(always) or only enabled when connected to
the VPN gateway (when connected).
© 2007 Astaro AG.
Subject to change without notice.
13 of 30
Configuration Guide
ASC V9 to ASG V7
Only communication within the tunnel permitted: This option denies the possibility
of split tunneling. If it is enabled, then the client blocks all other traffic to the Internet, as
soon as the VPN connection is established.
Enable NetBIOS over IP: Enable this option to allow NetBIOS traffic to traverse through
the tunnel.
Click on Finish to complete the wizard.
10. Edit the Connection:
In order to complete the configuration, edit
the connection in the Profile Settings window that appears next. Double-click on your
newly created entry, or alternatively select
the entry and click on Configure.
11. Define the Remote Networks:
Click on the section Remote Networks. On the
right side, you can enter one or more remote
networks, depending on your connection definition on Astaro Security Gateway (ASG)
(specified as Local subnet on ASG). Leave the
unused entries as empty. If the VPN subnet is
set to Any on ASG, then you can simply leave
the setting of this category as it is.
Networks are defined via a separate entry window. Click on
the New button to enter a new network. Enter the IP
address and network mask into the entry window and
confirm your settings by clicking on OK.
Note:
In order to use multiple remote subnets, you have to define multiple IPSec VPN connections on ASG with the same policy and the same remote key(s), each connection with
a different subnet. On the client you can simply add these different subnets in this
window. When connecting, all tunnels are established to the subnets automatically.
© 2007 Astaro AG.
Subject to change without notice.
14 of 30
Configuration Guide
ASC V9 to ASG V7
You should now be ready to establish the VPN
connection. Click on OK to close the window,
and again OK to close the profile overview
window.
See chapter 6 in order to find out how to
connect to the VPN.
© 2007 Astaro AG.
Subject to change without notice.
15 of 30
Configuration Guide
ASC V9 to ASG V7
5.1. X.509 Certificate when using PKCS#12
Open the menu Configuration >> Certificates on
Astaro Secure Client. As Certificate, select from
PKCS#12 File. Then click on the button next to
PKCS#12 Filename. Browse for the PKCS#12 file
of the user and select it.
Then click on OK to close the window.
Note:
The user’s PKCS#12 file is downloaded from Astaro Security Gateway on the Remote
Access >> Certificate Management >> Certificates tab.
You should now be ready to establish the VPN connection. Click on OK to close the window.
See chapter 6 in order to find out how to connect to the VPN.
5.2. X.509 Certificate using Smart Cards or USB Tokens
Open the menu Configuration >> Certificates on
the Astaro Secure Client. As Certificate, select
PKCS#11 Module. Then click on the button next to
PKCS#11 Module.
The PKCS#11 module wizard appears.
Click on Next to start the process.
The wizard automatically searches
PKCS#11 modules on your system.
© 2007 Astaro AG.
Subject to change without notice.
for
existing
16 of 30
Configuration Guide
ASC V9 to ASG V7
1.
Select the PKCS#11 Module:
Choose an offered DLL and click Next to
proceed.
Note:
If using SafeNet tokens, you may be presented with several choices. Please select
dkck232.dll in this case.
2.
Select the PKCS#11 Slot:
Select the correct hardware device, which is
usually the first one in the list, and click on
Next.
3.
Select the Certificate:
The wizard will show the existing key/certificate pairs on the token or Smart Card. Select
the right certificate and click on Next.
© 2007 Astaro AG.
Subject to change without notice.
17 of 30
Configuration Guide
ASC V9 to ASG V7
4.
Finish PKCS#11 Module Configuration:
After selecting the certificate, the certificate configuration window will appear again.
You should now be ready to establish the VPN connection.
Click on OK to close the window.
See chapter 6 in order to find out how to connect to the VPN.
Note:
Some vendors fail to import the CA certificate from the PKCS#12 container to the token or
Smart Card. In this case, Astaro Secure Client can not retrieve the CA certificate from the
token or Smart Card. You can recognize this error case by checking Log >> Logbook:
it reports PKI ERROR: - Client Error: Verify Certificate with error 2002 !
In order to resolve this issue, obtain the CA certificate in PEM format and copy it to
%SYSTEMROOT%\ncple\CaCerts\, for example C:\WINDOWS\ncple\CaCerts\.
On Astaro Security Gateway, you can download the CA certificate in Remote Access >>
Certificate Management >> Certificate Authority tab.
Note:
If you use an Aladdin eToken, and you get an error message Can’t open PKCS#11
session, then the PIN of your token or Smart Card is not set properly.
To resolve this issue, set the token’s or Smart Card’s PIN anew with the vendor’s software.
© 2007 Astaro AG.
Subject to change without notice.
18 of 30
Configuration Guide
ASC V9 to ASG V7
6. Connecting and Disconnecting
This chapter describes how to establish a road warrior connection between the client and
Astaro Security Gateway.
Note:
Depending on your policy definition on Astaro Security Gateway, the automatic negotiation
of IPSec parameters and encryption algorithms may fail. In this case, see Appendix A in order
to find out how to manually set up the policy in Astaro Secure Client.
Click on Connect.
If the connection establishes successfully, you will see
a green bar and the information Connection is established, as can be seen in the screenshot.
If you chose X.509 as authentication method, a PIN
dialog will show when connecting to the VPN. Enter
the password of the PKCS#12 container in this
case.
Astaro Secure Client has a caching mechanism. So during
normal operation (connect/disconnect) it is only necessary
to enter the PIN once. It is only after a restart of your
computer that you need to enter the PIN again.
The client has a timeout mechanism included. By default,
Astaro Secure Client closes the VPN connection after 100
seconds of inactivity. In order to increase this value, edit
your profile in Configuration >> Profile Settings and go to the section Line Management.
You can specify a higher value in Inactivity Timeout, or set the value to 0 in order to disable
the timeout mechanism completely.
To disconnect from the VPN, click on Disconnect.
Alternatively, you can connect and disconnect from the Astaro Secure
Client tray icon menu. Click on the icon with the right mouse button,
and you will see the context menu.
If the connection is established successfully, you can see
the tray icon switching from red to green, as can be seen
in right screenshot.
© 2007 Astaro AG.
Subject to change without notice.
19 of 30
Configuration Guide
ASC V9 to ASG V7
7. Configuring Connections via X.509 Certificate
This chapter describes the settings on the Astaro Secure Client for the IPSec connection with
X.509 certificates. Note that these manual settings may also be made automatically by
importing the User Config file. This process is described in more detail in chapter 8.1 on page
23.
Security Note:
The connection type with Pre-Shared Keys (PSK) is in general not recommended. If
you use PSKs for the IPSec VPN connection between the Astaro Secure Client and the
Astaro Security Gateway security system, a packet filter rule with the setting Source:
Any must be defined! If possible, use the connection type with X.509 certificates for a
secure IPSec VPN connection.
1.
Open the Profile Settings Window:
Edit your profile in Configuration Æ Profile
Settings. You need to set the IPSec policy to
the same values as specified on Astaro Security Gateway (ASG). Click on the section
IPSec General Settings. There are three
items which you need to change: Policy lifetimes, IKE policy and IPSec policy.
First click on Policy lifetimes.
Set the lifetime values to the same values as on
Astaro Security Gateway security system.
| IKE policy
Duration: Set this to the same value as on
ASG - ISAKMP (IKE) Settings/SA Lifetime.
| IPSec policy
Duration: Set this to the same value as on
ASG - IPSec Settings/SA Lifetime.
Close the window by clicking on OK.
© 2007 Astaro AG.
Subject to change without notice.
20 of 30
Configuration Guide
ASC V9 to ASG V7
2.
Edit the IKE Policy:
Now, you are back at the Profile Settings
window.
Click on Policy editor.
This opens the left window.
In the policy tree, click on IKE Policy and on
IPSec Policy to open the tree view.
Click on IKE Policy, then on the New Entry
button. This opens the following dialog.
Define a new IKE policy and specify the values
as defined on ASG.
Name: Enter a name for the policy.
Authentication: Select RSA-Signature.
Encryption: Select the value that is specified
in the ASG policy - ISAKMP (IKE) Settings/
Encryption Algorithm.
Hash: Select the value that is specified in the
ASG policy - ISAKMP (IKE) Settings/Authentication Algorithm.
© 2007 Astaro AG.
Subject to change without notice.
21 of 30
Configuration Guide
ASC V9 to ASG V7
DH Group: Select the value that is specified in the ASG policy - ISAKMP (IKE)
Settings/IKE DH Group.
Click on OK to close the window.
3.
Edit the IPSec Policy:
Now, you are back at the IPSec Configuration
window.
In the policy tree, click on IPSec Policy, then
on
New
Entry.
This
opens
the
following
dialogue.
Define a new IPSec policy and specify the
values as defined on ASG.
Name: Enter a name for the policy.
Transform: Select the value that is specified in
the ASG policy - IPSec Settings/Encryption
Algorithm.
Authentication: Select the value that is specified in the ASG policy - IPSec Settings/Authentication Algorithm.
Click on OK to close the window.
4.
Select the Policy:
You are now back at the Profile Settings
window.
Select your newly defined policy as IKE policy
and IPSec policy. Then click on OK to close
the window.
The settings for the IPSec connection with X.509 certificates are now completed. Now make
the settings on the Astaro Security Gateway security system. Then you can establish the
IPSec tunnel as described in chapter 6.
© 2007 Astaro AG.
Subject to change without notice.
22 of 30
Configuration Guide
ASC V9 to ASG V7
8. Configuration of the Astaro Security Gateway
The Astaro Security Gateway configuration will use the WebAdmin interface, accessed through a
standard web browser (e.g., MS Internet Explorer) from your administration PC.
The process of starting the WebAdmin interface is described in the Astaro Security
Gateway user manual in the introduction of chapter 5.
8.1. X.509 Certificate Connections
The Astaro Security Gateway is configured via the web based WebAdmin configuration tool
from the administration PC. Opening and using this configuration tool is extensively described
in the Astaro Security Gateway V7 administration guide.
1.
Define the user account for the remote host:
Open the Users >> Users page.
Define a new user account for the remote client.
With remote access via IPSec this user account is
necessary for accessing the Astaro User Portal
and for VPN.
Make the following settings:
Username: Enter a specific user name (e.g.
gforeman). In doing so remember that the remote user will need this username later to log in
to the Astaro User Portal.
Real name: Enter the full name of the remote
user (e.g. George Foreman).
Email address: Enter the e-mail address of the
user. When you specify an e-mail address, an
X.509 certificate for this user will be generated automatically while creating the user
account, using the e-mail address as the certificate's VPN ID. The certificate will be
displayed on the Remote Access >> Certificate Management >> Certificates tab.
Authentication: With the Local authentication method the following two entry menus will
be displayed for the definition of the password.
Password: Enter the password for the user. In doing so remember that also the remote
user will need this password later to log in to the Astaro User Portal.
Repeat: Confirm the password.
© 2007 Astaro AG.
Subject to change without notice.
23 of 30
Configuration Guide
ASC V9 to ASG V7
Use static remote access IP: Each remote access user can be assigned to a specific IP
address. The assigned IP address must not originate from the IP address pool. During the
dial-up the address is automatically assigned to the host. Enter the static IP address in the
RAS address box.
Comment (optional): Enter a description or additional information on the user.
Save your settings by clicking on Save.
More detailed information on the configuration of a User Account and detailed
explanations of the individual settings can be found in the Astaro Security Gateway V7 administration guide in chapter 5.
2.
Configure the IPSec remote access:
Open the Remote Access >> IPSec page.
On the Connections
tab, click New IPSec
remote access rule.
The Add IPSec remote
access
rule
dialog box opens.
More detailed information on the configuration of a IPSec Remote Access and detailed explanations of the individual settings can be found in the Astaro Security
Gateway V7 administration guide in chapter 13.
Name: Enter a descriptive name for this connection.
Interface: Select the network interface to use for IPSec access.
Local networks: Select the local networks that should be reachable to the client.
© 2007 Astaro AG.
Subject to change without notice.
24 of 30
Configuration Guide
ASC V9 to ASG V7
Note:
If you wish the IPSec-connected users to be allowed to access the Internet, you need to
select Any in the Local networks dialog box. Additionally, you need to define appropriate Masquerading or NAT rules.
Policy: Select an already defined policy (in this example: AES-256). Now you can use
the Remote Access >> IPSec >> Policies tab to define your own policies.
Creating of own IPSec Policies is described in in the administration guide in
chapter 13.
Authentication type: IPSec remote access supports authentication based on CA DN
Match, Preshared Keys and X.509 Certificate. The settings in this section depend on
the authentication type:
| CA DN Match
The authentication is based on the Distinguished Name (DN).
Authority: Select the Certificate Authority VPN Signing CA for the VPN users.
DN mask: In order to use a Distinguished Name as an ID, you will need information
from the X.509 index. Possible indications are Country (C), State (ST), Local (L), Organization
(O), Unit (OU), Common Name (CN) and E-Mail Address (E).
IP Pool: The default settings assign addresses from the private IP space 10.242.4.x/24.
This network is called the VPN Pool (IPSec). If you wish to use a different network, simply
change the definition of the VPN Pool (IPSec) on the Definitions >> Networks page.
| Preshared Keys
Preshared Key: Enter the shared secret. This shared secret is a secure phrase or password that is used to encrypt the traffic using the encryption algorithm for IPSec.
Confirm: Confirm the shared secret.
Security Note:
Use a secure password! Your name spelled backwards is, for example, not a secure
password – while something like xfT35!4z would be. Ensure that this password does
not fall into the hands of unauthorized third parties. With this password, an attacker
can build a connection to the internal network. We recommend changing this password at regular intervals.
© 2007 Astaro AG.
Subject to change without notice.
25 of 30
Configuration Guide
ASC V9 to ASG V7
| X.509 Certificate
If you choose X.509 CA certificate, the following dialog box will be displayed.
Allowed users: Select the user object, which had been created automatically in step 1
(e.g. gforeman).
Automatic packet filter rules: Once the IPSec VPN tunnel is successfully established,
the packet filter rules for the data traffic will automatically be added. After the completion
of the connection, the packet filter rules will be removed.
Comment: Add a description or other information about the IPSec connection.
Save your settings by clicking on Save.
3.
Configure the advanced IPSec remote access settings:
Open the Remote Access >> IPSec >> Advanced tab.
| Local X509 certificate
Select the local X.509 certificate used for IPSec connections to authenticate the server.
© 2007 Astaro AG.
Subject to change without notice.
26 of 30
Configuration Guide
ASC V9 to ASG V7
| Dead Peer Detection (DPD)
The Dead Peer Detection option is used to automatically determine whether a remote
IPSec peer can still be reached. Usually it is safe to always enable this option. The IPSec
peers automatically determine whether the remote side supports Dead Peer Detection or
not, and will fall back to normal mode if necessary.
| CRL handling
Automatic fetching: There might be situations, in which the provider of a certificate
attempts to revoke the confirmation awarded with still valid certificates, for example if it
has become known that the receiver of the certificate fraudulently obtained it by using
wrong data (name, etc.) or because an attacker has got hold of the private key, which is
part of the certified public key. For this purpose, so-called Certificate Revocation Lists
or CRLs are used. They normally contain the serial numbers of those certificates of a
certifying instance, that have been held invalid before their expiration.
The Automatic Fetching option automatically requests the CRL through the URL defined
in the partner certificate via HTTP, Anonymous FTP or LDAP Version 3. On request, the CRL
can be downloaded, saved and updated, once the validity period has expired.
Strict policy: Any partner certificate without a corresponding CRL will be rejected.
| Misc settings
Copy TOS (Type of Service) value: Type-of-Service-Bits are several four Bit-flags in
the IP header. The Bits are referred to as Type-of-Service-Bits, as they allow the transferring application, to tell the network which type of service quality is necessary. The available service quality classes are: minimum delay, maximum throughput, maximum reliability and minimum cost. This option copies the content of the TOS field in the encrypted
data packet, so that the IPSec data traffic can be routed according to its priority.
Allow path MTU discovery: It is usually preferable that IP data packets be of the largest
size that does not require fragmentation anywhere along the path from the source to the
destination. This size of the data packet is referred to as the Path Maximum Transmission
Unit (PMTU). If any of the data packets are too large to be forwarded without fragmentation by some router along the path, that router will discard them and return ICMP Destination Unreachable messages with a code meaning "fragmentation needed and DF set".
Upon receipt of such a message, the source host reduces its assumed PMTU for the path.
MTU: In this field you can specify the Maximum Transmission Unit (MTU) of the IPSec
interface; the default MTU is 1420 byte.
© 2007 Astaro AG.
Subject to change without notice.
27 of 30
Configuration Guide
ASC V9 to ASG V7
4.
Configure the advanced remote access settings:
Open the Remote Access >> Advanced page.
This page allows you to define name servers (DNS and WINS) and the name service
domain, which should be assigned to hosts during the connection establishment.
5.
Define the packet filter rule:
Only for authentication based on X.509 certificate, you needn’t define this packet filter
rule if you have enabled the Automatic packet filter rule function during the configuration of the IPSec remote access in step 2.
Open the Network Security >> Packet
Filter >> Rules tab.
After clicking on the New rule button the
dialog box for new rules will appear. Create
a new rule for the access to the local internal network.
Source: Remote host or user (in this
example: gforeman).
Service: Set the service.
Destination: The allowed internal network
(in this example: Internal (Network)).
Action: Allow.
Confirm your settings by clicking on Save.
New rules will be added at the end of the list and remain disabled (status light shows red)
until they are explicitly enabled by clicking on the status light.
Active rules are processed in the order of the numbers (next to the status light) until the
first matching rule. Then the following rules will be ignored! The sequence of the rules is
© 2007 Astaro AG.
Subject to change without notice.
28 of 30
Configuration Guide
ASC V9 to ASG V7
thus very important. Therefore never place a rule such as Any – Any – Any – Allow at
the beginning of the rules since all traffic will be allowed through and the following rules
ignored!
More detailed information on the definition of Packet Filter Rules and detailed
explanations of the individual settings can be found in the Astaro Security Gateway V7 administration guide in chapter 7.
6.
Define the masquerading rule (optional):
Masquerading is used to mask the IP addresses of one network (in this example:
gforeman) with the IP address of a second network (in this example: External). Thus
remote users, who have only private IP addresses can surf on the Internet with an official
IP address.
More detailed information on the definition of Masquerading Rules and detailed
explanations of the individual settings can be found in the Astaro Security Gateway V7 administration guide in chapter 7.
Open the Network Security >> NAT >> Masquerading tab.
Make the following settings:
Network: Select the network of the remote
endpoint (in this example: gforeman).
Interface: Select the interface that shall be
used to mask the clients. (in this example:
External).
Confirm your settings by clicking on Save.
New masquerading rules will be added at the end of the list and remain disabled (status
light shows red) until they are explicitly enabled by clicking on the status light.
© 2007 Astaro AG.
Subject to change without notice.
29 of 30
Configuration Guide
ASC V9 to ASG V7
7.
Activate the proxies (optional):
If the remote employees shall access URL services via the remote access you may configure the required proxies on the Astaro Security Gateway – this would be the DNS and
HTTP proxy for example.
More detailed information on the configuration of Proxies and detailed explanations
of the individual settings can be found in the Astaro Security Gateway V7 administration guide.
After configuring the VPN server (Headquarters) you must configure the road warrior.
Depending on the security policy of your organization and the requirements of your network
you might have to make additional settings.
© 2007 Astaro AG.
Subject to change without notice.
30 of 30