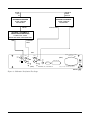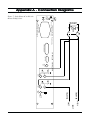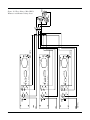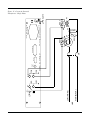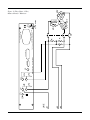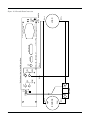
1
Model 6510
Single Phase
Power Analyzer
User ’s Manual
MAGTROL
Sales and TTechnical
echnical Assistance
MAGTROL
MAGTROL,, INC.
MAGTROL SA
70 Gardenville Parkway
Buffalo, New York 14224
USA
Route de Moncor 4B
1701 Fribourg
Switzerland
Tel:
(716) 668-5555
Fax: (716) 668-8705
E-mail: [email protected]
Tel:
+41 (0)26 407 3000
Fax:
+41 (0)26 407 3001
E-mail: [email protected]
ww w.
magtr
ol.c
om
w.m
agtro
l.co
Manufacturers of:
Motor Test Equipment and Hysteresis Brakes & Clutches
!
Torque Transducers, Displacement Sensors, Rotar y Transmitters
Table of R
evisions
Revisions
Date
Change
Page Number(s)
05/21/01
02/07/01
12/13/00
Modified External Shunt Input
Modified Data Output Commands
Modified Connection Diagram - Single Phase AC or DC, Remote Voltage Sense
Modified Connection Diagram - Three Phase, 4 Wire WYE, 3 Wattmeter with
Remote Voltage Sense
Modified Connection Diagram - External Shunt Connectio
9
11
17
12/13/00
12/13/00
20
24
While every precaution has been exercised in the compilation of this document, Magtrol, Inc.
assumes no responsibility for errors or omissions. Additionally, no liability is assumed for any
damages that may result from the use of the information contained within this publication.
LabVIEW® is a registered trademark of National Instruments Corporation.
RadioShack® is a registered trademark of the RadioShack Corporation.
02/01
Table of Contents
TABLE OF REVISIONS .......................................................................................................................................... ii
SALES AND TECHNICAL ASSISTANCE .............................................................................................................. ii
1 - INTRODUCTION ................................................................................................................................................ 1
ABBREVIATIONS ............................................................................................................................................................................ 1
UNPACKING ..................................................................................................................................................................................... 1
POWER .............................................................................................................................................................................................. 1
FUSE REPLACEMENT .................................................................................................................................................................... 1
SAFETY ............................................................................................................................................................................................. 1
CONNECTORS ................................................................................................................................................................................. 1
MAXIMUM RATINGS ..................................................................................................................................................................... 1
INSTALLATION ............................................................................................................................................................................... 2
INITIAL CHECKOUT ....................................................................................................................................................................... 2
TRANSIENT OVERLOADS ............................................................................................................................................................. 2
FIGURE 1. 6510 FRONT PANEL .............................................................................................................................................. 2
FIGURE 2. 6510 REAR PANEL ................................................................................................................................................ 2
Current Overload ........................................................................................................................................................................ 2
2 - SPECIFICATIONS ............................................................................................................................................. 3
MEASUREMENT FUNCTIONS ...................................................................................................................................................... 3
MEASUREMENT MODES ............................................................................................................................................................... 3
Continuous Mode ....................................................................................................................................................................... 3
Cycle-by-cycle Mode ................................................................................................................................................................. 3
VOLTAGE ......................................................................................................................................................................................... 3
Four DC and AC Ranges ............................................................................................................................................................ 3
CURRENT ......................................................................................................................................................................................... 3
Four DC and AC Ranges ............................................................................................................................................................ 3
Remote Current Sensing ............................................................................................................................................................. 3
IMPEDANCE ..................................................................................................................................................................................... 3
Voltage, DC or AC ..................................................................................................................................................................... 3
Current, DC or AC Ranges ........................................................................................................................................................ 3
MEASUREMENT ACCURACY ...................................................................................................................................................... 3
ACCURACY SPECIFICATIONS ..................................................................................................................................................... 3
Voltage Input .............................................................................................................................................................................. 3
Current Input .............................................................................................................................................................................. 4
External Shunt Input ................................................................................................................................................................... 4
Power .......................................................................................................................................................................................... 4
Frequency ................................................................................................................................................................................... 4
ISOLATION ....................................................................................................................................................................................... 4
TEMPERATURE COEFFICIENT .................................................................................................................................................... 4
ACCURACY CERTIFICATION ....................................................................................................................................................... 4
DISPLAY AUTO ZERO .................................................................................................................................................................... 4
3 - CONNECTING THE 6510 .................................................................................................................................. 5
SURGE PROTECTION ..................................................................................................................................................................... 5
CONNECTORS ................................................................................................................................................................................. 5
SINGLE PHASE ................................................................................................................................................................................ 5
AC or DC Connections .............................................................................................................................................................. 5
THREE PHASE ................................................................................................................................................................................. 6
3 Wire Delta Connections .......................................................................................................................................................... 6
3 Wire WYE, 2 Wattmeter Connections .................................................................................................................................... 6
4 Wire WYE, 3 Wattmeter Connections .................................................................................................................................... 6
Current & Potential Transformer Connections .......................................................................................................................... 6
4 Wire Balanced Load, 1 Wattmeter .......................................................................................................................................... 6
3 Wire Balanced Load, 1 Wattmeter .......................................................................................................................................... 6
iii
4 - OPERATION ...................................................................................................................................................... 7
GENERAL ......................................................................................................................................................................................... 7
6510 MENU NAVIGATION ............................................................................................................................................................. 7
6510 FUNCTIONS ............................................................................................................................................................................. 8
VACUUM FLUORESCENT DISPLAY (VFD) ................................................................................................................................ 8
AMPERES DISPLAY ........................................................................................................................................................................ 8
VOLTAGE DISPLAY ....................................................................................................................................................................... 8
WATTS DISPLAY ............................................................................................................................................................................ 9
MODE HOLD .................................................................................................................................................................................... 9
EXTERNAL SHUNT INPUT ............................................................................................................................................................ 9
5 - COMMUNICATION .......................................................................................................................................... 10
GPIB (IEEE-488) ............................................................................................................................................................................. 10
HARDWARE INSTALLATION ..................................................................................................................................................... 10
SOFTWARE INSTALLATION ...................................................................................................................................................... 10
PRIMARY ADDRESS ..................................................................................................................................................................... 10
SERIAL (RS-232) ............................................................................................................................................................................ 10
COMMUNICATION COMMANDS ............................................................................................................................................... 10
CONFIGURATION COMMANDS ................................................................................................................................................. 10
DATA OUTPUT COMMANDS ...................................................................................................................................................... 11
DATA OUTPUT FORMAT ............................................................................................................................................................. 11
ASCII Data Format ................................................................................................................................................................... 11
Binary Data Format .................................................................................................................................................................. 12
CALIBRATION MODE COMMANDS .......................................................................................................................................... 12
SPECIAL FUNCTIONS .................................................................................................................................................................. 12
WIRING DIAGRAMS ..................................................................................................................................................................... 12
Connector Pinout ...................................................................................................................................................................... 12
FIGURE 3. CONNECTOR PINOUT ............................................................................................................................................ 12
Serial Communications Cable .................................................................................................................................................. 12
FIGURE 4. SERIAL COMMUNICATIONS CABLE ........................................................................................................................... 12
General Purpose Interface Bus (GPIB) .................................................................................................................................... 12
FIGURE 5. IEEE-488 INTERFACE ......................................................................................................................................... 13
6 - OPERATING PRINCIPLES .............................................................................................................................. 14
AMPERES TRANSDUCING .......................................................................................................................................................... 14
VOLTAGE SENSING ..................................................................................................................................................................... 14
ANALOG PROCESSING ................................................................................................................................................................ 14
DIGITAL PROCESSING ................................................................................................................................................................ 14
7 - CALIBRATION ................................................................................................................................................ 15
GENERAL ....................................................................................................................................................................................... 15
TEST SETUP ................................................................................................................................................................................... 15
CALIBRATION ............................................................................................................................................................................... 15
VERIFICATION .............................................................................................................................................................................. 15
FIGURE 6. CALIBRATION VERIFICATION TEST SETUP ................................................................................................................ 16
APPENDIX A - CONNECTION DIAGRAMS ......................................................................................................... 17
FIGURE 7. SINGLE PHASE AC OR DC WITH REMOTE VOLTAGE SENSE ....................................................................................... 17
FIGURE 8. THREE PHASE, 3 WIRE DELTA, 2 WATTMETER WITH REMOTE VOLTAGE SENSE ............................................................. 18
FIGURE 9. THREE PHASE, 3 WIRE WYE, 2 WATTMETER WITH REMOTE VOLTAGE SENSE ............................................................. 19
FIGURE 10. THREE PHASE, 4 WIRE WYE, 3 WATTMETER WITH REMOTE VOLTAGE SENSE ........................................................... 20
FIGURE 11. CURRENT & POTENTIAL TRANSFORMER - SINGLE PHASE ........................................................................................ 21
FIGURE 12. THREE PHASE, 4 WIRE WYE, BALANCED LOAD, 1 WATTMETER ............................................................................... 22
FIGURE 13. THREE PHASE, 3 WIRE, BALANCED LOAD, 1 WATTMETER ........................................................................................ 23
FIGURE 14. EXTERNAL SHUNT CONNECTION ........................................................................................................................... 24
APPENDIX B - SCHEMATICS .............................................................................................................................. 25
INPUT BOARD ............................................................................................................................................................................... 25
MAIN BOARD - MCU SECTION .................................................................................................................................................. 26
MAIN BOARD - DSP SECTION .................................................................................................................................................... 27
MAGTROL LIMITED WARRANTY ....................................................................................................................... 29
1 - Introduction
ABBREVIATIONS
FUSE REPLACEMENT
Remove the line cord and carefully pry up and remove
the fuse holder. Use a 250 ma slow blow fuse for 120
Vrms or a 100 ma slow blow fuse for 240 Vrms power.
PA
Model 6510 Power Analyzer
GPIB
IEEE- 488 Instrument Bus Standard
A
Amperes
V
Volts
W
Watts
PF
Power Factor
VA
Volt Amperes
D SP
Digital Signal Processor
CONNECTORS
CM RR
Common Mode Rejection Ratio
VFD
Vacuum Fluorescent Display
For your convenience, the following connectors are
supplied with your 6500 PA.
PC
Personal Computer
SAFETY
SECURELY GROUND the 6510 PA case by
connecting a good earth ground at the ground stud that
is located on the rear panel. Use a number 12 AWG, or
larger wire.
Plugs t hat mat e wit h 6510 PA connect ors
( Standard 4mm shrouded banana plugs )
Mueller PN#
UNPACKING
AMPS +
plug, black, male BU- 31101- 0
The Model 6510 is packed in reusable, shock resistant
packing material that will protect the instrument during
normal handling. In the event of shipping damage,
immediately notify the carrier and MAGTROL
Customer Service Dept. Save all shipping materials for
reuse when returning the instrument for calibration or
servicing.
AMPS -
plug, black, male BU- 31101- 0
VOLTS -
plug, black, male BU- 31101- 0
VOLTS +
plug, red, male
POWER
The 6510 PA will accept either 120 or 240 Vrms, 50/60
Hz, power at 20 VA, max. The line cord is a detachable
NEMA standard 3 wire that plugs into the rear access
power entry and filter module of the 6510 PA. The line
cord must be detached from the PA
during servicing.
NOTE:
The standard 6510 is set up at the
factory for 120 Vrms power. 240
Vrms can be selected by
removing the line cord and
carefully prying up the fuse
holder. Inside the fuse
compartment, reconfigure the
jumper.
SHUNT INPUT Isolated BNC
BU- 31101- 2
BU- 5656- B- 48- 0
The following connectors / cables are not included and
must be ordered separately:
• EXT SYNC (BNC) - Standard BNC
• GPIB (IEEE-488) - 24 Pin bus male standard
• SERIAL (RS232) - 9 Pin female standard
MAXIMUM RATINGS
Load Voltage: 750 Vrms line to line, or 1000 Vrms
line to earth.
Load Current: 20 Amperes rms, continuous. 30
Amperes rms, 30 sec. max.
Shunt Input:
± 10 Vrms.
1
INSTALLATION
CAUTION Damage to the 6510 can
result from excessive voltage
transients generated by
unsuppressed inductive loads.
This damage is not within the
scope of the normal
instrument service and is not
covered by the MAGTROL
WARRANTY.
Orientation:
Electrical Load:
No special requirements.
Use wire and connectors rated for
the maximum load current and
voltage expected.
IEEE-488 (GPIB): Use only high quality shielded
cable conforming to the bus
standards.
INITIAL CHECKOUT
Make sure the circuit is completely de-energized by
removing all voltage sources.
Plug the 6510 PA into the 50/60 Hz power mains. Switch
the POWER rocker switch (red) to ON and observe that
the VFD reads “MAGTROL 6510” and displays the
revision of the software. After approximately 1 second
the display will change to the last saved display
configuration. Your 6510 PA has passed the initial
check.
TRANSIENT OVERLOADS
Connect an appropriate transient suppressor in parallel
with all inductive loads. Consult the suppressor vendor’s
application literature for proper selection and sizing.
CURRENT OVERLOAD
NO FUSES are in the 6510 PA measuring circuits.
Therefore, excessive current passed through the AMPS
terminals will cause excessive internal heating and
possible unit damage.
CAUTION This overload abuse is not
covered by the MAGTROL
WARRANTY.
Know your load conditions and double check all
connections. If an overload should occur, immediately
remove all power, locate and correct the problem before
re-energizing your circuit. If a circuit breaker is
installed, it must be installed on the LOAD side of the
6510 (downstream). This will keep the low impedance
of the input line connected to the 6510 PA for surge
suppression. If the line side must also contain a breaker,
it should be delayed in operation to open after the load
side breaker has opened.
MODEL 6510
POWER ANALYZER
ENTER
AUTO
AUTO
FREQ SOURCE
DC
PEAK-CF
MODE
W-VA-PF
HOLD
SHIFT
Figure 1. 6510 Front Panel
EXT.
SHUNT
±10 V
MAX.
AMPS
IN
HIGH (+)
20 A
MAX.
ON
OFF
CAUTION: DOUBLE POLE FUSING
20VA 50 / 60 Hz
VOLTS
OUT
750 V
MAX.
LOW (-)
1000 V
MAX.
EXT.
SYNC.
GPIB/IEEE-488
RS-232C
EARTH
GROUND
1000 V
MAX.
MAGTROL, INC. BUFFALO, NY
Figure 2. 6510 Rear Panel
2
120V UL/CSA 250mA 250V SB
FUSE (5 x 20mm): 240V IEC 100mA 250V T
2 - Specifications
MEASUREMENT FUNCTIONS
•
•
•
•
•
•
•
•
•
•
•
•
Volts RMS (AC+DC)
Amps RMS (AC+DC)
Volts DC
Amps DC
Volts Peak
Amps Peak
Volts Crest Factor
Amps Crest Factor
Watts
VA
Power Factor
Frequency (Volts, Amps, Line, Ext.)
MEASUREMENT MODES
CONTINUOUS MODE
REMOTE CURRENT SENSING
Differential input: 110 dB CMRR.
Maximum of 10 Volts RMS.
IMPEDANCE
VOLTAGE, DC OR AC
1.5 MegOhm load on all voltage ranges
CURRENT, DC OR AC RANGES
12 mOhm shunt resistance all ranges
MEASUREMENT ACCURACY
Specified test conditions: Ambient temperature of 68°
± 5°F and Power Factor of 0.1 to 1.0, lead or lag. Unit
allowed 10 minute warm-up time.
Measurement values are determined from continuously
processed and filtered V & I input values.
Calibration interval is six months for specified accuracy.
CYCLE-BY-CYCLE MODE
ACCURACY SPECIFICATIONS
Measurement values are determined from an integration
of one complete input cycle.
Effective Range: 10 to 110% of full range.
Fundamental frequency input: Can be selected from V,
A, Line, or EXT.
NOTE:
For V or A frequency measurement
minimum input must be >10% of
range setting.
VOLTAGE
FOUR DC AND AC RANGES
30, 150, 300 and 600 Volts DC and Volts rms, each
with a crest factor of 2.
CURRENT
VOLTAGE INPUT
Ranges
30V, 150V, 300V, 600V
Crest Factor
2.0 @ full scale input
Impedance
1.5 MegOhm
Display Range
4 digits with 10 mV resolution
Accuracy:
DC
±(0.1% Reading + 0.2% Range)
5 - 500Hz
±(0.1% Reading + 0.1% Range)
500 - 100kHz
±(0.02 x F (kHz)% Reading + 0.3%
Range)
>100kHz
N/A measurement band limited to
DC- 100kHz
FOUR DC AND AC RANGES
1, 5, 10, and 20 Amps DC and Amps rms, each with a
crest factor of 2.
3
CURRENT INPUT
Ranges
FREQUENCY
Source
V, A, LINE, or EXT (For V or A,
source input must be >10% of
range setting)
Accuracy
10 - 500Hz 0.05%
EXT. Input
BNC non- isolated, earth ground
referenced
Input Resistance
100 kOhm
Voltage Level
TTL / CMOS.
1A, 5A, 10A, 20A
Crest Factor
2.0 @ max range
Impedance
12 mOhm
Display Range
4 digits with 1 mA resolution
Accuracy:
DC
±(0.1% Reading + 0.2% Range)
5 - 500Hz
±(0.1% Reading + 0.1% Range)
500 - 100kHz
±(0.02 x F (kHz)% Reading + 0.3%
Range)
>100kHz
N/A measurement band limited to
DC- 100kHz
Maximum Voltage 50V
ISOLATION
EXTERNAL SHUNT INPUT
Ranges
50 mV, 250 mV, 500 mV, 1.0 V
Crest Factor
2.0 @ full scale input
Impedance
17 kOhm
Display Range
4 digits with 0.1 mV resolution
Accuracy:
DC
±(0.1% Reading + 0.2% Range)
5 - 500Hz
±(0.1% Reading + 0.1% Range)
500 - 100kHz
±(0.02 x F (kHz)% Reading + 0.3%
Range)
>100kHz
N/A measurement band limited to
DC- 100kHz
NOTE:
User definable scaling from 0.001
mV/Amp to 10,000 mV/Amp
POWER
Display Range
TEMPERATURE COEFFICIENT
± 0.01% of range per degree C, maximum.
ACCURACY CERTIFICATION
All instruments are shipped with a CERTIFICATE of
CALIBRATION from MAGTROL Inc. Magtrol
policies and procedures comply with MIL-STD45662A. Measurement standards are traceable to the
National Institute of Standards and Technology (NIST).
Instrument calibration every six calendar months is
necessary to maintain full compliance with all
specifications. If a one year calibration cycle is used,
all accuracy specifications are reduced by 0.1%. After
one calendar year, the instrument is considered to be
out of calibration.
DISPLAY AUTO ZERO
6 digits with 1 mW resolution
Accuracy:
DC
0.4% of VA range
5 - 500Hz
0.2% of VA range
500 - 10kHz
0.6% of VA range
10kHz - 100kHz
0.6% + 0.03% x F (kHz)% of VA
range
>100kHz
N/A measurement band limited to
DC- 100kHz
4
1000 Vrms input to GND.
When in continuous mode and when the A and V display
indication is less than 1.0% of range, the displayed value
is set to ZERO.
3 - Connecting the 6510
CAUTION Always install a properly rated circuit
breaker or fuse between the 6510
Power Analyzer and the load. Also,
make sure that your power source has
it’s own disconnect and overload
protection that has an operating time
lag that insures the load breaker
always operates first. Wire according
to all applicable wiring codes,
making sure the wire gauge and
insulation ratings are adequate for
your application.
SURGE PROTECTION
Use Metal Oxide Varistors (MOV) or other equivalent
transient suppressors connected between lines at the load
(across the load). These suppressors are an absolute
necessity when inductive loads are used. In three phase
systems, each load must have a suppressor.
CAUTION
If a circuit breaker is used in the input
line to the 6510 PA, a circuit should
be used that prevents the breaker
from opening until after the load side
breaker has operated. Otherwise,
potentially damaging inductive
transients will be applied to the 6510
PA. Damage caused by these
transients are outside the scope of the
MAGTROL WARRANTY.
For voltage sense lines less than 25 feet in length, a
twisted pair of #20 gauge (or larger) wire can be used.
For lines longer than 25 feet or lines grouped with other
AC conductors, shielded cable should be used. Connect
the shield at the 6510 PA GND terminal. If the wires
connecting the load to the 6510 PA Amps terminals are
short and the resulting voltage drop is insignificant, the
voltage sense connections can be made at the rear panel
of the 6510 PA.
CONNECTORS
Use the supplied connectors. For replacement, see
“Connectors” in Chapter 1 for manufacturer and part
numbers.
SINGLE PHASE
Connect the chassis ground terminal
to a good earth ground. Use at least
#12 gauge insulated copper wire.
AC OR DC CONNECTIONS
Figure 7
This circuit utilizes the 6510 PA REMOTE VOLTAGE
SENSE by measuring the voltage at the load. This
increases measurement accuracy by eliminating line
voltage drop from the power measurement. For safety,
an overload circuit breaker (CB) removes all load
voltage during an over current condition. Make sure
that connections from the remote voltage sense lines
are connected very close to the circuit breaker and the
lines from the breaker to load are as short as possible.
Drawings referred to in this chapter
can be found in Appendix A Connection Diagrams.
5
THREE PHASE
3 WIRE DELTA CONNECTIONS
Figure 8
Load true power is the algebraic sum of the two
wattmeter readings ( W = W1 ± W2 ) regardless of
load power factor or balance. The general discussion
from Figure 7 applies.
NOTE:
For a load power factor of 0.5, one
wattmeter reads zero. As the power
factor goes less than 0.5, its power is
negative and is subtracted in the
algebraic watts summation. The 6510
PA will not display a minus sign for
this condition. For power factors
greater than 0.5, the polarity of both
wattmeters will be the same.
Therefore, true power in watts is
simply the unsigned sum of the
wattmeter readings.
CURRENT & POTENTIAL TRANSFORMER CONNECTIONS
Figure 11
Voltage and current measurement ranges can be
extended by using current and potential
transformers. Frequency response will be determined
by the characteristics of the transformers used. T h e
general discussion from Figure 7 applies. Three phase
lines can be measured by using the two or three
wattmeter techniques previously illustrated.
4 WIRE BALANCED LOAD, 1 WATTMETER
Figure 12
With a balanced load, one wattmeter connected in one
phase reads 1/3 of the total power consumed.
WATTSTOTAL = 3 x WATTMETER READING
The general discussion from Figure 7 applies. The three
load impedances are equal for balanced loads.
3 WIRE BALANCED LOAD, 1 WATTMETER
Figure 13
3 WIRE WYE, 2 WATTMETER CONNECTIONS
Figure 9
True power is the algebraic sum of the two wattmeter
readings regardless of power factor and degree of load
balance - see NOTE for Figure 2, concerning power
factors less than 0.5. Also, the general discussion from
Figure 7 applies.
WATTSTOTAL = 3 x WATTMETER READING
An artificial neutral is formed by a star connection of
three identical resistors (R). The value of these resistors
should be high enough to avoid loading the lines and
affecting the power measurement. The general
discussion from Figure 7 applies. The three load
impedances are equal for a balanced load.
4 WIRE WYE, 3 WATTMETER CONNECTIONS
Figure 10
Three wattmeters are required for unbalanced loads.
Total power is the algebraic sum of the three wattmeter
readings. The general discussion from Figure 7 and the
power factor discussion of Figure 8 applies.
Drawings referred to in this chapter
can be found in Appendix A Connection Diagrams.
6
4 - Operation
GENERAL
Using Chapters 1 and 3 as a guide, connect the 6510.
Before connecting the power mains, double check all
connections using an Ohmmeter. Verify that the over
current circuit breaker is open and connect the power
mains. Observe the 6510 front panel indicators. Turn
the 6510 power switch ON and confirm proper operation
- refer to “Initial Checkout” in Chapter 1.
Energize the power mains and apply power to the load
by closing circuit breaker CB. If improper operation
occurs, immediately disconnect power mains, locate and
correct the problem.
6510 MENU NAVIGATION
M ENU NAVIGATION
FUNCTION
CURRENT RANGE: ! Increments current range
" Decrements current range
AUTO Selects / deselects current auto range (except in EXT ranges)
VOLTAGE RANGE: ! Increments voltage range
" Decrements voltage range
AUTO Selects / deselects voltage auto range
Selects the signal that the cycle by cycle measurement will be synchronized with.
Continue to press SHIFT then FREQ SOURCE and the source toggles through:
VOLT (voltage input)
SHIFT then
AMP (current input)
FREQ SOURCE
EXT (external sync input)
LINE (incoming ac line)
Note : Selecting SHIFT then FREQ SOURCE will automatically switch unit to cycle by
cycle mode.
SHIFT then DC
Selects DC measurement.
Note : Selecting DC will automatically set continuous mode.
Selects displayed measurement.
Continue to press SHIFT then PEAK- CF and the displayed values toggle through:
RMS readings ( A, V )
SHIFT then PEAK - CF
PEAK readings ( Apk, Vpk )
Crest Factor readings ( ACF, VCF )
MODE Selects continuous or cycle by cycle measurement mode.
Selects what calculated value is to be displayed.
Continue to press W- VA- PF and the displayed values toggle through:
W- VA- PF
W Watts
VA Vrms x Arms
PF Power factor
HOLD Holds current value until hold is pressed again.
SHIFT Used to select FREQ SOURCE, DC, PEAK
Note : The up/down, left/right switches are inactive until the MENU switch is pressed. Once
the MEN U switch has been pressed the left and right arrows will toggle though these
ENTER functions: CURREN T SCALIN G, VO LTAGE SCALIN G, EXTERN AL IN PUT, I/O
SETTINGS, AC/DC FILTER & SAVE SETUP. (These are described in further detail in
the Function Table on the next page.) Pressing ENTER will select the displayed function.
7
6510 FUNCTIONS
FUNCTION
DESCRIPTION
Scaling is turned ON by pressing the UP key and then pressing ENTER. This allows setting of
the scaling factor using the arrow keys. UP and DOWN keys will increase or decrease the
CURRENT
selected number. LEFT and RIGHT keys change the position of the number that is selected.
SCALING
Pressing ENTER will enable the set scale factor.
Note : This value is saved to nonvolatile ram.
Scaling is turned OFF by pressing the DOWN key and then pressing ENTER
Scaling is turned ON by pressing the UP key and then pressing ENTER. This allows setting of
the scaling factor using the arrow keys. UP and DOWN keys will increase or decrease the
VOLTAGE selected number. LEFT and RIGHT keys change the position of the number that is selected.
SCALING Pressing ENTER will enable the set scale factor.
Note : This value is saved to nonvolatile ram.
Scaling is turned OFF by pressing the DOWN key and then pressing ENTER.
Allows setting of the external shunt input scaling factor using the arrow keys. Pressing ENTER
EXTERNAL
will enable the set scale factor.
INPUT
Note : This value is saved to nonvolatile ram.
Pressing left or right arrow buttons toggles through the following selections:
CONTRAST: UP or DOWN keys select display contrast
I/O SETTINGS
BAUD RATE: UP or DOWN keys select baud rate for RS- 232
GPIB: UP or DOWN keys select GPIB address.
AC / DC FILTER Pressing the UP or DOWN keys select filter value.
SAVE SETUP Saves set up values to non volatile ram.
VACUUM FLUORESCENT DISPLAY (VFD)
The 6510 is shipped with the Contrast setting at zero
(lowest) in order to prolong display life. If it is necessary
to increase the contrast for improved readability, use
the lowest possible setting to achieve that result. Using
a setting higher than necessary may cause display
segments to burn-in over a period of time, resulting in
uneven illumination from segment to segment.
AMPERES DISPLAY
The AMPS display is a four digit, floating point display.
The 6510 defaults to AUTO (auto ranging) at turn on.
AUTO up-ranging occurs if the RMS current exceeds
the top of the range value plus about 5% or, if a peak
value exceeds full range RMS value x 1.414 plus
approximately 5%. AUTO down-ranging occurs when
the current is just less than full range value of the next
lower range.
8
Selection of any amps range push-button activates the
selected range by overriding the AUTO range selection
- AUTO indication is removed from display.
VOLTAGE DISPLAY
The VOLTS display is a four digit, floating point
display. If AC is selected, a selection can be made to
display True RMS, Peak, or Crest factor. If DC is
selected, a minus sign will be shown to indicate a
negative number.
The voltage input, between the rear panel VOLTS +
(red) and VOLTS - (black) terminals, is differential
(neither terminal tied to common) allowing connection
at a remotely located load. This remote connection
removes the voltage drop in the load connection wires
from the power measurement.
The AUTO and manual VOLTS range selection is
identical in operation to the AMPS as described above.
WATTS DISPLAY
The WATTS display is a five digit, unsigned floating
point display of power in WATTS, POWER FACTOR
or VA as a decimal number.
WATTS is the power ON default MODE; press the WVA-PF button to toggle through the three selections.
Watts measurements are from milliwatts through 30
kilowatts, and Power Factors are from 0.0001 through
0.9999.
The WATTS range is set by the AMPS and VOLTS
active ranges.
VA = Vrms xArms = V x I
WATTS = V x I x cos θ = TRUE POWER
Power Factor = True Power
VxI
MODE HOLD
The HOLD push-button may be depressed at any time.
When depressed, all internal machine functions are
halted except auto-ranging.
EXTERNAL SHUNT INPUT
An external shunt may be used with the 6510. Attach
the shunt to the “EXT SHUNT” BNC on the rear panel.
Turn the switch to the ON position (located directly
under the “EXT SHUNT” BNC). Using the front panel
buttons, input the scale factor for the shunt used. See
figure 14. Set the front panel current range to 50 mV
EXT, or the appropriate external range for the shunt
being used.
9
5 - Communication
GPIB (IEEE-488)
COMMUNICATION COMMANDS
The IEEE-488 or GPIB (General Purpose Interface Bus)
provides direct connection and control of the 6510 from
any appropriately equipped computer for the purpose
of data acquisition and display. MAGTROL factory
assistance is available.
GPIB Address:
0 - 15
Delimiter:
SERIAL Baud Rate:
(RS- 232)
Delimiter:
CR + LF
300, 600, 1200, 2400,
4800, 9600, 19.2K
CR + LF
HARDWARE INSTALLATION
A GPIB interface requires installation of an interface
card in the host computer and driver software resident
on the PC's hard disk. MAGTROL can supply the
National Instruments Corp. PCI-GPIB interface, for
personal computers.
SOFTWARE INSTALLATION
Formatting and initialization assistance is available from
MAGTROL Customer Service.
All GPIB data acquisition systems require the use of
termination characters to signal the conclusion of a data
exchange. The 6510 uses the Hewlett Packard - HPIB™
standard ASCII termination characters "Carriage Return
(CR) and Line Feed (LF)", in that order. On a write
cycle, the 6510 looks for the CR-LF to signal completion
of an instruction and transmits these characters upon
conclusion of a data read cycle.
CONFIGURATION COMMANDS
FUNCTION
Sets auto or
AAm <terminator>
manual range
AA
m = 0 : Manual range
mode for the
= 1 : Auto range
current ranges.
Sets auto or
AVm <terminator>
manual range
AV
m = 0 : Manual range
mode for the
= 1 : Auto range
voltage ranges.
Sets the input
to be used as
the fundamental
frequency for
FS cycle- by- cycle
mode.
FSm <terminator>
"m" indicates the input to be used
as the fundamental source
m = 0 : Volt
= 1 : Amp
= 2 : EXT (external input)
= 3 : LINE (50/60 Hz)
Sets the
AC & DC
measurement
mode filter.
PRIMARY ADDRESS
All instruments serviced on the bus have a separate
primary address code. The factory setting for the6510
is twelve (12). This code can be changed by pressing
the ENTER key and choosing I/O settings. Choose the
GPIB parameter then increase or decrease until the
desired address is obtained.
SYNTAX
MFm <terminator>
"m" indicates the measurement
filter low- pass frequency
(response time)
m = 2 : 1 Hz
= 3 : 2 Hz
MF
= 4 : 5 Hz
= 5 : 10 Hz
= 6 : 20 Hz
SERIAL (RS-232)
= 7 : 50 Hz
The 6510 communicates with the host computer through
a DB-9 interface connector. The connector pinout is:
2-RX, 3-TX, 4-DTR, 5-GND. No other pins are
connected. Important communication parameters are:
• No parity
• 8 Data Bits
• 1 Stop Bit
= 8 : 100 Hz
10
Sets the
measurement
mode ("m").
MM
MMm <terminator>
m = 0 : AC RMS (AC+DC)
= 1 : DC
= 2 : Cycle- by- cycle (update
rate - fundamental
frequency, 20Hz- 600Hz)
FUNCTION
Sets the peak
measurment
MP mode ("m").
SYNTAX
MPm <terminator>
= 1 : Peak
RAm <terminator>
m = 0 : 20 A
= 1 : 10 A
= 2 :5 A
= 3 :1 A
= 4 : 1 V External shunt
input range
RA
= 5 : 500 mV External
shunt input range
= 6 : 250 mV External
shunt input range
= 7 : 50 mV External shunt
input range
Sets voltage
range.
RVm <terminator>
"m" indicates input element
m = 0 : 600 V
RV
FUNCTION
m = 0 : Normal
= 2 : Crest- Factor
Sets current r.
DATA OUTPUT COMMANDS
= 1 : 300 V
Request output of
A, V, W & Freq.
OB?
data in binary
floating- point form.
Request output of
currently displayed
OV? Volts measurement
in ASCII form.
(V,Vpk,CF)
OV? <terminator> *
Request output of OW? <terminator> *
currently displayed
OW? Watts measurement
in ASCII form.
(W,VA,PF)
Request output of OF? <terminator> *
OF? Frequency in ASCII
form.
Sets high speed I/O HSm <terminator>
mode (ON/OFF)
m = 0 : Off
= 3 : 30 V
SAm <terminator>
"m" indicates the current scaling
constant in A/A, and must be
set within the following range:
0 < m < 10000
OB? <terminator> *
Request output of OA? <terminator> *
currently displayed
OA? Amps measurement
in ASCII form.
(A,Apk,CF)
= 2 : 150 V
Sets the current
scaling constant
(current
SA transformer).
SYNTAX
= 1 : On (front panel
display blanked
for high speed
I/O, ASCII
output format
disabled)
HS
m = 0 clears current scaling
mode
Sets the voltage SVm <terminator>
scaling constant "m" indicates the voltage scaling
constant in V/V, and must be
(potential
set within the following range:
SV transformer).
0 < m < 10000
m = 0 clears voltage scaling
mode
Sets the external SEm <terminator>
"m" indicates the external
current shunt
scaling constant. current sensor scaling constant
in mV/A, and must be set
within the following range:
SE
0.001 < m < 10000
* See “Data Output Format” for response example.
DATA OUTPUT FORMAT
ASCII DATA FORMAT
Measured data returned as an ASCII string floatingpoint number.
Example:
1.000 <terminator>
A, V, F = 8 bytes
W = 9 bytes
Note: Current input values are
multiplied by this value in external
shunt input current ranges.
11
BINARY DATA FORMAT
WIRING DIAGRAMS
Measured data consists of 4 single precision floatingpoint binary numbers.
CONNECTOR PINOUT
Total =16 bytes data (no <terminator> characters sent)
Amps
Volts
Watts
RX
DTR
TX
GND
Frequency
1
2
3
4
5
CALIBRATION MODE COMMANDS
The following commands are accessible when the
instrument is placed in calibration mode by holding in
the SHIFT key while the power is turned on.
“CALIBRATE” will be displayed.
FUNCTION
SYNTAX "m" INDICATES
Sets the gain
GAm
calibration factor <terminator>
GA
of the present
Amp input range.
Current scaling
constant in (raw
A/D input value)
per Amp
GVm
Sets the gain
calibration factor <terminator>
GV
of the present
Volt input range.
Voltage scaling
constant in (raw
A/D input value)
per Volt
Sets the zero
ZAm
Integer offset added
offset calibration <terminator> to the raw A/D
ZA value of the
Amp input value.
present Amp
input range.
ZVm
Integer offset added
Sets the zero
offset calibration <terminator> to the raw A/D Volt
input value.
ZV value of the
present Amp
input range.
Writes the
X
<terminator>
present
X
calibration values
to EEPROM
---
SPECIAL FUNCTIONS
Three special functions are available at power turn on:
NOTE:
12
These functions are provided for the
6510 PA performance evaluation and
are not of use to the average user.
6
7
8
9
Figure 3. Connector Pinout
SERIAL COMMUNICATIONS CABLE
To wire your own serial communications cable, use the
following wiring diagram:
9 Pin
(6510)
2
3
4
5
9 Pin
(Computer)
3
2
6
5
Figure 4. Serial Communications Cable
You may also purchase a cable from your local
electronics store. A RadioShack #26-152 cable and #26264 null modem adapter are known to work. You must
use the null modem adapter on the computer end of the
cable.
GENERAL PURPOSE INTERFACE BUS (GPIB)
Magtrol prefers to use the GPIB (IEEE-488 Standard)
for computer-to-instrument interfacing because:
• The GPIB parallel interface is faster than serial
interfaces.
• The GPIB enables testers to access up to 15
instruments on one port. Because typical motor
testing requires that at least five separate
parameters be synchronized, a system of easy,
fast access to more than one instrument is
essential.
•
The GPIB has rigid data formatting and
hardware standards. These standards help to
ensure that all functions will work properly
when the hardware and software are installed.
NOTE:
•
The GPIB interface is not
standard on most computers. An
interface card and driver software
must be installed. Magtrol
recommends National
Instruments Corporation's
hardware and software.
An IEEE-488 cable must also be installed
between the computer and the 6510.
D1
1 13
D5
D2
2 14
D6
D3
3 15
D7
D4
4 16
D8
EO1
5 17
REN
DAV
6 18
DAV-COM
NFRD
7 19
NFRD-COM
NDAC
8 20
NDAC-COM
IFC
9 21
IFC-COM
SRQ
10 22
SRQ-COM
ATN
11 23
ATN-COM
SHIELD
12 24
SIGNAL GROUND
Figure 5. IEEE-488 Interface
13
6 - Operating P
rinciples
Principles
AMPERES TRANSDUCING
Current measuring is accomplished using a calibrated
shunt. For all ranges, 0.012 Ohms resistance from the
shunt provides a voltage to a differential input
calibration amplifier.
VOLTAGE SENSING
The VOLTS input terminals connect a 1.5 MegOhm
voltage divider providing voltage to a differential input
calibration amplifier. See Figure 10.
ANALOG PROCESSING
Contact MAGTROL Customer Service for more
information.
DIGITAL PROCESSING
Contact MAGTROL Customer Service for more
information.
14
7 - Calibration
GENERAL
Example of resulting phase shift:
Complete calibration of the 6510 PA is beyond the
capabilities of most users. MAGTROL Inc.
recommends that the 6510 PA be returned to the factory
for calibration, in order to certify the instrument to full
specifications.
NOTE:
NOTE:
There are no internal adjustments.
Breaking the factory CAL VOID
sticker voids the MAGTROL
WARRANTY - Please call the
MAGTROL Service Department
before you break this seal.
Performing these steps VOIDS the
factory CALIBRATION
CERTIFICATION that comes with
the 6510 PA.
TEST SETUP
The recommended test setup is shown by Figure 6 on
the following page. The accuracy of the voltage and
current standards used for calibration should be at least
four times the accuracy of the 6510 PA specifications.
The equipment shown in this test setup meets this
requirement.
To accurately measure AC power it is important t h a t
the current source have a phase shifting control. With
such a phase adjustment, phase shift caused by incidental
circuit inductance can be compensated for by adjusting
the phase of the current wave form to be exactly in phase
(zero phase shift) with the voltage wave form. Sources
of incidental circuit inductance include the current
shunts within the 6510, output impedance of the
calibrators, impedance of the load and wiring
inductance. Since the current calibrator output is usually
a low impedance with low compliance voltage, the
6510's current measuring shunts are the circuits major
resistance.
Let L = 10 µhenries (wiring, etc.)
Let RSHUNT = 0.012 Ohm;
RWIRING = 0.01 Ohm
R = 0.012 = 0.01 = 0.022 Ohms
Let F = 60 Hz ∴ 2π F L ≈ 0.004
θ = Arctan (2π FL/R) = Arctan (0.004 /0.022)
θ = 10 degrees, or about 1.5 % measurement error.
This error can be eliminated by adjusting the
calibrators variable phase shift control. This
demonstrates the need for care in making power
analyzer calibration measurements.
CALIBRATION
Refer to Figure 6 on the next page, for the recommended
test setup.
VERIFICATION
If other test equipment is used, appropriately modify
the test steps for your equipment.
Potentially lethal voltages are used in
the following test steps. To avoid
electrical shock, refer to your
calibrator operator manual for
operating instructions. These
calibrators generate lethal voltages extreme care is necessary.
15
VARIABLE
PHASE
OUTPUT
PHASE
LOCK
IN
VOLTAGE CALIBRATOR
FLUKE 5700A OR
EQUIVALENT
VOLTAGE CALIBRATOR
FLUKE 5700A OR
EQUIVALENT
VOLTS, HIGH
VOLTS
LOW
OPTIONAL - FOR AMPS >2
TRANSCONDUCTANCE AMP.
FLUKE 5725A; 5205A
GUILDLINE 7620A, OR EQUIVALENT
LOW
CURRENT
HIGH
UUT
EXT.
SHUNT
±10 V
MAX.
AMPS
+
+
20 A
MAX.
ON
OFF
CAUTION: DOUBLE POLE FUSING
20VA 50 / 60 Hz
VOLTS
-
(REF)
750 V
MAX.
1000 V
MAX.
EXT.
SYNC.
GPIB/IEEE-488
RS-232C
EARTH
GROUND
1000 V
MAX.
(REF)
MAGTROL, INC. BUFFALO, NY
FUSE (5 x 20mm):
120V UL/CSA 250mA 250V SB
240V IEC 100mA 250V T
EARTH
Figure 6. Calibration Verification Test Setup
16
HIGH
LINE
(BLACK)
(WHITE)
ON
OFF
-
+
AMPS
1000 V
MAX.
20 A
MAX.
-
+
VOLTS
1000 V
MAX.
750 V
MAX.
RS-232C
MAGTROL, INC. BUFFALO, NY
EXT.
SYNC.
FUSE (5 x 20mm)
GPIB/IEEE-488
CB
MOV
120V UL/CSA 250mA 250V SB
240V IEC 100mA 250V T
CAUTION: DOUBLE POLE FUSING
20VA 50 / 60 Hz
EARTH
GROUND
Figure 7. Single Phase AC or DC with
Remote Voltage Sense
LOW
±10 V
MAX.
EXT.
SHUNT
Appendix A - Connection Diagrams
LOAD
17
18
±10 V
MAX.
ON
OFF
EXT.
SHUNT
ON
OFF
-
+
-
+
AMPS
1000 V
MAX.
20 A
MAX.
1000 V
MAX.
20 A
MAX.
-
+
-
+
VOLTS
VOLTS
1000 V
MAX.
750 V
MAX.
1000 V
MAX.
750 V
MAX.
RS-232C
RS-232C
MAGTROL, INC. BUFFALO, NY
EXT.
SYNC.
MAGTROL, INC. BUFFALO, NY
EXT.
SYNC.
GPIB/IEEE-488
GPIB/IEEE-488
FUSE (5 x 20mm): 120V UL/CSA 250mA 250V SB
240V IEC 100mA 250V T
CAUTION: DOUBLE POLE FUSING
20VA 50 / 60 Hz
CB
MOV
FUSE (5 x 20mm): 120V UL/CSA 250mA 250V SB
240V IEC 100mA 250V T
CAUTION: DOUBLE POLE FUSING
20VA 50 / 60 Hz
EARTH
GROUND
EARTH
EARTH
GROUND
EARTH
MOV
LOAD
AD
LO
03
02
01
LINE
±10 V
MAX.
AMPS
LO
AD
EXT.
SHUNT
MOV
Figure 8. Three Phase, 3 Wire Delta, 2
Wattmeter with Remote Voltage Sense
±10 V
MAX.
ON
OFF
EXT.
SHUNT
ON
OFF
-
+
-
+
AMPS
AMPS
1000 V
MAX.
20 A
MAX.
1000 V
MAX.
20 A
MAX.
-
+
-
+
VOLTS
VOLTS
1000 V
MAX.
750 V
MAX.
1000 V
MAX.
750 V
MAX.
RS-232C
RS-232C
MAGTROL, INC. BUFFALO, NY
EXT.
SYNC.
MAGTROL, INC. BUFFALO, NY
EXT.
SYNC.
GPIB/IEEE-488
GPIB/IEEE-488
EARTH
GROUND
FUSE (5 x 20mm): 120V UL/CSA 250mA 250V SB
240V IEC 100mA 250V T
LO
AD
EARTH
MOV
EARTH
GROUND
AD
LO
CAUTION: DOUBLE POLE FUSING
20VA 50 / 60 Hz
CB
MOV
FUSE (5 x 20mm): 120V UL/CSA 250mA 250V SB
240V IEC 100mA 250V T
CAUTION: DOUBLE POLE FUSING
20VA 50 / 60 Hz
LOAD
03
02
01
LINE
±10 V
MAX.
EXT.
SHUNT
MOV
Figure 9. Three Phase, 3 Wire WYE, 2
Wattmeter with Remote Voltage Sense
19
20
NEUTRAL
03
±10 V
MAX.
±10 V
MAX.
ON
OFF
EXT.
SHUNT
ON
OFF
EXT.
SHUNT
ON
OFF
EXT.
SHUNT
-
+
AMPS
AMPS
AMPS
-
+
-
+
1000 V
MAX.
20 A
MAX.
1000 V
MAX.
20 A
MAX.
1000 V
MAX.
20 A
MAX.
-
+
750 V
MAX.
RS-232C
RS-232C
EXT.
SYNC.
RS-232C
CAUTION: DOUBLE POLE FUSING
20VA 50 / 60 Hz
FUSE (5 x 20mm): 120V UL/CSA 250mA 250V SB
240V IEC 100mA 250V T
CAUTION: DOUBLE POLE FUSING
20VA 50 / 60 Hz
FUSE (5 x 20mm): 120V UL/CSA 250mA 250V SB
240V IEC 100mA 250V T
CAUTION: DOUBLE POLE FUSING
20VA 50 / 60 Hz
FUSE (5 x 20mm): 120V UL/CSA 250mA 250V SB
240V IEC 100mA 250V T
GPIB/IEEE-488
GPIB/IEEE-488
GPIB/IEEE-488
MAGTROL, INC. BUFFALO, NY
EXT.
SYNC.
MAGTROL, INC. BUFFALO, NY
EXT.
SYNC.
MAGTROL, INC. BUFFALO, NY
1000 V
MAX.
750 V
MAX.
1000 V
MAX.
750 V
MAX.
1000 V
MAX.
VOLTS
VOLTS
VOLTS
-
+
-
+
EARTH
GROUND
EARTH
GROUND
EARTH
GROUND
EARTH
EARTH
EARTH
CB
AD
LO
MOV
LO
AD
MOV
LOAD
02
01
LINE
±10 V
MAX.
MOV
Figure 10. Three Phase, 4 Wire WYE, 3
Wattmeter with Remote Voltage Sense
LINE
ON
OFF
HIGH (BLACK)
LOW (WHITE)
±10 V
MAX.
EXT.
SHUNT
-
+
AMPS
1000 V
MAX.
20 A
MAX.
-
+
VOLTS
1000 V
MAX.
750 V
MAX.
RS-232C
CT
120V UL/CSA 250mA 250V SB
240V IEC 100mA 250V T
MOV 1
MOV 2
FUSE (5 x 20mm)
GPIB/IEEE-488
CB
MAGTROL, INC. BUFFALO, NY
EXT.
SYNC.
EARTH
GROUND
MOV 3
CAUTION: DOUBLE POLE FUSING
20VA 50 / 60 Hz
PT
EARTH
Figure 11. Current & Potential
Transformer - SIngle Phase
LOAD
21
22
03
02
NEUTRAL
01
LINE
±10 V
MAX.
ON
OFF
EXT.
SHUNT
-
+
AMPS
1000 V
MAX.
20 A
MAX.
-
+
VOLTS
1000 V
MAX.
750 V
MAX.
RS-232C
MAGTROL, INC. BUFFALO, NY
EXT.
SYNC.
GPIB/IEEE-488
FUSE (5 x 20mm):
CB
EARTH
GROUND
AD
LO
MOV
120V UL/CSA 250mA 250V SB
240V IEC 100mA 250V T
CAUTION: DOUBLE POLE FUSING
20VA 50 / 60 Hz
LOAD
MOV
LO
AD
EARTH
MOV
Figure 12. Three Phase, 4 Wire WYE,
Balanced Load, 1 Wattmeter
03
02
01
LINE
±10 V
MAX.
ON
OFF
EXT.
SHUNT
-
+
AMPS
1000 V
MAX.
20 A
MAX.
-
+
VOLTS
1000 V
MAX.
750 V
MAX.
RS-232C
MAGTROL, INC. BUFFALO, NY
EXT.
SYNC.
GPIB/IEEE-488
R
FUSE (5 x 20mm):
R
R
CB
120V UL/CSA 250mA 250V SB
240V IEC 100mA 250V T
AD
LO
EARTH
EARTH
GROUND
MOV
CAUTION: DOUBLE POLE FUSING
20VA 50 / 60 Hz
LOAD
MOV
LO
AD
MOV
Figure 13. Three Phase, 3 Wire,
Balanced Load, 1 Wattmeter
23
24
White
Low
SOURCE
High
Black
±10 V
MAX.
-
+
SHUNT
ON
OFF
EXT.
SHUNT
AMPS
1000 V
MAX.
20 A
MAX.
White
-
+
VOLTS
1000 V
MAX.
750 V
MAX.
RS-232C
Black
MAGTROL, INC. BUFFALO, NY
EXT.
SYNC.
* Switch must be in the ON position.
FUSE (5 x 20mm)
GPIB/IEEE-488
120V UL/CSA 250mA 250V SB
240V IEC 100mA 250V T
CAUTION: DOUBLE POLE FUSING
20VA 50 / 60 Hz
White
LOAD
Black
EARTH
EARTH
GROUND
Figure 14. External Shunt Connection
R1
D1
D2
100pF
C12
2SEN+
3SEN-
1%
1.5k
SHUNT
0.012
1%
IN+1
1.5M
1%, 750V
1.2k
0.1%
R2
0
2 -
1
1
2
2
3
3
4
4
HEADER_SIP4
J5
C2
9
10
12
4
6
7
4
PD05
-
BR1
C21
0.1u
C3
0.1u
AC2
AC1
+
1
C23
0.1u
C7
0.1u
2
3
1 TX1
10uF
C27
0.1u
C9
0.1u
U17
1000uF
C33
Vbias
1
IN
0
GND
2
3
- 2
0.1u
C34
10uF
C35
0
GND
4
8
0
R27
1mH
L1
6
0.1u
C28
VOUT
SHTDWN
V+
2
D
U2
GND
+5VA
+5VA
0
3
U6
470
R8
OP262GS
4
V-
V+
14
Vbias
U3A
+ 3
8
VREF
REF-191/AD
1
OUT
LM7805C
U7
25
R7
7
4 OP262GS
V-
ZCref
6 -
V+
0
3
VSS
EN
VDD
0
DGND
10uF
0.1u
C26
+2.5V
C37
+5VD
10uF
C25
+2.5V
25
25
R14
R13
49.9k
1%
R16
1.2k
R19
C17
1nF
NPO
0
C13
1nF
NPO
C16
1nF
NPO
+5VD
TP2
0
C19
0.1u
C24
AD7722AS
DGND
0
TP1
2 -
0.1u
+5VA
0
1%
+/-1.25V FULL
SCALE
150.0k
C18
22nF
R18
+5VA
1
UNI
REF1
REF2
VIN(-)
VIN(+)
RESET
0.1u
C20
12
XTAL
11
CLKIN
17
27
CAL
30
SYNC
7
22
24
16
18
U5
0
4 OP262GS
V-
V+
U4A
3 +
8
2.2nF
R23
+5VA
63.4k
1%
R21
0
DGND
+5VD
C48
0.1u
1nF
C29
4
V-
31
32
33
34
35
36
37
38
40
41
42
43
44
1
2
3
0.1u
C45
0.1u
C43
(5) 74OL6000
DGND
AD7722AS
8
P/S
4
CFMT/DRDY
DGND/DB15
DGND/DB14
DGND/DB13
DGND/DB12
DGND/DB11
DGND/DB10
FSO/DB9
SDO/DB8
SCO/DB7
FSI/DB6
SFMT/DB5
DOE/DB4
TSI/DB3
DGND/DB2
DGND/DB1
DGND/DB0
7
C39
DGND
0.1u
ZCref
NP
10uF
C32
0.1u
C38
100
R28
+5VD
DGND
OP262GS
5
DVAL/RD
29
CS
DGND
6 -
V+
U4B
5 +
8
330pF
C31
R22
10
+5VD
C30 105.0k
1%
47nF
R20
63.4k
1%
DGND
SIG_TRANS_14A-2.5R-16
AC1
AC2
AC3
AC4
0
C15
0.1u
ADG408
1
MTG_HOLE
MH1
VBIAS
5.1k
0.1%
+5VA
U3B
5 +
8
2
ADG408
0
1
A0
16
A1
15
A2
4
S1
5
S2
6
S3
7
S4
12
S5
11
S6
10
S7
9
S8
13
C22
AGND7
26
25
AGND6
21
AGND5
19
AGND4
15
AGND3
13
AGND2
10
AGND1
9
AGND
C6
0.1u
U2
180pF
C4
2.4k 0.1%
R3
AIN
R12
+5VA
GAIN_1
100k 0.1% GAIN_0
R10
0pF
C11
20k 0.1%
R9
0pF
R17
49.9k
1%
23
AVDD2
14
AVDD1
20
AVDD
6
28
C1
1
5.1k
0.1%
R15
0pF
+5VA
DGND1
10uF
0
OP262GS
7
C10
4th Order Chebyshev 500Hz LPF
DVDD
U1
4
V-
OP262GS
4
V-
V+
U1A
3 +
8
6 -
V+
C14
10k 0.1%
R6
0pF
0.1%
39
+5VA
+5VA
U1B
5 +
8
D1N914
D1N914
+5VA
20A x .012ohm x 2.5 (crest-factor) x 2 (min gain) = 1.2Vpk
AIN+
J1
2
IN-4
R4
R11
VIN
C8
5.1k
DGND
+5VD
1.2k
R25
10k
R24
0
4
5
4
2
3
+5V
3
74OL6000
2
4
U10
1
5
6
4
2
U9
1
74OL6000
HCPL7100
5
6
8
7
OE
5
2
4
6
U14
1
74OL6000
6
1
3
+5V
74OL6000
5
6
3
100k
C51
10uF
0
1
LM393
R26
4
V-
V+
0.1u
C36
2
U11
U12
1
2 -
U8A
3 +
8
+5VA
zero cross detector w/ hyserisis
GAIN_1
GAIN_0
SCO
SYNC
CLKIN
0.1u
C47
SDO
3
H11L1
N/C
14
10
11
13
12
14
10
11
13
12
C44
0.1u
C42
0.1u
4
5
6
3
15
1
2
3
4
5
6
7
9
0.1u
C41
0.1u
C40
74HC595
QA
QB
QC
SRCLR QD
SRCK QE
QF
SER
QG
QH
QHP
+5V
15
1
2
3
4
5
6
7
9
74HC595
G
RCK
U15
QA
QB
QC
SRCLR QD
SRCK QE
QF
SER
QG
QH
QHP
U13
INTR
1.2k
R33
1.2k
R31
+5V
G
RCK
H11L1
(5) 74OL6000
+5V
+5V
3
2
U16
1
N/C
2
5
4
U18
1
6
H11L1
2
N/C
5
4
DGND
+5VD
R30
1.2k
RD
FSO
FREQ
10k
R34
R32
10k
U17
1
6
R29
FREQ
D[0:15]
0.1u
C50
H11L1
D8
D9
D10
D11
D12
D13
D14
D15
D0
D1
D2
D3
D4
D5
D6
D7
10k
G_1
G_0
C46
0.1u
2
4
6
8
10
C49
0.1u
2
4
6
8
10
12
14
16
18
20
RD
INTR
FREQ
G_0
G_1
HEADER_20
J6
1
3
5
7
9
11
13
15
17
19
HEADER_10
J7
1
3
5
7
9
D0
D2
D4
D6
D8
D10
D12
D14
(2) 74HC595
+5V
D1
D3
D5
D7
D9
D11
D13
D15
CLKIN
SYNC
INPUT BOARD
AIN-
J3
J2
MOV
MOV1
J4
1
Vbias
VIN+
1667:1 VOLTAGE DIVIDER
R5
0pF
C5
+5VD
FID1
1
FID2
1
FID3
1
Appendix B - Schematics
3
25
26
C24
5
8
J1
1
1
1
2
2
3
3
4
4
5
5
RST
1
HEADER_SIP2
J16
1
2
1
1
2
2
3
3
4
4
HEADER_SIP4
J3
2.2k
R17
+5V
2
4
6
8
10
12
14
2
3
MMBT2222
1
Q1
+5V
12
10
9
7
4
PD05
-
SPKR
+5V
D7
D6
D5
D4
D3
D2
D1
D0
BR1
ROW_4
ROW_3
ROW_2
ROW_1
EN
CLK
DATA
RESET~
TXD
RXD
A15
BEEP
COL_1
COL_2
COL_3
COL_4
BUSY~
SIG_TRANS_14A-30-24
6
4
3
2.2uF
C38
330
R16
COL_1
COL_2
COL_3
COL_4
CLK
SPKR
1 TX1
HEADER_14
J13
1
3
5
7
9
11
13
50
48
46
44
49
47
45
43
25
24
23
22
21
20
MC68HC11A1FN
PE7/AN7
PE6/AN6
PE5/AN5
PE4/AN4
PE3/AN3
PE2/AN2
PE1/AN1
PE0/AN0
4
6
16
15
14
13
12
11
10
9
E 5
PD5/SS
PD4/SCK
PD3/MOSI
PD2/MISO
PD1/TXD
PD0/RXD
STRA/AS
STRB/R/W
PC7/A7/D7
PC6/A6/D6
PC5/A5/D5
PC4/A4/D4
PC3/A3/D3
PC2/A2/D2
PC1/A1/D1
PC0/A0/D0
35
36
37
38
39
40
41
42
27
28
29
30
31
32
33
34
AC2
AC1
+
AC
1
8D
9
7D
8
6D
7
5D
6
4D
5
3D
4
2D
3
1D
2
C
11
OC
1
A14
A13
A12
A11
A10
A9
A8
8Q
12
7Q
13
6Q
14
5Q
15
4Q
16
3Q
17
2Q
18
1Q
19
1
E
IN
U2
6
11
A12
A13
A14
A15
CE
OE
A14
A13
A12
A11
A10
A9
A8
A7
A6
A5
A4
A3
A2
A1
A0
VPP
OUT
3
0.1uF
C3
C2
10uF
+5V
6
4
1
2
3
5
GND1
$G_DGND
$G_DPWR
C30
10uF
+5V
74HC138
2
1
A0
A1
A2
A3
A4
A5
A6
A7
A8
A9
A10
A11
A12
0.01uF
DQ0
DQ1
DQ2
DQ3
DQ4
DQ5
DQ6
DQ7
11
12
13
15
16
17
18
19
74HC00
0.1uF
D0
D1
D2
D3
D4
D5
D6
D7
+5V
W
C6
MS6264
CS~_VFD
CS~_IO_1
CS~IO_2
CS~_GPIB
0.1uF
CS~_RAM
27C256
C15
3
MS6264L-70FC
U17A
27 W
26 E2
22 G
20
E1
U4
10
A0
9
A1
8
A2
7
A3
6
A4
5
A5
4
A6
3
A7
25
A8
24
A9
21
A10
23
A11
2
A12
C29
68HC11
U19
15
14
13
12
11
CS~DSP
10
9
7
R
D7
D6
D5
D4
D3
D2
D1
D0
10k
10k
10k
10k
10k
10k
10k
10k
G2B Y0
Y1
A
Y2
B
Y3
C
Y4
Y5
G1
Y6
G2A Y7
W
27C256
19
18
17
16
15
13
12
11
R1
R2
R3
R4
R5
R6
R7
R8
O7
O6
O5
O4
O3
O2
O1
O0
PWR1
$B600-$B7FF = internal EEPROM
LM340-5
GND
2
74HC00
22
20
DSP_W~
U18D
8
U6
1
27
26
2
23
21
24
25
3
4
5
6
7
8
9
10
MEMORY MAP:
$0000-$0FFF = internal
$1000 -$2FFF = RAM
$3000 = GPIB
$4000 = DSP
$5000 = I/O_1
$6000 = I/O_2
$7000 = VFD
$8000-$FFFF = EPROM
E
13
A14
A13
A12
A11
A10
A9
A8
A7
A6
A5
A4
A3
A2
A1
A0
74HC14
8 R/W U17D
12
9
U17B
74HC00
A7
A6
A5
A4
A3
A2
A1
A0
74HC00
U17C
4700uF
C7
10
9
5
E
A15
4
R/W
74HC573
U8
A[0:14]
D[0:7]
+5V
DISPLAY
C21
0.1uF
2
4
6
8
10
12
14
16
D6
D4
D2
D0
C20
0.1uF
CS~_VFD
0.1uF
C16
74HC574
+5V
BUSY~
74HC574
HEADER_16
1
3
5
7
9
11
13
15
74HC573
D7
D5
D3
D1
J4
0.1uF
C42
74HC138
D0
D1
D2
D3
D4
D5
D6
D7
D0
D1
D2
D3
D4
D5
D6
D7
0.1uF
19
18
17
16
15
14
13
12
SYNC
SEL_A
SEL_B
SEL_C
GA_0
GB_0
GA_1
GB_1
19
18
17
16
15
14
13
12
0.1uF
10
U18E
74HC14
C41
XIRQ~
74HC14
GA_2
GB_2
GA_3
GB_3
GA_4
GB_4
GA_5
GB_5
74HC574
1Q
2Q
3Q
4Q
5Q
6Q
7Q
8Q
U5
74HC574
1Q
2Q
3Q
4Q
5Q
6Q
7Q
8Q
74HC00
OC
CLK
1D
2D
3D
4D
5D
6D
7D
8D
OC
CLK
1D
2D
3D
4D
5D
6D
7D
8D
C40
1
11
2
3
4
5
6
7
8
9
1
11
2
3
4
5
6
7
8
9
U9
11
C1
U3
DATA15
DATA14
DATA13
DATA12
DATA11
DATA10
DATA9
DATA8
DATA7
DATA6
DATA5
DATA4
DATA3
DATA2
DATA1
DATA0
ADDR4
ADDR3
ADDR2
ADDR1
ADDR0
RESETN
RDY1
INTR
C2+
C1-
0.1uF
C32
XTAL_OSC
C9
0.1uF
V-
V+
0.1uF
C28
6
2
GND
C10
0.1uF
0.1uF
C18
13
RX1IN
8
RX2IN
14
TX1OUT
7
TX2OUT
VCC
12
RX1OUT
9
RX2OUT
MAX232CSE
28
REM
23
TRIG
51
DCAS
21
TADCS
66
LADCS
98
KEYCLKN
99
KEYDQ
100
KEYRSTN
+5V
RXD
0.1uF 5 C2-
4
C1+
0.1uF
C31
70
79
81
82
84
85
73
76
71
74
77
80
88
89
91
92
95
XTAL0
96
XTAL1
RENN
IFCN
NDACN
NRFDN
DAVN
EOIN
ATNN
SRQN
DIO8N
DIO7N
DIO6N
DIO5N
DIO4N
DIO3N
DIO2N
DIO1N
1
BBUS_OEN
20
ABUS_OEN
11
TX1IN
10
TX2IN
C22
1
U10
0.1uF 3
TNT4882
NC
PAGED
SWAPN
BURST_RDN
FIFO_RDY
MODE
CPUACC
C25
52
26
29
31
30
53
22
32
DRQ
33
DACKN
38
34
14
ABUSN
62
BBUSN
55
CSN
64
WRN
63
RDN
2
3
5
6
7
9
10
11
50
49
47
46
44
43
42
39
19
18
17
16
15
67
TXD
+5V
W
R
CS~_GPIB
XTAL_OSC
0.1uF
A4
A3
A2
A1
A0
D7
D6
D5
D4
D3
D2
D1
D0
RST~
15
MTG_HOLE
VRL
51
ROW_1
ROW_2
ROW_3
ROW_4
EN
DATA
VRH
MODB/VSTDBY
MODA/LIR
52
2
3
IRQ
19
AC1
AC2
AC3
AC4
BEEP
+5V
XIRQ~
XIRQ
RESET
XTAL
EXTAL
18
17
8
7
PB7/A15
PB6/A14
PB5/A13
PB4/A12
PB3/A11
PB2/A10
PB1/A9
PB0/A8
PA7/PAI/OC1
PA6/OC2/OC1
PA5/OC3/OC1
PA4/OC4/OC1
PA3/OC5/OC1
PA2/IC1
PA1/IC2
PA0/IC3
2
MH1
+5V
R11
10k
+5V
RESET1
RST~
8MHz
U13
D7
D6
D5
D4
D3
D2
D1
D0
16
HEADER_SIP5
IRQ1
3
VSS
2
VDD
+5V
OUT
VDD
XTAL_OSC
GND
IRQ~
MCP130
0.1uF
U11
4
U12
1
NC/OE
+5V
0.1uF
C11
0.1uF
C23
0.1uF
C4
TNT488
2
RS_RXD
RS_TXD
DTR
40MHz
C8
0.1uF
VDD
OUT
8
5
0.1uF
C5
0.1uF
24
13
14
15
16
17
18
19
20
21
22
23
+5V
40MHz
IEEE488
MH1 MH2
9
10
11
12
1
2
3
4
5
6
7
8
+5V
C17
XTAL_OSC
GND
NC/OE
DB9M-B
MH1
MH2
1
2
3
4
5
6
7
8
9
RS232
J12
4
U1
1
J2
FID3
1
FID2
1
FID1
1
FID4
1
MAIN BOARD - MCU SECTION
3
RESET~
DSPRST1
+5V
RESET~
10k
R20
+5V
TIO
RD~
TIO
RD
WR
BN
BR
WT
BG
BS
C35
0.1uF
7
4
C43
40
nc1
49 nc2
39
47
46
41
44
42
43
54
0.1uF
X
T
RESET
52
DSO
53
DSI/OS0
50
DSCK/OS1
51
DR
10k
10k
TIO1
2
4
6
8
CKOUT
121
MODA/IRQA
120
MODB/IRQB
119
MODC/NMI
125
R12
+5V
+5V
EXTAL
XTAL
126
CKP
128
PCAP
130
PLOCK
131
PINIT
123
132
1
U15
R13
NPO
3300pF
C34
DSPCLK1
HEADER_8
J11
1
3
5
7
INTR
INTR1
+5V
+5V
8MHz
0.1uF
C19
7
4
118
117
115
114
112
111
109
108
107
106
104
103
101
100
96
95
94
93
91
90
88
87
85
84
83
82
80
78
77
76
74
73
72
71
68
65
64
63
61
60
33
38
31
32
35
29
28
26
25
0.1uF
C33
0.01uF
C37
DSP56002FC40
STD/PC8
SRD/PC7
SCK/PC6
SC2/PC5
SC1/PC4
SC0/PC3
SCLK/PC2
TXD/PC1
RXD/PC0
HACK/PB14
HREQ/PB13
HEN/PB12
HR/W/PB11
HA2/PB10
HA1/PB9
HA0/PB8
H7/PB7
H6/PB6
H5/PB5
H4/PB4
H3/PB3
H2/PB2
H1/PB1
H0/PB0
DSP_A2
DSP_A1
DSP_A0
DSP_A15
C45
0.01uF
D[0:7]
C36
C26
0.1uF
C44
DSP_W~
DSP_D[0:15]
0.01uF
A[0:14]
0.01uF
D
S
R15
10k
+5V
DSP_D15
DSP_D14
DSP_D13
DSP_D12
DSP_D11
DSP_D10
DSP_D9
DSP_D8
DSP_D7
DSP_D6
DSP_D5
DSP_D4
DSP_D3
DSP_D2
DSP_D1
DSP_D0
TEST1
8
13
IRQ~
10
CS~DSP
12
4
A2
6
A1
7
A0
14
D7
15
D6
17
D5
18
D4
19
D3
21
D2
23
D1
24
D0
59
PS
57
DS
55
X/Y
D23
D22
D21
D20
D19
D18
D17
D16
D15
D14
D13
D12
D11
D10
D9
D8
D7
D6
D5
D4
D3
D2
D1
D0
A15
A14
A13
A12
A11
A10
A9
A8
A7
A6
A5
A4
A3
A2
A1
A0
C27
0.1uF
+5V
M
E
M
O
R
Y
M
A
P
DSP_D0
DSP_D2
DSP_D4
DSP_D6
DSP_D8
DSP_D10
DSP_D12
DSP_D14
2
4
6
8
10
12
14
16
18
20
TIO
11
10
9
6
U7
I/O0
I/O1
I/O2
I/O3
I/O4
I/O5
I/O6
I/O7
COM_I/O
8
6
74HC14
5
74HC4051
U18C
7
13
14
15
12
1
5
2
4
3
INTR
CLKIN
SYNC
GND VEE
S0
S1
S2
E
DSP_D1
DSP_D3
DSP_D5
DSP_D7
DSP_D9
DSP_D11
DSP_D13
DSP_D15
SEL_A
SEL_B
SEL_C
HEADER_20
J15
1
3
5
7
9
11
13
15
17
19
RD~
6
4
1
2
3
5
12
U14
13
15
14
13
12
11
10
9
7
4
2
1
GA_5
GB_5
RD~_5
GA_4
GB_4
RD~_4
GA_3
GB_3
RD~_3
GA_2
GB_2
RD~_2
GA_1
GB_1
RD~_1
GA_0
GB_0
3
74HC14
U18B
5
8
+5V
J5
1
3
5
7
9
J6
1
3
5
7
9
J7
1
3
5
7
9
J8
1
3
5
7
9
J9
1
3
5
7
9
J10
1
3
5
7
9
D1N914
D1
D1N914
D2
D1N914
D3
D1N914
D4
+5V
+5V
HEADER_10
2
4
6
8
10
HEADER_10
2
4
6
8
10
HEADER_10
2
4
6
8
10
HEADER_10
2
4
6
8
10
HEADER_10
2
4
6
8
10
HEADER_10
2
4
6
8
10
RD~_0
RD~_1
RD~_2
RD~_3
RD~_4
RD~_5
RD~_0
74HC14
U18A
OUT
VDD
XTAL_OSC
GND
NC/OE
74HC138
G2B Y0
Y1
A
Y2
B
Y3
C
Y4
Y5
G1
Y6
G2A Y7
74HC14
U18F
DSP_A15
DSP_A0
DSP_A1
DSP_A2
4
1
U16
0.1uF
C12
0.001uF
C39
+5V
CLKIN
10k
R9
C14
0.1uF
100k
R19
1
J14
10k
R10
BNC
2
C13
0.1uF
AC
MAIN BOARD - DSP SECTION
27
Notes
Magtrol Limited W
arranty
Warranty
Magtrol, Inc. warrants its products to be free from defects in material and workmanship under normal use and
service for a period of one (1) year from the date of shipment. Software is warranted to operate in accordance with
its programmed instructions on appropriate Magtrol instruments. This warranty extends only to the original purchaser
and shall not apply to fuses, computer media, or any other product which, in Magtrol’s sole opinion, has been
subject to misuse, alteration, abuse or abnormal conditions of operation or shipping.
Magtrol’s obligation under this warranty is limited to repair or replacement of a product which is returned to the
factory within the warranty period and is determined, upon examination by Magtrol, to be defective. If Magtrol
determines that the defect or malfunction has been caused by misuse, alteration, abuse or abnormal conditions of
operation or shipping, Magtrol will repair the product and bill the purchaser for the reasonable cost of repair. If the
product is not covered by this warranty, Magtrol will, if requested by purchaser, submit an estimate of the repair
costs before work is started.
To obtain repair service under this warranty, purchaser must forward the product (transportation prepaid) and a
description of the malfunction to the factory. The instrument shall be repaired at the factory and returned to purchaser,
transportation prepaid. MAGTROL ASSUMES NO RISK FOR IN-TRANSIT DAMAGE.
THE FOREGOING WARRANTY IS PURCHASER’S SOLE AND EXCLUSIVE REMEDY AND IS IN LIEU OF
ALL OTHER WARRANTIES, EXPRESSED OR IMPLIED, INCLUDING BUT NOT LIMITED TO ANY IMPLIED
WARRANTY OF MERCHANTABILITY, OR FITNESS FOR ANY PARTICULAR PURPOSE OR USE.
MAGTROL SHALL NOT BE LIABLE FOR ANY SPECIAL, INDIRECT, INCIDENTAL, OR CONSEQUENTIAL
DAMAGES OR LOSS WHETHER IN CONTRACT, TORT, OR OTHERWISE.
CLAIMS
Immediately upon arrival, purchaser shall check the packing container against the enclosed packing list and shall,
within thirty (30) days of arrival, give Magtrol notice of shortages or any nonconformity with the terms of the order.
If purchaser fails to give notice, the delivery shall be deemed to conform with the terms of the order.
The purchaser assumes all risk of loss or damage to products upon delivery by Magtrol to the carrier. If a product is
damaged in transit, PURCHASER MUST FILE ALL CLAIMS FOR DAMAGE WITH THE CARRIER to obtain
compensation. Upon request by purchaser, Magtrol will submit an estimate of the cost to repair shipment damage.
70 Gardenville Parkway ! Buffalo, New York 14224
Phone: (716) 668-5555 ! (800) 828-7844 Fax: (716) 668-8705
Web site: www.magtrol.com ! E-mail: [email protected]
MOTOR TESTING EQUIPMENT ! HYSTERESIS BRAKES AND CLUTCHES