
1
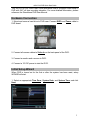
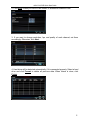
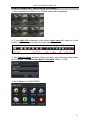
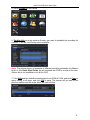
4/8/16-Ch Standalone DVR
Quick Start Guide
For H.264 Digital Video Recorder
All rights reserved
*All contents of this document may change without prior notice.
4/8/16-CH DVR Quick Start Guide
This 4/8/16-CH DVR Quick Start Guide discusses how to configure initial setup of
DVR with 24/7 all time recording schedule. For more detailed information, please
reference the Standalone DVR User Manual.
Hardware Connection
1. Mount and screw a hard drive to DVR case. Connect SATA and Power cable to
DVR board.
2. Connect all camera cables to Video In on the back panel of the DVR.
3. Connect a monitor and a mouse to DVR.
4. Connect a 12V DC power to start the DVR.
Initial Setup Wizard
When DVR is turned on for the first or after the system has been reset, setup
WIZARD will start.
1. Select an appropriate Time Zone, System Date, and System Time, and click
Next.
1
4/8/16-CH DVR Quick Start Guide
2. Click Next unless you have to use a static IP address or different Ports.
3. If you want to change resolution, fps, and quality of each channel, set them
accordingly. Otherwise, click Next.
4. Hard drive will be detected automatically if it is connected properly. Select a hard
drive and click Format to delete all previous data. When format is done, click
Finish.
2
4/8/16-CH DVR Quick Start Guide
How to setup 24/7 Recording Schedule?
1. After completing the Wizard, Live Preview screen will be displayed.
2. If you right click anywhere in the screen, main menu will show up on the
bottom. Right click again to make the main menu disappear.
3. Click function menu as shown above, and login using the correct User Name
and Password. The default User Name / Password: admin / 123456
4. Go to Setup in the MAIN MENU.
3
4/8/16-CH DVR Quick Start Guide
5. Go to Schedule in the Setup
6. Double click on a day such as Sunday you want to schedule for recording for
channel 1. We will use Sunday as an example.
Note: The picture shows an example of different recording schedules for different
days. In this Quick Start Guide, we will schedule the DVR to record all the time.
Sensor tab is not available in 4ch & 8ch DVR.
7. Click Add and the default schedule starts from 00:00 to 23:59, and click Copy to
apply setting to all days, and click OK to save. The screen will go back to the
previous section and the entire block will mark all blue.
4
4/8/16-CH DVR Quick Start Guide
8. You just added 24 hour recording schedule on channel 1, and click Copy to
apply settings to all channels, and click Apply to save it.
Note: The picture may look different from the procedures.
9. If all the blocks are blue in each channel, you created a 24/7 recording schedule
successfully.
How to Remove Motion Recording?
In this Quick Start Guide, we will remove motion recording. 24/7 Motion recording is
already set by default. We will remove all motion recording schedules.
1. Go to Motion tab, and double click on a day such as Sunday in channel 1.
2. Select a schedule Æ Delete Æ Copy Æ OK.
3. We will see the entire block is grey on channel 1.
4. Click Copy and then click Apply to all channels.
5. Now, motion recording schedule has been removed in all channels.
Note: If you setup properly, all blue blocks will turn grey in each channel. For 4ch &
8ch DVR, Sensor recording in not applicable.
Now, basic setup and 24/7 recording schedule have been finished.
Right click several times until you exit Menu to Live Preview. If recording indicators
are all blue, then you have successfully setup 24/7 recording schedule.
5


![DX-404 4 CH DMX Dimmer Pack [User Manual] Lite Puter](http://vs1.manualzilla.com/store/data/005637566_1-c679e36593f10ff673dd448c7922fea2-150x150.png)